Environment
Client for Open Enterprise Server 2 SP4 (IR6)
Client for Open Enterprise Server 2 SP4 (IR7)
Client for Open Enterprise Server 2 SP4 (IR7a)
Client for Open Enterprise Server 2 SP4 (IR8)
Client for Open Enterprise Server 2 SP4 (IR8a)
Client for Open Enterprise Server 2 SP4 (IR9)
Client for Open Enterprise Server 2 SP4 (IR10)
Advanced Authentication 5.5
This document applies to Client for Open Enterprise Server 2 SP4 (IR6 - IR10) only.
Resolution
Introduction


This document describes the expected Client for Open Enterprise Server behavior for integrating with the Advanced Authentication Client on Windows, to be delivered as part of a Client for Open Enterprise Server release in March 2017.
The behavior described in this document is based on features and functionality available in the current Advanced Authentication 5.5 release. While additional feature are planned for the future, these are the Advanced Authentication integration capabilities introduced in the Client for Open Enterprise Server 2 SP4 (IR6).
Quick Start
1. To install both Client for Open Enterprise Server and Advanced Authentication Client for Windows at the same time:
a. Extract the Client for Open Enterprise Server 2 SP4 (IR6) installation set, but do not run SETUP.EXE yet.
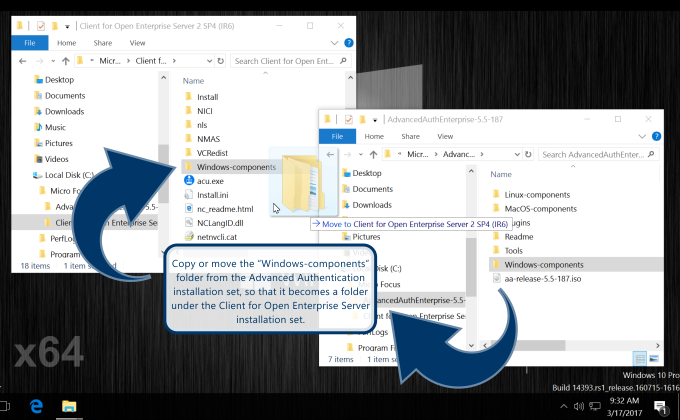
b. From the Advanced Authentication product download, copy the "Windowscomponents" subdirectory such that it is now a subdirectory of the Client for Open Enterprise Server 2 SP4 (IR6) installation set that was just extracted. Meaning relative to the Client for Open Enterprise Server's SETUP.EXE, there should now be a subdirectory ".\Windows-components\Windows-Client" with the MSIs for the Advanced Authentication Client, and a subdirectory ".\Windows-components\DeviceService" with the MSI for Advanced Authentication Device Services.
c. (Optional) Modify the INSTALL.INI at the root of the Client for Open Enterprise Server installation set, to set the defaults of the "InstallAdvancedAuthentication", "InstallAdvancedAuthenticationDeviceServices", "AdvancedAuthenticationClientDiscoveryHost" and/or "AdvancedAuthenticationClientEventName" parameters.
You will be prompted for all of these items if you choose the "Custom installation" option in SETUP.EXE. But modifying these INSTALL.INI parameters will control the defaults that are used if you instead choose "Express installation" in SETUP.EXE.
d. Now run the SETUP.EXE for Client for Open Enterprise Server. Choose the "Custom installation" option, and you will see new selections for "Advanced Authentication Client" and "Advanced Authentication Device Services" in addition to the existing NICI and NMAS selections.
e. If you choose to install "Advanced Authentication Client", there will be an additional SETUP.EXE wizard page that offers "Advanced Authentication Client (optional)" and "Advanced Authentication Event Name (optional)", in case you need to specify an explicit Advanced Authentication server, or an alternate Advanced Authentication event name for non-domain Windows logon.
f. In addition to installing the Advanced Authentication Client, the Client for Open Enterprise Server will also automatically enable the "Logon with Third-Party Credential Provider" option, so that an eDirectory login will be attempted after the Windows logon through the Advanced Authentication credential provider.
And a new "Advanced Authentication = On" parameter in Client Properties will also be enabled, which causes the "you must logout of Windows in order to re-login to eDirectory" prompt to be displayed during any eDirectory login attempt from the user's desktop.
2. To enable Advanced Authentication integration functionality when installing Client for Open Enterprise Server on a workstation where the Advanced Authentication Client is already installed (without performing an upgrade or re-installation of the existing Advanced Authentication Client):
a. Extract the Client for Open Enterprise Server 2 SP4 (IR6) installation set, but do not run SETUP.EXE yet.
b. Modify the INSTALL.INI at the root of the installation set, and set "InstallAdvancedAuthentication = Yes".
c. Optionally, you can also modify the INSTALL.INI to set the "AdvancedAuthenticationClientDiscoveryHost" and/or "AdvancedAuthenticationClientEventName" parameters to contain values that should be applied to Advanced Authentication’s “config.properties” file, if desired.
d. Now run the SETUP.EXE for Client for Open Enterprise Server, and use either the “Express installation” or “Custom installation” options to successfully perform the install.
Note that the Advanced Authentication-specific options WILL NOT be shown if you choose "Custom installation", because the MSIs are not available to actually perform Advanced Authentication Client installation.
But because of the "InstallAdvancedAuthentication = Yes" setting in INSTALL.INI, the "Login with non-Novell Credential Provider = On" and "Advanced Authentication = On" options will be enabled in Client Properties if SETUP.EXE detects that the Advanced Authentication Client is already installed on the machine.
e. In addition, if SETUP.EXE detects that the Advanced Authentication Client is already installed on the machine, the "AdvancedAuthenticationClientDiscoveryHost" and/or "AdvancedAuthenticationClientEventName" parameters will be added to the Advanced Authentication "config.properties" file during SETUP.EXE processing, if they were configured in the INSTALL.INI.
In this scenario, even though the Advanced Authentication installation MSIs for Windows were not available to the Client for Open Enterprise Server installation set and no Advanced Authentication Client components were installed or upgraded, the Client for Open Enterprise Server integration points of enabling Advanced Authentication-specific behaviors in Client for Open Enterprise Server were still achieved.
Preparing the Installation Set
A. The Client for Open Enterprise Server now supports installing both the Advanced Authentication Client and the Client for Open Enterprise Server at the same time.
However, because the Advanced Authentication Client is not shipped as part of the Client for Open Enterprise Server, in order to achieve this integrated installation you must copy the Advanced Authentication installation MSI packages for Windows into the Client for Open Enterprise Server installation set.
After extracting the Client for Open Enterprise Server installation set, but before running SETUP.EXE, either move or copy the “Windows-components” subdirectory from the Advanced Authentication product download. Such that “Windowscomponents” now becomes a subdirectory of the Client for Open Enterprise Server installation set.
Meaning relative to the Client for Open Enterprise Server's SETUP.EXE, there should now be a subdirectory ".\Windows-components\Windows-Client" with the MSIs for the Advanced Authentication Client installation, and a subdirectory ".\Windowscomponents\Device-Service" with the MSI for Advanced Authentication Device Services installation.
B. Optionally, there are also new Advanced Authentication-related parameters in the “[Setup]” section of the Client for Open Enterprise Server INSTALL.INI file, for controlling the defaults and configurations related to Advanced Authentication and the Client for Open Enterprise Server integration:
InstallAdvancedAuthentication=[Yes/No]
This option controls whether “Advanced Authentication Client” should be installed, if the Advanced Authentication MSI install packages have been made available in the Client for Open Enterprise Server installation set.For the “Custom install” this controls whether the checkbox will be selected by default or not, and the checkbox can still be de-selected interactively prior to install. For “Express install”, this controls whether Advanced Authentication Client will be installed in addition to the Client for Open Enterprise Server.
InstallAdvancedAuthenticationDeviceServices=[Yes/No]
This option controls whether “Advanced Authentication Device Services” should be installed, if the Advanced Authentication MSI install packages have been made available in the Client for Open Enterprise Server installation set.For the “Custom install” this controls whether the checkbox will be selected by default or not, and the checkbox can still be de-selected interactively prior to install. For “Express install”, this controls whether Advanced Authentication Client will be installed in addition to the Client for Open Enterprise Server.This setting is only honored if the “InstallAdvancedAuthenticationClient” parameter has been set to “Yes”. Device Services cannot be installed on its own, without also installing Advanced Authentication Client.
AdvancedAuthenticationClientDiscoveryHost=[blank/DNS name/IP address]
Can be configured with the DNS name or IP address of a specific Advanced Authentication server for the Advanced Authentication Client to use. Will be written as a “discovery.host=” parameter in the Advanced Authentication Client “config.properties” file.If left blank, no action will be taken regarding the “discovery.host=” parameter. Without a “discovery.host=” specified, the Advanced Authentication Client will attempt to automaticaly discover Advanced Authentication servers using DNS. For more information, see the “Configuring the Preliminary Settings” section of the Advanced Authentication Windows Client Installation Guide.
AdvancedAuthenticationClientEventName=[blank/Event name]
Can be configured with the name of an event created on the Advanced Authentication. The Advanced Authentication Client will invoke this event for the Advanced Authentication logon process. Will be written as an “event_name:” parameter in the Advanced Authentication Client “config.properties” file.If left blank, no action will be taken regarding the “event_name:” parameter. Without a “event_name=” specified, the Advanced Authentication Client for Windows will default to the built-in event named “Windows logon”. For more information, see the “Configuring the Preliminary Settings” section of the Advanced Authentication Windows Client Installation Guide.
Installing the Clients
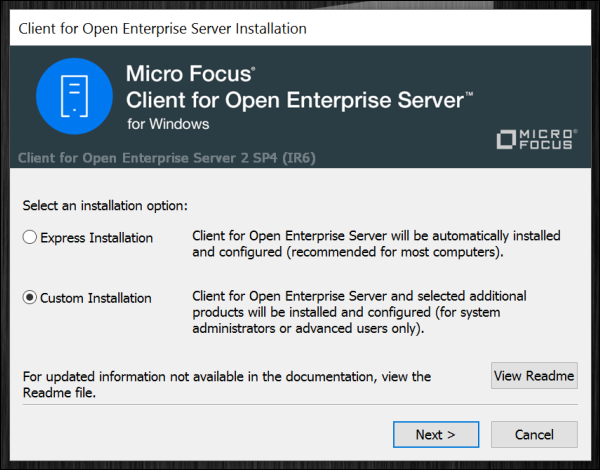
C. Run the Client for Open Enterprise Server SETUP.EXE and choose the “Custom Installation” pathway:
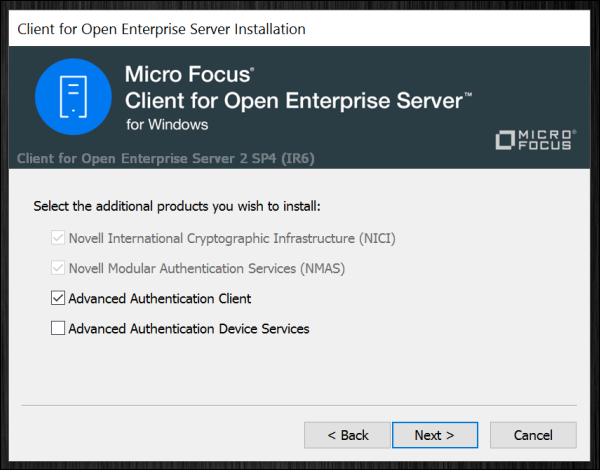
D. When “Custom Installation” has been chosen, in addition to the previous NICI and NMAS-related installation options, there will now also be two Advanced Authentication related options:
Note that the new Advanced Authentication options will NOT be selected by default during an interactive installation. But their selection and installation can be controlled using the INSTALL.INI in the Client for Open Enterprise Server installation set, same as the NMAS and NICI options.
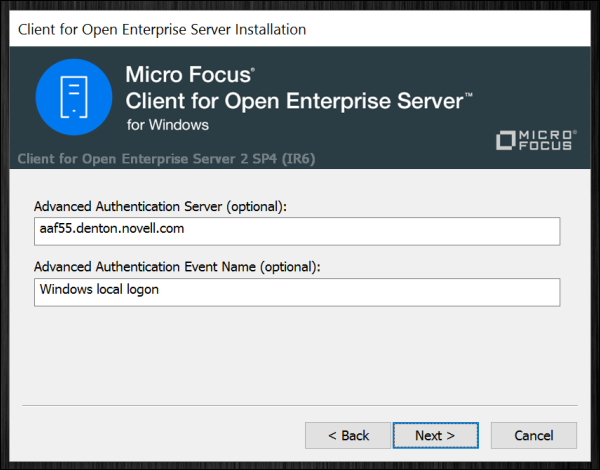
E. When “Advanced Authentication Client” has been selected, an additional configuration screen will be provided:
Both of these fields are blank by default, but can be configured to default to specific values using the INSTALL.INI options described earlier. If you need to specify a specific Advanced Authentication Server and/or Advanced
Authentication Event Name during an interactive install, these fields provide the opportunity to include such configuration.
When these values are left blank, the Advanced Authentication Client will default to attempting automatic DNS discovery of the Advanced Authentication Server, and will use the Advanced Authentication built-in event named “Windows logon” for logon. For more information, see the “Configuring the Preliminary Settings” section of the Advanced Authentication Windows Client Installation Guide.
In the above example dialog, both a specific Advanced Authentication Server DNS name and an alternate Advanced Authentication event name have been specified.
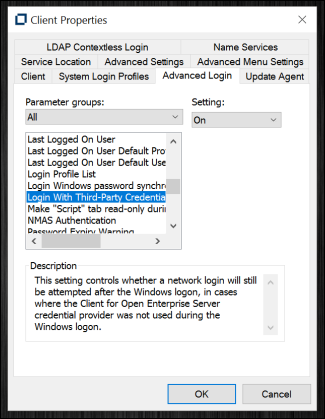
F. Selecting to install Advanced Authentication Client during the installation of Client for Open Enterprise Server will also cause a new setting for “Advanced Authentication” to be set to “On” by default.
When this setting is “On”, attempting to login to eDirectory from the user’s desktop will actually prompt the user to perform a logoff from Windows. This is so the user will return to the completely logged-out Windows state and then login again through the Advanced Authentication credential provider.
Meaning the attempt to login to eDirectory from the user’s desktop does not “directly perform a new Advanced Authentication login”, at this time. But the behavior does lead the user to where they will perform a new Advanced Authentication login through the existing Advanced Authentication credential provider for Windows, after which, an eDirectory login will also be performed.
G. Selecting to install Advanced Authentication Client during the installation of Client for Open Enterprise Server will also cause the existing “Login with Third-Party Credential Provider” option to be set to “On” by default.
When this setting is “On”, the Windows-only login performed by the Advanced Authentication credential provider is then followed by an eDirectory login attempt that uses the Windows username and the Windows account password.
Provided that the Windows account password is in sync with the eDirectory account password, the eDirectory login will happen transparently without any additional prompting to the user.
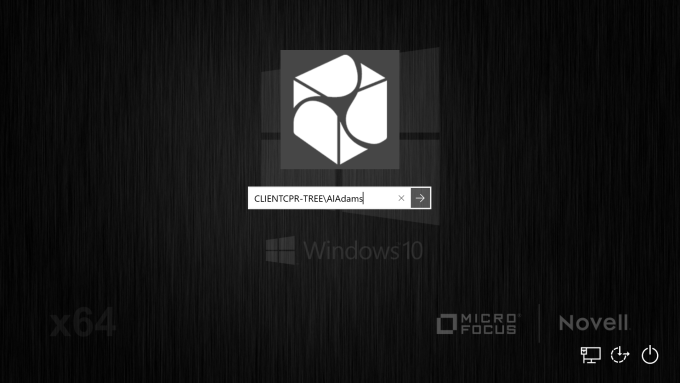
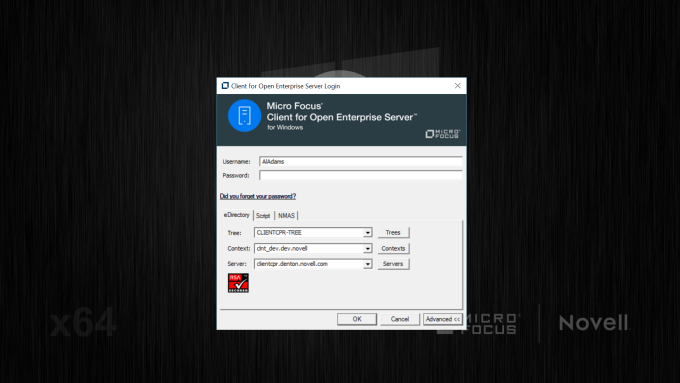
H. As such, after successful installation of the Client for Open Enterprise Server and the
Advanced Authentication Client, the initial screen that the user will see is the Advanced Authentication credential provider.
For example, as shown in the screen shot here, the Advanced Authentication credential provider has presented a blank credential, into which a username has been entered and we are ready to login to Windows with username “AlAdams” from the the Advanced Authentication user repository “CLIENTCPR-TREE”:
Note that on a domain-member Windows workstation, the credential provider will additionally display “Other User” when displaying this credential logon prompt.
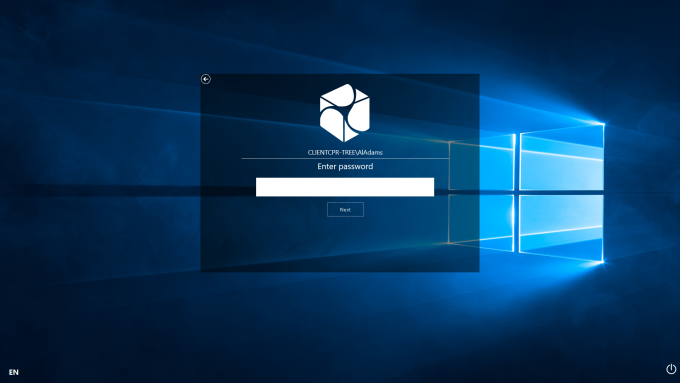
I. Presuming that a valid Advanced Authentication server or DNS discovery is performed, the next screen(s) the user will see are the enrolled method(s) that are required by Advanced Authentication for the Windows user login. Meaning, this is where the multi-factor authentication prompting and requirements will occur:
J. After the user has successfully passed the required Advanced Authentication methods, but before the user is allowed to reach their Windows user desktop, when logging on with Advanced Authentication for the first time the Advanced Authentication Client may need to prompt to store additional Windows account information.
If the Advanced Authentication logon on a domain-member Windows workstation is using domain-based Windows user account and has a domain-based Advanced Authentication user repository, this additional prompting for Windows account information will not have to occur. Because both the DN of the domain-based Windows user account and the password for the Windows domain-based user account are already known through the LDAPbased user repository in the Advanced Authentication server.
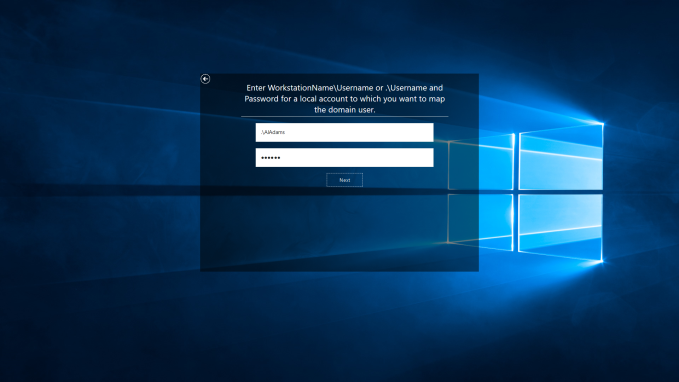
But for a non-domain-joined Windows workstation, the Advanced Authentication Client will need to prompt for the Windows account information that should be stored for use with this Advanced Authentication user and event:
Note that the ability to support non-domain-member Windows workstations only exists in Advanced Authentication 5.5 (December 2016) and later. Prior to Advanced Authentication 5.5, only domain-member Windows workstations were supported.
K. For non-domain-joined workstations, both the Windows account name and the Windows account password will be prompted for by the Advanced Authentication credential provider the first time the user logs on:
Note that in the “.\Username” format, the period character (“.”) represents “whatever the local computer name is.” Meaning its explicitly a Windows account name from the local computer, as opposed to a Windows domain-based user account.
Currently, as of the Advanced Authentication 5.5-131 Client for Windows, a blank password cannot be stored, and the Advanced Authentication Client will not allow you to proceed with logon if the Windows account password is currently blank.
You must either change the local Windows account password to a non-blank password before attempting to logon for the first time, or you must abort the Advanced Authentication-based logon and logon using the local user (”.\Username”) instead of the Advanced Authentication user repository-based user. And then change the password to a non-blank password before attempting to perform the Advanced Authentication-based logon again.
L. Next is the eDirectory login attempt that is being made due to the “Login with ThirdParty Credential Provider = On” configuration that was established as part of enabling Advanced Authentication support during the Client for Open Enterprise Server installation.
If the user has not logged into eDirectory before from this workstation, or for any reason the eDirectory tree name, eDirectory context or eDirectory password are not correct, then the Client for Open Enterprise Server will prompt the user to provide correct eDirectory information in order to complete the eDirectory login:
Once this information has been provided the first time the user logs into eDirectory successfully, it will be saved for use during future logins, so that the user will not have to be prompted again.
The only thing not saved is the password, because both the password and username in this “Login with Third-Party Credential Provider” case are coming from the Windows account username and Windows account password that were utilized by the Advanced Authentication logon. Which is why the eDirectory password will need to be set to the same password as the Windows account password.
Once the user has reached their Windows desktop, they are now logged in to both Windows and to eDirectory.
Normal Future Logons
M. After the user has successfully passed the required Advanced Authentication methods, but before the user is allowed to reach their Windows user desktop, the Client for Open Enterprise Server’s “Login with Third-Party Credential Provider” functionality will engage to perform the eDirectory login.
Presuming the Windows account password is set the same as the eDirectory account password, the user will simply “see nothing” while the eDirectory login is performed automatically and transparently on behalf of the user:
Note this also presumes the user has logged into eDirectory on this workstation before. Such that their eDirectory tree name, eDirectory context and any other Login Profile information for Client for Open Enterprise Server has already been populated and is still correct.
Same as in the first-time logon scenario, once the user has reached their Windows desktop, they are now logged in to both Windows and to eDirectory.
User Experience While Logged In to Windows
N. If for any reason the user disconnects their NCP connections or logs out of eDirectory, the Client for Open Enterprise Server will require that the user go through the Advanced Authentication login in order to access eDirectory again.
When the user attempts to perform an eDirectory login from their desktop, if the
“Advanced Authentication” setting is “On” in the Client Properties, the Client for Open Enterprise Server will prompt the user that they must logout from Windows in order to perform their eDirectory login again:
This ensures that the user will be required to go through the same Advanced Authentication factors and methods that were necessary when they originally logged in to both Windows and eDirectory on this workstation.
This is directly a result of the “Advanced Authentication = On” configuration that was established as part of enabling Advanced Authentication support during the Client for Open Enterprise Server installation.
The “Sign Out” button will initiate a Windows user logoff, which will prompt for the closing of any running applications. Pressing the “Cancel” button will allow the user to return to their applications and continue working.