ZENworks 2020 Update 2 - CVE Reference
Some of the biggest security challenges faced by customers these days are related to how they find the software vulnerabilities that are out there, how many of these vulnerabilities apply to their devices and how they mitigate these vulnerabilities. The ZENworks Security feature helps you address these challenges. From a security perspective, the primary way of tracking software vulnerabilities is through Common Vulnerabilities and Exposures (CVEs) and ZENworks now allows you to track device vulnerabilities using CVEs. This document includes the following sections:
2.0 Using CVEs with ZENworks Patch Management
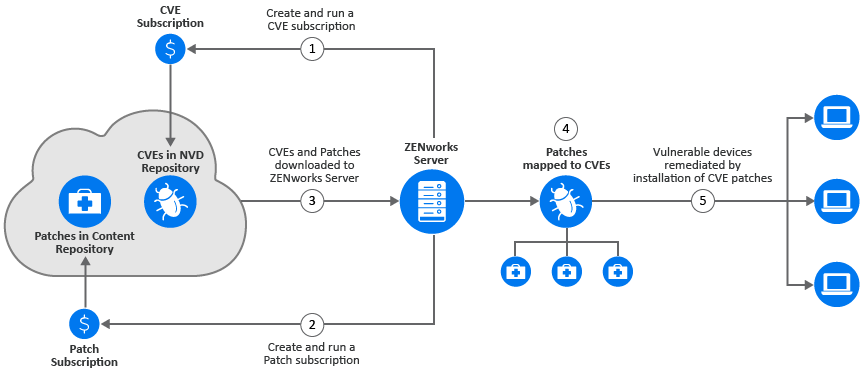
With Patch Management, after the patches are downloaded to the ZENworks server and a patch scan is performed, you can identify the vulnerable devices in your zone. However, you cannot easily identify the vulnerability addressed by the patch. To identify the vulnerability addressed by the patch you need to view the Patch Details window or you need to know the CVE ID based on which you can perform a search. However, now, as part of the Security feature, ZENworks provides you with a new security view that simplifies the setting up and tracking of security in your zone. You can quickly grasp the security posture of your devices with the vulnerability based view and approach to remediation. You can identify patches based on the CVE information and then remediate the vulnerable devices by applying the relevant patch remediation policy or bundle. The process by which ZENworks identifies these vulnerabilities is as follows:
-
Create and run a CVE subscription to import data from the NVD repository.
-
Create and run a Patch subscription to import data from the Patch Content repository.
After the CVE and Patch subscriptions are run, CVEs and Patches are imported to the configured ZENworks Server.
-
ZENworks maps the patches to the CVEs, based on the CVE ID associated with the patch signature.
When a patch scan is performed on devices as part of the device refresh, the vulnerable devices are identified. Users can also configure the patch scan schedule or they can manually run the initiate patch scan quick task based on their requirement.
-
The applicable patches are then deployed on the vulnerable devices, either through patch policies or through remediation bundles.
After all the CVE’s patches are installed on the device, the device is no longer vulnerable.
3.0 Mitigating Vulnerabilities Using CVEs
Using the Common Vulnerabilities and Exposures (CVE) data you can monitor devices in your zone for known software security vulnerabilities. To access CVEs, you need to first create a CVE subscription to sync ZENworks with the National Vulnerability Database. After the subscription is created, CVE data can be downloaded to a ZENworks Server based on the configured schedule. You also need to ensure that a Patch subscription is created and the latest patch content that is applicable to devices in your zone is downloaded from the patch repository. ZENworks maps the CVE content with the patches and then based on the patch scan, the vulnerable devices are identified. Using the Security dashlets you can get a better view of the security status of devices in the zone. After the vulnerable devices are identified, you can create the required Remediation bundles or patch policies to assign the patches to the devices.
IMPORTANT:If you have more than ten thousand devices in the zone, using the CVE feature will result in a significant amount of data getting stored in the database. Hence, for such scenarios, it is mandatory to install the Vertica database, before using the CVE feature.
Using the information in this section, you can perform the following tasks:
3.1 Create the CVE Subscription
To enable ZENworks to import CVE data from the National Vulnerability Database (NVD), you need to first create a CVE subscription.
To create the CVE Subscription:
-
Log into ZENworks Control Center and click .
-
In the Subscriptions list, click > .
-
In the Select Subscription Type page, select the CVE Subscription and then click .
-
In the Define Details page, specify the following details:
-
Subscription Name: A unique name for the subscription.
-
Folder: Type the name of the folder or browse to the folder in which this subscription will be created. By default, the subscription will be created in the /Subscriptions folder.
-
Description: A short description for the subscription. This description is displayed in the subscription’s Summary page.
-
-
Click .
-
In the Select CVE Subscription Server page, browse to select the Primary Server on which the CVE Subscription service will run. CVE data from the NVD repository will be downloaded onto this server.
-
Select the frequency at which the CVE data should be downloaded from the NVD repository. By default the CVE data is downloaded Daily at 23:00 hours (11 p.m).
The CVE subscription should be run before the Patch subscription for the Patch subscription to perform the CVE-Patch mapping. If the CVE subscription is run after the Patch subscription, the mapping will not happen until the next Patch subscription, which could be the next day.
-
Click to display the Summary page.
-
Review the information and if changes are required, you can make them by using the button.
-
(Conditional) check box to display the subscription’s Summary page after the wizard completes.
You can use the various tabs on the Summary page to edit the subscription information.
-
(Conditional) Select the check box to run the subscription service as soon as the subscription is created. You can also run the subscription at a later time by navigating to the page and clicking the CVE subscription.
-
Click to create the subscription.
3.2 Configure the CVE Subscription
While creating the CVE subscription, if you did not select the option to start the subscription service as soon as the CVE subscription is completed, you can start the subscription and also make changes to it by selecting the CVE subscription object.
-
In ZCC, click in the left pane.
-
In the Subscriptions page, click the CVE Subscription object. The CVE Subscription details are displayed:
The General panel displays the following information:
-
Name: Displays the name of the subscription.
-
Type: Displays the type of subscription.
-
Created By: Displays the name of the user who created the subscription.
-
GUID: Displays the subscription’s GUID (global unique identifier), a randomly generated string that provides a unique identifier for the subscription.
-
Description: Displays a description of the subscription if it was provided when the subscription was created. The description appears only in ZENworks Control Center. Click Edit to change the description.
-
Enabled: Displays whether the subscription is enabled or not.
-
Subscription Logs: Displays messages associated with the last run of the subscription. Click the View Log link to view the subscription logs.
The Subscription panel provides a summary of the CVE subscription. You can view the following details:
-
CVE Feed: The URL of the NVD repository from where the CVE feeds are imported. You can click the Edit link to change the URL.
IMPORTANT:DO NOT change the URL, unless instructed by Micro Focus Customer Support.
-
CVE Subscription Server: The server that syncs with the NVD repository, downloads CVE data and stores it in the ZENworks database.
-
Last Replication: The day and time at which the Subscription server last synced with the NVD repository. You can select the relevant options to:
-
Run Now: Syncs immediately without waiting for the schedule. When the sync is done for the first time, a full run is performed to download all the CVE data. However, if the last run was performed less than 8 days ago, only the changes since the last run will be downloaded.
-
Import Manually: Download the data from the NVD repository in the JSON file format and then upload the JSON zip file to the server. It is not necessary for you to perform this step, unless there is an issue with the subscription service. To manually upload the file, you need to navigate to https://nvd.nist.gov/vuln/data-feeds and select the zip file against the year for which you want to download the data. You can also select the zip file against the feed name to download just the modified CVE data.
-
Full Run: If no CVE data is downloaded or if the last run was performed more than 8 days ago, then use this feature to download all the data from the NVD repository.
-
-
Status: Indicates the status of the last sync with the NVD repository.
-
Schedule Interval: The interval at which the sync is performed with the NVD server. You can either perform the sync at a particular time, every day (daily) or you can perform the sync at an hourly interval.
-
NOTE:You can manage the CVE data by configuring the CVE cleanup schedule. For more information, see Managing CVEs.
3.3 Configuring the Proxy Settings for the CVE Subscription
You can configure the CVE Subscription proxy settings to download CVE data from the NVD repository through a proxy server.
To configure the HTTP Proxy settings for the CVE Subscription, perform the following steps:
-
On the Primary Server on which the CVE Subscription is configured to run, navigate to the lpm-server.properties file.
The lpm-server.properties file is available in the following location:
-
On Linux: /etc/opt/microfocus/zenworks/
-
On Windows: %ZENSERVER_HOME%\conf
An example of the content within the lpm-server.properties file is displayed below:
Debug=false
TTL=24
subscription-proxyaddress=
subscription-proxyport=
subscription-proxyuser=
subscription-proxypassword=
subscription-useNTLM=false
-
-
Modify and save the file with the following subscription proxy details:
-
Set the value of subscription-proxyaddress to the IP address of the proxy server.
-
Set the value of subscription-proxyport to the port number of the proxy server.
-
(Conditional) If the proxy is authentication-based, set the value of subscription-proxyuser to the name of the proxy user.
-
(Conditional) If the proxy is authentication-based, set the value of subscription-proxypassword to the password associated with the proxy user name.
It is recommended to use the zman srpp command to specify an obfuscated password instead of specifying the raw password.
-
(Conditional) If the proxy server uses an NTLM realm, set the value of subscription-useNTLM to true. By default, the value is false.
-
-
Restart the ZENworks services and then run the CVE subscription by navigating to the page.
3.4 Create a Patch Subscription
For the CVEs to get mapped with the patches, you need to ensure that you create a Patch subscription using which patch content is download to ZENworks from the Patch repository and you also need to ensure that the Patch subscription is run after the CVE subscription is run. For information on the Patch subscription, see the Viewing and Configuring the Subscription Service section in the ZENworks Patch Management Reference.
3.5 Perform a Patch Scan
After the CVEs and Patches are mapped, a ZENworks a patch scan should be performed to track the vulnerabilities in your zone. The patch scan is performed at the time of device refresh. However you can manually schedule the patch scan for a device by performing the Initiate patch scan quick task or by changing the patch scan schedule. For information on configuring the patch scan, see the Configuring the Schedule for Vulnerability Detections section, and for information on initiating a patch scan for a device, see the Initiating a Patch Scan section in the ZENworks Patch Management Reference.
3.6 Determine Vulnerabilities and Deploy Remediations
After the patch scan is completed, you can identify the devices in the zone that are impacted by the various vulnerabilities by viewing the CVE pages or by using the CVE dashlets. These dashlets provide a graphical and easy-to-comprehend view of the vulnerability status of your zone. After identifying the vulnerable devices you can deploy the remediation.
CVE information Page
To view information related to CVEs that impact devices in the zone and also to remediate these vulnerabilities, you can navigate to the CVE Details page.
The CVE Details page can be accessed by clicking the CVE link from a security dashlet, or by clicking the CVE link from the Patch Details page.This page provides detailed information about the selected CVE along with information about the devices that are impacted by the CVE and the patches that need to be applied to address the vulnerability. This page includes the following tabs:
CVE Information
This tab displays all the information related to the selected CVE. This includes:
-
CVE Status: The status indicates if the CVE is applicable or not. If there is a patch available for the CVE, then the status is Applicable, if not, the status is Not Applicable.
-
CVE ID: The CVE ID as defined in the National Vulnerability Database (NVD). The link when clicked displays the details of the CVE in the NVD website.
-
Severity: The severity ranking is displayed based on the score value defined by the Common Vulnerability Scoring System (CVSS) version 2.0 or 3.x standards.
The CVSS v2.0 ratings are:
-
Low: 0.0 -3.9
-
Medium: 4.0 - 6.9
-
High: 7.0 - 10.0
The CVSS v3.x ratings are:
-
None: 0.0
-
Low: 0.1 - 3.9
-
Medium: 4.0 - 6.9
-
High: 7.0 - 8.9
-
Critical: 9.0 - 10.0
The color of the icon indicates the severity level: Black for Critical, Red for High, Orange for Medium, Yellow for Low and Grey for None.
-
-
Score: The score value is defined by NVD based on the Common Vulnerability Scoring System (CVSS) version 2.0 or 3x0, which are open standards for assigning vulnerability impacts. If both the versions are applicable for the CVE, then the score that is related to the latest version is displayed.
Hence, a CVE with a CVSS 2.0 score of 10 would have a severity level of High, and be grouped in the High section and color of the dashlet charts, while a CVE with a CVSS 3.x score of 10 would have a Critical severity level and be grouped in the Critical section and color (black).
-
Released Date: The date on which the CVE was published for the public.
-
Last Modified Date: The date on which the last modification was made to the CVE.
-
CVE Description: A description of the vulnerability as defined in the NVD website.
-
Vulnerability Type: The Common Weakness Enumeration (CWE) number. Based on the CWE number you can identify the weakness category for the CVE.
-
Vulnerable Software and Versions: Provides information about the product version that includes the vulnerability. The Vendor, Product, and Version details are displayed. You can search for specific vendors within this panel.
-
References: Lists the links to related information and also displays the resource type as defined by NVD.
Exploitable Devices
This page lists the details of those devices that are impacted by the selected vulnerability. Using this page you can scan for available patches and deploy remediations to the selected devices. You can also export the data to the Comma Separated Value (CSV) format.
NOTE:If your zone has a large number of devices, the time taken to compute the effective assignments will be more. Hence, there might be a delay in displaying data in this page. For zones with ten thousand or more devices, it is recommended to have Vertica configured.
This page includes the following information:
-
Device Name: The name of the device. When clicked, the device summary page is displayed.
-
Type: The type of device. For example, server or workstation.
-
Platform: The device operating system.
-
Last Patch Scan: Date and time when the last patch scan was performed on the device.
-
CVE Patches Not Installed: Number of applicable CVE patches that are not installed on the device. When you click on the number link, the list of CVE patches that are not installed on the device are displayed.
-
CVE Patches Not Assigned: Number of applicable CVE patches that are not assigned to the device through a Patch Policy or Remediation Deployment. When you click on the number link, the list of CVE patches that are not yet assigned to the device are displayed.
-
Remediation Completed: Date on which all the applicable CVE patches were applied on the device and the device was completely remediated.
The following columns are not displayed by default. Click to select and view these additional columns:
-
Operating System: Version of the device operating system.
-
Folder Path: The location of the folder in which the device is located.
-
Status: The status of the device. For example, normal, retired, or lost.
-
User: The name of the user who has logged into the device.
-
Last Contact: The last time the device contacted the server.
-
Department: The department to which the device belongs.
-
Site: The location to which the device belongs.
Actions
In the Exploitable Devices page, you can perform the following actions:
-
Deploy Remediation: Select the required devices and then click Deploy Remediation to deploy the patch remediation bundle on the selected devices and remediate the vulnerability. For more information see Deploying Patches Manually. Any required patches that have not already been downloaded (cached) to your zone will be automatically downloaded.
-
Scan Now: Select the required devices and then click the Scan Now option to scan for the latest status of all patches applicable to the device. For more information, see Initiating a Patch Scan in the ZENworks Patch Management Reference.
-
Export as CSV: Click the Export as CSV option to export the data of all the exploitable devices to a Comma Separated Value file.
-
Search for Devices: Using the search field you can enter the exploitable device’s name and filter the device details.
-
Refresh Assignments: Click the Refresh button to calculate the effective assignments for the device. The Assignments column is updated with the latest device assignment details.
NOTE:If Vertica is configured, the Assignments column might take a while to get updated
-
Using the Filter, you can display specific devices by filtering them based on the Device Folders, Device Groups, Device Type, Assignment Status, Remediations Status, Operating System and Platform.
Patches
This page lists all the patches that need to be applied to mitigate the vulnerability. This page includes the following information:
-
Name: The name of the patch. When you click the link, the Patch details page is displayed.
-
Impact: Indicates the impact level. The impact levels include Critical, Recommended, Software Installers and Informational. For more information, see Patch Impact in the ZENworks Patch Management Reference.
-
Platform: Indicates the platform on which the patch is applicable.
-
Patched Devices: Indicates the number of devices on which the patch is applied. When you click the number link, the details of the devices are displayed.
-
Not Patched. Indicates the number of devices on which the patch is not applied. When you click the number link, the details of the impacted devices are displayed.
-
Release Date: The date on which the patch was published by the vendor for the public.
Actions
Using the Patches page, you can perform the following actions:
-
Remediate: Select the check boxes against the patches you want to deploy, and select to open the Deploy Remediation Wizard. For more information, see Deploying Patches Manually.
-
Download: Select the patch that you want to download and then click
-
Search: Enables you to search for specific patches.
-
Filter: Display specific patches by filtering them based on the Platform, Impact, Vendors, Device Status, and Download status. You can also apply the filter to include disabled patches.
CVE Dashlets
The CVE dashlets are a part of the Security dashboard. These include the CVE Severity Distribution, Top CVEs and CVE Tracker dashlets. While the CVE Severity Distribution and Top CVEs dashlets are ideal for tracking the overall status of vulnerabilities in your zone, the CVE Tracker dashlet is ideal for focusing on a single vulnerability (CVE), or group of related vulnerabilities.
NOTE:The Security Dashlets also include the Patch Tracker dashlet, which is ideal for focusing on a single patch or a group of related patches. For information about the Patch Tracker dashlet, see the Employing the Security and Patch Dashboard section in the ZENworks Patch Management Reference
CVE Severity Distribution
The CVE Severity Distribution dashlet graphically identifies all the CVEs that are applicable to your zone's devices. The CVEs are grouped by severity level, with the dashlet displaying five levels: Critical, High, Medium, Low, and None.
A CVE's level is determined by its National Vulnerability Database (NVD) CVSS rating (score). There are 2.0 and 3.x CVSS rating versions. Version 3.x is the newest system and is used whenever possible to assign the severity level. For older CVEs that have not been scored using version 3.x, the CVSS 2.0 rating is used to assign the severity level.
|
CVSS v2.0 Ratings |
CVSS v3.x Ratings |
||
|---|---|---|---|
|
Severity Level |
Score Range |
Severity Level |
Score Range |
|
Low |
0.0-3.9 |
None |
0.0 |
|
Medium |
4.0-6.9 |
Low |
0.1-3.9 |
|
High |
7.0-10.0 |
Medium |
4.0-6.9 |
|
High |
7.0-8.9 |
||
|
Critical |
9.0-10.0 |
||
For example, you could create a CVE Severity Distribution for Windows Devices dashlet that only displays CVEs that are applicable to Windows devices. Or, you could create a CVE Severity Distribution for Accounting dashlet that only displays the CVEs that are applicable to devices in your ZCC Accounting device folder.
You can customize the dashlet to best fit your needs, and create multiple custom dashlets, if necessary.
Accessing the dashlet: In ZCC, click > .
Modifying the Displayed Data: To customize the data displayed in the dashlet, expand and modify the relevant sections in the filter panel. The filter includes the following options:
-
Device Folders: To select the required device folders. Select to include all folders within the selected folders.
-
Device Groups: To select the required device groups.
-
Device Type: To select the required type of devices. The available options are Servers and Workstations.
-
Platforms: To select the device platforms. The available options are Windows, Linux and Mac.
-
Vendor: To select a vendor whose CVEs are to be displayed.
-
Vulnerability Status: To select CVEs with vulnerable devices. By default, CVEs with vulnerable devices are displayed. If required, you can uncheck this option to view both vulnerable and non-vulnerable devices.
-
Severity: Depending on the criticality of a CVE, CVSS assigns a severity to each CVE. Select the required severity. The available options are Critical, High, Medium, Low and None
-
CVE ID: To specify the CVE ID. Use the and options if you only know a part of the CVE ID. The option excludes result that match the specified text.
-
CVE Summary: To specify the CVE summary. You can specify only a part of the summary and use the and options if you only know a part of the CVE summary. The option excludes results that match the specified text.
-
Display CVE Data: To select the time period for which you want the CVE data displayed. The options include All and Current. The Current filter displays the most recent CVE information.
If you change this filter, the Vendor filter will be reset to the default option and you need to re-apply the Vendor filter, if required.
Execute actions from the CVEs panel: The CVEs panel displays the CVEs that meet the criteria defined in the dashlet filter panel. You can also filter the list by searching for a particular CVE in the search panel.
Following information is displayed in the CVEs panel:
|
Field |
Description |
|---|---|
|
CVE ID |
Displays the CVE ID |
|
CVSS Score |
Displays the CVSS Score. Depending on the CVSS version, the CVSS score is rated as critical, high, medium, low and none. |
|
CVSS Version |
Displays the CSVS version associate with the CVE. |
|
Summary |
Displays summary of the CVE. |
|
Platforms |
Displays the platform on which the CVE is applicable. |
|
Vulnerable |
Displays the number of vulnerable device. Click the number to view the list of vulnerable devices. |
|
Vendors |
Displays the name of vendors associated with this CVE. |
|
Released On |
Displays the date on which the CVE was released. |
|
Not Vulnerable |
Displays the number of devices that not vulnerable. Click the number to view the list of non-vulnerable devices. |
|
Last Modified |
Displays the date on which the CVE was modified. |
For information about other actions that you can perform in the CVEs panel, see the following table:
Table 1 CVE Panel
|
Task |
Description |
|---|---|
|
Deploy Remediation |
Deploys all patches required to remediate the selected vulnerability (CVE) on all vulnerable devices. Any required patches that have not already been downloaded (cached) to your zone will be automatically downloaded. Note that this action deploys the remediation to all vulnerable devices. If you want to target specific devices to remediate rather than all devices, click the CVE and go to its Exploitable Devices page. For more information, see Deploying Patches Manually in the ZENworks Patch Management Reference. |
|
|
To show or hide a column from the CVEs panel. |
|
Search |
To filter the data displayed in the table by specifying the summary in the search field. |

Top CVEs
The Top CVEs dashlet lets you list the top CVEs in your zone, based on their currency, number of vulnerable devices, or severity. You can select the top CVEs based on the most recently released, most number of vulnerable devices or most severe rating. When you hover over each list item, the number of vulnerable devices are displayed.
You can customize the dashlet to best fit your needs, and create multiple custom dashlets if necessary.
For example, you could create a CVEs with Most Vulnerable Windows Devices dashlet that orders the CVEs applicable to your Windows devices by the vulnerability count. Or, you could create a Top Adobe CVEs by Severity dashlet that orders applicable Adobe CVEs by their severity score.
Accessing the dashlet: In ZCC, click > .
Modifying the Displayed Data: To customize the data displayed in the dashlet, expand and modify the relevant sections in the filter panel. The filter includes the following options:
-
Top CVEs Based On: To specify the criteria based on which the Top CVEs are displayed. By default, the dashlet displays the top CVEs based on the number of vulnerable devices.
The available options are:
-
Most Recently Released: To display the top CVEs based on the most recently released or updated date.
-
Number of Vulnerable Devices: To display the top CVEs based on the most number of vulnerable devices.
-
Most Severe: To display the top CVEs based on the highest severity rating.
-
-
Device Folders: To select the required device folders. Select to include all folders within the selected folders.
-
Device Groups: To select the required device groups.
-
Device Type: To select the required type of devices. The available options are Servers and Workstations.
-
Platforms: To select the device platforms. The available options are Windows, Linux and Mac.
-
Vulnerability Status: To select CVEs with vulnerable devices. By default, CVEs with vulnerable devices are displayed. If required, you can uncheck this option to view both vulnerable and non-vulnerable devices.
-
Vendor: To select a vendor whose CVEs are to be displayed.
-
Severity: Depending on the criticality of a CVE, CVSS assigns a severity to each CVE. Select the required severity. The available options are Critical, High, Medium, Low and None
-
CVE ID: To specify the CVE ID. Use the and options if you only know a part of the CVE ID. The option excludes results that match the specified text.
-
CVE Summary: To specify the CVE summary. You can specify only a part of the summary and use the and options if you only know a part of the CVE summary. The option excludes result that match the specified text.
-
Display CVE Data: To select the time period for which you want the CVE data displayed. The options include All and Current. The Current filter displays the most recent CVE information.
If you change this filter, the Vendor filter will be reset and you need to re-apply the Vendor filter, if required.
Execute actions from the CVEs panel: The CVEs panel displays the CVEs that meet the criteria defined in the dashlet filter panel. You can also filter the list by searching for a particular CVE in the search panel.
Following information is displayed in the CVEs panel:
|
Field |
Description |
|---|---|
|
CVE ID |
Displays the CVE ID |
|
CVSS Score |
Displays the CVSS Score. Depending on the CVSS version, the CVSS score is rated as critical, high, medium, low and none. |
|
CVSS Version |
Displays the CVSS version associate with the CVE. |
|
Summary |
Displays summary of the CVE. |
|
Platforms |
Displays the platforms on which the CVE is applicable. |
|
Vulnerable |
Displays the number of vulnerable device. Click the number to view the list of vulnerable devices. |
|
Vendors |
Displays the name of vendors associated with this CVE. |
|
Released On |
Displays the date on which the CVE was released. |
|
Not Vulnerable |
Displays the number of devices that not vulnerable. Click the number to view the list of non vulnerable devices. |
|
Last Modified |
Displays the date on which the CVE was modified. |
For information about other actions and options you have in the CVEs panel, see the following table:
Table 2 CVE Panel
|
Task |
Description |
|---|---|
|
Deploy Remediation |
Deploys all patches required to remediate the selected vulnerability (CVE) on all vulnerable devices. Any required patches that have not already been downloaded (cached) to your zone will be automatically downloaded. Note that this action deploys the remediation to all vulnerable devices. If you want to target specific devices to remediate rather than all devices, click the CVE and go to its Exploitable Devices page. For more information, see Deploying Patches Manually in the ZENworks Patch Management Reference. |
|
|
To show or hide a column from the CVEs panel. |
|
Search |
To filter the data displayed in the table by specifying the summary in the search field. |
CVE Tracker
The CVE Tracker dashlet enables you to track the vulnerability of a single CVE or a group of associated CVEs available in the Management Zone. By drilling into the dashlet, you can view the current vulnerability status of devices and also view the vulnerability trend over a defined date grouping and date range.
You can customize the dashlet to best fit your needs, and create multiple custom dashlets if necessary.
For example, the BlueKeep vulnerability exposed in May 2019. By creating a tracker for BlueKeep (CVE-2019-0708) you can identify which devices are vulnerable, initiate remediation of the devices through one-step installation of the required patches, and track the remediation results (trend) across your entire zone.
Accessing the dashlet: In ZCC, click > > .
By default, the CVE Tracker dashlet does not display any information, to view information in the CVE Tracker, you need to first configure the dashlet.
Configuring the CVE Tracker Dashlet: Follow these steps:
-
In the Configuration tab, click .
-
In the Select CVEs window, select the required CVEs, and then click .
In the CVE Tracker, you can select both applicable and not applicable CVEs. Applicable CVEs are those CVEs for which ZENworks has a patch. Not-applicable CVEs are those CVEs for which ZENworks does not have a patch. Using not applicable CVEs, you can setup a CVE Tracker for CVEs for which patches are not yet released. Once a CVEs patches are released and downloaded to ZENworks (during the daily subscription process), the tracker will begin to show vulnerable and not vulnerable devices.
-
Specify a name for the dashlet and change the tracker icon, if you want.
-
To view the vulnerability trend data, in the Trend Chart section, specify the following information:
-
Date Grouping: You can group the trend data based on Day, Week, Month, Quarter or Year.
The chart will not be display any data until the end of the first period of the date grouping.
Example: If you choose Year, then you will not see any Trend Chart data for a year. Hence, while creating a new tracker, ensure that you set the Date Grouping to Day so that you see the data immediately. You can modify the filter at a later time, if you want.
-
Date Range: After selecting the Date Grouping filter, this option enables you to select the date range for the selected date grouping.
NOTE:Vertica is required to retrieve the trending data. The Trend Chart fields will be enabled only when Vertica is configured. For more information, see the Vertica Database Reference in the documentation site.
-
-
Click .
-
To save the dashlet, click the hamburger menu, and then select Save As.
After configuring the CVE Tracker dashlet, following information is displayed:
Vulnerability Status: The Vulnerability Status provides the current known status about the total number of devices to which the CVE is applicable and how many of those devices are still vulnerable. When you hover on each graph element the number of vulnerable (unpatched) and not vulnerable (patched) devices are displayed.
The Vulnerability Status also displays an arrow that indicates the current vulnerability trend in the Management Zone. The following table describes the various scenarios and the associated status arrow:
-
 The green arrow pointing downwards represents the number of vulnerable devices at the current point in time is less than the number of devices at the start of the date grouping period (Day, Week, Month, Quarter, or Year).
 -
 The red arrow pointing upwards represents the number of vulnerable devices at the current point in time is more than the number of devices at the start of the date grouping period (Day, Week, Month, Quarter, or Year).
 -
 The two-sided arrow represents the number of vulnerable devices at the current point in time is same as the number of devices at the start of the date grouping period (Day, Week, Month, Quarter, or Year).
Vulnerability Trend: The trend chart displays the current and historical data of selected CVEs based on the selected date grouping and date range. By analyzing this section, you can check the vulnerability trend of devices in your zone and also take necessary actions, such as Deploy Remediation, to make your zone more secure. The trend data is displayed based on the server time.
NOTE:If a new device is added to the zone, then the trend data for the newly added device will be displayed only after the data is retrieved from Vertica. By default, the data from Vertica will be retrieved after 12:30 PM (Server Time).
For example, if the Date Grouping is Day and the Date Range is 1 Month, then the Vulnerability Trend chart displays the trend for the last 30 days with each day represented as a point in the chart.
NOTE:The Vulnerability Trend chart is displayed only when Vertica is configured and enabled. For more information, see the Vertica Database Reference in the documentation site.
Execute actions from the Device Details panel: The Device Details panel displays the devices that meet the criteria that you defined in the dashlet filter panel. You can also filter the list by searching for a device name, Operating System or folder in the search panel.
Following information is displayed in the CVEs panel:
|
Field |
Description |
|---|---|
|
Device |
Displays name of the device. |
|
Status |
Displays the vulnerability status of the device. |
|
Last Vulnerability Scan |
Displays the date and time at which the Vulnerability Scan was performed on the device. If the device is vulnerable to any of the selected CVEs, then the device is marked as vulnerable. |
|
Operating System |
Displays operating system on which the device is operating. |
|
Device Folder |
Displays the folder path in which the device is located. |
|
Remaining Vulnerabilities |
Displays the number of vulnerabilities that should be applied on the device to make the device less vulnerable. |
Based on the information displayed in the Vulnerability Status and Vulnerability Trend charts, you can take the following actions:
Table 3 Device Details Panel
|
Task |
Description |
|---|---|
|
Deploy Remediation |
Deploys all patches required to remediate the vulnerability on the selected devices. Any required patches that have not already been downloaded (cached) to your zone will be automatically downloaded. For more information, see Deploying Patches Manually in the ZENworks Patch Management Reference. |
|
Scan Now |
This action initiates a patch scan on the selected devices in order to ensure that you have the latest vulnerability status for the devices. |
|
Search |
The Search operates on the Device, Operating System, and Device Folder fields to allow you to filter the list based on the data in those fields. |
Determining the Vulnerability Status of Devices
This section provides information on how the vulnerability status of a device is determined by ZENworks.
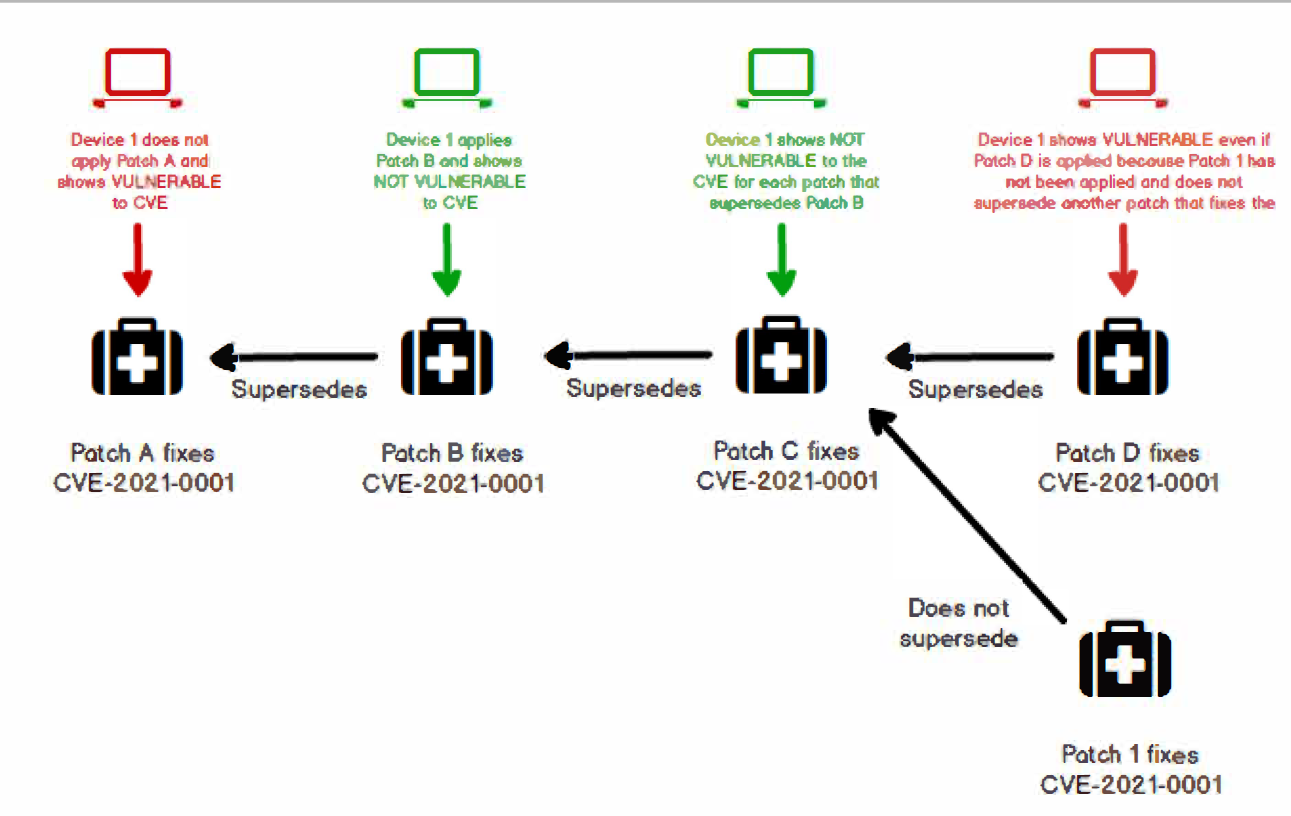
For the vulnerability status of the device to be displayed as Not Vulnerable, each independent, applicable patch that fixes a CVE must be applied to the device. Hence, if the applied patch supersedes a previous patch that remediates the CVE, the device vulnerability status is determined as Not Vulnerable. After any applicable patch in the patch supersedence chain is applied, the device will no longer be vulnerable because of the new patches in that patch supersedence chain.
However, if another applicable patch, which is not a part of the patch supersedence chain fixes the CVE, ZENworks cannot determine if that patch fixes the same issues addressed in the patch supersedence chain or if the patch is from another vendor and fixes another issue that is required to remediate the CVE. Hence, in such a scenario, the vulnerability status of the device is identified as Vulnerable, until all independent, applicable patches (or patch supersedence chains) are applied to the device. The diagram below provides a scenario that explain how the vulnerability status is identified.
NOTE:Vulnerability status is determined based on applicable patches. Non-applicable patches are not considered while determining the device vulnerability status.