


       |  |
 |
 |
 |
 |
 |
 |
 |
 |
Utility Tools
CHAPTER 16
The Deployment Descriptor Editor provides a quick and easy way to construct and populate J2EE-compatible deployment descriptors. This chapter describes the Deployment Descriptor Editor and includes these topics:

A deployment descriptor is an XML document that provides information about the components of a J2EE module (such as a WAR or an EJB JAR) or application (EAR). The deployment descriptor provides data that is required for both of the following:
Application assembly—to describe how a component is or should be used
Deployment—to define deployment needs such as roles and resource references
Sun has defined the contents and structure of a deployment descriptor for each J2EE archive. For more information, see J2EE Deployment Descriptor DTDs.
How deployment descriptors are created exteNd Director automatically constructs and adds a J2EE-compatible deployment descriptor file to your project in the appropriate location, as follows:
|
J2EE archive |
Deployment descriptor file |
Directory location |
|---|---|---|
|
Application client |
application-client.xml |
/META-INF |
|
EAR |
application.xml |
|
|
EJB JAR |
ejb-jar.xml |
|
|
RAR |
ra.xml |
|
|
WAR |
web.xml |
/WEB-INF |
As you add J2EE components to a project, exteNd Director adds the corresponding elements to the deployment descriptor when it has enough information to do so.
The Deployment Descriptor Editor allows you to fine-tune the deployment descriptor by modifying or completing entries that exteNd Director is unable to complete automatically.
The Deployment Descriptor Editor displays the deployment descriptor elements as expandable nodes. The nodes correspond to elements of the deployment descriptor DTD. All possible deployment descriptor entries are represented graphically, so you can use the interface to help you add the appropriate entries without having to memorize the DTD.
Here's a sample of the Deployment Descriptor Editor for an EAR project:
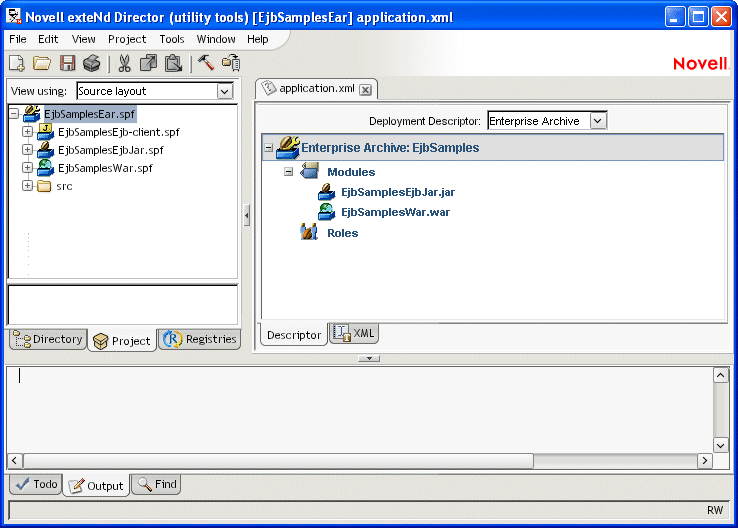
TIP: You can view or edit the deployment descriptor in raw XML by choosing the XML tab. The Deployment Descriptor Editor opens in the mode (raw XML or tree view) that was in use when you last saved.
Nodes displayed in bold (such as Modules and Roles) allow child nodes to be added or removed. You can add or remove these nodes by right-clicking and selecting from the popup menu.
Many of the nodes require additional information, which you can provide by completing a property sheet. To display the Property Inspector for a node, highlight the node, right-click, and select Properties.
To save your changes to the deployment descriptor file in the archive, select File>Save (or click the Save icon).
You can use the Deployment Descriptor Editor either to fine-tune the default deployment descriptor created by exteNd Director or to create a new deployment descriptor.
 To create a deployment descriptor:
Open the project for which you want to create the new deployment descriptor.
Select Deployment Descriptor and click OK.
This constructs the deployment descriptor shell based on the contents of the project and displays the shell in the Edit Pane.
To associate a deployment descriptor with a project:
NOTE: If you created a deployment descriptor outside of the exteNd Director development environment, you can still use it with a project by following these steps.
Open the project that you want to associate the deployment descriptor with.
Double-click the deployment descriptor you want.
You are prompted to associate the descriptor with the current project or a different project (which you can choose)—or to edit the deployment descriptor in XML mode.
Choose the option to associate the descriptor with the current project, then click OK.
This opens the deployment descriptor in the Deployment Descriptor Editor.
To modify a deployment descriptor:
Open the project whose deployment descriptor you want to modify.
Highlight the project (SPF) file, right-click, and select Open Deployment Descriptor from the popup menu.
You are prompted for build preferences. Once you specify your build preferences, the Deployment Descriptor Editor opens the file ready for editing.
To add a deployment descriptor element:
Highlight the descriptor element, right-click, and choose Add from the popup menu.
Highlight the new element, right-click, and choose Properties from the popup menu to launch the Property Inspector (so you can define any necessary values).
To remove a deployment descriptor element:
Highlight the descriptor element you want to remove, right-click, and select Delete from the popup menu.
NOTE: If Delete is not available as a menu option, that means the element is not removable.
Validating a deployment descriptor The Deployment Descriptor Editor automatically checks your work as follows:
But you can force validation anytime.
To force validation of a deployment descriptor:
Select Validate Archive from the Project menu.
This validates both the deployment descriptor and the archive.
Copyright © 2004 Novell, Inc. All rights reserved. Copyright © 1997, 1998, 1999, 2000, 2001, 2002, 2003 SilverStream Software, LLC. All rights reserved. more ...