NDS single sign-on authentication is not a separate profile type. Rather it is additional functionality enabled as part of either an LDAP authentication profile that uses an NDS database or an NDS authentication profile.
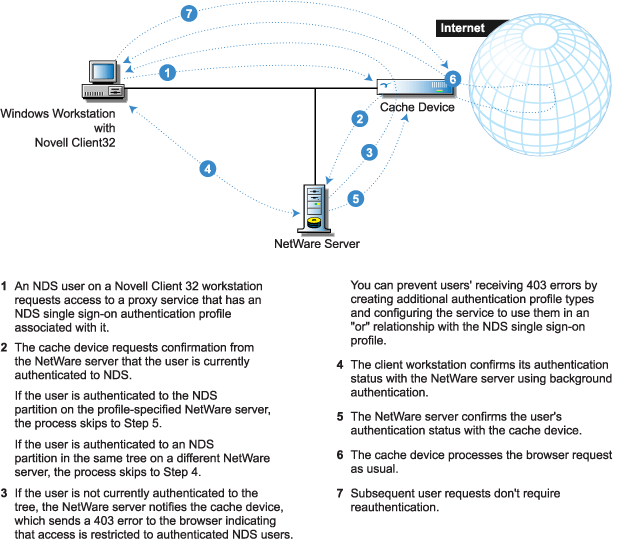
Figure 55 illustrates how NDS single sign-on functionality works
Figure 57
The following table summarizes the platforms supported for NDS authentication:
Table 17.
| Network Component | Software Requirements |
|---|---|
Workstation |
An SSL-capable Internet browser (For NDS single sign-on, Windows 95, 98, NT, or 2000) |
Cache Device |
Excelerator 2.x |
NDS Database |
NetWare 4 or later |
Figure 56 summarizes the configuration requirements for NDS authentication:
Figure 58 
Complete the following steps to set up and enable NDS Single Sign-on:
Create one of the following:
Using an FTP client, access the Excelerator 2.3 device's default FTP directory (/etc/proxy/appliance/config/user) and retrieve copies of the following files:
Install CLNTRUST.EXE on every Novell Client32 workstation that you want to enable for single sign-on authentication.
Copy BGAUTHSV.NLM to the SYS:\SYSTEM directory on every NetWare 4, 5, or 6 server running the NDS database to which users will authenticate.
IMPORTANT: BGAUTHSV cannot be run on a NetWare server that is running any version of Novell Border Manager.
Copy DDCLIENT.NLM to the SYS:\SYSTEM directory on every NetWare 4 server running the NDS database to which users will authenticate.
Load the NLMs you copied to the NetWare servers and include references to them in the servers' AUTOEXEC.NCF files.
Complete the relevant instructions for enabling NDS single sign-on: