Novell exteNd 5 Guided Tour
Introduction to Novell exteNd 5
The exteNd set of development tools provides you, the developer, with the ability
to create end-to-end Web Services that are secure with little to no coding. It
is a comprehensive suite that facilitates the creation (Producing the service)
of Web Services that utilize non-XML data sources such as directories or
relational databases, accomplished with exteNd Composer. The final end point of a Web Service is to present the
results (Consuming the service) to a user. This is accomplished in exteNd, by
building a Portlet that can then be deployed as part of a Web application such
as a portal, to truly make this a complete solution with little to no coding we
need to create forms that are bound to the data in the Web Service, all accomplished in the exteNd Director.
ExteNd 5 provides a Service Oriented Architecture (SOA) that is standards based.
Giving you all the tools you need to develop Web Services and Web Applications
to meet the ever changing needs of your business, utilizing current and evolving
standards that don't lock you in to a specific platform. For more information
about Novell exteNd check out
http://www.novell.com/solutions/extend/.
Documentation on the functionality of exteNd may be found at
http://www.novell.com/documentation/exteNd.html.
To get more information about the technologies discussed in this document please see Resources at then of this document.
Overview of the Application
The application (more like a part of a larger application) you will build in
this tutorial will retrieve basic contact information from an LDAP (such as
Novell's eDirectory) directory. You will retrieve basic information such as full
name, title, phone, and email, then the information will be displayed in a Portlet
that is part of a Web Application. While this is a simple read
application it is the start of a more complete solution, where
the user can maintain contact information about themselves or other Directory users.
The Web Service that you will create could also be utilized by other portlets to
tailor their functionality to give a customer or other user of your
application a personalized look. In developing the Web Applications of tomorrow we need to provide
the people using those applications the relevant information to solve their needs.
The simple example you will build is leading you in that direction by showing how
to retrieve information specific to a user based on a centralized directory repository.
Objective of the Guided Tour
This tutorial is not intended to be a complete coding exercise but rather an
introduction to exteNd and how you can use it to create Web Services and utilize
these Web Services in a Web Application. You will be taking a partially completed
project, writing some code to complete the application. Deploy the application to the
exteNd Application Server, a J2EE Server, then testing the code you completed by
running the application in your favorite web browser.
The code that is provided for you is well commented and it would be
instructive to
review it, you will review some of the key artifacts as you progress
through this tutorial. In the process of working through the Guided
Tour you will also learn how the exteNd Composer and Director
Designer's help you build applications that solve business problems
while minimizing the amount of code that you will need to write.
Intended Audience for Guided Tour
Application developers that are familiar with building applications that provide a
graphical user interface. You should be familiar with visual development tools and
be comfortable with building forms that bind to data sources such as relational
databases.
Software Requirements
Novell exteNd 5
- Novell exteNd Application Server
- Novell exteNd Composer
- Novell exteNd Director
plus...
- MySQL as the database
- XLDAP as the LDAP Directory
- exteNd Director template project, includes a exteNd Composer
project (available in a zip file with documentation)
If you installed the Novell exteNd Professional Suite 5.0 or Novell exteNd
Enterprise Suite 5.0 then everything you need is already on your PC. Evaluation
copies of the software may be obtained at
http://download.novell.com/, select exteNd as the category in the search.
For the latest updates to this document and the source files used, go to
http://www.novell.com/documentation/exteNd.html.
Lets Get Started...
You will start by doing the setup of the template project and database required by the application.
Then you will complete Composer Service that will extract the user
information from the LDAP directory, ultimately deploying this as a Web Service.
After completing the Composer part you will go into Director to complete the user
interface. The web application will request an User ID, invoke the Web Service
returning the information about the user or an error message, then the information
will be displayed.
Exercises
Setup of Guided Tour Project and Database
Section Objective
In this exercise section you will extract the template project to
create your project work area along with creating a database required
for the Director section of the application. You will setup a
connection pool in the Application Server for the Director database.
Updated versions of the template project, this document and a complete
solution may be found at: http://www.novell.com/documentation/exteNd.html.
You will also start the exteNd Application Server and the XLDAP server that you will using for deployment and testing.
Steps
Create Project Area Folder
The template project is found in the base folder where you installed the exteNd Suite. The default
is C:\Program Files\Novell\exteNd5, for the examples in this
tutorial C:\Programs\Novell\exteNd5 will be used. The project is in a zip file that you
must extract, it is found at: [install folder]\Docs\GuidedTour, example;
C:\Programs\Novell\exteNd5\Docs\GuidedTour.
-
Unzip (using your preferred tool) the file template.zip into a work folder on your PC, such as D:\GuidedTour,
make sure you use option to use the folder names during the extract. This will be
your working copy as you go through this Guided Tour.
The folders setup and template\RequestUserInfoProject will be created in your work folder, the RequestUserInfoProject is the Director project folder.
Note: All future references to these projects in the following instructions will use
the base location of D:\GuidedTour\template,
you will need to adjust your actions accordingly, if you used a different location.
- Copy the TreeData.xml file in
D:\GuidedTour\setup folder to C:\Programs\Novell\exteNd5\tools\xldap folder, remember this is your exteNd install folder.
Create MySQL Database
A Director application requires a database to store the data
specific to Director. For the application you are building in this
tutorial you will need to create a database then setup a connection
pool in the exteNd Application Server. The following steps will take
you through the process of creating a MySQL database, but if you wish
you may use any database supported by Director, for more information on
the supported databases see the release notes for exteNd 5.
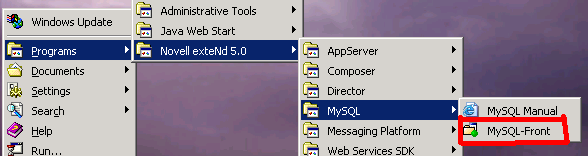
- Start MySQL-Front by going to the Start-->Programs-->Novell exteNd 5.0-->MySQL
menu and clicking on MySQL-Front.
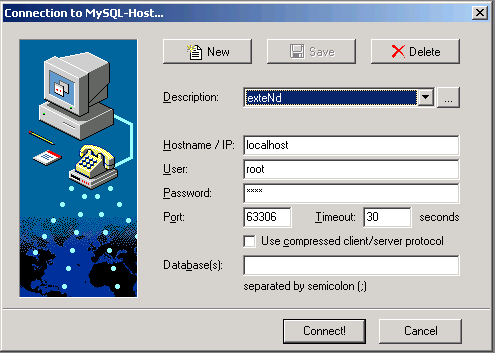
- Using your MySQL root user connect to the MySQL server. Type the password your provided for my MySQL during the install into the Password field.
- Click Connect button to continue.
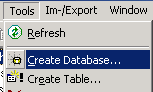
- Select Create Database from the Tools menu.
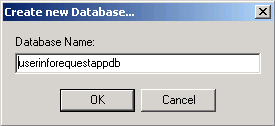
- Type
userinforequestappdb into the Database Name field.
- Click OK.
- It is good practice to assign an administrative ID to a database
other than root. In this way you insure that users of your applications
are only running with the restricted privileges instead of having
unrestricted access as alllowed with the root user.
- Make sure the database you just created is selected then click the SQL Query tab.
- Type the following SQL statement into the query tab:
grant all on userinforequestappdb.* to uireqadmin@localhost identified by 'uireqadmin';
- Click the Execute SQL
 icon or enter F9.
 - Close the MySQL-Front application by using File-->Exit menu.
Start exteNd Application Server
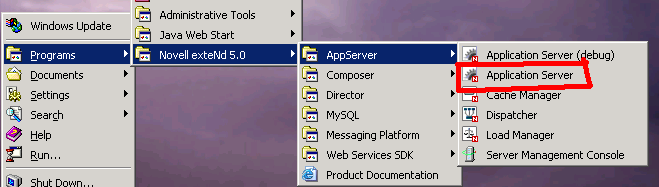
- First you must start the Application Server by going to the Start-->Programs-->Novell exteNd 5.0-->AppServer
menu and clicking on Application Server, do not select the debug option.
- The application server has completed its startup initialization
when you see the following text on the server console, the build
number and server/port will be specific to your install.
exteNd application server [Build Number:Release5.1.0_beta2 (BUILD_510_BETA2_031030_1)] serving at:

   http://jgdext5testvm:80 (runtime, admin)
Create JDBC Connection Pool
The database you created will be accessed as a Connection
Pool in the application server. This improves the performance of the
application and provides for flexibility in deploying by leaving the
definition of what database is being used until deployment time.
The following steps will take you through the process of defining a
pool in the exteNd Application Server.
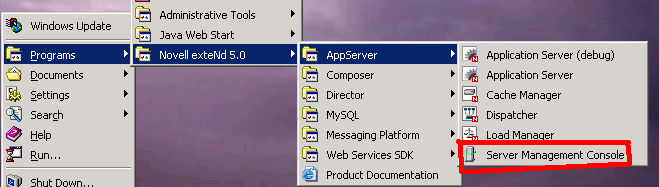
- Once the Application Server is ready, start Server Management Console (SMC) by going to the Start-->Programs-->Novell exteNd 5.0-->AppServer
menu and clicking on Server Management Console.
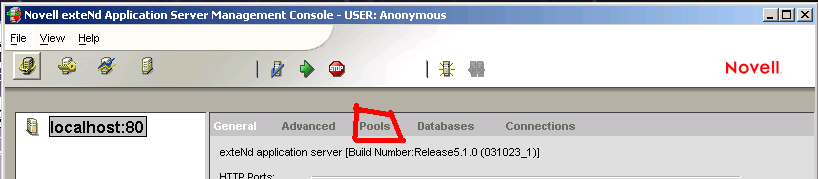
- Select the Pools tab on the Configuration section in the SMC.
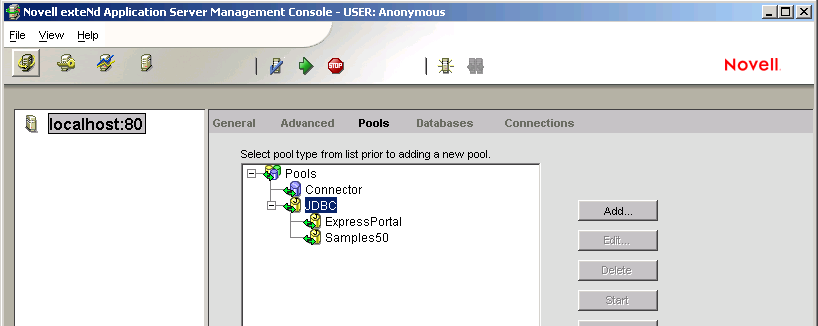
- Select JDBC as the Pools type.
- Click Add button.
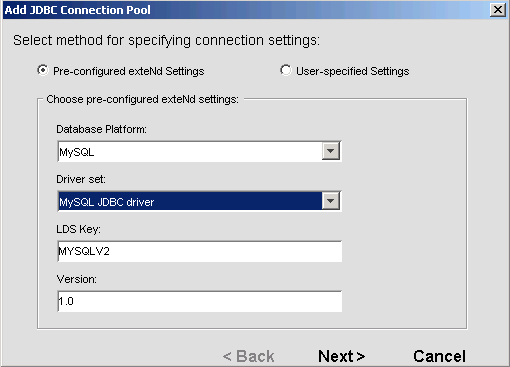
- Select MySQL as the Database Platform from the drop-down list.
- If not selected then select MySQL JDBC driver from the Driver set drop-down list.
- Click Next.
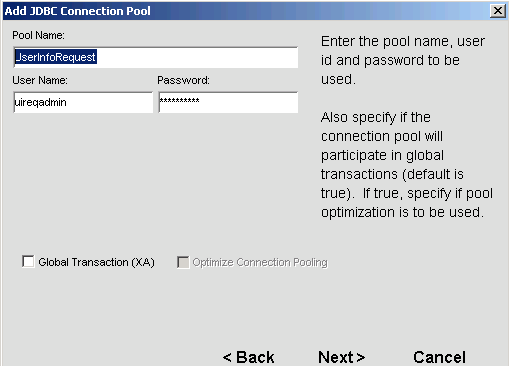
- Type UserInfoRequest in the Pool Name field.
- The complete pool name for a JNDI lookup will be
JDBC/UserInfoRequest.
- Type uireqadmin in the User Name and Password fields.
- Click Next.
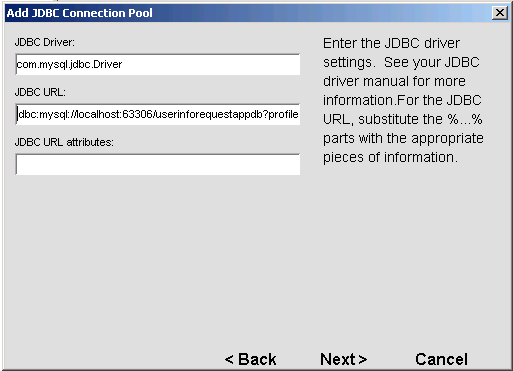
- The JDBC URL template is
jdbc:mysql://%HOST%:%PORT%/%DBNAME%?profileSql=false&maxRows=0
- Change the variables in the template as follows:
- Change
%HOST% to localhost.
- Change
%PORT% to 63306.
- Change
%DBNAME% to userinforequestappdb.
- The URL should read:
jdbc:mysql://localhost:63306/userinforequestappdb?profileSql=false&maxRows=0
- Click Next.
- Click Next on the optional connection pool properties dialog.
- Accept the default connection pool manager properties by clicking Finish.
- Close the SMC application by using File-->Exit menu.
Start xLDAP Directory Server
The xLDAP Directory Server is the data source that will be used by the Composer
Web Service that you will complete. xLDAP is a simple LDAP
directory implementation developed to provide a LDAP Server to be used by developers for
development and testing.
- Start the XLDAP server by double-clicking on the file StartxLDAP.bat
in
C:\Programs\Novell\exteNd5\tools\xldap.
- Minimize Novell exteNd xLDAP Development Server by clicking on the
 icon.
icon.
Complete the Composer Project
What is Composer?
Novell exteNd Composer is a development (and runtime) environment designed for rapid
design and deployment of Web Services and XML integration to applications. Applications
that can connect to diverse back-end systems (read legacy) and data sources. It offers a flexible,
intuitive, point-and-click GUI (graphical user interface) for rapid application
development, giving the business analyst or application developer a powerful tool for
creating robust XML integration solutions in minimum time.
Section Objective
This project provides a Composer Component that extracts information
from an LDAP directory. The component (using the LDAP Connect)
provides basic user information, such as name, phone, title, etc. Your
objective is to complete the application by completing a Composer Service
that you will deploy as a Web Service to receive a request with user
ID and provide the information supplied by the component.
Steps
Start Composer and Open Project
- Start Composer by going to the Start-->Programs-->Novell exteNd 5.0-->Composer Designer
menu and selecting Composer Designer.
- In the interest of time you will use a template project that
has some of artifacts you need already coded. We will be reviewing some
of the artifacts and completing the steps required to complete this
part of the application.
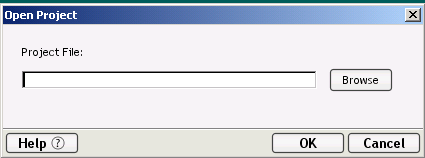
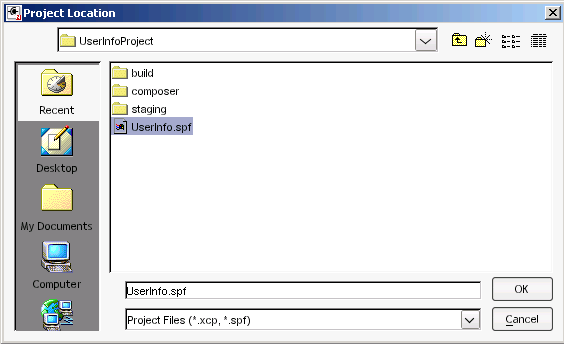
- Open the project by selecting menu File-->Open Project...
- Navigate to the project folder by clicking the Browse button. The project
folder is: D:\GuidedTour\template\RequestUserInfoProject\UserInfoProject
- Select the project file UserInfo.spf then click OK.
- Click OK.
Review LDAP Component
You will review the component that will retrieve the information from
the xLDAP server. This component was created using the Composer LDAP
Connect.
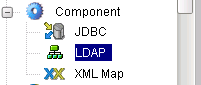
- In the Category pane of the Navigation panel select Component then LDAP.
- In the Detail pane of the Navigation panel double click RequestUserInfo, this will open the
component in the Editor panel.
Composer Component Editor Layout (a sidebar)
In this section we will take a brief
detour to get a better understanding of the functionality provided in
exteNd Composer to allow you to quickly build and test solutions that
access legacy data sources.
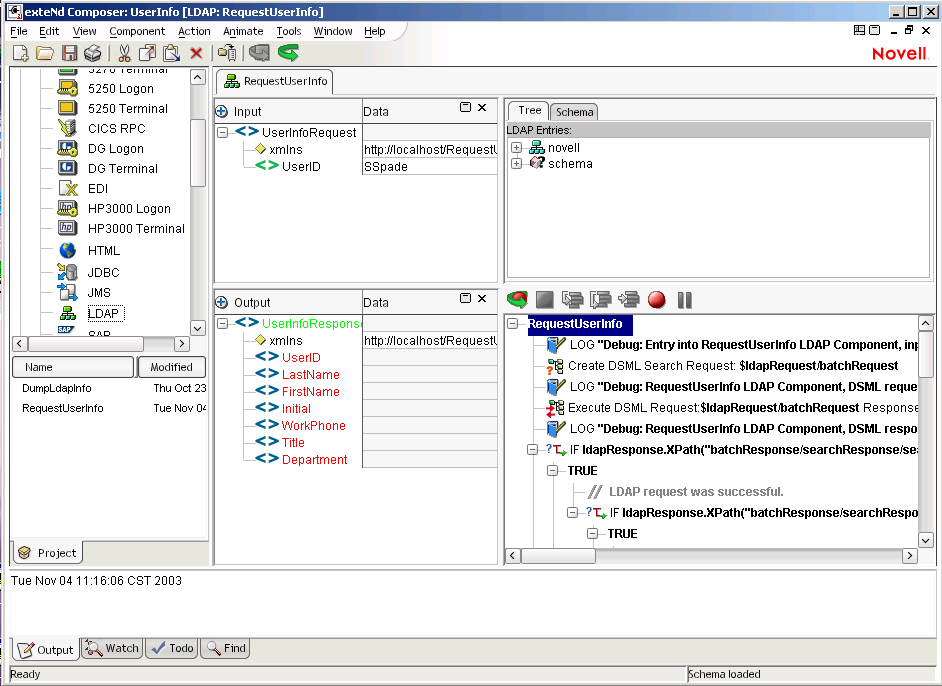
Above is a complete screen shot of the Composer Designer showing
you an open LDAP Component in the Editor panel. The editor itself is
devided into three sub-panels.
- The XML Documents panel or DOM (for Document Object
Model). In
this panel you may view and work with the XML documents that are being
manipulated by the component. As part of managing the screen layout you
can control which of these DOMs you wish to make visible at any point
to make it easier to work with the Designer.
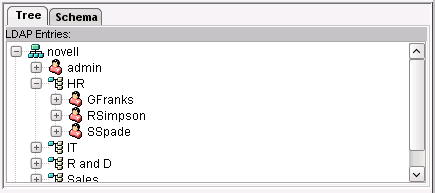
- The Native Environment panel is used by Composer Connects to
provide
a native view into the data source for which the Connect provides the
integration interface. So in the LDAP Connect we see a pictorial view
of the Directory tree.
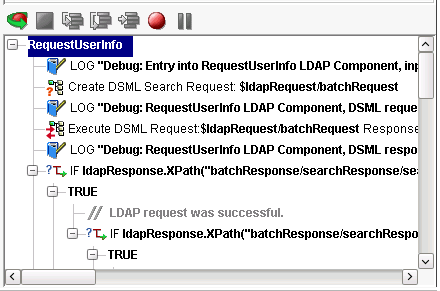
- The last panel is the Action Model, Actions are the language of
Composer. They are a visual representation of the instructions that will be
executed to produce the required results. The majority of components will take the
input XML and process it to produce the XML output.
-
The tool bar above the Action Model is called Animation Tools.
They allow you to test and troubleshoot actions within your services
and components. You can work your way through a service or component's
Action Model step-by-step and watch the result of each action. Not only
will you be informed of any action failures, but you can verify that
the data looks like what you planned.
For testing one particular section of
an Action Model, the animation tools allow you to set one or more
breakpoints. This way you can quickly run through actions that work
properly, stop the test at the actions that are giving you trouble, and
then step through each problematic action.
 |
Start Animation: Clicking this
button starts the animation process. |
 |
End Animation: Clicking this
button stops the animation process. |
 |
Step Into: Clicking this button
executes the currently selected action and highlights the next
sequential action. If the currently selected action is a Component,
Repeat, Decision, or Try/On Error action, then the next highlighted
action becomes the details of those actions. |
 |
Step Over: Clicking this button
executes the currently selected action and highlights the next
sequential action. Unlike the Step Into button, clicking this button
does not highlight and execute the details of Component, Repeat,
Decision, or Try/On Fault actions. |
 |
Toggle Breakpoint: Clicking this
button sets the highlighted action in the Action Model as a breakpoint.
You may set more than one breakpoint. |
 |
Run To Breakpoint/End: Clicking
this button runs the animation to the next breakpoint or to the end of
the Action Model. |
 |
Pause Animation: Clicking this
button pauses the animation. |
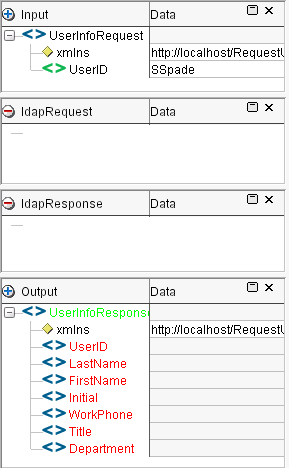
Input and Output
for LDAP Component
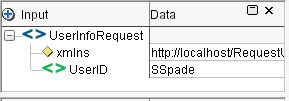
- The Input XML document is a sample of the data required to make a
request for user information. This sample is stored in Composer in a
XML Template that is used to assist the developer in writing the action
model and testing the execution of the model.
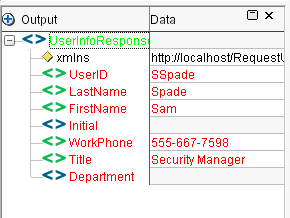
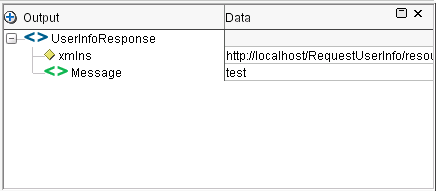
- The Output XML document is a sample of the data that will be
provided to fulfill the request. Like the Input it is also a Composer
XML Template.
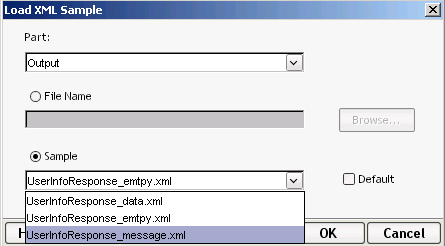
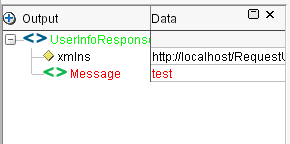
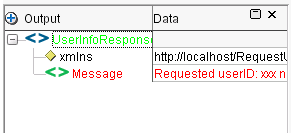
- The sample of the XML Output is what will be sent if the
component is successful in connecting to the Directory and finds the
user information. If the user does not exist a message will be sent
instead. The XML Template for the output has a sample of the XML
structure, you will view this sample.
- In the Output XML document in the editor right-mouse click to
open the context sensitive menu.
- Select Load XML Sample...
- Click on the Sample drop-down
list then select UserInfoResponse_message.xml.
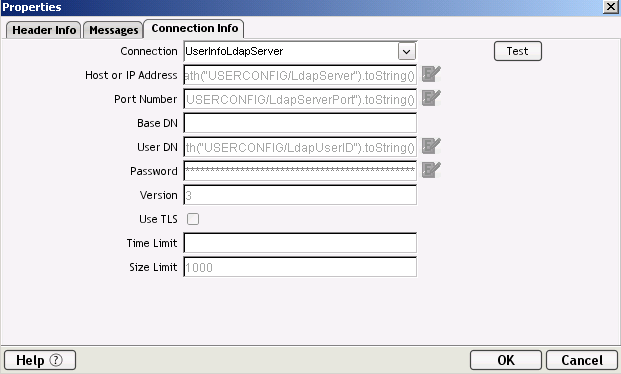
LDAP Connection Resource
- For this component to connect to an LDAP server it requires a
Connection Resource that provides the specific information required to
establish a connection to the xLDAP Directory Server you are using. You may view
the Resource used by this component by following these steps.
- From the menu bar select File-->Properties...
- Select the Connection Info tab.
- The Connection tab provides the information for the Connection
Resource being used in a read-only mode. By clicking the Test button
you can verify that a connection can be established to the xLDAP server.
Note the little icon next to some of the field values, this indicates
that an ECMAScript expression is used to create the required value. The
actual values are stored as Project Varaibles in our project where you
can easily change them in one place or even dynamically before the
component is executed.
- Click OK to close the
dialog.
Action Model Review
The Action Model is the collection of instructions that are
executed in sequence to process the input to produce the output, in
other words classic computer programming. In the next few paragraphs you
will be reviewing some of the key Actions in the LDAP component that
will be executed by the Web Service you are going to complete.
- The first Action is a Log Action use to report debug level
information, this logging can be turned on by setting the Designer or
Server Log threshold. After deployment to an application server
these log actions may be very helpful in tracking down problems with a
deployed application and it is good development to be proactive about
adding them to your code. If you wish to see the results of the debug
log actions in this project you must set the Log Threshold in the
Preferences to 4 or lower.
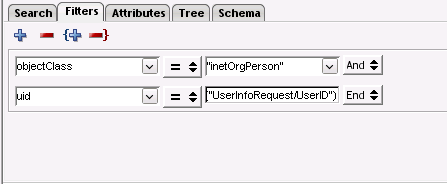
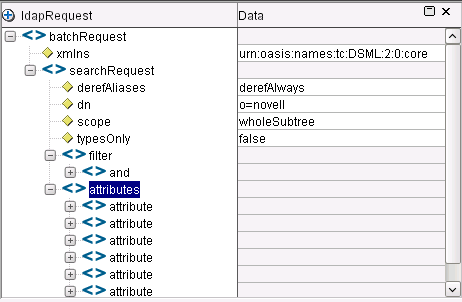
- The second Action is Create DSML Search Request, which is used
to create an LDAP request as a DSML XML document. This action is used to
create the actual query details (the where clause) and to identify the
attributes that are to be returned.
- When you select the action the Native Environment panel allows
you to review and edit the details of the search request. The UserID in
the Input XML Document is used to query the uid attribute in the
Directory.
- The results of executing this action is an XML document that is
placed in a tempory XML DOM that you can view in the XML Documents
panel.
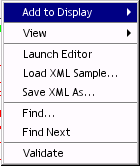
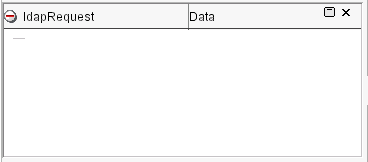
- Right-mouse click in
the XML Document panel,
select Add to Display
sub-menu, select ldapRequest.
This is the temporary
XML DOM used to hold the XML created by the Create DSML Action.
- In the Action Model select the Create DSML Search action.
- Click on the Execute
Current Action icon
 on the tool bar. This will execute
the action and you will be able to view the XML created for the request
in the XML Document panel.
on the tool bar. This will execute
the action and you will be able to view the XML created for the request
in the XML Document panel.
- Click the Execute All
 icon on the toolbar, this will cause entire Component to be executed, providing you the results of a successful query.
- Click OK at the Execution completed message dialog.
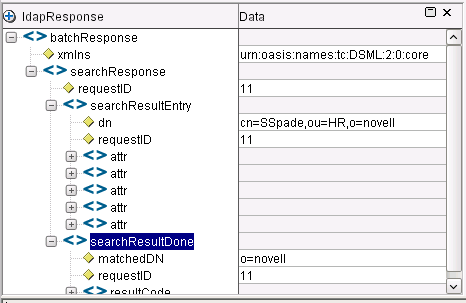
- The fourth action, Execute DSML Request will take the request
created by the Create DSML action and connect to the server to execute
the request. The result will be placed into another temporary XML
document called ldapResponse.
- Native panel view when action is selected, after execution.
- ldapResponse XML Document after action executed, use the steps you learned above to make it visible.
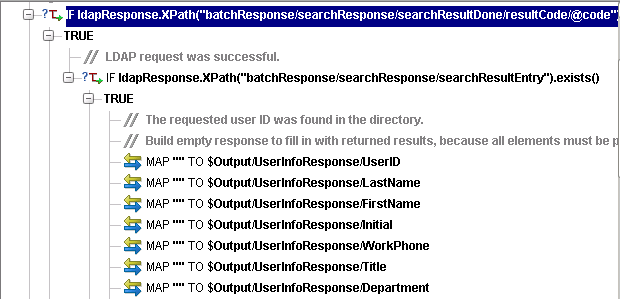
- A little bit further down in the Action model you will see the
Decision action to check for a successful request and the TRUE block of
actions that will be exetuted. This sequence of actions is used to
produce the required output that you saw in the Output XML Document
earlier. First the XML document is created with no data to insure that
the structure of the XML document conforms to the schema. Composer will
always create well-formed XML, it is your responsibility to insure that
the XML is valid when an XML Schema or DTD is specified.
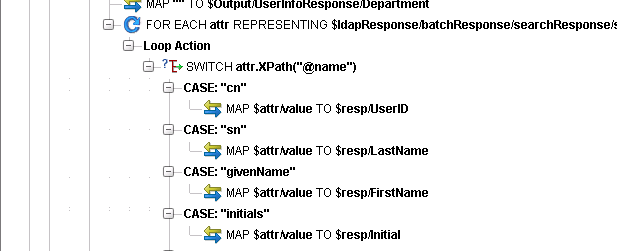
- The next step is to handle each of the attributes returned in
the result and place the data in the XML document. The DSML response
will contain a repeating element for each of the attributes that was
requested and is available for that specific entry in the directory.
The action model must loop throw each of these repeating elements and check
the attribute name, placing the value into the correct element in the
output XML document.
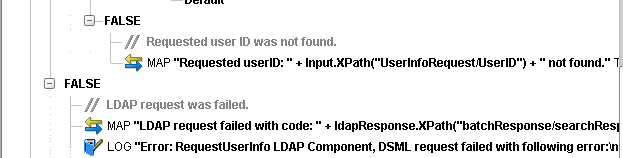
- The FALSE blocks of the Decision actions contain a Map action
that creates the Message structure that is provided in the event of a
failure. Along with a log action when failure occurs at the LDAP request.
- The final step is a Apply Namespace action that adds a
reference to the XML Schema namespace that can be used to validate this
document.
Test the Component
With the Composer Designer you can test the execution of the component
without having to deploy to a J2EE Application Server. You will now
test the component first with a valid user ID and then with an invalid ID.
- The valid User ID is already provided for in the default XML
Input sample. Click the Execute All icon on the toolbar.
- Click OK for the
Execution completed message dialog.
- Review the Output XML Document.
- To enter an invalid User ID you need to change the Input sample.
Double click on the value SSpade.
- Type xxx replacing SSpade.
- Click OK.
- Click the Execute All icon on the toolbar.
- Click OK for the
Execution completed message dialog.
- Review the Output XML Document.
Close Component Editor
You are done reviewing the LDAP Component.
- Click on the Close document
frame icon in the editor to close the component.
- Click No, if prompted to save changes.
Complete Action Model for Service
In using Composer, a service is required to act as the interface to the
outside world. An application that wishes to utilize the LDAP Component
you reviewed must invoke a service through a Service Trigger (more on
this later) that will execute the component or even possibly other
components. A Service has an Action Model so that it too may perform
some work. In this section you will complete the service that was
started to accept the requested user ID and return the information
supplied by RequestUserInfo component.
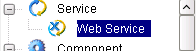
- In the Category pane of the Navigation panel select Service then Web Service.
- Although the service we selected is classified as a Web Service
it does not necessarily mean that it is a "Web Service" with a WSDL and
SOAP binding. It is a Web Service in the sense that it will normally be
invoked as part of a Web Application and that it responds to request/response model used
with HTTP. When it is deployed to a J2EE
Application Server (like Novell exteNd Application Server) is when the
service trigger (or triggers) for invoking it will be created and one of
the options available to you is to use a "Web Service" with a WSDL and
SOAP binding.
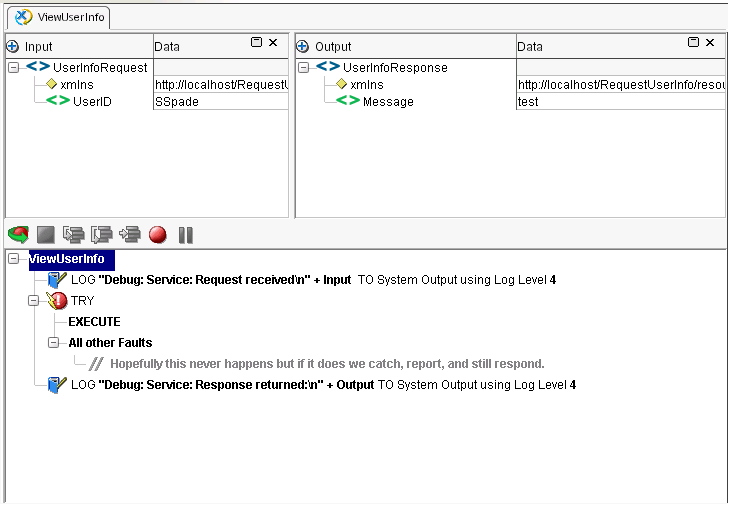
- In the Detail pane of the Navigation panel double click ViewUserInfo, this will open the
service in the Editor panel.
- Note that the XML Output sample used for the service is the
message response. This was set as the default because the service will
normally take the output produced by the LDAP component as its output
but in the event that the component fails to execute for any reason
then
the service will respond with a message.
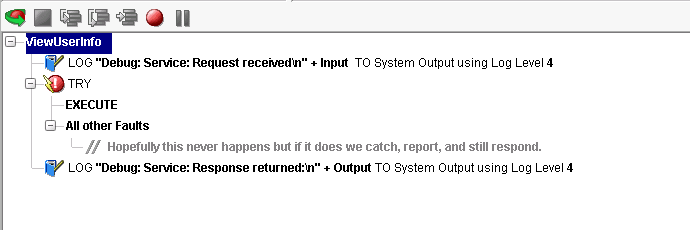
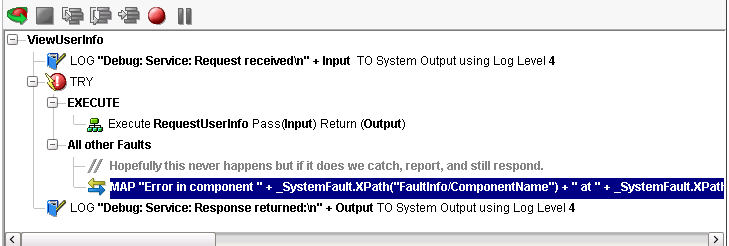
- The Action Model for the service has been partially completed. The
Try On Fault action is a wrap for the execution of the component, if it
fails the Fault section will be executed and a Log action will send a
log message to the System Output. You will add the action to execute
the RequestUserInfo component
and a Map action to create the XML output in the event of a fault.
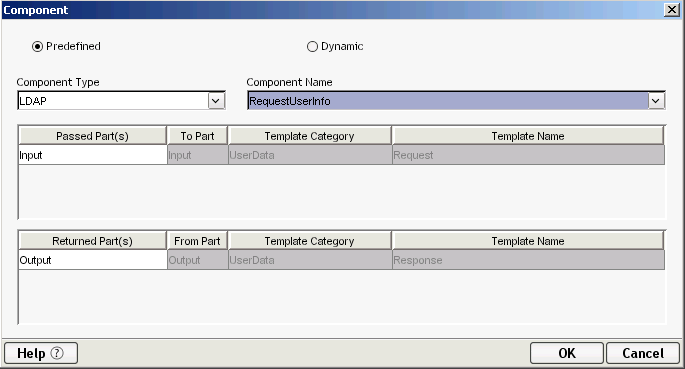
- Select the EXECUTE of the TRY action.
- Right-mouse click for the context menu then select New Action-->Component...
- Component Type is LDAP,
Component Name is RequestUserInfo, select it from drop-down list,
Passed Part will be Input from
the Service to Input of the Component, the Returned Part will be Output of the Service from the
Component.
- Click OK.
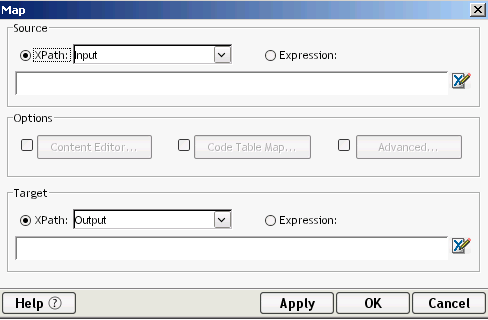
- Select All other Faults of the Try/On Fault action.
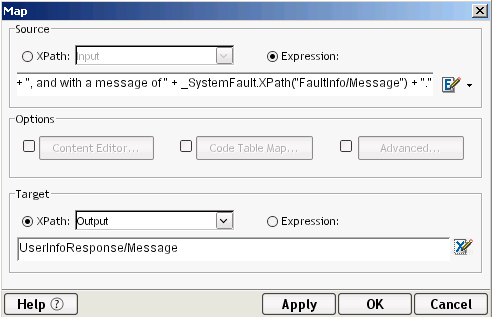
- Right-mouse click for context menu then select New Action-->Map... or use the keyboard shortcut Ctrl+M.
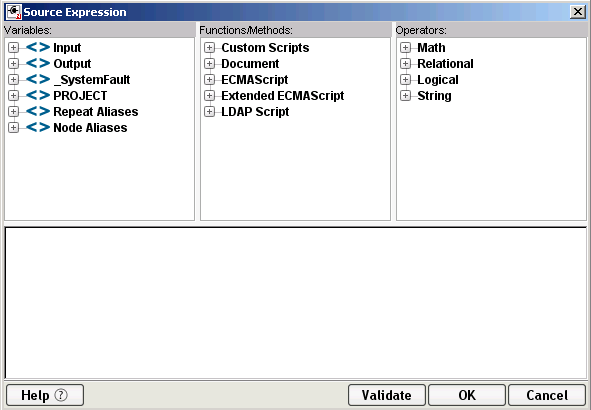
- In the Source area click the Expression
radion button, then click
 icon
to open the Expression editor.
icon
to open the Expression editor.
- Type the following, including the quotes.
"Error in component
" + _SystemFault.XPath("FaultInfo/ComponentName") + " at " +
_SystemFault.XPath("FaultInfo/DateTime") + " with MainCode " +
_SystemFault.XPath("FaultInfo/MainCode") + ", SubCode " +
_SystemFault.XPath("FaultInfo/SubCode") + ", and with a message of " +
_SystemFault.XPath("FaultInfo/Message") + "."
- The _SystemFault is
a Composer DOM variable that holds an XML document in the event that a
System Fault occurs. You could of forced a fault (by stopping your XLDAP
Server for example) during the execution of the service. Then in the
expression editor you could of used the
 icon next to _SystemFault, revealing the
structure of this document. When you double click on an XML element in a
DOM variable such as _SystemFaultthe
expression editor will write the appropriate ECAMScript; example _SystemFault.XPath("FaultInfo/DateTime").
icon next to _SystemFault, revealing the
structure of this document. When you double click on an XML element in a
DOM variable such as _SystemFaultthe
expression editor will write the appropriate ECAMScript; example _SystemFault.XPath("FaultInfo/DateTime").
- In the Target field type UserInfoResponse/Message
or you can use the Expression editor by clicking the
 icon.
icon.
- Click OK.
- To place the Map Action after the Comment Action you can drag-n-drop. Click on the
Map Action with left mouse button, hold it and drag it down to the Comment
Action then release the left mouse button.
- Click the Execute All icon on the toolbar.
- Click OK for the
Execution completed message dialog.
- Review the Output XML Document.
- Click on the Close document
frame icon in the editor to close the service.
- Click Yes, if prompted to save changes.
Create the Web Services Definition
Language (WSDL)
Now that the service is completed and tested, your next task is to
create a WSDL for the service. You need to do this because you will be
deploying this service as a Web Service and the WSDL is required for the
Service Trigger that will be generated. The WSDL will also be used by the consumers of this
Web Service that you will build in Director as the user interface of the application.
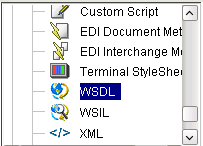
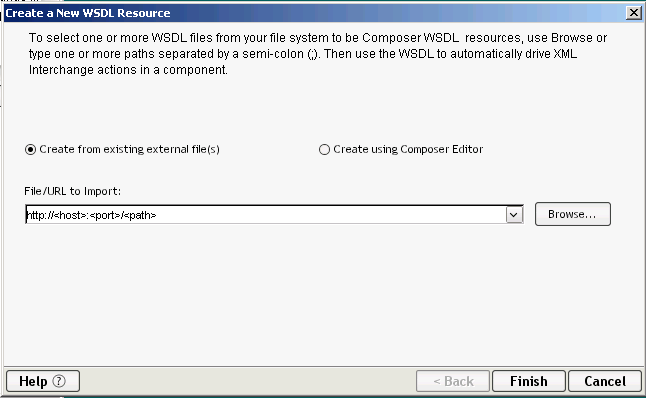
- In the Category pane of the Navigation panel select Resource then WSDL.
- Right-mouse click for context menu then select New.
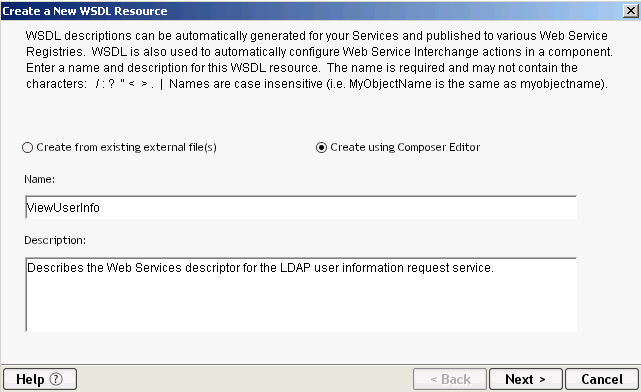
- Select Create using Composer Editor radio button.
- Type ViewUserInfo in
the Name field.
- Type Describes the Web Services
descriptor for the LDAP user information request service. in the
Description field.
- Click Next.
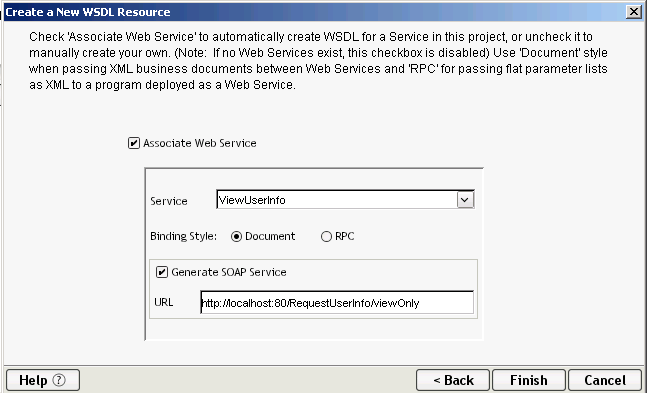
- Select ViewUserInfo
from the Service drop-down list.
- Check Generate SOAP Binding checkbox.
- Type http://localhost:80/RequestUserInfo/viewOnly in the URL field.
- Click Finish.
- If prompted with a message click OK.
- Click on the Close document
frame icon in the editor to close the service.
- Your are done, with the creation of the Composer Web Service part of the application. Next is deploying and testing.
Deploy and Test the Web Service
Section Objective
The Composer project you just worked is part of a Director project.
Composer is being used as the data layer of the application and
Director will be used for the presentation layer. By cleanly separating
the two layers changes may be made to one without necessarily requiring
changes in the other.
In this section you are going to create a Service Trigger for the
Composer Service you completed, deploy the application, then use
Composer to test the SOAP interface to the Service.
Steps
Start Director and Open Project
In the interest of time you will use a template project that
has some of artifacts you need already completed, including the addition of the Composer project. In the next section (Complete the Director Project) you will be reviewing some
of these artifacts, once you completed the required artifacts, you will then test the completed application.
-
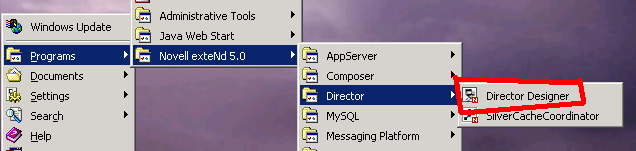
Start the Director Designer by going to the Start-->Programs-->Novell exteNd 5.0-->Director
menu and selecting Director Designer.
- Open the project by selecting menu File-->Open Project...
- Navigate to the project folder by clicking on the Look in drop-down list. The project
folder is D:\GuidedTour\template\RequestUserInfoProject
- Select the project file RequestUserInfo.spf
then click Open.
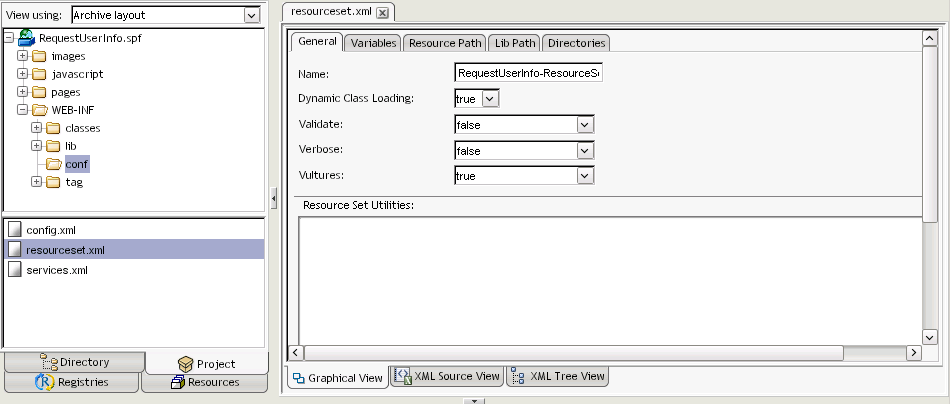
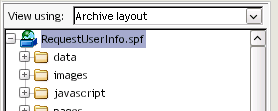
- Change the view
 in the
navigation pane to Archive
layout view.
in the
navigation pane to Archive
layout view.
- This view will show you where the various artifacts in your
project are placed in the archive that will be deployed to the server.
The default view is source, which shows you where the actuall artifacts
are stored on the file system. In J2EE where things are placed in the
archive is important.
- All the artifacts of the Composer and Director projects are
stored as files in folders located relative to the project file that
you opened in the respective Designers. One of the features of Director
that helps the developer cut down on the amount of time required in
testing by reducing the number of deployments required is the Resource
Set, for more details on the Resource Set see the chapter "Using the Resource Set in an exteNd Director Application"
in the documentation. A Director project has a configuration file
called resourceset.xml and for the Resource Set to be used properly in
the Designer and Application Server a variable in the file must point
to the projects physical location on your drive. In the following steps
you will adjust this variable because the current location of your
project is most likely different from the location used to create the
project initially.
- In the Folder pane of the Navigation panel click icon next to the WEB-INF folder.
- Select the conf folder.
- Double-click on the resourceset.xml file in the Detail Pane of the Navigation panel to open the file in the Editor panel.
- In the Editor pane click on the Variables tab.
- Locate the WARLOCATION key and change its Value to point to the physical location where you placed the template project, for example: D:\GuidedTour\template\RequestUserInfoProject.
- Press Enter to save the change.
- Click
 toolbar icon to save your
changes.
toolbar icon to save your
changes. - Close the open editor by clicking
 on the editor title tab
  .
.
Create SOAP Based Service Trigger
A Composer Service requires a Java Service trigger that will interact
with the Composer runtime on behalf of the users of the Service.The
Composer service you completed will be invoked as a Web Serivce using
SOAP. For working with Web Services what we need is a Java Servlet that
is listening at the URL specified when you created the WSDL (see Create the Web Services Definition Language), which is what you are going to do in this section.
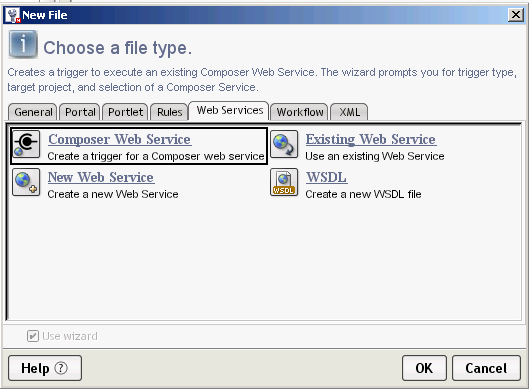
- Click on the New File
icon
 .
. - Select the Web Services tab.
- Select the Composer Web Service wizard.
- Click OK.
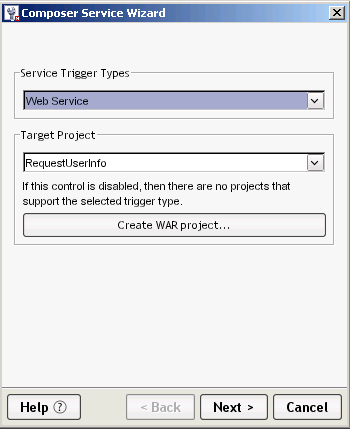
- Select Web Service as the Service Trigger Types.
- Verify that RequestUserInfo is the target project.
- Click Next.
- Verify that UserInfo is the project selected.
- Select ViewUserInfo as the Service.
- Click Next.
- Accept the defaults.
- Click Finish.
- Click OK for the Composer Deployment Wizard confirmation dialog.
Using the Director Designer (a sidebar)
The Director Designer along with providing you with the ability to
visually create Director artifacts such as Portlets and XForms is also
used to keep track of the J2EE specific artifacts and to build/deploy
the J2EE archives that make up your project. In this section we will
take a slight detour to look at some of the features of Director that
are useful in managing the development of a Web based solution.
- In the previous section you created a Composer Service Trigger
and you may of noticed that no source file was opended in the editor.
So you may wonder do I have a service trigger or not? And the answer is
yes. The Composer runtime provides a generic servlet implementation
that deals with receiving and responding to SOAP requests on behalf of
a Composer Service. All that is needed to use this servlet is some
entries in the web.xml (J2EE Web Application Descriptor file) to
properly configure an instant of the servlet. Lets view these entries:
- Scroll up the Folder pane of the Navigation panel until you see the RequestUserInfo.spf entry for the project then select this folder.
- Click the right-mouse button to open the Context menu then select Open Deployment Descriptor.
- If you get the Select Build Option dialog and do not wish to see this dialog again select No, don't build now, Never automatically build my project then click OK.
- It is usually better to explicitly build your project rather
than having it done automatically especially when all you want to do at
this moment is simply view the descriptor file. When you deploy your
project in a later section the Designer will check if a build is
required at that point.
- You could of also opened this file by navigating to the
WEB-INF folder and selecting it in the details. The descriptor file is
always called
web.xml and will always be located in the WEB-INF folder of the archive.
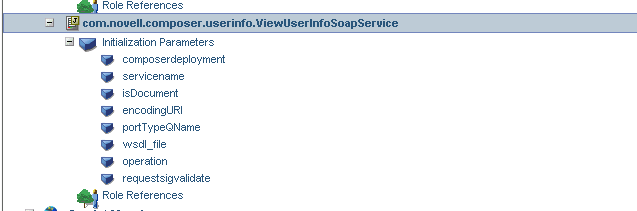
- In the editor panel scroll down until you see an entry called com.novell.composer.userinfo.ViewUserInfoSoapService, this is the servlet configuration.
- The web.xml file is XML and the Designer gives you access
to the actual XML but in most situations you will use the visual editor
which provides a property editor for each of the elements in the file
that you can edit by using the right-mouse button to bring up a
property editor.
- If you scroll further down you also find a Servlet Mapping
entry for this servlet that configures the proper URL pattern that this
instance will use.
- Close the open editor by clicking on the editor title tab.
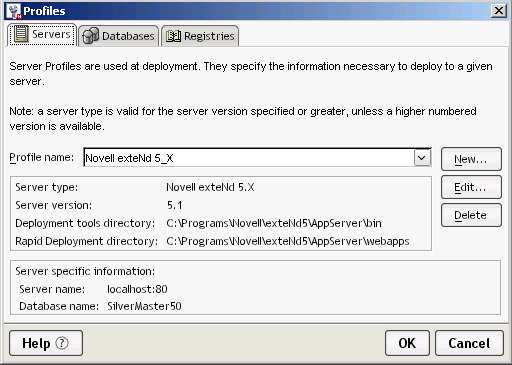
- The Designer has separate profiles that are used to define the
details required for deploying to an application server. In this
tutorial we are using the default profile that will deploy to exteNd
Application Server running locally on your PC. If you wish to review
this profile or create a new one use the profile editor available from
the Tools-->Profiles... menu.
Deploy the Application
Now you are ready to deploy the application to the exteNd
Application Server so that you may test the Composer Service as a Web
Service.
- Scroll up the Folder pane of the Navigation panel until you see the RequestUserInfo.spf entry for the project then select this folder.
- Click the right-mouse button to open the Context menu then select Open Deployment Plan.
- The Deployment plan defines the server specific details to
successfully deploy the application to the exteNd Application Server.
It is created and maintained in the Designer by using the Descriptor
file (web.xml), you should always review it and save before doing a
deployment.
- Note: If you are deploying to a different server you will need to change the profile used by this plan.
- Click toolbar icon to save your
changes.
- Close the open editor by clicking on the editor title tab.
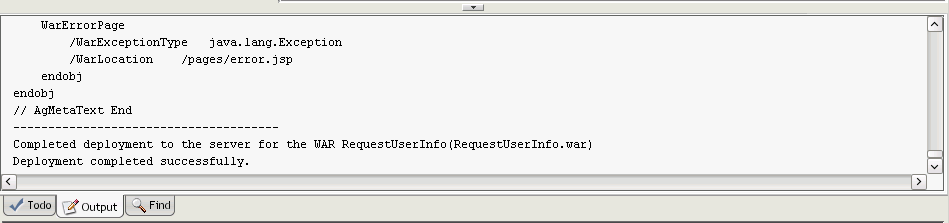
- Click the Deploy toolbar icon
 .
.
- Time to take a break.
- When you see Deployment completed successfully.
in the Output panel of the Designer your deployment has completed. This
first deployment took a little bit longer because not only was your
application deployed to the server and then started by the server but
the database was also initialized. This was the database you created
and defined a connection pool for in the Setup of Guided Tour Project and Database section above.
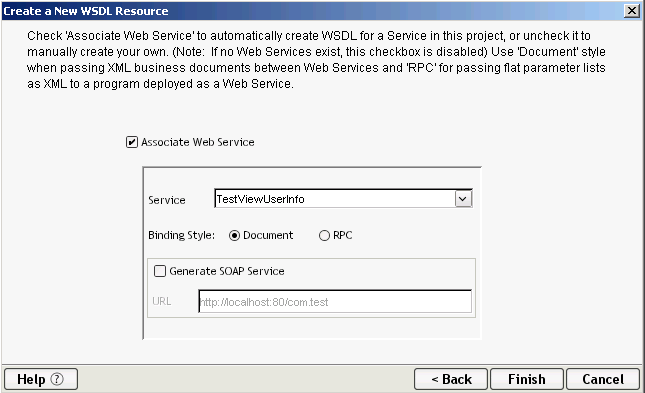
Test Web Service using Composer
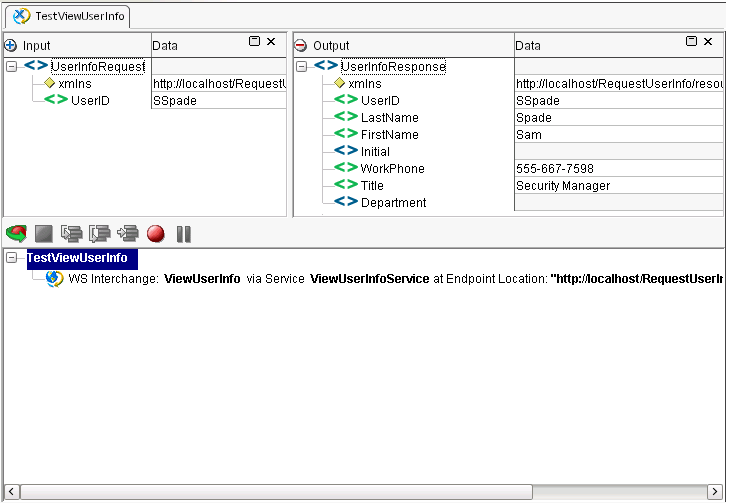
In the Composer project there is a Service (TestViewUserInfo) that was
created to test the deployed ViewUserInfo as a SOAP service. This
service has one action the WS Interchange which is used by Composer to
consume a Web Service that uses SOAP binding. In this section you will
use this Service to test the application you just deployed.
- As part of our testing you want to see the output from the log
actions in the Composer Component and Service to appear on the server
console. For this to happen you need to set the log threshold on the
server using the Composer Administrator Console.
-
Open a browser window by double-clicking on the Internet
Explorer icon
 on the desktop or use your favorite Web Browser.
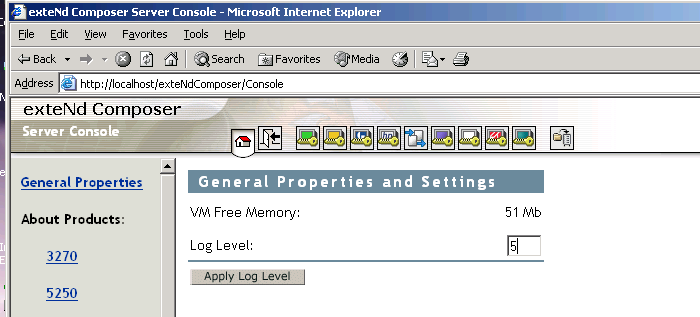
- Type in the URL http://localhost/exteNdComposer/
in the address bar then press Enter.
- Type in the exteNd Application Server Administrator User ID and
Password that you supplied when you installed the exteNd 5 Suite then
click OK.
- Change the Log Level to 4 then click Apply Log Level.
- Close the IE Browser application by using File-->Close menu.
- Open the Composer Designer, it should still be opened from the earlier section therefore using Alt+Tab should get you to it.
- In the Category pane of the Navigation panel select Web Service under the Service category.
- Double-click on TestViewUserInfo to open the service in the Editor panel.
- Click the Execute All icon on the toolbar.
- Click OK on the Execution completed dialog.
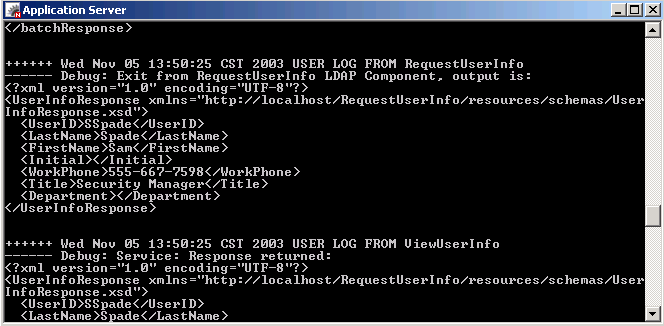
- You should see results returned the SOAP service in the Output
DOM of the editor. And when you look at the server console you will see the log results from the Composer runtime.
- Congratulations you have successfully completed a Composer Service and deployed it with a SOAP Service Trigger.
- Close the Composer Designer application by using File-->Exit menu. You will not need Composer for the remainder of this tutorial.
- When prompted to confirm closing Composer click Yes.
Complete the Director Project
What is Director?
Novell exteNd Director is an interaction, portal server that enables IT organizations
to rapidly deliver and easily maintain rich, personalized Web applications. It provides
a comprehensive development environment to help you create state-of-the-art interactive
applications that users access through a portal.
- Powerful J2EE capabilities for the rapid implementation of sophisticated, services-oriented business Web sites
- Dynamic content, data, and Web Services
- Build interactive form based applications that consume Web Services
- Model business processes using workflow, rules, and content management
- User personalization and profiling
- Deliver to any front end (browser, PDA, phone, kiosk)
- Multiplatform, multivendor combinations of application servers, databases, and operating systems
Section Objective
In this section you will a simple application that will present an
initial form to the user requesting a User ID then will invoke the Web
Service (Composer ViewUserInfo) that you deployed. The application will
then display the results returned using one of two forms depending on
whether user data was returned or a message. This application will run
as a Portlet in a Personal Page of a Portal application. As you
complete the application you will also have the opportunity to test
your application.
Steps
Create Web Service Pageflow using Wizard
In this section you will use a Director wizard to create a pageflow
which is a Director artifact that links together XForms (presentation
and data binding) to the invocation of a Web Service. It builds XForms
based on the schema in the Web Service ties it all together to invoke
the Web Service and includes default exception handling all without you
writing any code.
- Click on the New File
icon to use the Pageflow wizard.
- In the New file dialog select the Portlet tab.
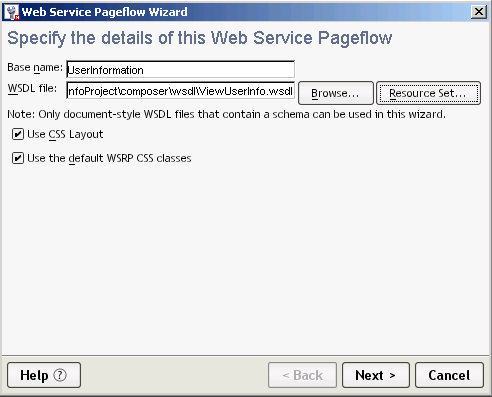
- Select the Web Service Pageflow
wizard.
- Click OK.
- Type UserInformation for
the Base name.
- Use the Resource Set button
to navigate to the location of the WSDL in the Composer project.
- In the Choose file dialog click icon to expand the folders until you see the ViewUserInfo.wsdl file.
- Select the ViewUserInfo.wsdl file.
- Click OK.
- Accept the default checks on Use
CSS Layout and Use the default
WSRP CSS classes.
- Click Next.
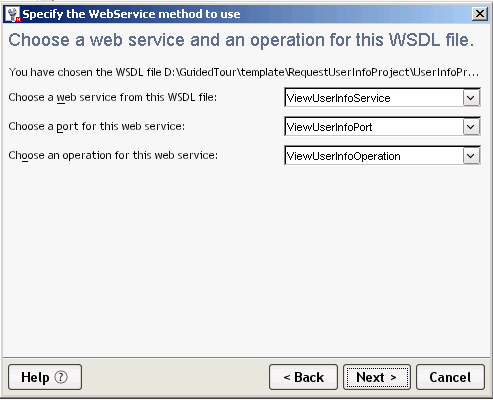
- The WSDL only has one Operation therefore take the defaults for
the Select the Web Service method dialog by clicking Next.
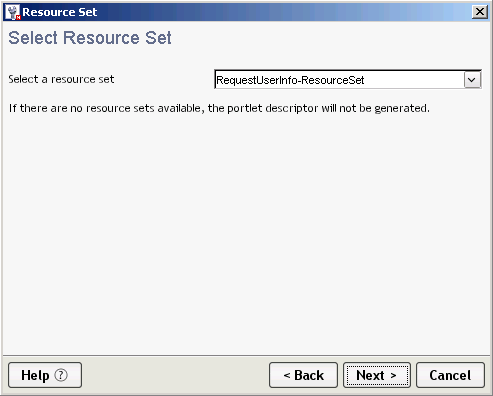
- The Director project only has one Resourceset therefore click Next in the Resource Set dialog.
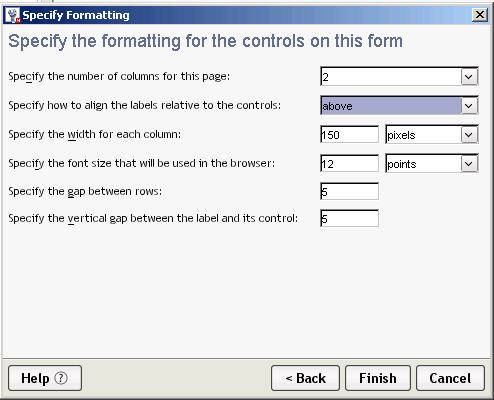
- In the Formatting controls tab select 2 for number of columns.
- Select above for the
label alignment.
- Click Finish.
- Click OK on the Done creating forms and pageflow
message.
- Use the percentage drop down list
 to ajust the size of the pageflow diagram in the editor. 100% is a good compromise between size and readability.
The Resource Set in a Director Application (a sidebar)
An exteNd Director resource set organizes descriptors and other files used by exteNd
Director subsystems and provides for dynamic loading during development, avoiding
frequent redeployments and speeding up your testing. Each custom Web application can
include a resource set.
A resource set holds application-defined resources and classes. Some of these resources
are templates or definitions for using a subsystem's features, such as a rule, XForms,
Pageflows, or a portlet descriptor. Others specify how subsystems work together,
such as bindings between rules and users. Resources are usually XML files; some are
accompanied by Java classes.
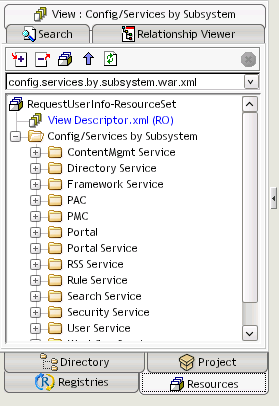
- A resource set organizes your application's resources in a
known directory structure and within the Director Designer you may use
the Resources navigator to find the various artifacts in your project.
For example if you wanted to find all the files created in the previous
section you would...
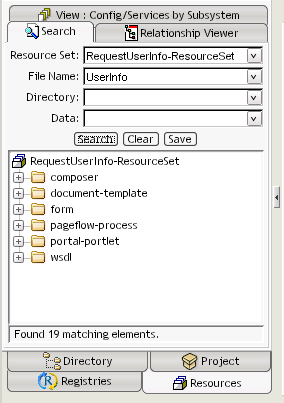
- Select the Resources tab in the Navigation panel.
- Select the Search tab.
- In the File Name field type UserInfo.
- Click the Search button.
- You can save this search as a view to reuse the search criteria at a later time. Click the Save button.
- Name the file UserInfoStuff.xml then click Save.
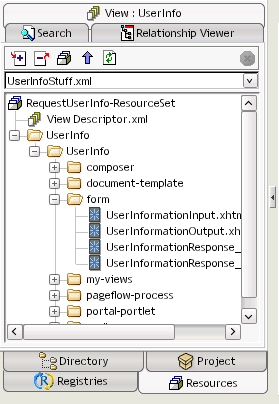
- The View is an XML file that describes the search criteria and
display structure and you may edit it to server your specific needs.Close the open editor by clicking on the editor title tab to close the UserInfoStuff.xml file.
- Select the View tab.
- From the drop-down list find UserInfoStuff then select it.
- You may expand the folders to see the various artifacts you
created and by double-cliking on a particular entry the appropriate
editor for working with that artifact will be opened.
- See the chapter "Using the Resource Set in an exteNd Director Application" for more details.
Test the Default Pageflow You Created
Because Pageflow and XForms created by the wizard are stored in the
Resource Set and you already deployed the application you may
immediately test the default portlet that was created. This is because
by default during development your Director project is configured to
dynamic load the Resource Set artifacts.
-
Open a browser window by double-clicking on the Internet
Explorer icon on the desktop.
- Type in the URL http://localhost/RequestUserInfo/portal/portlet/LoginPortlet
in the address bar.
- At the portal login page click on the New User? link.
- Enter the information to create a new user, for example:
- User ID: user1
- Password: password
- Confirm Password: password
- First Name: Test
- Last Name: User
- Email: user1@somewhere.com
- Click Create.
- Click Continue to return to the Login page.
- Login using the account you just created. Click Login or press Enter.
- You will see the default portal shared page with some sample
Portlets. You will create a Personal page on which will be placed the
portlet for the pageflow that you created. You will then use this page
in future steps of this exercise to test and review your changes.
- Click on the Personalize link.
- Click on New under the Personal Pages list to
create a new personal page.
- Change the name of the page to
User Info Test then click Update.
- In the Default Page field select the page you just created.
- Click the Set as current link. This will allow you to quickly get to this page in the Portal Page.
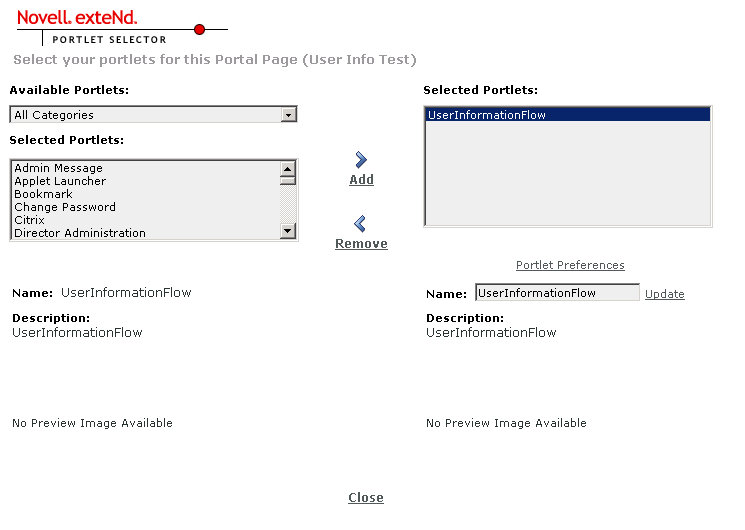
- Click the Choose Content link.
- Scroll the Available Portlets
list until you find UserInformationFlow,
select it, then click Add.
- ClickClose.
- Click Portal link.
- At the top of the page click Portal Home or under Personal Pages click User Info Test (the page you just
created) to view your Pageflow Portlet.
- If you see the message Portlet did not respond in time, click the
 link or reload the page by clicking on Portal Home or under Personal Pages click User Info Test.
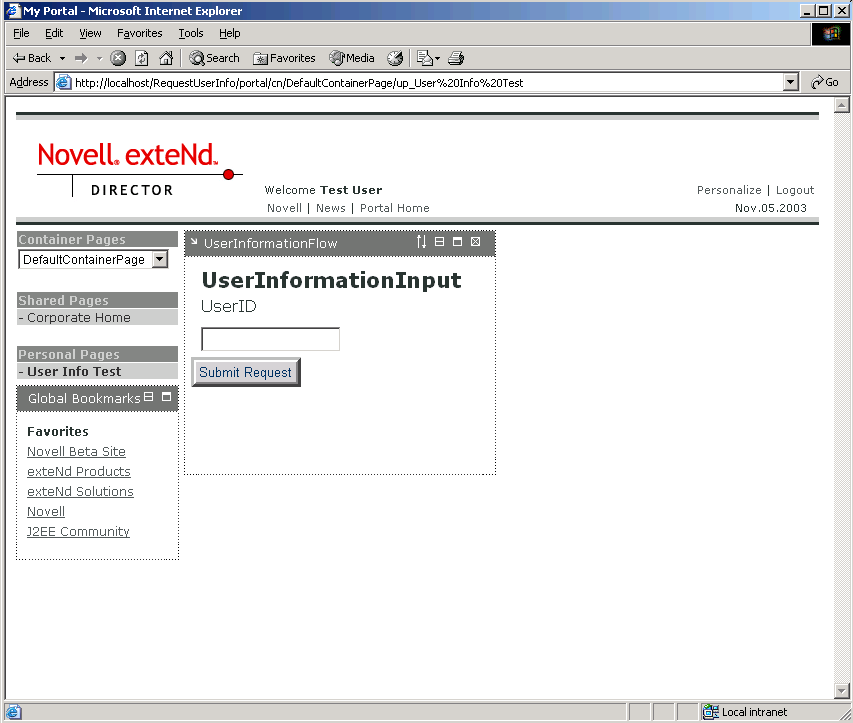
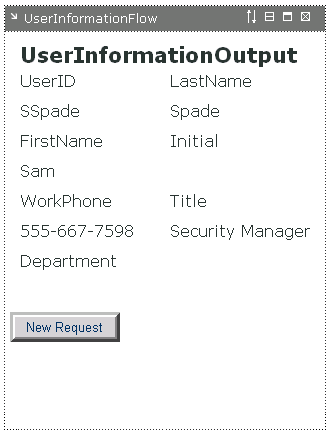
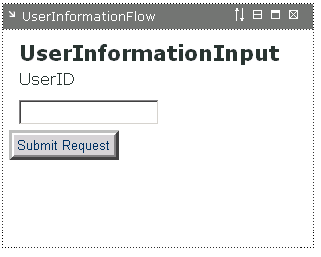
- Type SSpade in the UserID
field of the UserInformationInput Portlet
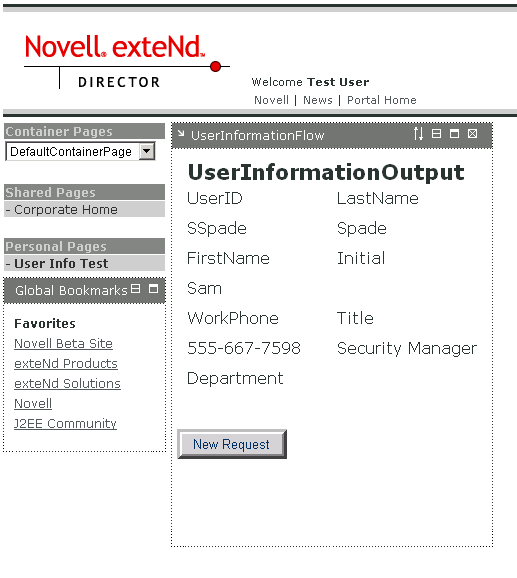
page then click the Submit Request button.
- Click the New Request button to return to the first form.
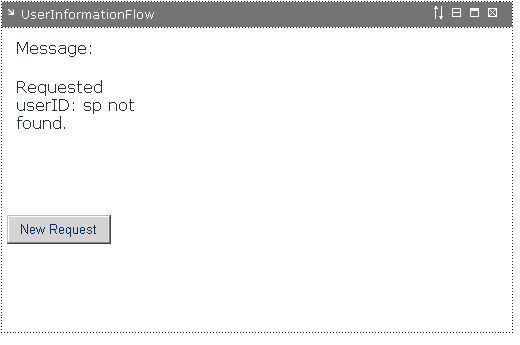
- Type SP in the UserID field then click Submit Request button.
- You will not see any message.
- Click the New Request button to return to the first form.
- If you take a peek at the exteNd Application Server console you
will see the Log output from the Composer service that shows the data
returned to the application. The forms and pageflow created by the
wizard did not take this form into consideration therefore you need to
change the pageflow to add a conditional decision on which form to
display based on the data returned from invoking the Web Service that
is the task of the next lesson.
Edit Additional XForms
A form was already created that displays the message returned
by the Web Service when an invalid request is made. You will review this
form and make some slight modifications. In the next section you will insert this form
into the Pageflow you created with the Web Service Pageflow wizard in the earlier lesson.
- In the Novell exteNd Director select the Resources tab
 of the Navigation pane.
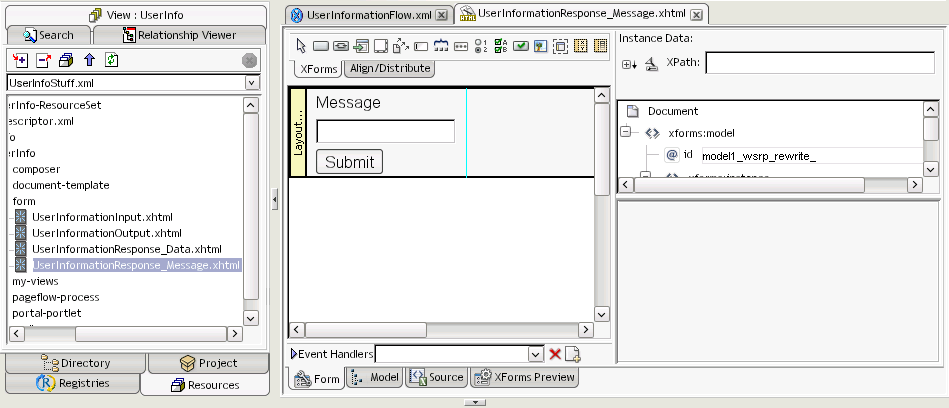
- Select the View tab
in the Resources Navigation pane view, use the drop-down list to select UserInfoStuff, the view you created earlier.
- Expand the listed folders by clicking icon until you find the form folder.
- Double-click on UserInformationResponse_Message.xhtml, which will open the form in the XForms editor.
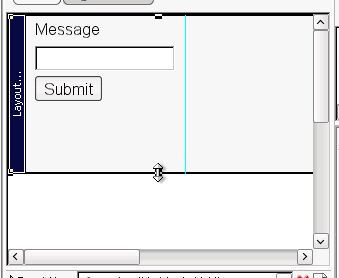
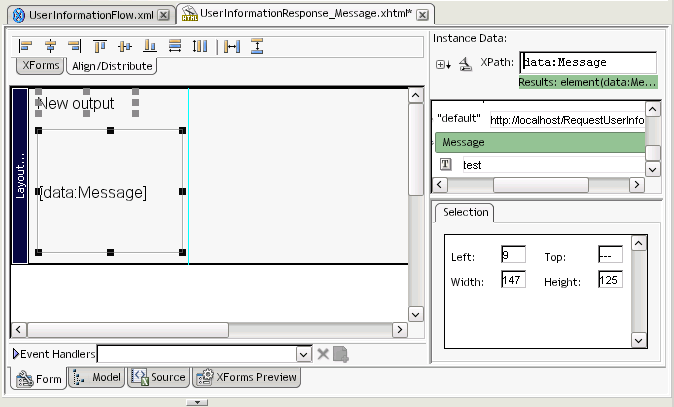
- You are going to change the look and feel of this form by replacing the input message field with an output (display only) field.
- Select the Layout Region and holding the left mouse button
increase its size by scrolling downwards with the mouse.
- Click the Submit button on the form and press the Delete key to delete it.
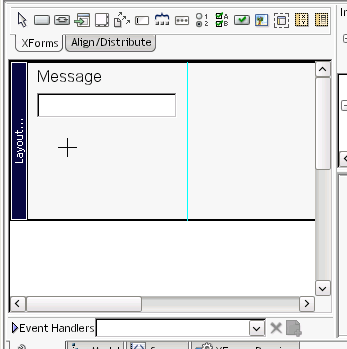
- Click the Insert XForms output
 button.
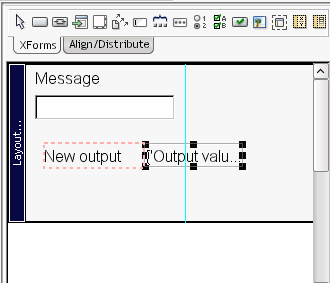
- Click below the Message field to add the Output control.
- Select the Input message field then press the Delete key.
- Select the Output field and drag it below the New output label.
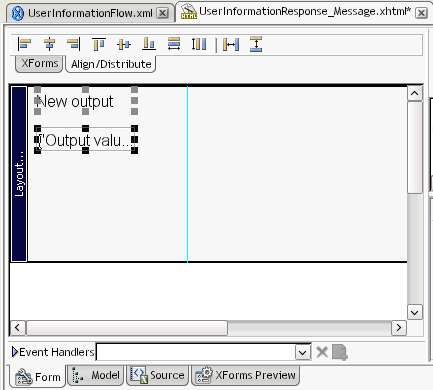
- Select the label and field while holding the Ctrl key then drag both towards the top of the layout area.
- You can use the align editor toolbar
 to properly align the controls on the layout.
- Click toolbar icon to save your
changes.
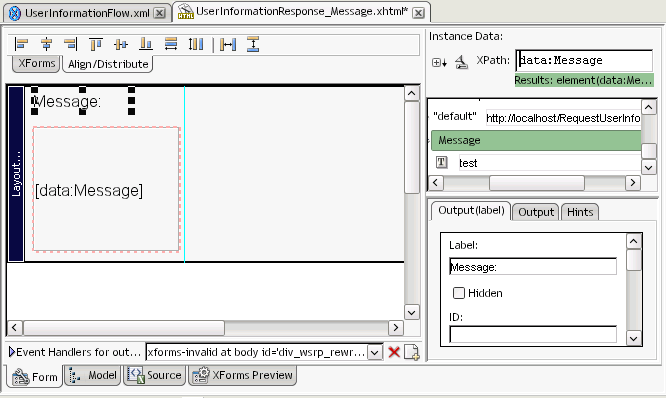
- Enlarge the Output field by clicking it then drag the corn down and to the right.
- In the Instance Data pane click icon until you see the Message element, you may need to scroll.
- Click the Message element, hold the left-mouse button and drag the element on the Output field in the form pane.
- Click toolbar icon to save your
changes.
- Select the Output(label)
tab in the Property editor, scroll to the top and change the Label to
read Message:.
- Click toolbar icon to save your
changes.
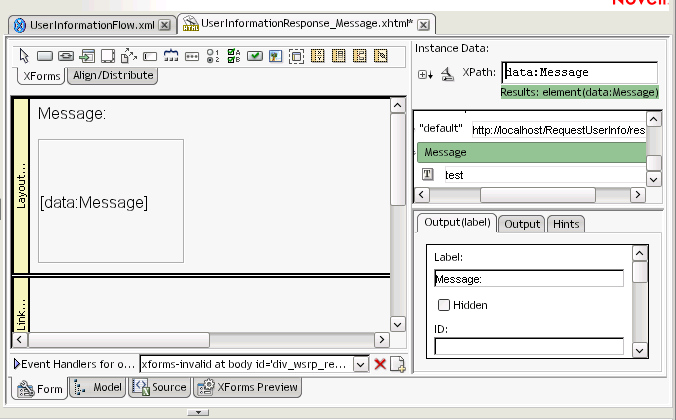
- Click the side of the form editor until you see the complete list
of XForms editor toolbar.
- Click the Insert Pageflow link
region
 button.
 - Click in the Form Layout
to add the control to the form.
- This region will be used by Pageflow button link when we add this
page to the existing pageflow.
- Click toolbar icon to save your
changes.
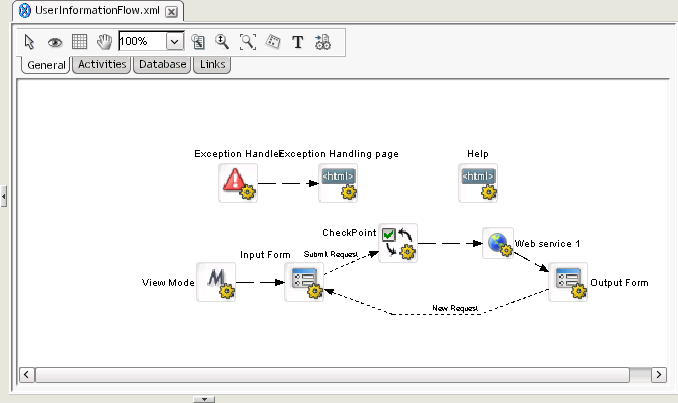
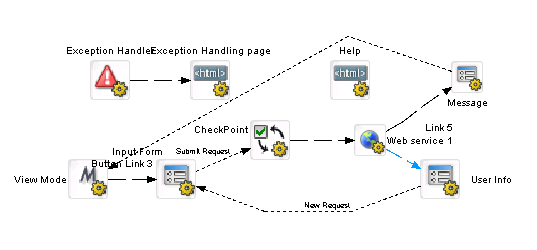
Add New Form to Pageflow
In this lesson you are going to add the Message Display page
to the existing pageflow and then change the links on this page to
include this page as part of the application flow. One of the links
will have a condition that will check what result was received from the
Web Service to determine which page should be displayed; the User
Information or Message page. Our objective is to go from the flow
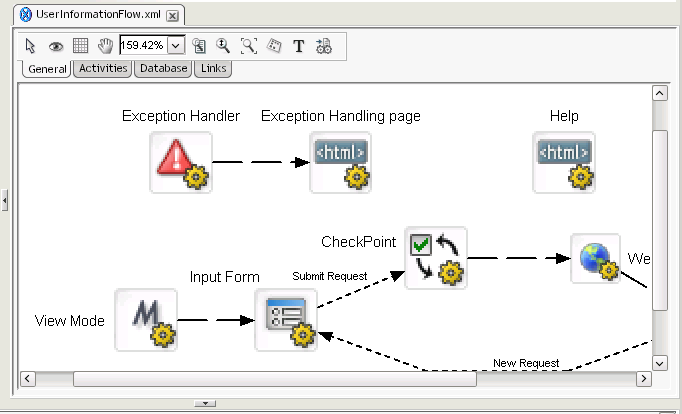
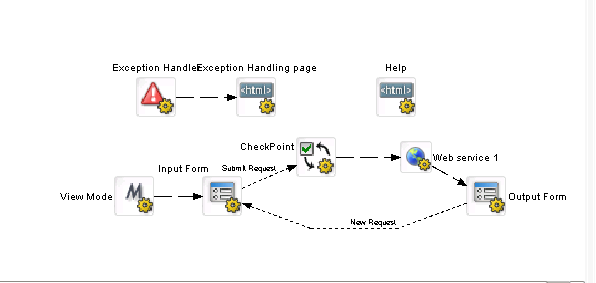
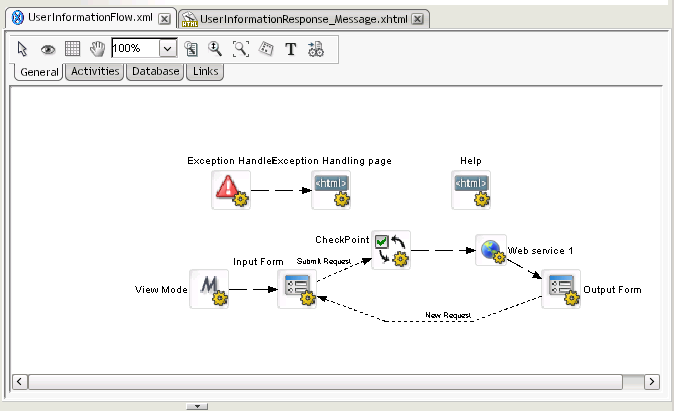
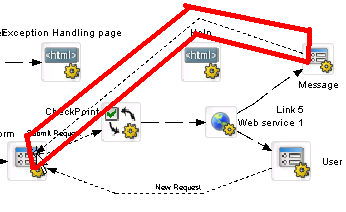
pictured below to the one pictured under it.
Original Pageflow
Target pageflow
- Select the UserInformationFlow.xml
file in the Director editor.
- Select the Activities toolbar
 in the Pageflow
editor.
in the Pageflow
editor.
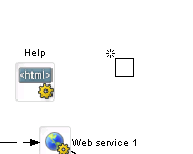
- Click the Form Activity
 toolbar button.
- Add the Form to the right of the Help HTML activity in the
pageflow diagram by moving the mouse cursor to the location then click
the left mouse button.
- Click on the label added under the Form Activity you just placed
on the diagram and edit it to read Message.
- Double click the Form Activity you just placed on the diagram to
open the Property editor for the Activity.
- You may drag this window to a more convenient location on you
desktop so that it does not cover the diagram or other parts of the
editor that you need to view.
- Type Message into the Name field.
- Click on the Form tab.
- Click on
 button next to the XHTML field on
the Form tab.
button next to the XHTML field on
the Form tab.
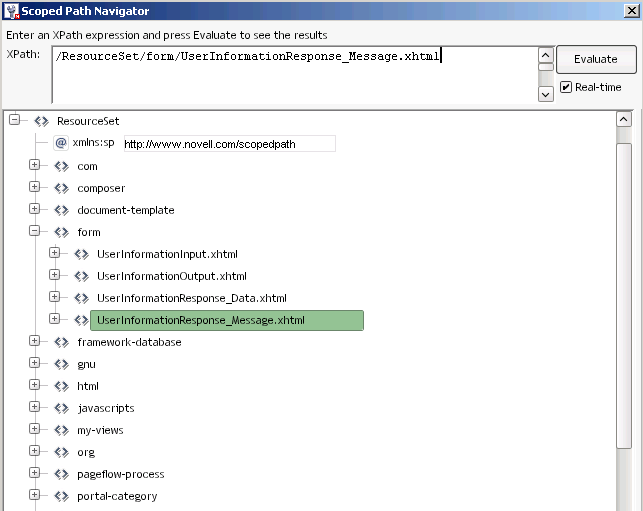
- In the Choose The Scoped XPath dialog select ResourceSet from the
drop-down list then click the Browse
button.
- In the XPath Navigator, use the button to open the
ResourceSet and
form lists then select the UserInformationResponse_Message.xhtml
file.
- Click OK.
- Click toolbar icon to save your
changes.
- Click on the Instance Data
tab.
- Click on
 button next to Inbound
Documents.
button next to Inbound
Documents.
- Click on
button next
to Inbound Documents dialog next to the
Primary Data field.
- Click on the Scoped XPaths
drop-down list to select /Flow/document/RESPONSE.
- Click OK.
- Click
toolbar icon to save your changes.
Change Links to Include New Form in Pageflow
The next step is to create links for the new form to include it as part
of the normal flow of the application. The Web Service will go to both
forms with a condition added to one of the links to determine which
one. The new Message form will link to the Input form completing the
loop in the application.
- Select the Links toolbar
 in the Pageflow editor.
- Click the Button Link
 button.
- Click on the Message Form activity, drag to the Input Form
activity, then click the left mouse button to create a link between the
2 activities.
- Click on the link you just added to select it.
- In the Property Editor in the Button Link tab change the Description to New Request.
- This is the value that will appear on the button when the page is rendered in the browser.
- Click the Link
 button.
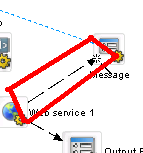
- Click the Web service activity, drag to the Message form
activity, then click the left mouse button to create a link between the
2 activities.
- Change the label next to the Output Form to read User Info.
- Click toolbar icon to save your
changes.
- Click on the Link between the Web Service activity and Message
Form activity.
- In the Property Editor click on the Edit Expression
 link
in
the Link tab.
link
in
the Link tab.
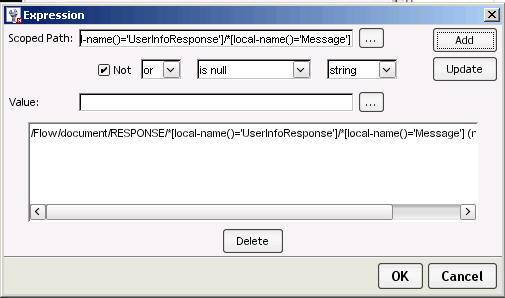
- In the Scoped Path field
of the Expression Dialog type the following expression, be careful with
the punctuation and case.
/Flow/document/RESPONSE/*[local-name()='UserInfoResponse']/*[local-name()='Message']
- In the Operator dop-down
list select is null, check the
Not checkbox, then click
the Add button.
- Click OK.
- In the Link tab of the Property Editor make sure that the Precedence field has a value of 1.
- Click on the Link between the Web Service activity and User Info
Form activity.
- In the Link tab of the Property Editor make sure that the Precedence field has a value of 2.
- Click
toolbar icon to save your changes.
Test the Revised Pageflow You Edited
Now that you have completed the changes to the pageflow to incorporate
the new page the last step is to test your changes in the application
server. Because of the Dynamic Loading feature of Director your changed
forms and pageflow have been automatically loaded into the application
server and all that is needed to test the changes is to open a browser
window and login to the Portal application.
- Open a browser window by double-clicking on the Internet
Explorer icon on the desktop.
- http://localhost/RequestUserInfo/portal/portlet/LoginPortlet
in the address bar then press Enter.
- Login as user1/password.
- Under the Personal Pages list click on the User Info Test link.
- In the UserID field of the UserInformationInput page type SSpade then click Submit Request button.
- Click the New Request
button.
- Type sp in UserID field
then click Submit Request
button.
- Click the New Request
button.
- Congratulations you have successfully completed this Guided Tour.
- Close the Director Designer application by using File-->Exit menu.
In this Guided Tour through the development features of the exteNd 5 Suite you have created a
Composer Service that extracts information from an LDAP directory. Showing you how you may use
exteNd Composer to XML enable your legacy systems to utilize the information in them to
provide new services. This was then deployed as a SOAP service allowing access to this
information in a standards based approach.
You then built a browser based interface to utilize this service by accepting input from the
user and then displaying information to the user. Going from producing a Web Service to consuming
a Web Service all in one integrated set of tools. The entire application was provided by a
robust J2EE Application Server.
And all this without writing one line of Java code.
The next steps in this application would be to go from a query only application to a maintenance
and query application. But that is a challenge for another time.
If you wish to learn more about the technologies used in exteNd check the resources below.
To learn more about exteNd check out the other tutorials included with the documentation or
the training available from Novell, see http://www.novell.com/training/.
Resources
Web Services Activity at the W3C
http://www.w3.org/2002/ws/
Web Services Description Language (WSDL) 1.1
http://www.w3.org/TR/wsdl.html
XForms at the W3C
http://www.w3.org/MarkUp/Forms/
XForms Essentials a book from O'Reilly
XForms
Essentials at Safari
XML Schema
http://www.w3.org/XML/Schema
XML Path Language (XPath)
http://www.w3.org/TR/xpath
Novell XForms Technology Preview
http://developer.novell.com/tech/xforms.html
DSML
Directory
Services Markup Language (DSML) v2.0 Specification
SOAP
http://www.w3.org/TR/SOAP/
J2EE
http://java.sun.com/j2ee/