3270 Connect User's Guide
CHAPTER 3
As with all exteNd Composer components, the first step in creating a 3270 component is to specify the XML templates needed. For more information, see Creating a New XML Template in the Composer User's Guide.
Once you've specified the XML templates, you can create a component, using the template's sample documents to represent the inputs and outputs processed by your component.
Also, as part of the process of creating a 3270 component, you must select a 3270 connection or you can create a new one. See "Creating a 3270 Connection Resource" on page 13.
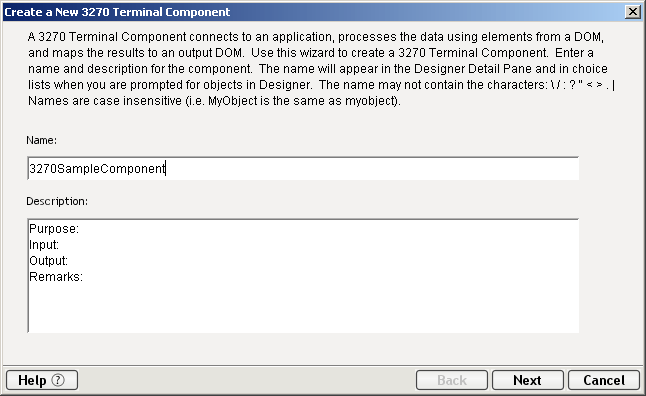
 To create a new 3270 Component:
Select File>New>xObject. Select the Component tab and choose 3270 Terminal.
NOTE: Alternatively, under Component in the Composer window category pane you can highlight 3270 Terminal, click the right mouse button, then select New.
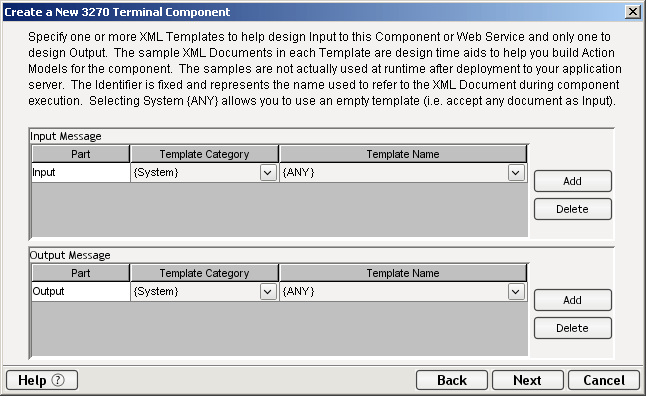
Click Next. The XML Input/Output Property Info panel of the New 3270 Component Wizard appears.
Specify the Input and Output templates as follows.
Type in a name for the template under Part if you wish the name to appear in the DOM as something other than "Input".
Select a Template Category if it is different than the default category.
Select a Template Name from the list of XML templates in the selected Template Category.
To add additional input XML templates, click Add and choose a Template Category and Template Name for each.
To remove an input XML template, select an entry and click Delete.
Select an XML template for use as an Output DOM using the same steps outlined above.
NOTE: You can specify an input or output XML template that contains no structure by selecting {System}{ANY} as the Input or Output template. For more information, see "Creating an Output DOM without Using a Template" in the User's Guide.
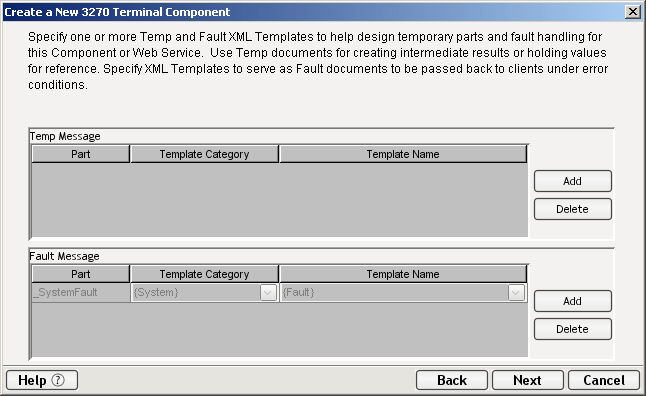
Click Next. The XML Temp/Fault Template Info panel of the New 3270 Component Wizard appears.
If desired, specify a template to be used as a scratchpad under the "Temp Message" pane of the dialog window. This can be useful if you need a place to hold values that will only be used temporarily during the execution of your component or are for reference only. Specify the templates as indicated in Step 6 above.
Under the "Fault Message" pane, select an XML template to be used to pass back to clients when an error condition occurs.
As above, to add additional temp or fault XML templates, click Add and choose a Template Category and Template Name for each. Repeat as many times as desired. To remove an XML template, select an entry and click Delete.
Click Next. The Connection Info panel of the Create a New 3270 Component Wizard appears.
Select a Connection name from the pull down list. For more information on the 3270 Connection, see "Creating a Connection Resource" in Section 2 of this Guide.
Click Finish. The component is created and the 3270 Component Editor appears.
The 3270 Component Editor includes all the functionality of the XML Map Component Editor. It contains mapping panes for Input and Output XML documents as well as an Action pane.
There are two key differences, however. The first is that the 3270 Component Editor also includes a Native Environment pane common to all Connects. It contains a 3270 or emulator and appears black until you select the Record or connect button in the 3270 Component Editor window. Pressing the Record button establishes a 3270 emulation session inside the Native Environment pane with the host specified in the connection used by the 3270 component. The second difference is the addition of a panel containing only an XML DOM called ScreenDoc to the component editor window. This DOM presents an XML document representation of each screen received from the host and is available for reference and creating mapping actions within the component, and is available in the expression builder, allowing the user to easily reference a screen field. For those who want to create a quick HTML representation of the 3270 screen, they can use the output of the ScreenDoc DOM and apply a style sheet to create an HTML representation of the screen.
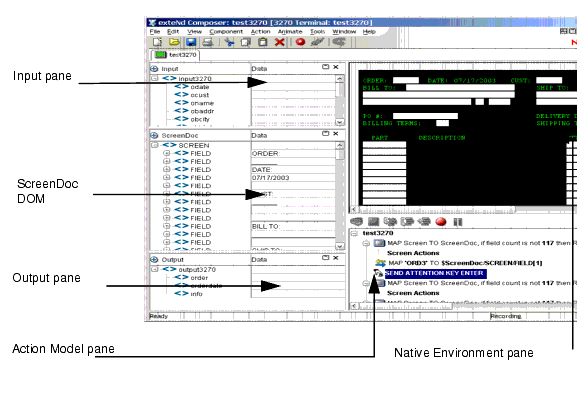

The 3270 Native Environment pane provides 3270 emulation of your mainframe environment. From this pane, you can perform the following:
Map data from an Input XML document (or other available DOM) and use it as input for a 3270 screen field. For example, you could drag a SKU number from an input DOM into the part field of a 3270 screen, which would then query the mainframe and return data associated with that part number, such as description and price.
Map the data from the returned 3270 screen and put it into an Output XML document (or other available DOM, e.g., Temp, MyDom, etc.).
Map header and detail information (such as an invoice with multiple line items) from an XML document into the transaction accessed in the native environment pane using a special Multi-Row action.
Map header and detail information (such as customer name and transaction history) from the transaction in the native environment pane into an XML document.
The transaction functionality of the Native Environment pane is identical to that of a 3270 terminal or terminal emulator.
The 3270 Native Environment pane supports the use of several attention identifier or AID keys: Enter, Clear, PA1-3, and PF1-24. The function for each attention key varies, depending on the host application. These keys are mapped to the PC keyboard as follows:
|
3270 Key |
PC Key |
|---|---|
|
Enter |
Enter |
|
Clear |
ESC |
|
PF1 through PF12 |
F1 through F12 |
|
PF13 through PF24 |
Shift F1 through Shift F12 |
|
PA1 through PA3 |
Ctrl F1 through Ctrl F3 |
You can either use the keys directly from the keyboard as you create a 3270 component or you can use a keypad tool bar available from the View menu.
The ScreenDoc DOM is an XML document representation of the current screen received through the terminal data stream in the Native Environment pane. All Mapping actions to and from the screen display (including drag and drop) actually reference elements in the ScreenDoc DOM. This provides you with the advantage of being able to see and reference your familiar application screens while at the same time working with them as XML documents.
The 3270 component communicates with the host environment via the block mode terminal data stream in an asynchronous fashion. A block of data essentially represents a screen. The host sends a screen block that is displayed in the component. The screen is edited by the user (and ultimately by the component you create) and the modified screen is sent back to the host for processing after you press an AID key.
During the recording mode, each time a screen block of data is received by the component, four things happen simultaneously:
A Map Screen action appears in the Action Model. The Map Screen action is where you will add, change, and delete actions for this particular screen. Each time a new screen block is received as you build the component, a new Map Screen action is created.
The Map Screen action calculates and records how many TDS fields were received for this particular screen. This information is used for validation purposes the next time the component is run.
The ScreenDoc DOM is refreshed with a new DOM that reflects the screen just received. Block mode terminals send their data as a stream of fields. These fields are defined using screen creation utilities in the host environment (such as BMS in CICS).
The fields are represented in the ScreenDoc DOM in the order they appear on the screen starting from the upper left corner of the screen, moving across to the right, then down a row starting again at the left and so on until the entire 80x24 screen area is covered. Depending on how the original screen layout was defined, there can be many fields. Some FIELDs are text labels on the screen and usually have display attributes of protected (prot) and bright (brt). Some FIELDs are for data entry and have an attribute of unprotected (unprot). Other FIELDs contain data but are hidden from display with an attribute of dark (drk). Finally there are special screen fields for implementing tabbing features on the screen, which are protected from entering data and called bypass fields with an attribute bypass.
The end result of listing all the TDS fields is that the ScreenDoc DOM can be quite large. Its use is primarily intended for finding hidden fields, verifying fields and their locations by their attributes, and in cases where it is convenient, mapping from the ScreenDoc DOM to the Output DOM using Composer's drag and drop features.
NOTE: Normally it is much quicker and more efficient to map directly to and from the Native Environment pane using drag and drop instead of mapping to the ScreenDoc DOM.
Each field in the TDS is represented in the ScreenDoc DOM as an element titled FIELD. The ScreenDoc DOM contains as many FIELD elements as there are fields in the TDS. The element displays any data defined for the field. Note that screen fields are used for both field labels and data-entry fields.
Whenever a Map Screen action executes, a new screen is displayed in the Native Environment Pane (NEP). Each time a screen displays in NEP, an XML representation of the screen is created in the ScreenDoc DOM. (To make this DOM visible, you may need to select a View from the menu bar, then the Window Layout choice next pick the XML Layout Tab, and finally move ScreenDoc to the Visible list and click OK. To help locate the screen cursor position programatically, each ScreenDoc Field returned by the TDS will have an attribute named "cursor." The attribute value of the cursor will be "false" for all the Fields except one whose value will be "true." To determine which Field has the cursor, you can write an expression to check the cursor attribute and return the Field's id attribute as shown below.

In the sample list of ScreenDoc Fields in the above graphic, the XPath location ScreenDoc.XPath ("SCREEN/FIELD[@cursor= `true']/@id") would return the number "4" indicating that Field 4 is the current cursor location.
Each element also displays the following attributes for the field:
Keypad Tool Bar - This selection displays a keypad tool bar for the 3270 terminal keys. It is docked to the top of the native environment pane. You can drag the keypad from this location, changing it to a floating window. When you close the floating window, the keypad returns to the native environment pane. To remove the keypad from sight, select View, then Keypad Tool bar from the menu bar.
Style Sheet - This selection displays the style sheet editor dialog. It contains a few pre-defined style sheets that appear as resources on the main Composer window.
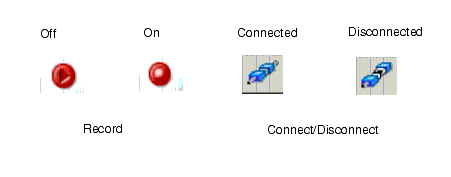
Start/Stop Recording - This selection manages the automatic creation of actions as you interact with a screen transaction. Start will create actions as you interact with the screen and Stop will end action creation.
Connect/Disconnect - This selection allows you to control the connection to the host. When you are recording or animating, a connection is automatically established, so you are not required to use this button at that time. However, this button is useful if you want to establish a connection simply to navigate through the 3270 environment when you are not recording or animating.
The 3270 Connector also includes context menu items that are specific to this Connector. To view the context menu, place your cursor in a field in the native environment pane and click the right mouse button. The context menu appears as shown.
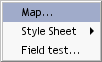
The function of the context menu items are as follows:
Map - Allows you to create a Map action. This is done by highlighting a source in the Input DOM, then highlighting a source in the Native Environment Pane. As a result, a map action is created. Also you can click the RMB in the Native Environment pane, select Map, and an action is created.
Style Sheet - Allows you to change the appearance of the native environment pane by applying a different Style Sheet.
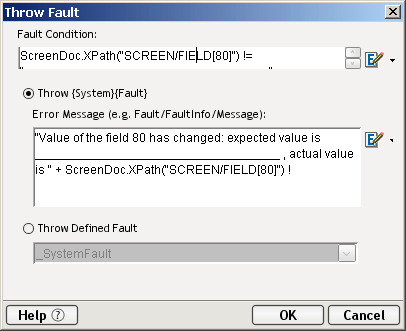
Field Test - Allows you to create a Throw Fault action for the selected field. An expression for the fault condition will automatically be entered for you, based on the field you clicked when you brought up the context menu. Select Throw System Fault to define a new error message. (You have access to the ECMAScript expression builder.) Alternatively, you may select Throw Defined Fault to select a previously defined Fault Document from the dropdown list.
For more information on how to use Throw Fault Actions, refer to Chapter 9 of the Composer User's Guide.
The 3270 Connect includes two additional tools on the component editor tool bar: the Record button and the Connect/Disconnect button. The Record button enables the automatic creation of actions in the Action Model as you interact with screen transactions. The Connect/Disconnect button controls your connection to the mainframe. They appear as shown.
Copyright © 2004 Novell, Inc. All rights reserved. Copyright © 1997, 1998, 1999, 2000, 2001, 2002, 2003 SilverStream Software, LLC. All rights reserved. more ...