4.2 Recovering Data Using Advanced Recovery
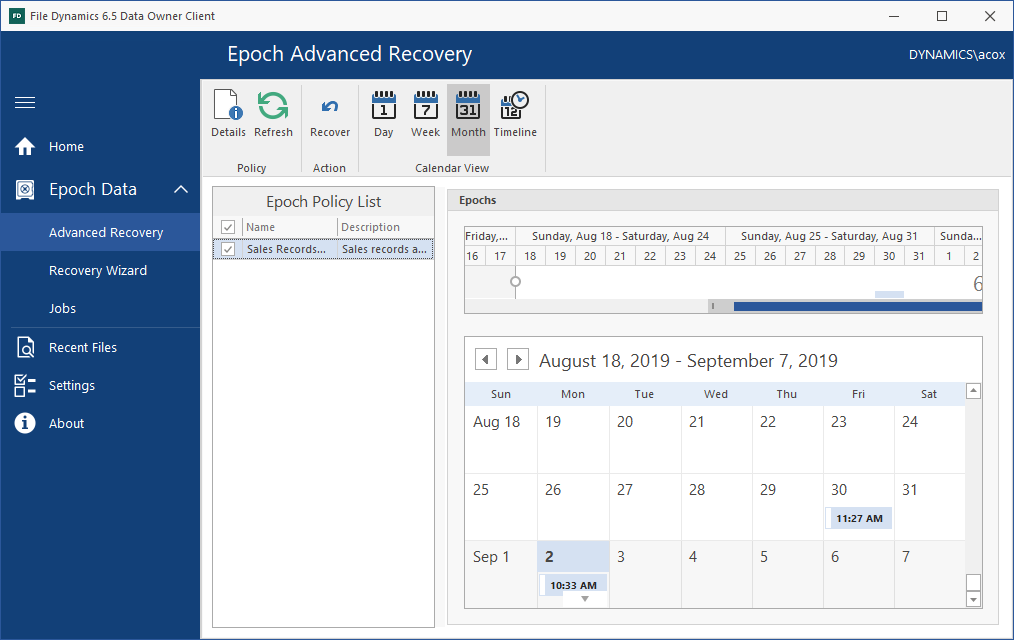
The Advanced Recovery interface provides more advanced options for recovering data. Data Owners who frequently recover data and consequently, become quite familiar with the Advanced Recovery interface, might want to use this as the means of data recovery.
-
Click > .
-
From the Epoch Policy List, select an Epoch policy.
-
From the calendar, select an Epoch.
-
Click .
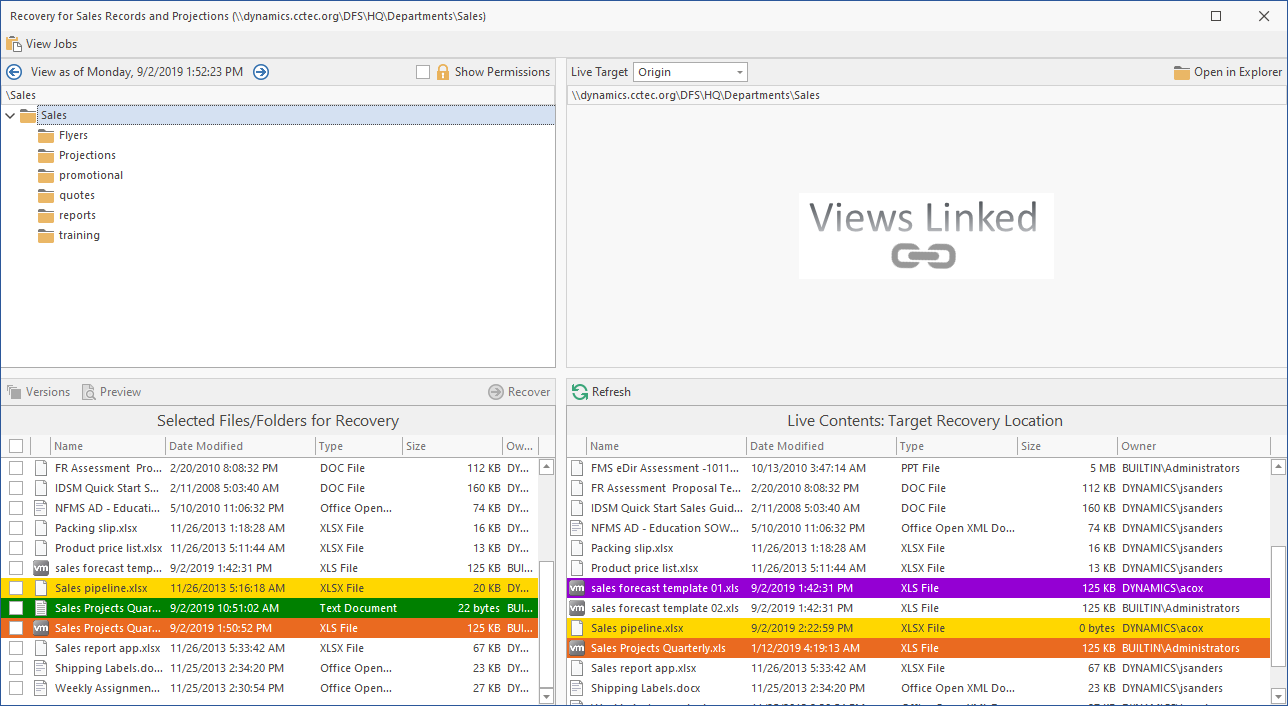
This interface features a side-by-side view of the selected Epoch (on the left) and the live file system’s target recovery location (on the right).
Yellow highlighted files indicate that a file with the same name exists in both the Epoch and the live file system. These files are highlighted because if you recover the file from the Epoch, you might possibly overwrite the version of the file you actually want.
Green highlighted files indicate that the file only resides in the Epoch and that there is no chance of overwriting a file with the same name on the live file system.
Purple highlighted files indicate that these files exist only in the live file system and not in the Epoch.
Orange highlighted files indicate that the file is the live file system is older that the file in the epoch.
View Jobs: Clicking this accesses the Manage Recovery Jobs dialog box that lists all recovery jobs performed. Clicking an individual job listing opens a Recovery Jobs Detail dialog box that provides specific information about the recovery job.
Show Permissions: When selected, this specifies all users and groups that have permissions to a selected folder from the Epoch, and what those specific permissions are. This information is useful to have before you recover a folder because when you do so, you can specify to keep the existing permissions or to overwrite them with the permissions (including inherited) that exist in the live network.
Live Target: If the Epoch Data Protection policy specifies that files can be recovered to an Alternate path or Anywhere, these options appear in the drop-down menu. Selecting either of these options lets you then specify a location where the recovered file will be stored.
Open in Explorer: This provides the ability to open files in the live file system. You might want to use this before a recovery when you need to compare the differences between a rendered file from the Epoch with the same named file in the live file system.
Versions: When a single file is selected from an Epoch, you can view specific metadata of the file by clicking this.
Preview: When a single file is selected from an Epoch, you can click to view a rendering of the file and verify that it is the file you want to recover.
Recover: This is the means of initiating the file or folder recovery.
Refresh: Refreshes the displayed contents based on any updates.
-
From the left side of the interface, select the folders or files you want to recover.
-
Click .

Selected for Recovery: Displays the number of selected files and folders, along with the total size.
Recover To: Displays the path where the folders and files will be located once they are recovered.
Recovery Options: This region allows you to specify parameters for the recovery.
Recover Data: If the items in the list do not include folders, this option is selected and cannot be overridden. If your selected items include folders, you can deselect this check box, meaning that you are only want to recover the permissions on the same named folder in the live file system.
File Data Overwrite Options: Lets you specify what to do with recovered files from the Epoch when there are files with the same name on the target. Selecting means that the file will not be recovered. means that the file will be recovered and will overwrite the file on the target – even if the file is newer.
Recover File Owners: Selecting this check box specifies that the owners for all recovered files and folders will remain the owners when the Epoch was saved. Deselecting this check box will leave the owner as it exists in the live file system.
Recover Folder Security: This check box is displayed only when the selected data for recovery includes folders. Selecting this check box specifies that you want recovered folders to maintain the folder permissions.
Security Overwrite Options: Lets you specify what to do with recovered folders from the Epoch when there are folders with the same name on the target. Selecting will merge the permissions of the recovered folder with those of the same named folder in the live file system. Selecting will overwrite the permissions of the same named folder on the live file system and replace those permissions with those of the recovered folder.
Description: Lets you provide a description of this recovery instance. You must provide a description before the button is activated.
-
Specify your recovery options in the Submit for Recovery Job dialog box and click .
-
When the confirmation dialog box appears, click .
The Manage Recovery Jobs dialog box appears with the new recovery job located at the top, along details of the data recovery.
-
In the Manage Recovery dialog box, click to get an update of the status of the recovery.