Hybrid Workspaces 23.1 Documentation
1.0 Getting Started
1.1 Getting Started
Signing In
To get started, sign in to your Turbo.net Portal. The Portal is a web site where you can access all of your organization's applications, files, and other resources.
Your system administrator will provide with the URL of your organization's Turbo.net Portal. Once you open the URL, you can sign in with your organization credentials.
If you have a Workspace hosted on Turbo.net, press the Sign In button in the top right and sign in with your Turbo.net credentials. If you don't already have a Turbo.net account, you will need to create a Turbo.net account and ask your administrator to add you as a member of the Workspace.
Clients
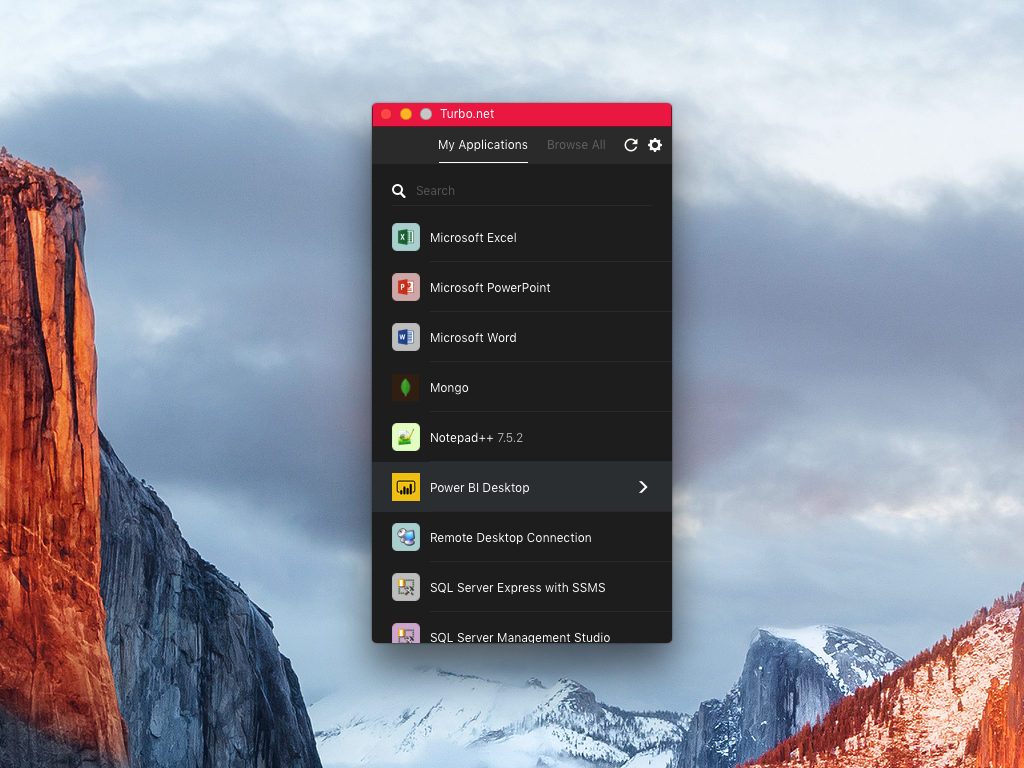
For the best experience, it is recommended to install and use one of the native Turbo.net clients on your device. Turbo.net provides an app for all major desktop and mobile platforms.
If you do not use one of Turbo.net client applications, you can still use Turbo.net via the HTML5 interface in any major web browser.
If you are on a device issued by your organization, your system administrator may already have installed the necessary Turbo.net client on your device.
Running Applications
Turbo.net applications can be opened using the Portal or, if configured by your administrator, directly from the Start Menu or Applications folder.
Portal
To open an application or file, go to the Turbo.net Portal and click on the item you want to open.
By default, items will open and stream inside the web browser. For a better experience, you can open items in one of the Turbo.net native applications by right-clicking on the icon and selecting Run in Cloud (Windowed).
If you are on a PC that meets the application requirements, you also have the option of running the application on your own device. There are no separate installation steps required to run applications once the Turbo.net for PC application is installed.
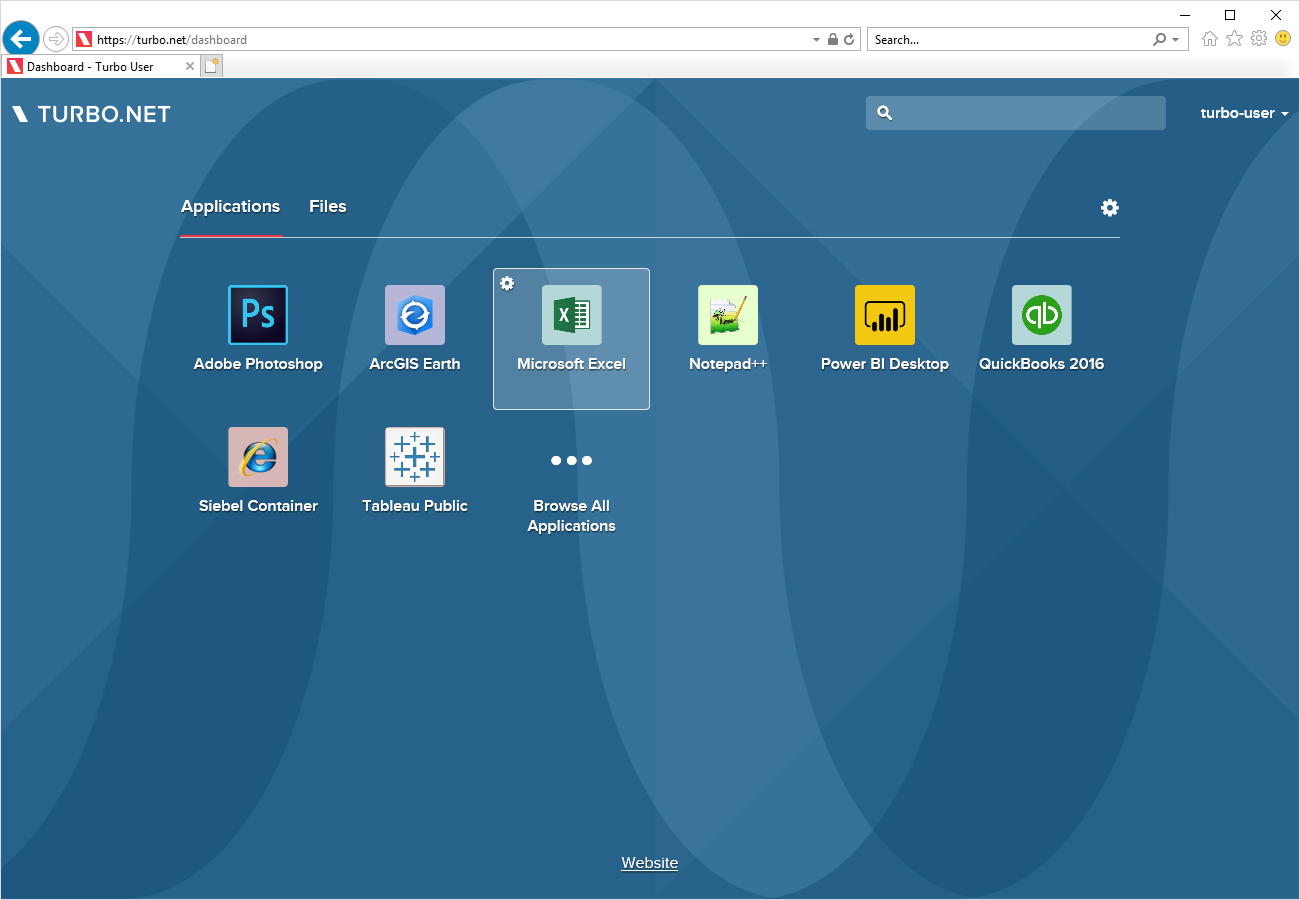
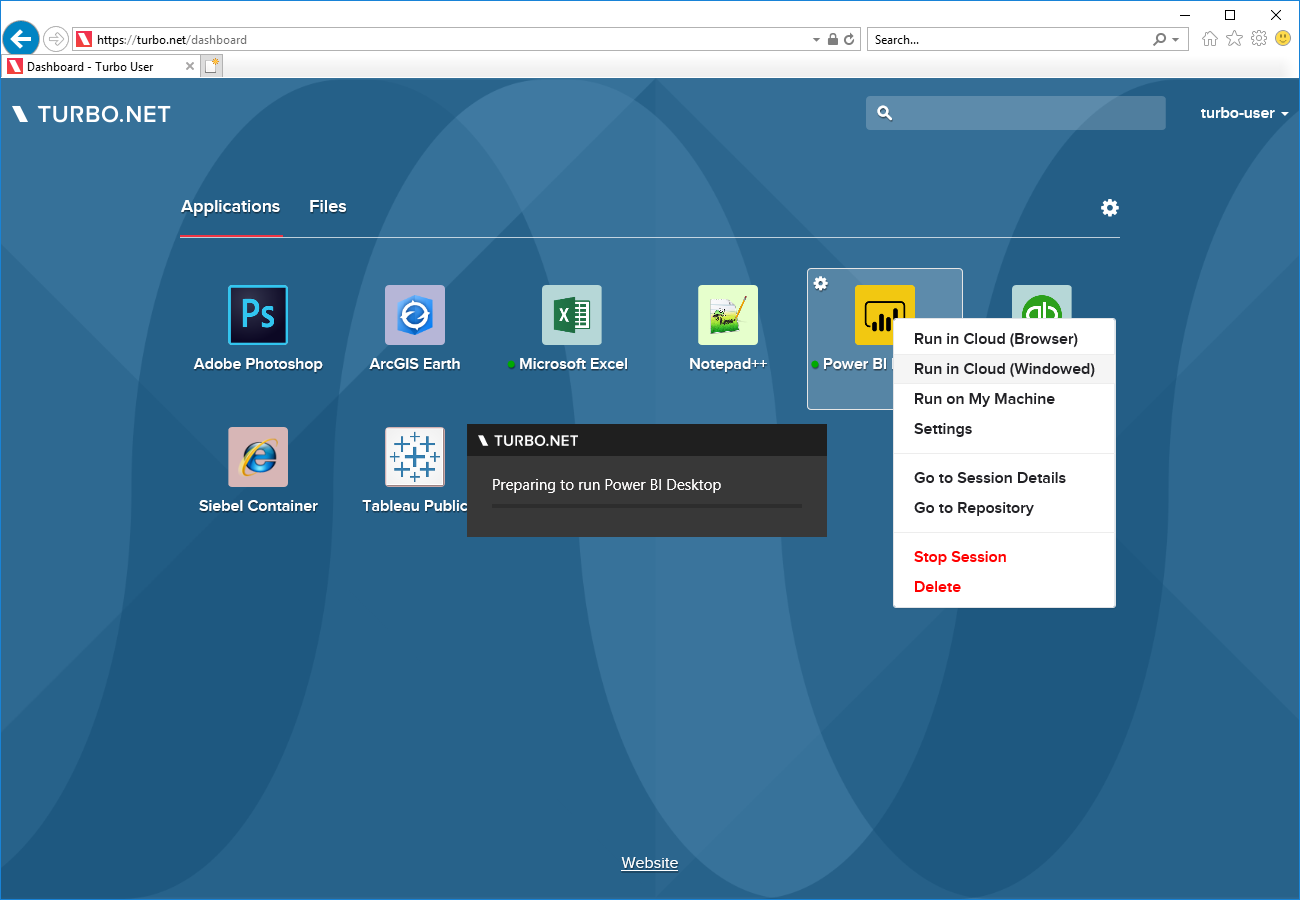
To select a specific way to run the application, right-click on the application and select one of the following:
- Run in Cloud (HTML5): The application will run in the cloud and stream to your device inside the web browser.
- Run in Cloud (Windowed): The application will run in the cloud and stream to your device via the Turbo.net native application.
- Run on My PC (Local): The application will be downloaded and run on your device.
- Install on My PC: The application will be installed on your device.
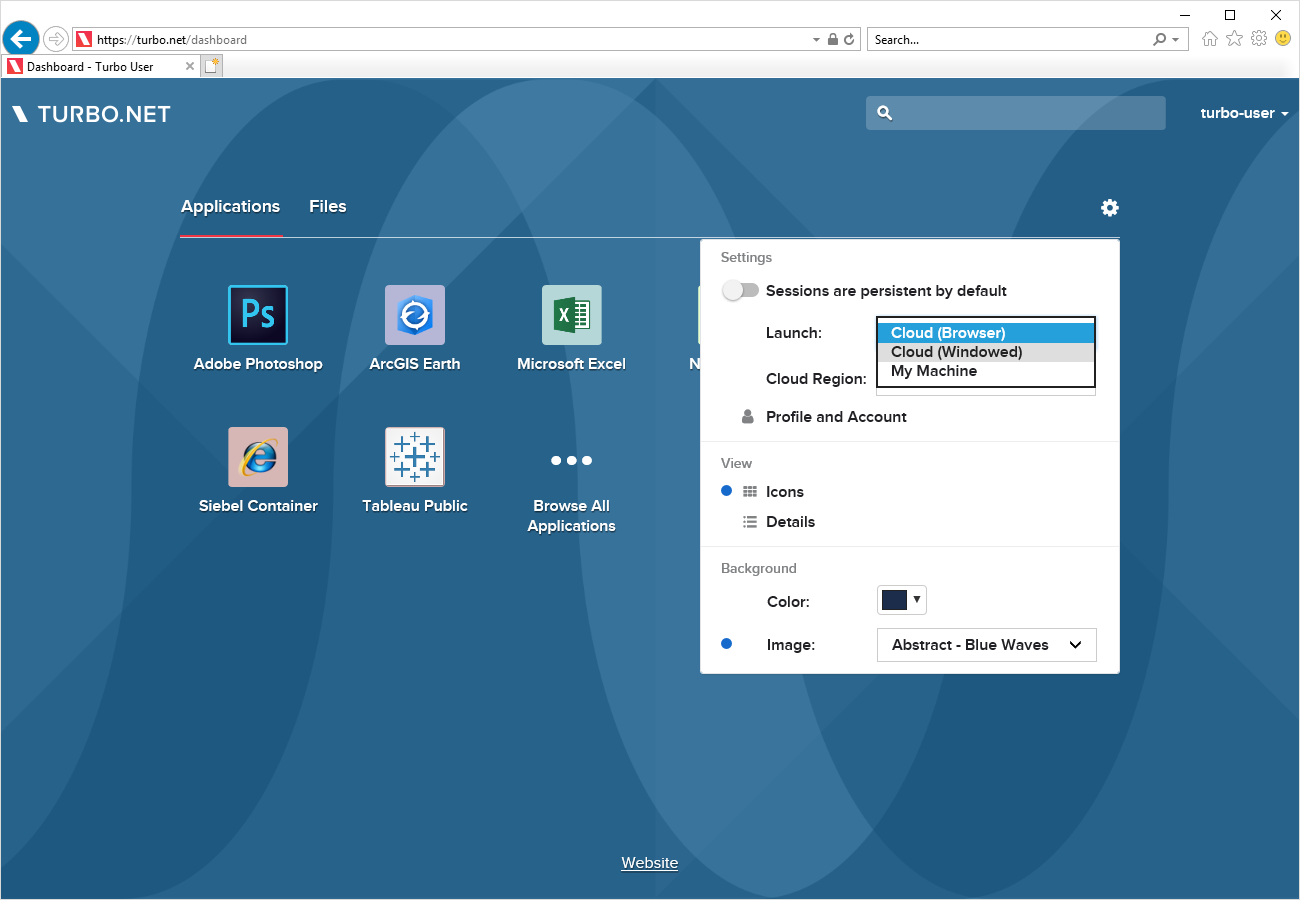
You can select a preferred default method of running an application by clicking on the gear icon in the top right of the application list:
1.2 Using Files
Turbo.net let you use files located on your device or on popular online storage providers such as OneDrive and Dropbox.
Local File System
Users may access files on their local system when launching an application in the Cloud or on a local container instance.
Access local files with Run in Cloud (Turbo.net for PC)
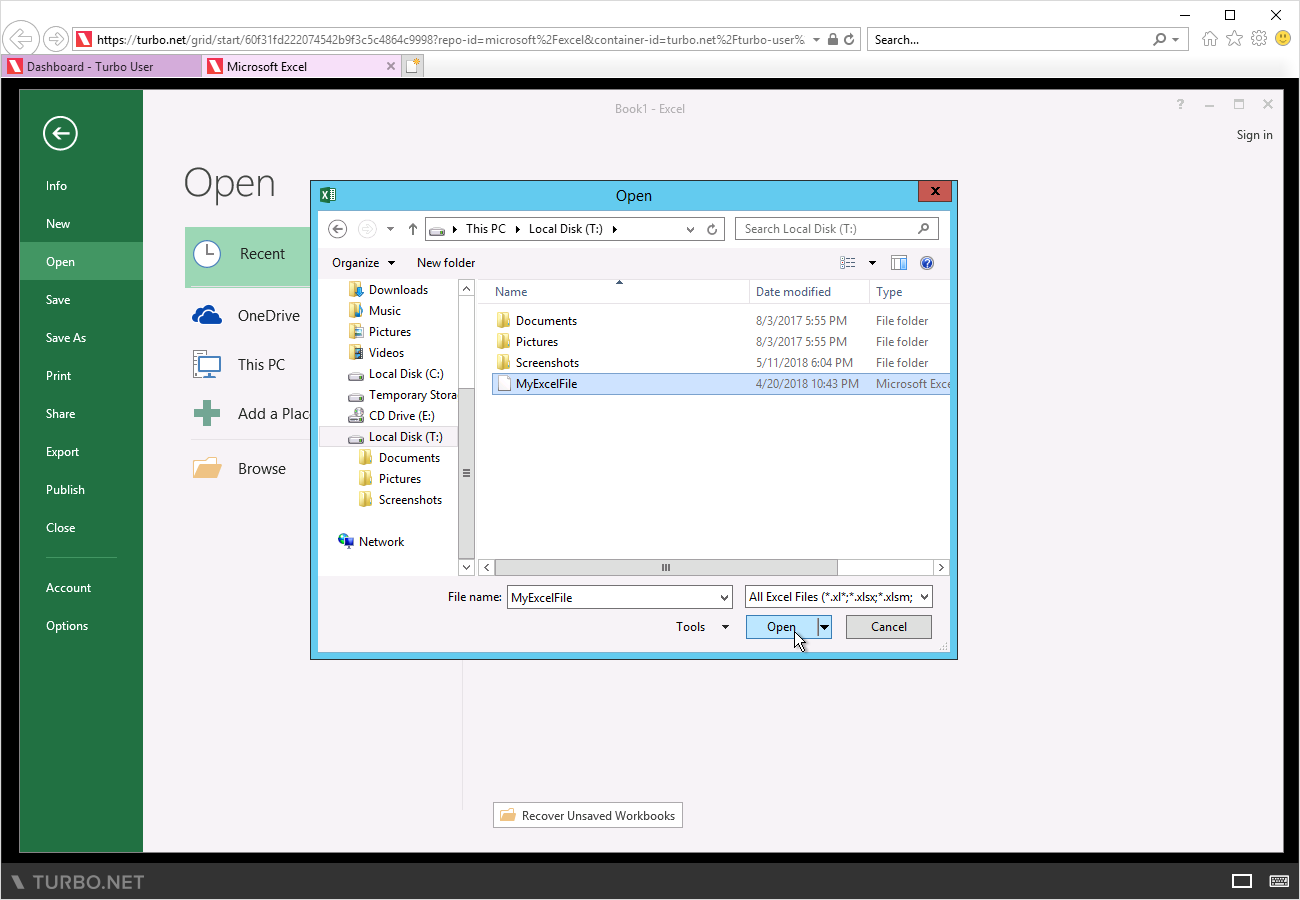
You can access files on your device when an application is launched using a Turbo.net native client. On the Portal, this mode is referred to as Run in Cloud (Windowed):
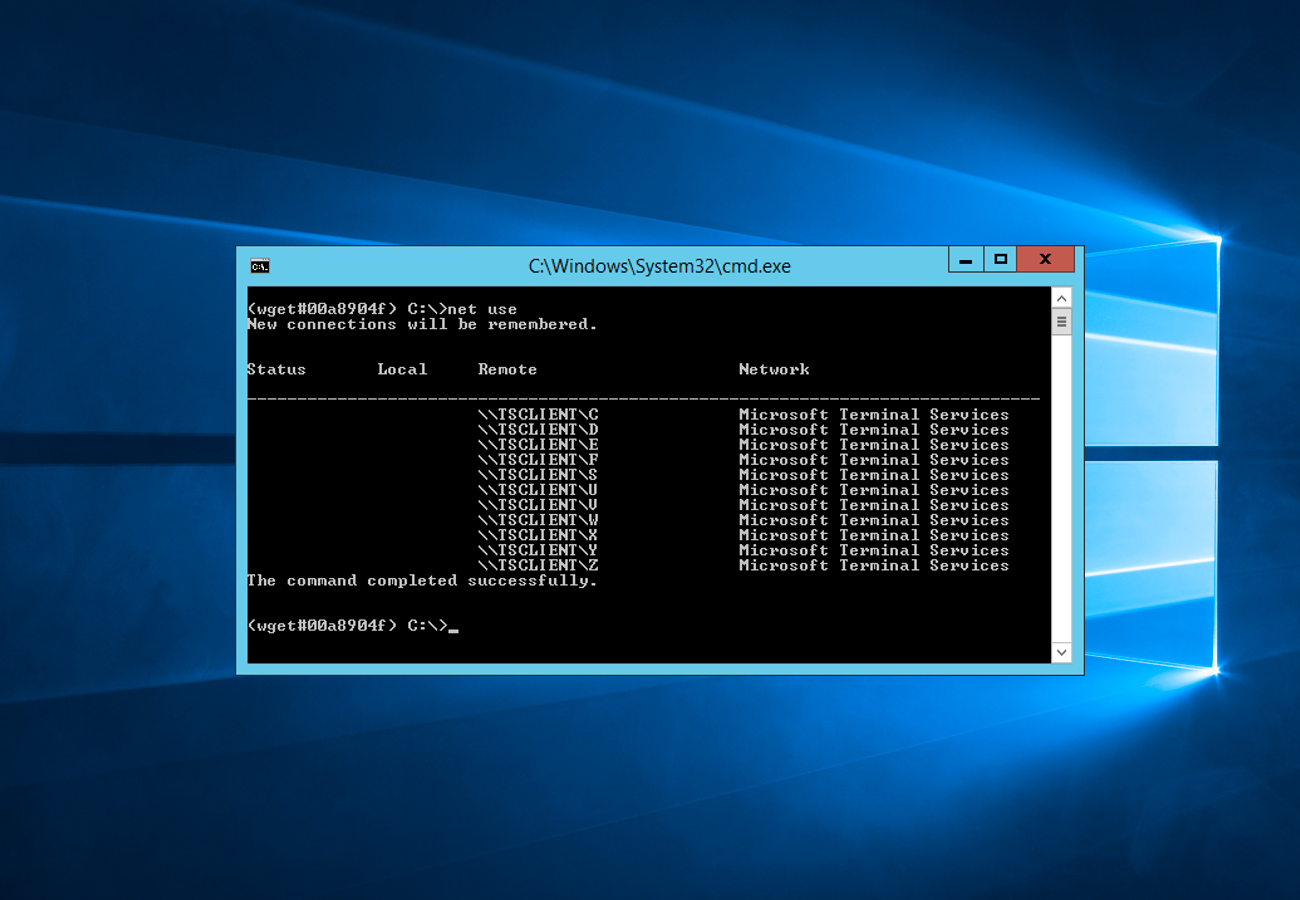
Applications running in this mode will show files from the local device as Home on My PC or Home on My Mac in the File Open and Save dialogs.
Files from the local system may also be accessed using the \\\\tsclient\\\{drive\} remote path.
Access local files with Run On My PC (Turbo.net for PC)
Users who run Turbo applications on their local Windows Desktop may access the local file system directly. Open the Settings dialog from Turbo Launcher and check the Access to local user folders setting.

User folders such as Desktop, Downloads, Documents, Music, Pictures, and Videos are now accessible in the Turbo application that are launched on the machine. Non-system drives are also directly accessible.
Access local file system files with Turbo.net for Mac
Users may access files from their local system when they launch an application in the cloud and stream it to their device via Turbo for Mac.
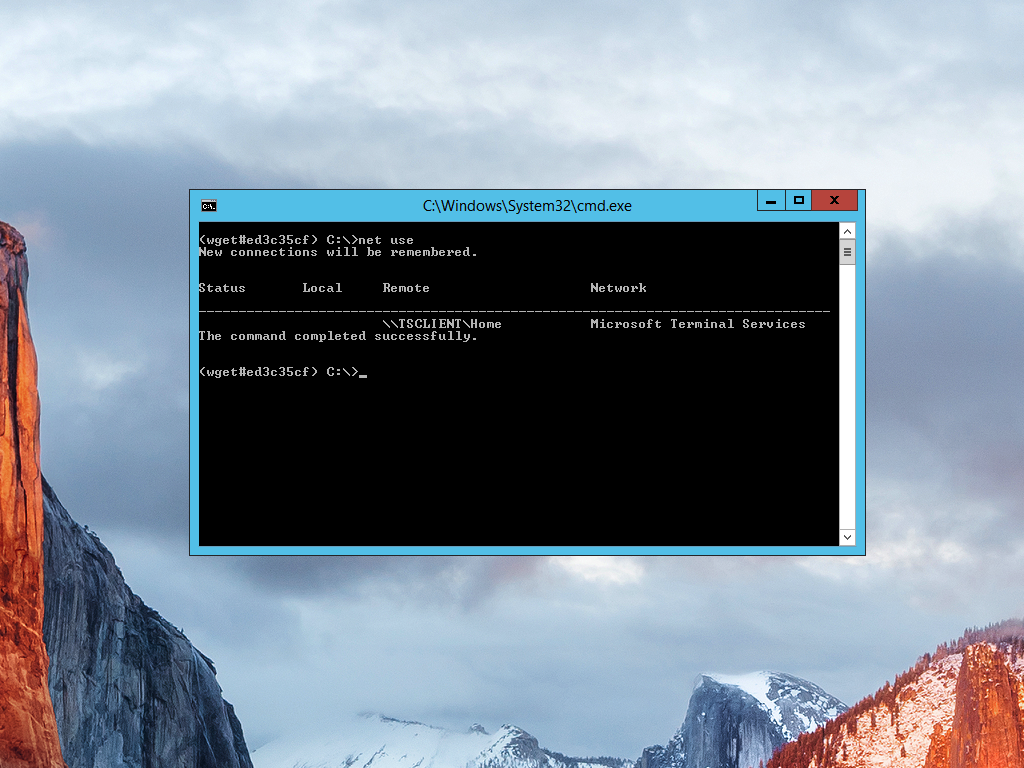
Applications running in this mode will show files from the local system under the Home on My Mac mapped drive in the File Open and Save dialogs.

Files from the local system may also be accessed using the \\TSCLIENT\Home remote path.
Cloud Storage Services
Connecting a cloud storage service, such as OneDrive or Dropbox, to your applications on Turbo.net is a seamless way to access your files quickly.
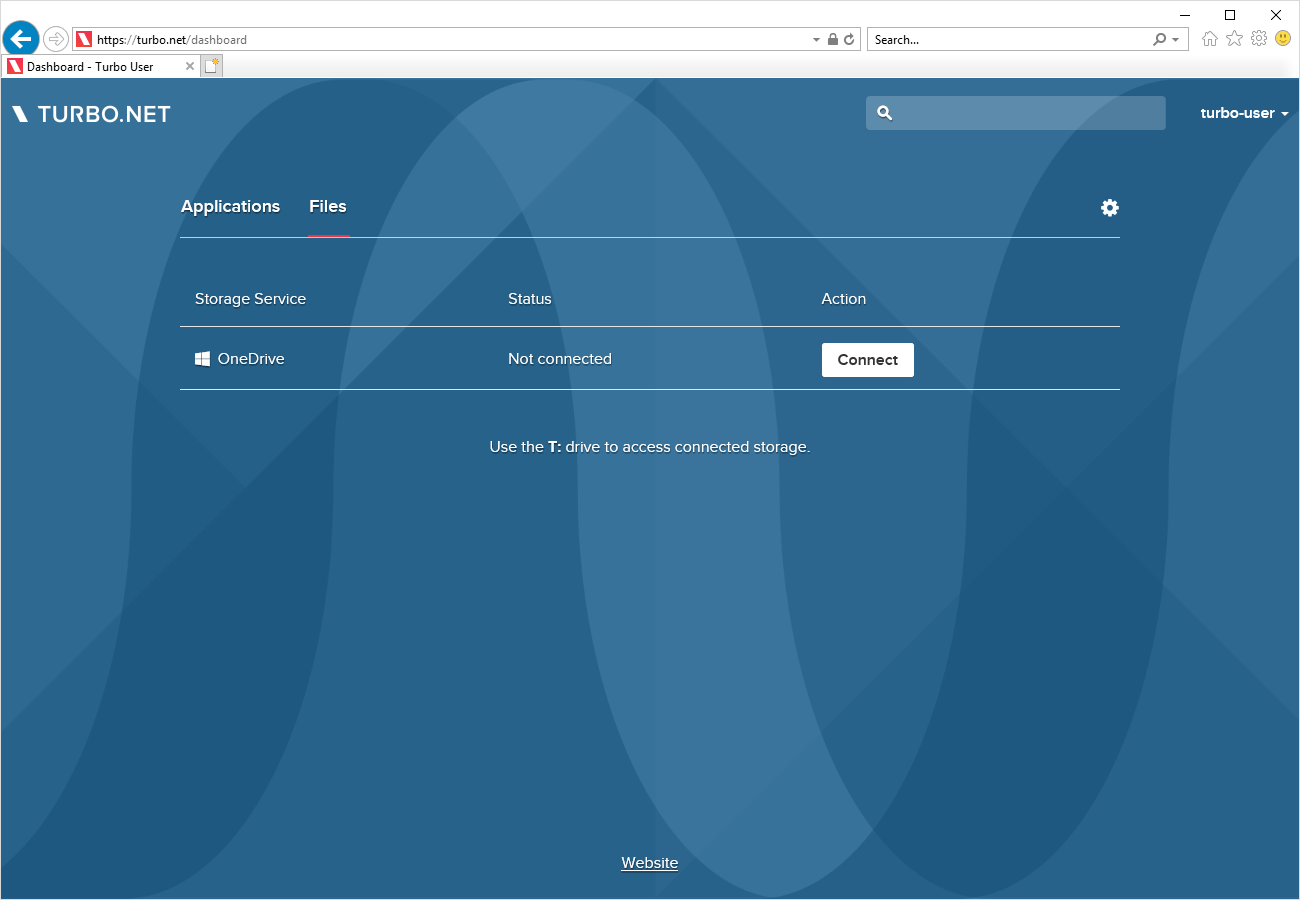
From your Portal, click on Files to access the storage services for your account.
Then, click on the Connect button to link the storage service to your account, allowing Turbo applications to load and save data to the storage service.
You will be asked to authenticate your account with the storage service to link it with your applications.

When the authentication succeeds, the storage service status will show as connected and give you the option to Disconnect.
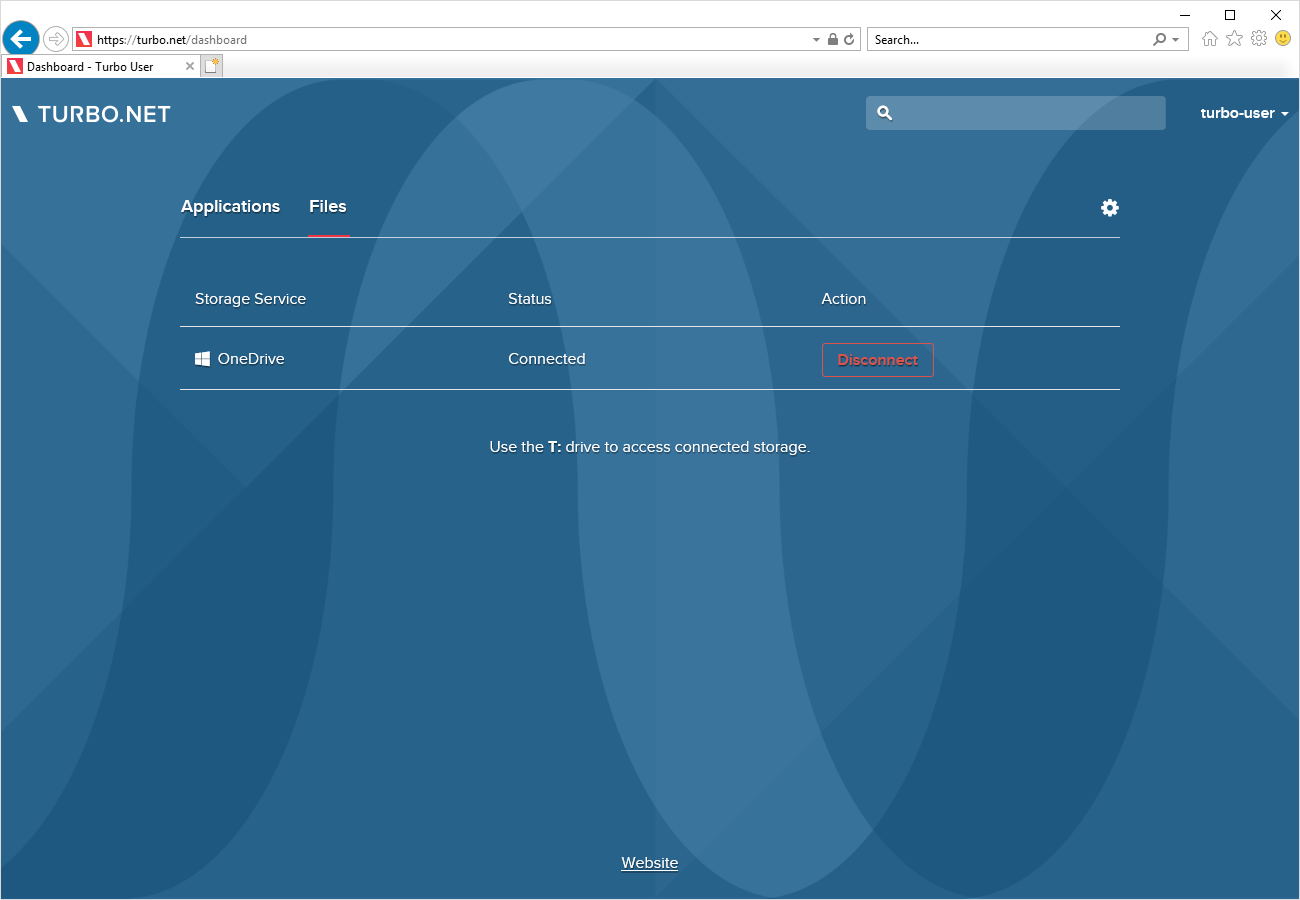
Files from the storage service will be available under the T:\ drive for applications running in the cloud.
1.3 Printing
Turbo supports printing both from the HTML5 and native client interfaces.
For the best experience, we recommend installing a Turbo native client to allow direct use of local printers.
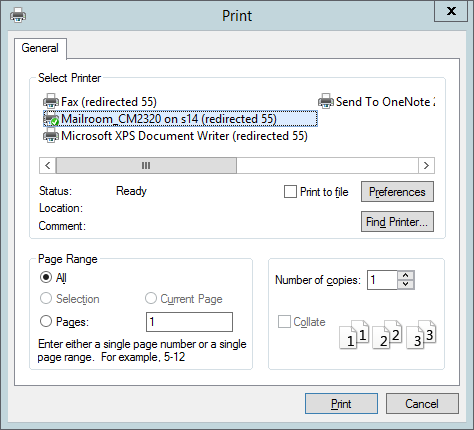
From a Web Browser
To print from the HTML5 client, select the Print to PDF printer:

The printer will download a PDF file through the browser. Open the PDF and print using your local printer.
From Native Clients
If the Turbo application is executing on the local machine, the printer should automatically be visible to the application.
If the application is running in the cloud, local printers will be automatically redirected and visible to the application.
1.4 Networking
Turbo.net allows applications to access the local network of the client device even when running from the cloud when using the Turbo for PC or Turbo for Mac client.
The HTML5 and mobile clients do not support local network access without a separate network tunnel setup.
Applications launched on the local device, eg Run on My PC will automatically interact with the local network.
Enabling Local Network Access
For security purposes, local network access must be enabled in the Turbo for PC or Turbo for Mac settings before network sharing can be used.
To enable local network access, open the Turbo for PC or Turbo fro Mac application and check the Allow access to local network setting.
Once the setting is enabled, subsequent launches of cloud-based applications will be able to reference local URLs.
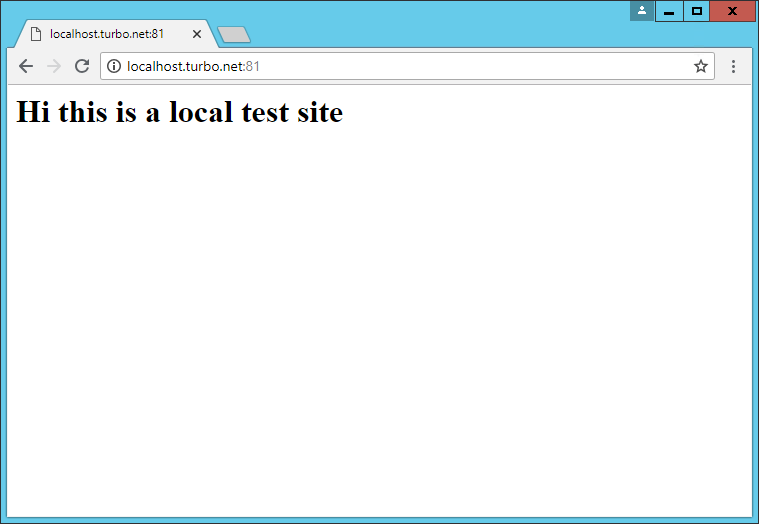
Accessing localhost
When network sharing is enabled, a potential ambiguity exists when referencing the special localhost device name, depending on whether the client device or cloud host is the intended target.
To resolve this ambiguity, Turbo.net uses the following address convention:
- The
localhostname references the server running the application in the cloud. - The special host name
localhost.turbo.netreferences the client device.
For example:
1.5 Advanced Settings
Turbo for Windows
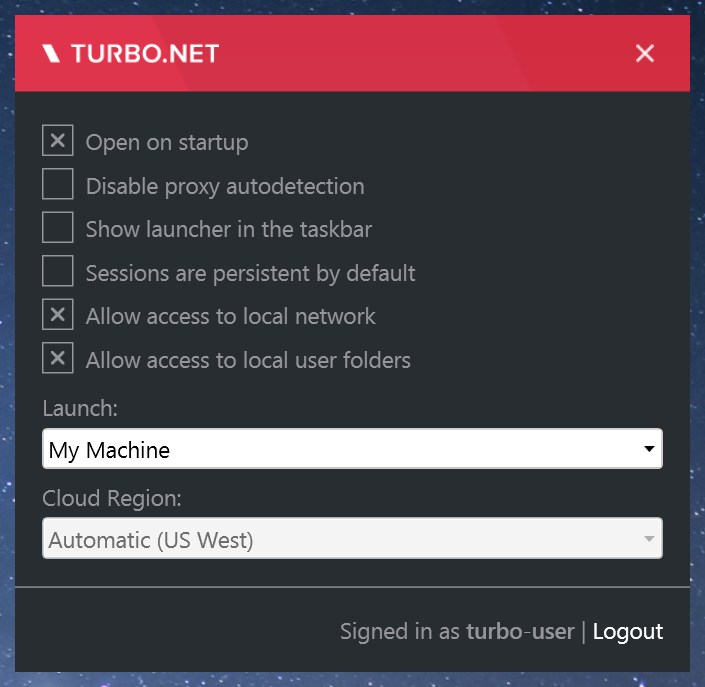
Click on Settings at the bottom right of the Turbo Launcher to bring up the Settings dialog.
- Open on startup: starts Turbo Launcher on Windows startup.
- Disable proxy autodetection: do not use the Windows Internet Explorer proxy settings to access the internet.
- Show launcher in the taskbar: shows Turbo Launcher on the Windows taskbar.
- Allow access to local network: allow cloud launched applications to connect to the local network.
- Allow access to local user folders: allows applications launched on my machine to have full read write access to special user folders including the OneDrive folder.
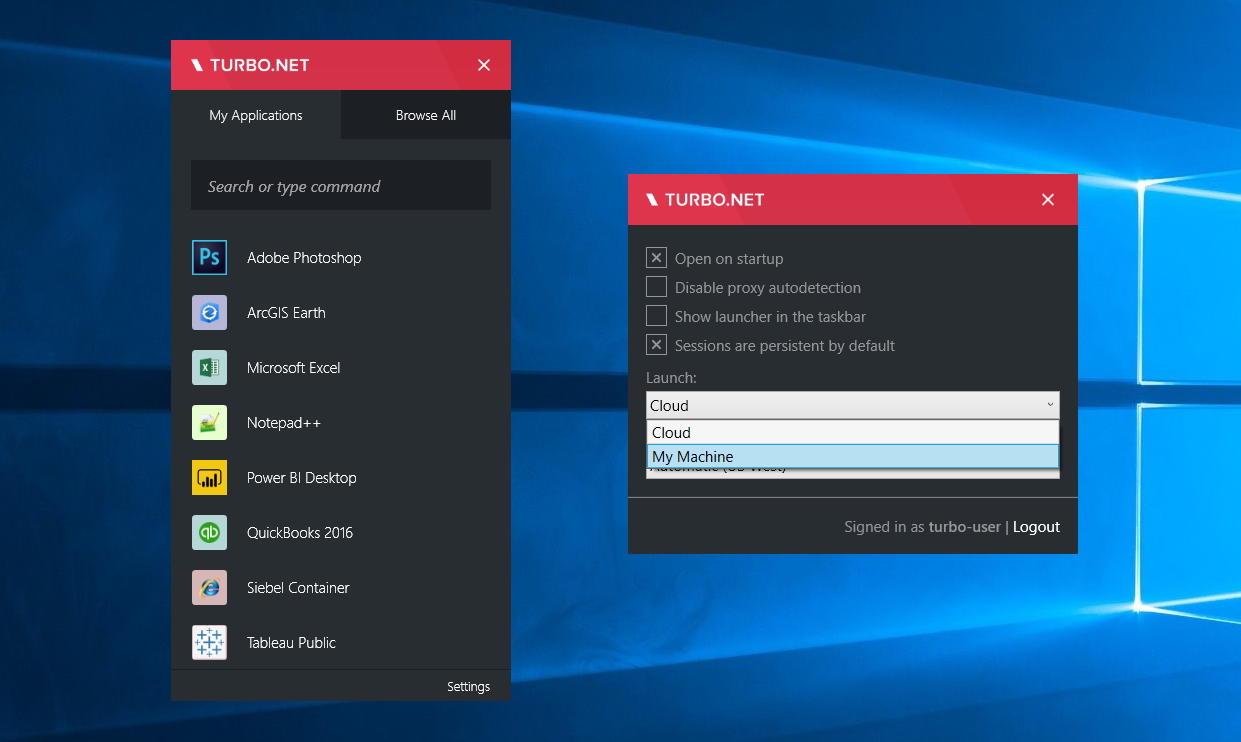
- Launch: controls where the applications will execute for your left-click launches.
- Cloud: the application will execute in the cloud and stream to the user’s device.
- Machine: the application will execute locally on the user’s device.
Turbo for Mac
Click on the gear (⚙) icon at the top-right of the Launcher to access the settings.
- Synchronize with Turbo.net: save application settings to the cloud.
- Open on startup: open the Turbo Launcher when the system starts.
- Use Extended RAIL: improve visual appearance of streamed application.
- Use H.264: use codec to decrease bandwidth usage for streaming (requires Extended RAIL).
- Cloud Region: select the region where the application will execute and stream from.

FAQ
How do I save passwords in a browser on Turbo to share with team members?
This can be achieved by creating an image with the credentials set using the Turbo CLI
# Run a browser
>turbo new firefox
Using VM 18.7.1306 from local
Using image clean:26 from local
Using image firefox:61 from local
Running new container firefox#9afe83e2

# Go to a website and log in, saving your credentials, then exit the application
Process exited with status 0

# Save the container into an image
> turbo commit firefox#9afe83e2 ffpassword
Using image firefox:61 from local
Committing container firefox:3.5#a524349c to image ffpassword
Commit complete

# Push to hub
> turbo push ffpassword mynamespace/ffpassword
Pushing image ffpassword to mynamespace/ffpassword
Push complete
Image is private
1.6 Administrators
Creating Images
In the previous section, we used several ready-to-use images from the Turbo.net Hub. But what if we want to create or customize our own images?
Customizing applications
Recall that in the previous section we launched several Firefox containers from the Turbo.net Hub. Applications in the Hub are configured with installer defaults. Let’s see how to customize images with our own preferred settings.
Launch a new Firefox container as before:
> turbo new firefox
In this example, we modify the Firefox container by setting the homepage to a new URL from the Options menu:

Close the browser window to stop the container.
We suggest restarting the container to verify the all of the settings are configured as desired. This will be the same experience as your users when they launch the final image:
> turbo start e4a84281
Using VM 11.8.960 from local
Using image vcredist:2008 from local
Using image clean:25 from local
Using image firefox:47.0.1 from local
Using image firefox-base:47.0.1 from local
Running existing container firefox#e4a84281 with visibility private
Notice that if we use the new command to start a new Firefox container, the default home page still appears.
> turbo new firefox
Using VM 11.8.960 from local
Using image vcredist:2008 from local
Using image clean:25 from local
Using image firefox:47.0.1 from local
Using image firefox-base:47.0.1 from local
Running new container firefox#b05176b2 with visibility private
To publish our modified Firefox container, we must create a new image. To create an image from a container, use the turbo commit command:
> turbo commit e4a8 firefox-turbo
The first argument to commit is the identifier of the container being committed. Observe again that we used prefix matching to shorten the container identifier. The second argument is the name of the new image. By convention, modifications to a base image are named following the pattern
Finally, we can launch a new instance of our custom image!
> turbo new firefox-turbo
Notice that a new container identifier has been assigned. Even though the configuration is the same as our initial container e4a84281, the container we just launched is a new instance of a container instantiated off the firefox-turbo image.
Removing images
Since we only created the firefox-turbo image for testing purposes, we’d like to remove it to keep our local repository clean.
Images can be removed using the rmi (remove image) command:
> turbo rmi turbo-clean
Image firefox-turbo was removed
The rmi command also accepts wildcards. For example, all images can be removed from a device with the command turbo rmi *.
Installing custom applications
So far we have been using applications that were already available in the Turbo.net Hub. But what if we want to install completely custom applications into our containers?
In this example, we’ll install Sublime Text editor into a container. (Sublime Text is a popular text editor.) To follow along with this demo, you’ll need to download the Sublime Text installer:
Download Sublime Text 2.0.2a Setup.exe
We assume in this example that the installer is downloaded to the folder C:\Installers.
You can install applications into containers just like you would a normal desktop. However notice we have a small problem — how do we get the installer binary into the container?
The --mount flag causes the specified directory to be mounted within the container. Mounted directories on the host device are accessible from within the container context exactly as they would be on the host device.
# Mount a host folder into the container that contains the setup file
> turbo new clean --mount="C:\Installers"

# The native C:\Installers folder is now accessible from the container command prompt
(clean#94d6338f) C:\>cd "C:\Installers"
(clean#94d6338f) C:\Installers>dir
 Volume in drive C has no label.
 Volume Serial Number is DADA-BCA1

 Directory of C:\Installers

07/01/2016 01:58 PM <DIR> .
07/01/2016 01:58 PM <DIR> ..
07/01/2016 01:58 PM 5,601,488 Sublime Text 2.0.2a Setup.exe
 1 File(s) 5,601,488 bytes
 2 Dir(s) 114,467,921,920 bytes free
Notice that unlike a normal clean image, this container has a C:\Installers directory visible that contains the Sublime Text setup file.
Next, launch the setup and click through the installer as you would normally. Once it’s complete, you can navigate to the C:\Program Files (x86)\Sublime Text 2 folder to confirm that Sublime Text has been installed in the container:
# Run the installer to install the program into the container
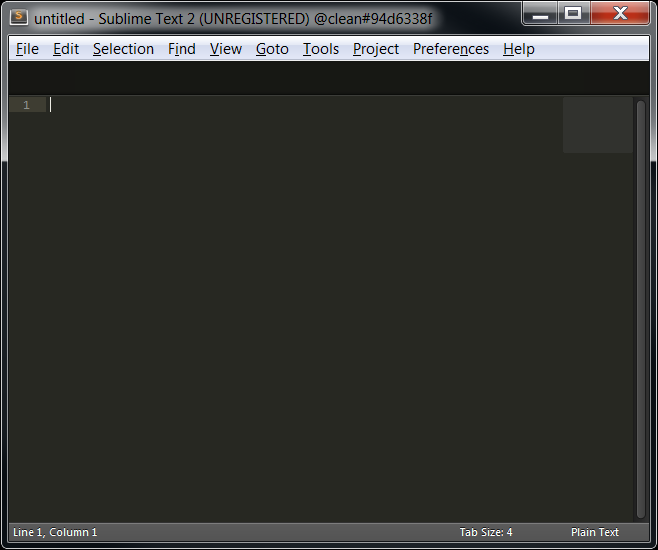
(clean#94d6338f) C:\Installers>"Sublime Text 2.0.2a Setup.exe"
# Verify the install
(clean#94d6338f) C:\>cd "Program Files (x86)\Sublime Text 2"
(clean#94d6338f) C:\Program Files (x86)\Sublime Text 2>dir
Volume in drive C has no label.
Volume Serial Number is DADA-BCA1
Directory of C:\Program Files (x86)\Sublime Text 2
07/01/2016 02:01 PM <DIR> .
07/01/2016 02:01 PM <DIR> ..
09/15/2010 10:06 PM 71,680 bz2.pyd
09/15/2010 10:06 PM 1,852 Microsoft.VC90.CRT.manifest
09/15/2010 10:06 PM 572,928 msvcp90.dll
09/15/2010 10:06 PM 653,136 msvcr90.dll
07/31/2012 09:54 PM 4,206 PackageSetup.py
07/01/2016 02:01 PM <DIR> Pristine Packages
09/15/2010 10:06 PM 153,088 pyexpat.pyd
09/15/2010 10:06 PM 2,145,280 python26.dll
09/15/2010 10:06 PM 1,484,587 python26.zip
09/15/2010 10:06 PM 11,776 select.pyd
03/10/2012 08:23 AM 10,838 sublime_plugin.py
07/08/2013 11:25 AM 3,921,408 sublime_text.exe
09/15/2010 10:06 PM 585,728 unicodedata.pyd
07/01/2016 02:01 PM 13,381 unins000.dat
07/01/2016 02:01 PM 1,179,960 unins000.exe
07/01/2016 02:01 PM 20,903 unins000.msg
09/15/2010 10:06 PM 73,728 _ctypes.pyd
09/15/2010 10:06 PM 86,016 _elementtree.pyd
09/15/2010 10:06 PM 286,208 _hashlib.pyd
09/15/2010 10:06 PM 40,448 _socket.pyd
09/15/2010 10:06 PM 665,600 _ssl.pyd
20 File(s) 11,982,751 bytes
3 Dir(s) 114,456,604,672 bytes free
Finally we can launch the sublime_text.exe executable!
Take note of the full path to the startup file as we’ll need it later.
# Run the program inside of the container
(clean#94d6338f) C:\Program Files (x86)\Sublime Text 2>sublime_text.exe
Saving new images
Now we have a useful container that has Sublime Text installed.
As before, we’ll use the commit command to create an image that we can distribute. But in this case we do not want the command prompt to open by default. An alternate startup file can be specified at commit time using the --startup-file flag.
Here we commit the container to a new image using the startup file path we noted previously:
# Save changes to the container to an image.
# The startup-file flag allows the image to automatically run an executable instead of opening a command prompt.
> turbo commit 94d6338f sublimetext --startup-file="C:\Program Files (x86)\Sublime Text 2\sublime_text.exe"
Committing container clean#94d6338f to image sublimetext
Commit complete
Now launch a fresh sublimetext container using the image we just created:
# Run the new image, the run command is similar to the new command but instead runs an existing container of the same image name if they exist
> turbo run sublimetext
Desktop Integration
Sometimes we want containers to behave as isolated environments. Other times, we want the container to interact (in a managed way) with the host desktop.
Turbo lets you to control the level and types of integration with the host desktop.
Accessing local files
You may have noticed in previous examples that you could not access the My Documents or My Downloads file when using containerized applications. This is because the container has its own instance of the filesystem by default. In many cases, we may want to allow access to these built-in folders.
Turbo allows you to selectively de-isolate individual folders between the container and host device. We saw an example of this earlier with the --mount flag. But explicitly mounting all of the user folders would be tedious. Also, user folder names vary between operating system variants.
To solve this, Turbo provides a built-in isolation mode that de-isolates all major user folders:
> turbo run notepadplusplus --isolate=full+merge-user
When Notepad++ starts, notice that you can view and edit files in your user folders.
Shell integration
Full desktop integration extends beyond just the ability to access the host filesystem. For example, we may want the application’s Start Menu shortcuts, file associations, and other shell integrations to work as if the application was natively installed.
Turbo lets you “install” images via the installi (install image) command. Installed images are “wired up” to the shell and behave as if they are installed on the host device. But note that these applications are not actually installed — they are still running in the Turbo container environment, just with shell interactions and different isolation settings.
To install an image, we use the command:
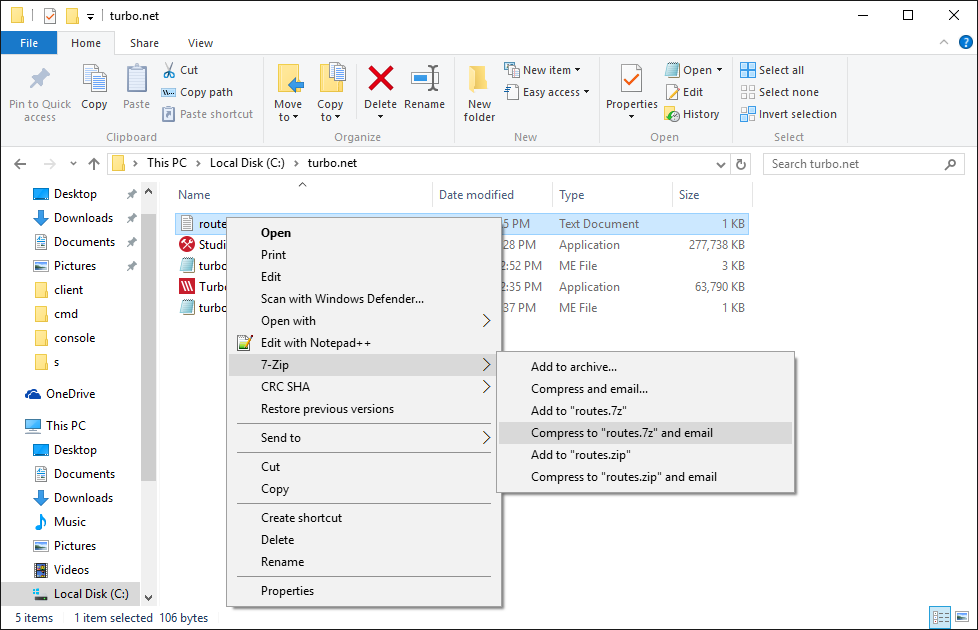
> turbo installi 7-zip
Shortcut 7-zip created in Start Menu

>turbo installi notepadplusplus
Shortcut notepadplusplus created in Start Menu
If you press the Windows key, you will notice that 7-Zip and Notepad++ appear in the Start Menu! You can launch these applications through the normal Windows application launch experience.
Also, notice that if you right-click on a file in the Windows Explorer, you see the shell extensions normally associated with installed versions of 7-Zip and Notepad++:
Installing a container does not automatically cause the image contents to download. The contents will download automatically when the application is first run. Container installation is intentionally designed this way so that many applications can be registered on the desktop very quickly.
To remove the applications, use the uninstalli command:
> turbo uninstalli 7-zip
Shortcut for 7-zip removed from Start Menu

> turbo uninstalli notepadplusplus
Shortcut for notepadplusplus removed from Start Menu
You can check that the Start Menu shortcuts, file associations, and shell extensions have been removed.
Installed containers can also be removed through the Add/Remove Programs section of the Control Panel.
Networking
Turbo containers have a virtual networking stack that can be customized on a per-container basis. You can also connect containers with one another and with the host device’s network adapters.
Site whitelisting
The route-block and route-add flags control which domains and protocols are allowed to interact with the container.
A nice application of container networking is to block all IP addresses except specified websites in a browser.
> turbo new firefox --route-block=ip --route-add=ip://yahoo.com
This will launch a new Firefox browser with all IP addresses blocked except for the IP address associated with yahoo.com. To verify this, try navigating to a a few websites and notice that only Yahoo’s site is accessible!
Routing rules are applied in left-to-right order. The first rule blocks all IP traffic. Subsequent rules can then add back specific routes. In our example, we could have added additional --route-add arguments to allow access to additional web sites. The ip:// prefix indicates that all IP traffic, including both TCP and UDP protocols, should be affected by the routing rule.
Virtual networks
Suppose we want to run multiple containers on an isolated virtual network such that the containers can communicate with one another.
In this example, we’ll create a WordPress server and then access it with a Firefox web browser.
# Launch a WordPress server in a virtual network environment
> turbo run wordpress -d --network=wp --name=web

# Run a Firefox browser instance in the same virtual network
# environment and connect to the WordPress server
> turbo run --network=wp firefox http://web:8080
The --network flag creates a named virtual network. Containers started in the same virtual network can communicate with one another. The --name flag assigns a friendly name to the container which is also used to reference the container via virtual DNS resolution.
Notice that the Firefox browser is able to connect to the WordPress server at the http://web:8080 address. You may also confirm that the WordPress server is not externally accessible on the device.
Container linking
It is also possible to connect individual containers together via container linking.
We can repeat the example above using the --link command:
# Launch a WordPress server in a virtual network environment
> turbo run -d --network=wp --name=web wordpress

# It is also possible to map a different domain name than
# the container name by setting up a container-to-container link
> turbo run --link=web:mywordpress.com firefox http://mywordpress.com:8080
Container linking provides more fine grained control over container interactions but may be more complicated to use than named virtual networks.
This example also demonstrates the use of container name remapping. In this case, we mapped Firefox to the web container as before but modified its DNS entry to mywordpress.com.
Network layering
Network configurations can be stored in images and layered just like any other image. This is very useful when applying the same set of routing rules to multiple images. The Turbo.net Hub also provides pre-configured network routing images.
For example, the following command creates a Firefox browser with social media websites blocked:
> turbo run firefox,block-social-routes
The block-social-routes is a layer provided by the Turbo.net Hub that has route blocking rules defined for popular social media sites.
Notice that the Firefox browser will not navigate to sites like facebook.com and twitter.com.
Automation
When operating in a developer environment, the recommended practice is to automate creation of Turbo images.
Turbo supports a flexible scripting language called TurboScript. In this section, we’ll see how to use TurboScript in conjunction with different external tools to automate container builds.
Building images with TurboScript
In this example, we’ll use TurboScript to automatically build VLC Media Player, a popular media player for Windows.
To execute a TurboScript build, we use the turbo build command. The script reference can be either a local path or a URL.
> turbo build https://raw.githubusercontent.com/turboapps/turbome/master/vlc/stable/turbo.me
We have provided the build script for this application at that URL. (More on this later.) Notice that by convention the TurboScript name is turbo.me.
If you have run this script before, you should add the --overwrite flag to the command to allow the build to overwrite the previously created image.
After a couple minutes, a new vlc image should be created. Try running it to confirm it works!
> turbo run vlc
Inside TurboScript
Let’s look at what this script does. It starts by defining the namespace, name and title of the container image that will be created.
meta title="VLC stable"
meta namespace="videolan"
meta name="vlc"
Next we want to fetch the VLC homepage, parse the contents and extract the download link and version number for the latest release. The tools we chose for the job are wget and Python. Both of these tools are available in the Turbo.net Hub.
We bring these into the script’s scope as transient dependencies. Transient layers are available while the script is executing but are automatically removed when the final image is saved. Transient layers are applied with the using command.
# we'll use wget to download files and python to fetch and parse VLC homepage
using gnu/wget,python/python:3.4.1
# we'll need the 'requests' python module
cmd pip install requests --quiet
The cmd verb executes the given command. Here we use the Python pip package manager to install additional components.
With our tools ready we parse the download URL from the homepage and fetch the VLC setup file:
batch
 echo import requests >> getUrl.py
 echo import re >> getUrl.py
 echo host = "http://www.videolan.org/vlc" >> getUrl.py
 echo headers = {'User-Agent': 'Mozilla/5.0 (Windows NT 6.3; WOW64; rv:41.0) Gecko/20100101 Firefox/41.0'} >> getUrl.py
 echo r = requests.get(host , headers=headers, timeout=10) >> getUrl.py
 echo url = ''.join(list(re.findall('(get.videolan.org\/vlc\/.*exe)', r.text)[0])) >> getUrl.py
 echo print(url) >> getUrl.py

cmd python getUrl.py
 var url = last

# Download
 cmd "wget --no-check-certificate --no-verbose -O VlcSetup.exe %url%"
Notice another great TurboScript trick here — the batch block! The batch verb lets us inline script files within the script itself, avoiding the need to pull in an external .py file and allowing us to keep our script self contained. Scopes in TurboScript are determined by whitespace alignment, similar to Python.
Also notice the last keyword. This special variable is substituted by TurboScript with the return value from the previous command. Here it is used to capture the output from the Python script and place it into a TurboScript variable.
The next step is to install VLC. When using automation, be sure to use silent install options (the /S flag in this case).
# Install
 cmd VlcSetup.exe /S
With VLC installed the container image is ready. We do some final Python scripting to parse out the version number and set that as the container version tag:
batch
 echo import requests >> getVersion.py
 echo import re >> getVersion.py
 echo host = "http://www.videolan.org/vlc" >> getVersion.py
 echo headers = {'User-Agent': 'Mozilla/5.0 (Windows NT 6.3; WOW64; rv:41.0) Gecko/20100101 Firefox/41.0'} >> getVersion.py
 echo r = requests.get(host , headers=headers, timeout=10) >> getVersion.py
 echo version = ''.join(list(re.findall('(get.videolan.org\/vlc\/(.*)\/win.*exe)', r.text)[0][1])) >> getVersion.py
 echo print(version) >> getVersion.py

cmd python getVersion.py
 var version = last
We were only able to cover some TurboScript basics here. To learn more, view the TurboScript Reference Guide.
Scripting builds
Now that we have our TurboScript and a command to run the build, we need to automate the rest of the build process.
Add the follow commands to your automated CI build script:
# Log in to your Turbo.net account
turbo login <username> <password>

# Execute the TurboScript and build a new image
turbo build -n=<name> C:\path\to\turbo.me

# Push the image to our repo
turbo push <name>
(You may want to use an API key instead of your password for automated logins. We'll discuss API keys in just a moment.)
Once the image is pushed, other users and processes can pull and run it instantly!
Integrating with MSBuild and Visual Studio
Now let's integrate our container build step with MSBuild, Visual Studio's build system. (The same basic steps will work with any IDE.)
The easiest way to integrate with Visual Studio/MSBuild is to add a Post-build event to your project.
Right-click on your project in Visual Studio and select Build Events from the left-hand menu.
In the Post-build event command line box, add the line:
turbo build -n=$(SolutionName) $(SolutionDir)\turbo.me
For solutions with multiple projects, we recommend only triggering a post-build event for the last project in the build chain. This may require customizing your TurboScript to also pull in the build outputs from these other projects.
As before, you could also optionally add a turbo push event to automatically generate a repository version on each build. This is the recommended practice for continuous integration style development.
Automating with Jenkins
Jenkins is a popular and free open source continuous integration (CI) system. Turbo directly integration with Jenkins that allows container images to be built as part of the CI process.
To follow along with this section, you'll need to install the TurboScript plugin for Jenkins into your Jenkins environment. Install it by opening the Jenkins Plugin Manager and install the latest TurboScript plugin.
First we need to setup the Jenkins job. Save the script file on the Jenkins host machine. Change line #15 to use your own Turbo.net username.
From the Jenkins Dashboard create a new Jenkins job of type Turbo Project. Add an Execute TurboScript build step and connect it to the script just saved.
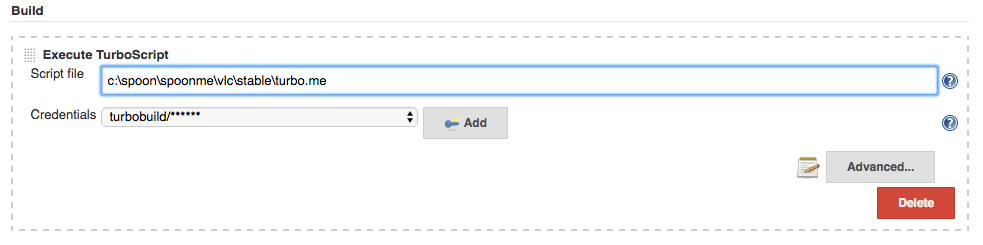
We want to push the container image created to the Hub, so we add a Push Turbo Image build step:

Save the new Jenkins job and trigger a run to see your automated build in action!
Automating Turbo with Chocolatey
Chocolatey is a package manager for Windows desktop applications. We can use TurboScript to leverage Chocolatey to create Turbo images. This is powerful since any application with a Chocolatey package can be used to create a Turbo container. As of this writing there are nearly 3,000 distinct Chocolatey packages available.
Let's repeat our VLC example using Chocolatey instead of a native TurboScript:
> turbo new --name=choco-vlc clean --using=chocolatey/chocolatey
This command creates a new container named choco-vlc. The --using flag lets applies Chocolatey as a transient layer within the container. Recall that this will allow us to use Chocolatey within the container but remove it from the final image. We saw this earlier in the TurboScript but here we see how to apply using from the command line.
In some cases other dependencies may be required to install the chocolate package such as PowerShell. In this case, just add additional transient layers: --using=chocolatey/chocolatey,microsoft/powershell.
In the command window that opens run:
choco install vlc -y
The VLC package should start to download and install successfully within the container.

When the install has completed, close the command window.
> exit
In the original command window used to create the container, we commit our image.
> turbo commit choco-vlc my-vlc --startup-file="@PROGRAMFILESX86@\VideoLAN\VLC\vlc.exe"
Note we set the appropriate startup file using the --startup-file flag so the container runs VLC on startup (rather than a command prompt containing VLC).
We can now test the image by launching it in a new container. In a command window, enter:
> turbo new my-vlc
VLC should launch:

Sample TurboScripts on GitHub
TurboScripts for many popular applications have been open sourced and are available in the turboapps GitHub repository.
Looking at examples is a quick way to pick up the basics of TurboScript. Pull these down, customize your builds -- and remember to contribute your own TurboScripts back to the community by sending a pull request!
API keys for scripting and authentication
To allow authentication in the context of scripting and automation, Turbo supports authentication via API keys. API keys eliminate the need to hard code passwords or pass them as parameters to your scripts.
The first step is to create an API key. To do this, go to your organization settings, and then select Devices & API Keys on the right menu. (You can also generate and manage API keys for an individual account on the Account Settings page.)
Once here, click Add API Key to generate a new key.
Notice that when you hover your mouse over an API key a Remove button is shown. Use this button to remove the key and revoke its access to your organization.
There is no limit to the number of keys you can generate. You may decide to create and manage different keys for different teams or for different user access, allowing you the flexibility to revoke them independently without disrupting all key users.
Click Copy Key and head back to the command line.
Using the API key is easy -- just include the key in the turbo login command using the --api-key flag:
> turbo login --api-key=9ZoKH_336g0MqP2yptwfrv9B1XUm8YFPnCZNugVQNr4
testorg logged in at 2/26/2016 3:53:31 PM
The session is now authenticated in the organization account context. The account will stay logged in until the API key is revoked or the session is closed with the turbo logout command.
Turbo on Citrix and RDS
System administrators can use Turbo to quickly deploy applications and custom containerized environments on Citrix, Parallels RAS, Workspot, Windows Remote Desktop Services (RDS), and other remote desktop systems.

Prerequisites
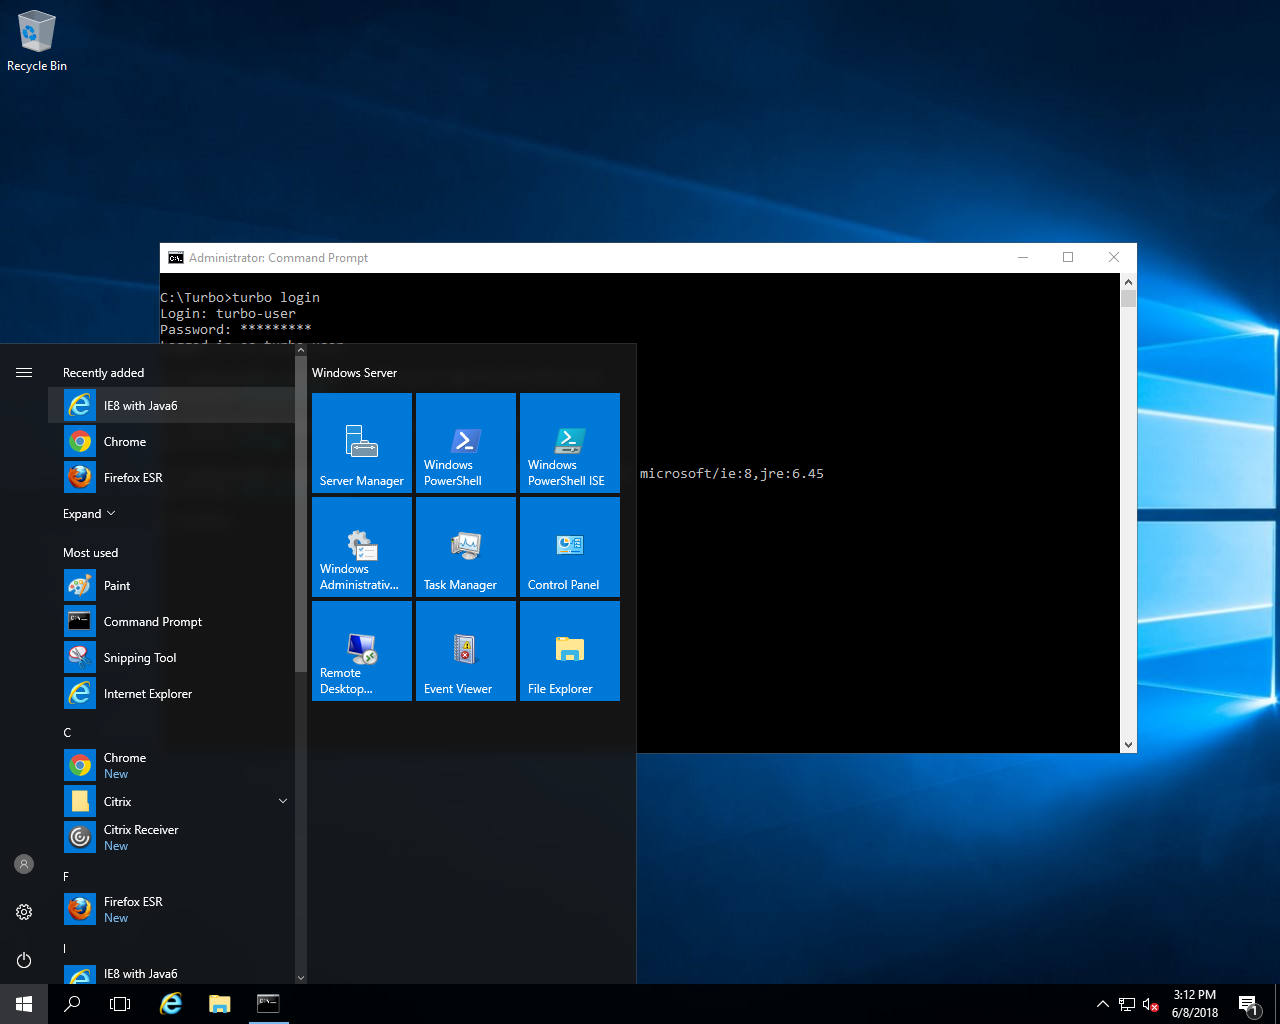
To get started, you will need to download and install Turbo for Windows for all users on the system.
If users will be streaming the application window rather than the whole desktop, we recommend hiding the Turbo GUI using the --hide-gui flag.
> start /wait turbo-client.exe --all-users --silent --hide-gui

Adding Applications to the Start Menu
Turbo application desktop integration, including Start Menu, desktop shortcuts, and file associations, can be enabled with the turbo installi command along with the --all-users flag. If you omit the version from the application identifier, then the latest version will be used.
# Sign in to Turbo.net (sign up at https://turbo.net/signup)
> turbo login

# Add the latest Firefox ESR browser to the Start Menu
> turbo installi --all-users mozilla/firefox-esr

# Add the latest Google Chrome browser to the Start Menu
> turbo installi --all-users google/chrome

# Add Internet Explorer 8 with Java 6.45 to the Start Menu
> turbo installi --all-users microsoft/ie:8,jre:6.45
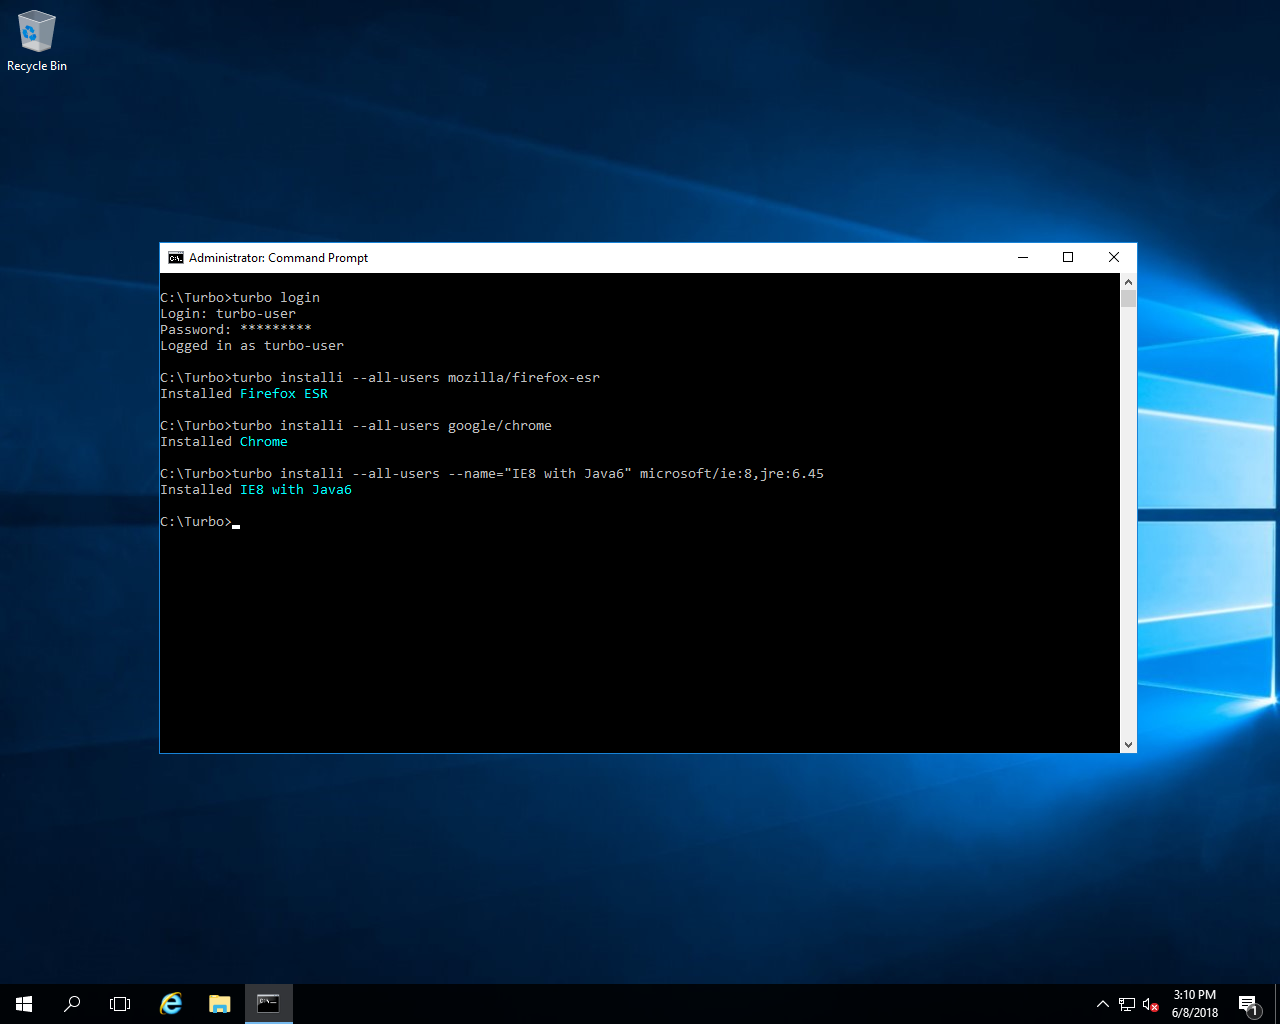
The Firefox ESR, Chrome,and IE8 with Java6 applications will appear in the Start Menu of the server.
Adding Applications to the Delivery Platform
Depending on the delivery platform in use, you may also need to add the applications in the delivery system’s administration interface.
In this example, we will add applications to Citrix XenApp using Citrix Studio.
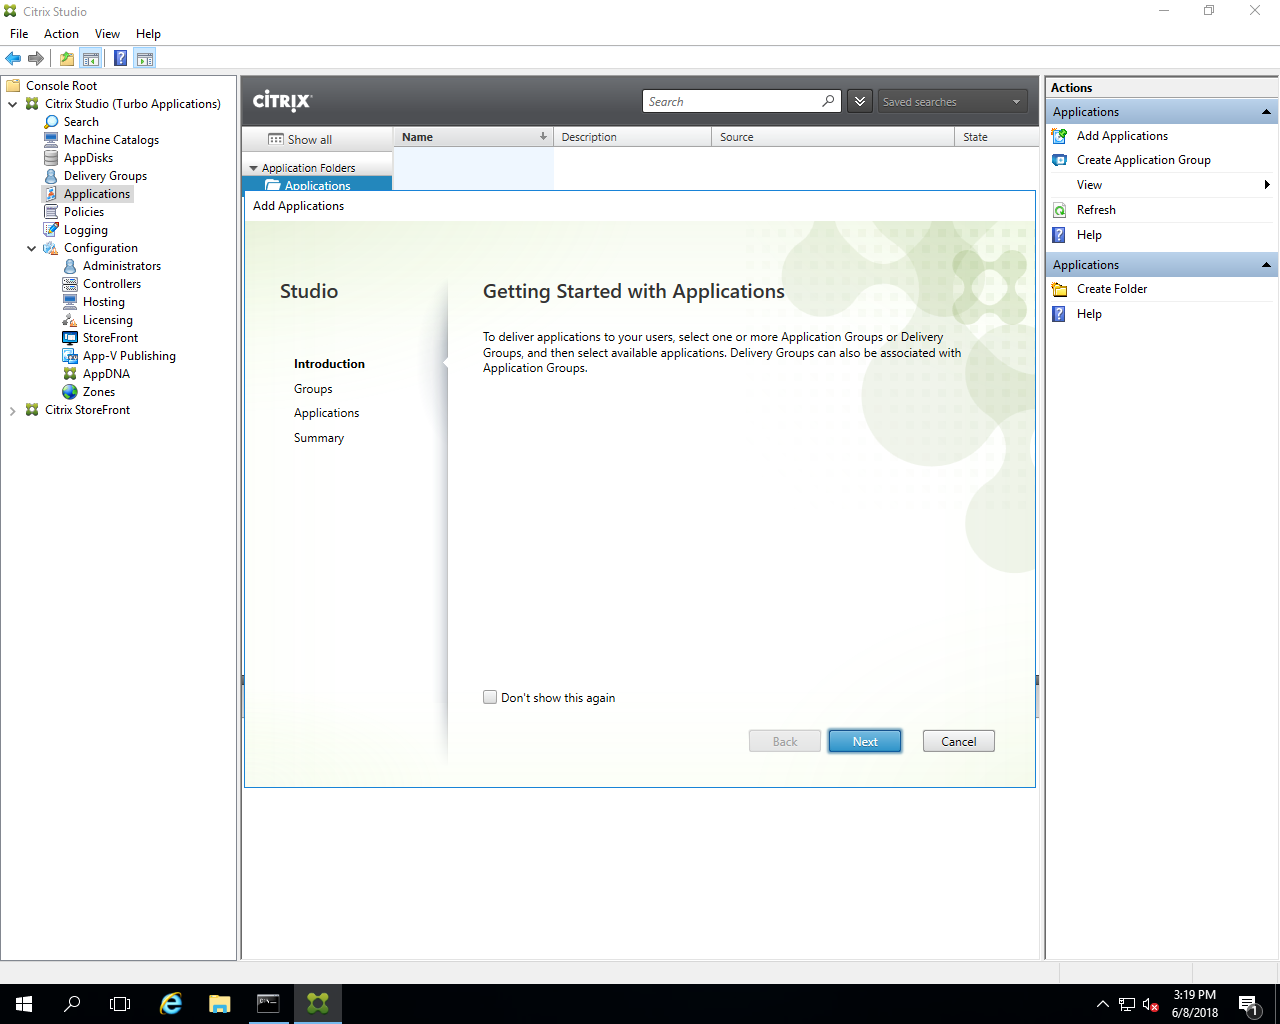
Start Citrix Studio and go to Applications > Add Applications.
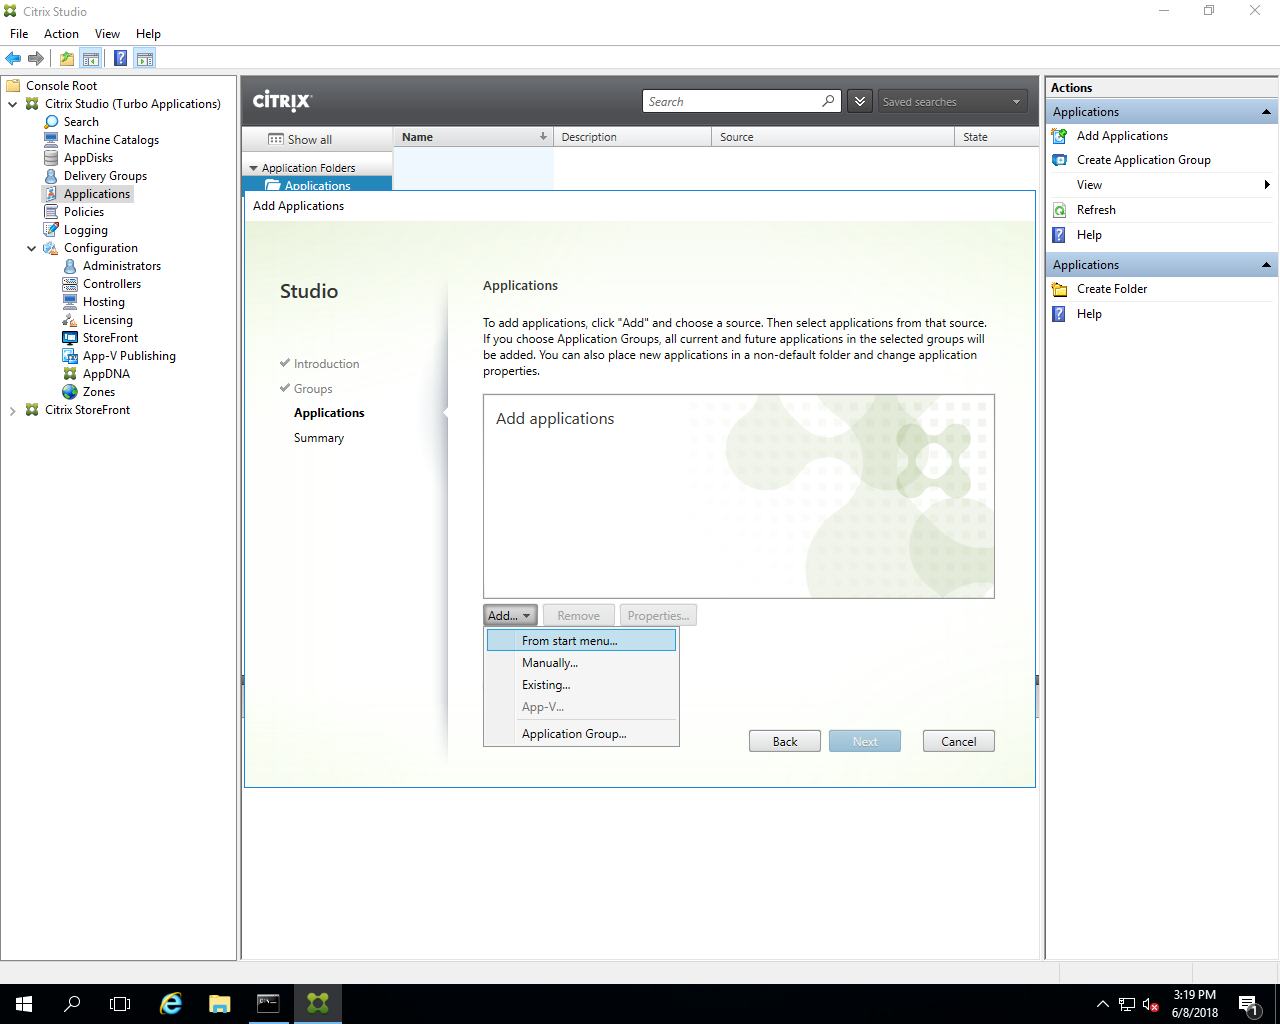
Select the option to Add applications From Start Menu…
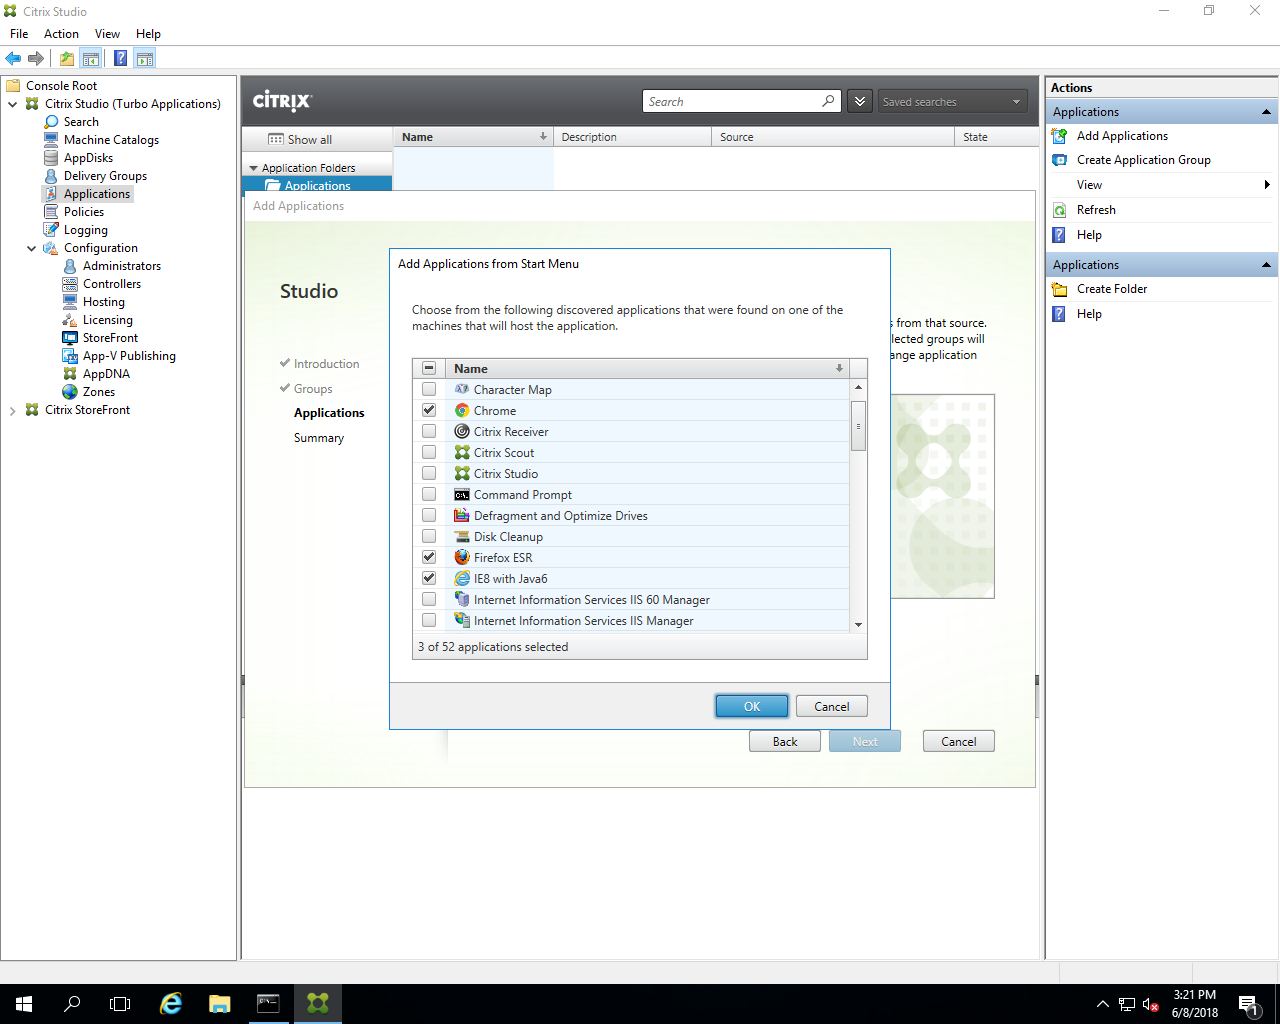
Then select the Firefox ESR, Chrome, and IE8 with Java6 applications.
Click through to Finish to complete the process.
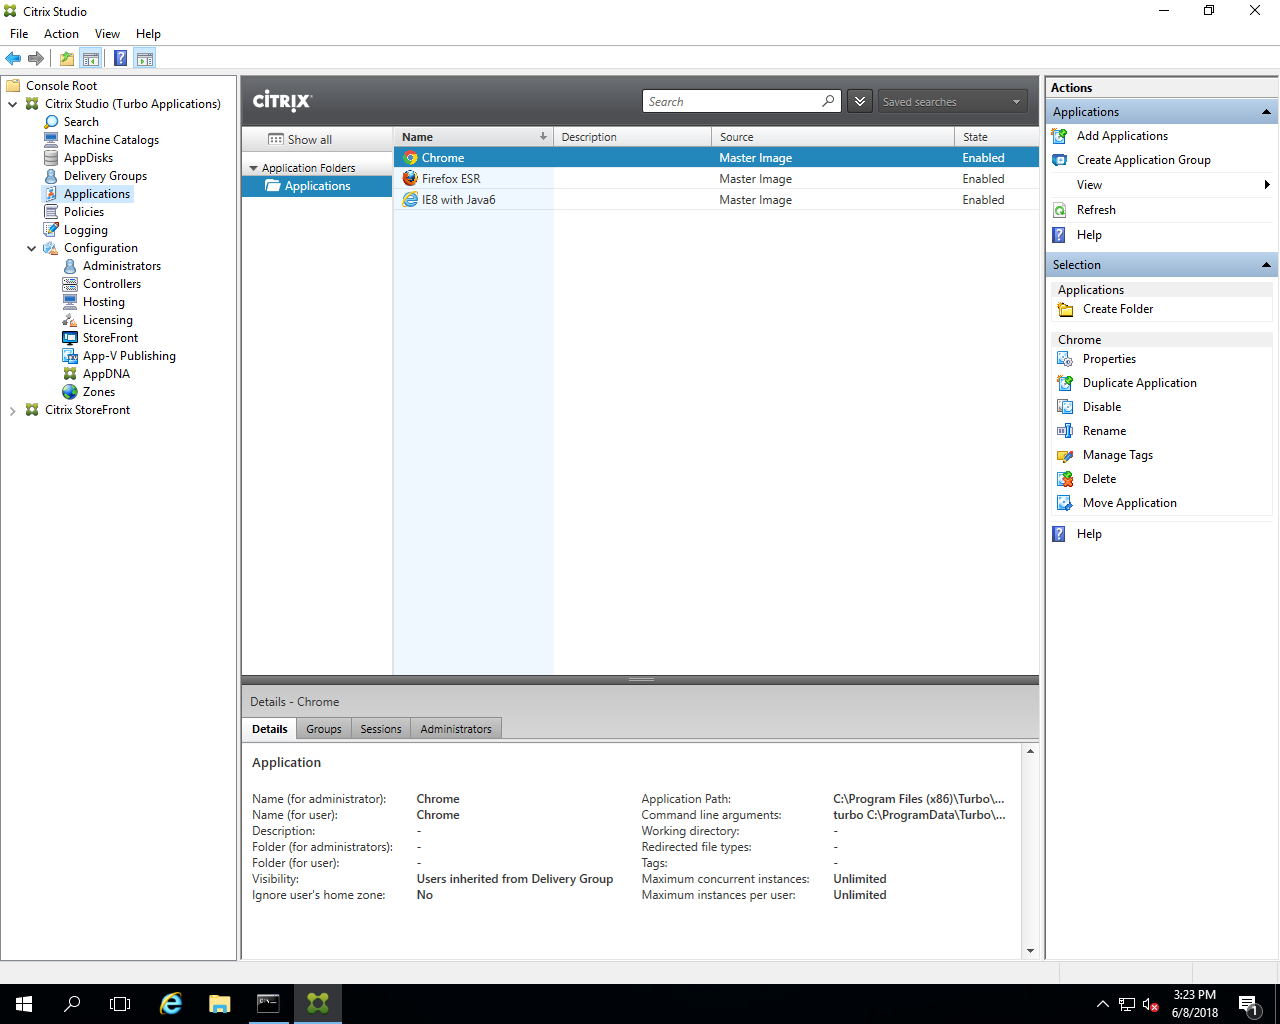
Running the Applications
Once added to Citrix Studio users can access the applications from the Citrix StoreFront website or the Citrix Receiver application.
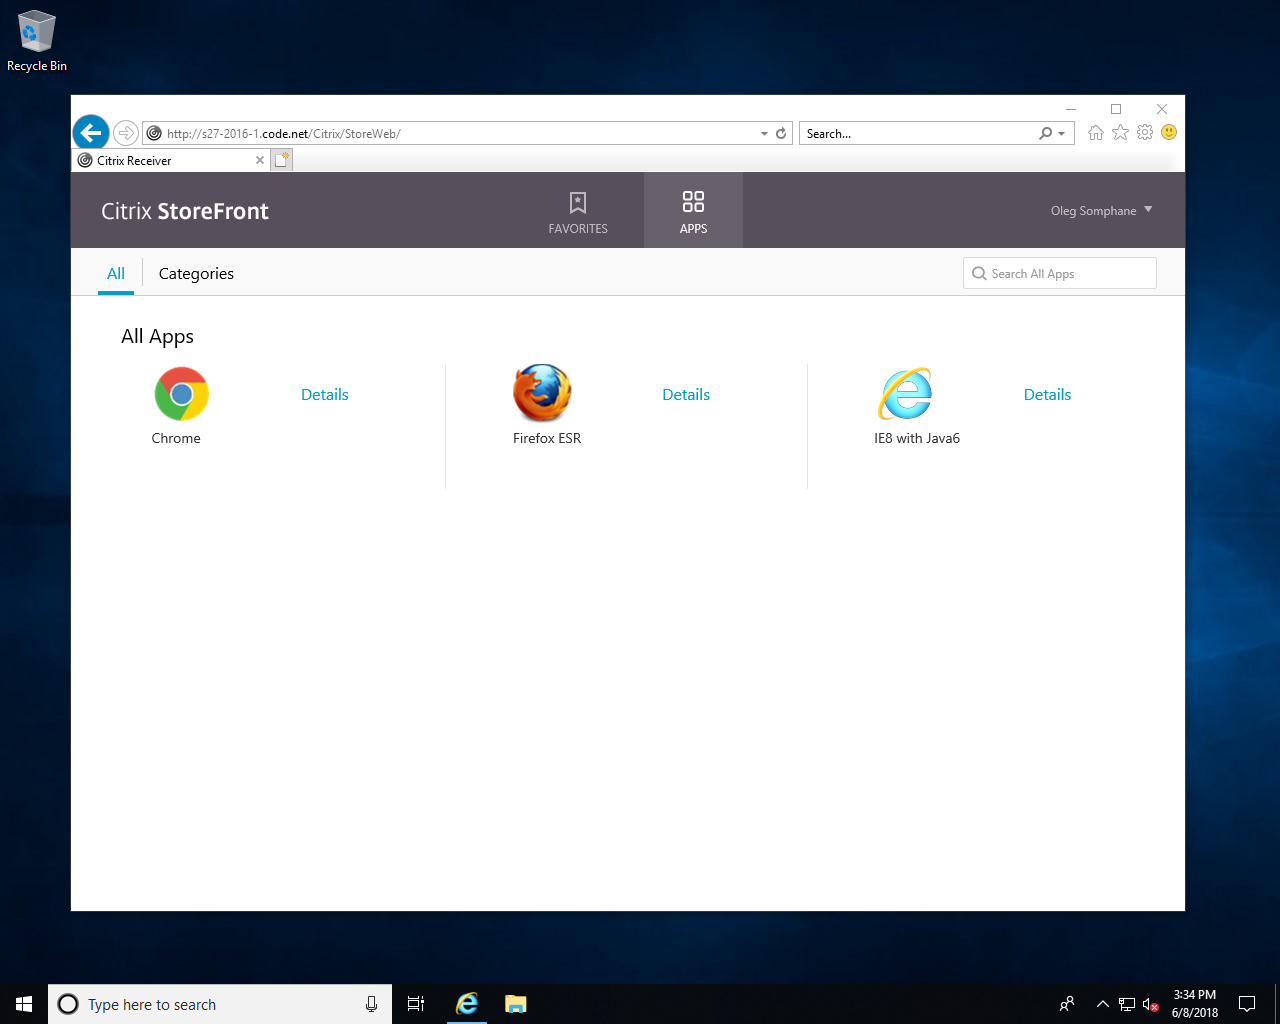
Click on an application to launch it.
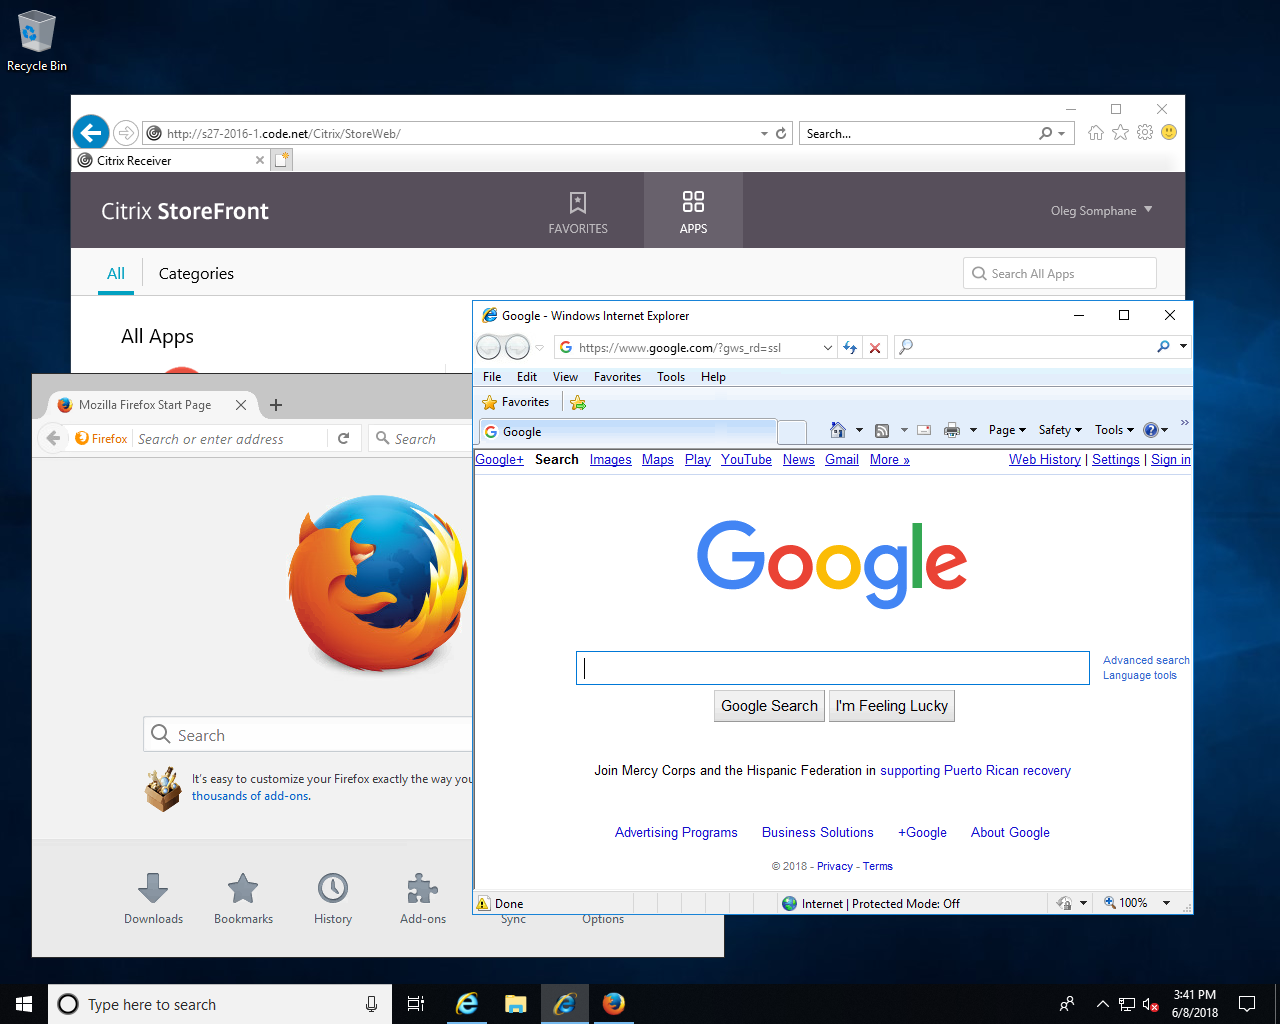

Note that because applications are executed in isolated Turbo container environments, any combination of browsers, plugins, and runtimes can run side-by-side on the same server.
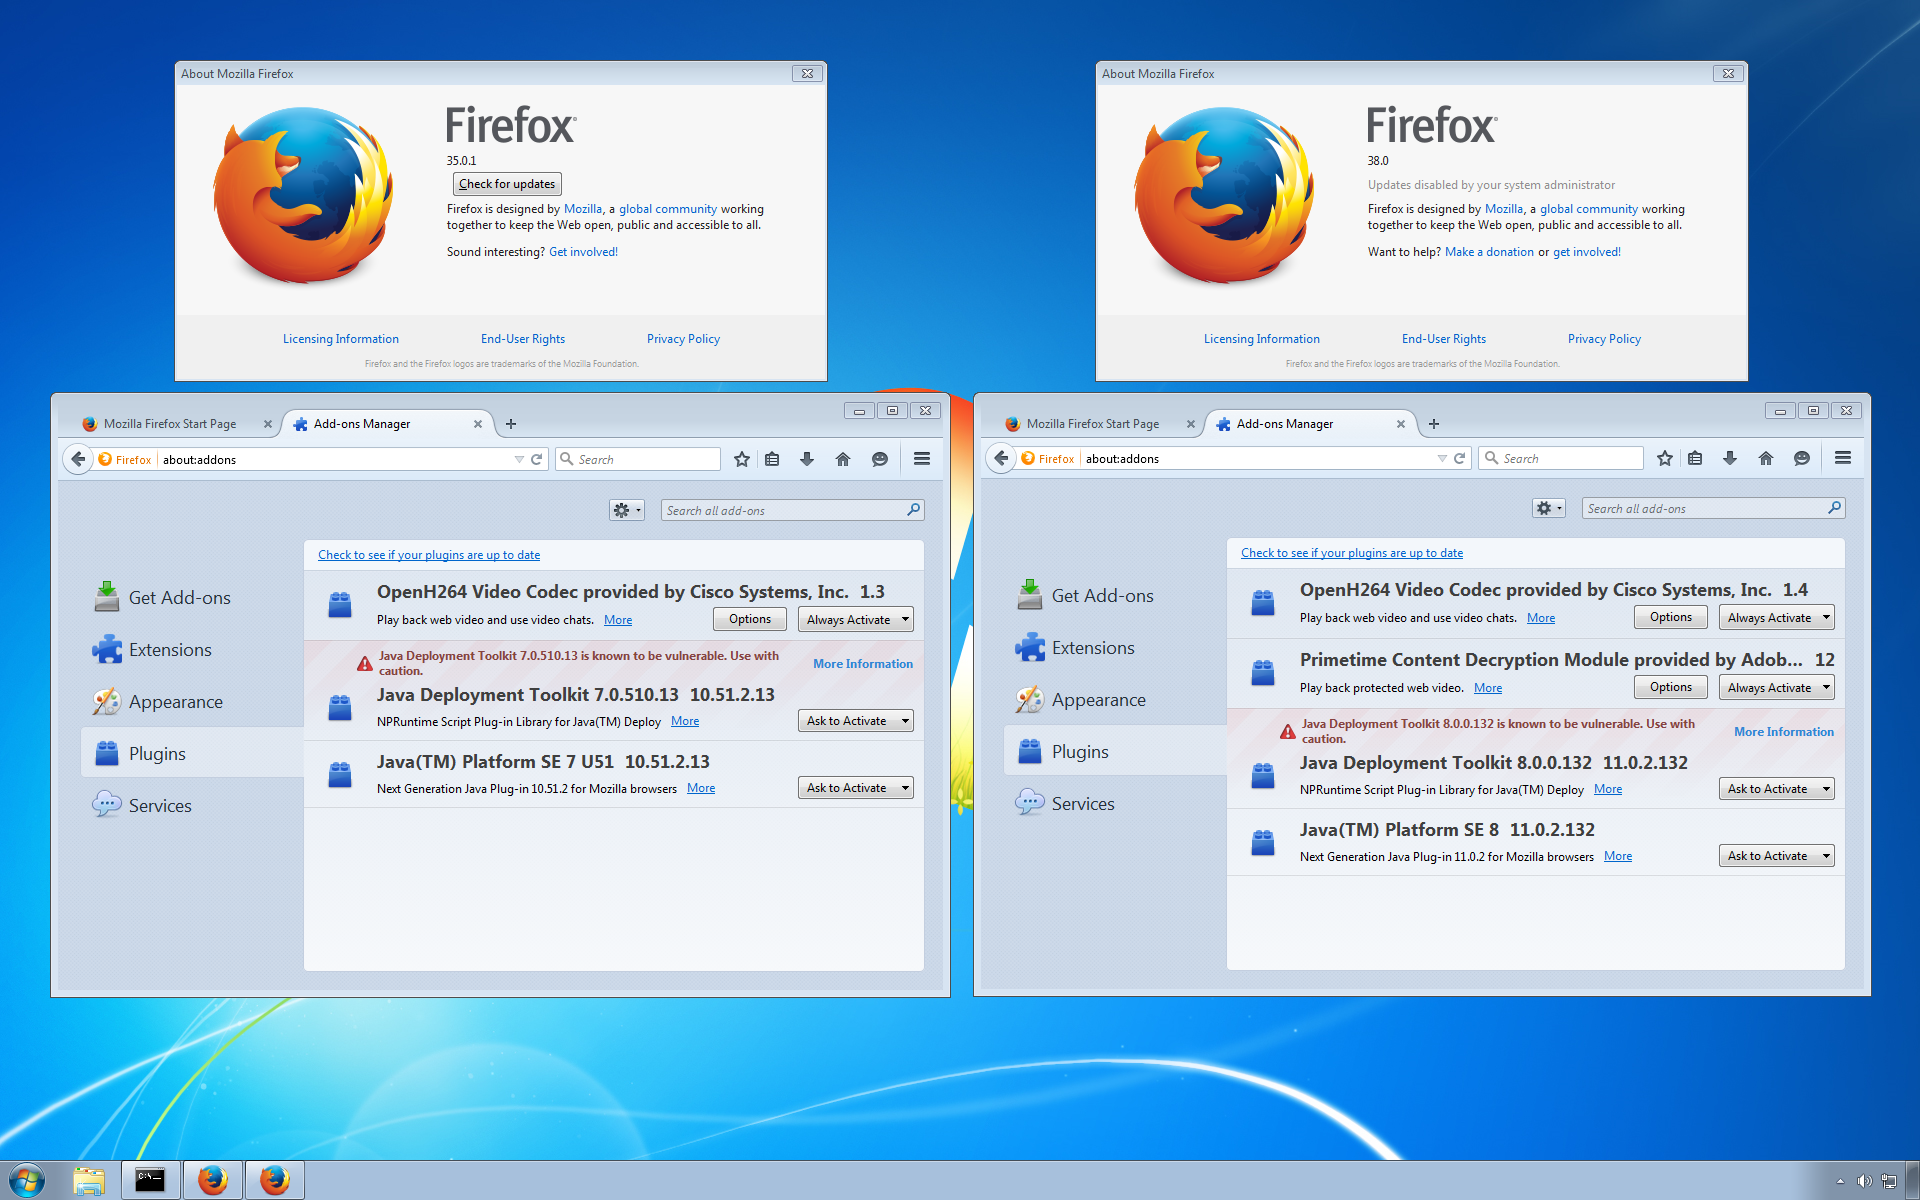
For example, an Internet Explorer 8 with Java 6 environment can run alongside an Internet Explorer 10 with Java 7 environment or another Internet Explorer 8 with Java 7 environment:
This allows elimination of Citrix siloing and consolidation of servers to a single version of Citrix using a single base image.
Advanced Topics
Turbo.net has many capabilities that we didn’t discuss in other sections. Here are a few:
Synchronizing state across machines
Turbo.net optionally supports state synchronization. This allows application state to be saved and continue automatically on a different device.
To enable state synchronization, launch the container with the --enable-sync flag:
# Begin work in container on device A
> turbo run --enable-sync python
(python#a37b20f9) C:\> exit

Saving state of container python#a37b20f9
Container python#a37b20f9 stopped in state cc525b1b
 `start python#a37b20f9` to restart execution locally
 `continue cc525b1b` to continue execution remotely
Notice that when state synchronization is enabled, a state identifier is generated when the container is stopped. The state identifier includes information about the state of the container as it existed upon termination and is used to identify a point at which continuation of execution should occur on another device. In this example, the state identifier is cc525b1b.
If you have another device available, login and use the command:
# Continue execution on device B
> turbo continue cc525b1b
Continuing execution of container python#a37b20f9 in state cc525b1b
(python#a37b20f9) C:\>
(You should use the state identifier you received when you closed your version of the container.)
Turbo.net uses efficient differential synchronization techniques that only transmit information on changes across devices. The entire container does not need to be copied across devices if the other machine already has some of the container information. This makes it much faster to migrate state across devices.
Importing third party package formats
Turbo.net supports importing of several application package formats directly into Turbo container images. This is useful if investment has already been made in packaging applications in a third party package format.
In this example, we import a virtual application package from ThinApp into a Turbo containers:
# Import the ThinApp package described by package.ini into the appname image
> turbo import -n=appname thinapp C:\thinapp-project\package.ini
Container Skinning
When many container instances are running it can be difficult to distinguish between applications, particularly if they are subtle variants of a single base application. Skinning makes it easy to visually distinguish between container contexts.
Turbo currently supports a skinning driver that surrounds visible container windows with a specified color:
# Identify different Java versions by window skin
> turbo run jre:8.0,firefox+skin(green)
> turbo run jre:7.51,firefox+skin(red)
> turbo run jre:6.45,firefox+skin(0x0000ff)
Organization Dashboard
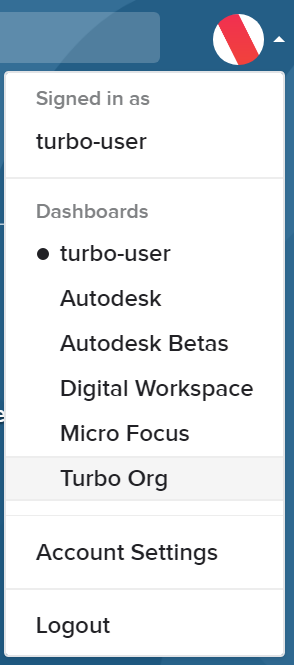
To access the dashboard in an administrator mode, you need to sign in to your turbo.net account on the https://turbo.net page. After accessing your personal dashboard, click on the profile icon in the upper right corner and switch to your organization's dashboard:
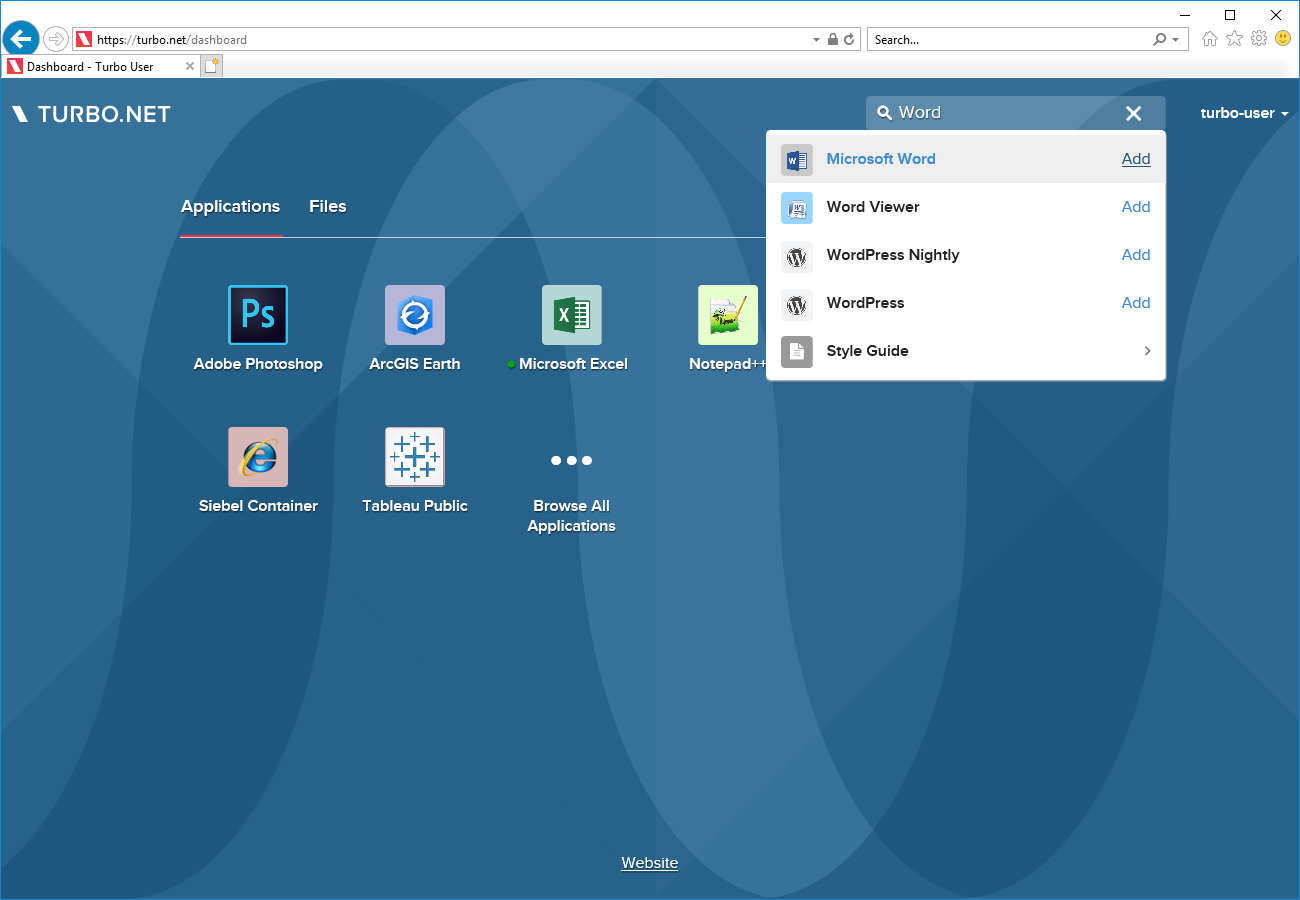
You can now search for new applications and add them to the dashboard (or remove the ones that are already there):
Being an admin of the organization, allows you to also publish images under the organization namespace. After adding a new image, it will appear on the dashboard, but the only way to run it would be using the “My PC” mode. To enable custom applications to run in the cloud please contact support@turbo.net.
Running Applications Using a Shareable URL
Turbo allows organization administrators to create a URL for end users to run applications without having to log into the dashboard.
First create an API key under the organization. Log into your organization's administrator or owner account and navigate to your organizations Devices & API Keys page. The Devices & API Keys page can be found through the Profile and Account link on your organization's dashboard, or directly through the URL https://turbo.net/orgs/{org-name}/settings/devices-and-api-keys. Click Add API Key to create an API key which will be embed in the Turbo URL as a query parameter. Give it a name you can remember (and possibly revoke later).
Next, we will obtain a URL to launch an application under the organizations namespace. Navigate to your organization's dashboard (click on your profile dropdown). The organization's dashboard should be at the url https://turbo.net/orgs/{org-name}. Right click on the application you would like to run using an anonymous url. Select Share Application. A new dialog will open, with the option to select the API key from the previous step. The Launch Location dropdown allows the URL to specify whether the application will launch directly in the HTML5 client, or attempt to launch using the native Turbo.net client via the Turbo Protocol. Click Create Link, then copy the Share URL to a text editor.

To test your link, open an incognito browser window without logging into Turbo.net and paste the URL into the browser address bar. The application should run without requiring a login. Please be aware that the Share URLs use an API Key that allows access to your organization's applications and should be kept secure within the organization.
A list of all of your organization's Share URLs can be found by visiting the the Sharing tab on your organization's dashboard. If you wish to modify or revoke your Share URL, you may do so by clicking ... options dropdown on the appropriate Share URL.

1.7 Developers
.NET and Java
Containers let you deploy applications built on frameworks such as .NET and Java without requiring users to install the .NET Framework or Java runtime.
Containerizing also assures that your application will run reliably regardless of what runtimes may already be installed on the endpoint.
Getting Started
We will begin by downloading the sample applications from GitHub. A nice trick to do this without installing Git is to create a temporary container with turbo try that is only used to clone the repository. The --mount=%CD%\samples flag is used to poke a hole in the container to the samples directory on the native file system so that the containerized Git application can write to it. (The %CD% special path variable represents the current directory.)
# Create a samples folder
> mkdir samples

# Download the sample applications from GitHub
> turbo try --mount=%CD%\samples git -- /c git clone https://github.com/turboapps/samples
.NET
This example shows how to make an image for a .NET Framework application using TurboScript, an automated way to build application images.
The script copies the application binaries from the cloned repository to a new container and commits it to an image. The --mount=%CD%\samples flag is used to poke a hole in the container isolation so that the cloned repository can be accessed. The --no-base flag just marks microsoft/dotnet:4.5 as a dependency rather than copying it into the image. This greatly reduces the size of the final image.
# Build an image using the application binaries from the cloned repository

> turbo build --mount=%CD%\samples --name=dotNetApp --no-base turbo.me
Below is the TurboScript used for this example project. You should copy and paste this code into an empty text file named turbo.me:
# Layer in the required version of the .NET Framework
layer microsoft/dotnet:4.5

# Create a new directory for your application
cmd mkdir C:\myApp

# Copy the application from the mounted path to the application folder
cmd copy %CD%\samples\dotnet-helloworld\DotNetHelloWorld.exe c:\myApp

# Set the startup file for the image to the application executable
startup file c:\myApp\DotNetHelloWorld.exe
Java
Instead of using TurboScript automation, we will demonstrate a different and more interactive process for containerizing the Java sample application.
First, create a new container with the Java Development Kit, specified with the turbo new jdk:7 command. We will do all of our work in this container, such as copying and running the application. When everything is ready, the container state will be committed to an image.
The --mount=%CD%\samples flag is used to poke a hole in the container isolation so that the Java application can be copied from the host file system. The --detach flag specifies that the turbo command should not wait for the container to finish.
# Start a new Java Development Kit container
> turbo new jdk:7 --detach --mount=%CD%\samples

# Create a folder for the Java application
(3df234f3) > mkdir C:\javaApp

# Copy the Java application from the host file system to the container
(3df234f3) > xcopy /s samples\java-simple-webserver C:\javaApp

# Set the working directory to C:\javaApp
(3df234f3) > pushd C:\javaApp

# Run the server from within the container
(3df234f3) C:\javaApp> "%java_home%\bin\java.exe" -jar SimpleWebServer.jar
The Java application is now running on your local machine using port 80, which can be confirmed by opening a web browser to http://localhost. You should see a listing of all the files in the C:\javaApp folder of the container.
Now that the Java application has been copied to the container and is running correctly, we can proceed to the final step of committing the container state to an image. To do that, shutdown the container using the turbo stop command with the container identifier.
# Stop the container
> turbo stop 3df234ff3
Commit the container state to an image using the turbo commit command.
# Commit the container
> turbo commit 3df234f3 simple-java-webserver
By default, committing will generate a final image that also contains the base oracle/jdk:7 dependency. This may be desirable for portability if you plan on exporting the image for use with Turbo Studio or Server, or if the base dependency may get deleted later on. However, it will also increase the size of the image. Instead, you may want to soft-link the oracle/jdk:7 dependency by using the --no-base flag. A soft-linked dependency will be pulled automatically and added to the container by our layering mechanism on startup.
# Commit with a soft-linked dependency
> turbo commit --no-base 3df234f3 simple-java-webserver
Creating releases
Each time an image is pushed a new version is generated. But usually only certain versions are released to end users. These images can be marked as releases using the turbo release command.
To illustrate this idea, we’ll create a 1.0 release from our newly created image.
# Create a new release version 1.0 for the image
> turbo release simple-java-webserver 1.0
When turbo images is executed, you should now see a new entry for simple-java-webserver:1.0.
> turbo images
ID            Name                   Release   Created                Size
--            ----                   -------   -------                ----
7a85fe8f7ad1  oracle/jdk             7.65      8/22/2014 11:34:19 AM  74.3 MB
9iejrk2a34hd  git/git                1.94      8/21/2014 11:32:00 AM  50.4 MB
3a24fade3ea4  simple-java-webserver            8/22/2014 11:52:32 AM  20.2 MB
3a24fade3ea4  simple-java-webserver  1.0       8/22/2014 11:59:59 AM  20.2 MB
Deploying to the Turbo.net Hub
Now that we have built our image, we can deploy it to end users by pushing it to the Turbo Hub.
> turbo push simple-java-webserver
This will create a new repository in your Turbo.net account called simple-java-webserver where the image will be placed.
Note that if you tagged your image in the previous section, use the command:
>turbo push simple-java-webserver:1.0.
Web Applications
Turbo can also be used to containerize web applications. Let’s see how to use Turbo with two popular web frameworks — ASP.NET and Node.
Creating an ASP.NET application container
# Create a new container with .NET, ASP.NET, and git
> turbo run microsoft/dotnet,microsoft/aspnet --using=git/git

Downloading dotnet from https://turbo.net/users/microsoft
Downloading aspnet from https://turbo.net/users/microsoft
Downloading git from https://turbo.net/users/git
Running container 249c4f3e with visibility private
Inside the container session, use the git clone command to move the application into the container.
(249c4f3e) > cd c:\
(249c4f3e) > git clone https://github.com/turboapps/samples
We use IIS Express to launch the ASP.NET application:
# Start the ASP.NET application console
(249c4f3e) > start "MiniBlog" "C:\Program Files (x86)\IIS Express\iisexpress.exe" /path:C:\samples\aspnet-MiniBlog\Website
We can see the ASP.NET application start up as the IIS output is logged in the new console window.
Copied template config file 'C:\Program Files (x86)\IIS Express\AppServer\applicationhost.config' to 'C:\Users\Administrator\appdata\local\temp\iisexpress\applicationhost2014112420457848.config'
Updated configuration file 'C:\Users\Administrator\appdata\local\temp\iisexpress\applicationhost2014112420457848.config' with given cmd line info.
Starting IIS Express ...
Successfully registered URL "http://localhost:8080/" for site "Development Web Site" application "/"
Registration completed
IIS Express is running.
Enter 'Q' to stop IIS Express
Let’s confirm the application is running by opening http://localhost:8080 in a browser.
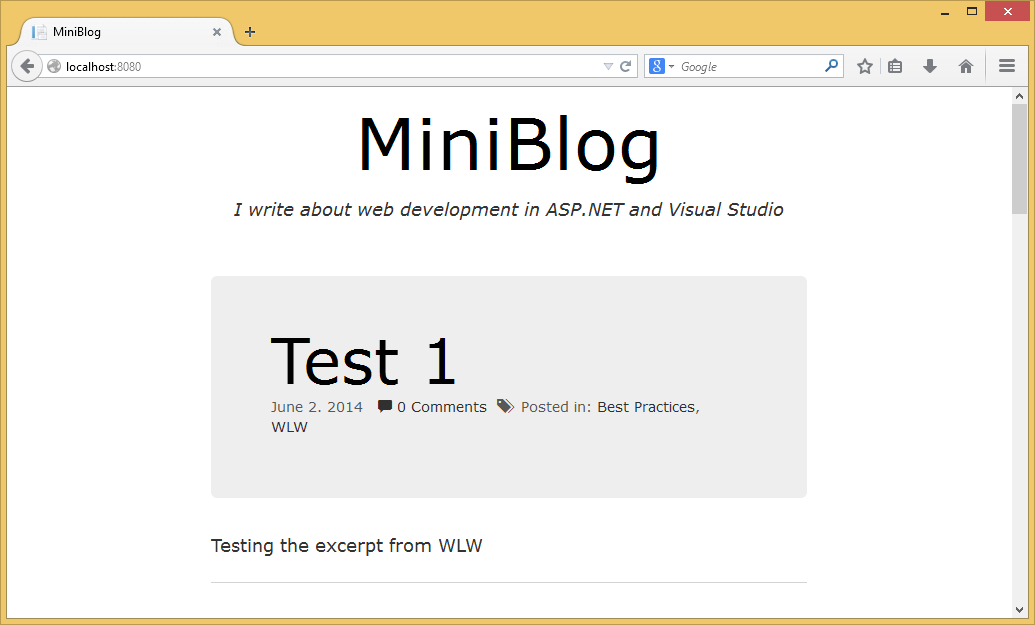
Login using username demo and password demo.
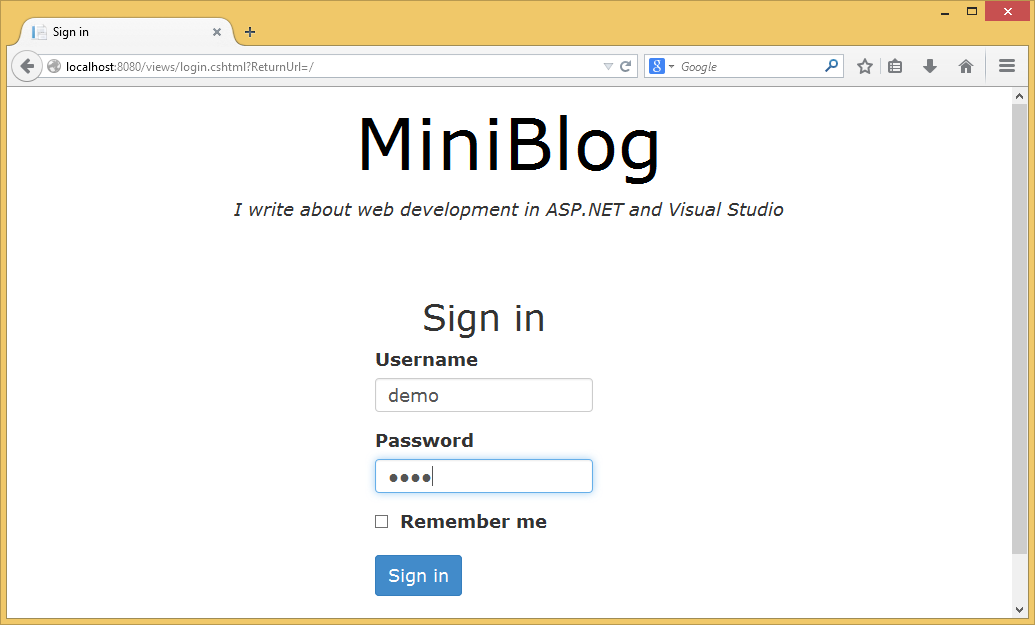
And finally create a new post!

Creating a Node.js container
In this example we’ll containerize aIRChat, an open source IRC client built on the popular Node.js framework.
Start a new container using the turbo run command specifying the Node.js image to be included and applying as before a transient Git layer:
> turbo run node --using=git
In the container, first create a folder where we can clone the aIRChat project from GitHub.
> mkdir projects
> cd projects
Use the git clone command again to copy the application contents into the container.
> git clone https://github.com/redwire/airchat.git
Cloning into 'airchat'...
remote: Reusing existing pack: 2983, done.
remote: Counting objects: 21, done.
remote: Compressing objects: 100% (18/18), done.
Receiving objects:  99% (remote: Total 3004 (delta 9), reused 0 (delta 0)
Receiving objects: 100% (3004/3004), 8.84MiB | 948.00 KiB/s, done.
Resolving deltas: 100% (1302/1302), done.
Checking connectivity... done.
Once the application files are present, we can use the standard npm package manager to install the aIRChat application:
> cd .\airchat\Content
> npm install
We are now ready to launch the application!
# Launch a Node.js server
> node app.js

connect.multipart() will be removed in connect 3.0
visit https://github.com/senchalabs/connect/wiki/Connect-3.0 for alternatives
connect.limit() will be removed in connect 3.0
Express server listening on port 3000
aIRChat is now running on port 3000. You can confirm this by opening a browser to http://localhost:3000.
Once you’ve verified that aIRChat is running, stop the Node.js server by entering Ctrl+C. At the command prompt type exit to shut down the container session.
When you’re finished configuring the container, committing it will create a new merged image.
# Specify a name for the new image
> turbo commit 1be755fcfafc4cf0b8e1c0667f6d13f0 aIRChat
Servers
Turbo.net supports both desktop and server applications. For the most part, server application images behave in the same way as desktop application images. However, special configuration considerations often arise with server applications.
Multiple database server versions
Turbo can be used to run database servers such as SQL Server, MySQL, ElasticSearch, MongoDB, and others.
In this example, we will use Turbo to run multiple versions of the free SQL Server Express database and access them from the database management client.
> turbo run sqlserver/sqlserver2012-express -d --route-block=tcp,udp -n=sql1
> turbo run sqlserver/sqlserver2014-express -d --route-block=tcp,udp -n=sql2
> turbo run sqlserver/ssms2012 -d --link=sql1:sql1 --link=sql2:sql2
Note that we have used container linking and naming to connect the SSMS management client to the two database instances, and route blocking to prevent the database ports from being accessible on the host device’s network.
Login using the username sa and password password1 to the database servers sql1 and sql2. You can confirm the two databases are manageable through the client and are two distinct versions.
Multiple instances of a single server
In this example, we’ll use TCP port mapping, a special case of network routing, to run multiple instances of the Ghost blogging engine on the same host.
By default, Ghost uses port 2368 to listen to requests. Since only one server can listen on a given port at a time, we need to remap this port to allow multiple Ghost instances to run simultaneously:
# Create a container that maps port 8080 on the host to port 2368 on the container.
C:\> turbo new -d --route-add=tcp://2368:8080 ghost

# Create a container that maps port 8081 on the host to port 2368 on the container.
C:\> turbo new -d --route-add=tcp://2368:8081 ghost

# Create a container that maps port 8082 on the host to port 2368 on the container.
C:\> turbo new -d --route-add=tcp://2368:8082 ghost
The tcp:// prefix indicates that the routing rule should apply to TCP traffic. The rule 2368:8080 causes the container’s port 2368 to be mapped to the host device port 8080. We can then launch a second and third instance by mapping 2368 to host port 8081 and 8082.
You can check that three distinct Ghost instances are accessible by browsing to localhost:8080, localhost:8081, and localhost:8082. You can also test what happens if you try to launch instances without applying the routing rules!
Factoring a database into a layer
A useful practice when constructing container architectures is to use layering to factor data from the underlying server application.
For example, suppose that we have a Ghost blog that’s been populated with some data. We would like to move the data into a separate layer. This will allow us to layer in just the database contents on top of any compatible base Ghost image. Saving the database in a distinct layer can help you test different application versions against the same data, back up database contents, or quickly rollback a database to a fixed base state during development.
First, we need to create a blank container that will hold the database:
# Create a clean container
> turbo new clean --no-run
We do not want to actually run the new container so we used the --no-run flag.
Next, use the turbo cp command to copy the database from the Ghost container (bc53e584 in our example) to the blank container:
> turbo cp bc53e584:c:\ghost\content\data d65260ad:c:\ghost\content\data
Note the d65260ad: prefix used for the target folder. This tells the copy command to place the contents into a particular folder. If no container prefix is used, the host device is assumed. The c:\ghost\content\data folder is the location for the database contents in this example.
Now that the database container is ready, we commit it into a new image called ghost-db:
# Commit the container to a new image
> turbo commit d65260ad ghost-db
Finally, we can layer ghost-db into any base Ghost server container and to pre-populate it with our content:
# Create a ghost container with the ghost-db content layered on top of it
> turbo run ghost,ghost-db
2.0 Hub
2.1 Overview
The Turbo.net Hub is a public Hub server hosted on app.turbo.net that maintains thousands of publicly available applications. Users may pull and run public applications on their local machine or publish their own private applications.
On-premises Hub servers are also available with Turbo Server, which allows enterprises to deploy and manage their own applications.
Users may browse the applications available on the Turbo.net Hub by clicking on the Hub link at the top of the Turbo.net homepage.
For more information on running applications from the Turbo.net Hub, see Running Applications.
2.2 Working with Images
Creating Images
There are four ways to create an image:
- Commit a container
- Automatically create with a build script
- Build images from XAPPL configuration files created with Turbo Studio
- Import and convert various file types to images
Commit a Container
# Before committing a container check that it is stopped
> turbo containers

# Then create a new image from the container
> turbo commit <container-id> <image-name>
See a more detailed example here.
Automatic Builds
You can automatically build images using a TurboScript, which is a set of instructions that recreate the steps of configuring a container. See more information on TurboScript verbage and syntax.
# Example script to automatically build a 7-Zip image

# Pull dependency images
layer gnu/wget

# Prepare environmnet
cmd mkdir c:\7zip

# Download installation media
workdir C:\7zip
cmd wget http://downloads.sourceforge.net/sevenzip/7z920.exe

# Install 7-Zip
cmd 7z920.exe /S /D=C:\7zip
Save the script as a .me file and then use turbo build command:
# Build the script and specify a name for the new image
> turbo build -n=7-zip:9.20 C:\path\to\build.me

# New image is now saved in the local registry
> turbo images

Name   Tag   ID            Created               Size
7-zip  9.20  95sdf1245239  8/18/2014 2:21:32 PM  25.4MB
Building from a XAPPL File
XAPPL files are static configuration files originally created using Turbo Studio that specify the files, registry keys, and virtual machine settings for an image. The command-line interface can also build images based on XAPPL configuration files using turbo build command.
# Build an image and specify a name
> turbo build -n=firefox:30 C:\path\to\firefox30.xappl
Import
If you have an existing image (file type .svm) on your local machine or a network drive (perhaps built with Turbo Studio or a legacy version of Turbo Studio), you can import it to your local registry.
# Specify the new name, file type, and path to the image
> turbo import -n=newimage svm C:\path\to\image.svm
If the image is not explicitly named, its ID will be used as a default.
The import command also supports building from 2 external file types:
- Microsoft Software Installer (
.msi) - ThinApp Configuration (
package.ini)
Use the appropriate file type parameter:
# MSI
> turbo import msi <path to .msi>

# ThinApp configuration
> turbo import thinapp <path to package.ini>
Forking, Renaming, and Tagging
Images can be forked using the turbo fork command. This creates a link to the specified image with a new name and tag. It does not affect the original image.
# Pull an image
> turbo pull account/image

# Check the image
> turbo images

Name            Tag  ID            Created               Size
account/image        14wed2165141  8/18/2014 1:55:23 PM  1.9MB

# Fork to a new image name and tag
> turbo fork account/image tester/test1:1.0

# New image is added
> turbo images

Name            Tag  ID            Created               Size
account/image        14wed2165141  8/18/2014 1:55:23 PM  1.9MB
tester/test1    1.0  14wed2165141  8/18/2014 1:55:23 PM  1.9MB
The turbo tag command can also retag images.
# Specify the image you want to tag and the new tag
> turbo tag tester/test1:1.0 2.0

# Check the tag
> turbo images

Name            Tag  ID            Created               Size
account/image        14wed2165141  8/18/2014 1:55:23 PM  1.9MB
tester/test1    2.0  14wed2165141  8/18/2014 1:55:23 PM  1.9MB
Push to a Remote Repository
Images in a local registry can be copied to a remote repository on the Turbo.net Hub or an on-premises Turbo Server with the turbo push command. Images pushed to a Turbo Server can be made available to your team members and end-users.
# Specify the image you want to push
> turbo push sample

# Or push to a specific namespace and tag
> turbo push turbotest/sample:latest
If unspecified, the image will be pushed to the logged-in user's namespace with the tag head.
Images pushed to the Turbo.net Hub are private by default. For more information on sharing images with your enterprise, see Turbo Server.
See more information on using the hub.
Creating Layers
Creating a layer on top of an existing image is used to apply special settings, files, or registry entries without having to maintain and deploy a duplicated image. A common use case is to layer a brower image with different browser plugins, change the default homepage, or have it launch in kiosk mode.
Using TurboScript
Turboscript allows creating layers in an interable and repeatable fashion. In this example we will create a layer which modifies the startup file for Python in order to launch Python's built in ide IDLE.
First, create a a turbo.me file and open it in a text editor. Begin the file with the meta data section:
###################################
# Meta tags
###################################

# User friendly title which will be displayed on the hub
meta title="Python IDLE"

# Namespace should be your username or organization (https://turbo.net/hub/namespace/name)
meta namespace="python"
meta name="pythonidle"

# Version of the application
meta release="3.7.3"
Include the base image by using the layer command:
###################################
# Pull dependency images
###################################

layer python/python:3.7.3
Finally, set the startup file to the start menu .lnk used by Python to launch IDLE:
###################################
# Startup File
###################################

startup file ("c:\ProgramData\Microsoft\Windows\Start Menu\Programs\Python 3.7\IDLE (Python 3.7 32-bit).lnk")
Run turbo build turbo.me to build the image. Try it out using turbo try python/pythonidle:3.7.3.
See the TurboScript reference page for advanced details.
Customizing Layer Using TurboScript
In the previous example we simply set the startup file from the base image to create a layer that behaved in a different way. If the user wanted to change files within the base image in the layer, it is achievable by using TurboScript copy command.
Lets say the user wants to change the default working directory for the Python IDLE layer, so that the application's open/save dialogs will look into the T: (TurboDrive) drive. A solution will be to change the lnk file's Start in field. We must edit this file and extract it for rebuilding.
This can be achieved by starting a python container and manually editing the lnk file using Windows File Explorer:
turbo run --isolate=merge-user --startup-file=explorer.exe python/python:3.7.3- Navigate to
C:\ProgramData\Microsoft\Windows\Start Menu\Programs\Python 3.7 - Right click on the file
IDLE (Python 3.7 32-bit).lnk - Edit the Start in to T:, or any other folder of your choice.
- Open another instance of File Explorer, this will be outside of the Turbo Virtual Machine.
- Copy the
IDLE (Python 3.7 32-bit).lnkyou just edited using the virtual File Explorer instance, and paste it to the native File Explorer folder where you've created the turbo.me file. - Close the virtual File Explorer to shutdown the container. If the container does not shutdown, press ctrl+c in the command line to force kill.
Next we modify the TurboScript to replace the startup file with the modifed file:
###################################
# Startup File
###################################

copy "IDLE (Python 3.7 32-bit).lnk" "c:\ProgramData\Microsoft\Windows\Start Menu\Programs\Python 3.7\IDLE (Python 3.7 32-bit).lnk"
startup file ("c:\ProgramData\Microsoft\Windows\Start Menu\Programs\Python 3.7\IDLE (Python 3.7 32-bit).lnk")
Run turbo build --overwrite turbo.me to rebuild the image. This time, turbo try python/pythonidle:3.7.3 should launch Python IDLE with the working directory set to the specified directory.
2.3 Command Line Interface
The Turbo Command Line Interface allows advanced users and administrators to execute, modify, and create Turbo applications in an automated manner. Install the Turbo for Windows to get started.
Creating Containers
A container is an instance of a Turbo Application. The new command creates and starts a new container.
The clean image represents a clean OS image. A container is an instance of an image — in other words, you can start up multiple containers that start off in the state specified by a given image. The container holds all of the data and other state changes that occur as the user performs actions in the container.
To create a new container from the clean image, we use the command turbo new clean:
> turbo new clean
Using VM 11.8.960 from local
Using image vcredist:2008 from local
Using image clean:25 from local
Running new container clean#8104e501 with visibility private

# A new console running in a container will appear. Consoles running inside a
# Turbo container display the name and first 8 characters of the randomly
# assigned container ID in the prompt.
(clean#8104e501) C:\>

# Verify the clean container is a clean OS instance
(clean#8104e501) C:\>dir
 Volume in drive C has no label.
 Volume Serial Number is DADA-BCA1

 Directory of C:\

07/01/2016 01:14 PM <DIR> .
07/01/2016 01:14 PM <DIR> ..
12/31/1999 05:00 PM <DIR> Users
12/31/1999 05:00 PM <DIR> ProgramData
12/31/1999 05:00 PM <DIR> Program Files
12/31/1999 05:00 PM <DIR> Program Files (x86)
12/31/1999 05:00 PM <DIR> Windows
12/31/1999 05:00 PM <DIR> $Recycle.Bin
12/31/1999 05:00 PM <DIR> Documents and Settings
12/31/1999 05:00 PM <DIR> PerfLogs
12/31/1999 05:00 PM <DIR> Recovery
12/31/1999 05:00 PM <DIR> System Volume Information
 0 File(s) 0 bytes
 12 Dir(s) 113,578,422,272 bytes free
Take a moment to compare the directory listing inside the container from the corresponding listings on your host device. Notice there will likely be many files on the host device that don’t appear in the container command prompt. This is because the container has its own version of the filesystem that reflects the settings of the clean image!
To exit a container, exit all processes that were started in the container. In our case, only the command prompt process is running in the container.
(clean#8104e501) C:\> exit

# The container exit code will be printed
Process exited with status 0
Starting Existing Containers
The container still exists even though we exited all processes and it was shut down.
We can restart an existing container using the start command:
> turbo start 8104e501
Using VM 11.8.960 from local
Using image vcredist:2008 from local
Using image clean:25 from local
Running existing container clean#8104e501 with visibility private

# Command prompt to the existing container appears
(clean#8104e501) C:\>
In this example, we used the full container identifier. If there is no danger of ambiguity, you can use any prefix of a container identifier to specify the container. For example, we could have used turbo start 810 so long as there were no other containers with identifiers starting in 810.
Deleting Containers
Suppose we are done with our container. We can remove it from our local repository using the rm command.
> turbo rm clean#8104e501
Container clean#8104e501 has been removed
This is especially useful when creating and tearing down test environments or performing other transient tasks where we’d like to leave our host device in a clean state.
We can remove all containers in the local repository using the -a flag:
# Remove all containers
> turbo rm -a
All containers have been removed
This restores us to a nice clean desktop!
Running Hub Images
Creating an empty container is nice, but really we want to run real applications.
While you can install your own applications into containers, many popular applications now such as Mozilla Firefox.
# Run the latest version of Firefox
> turbo run firefox
In a few seconds, you will see the Firefox browser window appear!
Take a moment to look at the Start Menu and observe that Firefox has not been installed on the desktop! If you are on a desktop with limited permissions, you may also have noticed that no permissions were required to launch Firefox.
Since no specific version of Firefox was specified, this command runs the latest version of Firefox.
How did the turbo command know how to run Firefox? By default, it will connect to the Turbo.net Hub to resolve any image names that are not present in the local repository. (We’ll see how to add images to the local repository later.)
The Turbo.net Hub provides thousands of images for popular applications, runtimes, and layers that will automatically configure and run on demand. You can also publish images into a private repository. Enterprises can deploy and manager an on-premises Turbo Hub with Turbo Server.
Version Management
In the example above, no version was specified. In this case the container is called evergreen — the latest image version is always run and the container is automatically updated if a new version becomes available. This is a powerful and easy method to keep devices up to date with the latest patches.
We can also run a specific version of an application. To specify an image version, use the : operator:
# Run version 40 of Firefox
> turbo run firefox:40
Because containers are isolated from the host desktop, Turbo can run legacy applications even if newer versions are installed locally or the host is running a newer operating system than the application was originally designed for.
Turbo versions are also based on prefix matching. For example, if versions 8.77 and 8.91 of the jre image exist, then the image specifier jre:8 refers the latest among the versions prefixed with major version 8 — 8.91 in this example. This behavior allows the latest update or patch of a previous major version branch to be applied to an evergreen image.
Layering
We can also combine together multiple images into a single container using the layering operator.
For example, suppose we want to run Firefox with the Java runtime enabled:
# Run Firefox with Java enabled
> turbo run firefox:35,jre

Note that if you navigate to the Options / Plugins menu in Firefox, the Java plugin is installed!
The layering operator applies each image’s configuration on top of the existing container configuration sequentially from left to right.
We can combine the versioning and layering operators to achieve more combinations:
# Run two different Firefox versions with multiple Java versions enabled
> turbo run firefox:35,jre:7.51 --detach
> turbo run firefox:38,jre:8 --detach
Notice that we are able to run multiple versions of Firefox — with multiple versions of Java! — side by side on a single desktop.
In this example, we used the --detach flag to allow another command to be executed immediately before the container session closed. The default behavior is often preferred when using the turbo command in scripting.
Since detach is a common option, it is also available as a short form argument -d. We’ll use the short form in the future, and also note other frequent commands that have short forms available.
Using
A container's layered images is an immutable property. This means if you were to create a container using > turbo run firefox:35,jre, then the container must always run with the firefox and jre image.
To make enable a layer temporarily, use the --using flag:
> turbo run firefox:35 --using=jre
Commit
Commiting a container will create a new image with all layers and changes to the container. A commited container will not include any using images.
# Creates a new image with both firefox and jre included
> turbo new firefox,jre
> turbo commit <cid> firefoxjre
A dependency is created if you commit with the flag --no-base. A dependency must be pushed to the hub before the dependant image is pushed.
# Creates a new image with firefox. The image `jre` is referenced as a dependency
> turbo new firefox,jre
> turbo commit --no-base <cid> firefox2
> turbo push jre
> turbo push firefox2
Images that are ran with the --using flag are not included in the new image or as a dependency.
# Creates a new firefox image, temprorarily allowing usage of jre but commiting without
> turbo new firefox --using=jre
> turbo commit <cid> firefox2
2.4 Repositories
Repositories are the units that make up the Hub. A repository contains the image and version histories of a project, and it may be public or private.
The Hub is where you can browse and search for repositories for popular applications and components, upload your own projects, and run them online with a single click.
If a repository is public, it will appear in search results, and any Turbo user can pull or run it. Only the repository owner (or members of the owning organization) can push to the repository.
Private repositories are not searchable, and they can only be accessed, pulled, or changed by their named owner(s).
A repository can be owned by a user or an organization. Anywhere in this documentation that mentions the repository owner or profile, it could be used interchagably between a single user or an organization. Users belonging to the organization can access the repositories in the organization if they belong to the organization. Write access to an organizations repository is granted to the administrators and owner of the organization.
The homepage for a repository is located at https://app.turbo.net/run/[profile]/[repo], where profile is the username of the repository owner and repo is the name of the repository. The homepage contains 3 sections:
- About - Provides an overview of the repository.
- Releases - Lists all tagged versions of the image.
- History - Lists the full version history of the image.
On your repository's About page, you can edit the description, Readme, icon, URL, and steps for getting started with your project.
Other users viewing the repository details page can run the repository in a variety of ways.
They can Run your image in a new container through the command-line interface:
# Run the image in a container
> turbo run [profile]/[repo]
They can Pull the image to their local registry. This button will execute this command as if entered via the command-line interface:
# Pull an image down from the Hub
> turbo pull [profile]/[repo]
They can Open a console window in a fresh container with your image as the base. These same actions can also be completed from the command-line interface:
# Open a console window with your image as base
> turbo run [profile]/[repo] cmd
You can create a new repository from the command-line interface by pushing it to the Hub from your local registry:
# First run a container
> turbo run clean

# Then commit the container to an image
> turbo commit 125ee2932 <image>

# Push an image to the Hub
> turbo push <image>

# The image is now pushed to the logged-in profile
To push a repository to an organization, include the name of the organization you are pushing to:
# Push image to organization
> turbo push <image> <org>/<reponame>
Repository Settings
This section will describe the different settings you can apply to the repository. Any workspace application created from a repository will inherit these settings. If an organization dashboard has a direct reference to launch a repository, the session will inherit these settings as well.
Sessions are persistent
Persistent sessions automatically synchronize the application state and settings with Turbo.net. This allows your state and settings to be preserved automatically across multiple sessions and devices.
Typically this setting should be enabled in order to prevent loss of data.
Access local user folders
This setting allows the application to access the host device's local user folders. This includes user folders such as Desktop, Downloads, Documents, Music, Pictures, and Videos.
For applications executing on a remote host, it is recommend that you access your files by connecting a Cloud Storage Service.
Enable URL redirection
When enabled, users using the Turbo URL Redirector Extension will automatically be routed to this virtual application when a accessing certain websites from their native browser.
For more information on installing and configuring the URL redirection extension, see Browser Redirector.
Isolate network
Network isolation runs applications in a virtualized network environment. This environment is unique per application, and is isolated from the host's network.
If you expect multiple users to be running on the same host, it is recommended that you disable this setting to prevent cross-session network access.
For more granular network isolation settings, see Virtual Networks.
Use DLL Cache
This setting enables pre-caching of application DLL and EXE files on the Application Servers’ local disk for faster loading.
Typically this setting will be disabled, in which case the DLL and EXE files are embedded in the SVM and loaded from the Image Cache Server.
Access local network
Local network access allows a remote application to access the local host's network. The local host's network can be accessed by using the special hostname localhost.turbo.net.
Enable: Enables remote access to the local network.
Disable: Disables remote access to the local network.
None: Uses the client's settings to control local network access.
Using
Images added to the using field are included as temporary dependencies during application execution. These images are not committed to the final image, and are not included when continuing a session unless specified.
You may add multiple images by using a comma delimiter: example/using-1,example/using-2.
Components
Components are added to the base image as layers. These layers will be committed to the final image, and are included when continuing a session.
Components must be enabled to be included during execution. Disabled components are for display purposes only, they are shown on the repo settings page and application settings dialog.
VM version
The VM version is a version string that specifies which Turbo VM version will be used for execution.
Typically this field should be left empty so that you are automatically updated to the latest VM version. This should only be used for known VM incompatibilities.
If the specified version is lower than the minimum version that is required by turbo.exe, then the minimum version will be used instead.
2.5 Templates
Templates provide a way to build your own application environment. Tell Turbo what type of application you're building and the dependencies it needs, and we'll deliver a base container embedded with the proper images.
For example, let's say you've written a JavaScript web application on Node.js and MongoDB. Instead of installing these and forcing your testers or end-users to install these dependencies as well, you can build a portable container for your project by adding your application to a template with Node.js and MongoDB images pre-packaged.
Once you package your application into that container, you can deploy it to any Windows environment for testing or use without installers, missing dependencies, or breaks.
3.0 Deploying
3.1 Overview
Turbo.net embraces a "Package Once, Publisher Anywhere" philosophy.
Once an application has been containerized in Turbo, it can be deployed directly to desktops; streamed from an on-premises Turbo Application Server or the cloud; or pushed or streamed via major device management platforms.
This section provides instructions for deploying Turbo applications over major delivery modes.
Additional delivery methods can be implemented using the Turbo APIs.
Note that when using the Turbo HTML5 client for delivery, no client deployment steps are required -- applications launch directly within any HTML5-enabled web browser.
3.2 To Turbo.net
Turbo supports deploying containers as standalone executables, MSIs and Turbo Virtual Machines (SVMs). Read this section to find out more about which deployment option and tools best fit your needs.
The Hub
The Hub is an online registry of Turbo images and provides a central location to archive and distribute applications. Once an application is packaged into a Turbo image using Turbo Studio or the command-line interface, the image can be uploaded to the Hub and accessed privately.
Images are pushed to the Hub using the command-line interface. The most common scenario is to create a container via the command line, commit the container to your local registry and then push the image to the Hub. However, it's also possible to start with an SVM output from Turbo Studio and push that to the Hub. Read below for details on each scenario.
Containers
Before pushing a container to the Hub, it needs to be committed to the local registry and converted into an image. Here is an example of the process of creating a container and publishing it on the Turbo Hub.
# Create a container with Java, Node.js and Git support
> turbo run oracle/jdk,nodejs/nodejs,git/git

# Shut down the container by typing exit into the new command window
> exit

# Get the container id for the last container
> turbo containers -l

# Commit the container to your local registry
> turbo commit 922e myimage

# Verify that the image is now in your local registry
> turbo images

# Push the image to the Hub
> turbo push myimage
To push a repository to an organization, include the name of the organization you are pushing to:
# Push image to organization myorg
> turbo push myimage orgname/reponame
Once the push is complete you can verify that the image is available on the Hub by going to the app.turbo.net/settings/repos or app.turbo.net/orgs/orgname/settings/repos in your browser.
SVMs
Here is an example of how you would deploy an SVM to the Hub.
# Import the SVM into your local registry with the name "myimage"
> turbo import -n=myimage svm \path\to\app.svm

# Verify that the image is now in your local registry
> turbo images

# Push the image to the Hub
> turbo push myimage
Once the push is complete you can verify that the image is available on the Hub by going to the app.turbo.net/settings/repos in your browser.
Using Turbo Studio
Turbo Studio provides a feature to deploy applications directly to your Turbo.net account. After completing the build process, see the Build section for details, click on the Publish to Server option on the ribbon menu.
You will be prompted to log in with your Turbo.net account information and then application will be added to your profile. Once the application has been added to your Turbo.net account, it will be accessible from any Turbo enabled device.
3.3 To Turbo Server
Turbo supports deploying container images as standalone executables, MSIs, and Turbo Virtual Machines (SVMs) to Turbo Server using Turbo Studio or the Turbo Client command line tools. Images added to the Hub can then be added to Workspaces as PC Applications, making the applications available to end-users.
Turbo Server also supports other application types, such as Web Applications and Native Applications, which can be added directly from the Turbo Server administration site.
Adding Images to the Hub
Using Turbo Studio
Turbo Studio provides a feature to deploy applications directly to your Turbo Server. After completing the build process, see the Build section for details, click on the Publish to Server option on the ribbon menu.
From the publish dialog, click change next to the publish server and login to the your Turbo Server. Once you have published the application it will be added to your Turbo Server Hub.
You will now see your application in your hub list in the administration site. Follow the Adding Applications to a Workspace instructions to add the application to a workspace and make it available to end-users.
Using Command Line
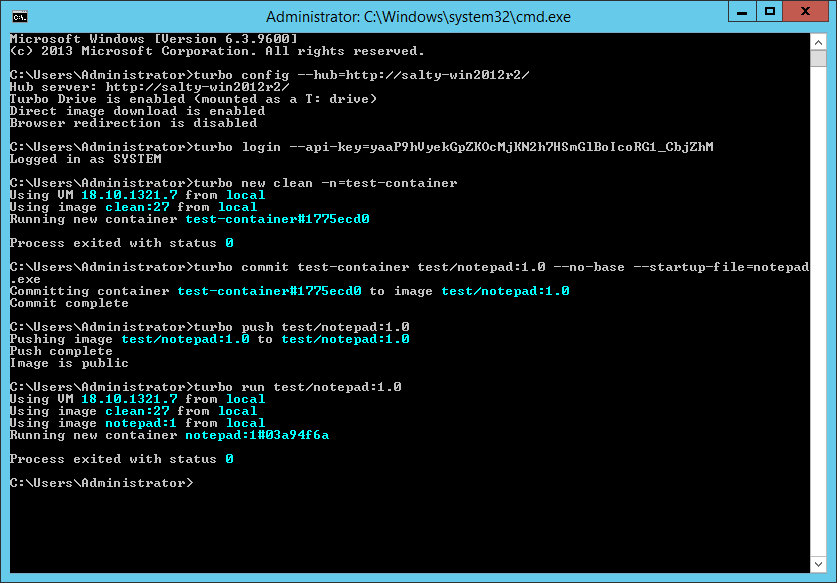
Complete the following steps to add a new application image to Turbo Hub Server:
-
Install the Turbo Client for Windows platform.
-
Connect the client to your hub server using the
turbo configcommand. See Config Command for more information.
> turbo config --hub=http://[hubserver]
- Log in as a hub administrator account or use a system API key. This is done using the
turbo logincommand. See Login Command for more information.
> turbo login admin-user
-OR-
> turbo login --api-key=6g8BwsIlU7ezl_CMIZ_0PYBwK6WVAUZdx1mxYO1WFOg
- Create your container image. See Working with Containers for more information on ways to create container images.
As an example, we will make a create an empty container that executes the native notepad.exe application.
> turbo new clean -n=test-container
(exit the container window that is shown)
> turbo commit test-container test/notepad:1.0 --no-base --startup-file=notepad.exe
> turbo push test/notepad:1.0
You will now see your test image in your hub list in the administration site. Follow the Adding PC Applications to a Workspace instructions to add the application to a workspace and make it available to end-users.
NOTE: If you do not specify a namespace in the image name (ex, "test" in "test/notepad") then the image will be pushed to the user's private namespace. This image will only be accessible by the user who pushed it and it will not show in the hub list on the administration site.
Troubleshooting
The push command is denied with following error message:
> turbo push mozilla/firefox-base:68.0.1
Pushing image mozilla/firefox-base:68.0.1 to mozilla/firefox-base:68.0.1
Error: Push failed. This user may not be authorized to push to the mozilla repository.
The current logged in user may not be an administrator of the Hub server. Add the user to the administrators group. For more information refer to Managing Users and Authentication.
NOTE: If you add the user to the administrators group after already attempting to push an image to the Hub server, you may have to wait up to 5 minutes for the permissions to propagate to the Hub server. Either switch to an API key based login, or restart the Hub server process and try again.
Adding PC Applications to a Workspace
A workspace is a list of applications that is shown on the Turbo Portal and on the Turbo Clients to users with sufficient permissions. From this workspace, users will be able to run applications using any Turbo enabled device (Windows, MacOS, iOS, Android, or any HTML5 browser).
Applications must first be added to the Turbo Server Hub before they can be added to a Workspace, see Adding Images to the Hub.
If you have not yet created a workspace, you may do so by accessing the Turbo Server administration site at: https://[server]/admin. Navigate to the Workspaces tab, click Add Workspace, and submit your desired workspace settings.

Then open the Workspace administration site by clicking on the Manage link. Navigate to the Applications tab, click Add > PC Application, and select your application.
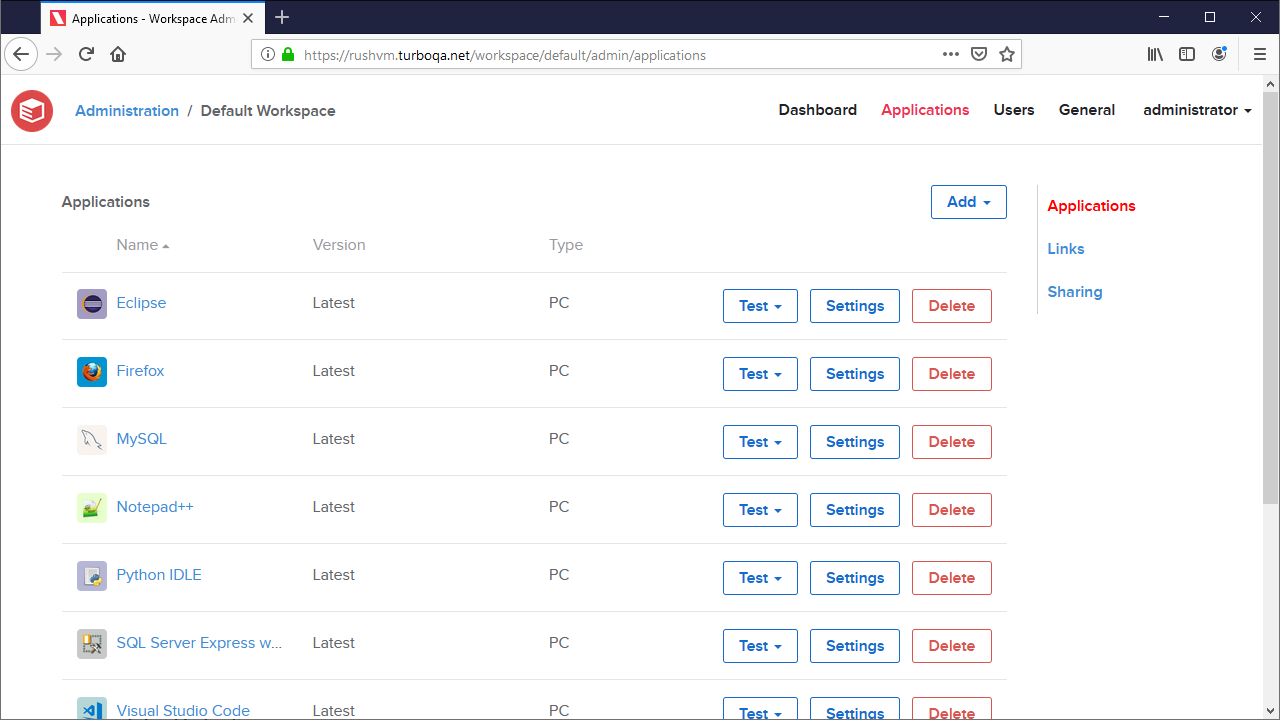
The application will now be available on the Turbo Server Portal and on the Turbo Clients to users with sufficient permissions.
3.4 To a Desktop
Turbo supports deploying containers from the Turbo Hub to your desktop using the subscribe and installi features. Add the latest version of an application to enable auto-patching of that application. This ensures you get the latest updates to the selected applications as they are released.
Virtual desktop infrastructure (VDI) / Windows Virtual Desktop (WVD)
The turbo subscribe command allows administrators to register desktops to workspaces. A desktop registered to a workspace provides end users access to all workspace applications, application updates, and Active Directory based permissions.
- Add an API key for a workspace.
- Give the API key Read Only Admin Permissions to the workspace.
- Configure applications in the workspace with the appropriate permissions under Application Settings.
- Install Turbo Client for all users on the VDI base image.
- Login with the API key which will be used to update the workspace and grant end users access
turbo login --all-users --api-key=<apiKey>. - Subscribe to the workspace:
turbo subscribe --all-users <workspace>. The workspace applications will be cached to the local all-users repository location. Application updates and settings are updated periodically. - Configure a login script to register the workspace subscription to the user
turbo subscription register <subscription>.
Single Repository Shell Registration
Containers can also be integrated with the Windows shell. The install or installi command will create Start Menu shortcuts, file associations, and shell extensions in the shell for the image so that it behaves similar to an installed application.
# Install the VLC container to the shell
> turbo installi --name=vlc videolan/vlc --register-extensions
Configuring shortcuts and file associations for an image is done in Turbo Studio. See the reference section for more details.
3.5 AWS AppStream
Turbo supports deploying applications to Amazon AppStream 2.0. AppStream 2.0 provides cloud-based Windows desktops hosted in the AWS cloud.
AppStream 2.0 offers two deployment models: Always-On/On-Demand and Elastic fleets.
With Always-On and On-Demand fleets, one creates a golden image that includes the Turbo client configured as you would any other VDI environment. In this case, Turbo allows applications to be dynamically deployed without modifications to the base image.
With Elastic fleets, it is necessary to have a way to rapidly provision applications on the clean base image provided by AWS as well as run applications that may not originally be designed for portable use or for execution in the specific Windows environment provided by AWS. Turbo containers address all of these issues in a single, efficient solution.
Before Starting
Before starting the AppStream 2.0 setup, please note the following information:
- URL of the Turbo Hub Server
- API Key to access the Hub Server
The API key can be generated from the Turbo Server administration console under Hub / API Keys. Press Add Key and enter a key name such as aws-appstream. Leave the Run as system option unselected.
It is strongly recommended that a dedicated API key be used for the AppStream 2.0 fleet.
For the best performance, it is recommended that the Hub Server run in the same AWS Availability Zone as the AppStream 2.0 fleet. This also minimizes costs associated with data transfer. If necessary, the AWS Hub instance can federate respositories from an external Turbo Hub such as an on-premises Hub.
AppStream 2.0 Setup
Turbo AppStream 2.0 setup consists of:
- Configuring an AppStream 2.0 Stack and Fleet
- Setting up the Turbo App Block
- Adding applications
Stack and Fleet Setup
Prior to configuring Turbo in AppStream, it is necessary to create an AppStream 2.0 Stack and Fleet. These provide the computate infrastructure that will run applications.
Instructions on configuration can be found in the AWS AppStream 2.0 documentation:
Create an AppStream 2.0 Fleet and Stack
AppStream 2.0 includes the ability to use Elastic Fleets which are a very cost effective way to launch and stream Turbo applications to end users. Since elastic fleet VMs are provisioned from a ready-to-use pool of instances, provisioning is fast, yet customers are only charged for actual time used, exclusive of "standby" time.
App Block
An AppStream App Block provides shared setup for a set of AppStream applications. When using Turbo to deploy on AppStream, a single App Block is used to deploy the Turbo Client, which can then run any Turbo-packaged application.
For convenience, the Turbo Client is available in VHD form from the Turbo Downloads page:
A setup script is provided that handles mounting of the VHD and setup of the Turbo Client. The setup script is available in the Turbo GitHub repository:
The setup script accepts a single parameter indicating the Hub server to be used.
The Turbo Client VHD and setup script must be copied into an S3 bucket in the same zone as the AppStream 2.0 fleet. AppStream 2.0 must also have permissions to access the S3 bucket.
For more information on S3 bucket configuration, see the document:
Store Application Icon, Setup Script, and VHD in S3 Bucket
The following App Block settings should be used:
| Field | Value |
|---|---|
| Name | turbo-client |
| VHD Object | Select turbo-client.vhd from S3 |
| Setup script object | Select setup-turbo-client.ps1 from S3 |
| Setup script executable | C:\Windows\System32\WindowsPowerShell\v1.0\powershell.exe |
| Setup script executable arguments | C:\AppStream\AppBlocks\turbo-client\setup-turbo-client.ps1 https://your.hub.url |
Adding Applications
Once the App Block is configured, any Turbo application can be launched within the AppStream 2.0 interface.
Prior to adding the application, the application icon should be added to the connected S3 bucket.
The following Application settings should be used:
| Field | Value |
|---|---|
| Application icon object | Select app-icon.png from S3 |
| Application executable launch path | c:\program files (x86)\turbo\cmd\turboplay.exe |
| Application launch parameters | turbo run appspec --api-key=abcd1234-abcd1234 |
| App block | Select App Block created above |
Note that each application must be associated to a fleet before the application will be available.
Launching Applications
To test applications, select the applicable AppStream 2.0 Stack and press Action / Create Streaming URL. This creates a one-time URL that will launch AppStream as the specified user.
3.6 Citrix
System administrators can use Turbo to quickly deploy applications and custom containerized environments on Citrix, Parallels RAS, Workspot, Windows Remote Desktop Services (RDS), and other remote desktop systems.
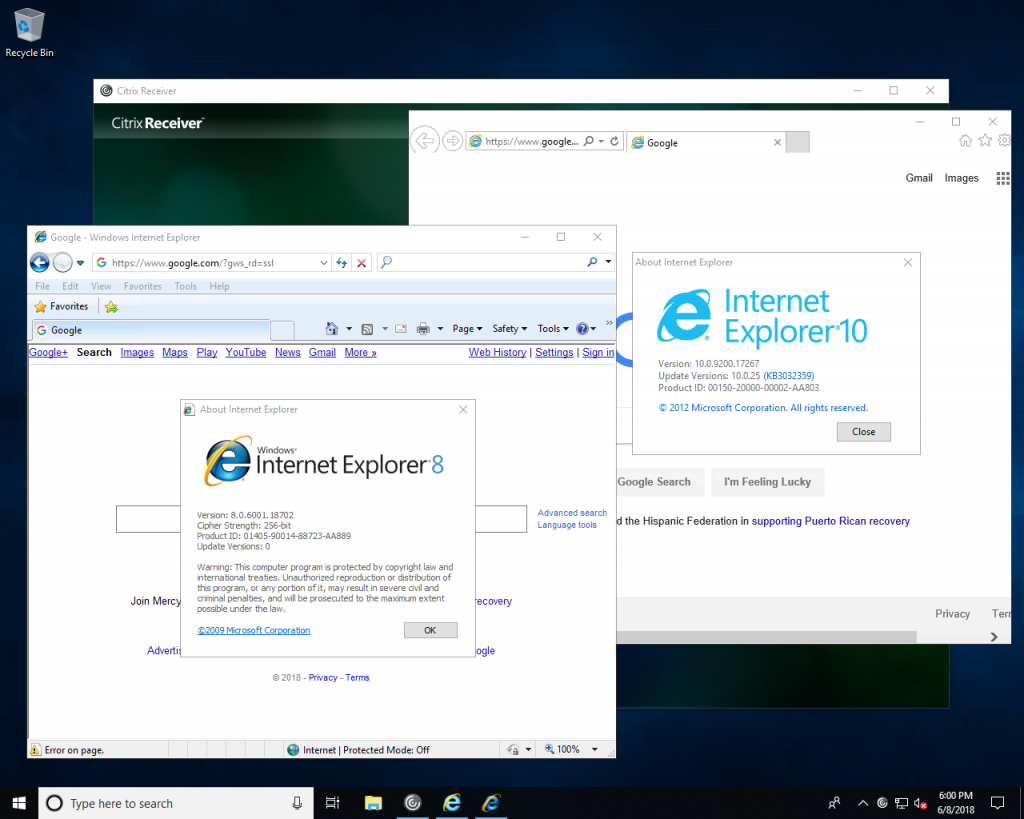 Citrix Receiver Applications Side by Side Launched
Using Turbo Command Line
Turbo containers can be deployed to Citrix XenApp servers using the Turbo command line interface. Below are the steps required.
Prerequisites
To get started, you will need to download and install Turbo for Windows for all users on the system.
If users will be streaming the application window rather than the whole desktop, we recommend hiding the Turbo GUI using the --hide-gui flag.
> start /wait turbo-client.exe --all-users --silent --hide-gui

Adding Applications to the Start Menu
Turbo application desktop integration, including Start Menu, desktop shortcuts, and file associations, can be enabled with the turbo installi command along with the --all-users flag. If you omit the version from the application identifier, then the latest version will be used.
# Sign in to Turbo.net
> turbo login

# Add the latest Firefox ESR browser to the Start Menu
> turbo installi --all-users mozilla/firefox-esr

# Add the latest Google Chrome browser to the Start Menu
> turbo installi --all-users google/chrome

# Add Internet Explorer 8 with Java 6.45 to the Start Menu
> turbo installi --all-users microsoft/ie:8,jre:6.45

The Firefox ESR, Chrome,and IE8 with Java6 applications will appear in the Start Menu of the server.
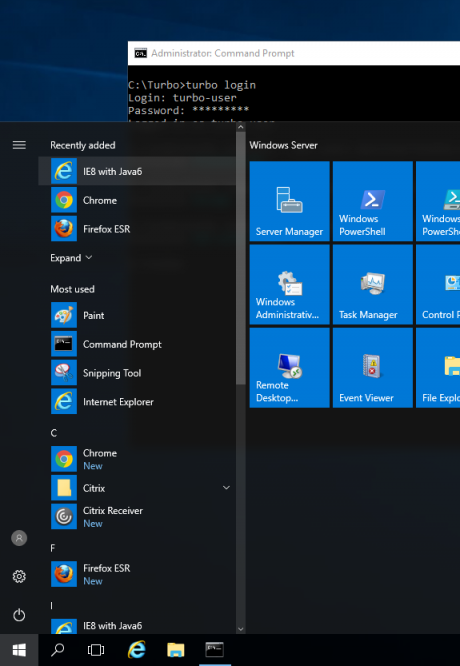
Adding Applications to the Delivery Platform
Depending on the delivery platform in use, you may also need to add the applications in the delivery system's administration interface.
In this example, we will add applications to Citrix XenApp using Citrix Studio.
Start Citrix Studio and go to Applications > Add Applications.

Select the option to Add applications From Start Menu...
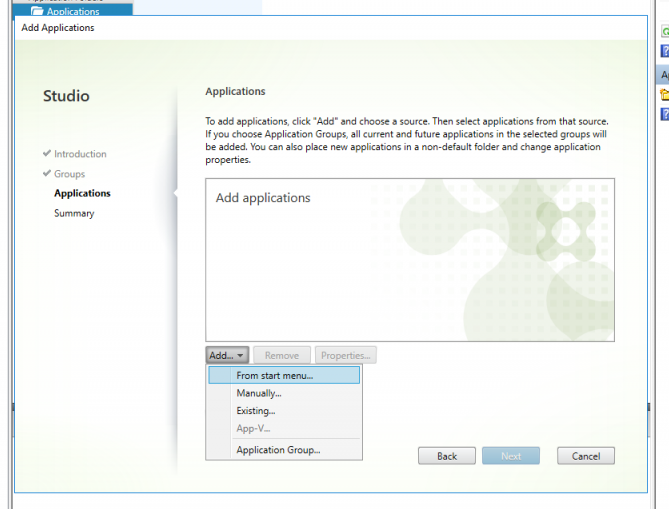
Then select the Firefox ESR, Chrome, and IE8 with Java6 applications.
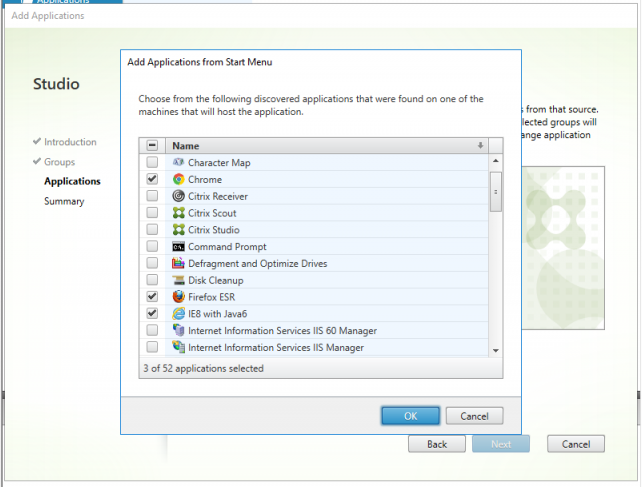
Click through to Finish to complete the process.
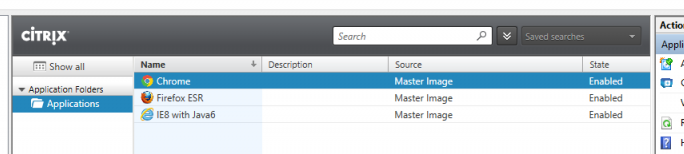
Running the Applications
Once added to Citrix Studio users can access the applications from the Citrix StoreFront website or the Citrix Receiver application.
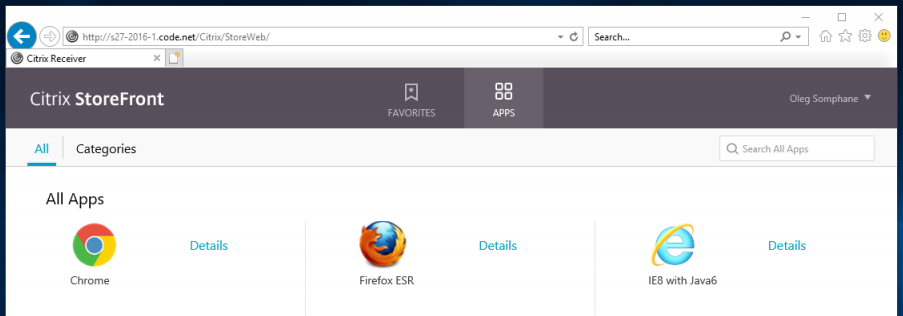
Click on an application to launch it.
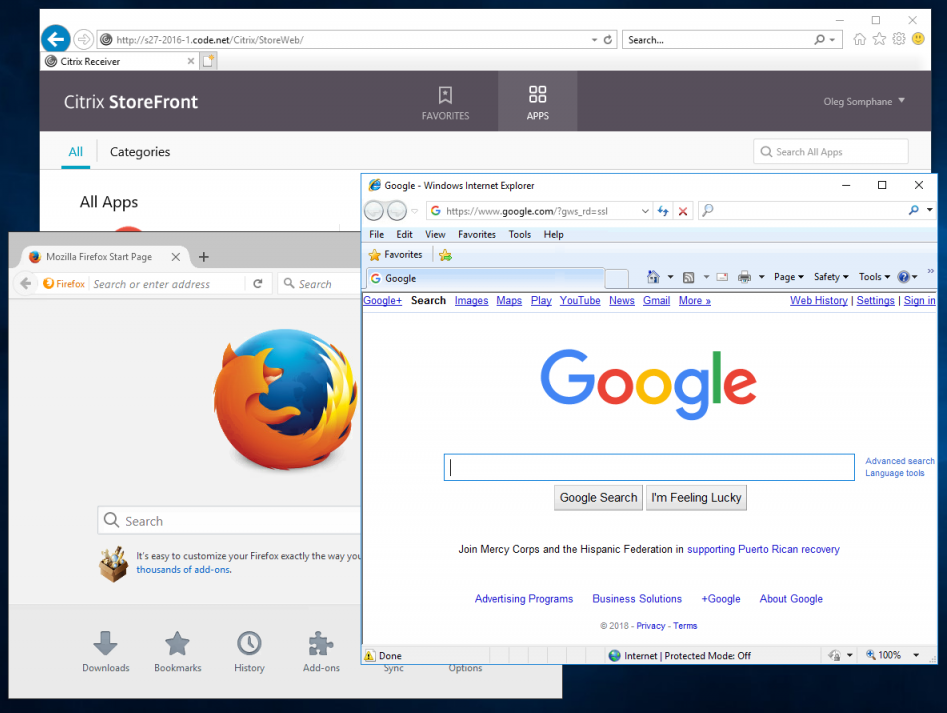
Since applications are executed in isolated Turbo container environments, any combination of browsers, plugins, and runtimes can run side-by-side on the same server.
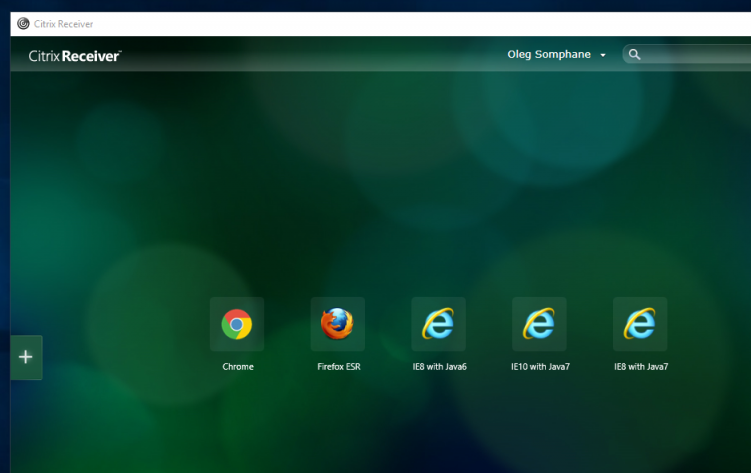
For example, an Internet Explorer 8 with Java 6 environment can run alongside an Internet Explorer 10 with Java 7 environment or another Internet Explorer 8 with Java 7 environment.
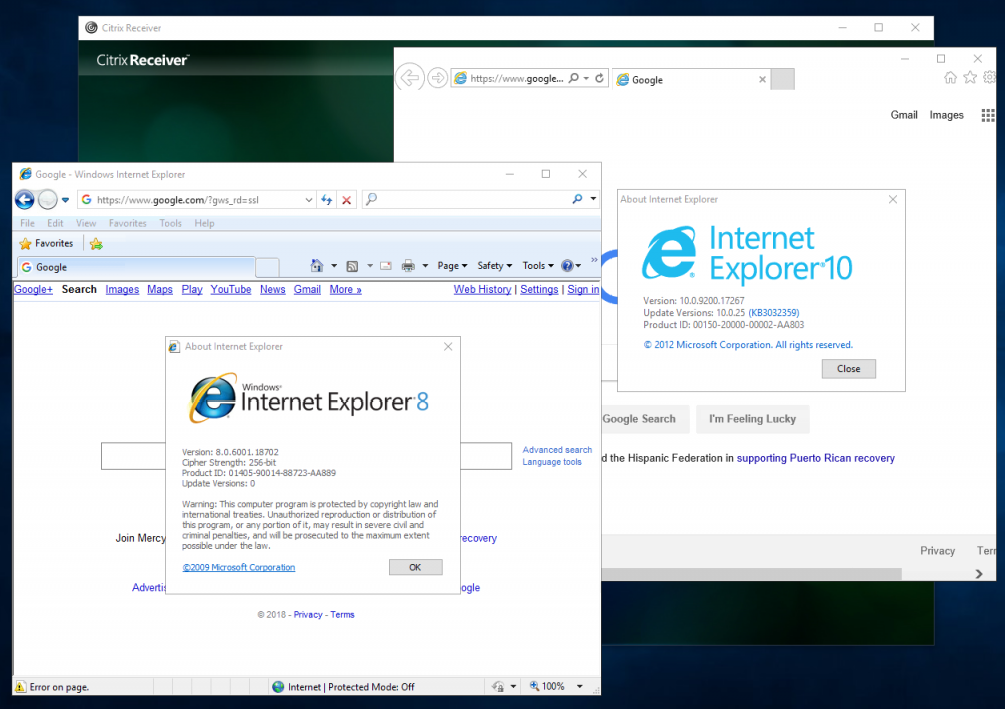
This allows elimination of Citrix siloing and consolidation of servers to a single version of Citrix using a single base image.
Using Turbo Citrix Scripts
Turbo containers can also be deployed to XenApp using powershell helper scripts to automate the deployment.

XenApp 7
For XenApp 7, use the turbocitrix/xa7-subscribe container image to add turbo applications to your XenApp server and publish them automatically.
# install the turbo client for all users on the machine (this is only necessary once)
> Turbo-Plugin.exe --all-users --silent

# login to your account or org using the defined API key
> turbo login --api-key=WvUjfpjqtx0as1CczTX5mPZ5pdXgc1w2t91HRzVc3Qc
Logged in as turboorg

# run the container image that contains the powershell helper script
> turbo try turbocitrix/xa7-subscribe -- turboorg -deliveryGroup Default -apikey WvUjfpjqtx0as1CczTX5mPZ5pdXgc1w2t91HRzVc3Qc -waitonexit
Using VM 11.8.817.5 from local
Using image clean:25 from local
Using image vcredist:2008 from local
Using image xa7-subscribe:2016.02.26 from local
Running new container xa7-subscribe#3d2a1d9f with visibility private
Checking if Turbo client is installed...
Subscribe to turboorg...
Aptana Studio subscribed
Mozilla Firefox subscribed
7-Zip subscribed
Atom subscribed
Audacity subscribed
Dia subscribed
LibreOffice Writer subscribed
LibreOffice Base subscribed
Beyond Compare subscribed
NPP Notepad++ subscribed
Google Chrome subscribed
LibreOffice Calc subscribed

Aptana Studio published
Mozilla Firefox published
Atom published
Dia published
LibreOffice Writer published
LibreOffice Base published
Beyond Compare published
NPP Notepad++ published
Google Chrome published
LibreOffice Calc published
Deployment successful
After those easy commands, we have applications deployed to our XenApp farm!
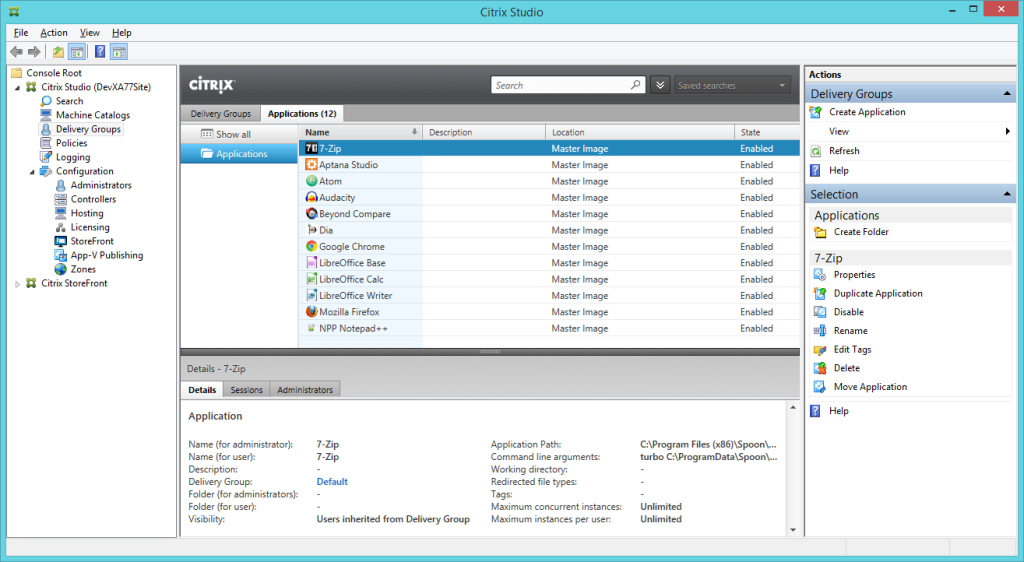
Go to Subscribe for XenApp7 for more information and full documentation of the script parameters.
XenApp 6.5
For XenApp 6.5, use the turbocitrix/xa6-subscribe container image to add turbo applications to your XenApp server and publish them automatically.
> Turbo-Plugin.exe --all-users --silent

> turbo login --api-key=WvUjfpjqtx0as1CczTX5mPZ5pdXgc1w2t91HRzVc3Qc
Logged in as turboorg

> turbo try turbocitrix/xa6-subscribe -- turboorg -users domain\users -apikey WvUjfpjqtx0as1CczTX5mPZ5pdXgc1w2t91HRzVc3Qc -waitonexit
Using VM 11.8.817.5 from local
Using image clean:25 from local
Using image vcredist:2008 from local
Using image xa6-subscribe:2016.02.26 from local
Running new container xa6-subscribe#4fa191d9f with visibility private
Checking if Turbo client is installed...
Subscribe to turboorg...
Aptana Studio subscribed
Mozilla Firefox subscribed
7-Zip subscribed
Atom subscribed
Audacity subscribed
Dia subscribed
LibreOffice Writer subscribed
LibreOffice Base subscribed
Beyond Compare subscribed
NPP Notepad++ subscribed
Google Chrome subscribed
LibreOffice Calc subscribed

Aptana Studio published
Mozilla Firefox published
Atom published
Dia published
LibreOffice Writer published
LibreOffice Base published
Beyond Compare published
NPP Notepad++ published
Google Chrome published
LibreOffice Calc published
Deployment successful
You can find more information and full documentation at Subscribe for XenApp6.5.
3.7 System Center (SCCM)
Microsoft System Center Configuration Manager (SCCM) is a wonderful tool to deploy application containers to desktops in your enterprise. Below shows several methods that SCCM can be used to deploy containers.
Distribute Standalone Executables
The easiest solution is to deploy a shortcut to a standalone executable container. Standalone executable containers are single .exe files that have the full virtual machine built in. With them you can get the full application experience without installing anything to the machine. You can either point your application shortcut to a copy of the .exe in a local machine location or at shared network location. See building standalone executables for more information.
Distribute MSIs
Turbo MSIs can be used as an alternative to deploy standalone executables. The benefits are that you have full control over what shortcuts get created as well as the ability to add file associations to your application. See building MSIs for more information.
Use application images (.svm files)
This option is the most versatile but also requires some configuration effort. Instead of embedding all the application files in the SCCM package, we may use the .svm files hosted either on Hub or a file share. Below, you can find a description of the file share deployment. Firstly, we need to configure the file share server.
1. Configure the file share server
There are two configuration steps for the file share server:
- Install the Turbo.net client:
turbo-client-19.9.2054.0.exe --silent --all-users - Make the path C:\ProgramData\Turbo\Containers\repo a shared folder, giving read-access to all the user accounts which will run Turbo applications
- Download the base images:
turbo pull --all-users xvmturbo pull --all-users clean
2. Prepare Turbo.net Client Runtime installation package in SCCM
From https://turbo.net/download download the .msi Turbo.net Client installer and create an Application in SCCM with the .msi deployment type:
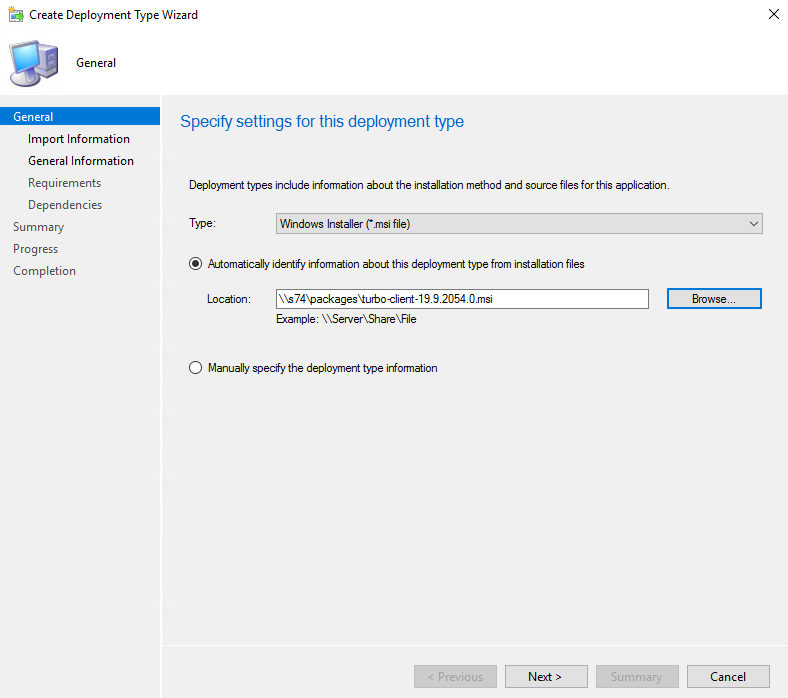
Next, create a custom Application that configures the newly installed Turbo.net Client. For this purpose, we need a simple install.bat file with the following content (replace {file-share} with the shared folder path from the previous point):
"C:\Program Files (x86)\Turbo\Cmd\turbo.exe" config --all-users --image-path {file-share}
echo ok > "C:\Program Files (x86)\Turbo\configured.txt"
** Note about the file share address **
When you have multiple sites configured in SCCM, you may want to use a separate file share for each one of them. For instance, the right place for a Turbo file share would be the SCCM Distribution Point. However, that complicates the above script, as we need to discover the nearest share dynamically. One option to do so is by querying the SCCM WMI objects.
Next, we create a custom Application:
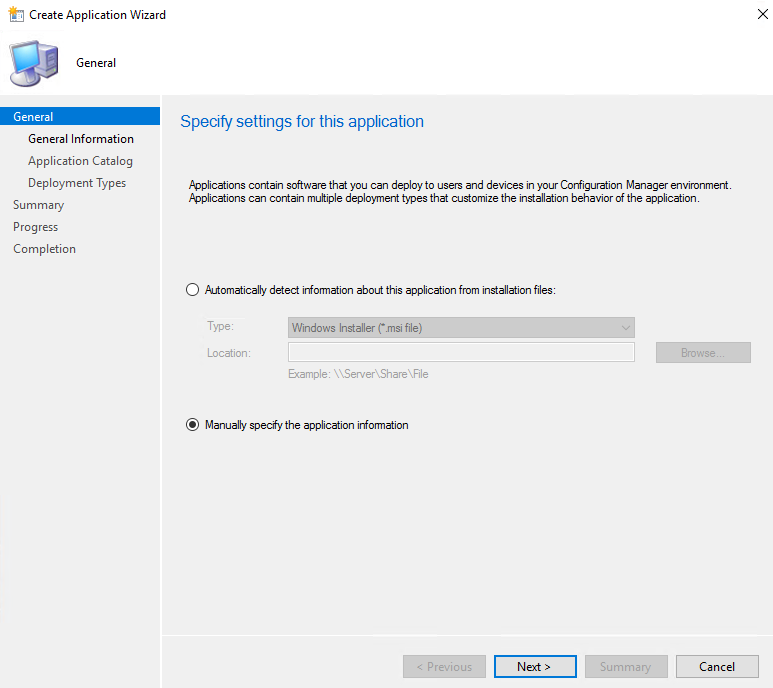
Create the 'Script Installer' deployment type:
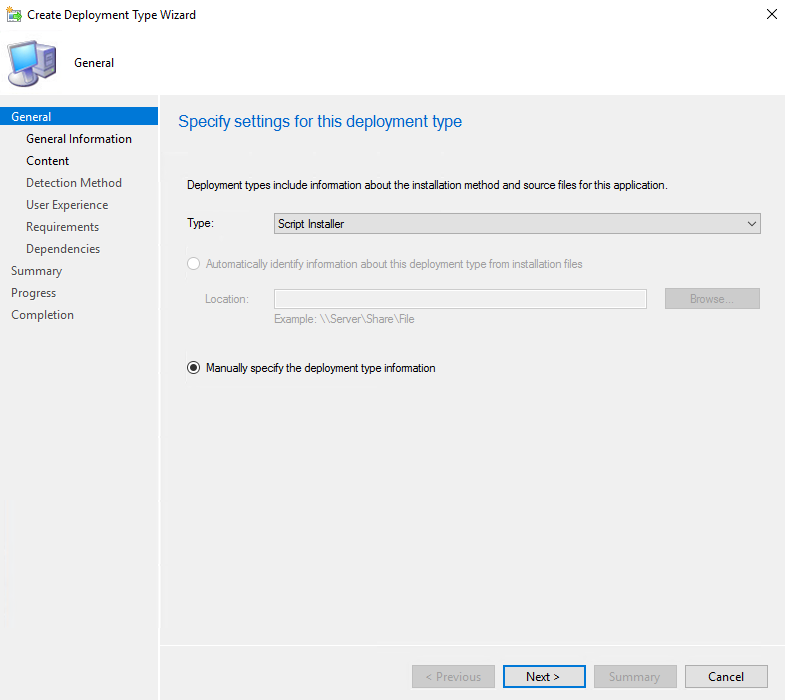
Specify the path to the batch file:

And the detection rules:
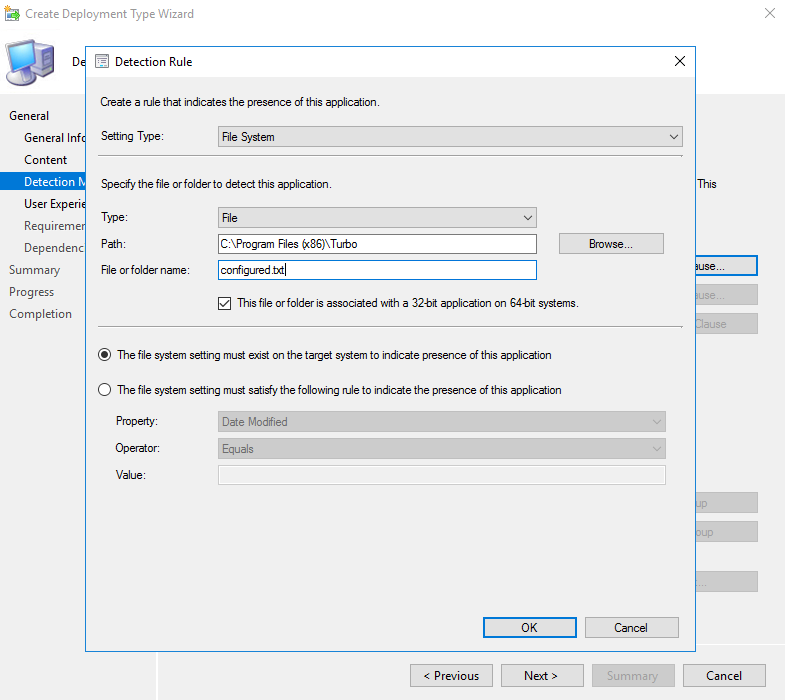
Finally, on the User Experience tab, make sure the script installs for the system and run the deployment.
3. Prepare and publish the application image
It's time to create the application .svm file. We can do that by using either Studio or Turbo Script. Both methods are covered in other sections of the documentation, so let's focus only on the publishing part. With the .svm file ready, we need to import it by running turbo import svm --name {app-name} {path-to-svm-file} on the file share server(s).
4. Prepare the SCCM application package
We are now ready to prepare the SCCM package for our application. We start again by creating a .bat file with a simple command:
"C:\Program Files (x86)\Turbo\Cmd\turbo.exe" installi --skip-installed --offline {app-name}
And use it in a 'Script Installer' deployment:
The turbo installi command adds keys to the Uninstaller key, so you may use the app key in a Detection Rule configuration:

In the User Experience tab, select 'Install for user' and finish the Application wizard. We are now ready to deploy the package to Distribution Points and client devices.
** Note **
When you use a hub instead of the file share, it is possible to install all the organization images published to a hub with the subscribe command, for example:
# Add shortcuts to all the dashboard apps from the 'turbo-user' user account
> turbo subscribe turbo-user

# Add shortcuts to all the dashboard apps from the 'turbo-org' org
> turbo subscribe turbo-org
3.8 Intune
Intune is an Azure-based device management solution by Microsoft.
This section describes the process for deploying the Turbo client to Intune-managed devices.
Deploying Turbo for PC
- Download the latest Turbo Client MSI installer at
https://start.turbo.net/install?msi= - Sign in to the Intune portal
- In the Intune pane select Client Apps > Apps > Add
- In the App type list select Line-of-business app and select the Turbo Client MSI installer
- Select Configure and provide the following information:
- Name: Enter the name of the app as it is to be displayed in the company portal
- Description: Enter a description for the app as it is to be displayed in the company portal
- Publisher: Enter Turbo.net as the publisher.
- Under the Command-line arguments section, enter the text
CMDLINE="params"whereparamsare the desired setup parameters. Any parameters valid for the Turbo EXE client install andturbo configcommand may be provided here.- Recomended: Use the
--image-path=allusersflag to have all users on the device use a shared image cache. This prevents redownload of the application when different users on the same device run the same application. - (Optional) Use the
--add-trusted-source=https://myhub.start.turbo.netflag to have the device automatically trust applications from your Hub. If this is not done at client setup time, the user will be prompted to trust applications published by your organization before an application can execute on the device. - For example, to use a shared image cache and add a trusted source, the command-line argument would be
CMDLINE="--image-path=allusers --add-trusted-source=https://myhub.start.turbo.net"
- Recomended: Use the
- Optional: Select Scope and select any desired tags
- Select Add
- Under Manage, click Assignments and assign the app to the necessary groups
Deploying Turbo for iOS
- Sign in to the Intune portal
- In the Intune pane select Client Apps > Apps > Add
- In the App type list select iOS
- In the Search the App Store pane search for Turbo.net, select the Turbo.net iOS app, and press Select
- (Optional) Select App information to edit the auto-populated fields
- (Optional) Select Scope and select any desired tags
- Select Add
- Under Manage, click Assignments and assign the app to the necessary groups.
Deploying Turbo for Android
To deploy Turbo.net for Android via InTune:
- Sign in to the Intune portal
- In the Intune pane select Client Apps > Apps > Add
- In the App type list select Android
- Select Configure and provide the following information:
- Name: Enter the name of the app as it is to be displayed in the company portal. Usually this would be Turbo.net.
- Description: Enter a description for the app as it is to be displayed in the company portal.
- Publisher: Enter Turbo.net as the publisher.
- Appstore URL: Enter
https://play.google.com/store/apps/details?id=net.turbo.android.launcher - Minimum operating system: Select Android 5.0 (Lollipop)
- Select OK and Add
- Under Manage, click Assignments and assign the app to the necessary groups.
3.9 Parallels RAS
Parallels Remote Application Server (RAS) is a comprehensive virtual application and desktop delivery solution that allows your employees to access and use applications and data from any device.
By integrating Turbo.net technology, Parallels Remote Application Server allows IT administrators to package applications and their dependencies into an isolated virtual environments. Containerized applications can be run on any Windows server, no matter the underlying OS. This eliminates installs, conflicts, breaks, and missing dependencies.
Application Provisioning
Turbo.net is integrated into Parallels RAS, allowing application provisioning directly from the Turbo.net Hub to any server in the farm. Administrators can just select the required application directly from the RAS Console; applications are automatically installed and ready to be published to the users.
Effortless Delivery
Turbo.net has teamed up with Parallels RAS to further simplify the process of delivering applications and desktops. Completely transparent to the administrator and without any extra configurations required, the applications in the Turbo.net Hub are available for delivery in the Parallels RAS Console like any application already installed in the farm. As soon as a user requests first-time access to an application published, Parallels RAS automatically installs and configures Turbo.net runtime and the application on the RDSH servers, reducing IT staff's manual tasks.
Run Legacy Applications and Multiple Versions Simultaneously
Some applications (and very often legacy applications) were not designed for publishing, since they may fail to launch if there is another instance of the application already running on the server. Parallels RAS integrated with Turbo.net allows you to bypass such limitations, because a running application wouldn’t be able to detect that there is another instance of the application already running on the computer. Application containerization enables administrators to run different versions of the same application on the same server. For instance, on a webpage, testers may test the page on different browsers and also different versions of the same browser, ensuring the same face is shown on each.
Learn More
For more information on Turbo.net on Parallels RAS, take a look at the demo video above or visit https://www.parallels.com/products/ras/features/turbo-net.
3.10 Turbo Client
In the following pages you will learn about how to use the Turbo Client and Turbo Launcher.
Install the Plugin
End-users must download and install the Turbo Client prior to launching Turbo applications for the first time.
If you already have the Turbo Client and are installing an update Turbo automatically uninstalls older versions if they have been idle for more than 30 days.
Command line flags
When installing the Turbo Client for a managed environment, there are command line flags that may be useful.
Turbo-plugin.exe [Option]
| Parameter | Behavior |
|---|---|
|
--silent |
Installs the Turbo Client silently. |
|
--all-users |
Installs the Turbo Client under the All Users profile, so it is available to all profiles on the machine. |
Proxy Settings
The Turbo Client uses the proxy settings of the local device by default. End-users using Microsoft Internet Explorer can change proxy settings from within the browser. Users of other browsers must change proxy settings on the host device itself.
Complete the following steps to change system proxy settings on the host device:
-
Navigate to the Control Panel in your windows Start Menu.
-
Select the Internet Options icon.
-
Select the Connections tab, then LAN Settings.
-
Enter the proxy settings specified by your network administrator.
Using the Turbo Launcher
The Turbo Launcher
The Turbo Launcher is what end-users see when they select the Turbo icon from the system tray. Users are able to launch applications from the Hub they are connected to.
-
Turbo Launcher automatically runs on Microsoft Windows startup and runs in the background until manually shut-down. The process is represented in the Microsoft Windows systray by a Turbo icon. Select the icon brings up a more detailed window from which all other settings are available. Closing this window does not end the background activity; only choosing Shut Down from the Options menu shuts down background activity.
-
Any Turbo user can sign in to a host using the Turbo Launcher. This includes users with turbo.net accounts and users with accounts on private Turbo Hub Servers.
-
To be "signed in" means that applications will run without prompting for a username and a password, application settings data are saved, and settings for that user can be viewed and edited.
-
Multiple Turbo users can be signed in on the same machine.
-
Only one Turbo user per host can be signed in at the same time.
Advanced Plugin Topics
Install location
If the Turbo Client was installed for all users, the install location is in one of the following locations.
-
For x86 platforms: C:\Program Files\Turbo
-
For x64 platforms: C:\Program Files (x86)\Turbo
If the plugin is installed for a single user profile, the install location is in the following locations: C:\Users<profile>\AppData\Local\Turbo
Command line flags
The Turbo Client installs an application called Turbo Service that runs on startup. This application can be found in the install directory of the Turbo Client. There is a command line interface for this application.
TurboService.exe [Option]
| Parameter | Behavior |
|---|---|
|
/uninstall |
Uninstalls the Turbo Client. Close all web browsers before uninstalling. |
|
/silent |
Used with /uninstall to perform a silent uninstall. |
|
/delete-user-data |
Used with /uninstall and /silent to remove user container data during uninstall. |
|
/uninstall-launcher |
Uninstalls the TurboLauncher but leaves the rest of the client. |
|
/uninstall-redirector |
Uninstalls the TurboRedirector but leaves the rest of the client. |
Mobile Device Management Configuration
Mobile Device Management (MDM) software is used to monitor, manage, and secure employee mobile devices. Below is the configuration XML necessary for iOS and Android devices.
iOS
<?xml version="1.0" encoding="UTF-8"?>
<!DOCTYPE plist PUBLIC "-//Apple//DTD PLIST 1.0//EN" "http://www.apple.com/DTDs/PropertyList-1.0.dtd">
<plist version="1.0">
<dict>
    <key>serverURL</key>
    <string>https://turbo.net/</string>
    <key>username</key>
    <string>example@domain.com</string>
    <key>rememberMe</key>
    <true/>
    <key>password</key>
    <string>userpassword</string>
</dict>
</plist>
serverURL is URL of Turbo Server.
username and password are the user's Turbo Server credentials.
rememberMe indicates that user credentials are stored on the device.
If username and password are provided then the application tries to login the user automatically.
Android
<restrictions xmlns:android="http://schemas.android.com/apk/res/android">
    <restriction
        android:defaultValue=""
        android:key="login"
        android:restrictionType="string"
        android:title="User login" />

    <restriction
        android:defaultValue=""
        android:key="password"
        android:restrictionType="string"
        android:title="User password" />

    <restriction
        android:defaultValue=""
        android:key="server"
        android:restrictionType="string"
        android:title="Turbo server" />

    <restriction
        android:defaultValue="true"
        android:key="rememberme"
        android:restrictionType="bool"
        android:title="Remember me" />
</restrictions>
server is URL of Turbo Server.
login and password are the user's Turbo Server credentials.
rememberme indicates that user credentials are stored on the device.
If login and password are provided then the application tries to login the user automatically.
3.11 Portable EXEs and MSIs
Turbo Studio can be used to package virtual applications as portable EXEs and MSIs.
EXE
A popular option for organizations that have an existing endpoint management solution like LANDesk Management Suite ®, Microsoft System Center, or Novell ZENworks is to deploy containerized applications as standalone executables. These executables are built on the SVM architecture and work just like a container.
Deploying applications within containers is convenient for running different versions of applications like Internet Explorer 8 and 11 side-by-side on the same system.
To produce an executable output, set the Project Type to ISV Application in Turbo Studio. Executables can be deployed directly to the users device or to a network share and do not have any dependency requirements.
An enterprise license for Turbo Studio is required to enable executable outputs. Contact our sales team for more information.
MSI
MSI outputs simply wrap the standalone application exe into an MSI package to add support for shell integrations such as file associations, Start Menu shortcuts and ProgIds. MSIs are a common deployment option for organizations that are using AdminStudio or for integrating with existing desktop management solutions.
To build an MSI, go to the Setup section of Turbo Studio, enter the MSI details and click Build MSI. MSIs can be deployed with existing desktop management tools or directly by the end users. See the reference for details on MSI settings.
An enterprise license for Turbo Studio is required to enable MSI outputs. Contact our sales team for more information.
Turbo EXE
A Turbo EXE is a portable executable that packages the application with the Turbo client. When an application is published as a Turbo EXE, the application is pushed to the Hub which enables features such as deploying application updates to users. See the hub docs for additional features.
To produce a Turbo exe, set the Project Type to Portable Application in Turbo Studio. A Turbo.net account is required.
3.12 Integration Tools
Turbo has tools to enhance the deployment process and integrate containerized applications with existing deployment tools. For example, Browser Redirector enables administrators to automatically direct users to a supported browser based on a URL that is entered. This solves compatibility issues for organizations that have legacy web applications that rely on non-standard browser configurations.
Redirector Walkthrough
The Turbo URL Redirector is a native browser extension that assists in web navigation by processing clicked hyperlinks and URLs entered in the navigation bar. The extension can be configured to open specified domains using a browser available on Turbo.net or a local Turbo Server.
The Turbo URL Redirector for Internet Explorer is implemented in the Turbo.net Browser Helper Object (Turbo-IEBrowserHelper.dll or Turbo-IEBrowserHelper-x64.dll depending on the processor architecture of the host machine) and supports IE versions 8, 9, 10 and 11. The Turbo.net Extension provides the same experience for users of Chrome 42 and above. To try the Turbo URL Redirector feature for yourself, follow this step-by-step guide.
Enabling Turbo URL Redirection
The Turbo URL Redirector is disabled by default, because its installation requires elevated permissions to copy IE Browser Helper binaries to %ProgramFiles(x86)%.
To enable the Turbo URL Redirector, execute the following command:
> turbo config --enable-redirector
Hub server: https://turbo.net/
Browser redirection is enabled
Enabling Turbo URL Redirection in Internet Explorer
Launch Internet Explorer.
You may see an Internet Explorer Security alert explaining that the Turbo Sandbox Manager will be opened outside of Protected mode. (Turbo Sandbox Manager is the service responsible for integration of Turbo applications with the Turbo.net website.) Ignore this warning by checking Do not show me the warning for this program again and then clicking Allow.
Go to Tools (Alt + X) and Manage add-ons (M).

The Turbo.net Browser Helper will be displayed in the list of currently loaded add-ons. Change the status of the add-on to Enabled if required and close the dialog.
Enabling Turbo URL Redirection in Chrome
Install and enable the Turbo.net Extension.
For information how to enable the extension for all users see Deploying Turbo URL Redirection via Group Policy.
Defining Redirection Rules in the Windows Registry
Redirection rules can also be set in the Windows registry in cases where Turbo.net subscriptions are not used.
Rules are added to the "HKLM\Software\Code Systems\Turbo\Redirector" hive ("HKLM\Software\Wow6432node\Code Systems\Turbo\Redirector" for 64-bit operating systems).
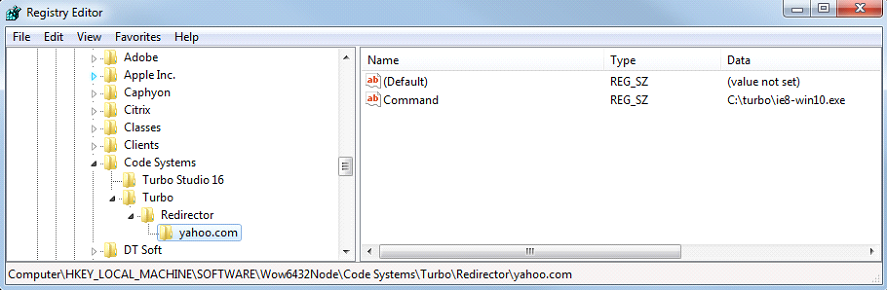
Create a key under the Redirector hive, setting the name of the new key to the url pattern to match. In the example above, the pattern is "yahoo.com" which matches any url that contains "yahoo.com".
Within the new rule key, registry values are used to describe the command to execute if a url is encountered which matches the pattern. There are two ways to describe the redirection response, with Command or TurboCommand string values. A Command value is set to the full path to the command to execute. In the example above, the command is set to "c:\turbo\ie8-win10.exe". A TurboCommand value is set to the command to execute via turbo.exe. An example value would be "run ie8" which would execute "turbo.exe run ie8". For either of these command types, the url which matched the pattern is appeneded to the end of the command to be passed as a parameter.
Deploying Turbo URL Redirection via Group Policy
This section explains how to enable the Turbo URL Redirector for all users of Internet Explorer and Chrome.
Before following the step-by-step guide for each browser ensure that the Turbo URL Redirector is enabled.
> turbo config
Hub server: https://turbo.net/
Browser redirection is enabled
If the browser redirection feature is disabled, see enabling Turbo URL Redirection.
Enable the Turbo Browser Helper Object for All IE Users
Microsoft Internet Explorer can be configured for all users through Local Group Policy. This section explains how to specify the GPO to silently load and enable the Turbo.net Browser Helper Object. Depending on the policy settings the user may be allowed to disable the add-on afterwards.
First open the Local Group Policy Editor:
> gpedit.msc
Select the Add-on Management node under Computer Configuration/Administrative Templates/Windows Components/Internet Explorer/Security Features in the Local Computer Policy panel.

Double click Add-on List in the detailed view.
Select Enabled and click the Show button in the Options panel.
Add a new entry with Value name {DEC8F2AC-A81F-4BC9-A973-41EE4C4AF116} and Value 1. The Value name corresponds to the class identifier (CLSID) of the Browser Helper Object. The Value is a number indicating whether Internet Explorer should deny or allow the add-on to be loaded. Setting Value to 1 means that an add-on should be allowed. Enter a 2 to allow the add-on to be loaded and permit the user to manage the add-on through Add-on Manager. We recommend using 1 for most administration scenarios.
Click OK to save options and close the dialog.
Press the Apply button to update the policy settings and OK to close the dialog.
Launch the native IE to verify settings.
If the Turbo Sandbox Manager is not running you may see an Internet Explorer Security alert explaining the process will be opened outside of Protected mode. (Turbo Sandbox Manager is the service responsible for integration of Turbo applications with the Turbo.net website.) You can ignore this warning by checking Do not show me the warning for this program again and then clicking Allow.
Go to Tools (Alt + X) and open Manage Add-ons (M).
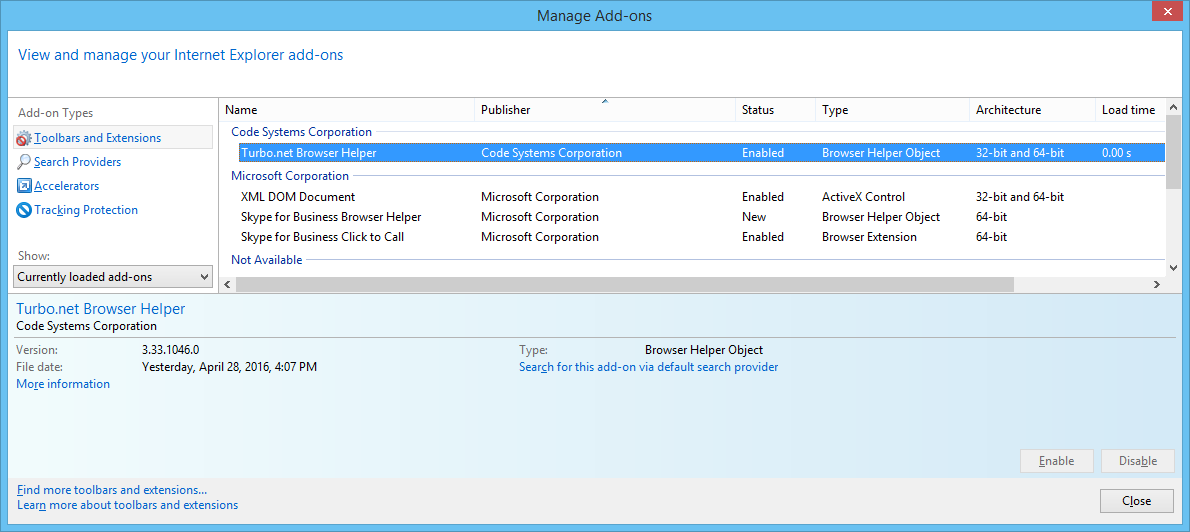
Turbo.net Browser Helper should be included in the list of currently loaded add-ons and be enabled. Note that actions to change the status of the Turbo.net Browser Helper are disabled.
Enable the Turbo.net Extension for All Chrome Users
Google Chrome configuration for all Windows domain users can also be defined using Local Group Policy. This section provides step-by-step instructions on adding the Turbo.net Extension to force-install extensions in Chrome. The extension will be installed silently, without user interaction and cannot be uninstalled by the user. All permissions requested by the extension will be granted implicitly, without user interaction.
As of this writing the Turbo.net Extension requires permissions to read and change all data on the visited websites and communicate with cooperating native applications. The extension supports Chrome 42 and above.
First, Download the IP archive with policy templates from the Chrome website.
(For more information about the policy templates and other supported configuration settings refer to the documentation for Chrome administrators.)
Unpack the archive to and install templates on the local machine by copying them to %SystemRoot%\PolicyDefinitions directory.
Copy .\policy_templates\windows\admx\chrome.admx to %SystemRoot%\PolicyDefinitions.
Copy .\policy_templates\windows\admx\locale\chrome.adml to the %SystemRoot%\PolicyDefinitions\locale directory, where the locale alias corresponds to the locale name (en-US for United States) of the Windows display language used on the host machine.
Run the Local Group Policy Editor:
> gpedit.msc
Select Extensions node under Computer Configuration/Administrative Templates/Google/Google Chrome in the Local Computer Policy panel.

Double click on the Configure the list of force-installed apps and extensions in the detailed view.
Select Enabled and click the Show button in the Options panel.
Add the following entry to the list of Extension/app ids and update URLs to be silently installed.
ldibmiofagdkgiphkcokpooepankmacl;https://clients2.google.com/service/update2/crx
The first component is the Id of the Turbo.net Extension. The URL points to the standard Chrome Web Store update service.

Click OK to save options and close the dialog.
Press the Apply button to update the policy settings and OK to close the dialog.
To verify that local policy settings are applied correctly launch Google Chrome and go to chrome://extensions URL.
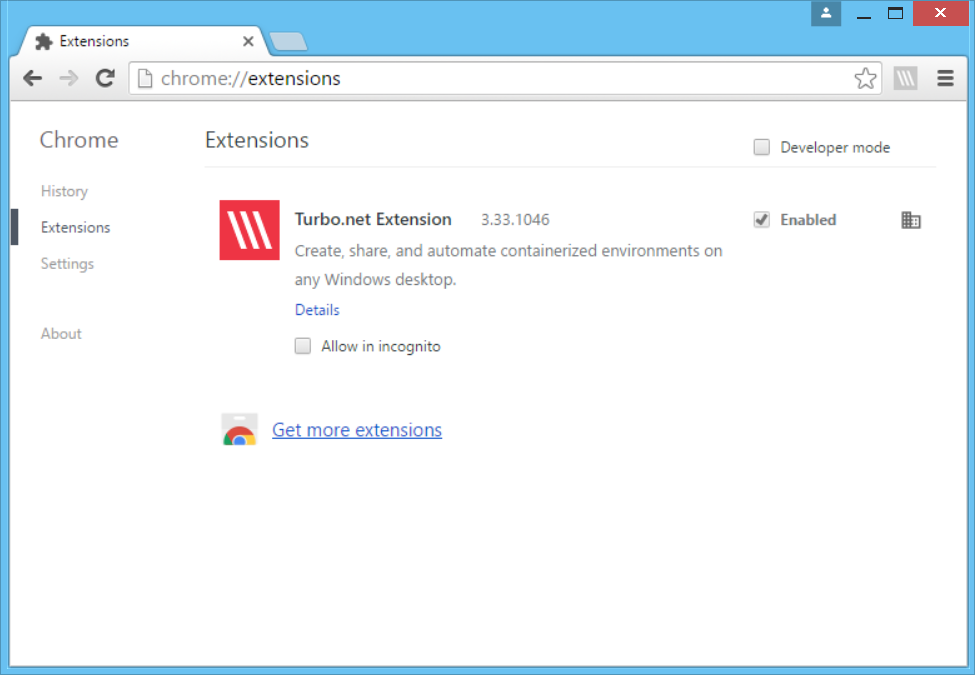
The Turbo.net Extension should be listed on the page with the Enabled checkbox set, but not available for user interaction and a badge informing that the extension was installed by enterprise policy.
The Local Group Policies presented in this article apply equally well to browsers launched with merge or write-copy isolation using Turbo:
> turbo try google/chrome --isolate=merge
> turbo try microsoft/ie --isolate=write-copy
3.13 Tips
API Keys
API keys allow you to login to the Turbo.net or Turbo Server hub without the use of a password. This is important for scripting and automation as it eliminates the need to hard code passwords or pass them in as parameters to your scripts. API keys can be revoked or regenerated in case they have been compromised.
Manage Your Keys
The first step is to create an API key. To do this, go to your account or organization settings page by clicking on the account dropdown on the top right of the page, and then select Device and API Keys on the right menu.
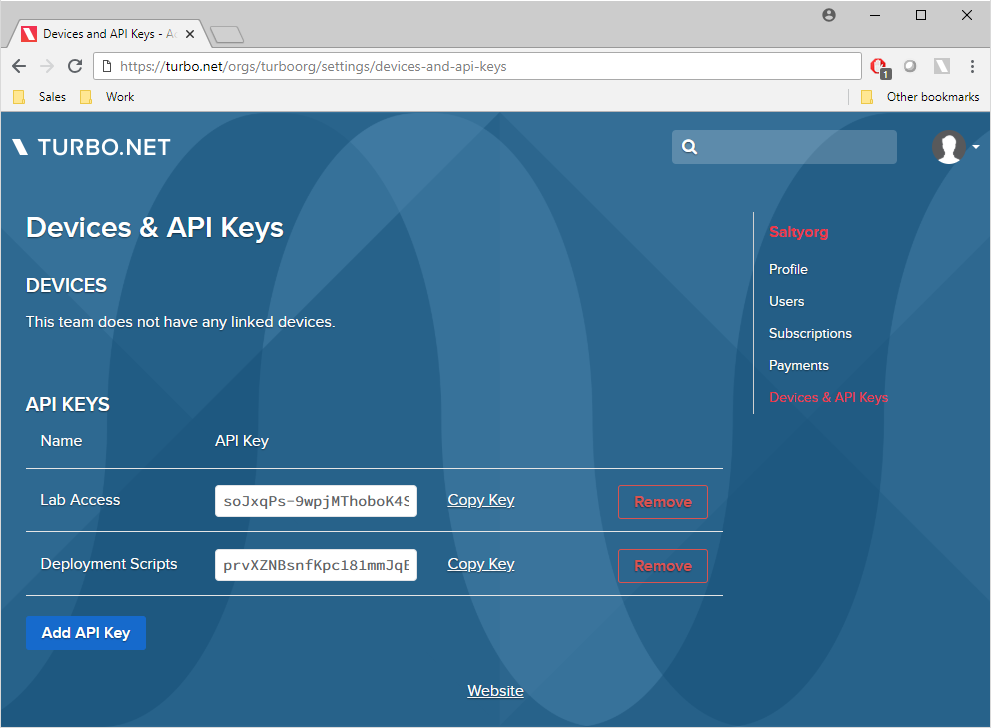
Once here, click Add API Key to generate a new key. Press the Remove button to remove the key and revoke its access to your organization. There is no limit to the number of keys you can generate. You may decide to create and manage different keys for different teams or for different user access, allowing you the flexibility to revoke them independently without disrupting all key users.
Click Copy Key and head back to the command line.
Turbo Login with an API Key
Using the API key is easy -- just include the key in the turbo login command using the --api-key flag.
> turbo login --api-key=9ZoKH_336g0MqP2yptwfrv9B1XUm8YFPnCZNugVQNr4
turboorg logged in at 7/26/2018 3:53:31 PM
The session is now authenticated in the account context. The account will stay logged in until the API key is revoked or the session is closed with the turbo logout command.
Windows Firewall
Sometimes it is necessary to add Windows Firewall rules to allow container applications access to network ports. Below are some suggestions when configuring these rules.
Using the StubExe Path
If creating a rule that applies to a program path, you will need to use the path to the stubexe. The stubexe is a small .exe stub that is written to the sandbox when an application inside the container is launched. It is required by the Windows operating system in order to execute an application.
If I run Mozilla Firefox in a container:
> turbo run firefox -d
Using VM 18.7.1306 from local
Using image clean:26 from local
Using image firefox:61.0.1 from local
Using image firefox-base:61.0.1 from local
Running existing container firefox#d9011823
I will find the sandbox for this container at C:\Users\turbouser\AppData\Local\Turbo\Containers\sandboxes\d9011823384b4cbeac39e7d430892fe4, where d9011823384b4cbeac39e7d430892fe4 is the container ID. You can find the container ID using the turbo containers command or by looking for a directory which matches the container name, in this case firefox#d9011823.
> tree /f C:\Users\turbouser\AppData\Local\Turbo\Containers\sandboxes\d9011823384b4cbeac39e7d430892fe4\local\stubexe
Folder PATH listing
Volume serial number is 000000FB 5ABB:3E17
C:\USERS\TURBOUSER\APPDATA\LOCAL\TURBO\CONTAINERS\SANDBOXES\D9011823384B4CBEAC39E7D430892FE4\LOCAL\STUBEXE
└───0xBD0FFFB5401D3815
        firefox.exe
        firefox.exe.manifest
The folder 0xBD0FFFB5401D3815 is a hash of the file configuration settings so that that the same launch again in the future does not require a new file to be written unnecessarily.
Note, there will be a stubexe for each .exe that is spawned from the container. You will need to make rules for each .exe that it should apply to.
If you are using a standalone executable, the stubexe is also used and will be in the application sandbox in the same folder structure. If your environment has upgraded from using a Spoon Client, then you may need to use the spoon directory rather than the one which using a turbo link.
Creating a New Outbound Rule
In Windows Firewall, an Outbound Rule is used to control how an application can access outside resources.
Open the Windows Firewall from the Control Panel.

Click on Advanced Settings link.
Click on Outbound Rules and then New Rule....
Select the Program rule type and then next.
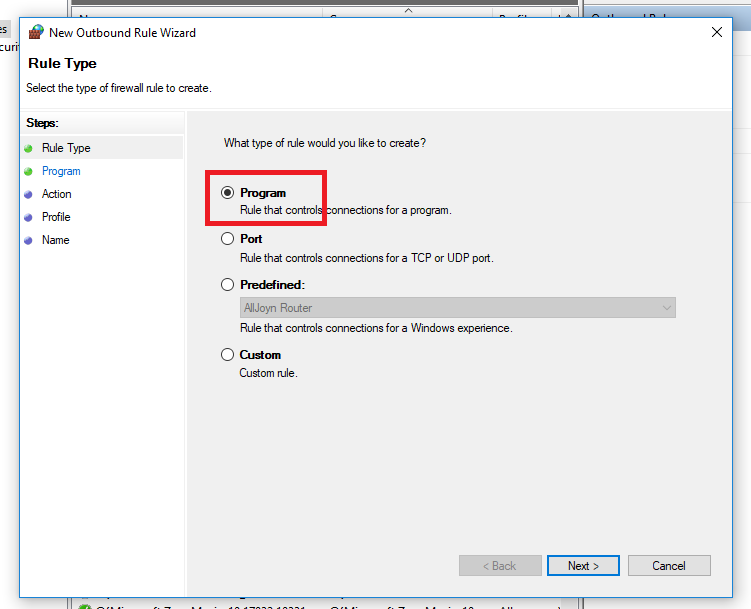
Enter the path to the application stubexe and then next.
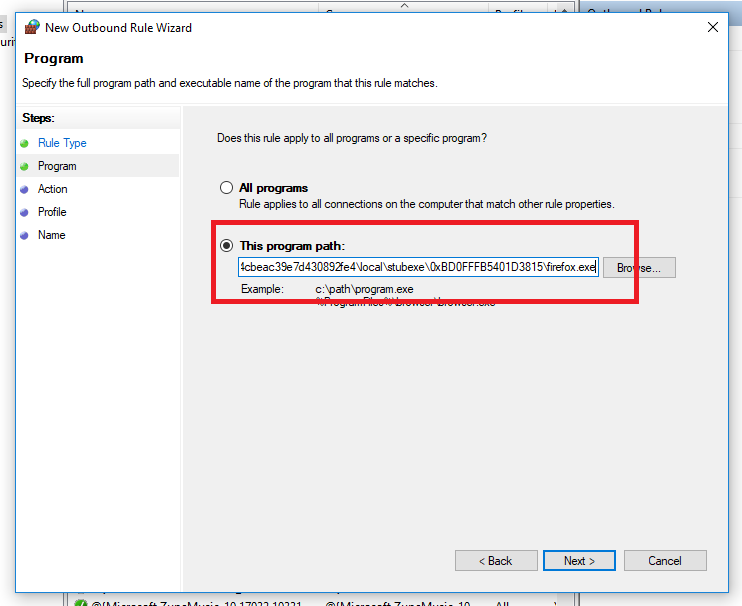
For our example we will block all connections from the application. Then press next.
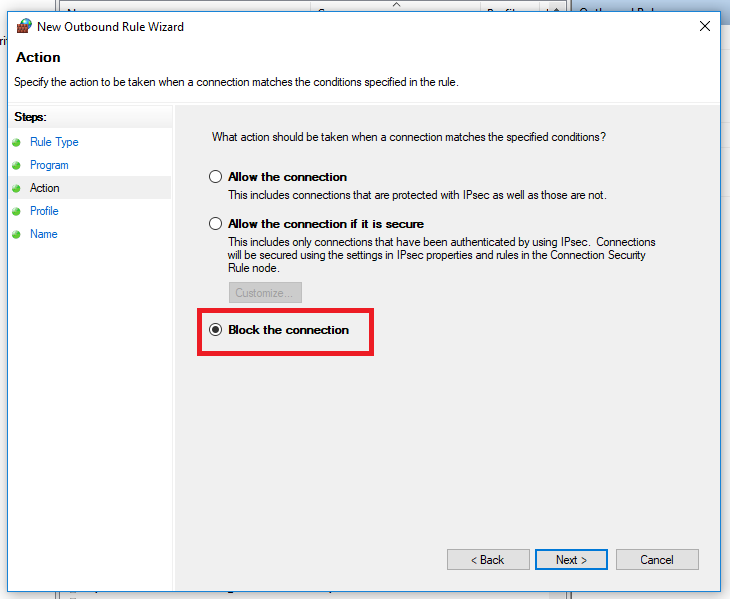
Apply to all networks then press next.
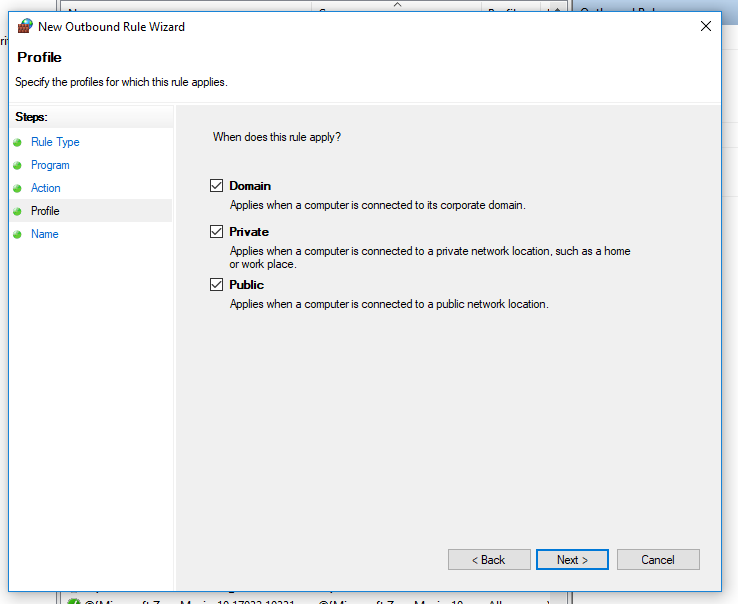
Give the rule a name and description, then press next.
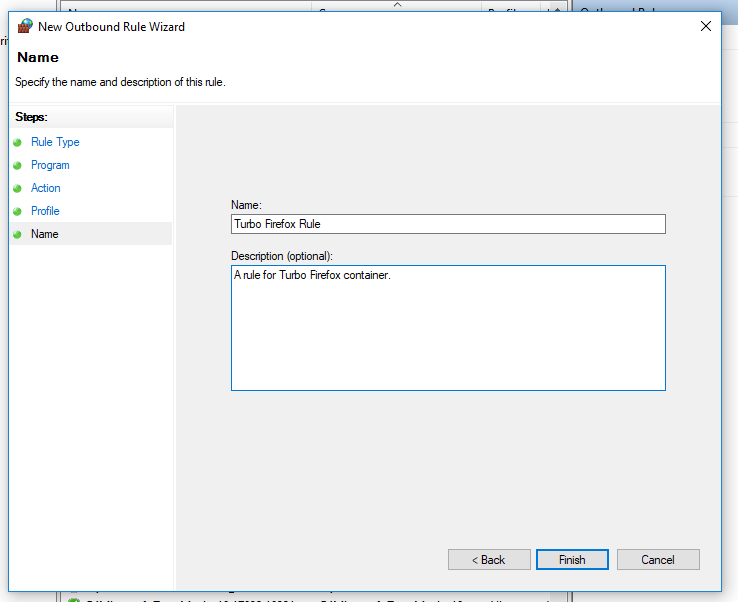
Now your new rule will be added to those that Windows adds by default.
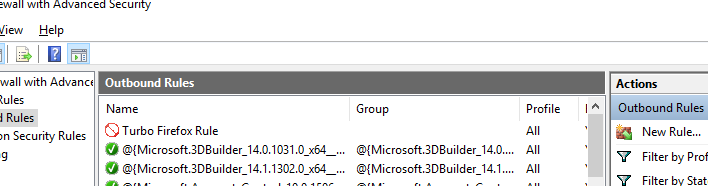
Running firefox again from the same container yields a different result this time.
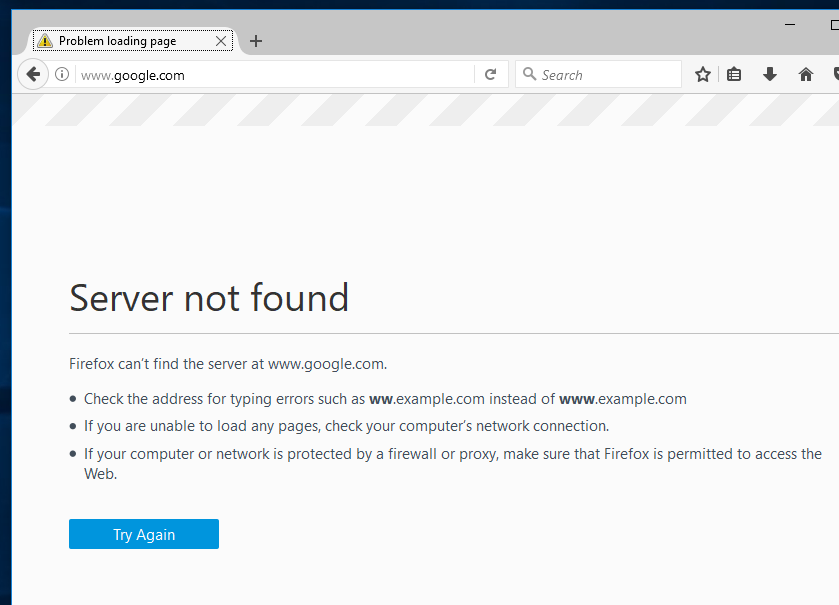
Customizing the StubExe Path
By default the stubexe path is inside the sandbox. However, this can make it difficult to configure network rules that apply across your enterprise since it will be a different path for every user. For this case, you can configure where the stubexe is cached using Turbo Studio when you build your container images.
You can set the Application stub cache location to any local path.

Now the application stubexe will always be cached in a well known location that you can set your universal rules to point to.

Adding Rules Programatically
You can use either the PowerShell New-NetFirewallRule cmdlet or call the Windows netsh command directly.
4.0 Studio
4.1 Overview
Turbo Studio is a desktop application that allows you to convert any Windows application into a self-contained virtual application container. Virtual applications can be delivered as Turbo images to be used by the Turbo Client or Turbo Server as well as standalone executables.
The GUI allows users to easily edit complex configurations for applications that may require complicated settings. Whereas Turbo's command line tool builds images from containers, Turbo Studio uses static XML files (.xappl) to build images. More information about the XAPPL file format is available in the XAPPL reference.
Once created with Turbo Studio, the command-line interface builds these XAPPL files into images that you can push to the Turbo Hub. Click here for a specific example.
Turbo Studio provides three methods for creating images and virtual applications:
-
Setup Capture: In this method, file and registry changes are recorded during the installation process of an application and these changes are applied to the configuration. This is the recommended method of image creation.
-
Snapshot an application or component: In this method, snapshots capture the system state before and after an application is installed. Based on the observed system changes, the virtual application settings are automatically configured.
-
Install application into a container: With this method, you would run the application installer in a clean container environment. When the installer completes, the contents of the container will be used to generate the application configuration.
Turbo Studio offers a user interface to manage custom images and virtual applications as well as additional creation methods not available in the command-line interface.
System Requirements
Turbo Studio runs on on Windows Vista and higher, including systems running within VMware and Microsoft hardware virtualization and hypervisor environments.
Turbo Studio supports both 32- and 64-bit applications. Both 32-bit (under 32-bit mode) and 64-bit executables can be run on x64-based platforms.
Turbo Studio has limited support for the Windows Preinstallation Environment (WinPE), though certain applications (depending on operating system features unavailable in WinPE) may not function properly.
Note: Turbo Studio does not support virtualization of 16-bit executables. To run 16-bit DOS applications, virtualize an appropriate emulator with the application and launch the application through the emulator.
Note: For legacy applications that install only on Windows XP or Windows Server 2003, use Turbo Studio 19 to capture the application and generate a XAPPL+Files configuration, then use the latest version of Turbo Studio to build the configuration into an application SVM or EXE package.
4.2 Working with Turbo Studio
Getting Started
Using Turbo Studio enables you to configure the filesystem and registry of a container, embed external runtimes and components, take application snapshots, and create Turbo Virtual Machine (SVM) or executable files. The primary interface consists of a ribbon bar along the top and several panes accessed by buttons on the left.

Menu Bar
- The File menu enables container configurations to be created, opened, and saved. Turbo Studio configuration settings like the license certificate, proxy settings, troubleshooting options, etc can also be found here.
- The Home ribbon bar provides access to common Turbo Studio features. Details below.
- The Advanced ribbon bar provides access to advanced Turbo Studio features. Details below.
Options
- License settings button is to set the turbo.net account or license certificate used for licensing purposes.
- Proxy settings button is to configure network proxy settings.
- Play sound on build completion sets whether an audible chime is played to notify the user that the build is complete. This can be useful for long builds that are running in the background. The default is enabled.
- Enable capture diagnostic logging sets whether exhaustive diagnostic logs are collected during a system capture or snapshot. These can be useful in troubleshooting why a capture or snapshot failed to collect some information. The default is disabled.
- Copy added files to the configuration folder sets whether files that are added to a configuration are sourced from their current location or copied into the configuration's "Files" folder. Sourcing from their location can be useful if adding files from a network share or from system folders where the files may change between builds. However, if the configuration is built from a different location or by a different user, Studio may not have access to the files. To make a configuration portable, enable this setting so that all files necessary to build are in the same location. The default is disabled.
- Show virtual filesystem drives sets whether virtual drives (from 'A:' to 'Z:') are shown. This allows configuration of files on non-system drives.
- Internet Explorer snapshot compatibility mode sets whether special configuration settings should be used when taking a snapshot of Microsoft Internet Explorer. The default is disabled.
- Use hardware acceleration to optimize rendering sets whether Turbo Studio is rendered using hardware acceleration. This will increase the rendering performance but in some cases this may result in rendering defects. The default is enabled.
- Use dark color scheme sets wether Turbo Studio uses a dark or light color scheme. The default is dark color scheme.
Home Ribbon Bar
Capture
- Start Capture button is to start a real-time capture of your application installation. This is the recommended method of creating container configurations. The feature is only available on Windows 10+ and Windows Server 2016+ and does not support applications that are required to reboot the machine during the installation process.
Snapshot
- Capture Before button is to capture the machine state before you install your application for a snapshot.
- Capture and Diff button is to capture the machine state after you install your application for a snapshot.
For more information on the snapshot process, see Snapshot documentation.
Build
- Build button is to build your container image output.
- Build and Run button is to build your container image output and then execute it for testing purposes.
- Run and Merge button builds your container image and then executes it within the Turbo Client Runtime environment. Any changes made while inside the container environment will be added back to the configuration after the application is shutdown. This can be used to quickly set defaults in your container image.
Startup
- Startup File button shows the Startup File dialog where paths to applications can be set to be executed when the container starts.
Output
-
Output File field is the name of the file that is created when your container image configuration is built. The Browse... button allows this field to be set.
-
Project Type dropdown allows you to set the type of output to generate. The following values are possible:
- Layer (SVM) is a bare Turbo container image file that can be pushed to Turbo.net Hub, used in Turbo Server, imported into the Turbo.net Client Runtime environment, or used as a dependency in another project.
- Standalone/ISV Application (EXE) is a standalone executable file with no dependence on the Turbo.net Client Runtime or Turbo.net Hub. This output type requires an Enterprise or ISV license for Turbo Studio.
- Portable Application (EXE) is a packaged executable file which contains the Turbo.net Client Runtime components and integrates with the Turbo.net Hub or an on-premise Turbo Server.
At runtime, you may see different behavior between Standalone and Portable applications. This is because they use a different set of default runtime settings which can change how the application behaves.
- The default isolation settings will be different. This will change how the application can interact with the software on the native machine. Standalone executables will have the isolation settings exactly as you see it in the xappl and in Turbo Studio. Since Portal applications are built to run on the Turbo.net Client Runtime, its isolation settings will be a combination of the image configuration and the isolation mode which can be dynamically assigned at runtime. The default mode is full isolation which will override merge or writecopy isolation settings in the image configuration. You can change the isolation mode for a Portable application with the --isolate parameter. Setting the isolation mode to merge will defer isolation settings to those assigned in the image configuration. There is no way to change the base isolation mode in Standalone applications.
- The default VM settings flags are also different between the two application types. Standalone executables will only have those that are defined in the image configuration. Portable application will additionally contain these settings: ExeOptimization, SpawnComServers, IsolateWindowClasses, SuppressPopups, ForceWriteCopyIsolation, MergePathEnvVars, MergeVmSettings, DumpStdStreams, InheritFolderMaps, and ForceEnvironmentVariablesWriteCopyIsolation. See xappl reference for more information on these flags.
Publish
- Publish to Turbo Server button allows an output container image to be pushed directly to the Turbo.net Hub or a Turbo Server instance.
- Publish to Local Repository button allows an output container image to be pushed to the local Turbo.net Client Runtime repository.
Advanced Ribbon Bar
Tools
- Platform Merge button allows a configuration to be quickly created which merges different configurations that were built for specific platforms (ex: Windows 7, Window 10, etc). The merged configuration is optimized by putting files and registry keys which are shared across platforms into a shared layer.
- Architecture Merge button allows a configuration to be quickly created which merged different configurations that were built for different platform architectures (ex: x86, x64).
- Debugger button opens the Turbo Studio Debugger tool.
- Factor Configuration button splits a standalone executable configuration into two configurations, a launcher configuration and a data configuration. The launcher configuration only contains metadata and settings while the data configuration contains all the file and registry references. This is useful for large applications which generate large executable files (.exe) in order to mitigate performance consequence of Windows scanning the .exe on launch.
Import
- Import Configuration button allows an application package to be imported from a file (.ini, .msi, .axt, .appv), the turbo.net hub, or the local image repository. For more information, see Import Configuration.
- Import Registry File button allows a registry file (.reg) to be imported into the current layer of the configuration. The registry file can be generated by exporting a key from the Windows Registry Editor (regedit).
Side Navigation
- The layers dropdown list shows all the layers that are defined in the configuration. Edit... to create, remove, modify the order in which they are applied, and define conditions on layers.
- The Filesystem pane displays the application virtual filesystem and enables addition and removal of virtual files and directories.
- The Registry pane displays the application virtual registry and enables addition and removal of virtual registry keys and data values.
- The Settings pane enables configuration of container metadata, startup image, startup/shutdown shims, and process configuration options.
- The Layers pane enables configuration of external container components. This is for use with the Standalone Executable project type. Layers which are to be used with the Turbo Client or Turbo Server should define dependencies using those platforms.
- The Desktop pane enables configuration of the MSI setup package, shortcuts, and other shell integration options.
- The Licensing pane enables configuration of application expiration options.
- The Security panel enables configuration of application security options.
- The Network pane enables you to configure container proxy and DNS settings.
Note: Turbo Studio users are responsible for any third-party licensing compliance for redistributable components included using virtualization.
Filesystem
Turbo Studio enables you to embed a virtual filesystem into your executable. Embedded files are accessible by your Turbo-processed application as if they were present in the actual filesystem. Virtual files are isolated from the host device. Virtual files do not require security privileges on the host device regardless of whether the virtual files reside in a privileged directory. Because virtual files are embedded in the application executable, shared DLLs do not interfere with those installed by other applications on the host device.
In the event of a conflict between a file in the virtual filesystem and a file present on the host device, the file in the virtual filesystem takes precedence.
Note: When running a container on Windows 7, the All Users Directory\Application Data and All Users Directory root folders will map to the same folder at runtime. To prevent one setting from overriding another, verify that the isolation settings for these folders are the same.
Isolation Modes
Folders may be containerized in Full, Merge, Write Copy, or Hide mode.
- Full: Full mode is used when the directory is required to be completely isolated from the host device. Only files in the virtual filesystem are visible to the application even if a corresponding directory exists on the host device. Any writes to files are redirected to the sandbox data area.
- Merge: Merge mode is used when the directory is required to have some level of interaction with the host device. Files will be visible from both the virtual filesystem and the host device. Any writes to files which are new or already exist on the host device will pass through and be written to the host device. Any writes to files that are in the virtual filesystem will be written to the sandbox data area.
- Write Copy: Write Copy mode is used when the directory is required to have visibility to files on the host device but cannot change them. Files will be visible from both the virtual filesystem and the host device. Any writes to files are redirected to the sandbox data area.
- Hide: Hide mode is used when a directory on the host device could interfere with the application's ability to run properly. The application will receive a File Not Found error code whenever an attempt is made to read from or write to files in the directory even if the files exist on the host device.
Tip: To apply selected isolation modes to all subfolders, right-click on the folder, choose Isolation, select the checkbox for Apply to Subfolders, then select OK.
File Attributes
- Hidden: Files and folders can be hidden from shell browse dialogs and other applications. This is used to prevent internal components and data files from being displayed to the user. To hide a file or folder, select the checkbox in the Hidden column adjacent to the desired file or folder. Note: The Hidden Flag is NOT the same as the Hide isolation mode. Enabling the Hidden Flag prevents a file or folder from displaying in browse dialogs or from directory enumeration APIs; it does not prevent the application (and potentially the end-user) from accessing the folder or file contents by direct binding. To prevent the file or folder from being found by the application, enable Hide isolation mode.
- No Sync: This feature only applies to containers that are delivered and managed by Turbo Virtual Desktop Server. By default, files in the virtual filesystem can be synchronized to a user's Turbo account. This enables the application state to be maintained across different devices that are Turbo enabled. If there are folders in the virtual filesystem that should not be synchronized and remain only on the local device, select the checkbox in the No Sync column next to the desired file or folder. This setting is managed on a folder level and applies to all files within that folder.
- Read Only: Flagging files and folders as read-only prevents the application from modifying the file or folder contents. To make a file or folder read-only, select the checkbox in the Read Only column next to the desired file or folder.
- No Upgrade: By default, files in the virtual filesystem can be upgraded with patches (refer to "Updating Registration Settings" in the Register containers in the Windows Shell section for more information). If there are files in the virtual filesystem that should not be upgraded, such as user data files, select the checkbox in the No Upgrade column next to the desired file or folder.
Registry
Turbo Studio enables you to embed a virtual registry into your executable. Embedded registry keys are accessible by your Turbo-processed application as if they were present in the actual registry. Virtual registry keys are isolated from the host device. Virtual registry keys do not require security privileges on the host device regardless of whether the virtual files reside in a privileged directory. Because virtual registry entries are embedded in the application executable, other applications are unable to disrupt application execution by inadvertent modification of registry entries.
The Classes root, Current User root, Local Machine root, and Users root folders correspond to the HKEY_CLASSES_ROOT, HKEY_CURRENT_USER, HKEY_LOCAL_MACHINE, and HKEY_USERS keys on the host machine.
Registry string values can include well-known variables such as @WINDIR@, @SYSWOW64@, @PROGRAMFILESX86@ and @PROGRAMFILES@.
In the event of a conflict between a key or value in the virtual registry and data present on the host device registry, information in the virtual registry takes precedence.
Isolation Modes
Keys may be containerized in Full, Merge, Write Copy, or Hide mode.
-
Full: Full mode is used when the key is required to be completely isolated from the host device. Only values in the virtual registry are visible to the application even if a corresponding key exists on the host device. Any writes to values are redirected to the sandbox data area.
-
Merge: Merge mode is used when the key is required to have some level of interaction with the host device. Values will be visible from both the virtual registry and the host device. Any writes to values which are new or already exist on the host device will pass through and be written to the host device. Any writes to values that are in the virtual registry will be written to the sandbox data area.
-
Write Copy: Write Copy mode is used when the key is required to have visibility to values on the host device but cannot change them. Values will be visible from both the virtual registry and the host device. Any writes to values are redirected to the sandbox data area.
-
Hide: Hide mode is used when a key on the host device could interfere with the application's ability to run properly. The application will receive a Key Not Found error code whenever an attempt is made to read from or write to values in the key even if the values exist on the host device.
Tip: To apply selected isolation modes to all subkeys, right-click on the key, choose Isolation, select the checkbox for Apply to Subkeys, then OK.
Key Attributes
- No Sync: This feature only applies to containers that are delivered and managed by Turbo Virtual Desktop Server. By default, keys and values in the virtual registry can be synchronized to a user's Turbo account. This enables the application state to be maintained across different devices that are Turbo enabled. If there are keys in the virtual registry that should not be synchronized and remain only on the local device, select the checkbox in the No Sync column next to the desired key. This setting is managed on a key level and applies to all values within that folder.
Setup Capture
The Setup Capture allows an application install to be recorded in order to create the container configuration. This is the recommended method of creating container configurations. The feature is only available on Windows 10+ and Windows Server 2016+ and does not support applications that are required to reboot the machine during the installation process. Use Snapshot if these requirements cannot be met for your application.
Note that Setup Capture does not capture changes to drives other than the system drive.
Below is a walkthrough of the steps required to setup capture ShareX.
Using Setup Capture to Capture the Application Install
Launch Turbo Studio and open a blank configuration by clicking File > New.
Click Start Capture and select an empty folder to store the application files and configuration file.

Perform the ShareX installation as normal.
ShareX requires .NET 4.7. Add a .NET 4.7 layer to this application using one of the following methods:
- Install .NET 4.7 during the Setup Capture
- Add a .NET 4.7 layer to the application as a Component in Turbo Server
Once the installation is complete click Stop on the recording dialog in Turbo Studio.
The Setup Capture process records all running process on the system. Therefore it will likely record processes that are not necessary for this application image. Right-clicking on a process name and selecting Copy Captured Paths will copy all the paths that will be captured on the clipboard. This can be used to confirm that a process is necessary. For ShareX, select only the ShareX.exe and ShareX-13.2.1-setup.exe processes on the progress selection dialog and click OK.
After the recording and process selection steps are complete Turbo Studio will gather the necessary files and registry settings into the selected folder.
Click Browse next to the Output File field and select a folder and filename to save the build output. The Output File is generally saved in the same folder as the application files and registry settings that was selected above. Click File > Save to save the application configuration.

Click Build and Run to build the application at the Output File location selected above and do a test launch of the application.
See Deploying for information about deploying containers on the Turbo platform.
Snapshots
Many applications require combinations of filesystem and registry entries. To facilitate containerization of these applications, Turbo Studio can snapshot application installations and automatically configure them based on modifications made to the host system during setup.
If possible, the Setup Capture method of container creation should be used instead of snapshotting.
Note that Snapshot does not capture changes to drives other than the system drive.
Process
Snapshots use before and after images of the host machine to determine configuration:
-
Before: This snapshot is taken prior to installing the application and captures the state of the host device without the target application installed.
-
After: This snapshot is taken after installing the application and captures all changes to the host device during application installation. Turbo Studio then computes the changes between the before and after snapshots, and inserts these changes into the configuration.
Complete the following steps to use the Snapshot feature:
-
Prepare the host device: Install Turbo Studio onto a clean machine. IMPORTANT: Taking a snapshot on a base OS image with application components already installed will result in an unreliable snapshot capture.
-
Capture the before image: Select Capture Before on the Virtual Application tab on the ribbon bar. This may take several minutes to complete.
-
(Optional) Save the Before Snapshot: Saving the before snapshot enables you to skip this step in subsequent applications from the same clean machine. Select the down arrow underneath Capture Before and choose Save Snapshot. Turbo Studio automatically saves the most recently captured before snapshot. This snapshot is reset once the Capture and Diff is complete.
-
Install your application: Install the appication as you would normally. If the application setup requests a reboot, save the Before Snapshot, then proceed with the reboot.
-
Capture the after image: On the Virtual Application tab on the ribbon bar, select Capture and Diff. This captures the After Snapshot, computes the deltas between the two snapshots, and populates the image with the delta entries.
-
Review the filesystem and registry entries: Remove any files or settings not required for proper execution. Removing unused entries will reduce image size. Be careful to avoid removal of required resources, as it will cause your image to fail to function properly.
Capture Application Updates via Snapshot
Container updates can be captured within Turbo Studio via snapshots.
Complete the following steps to capture an update via snapshots:
-
Install the native version of the application on a clean machine.
-
Select Capture Before.
-
Install necessary updates to the native application.
-
Select Capture and Diff to create the after snapshot. This captures the deltas between the original and updated versions.
-
Set the Project Type to Component, then select Build to create the SVM.
This process only captures changes between the original executable and installed updates. You can then apply the resulting SVM to the original virtual package.
Best Practices
-
Performing the snapshot on a clean machine ensures that all dependencies are installed by the application setup. Installing on a machine with existing components can inadvertently include dependencies in the before snapshot and exclude them from the final output.
-
If you configure a clean machine using whole-machine virtualization tools such as Microsoft Virtual PC and save a before snapshot based on this image you can snapshot many distinct containers in rapid succession by reverting the whole-machine virtual state and using the same before snapshot.
-
Most applications should be configured by performing the snapshot on the earliest (least common denominator) target operating system. A small number of applications may require multi-platform merge for successful deployment across all operating system variants.
-
When selecting a folder to save the Capture and Diff snapshot, select Make New Folder in Turbo Studio. This folder will not be included in the snapshot. If the folder is included in the Capture and Diff snapshot, remove it using the Filesystem tab.
-
Before beginning the pruning process, save a backup of the Capture and Diff snapshot (snapshot.xappl). Revert to the original Capture and Diff snapshot in the event of an error.
-
Run and use the native application to understand what registry keys and folders are updated at runtime. This will help determine the proper isolation settings for folders and registry keys.
-
To determine if a folder should be set to full isolation or merge isolation, decide if the user would want access to files created within that folder outside the container environment. If yes, the folder should be set to merge, if no, full.
-
Remove uninstall shortcuts during the pruning process.
Configuration
The following discusses the many configuration features available in Turbo Studio. These features allow you to edit and customize the settings for an image or virtual application configuration.
Process Settings

- Command line arguments will be passed to the startup file when the container is executed by default. You can override and specify a fixed set of command line arguments to pass to the startup executable for Standalone Executable project types. Command line arguments can also be assigned directly to the startup files in the Startup Files dialog.
- Working directory allows you to specify what the default working directory of startup files will be. Options include the directory that the startup file is in (default), the directory that the container was executed from (useful for tooling that might take relative paths to files as parameters), or a specific location.
- Target architecture controls how wow64 redirection functions inside the virtual environment. If the configuration file was generated from a snapshot of an x86 machine then this should be set to x86. Otherwise this should be left as x64.
- Minimum required OS specifies the minimum required version of the Windows Operating System where the container will be allowed to run. If the requirements are not met then an error dialog is shown on container start.
- Application type specified which Windows subsystem is used for executable project types. This can either be GUI, Console, or Inherit. Inherit will determine the value for this field from the startup file executable.
- Spawn child processes within virtualized environment sets the default behavior for how native executables (those that are not inside the container configuratino) are handled in the container. They can either be spawned inside the container and therefore be subject to the configuration of the container environment, or they can be spawned outside the container and therefore not have access to files or registry inside the container.
- Spawn COM servers within virtualized environment specifies whether COM servers in the container are isolated from the native environment.
- Child process exception list is a list of executable files that will be excluded from the default spawn behavior. This is useful if certain system processes need to be spawned outside the container while everything else is kept inside (ie. print spooler, etc).
- Compress payload makes it so that the files stored in the container at build time will be compressed. This can greatly reduce the size of the container image or executable file. Enabling this setting will decrease performance as files must be decompressed at runtime and those over 1MB will be copied into the sandbox, even for read operations.
- Use Windows DLL loader allows the container runtime environment to use the Windows loader for executable file types (.dll and .exe). This has the advantage of increased compatibility but increases the filesystem usage requirements as all executable files must be faulted into the sandbox before they can be loaded rather than loading directly from the container image.
- Trace process starts in debug output will display a message in the debug output stream whenever a process is started. The debug output stream can be viewed with dbgview.
- Enable Turbo command line arguments makes it so that the container runtime parameters can be used (ie /XEnable, /XShellEx, etc). See building standalone executables for more information.
- Enable startup executable optimization makes it so that if there is a single startup file, then it will be run directly rather than being spawned from the virtual machine boostrap executable. This will reduce the number of processes that are required to start the container.
- Shutdown process tree on root process exit makes is so that all child processes of the startup file will automatically be killed when the startup file exists.
- Enable Chromium suport allows support for the Chromium sandbox used by Google Chrome, Microsoft Edge, and other applications and components.
Sandbox Settings

- Sandbox location field specifies where the container's runtime sandbox will be stored during execution. This only applies to Standalone Executables and containers which are started using the Turbo Client Runtime will override this with its own behavior. This path can use the folder root tokens (ie @DESKTOP@, @APPDATA@, etc) as well as the following metadata variables: @TITLE@, @PUBLISHER@, @VERSION@, @WEBSITE@, and @BUILDTIME@. The container build time is in a format similar to 2008.02.01T08.00. With the exception of the @BUILDTIME@ variable (which is set automatically), these variables are based on the values specified in the Properties tab of Settings panel.
- Stubexe cache location field specifies where the container stubexe files are stored. By default this is blank and they are stored in the sandbox. Stubexe files are generated .exe files that map to executables which are launched inside the container. In some environment, stubexe files require exclusions for security or anti-virus software so it can be convenient to store them in the same place to reduce the exposure and complexity of exception rules.
- Cache location allows you to specify a location to store temporary container files. By default thse are stored in the user's temp directory.
- Environment variables allows to define custom environment variables that will be seen by applications inside the container. Options exist to control how variables are merged or overridden inside the container.
- Virtual services allow Windows services to be defined inside the container. Windows services are specialized applications that run in the background. They are typically responsible for providing system services such as database services, network traffic handling, web request processing, and other server functionality. Many applications install and require specific services in order to function properly.
- Delete sandbox on application shutdown makes it so that the sandbox folder is removed once the container stops. Enabling this setting will increase startup time as there are many files that are cached in the sandbox between runs.
- Enable window class isolation enables isolation for window classes. Window classes are a fundamental set of attributes that are assigned to an application window in the Windows operating system. These are often used to detect the presence of applications that are already running.
- Enable clipboard isolation enables isolation of the clipboard, preventing copy/paste operations from crossing container boundaries.
- Enable process name isolation augments process names with the sandbox hash. This can be used for some applications which look for process names to enforce side-by-side constraints.
- Enable non-system drive isolation hides local drives other than the system drive where the operating system is installed.
- Enable network share isolation hides network shares on the system.
- Enable DDE message isolation prevents Dynamic Data Exchange (DDE) messages from crossing container boundaries.
- Force read-share files makes it so that all files in the container are opened in a way that doesn't block other processes from opening for read.
Metadata Settings

- Standard Metadata fields include information such as product title, publisher, description, icon, web site URL, and version. By default these values are inherited by the startup file and will be displayed here. To override any of the values, uncheck the Inherit checkbox. Leave the value as @INHERIT@ for any values that should continue to be inherited.
- Custom Metadata can be used by specialized external executable viewer applications, inventory scanners, and other asset and licensing management systems. For information on custom executable metadata, consult the Microsoft Windows Software Development Kit.
Startup Settings

- Splash Image can assign an image that is displayed while the container is loading. Startup images improve application branding and are useful when the application requires several seconds to initialize.
- Transparency key enables the splash image to contain transparent regions which can improve the visual effectiveness of your splash.
- Display splash until assigns how the splash will be shown, either for a specific amount of time or until the first application window appears. The splash image can always be dismissed by clicking it with the mouse.
- Shims and Scripts settings allow you to run custom code to configure or clean up environments before and after a container is executed. See Startup/Shutdown Scripts and Shims for more information.
- Startup script assigns a path to a script that is executed when the container starts.
- Shutdown script assigns a path to a script that is executed when the container stops.
- Terminate container with non-zero exit code sets whether the exit code from the startup script is honored. If enabled, any non-zero exit code from the startup script will abort the container start (ex:
exit /b 1). If disabled, the exit code from the script will be ignored. The default is disabled. - Run scripts as admin user sets whether the scripts are to be executed in an administrator context. If enabled, the container startup will show a UAC prompt if the user is not already an administrator. The default is disabled.
- Startup shim DLL assigns a path to a shim DLL that is executed when the container starts.
- OnInitialize parameter is a string value which is passed to the startup shim.
- Shutdown shim DLL assigns a path to a shim DLL that is executed when the container stops.
- OnShutdown parameter is a string value which is passed to the shutdown shim.
Layers Settings

The Layers panel allows external image layers (SVMs) to be merged into the configuration at build time. While this can be used for any of the project types, it is primarily used for standalone executable projects.
If the image output from the configuration is being used with the Turbo Client or Turbo Server then dependencies should be managed through those platforms directly and not by using external layer settings here.
External layers which are imported for use as build-time dependencies are copied to a local dependency cache. If the configuration is to be built on another machine or by a different user on the same machine, then the external layers must be imported again before the build will succeed.
External layers in the local dependency cache are loosely matched by name and version. If the external layer changes in any way (ex: isolation setting, new files, etc) but the name or version are not updated, then the new version will not be used unless it has been re-imported in all build environments.
For standalone executable project types, runtime patch layer dependencies can be set by clicking the Patches... button.
Desktop Integration Settings

The Desktop panel allows shortcuts and file associations to be defined which are used when the container is installed to the machine via Turbo Client install, installi, or subscribe commands, from the Turbo Server portal, or with MSI deployments.
See Desktop Integration for more information on shortcut and file association configuration.
Licensing Settings

- Disallow execution after number of days sets a hard limit on how many days the container can be executed. Useful for applications for trials or proof-of-concept.
- Disallow execution after date sets the date at which point the container no longer executes.
- Expiration message is the error message which is displayed when the container expires.
- Display warning with number of days left sets the number of days prior to expiration that a warning message is shown when the container starts.
- Warning message sets the message that is displayed when the warning is shown.
- System clock uses the machine time to determine expiration. If the machine time is modified then the expiration time can be affected.
- Web server clock uses the URL specified in the Web server URL field to determine the time used for expiration settings. This removes the possibility of the end-user changing their system time settings to extend the expiration but requires a network connection to the specified web server.
- Disallow execution if unreachable will prevent the container from executing if the web server clock URL cannot be reached.
- Warning message sets the message that is displayed when the unreachable warning is shown.
Security Settings

- Required domain specifies the name of an Active Directory domain where the container must be executed. If the container is attempted to be executed off the domain then an error message will be displayed.
- Required group membership is a list of Active Directory groups to which the user executing the container must belong. Group names are semi-colon delimited.
- Emulate elevated security privileges makes it so that the processes in the container think they are running as admin when they are not. Since processes are running in a sandbox, writes to secure locations won't require administrative access.
- Trim elevation from manifests removes application manifest entries which result in UAC prompts. Useful if the elevation is no longer necessary because write operations to system locations are only in the container sandbox.
- Always launch child processes as current user makes it so that any processes spawn inside the container will inherit the current user's account privileges rather than any custom privileges that the parent process might assign.
- Virtual environment is read-only makes it so that all write attempts to files inside the container will return access denied errors.
- Enable DRM compatibility allows some DRM software (ie Armadillo variants) to function inside the container.
- Enable DEP compatibility hides Data Execution Prevention (DEP) settings on modern operating systems which can allow older applications to run in a container. Be aware of your company security policies before enabling this setting.
- Enable FIPS compatibility hides the container from any FIPS rules enforced on the machine. Useful for legacy applications which cannot be made FIPS compliant. The application security must be ensured by other means.
- Enable AppLocker DLL rules compatibility disables AppLocker DLL rules for the container applications. The application security must be ensured by other means.
Proxy Settings

- Proxy TCP connections enables proxy settings for all TCP network traffic.
- Proxy UDP connections enables proxy settings for all UDP network traffic.
- Proxy server sets the proxy server to use for the specific protocols.
- Protocol specifies the proxy protocol to use. Valid options are SOCKS5, SOCKS4, HTTPS, and HTTP.
- Authentication specifies how the container authenticates with the proxy server. This can either be anonymous or plain-text username/password.
DNS Settings

- Hostname or IP Address specifies the source name/address to map to another location.
- Redirect specified the target IP address where the source address is mapped to. Redirecting to IP 0.0.0.0 will make the source name/address unreachable.
IP Restriction Settings

- Route is the hostname, IP address (v4 or v6 format, CIDR notation for subnet mask), or pattern to which the rule applies.
- Type sets whether the matching routes will be allowed or denied. All routes are allowed by default. To change this default add a route for "*" set to Deny.
Desktop Integration
A container image can be configured for integration into your desktop environment using custom shortcuts or file associations. Container images can be deployed to a desktop with the Turbo Client using install, installi, or subscribe commands or through the Turbo Server portal. Standalone executables can be deployed using a Microsoft Installer (MSI) file.
If the configuration was created using Setup Capture or Snapshot then shortcuts and file associations will automatically be defined from the values that were discovered.
MSI Configuration

The MSI panel allows configuration of Microsoft Installer output files. This is only visible for standalone executable project types. The MSI will only install the standalone executable and execute it via the shortcuts and file associations that were defined.
- Output location specifies the location where the MSI file will be saved when built.
- Automatically generate MSI after successful application build will cause Turbo Studio to automatically build a new MSI whenever a new EXE is built.
- Product Info properties will be applied to the installation record in Programs and Features or Add/Remove Programs list.
- Install application for All Users controls whether the application is installed to a user's Application Data directory or Program Files. If enabled, the MSI will require administrative privileges to install.
- Application folder allows customization of the location where application files will be installed.
- Automatically upgrade earlier application versions will update the installation record, shortcuts, and file associations that were created with previous versions of the MSI. The Product Version field must be updated for this to be applied.
- Allow side-by-side versions of the same application will append to the installation record, shortcuts, and file associations that were created with previous versions of the MSI. The Product Version field must be updated for this to be applied.
- Extended Properties specifies additional property values that are displayed in the installation record.
Shortcuts

Defines that shortcuts that are created when the container is installed to a device. Shortcuts can be created on the desktop, in the programs menu, or in the SendTo folder.
- Name specifies the name of the shortcut that is created.
- Target specifies the application from the startup file list that is executed when the shortcut is clicked.
- Edit List... button brings up the startup file dialog to edit the available startup files.
- Arguments specifies that command-line parameters that are passed to the target.
- Show As specifies how the application is shown on launch. Options are Normal, Minimized, and Maximized.
- Description specifies the description of the shortcut that is displayed on hover.
- Browse button allows the selection of an icon file to be assigned.
ProgIDs

A ProgID (short for PROgrammatic IDentifier) is the mechanism in Microsoft Windows where actions (known as verbs) can be defined for specific file types.
- ProgID specifies the name of the ProgID (ex: "txtfile").
- Description specifies the friendly name of the ProgID (ex: "Text Document").
- Icon... assigns the associated icon file.
Verbs

Verbs define that actions that can be performed on a file type associated with a ProgID. These verbs will show in the context menu when right-clicking on a file.
- Verb specified the name of the verb. Common verbs include Open, Edit, and Print.
- Default indicates that this verb is the default action if the file type is opened (double-clicked or pressed enter key).
- Command is the friendly name of the verb that will be seen in the context menu for the file.
- Inherit uses the behavior defined in the virtual registry for the verb. If unchecked then can set the behavior manually.
- Target is the application from the startup file list that is executed.
- Arguments is the additional parameters to pass to the target application. The "%1" token is replaced by the path to the file being acted upon. Take care to quote this token appropriately so that paths that contain spaces will be handled correctly.
Extensions

The Extensions list defines file types and their associated ProgIDs.
- Extension specifies the file extension (ex: ".txt").
- ProgID specifies the name of the ProgID that was defined with associated verbs to act on the file type.
- MIME Type specifies the MIME type label to apply to the file extension. This field is optional.
MSI Example
Here we will show the steps required to configure a simple container to be deployed via MSI with shortcuts and file associations.
Start by creating an empty container configuration file. Add "c:\windows\syswow64\notepad.exe" from your machine to the @SYSWOW64@ directory in the Filesystem panel. Set the startup file to @SYSWOW64@\notepad.exe, set the project type to Standalone/ISV Application, and set the output file location. Save the configuration file.
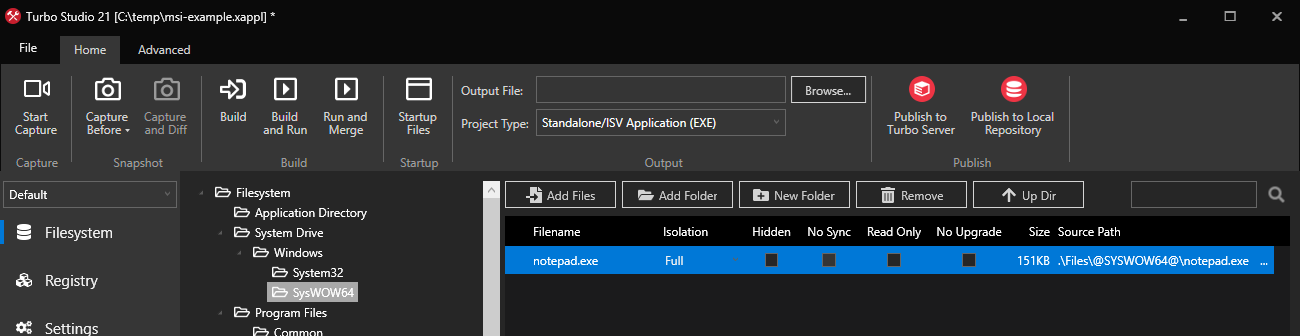
Go to the Settings panel. By default the metadata will be inherited automatically from the startup file.
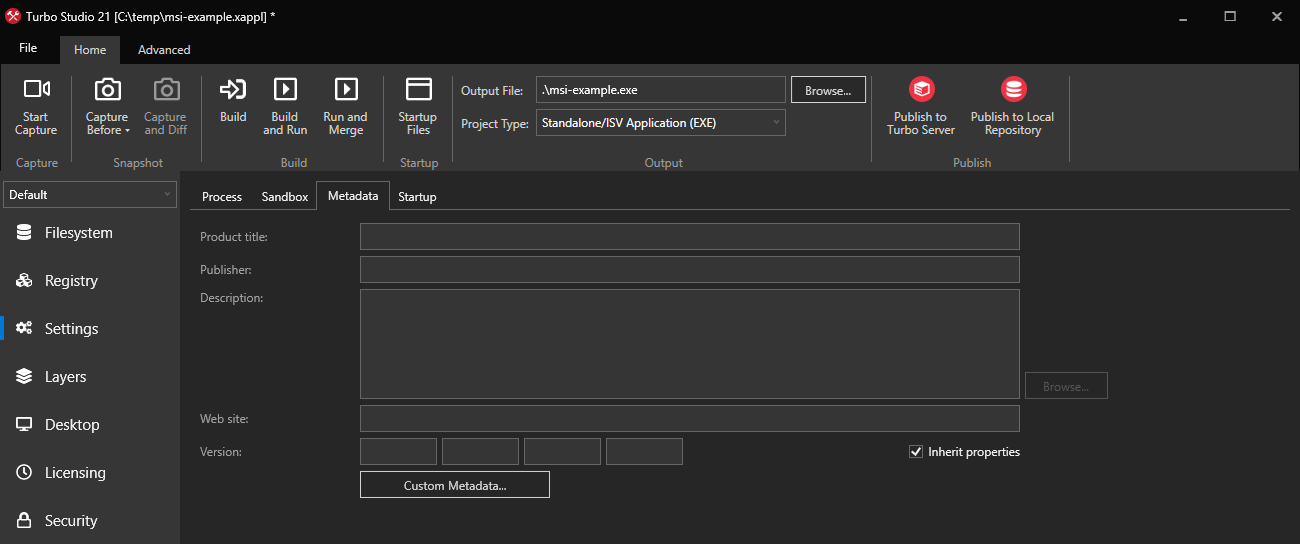
In our case, we will want to change some of these values to something more appropriate. Unselect the Inherit properties checkbox. Set the Product Title field to "Notepad Container".

Note that the custom value of the Product Title field is shown in the Open With... menu in Windows when file associations are configured. If you choose to inherit metadata then the value shown may not be what you want. To override what is displayed in the Open With... menu while still inheriting the other values, click the Custom Metadata... button and add the FileDescription field.
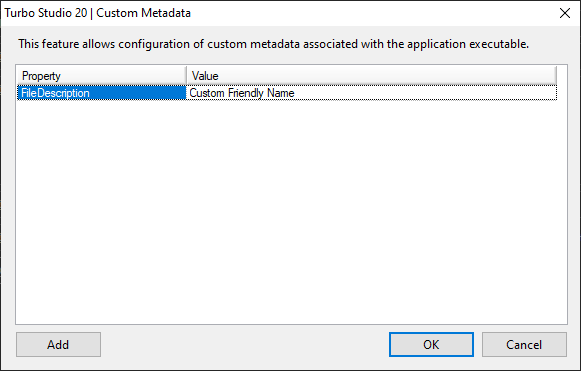
Go to the Install panel. Set the location where the MSI output will be written. Assign Product Info values. These values affect where the container files will be deployed on the machine and will show up in the uninstall entry on the machine where the MSI is installed.
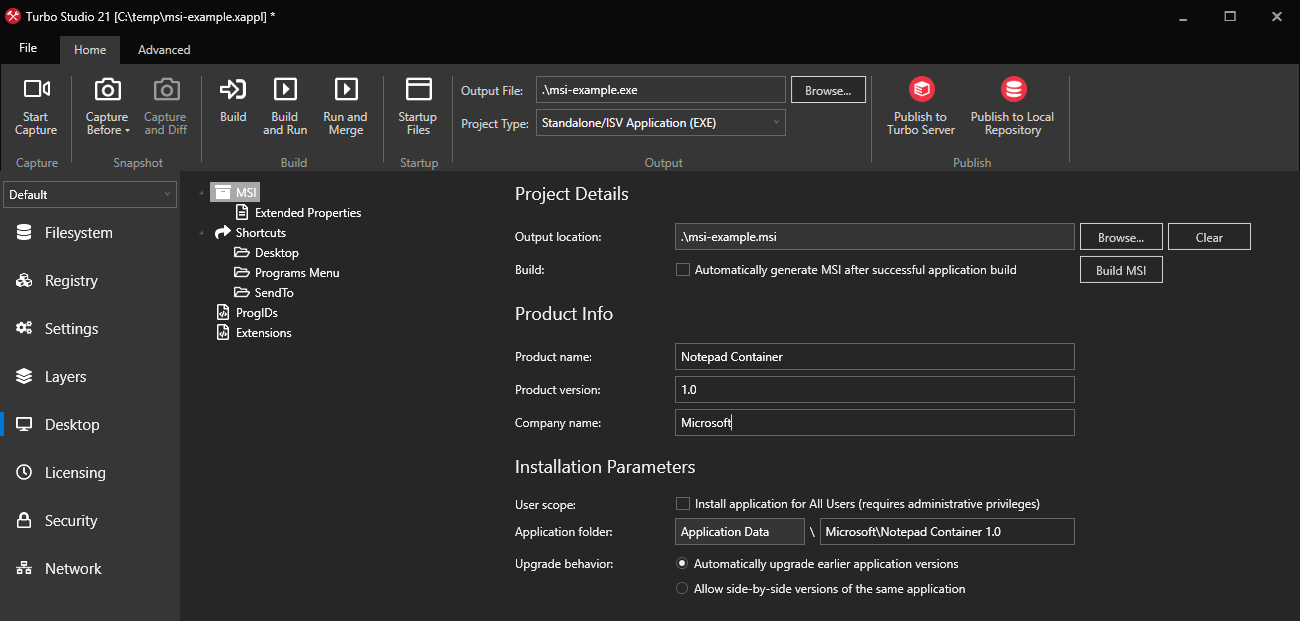
If the container is to be installed for all users on the machine, then select the Install application for All Users checkbox. Note that this will require administrative privileges to install.
You can control how different versions of the same container MSI are handled. They can either be allowed to run versions of the container side-by-side or upgrade existing versions. Note that this is controlled by the Product Version field on this panel and not by the container version metadata on the Settings panel. Also note that for this to work properly, the MSI version must be changed inside Turbo Studio and not updated in an external editor.
Now we will add a shortcut that gets created on the desktop. Click on Desktop in the Shortcuts tree. Click Add Shortcut.... Set the name of the shortcut as it will appear on the desktop, in our example we will use "Notepad Container". The Target dropdown list will show all available startup files that can be executed by the shortcut. If there is something that is not included here, click the Edit List... button to add a new startup file for it. Select the icon to use for the shortcut and press ok.
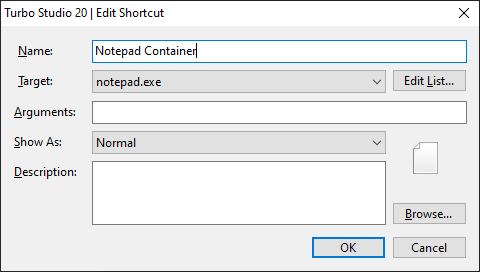
Next we will add a file assocation to allow this container to be easily used to open .txt files from the Windows shell. Click on ProgIds and then Add ProgId.... A ProgId is a programatic identifier that the Windows Shell uses to associate an application with a file type. We will add one here for textfile which is the ProgId for all text file types. You can also assign an icon which will be used by associated files.
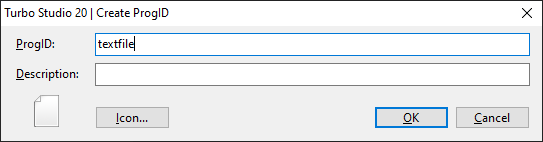
Next we will define actions that are available for the file type from the Windows context menu (when you right-click on a file). Common verbs include "open", "edit", or "print" but you can define any that you wish. Click on the newly added textfile ProgId and click the Add Verb... button. Set the verb name to "open" and check the Default box. Default verbs will be used when a user double-click the file. Set the Command field to what the user will see in the context menu.
If you created your container from a snapshot or otherwise defined the file association settings in the virtual registry, then you can select the Inherit checkbox to use that configuration. Otherwise, set the Target to a startup file and specify the arguments. In most cases you will want to pass the selected file as a parameter to the application so that it can be opened. Use %1 as a placeholder for the selected file path. Make note to properly quote this value as paths can contain spaces that may be incorrectly parsed by your application.
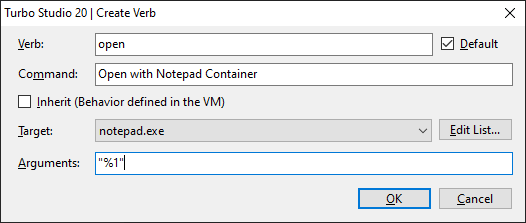
The final step is to define a file extension that will use this new ProgId. Click on Extensions and then on Add Extension.... Set the Extension to ".txt" and ProgId to "textfile". MIME Type is optional.
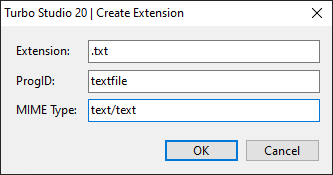
Now you're done. Save the configuration file and build the container. When the build completes, go to the Install panel and click the Build MSI button to produce the MSI package for the container. Copy the MSI to a test machine and run it.

After installation is complete, you will notice that the shortcut that we configured is now on the desktop.

You will notice, however, that the file icon is the default and not what we assigned. This is because Windows 10+ doesn't allow file associations to be changed except by direct user input to prevent malware attacks. Since there were changes to the system file associations, Windows will prompt you the next time the file type is opened to confirm which application should be used. You will notice that "Notepad Container" is now in the list.
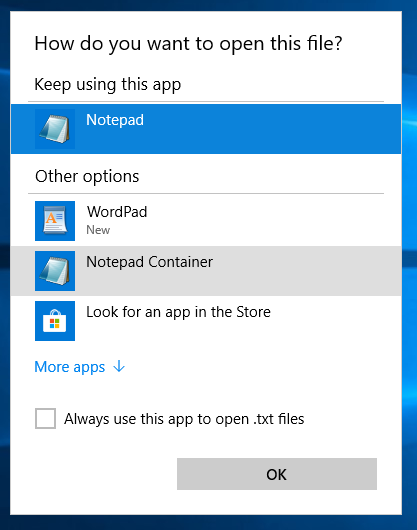
Select Notepad Container from the list and check Always use this app to open .txt files. Press OK. Now the file will be permenantly linked to your container. You will notice also that the icon is now updated to that of the ProgId icon that we selected earlier. In addition, you will now see all your defined verbs in the file's context menu.
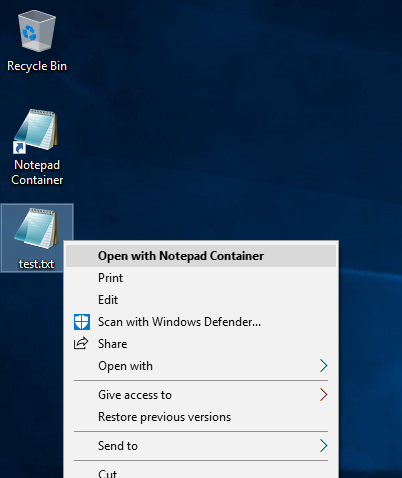
In the Windows Programs and Features panel, you will find an entry for our Notepad Container deployment. Uninstalling it from here will remove all shortcuts and file associations that were added.
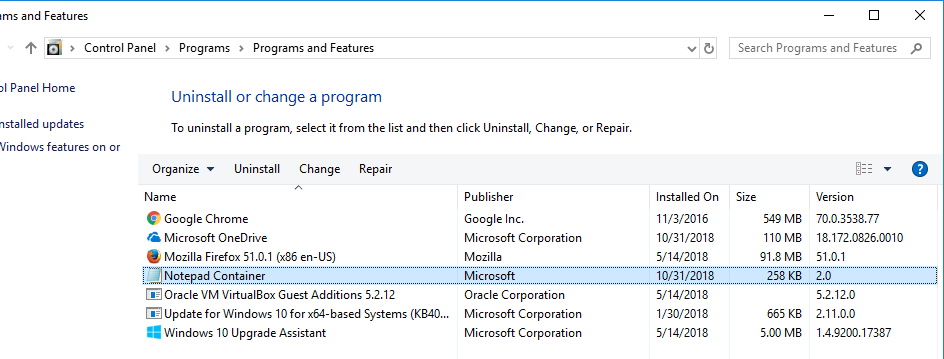
Import Configuration
The following section details the Import Configuration feature available in Turbo Studio. Import Configuration is used to import application packages in various formats into a Turbo Studio configuration that can be built and deployed to your endpoints.
Supported application package formats are: Microsoft App-V package (.appv), ThinApp configuration (.ini), Microsoft Installer (.msi), and ZENworks application package (.axt).
Import Wizard

To import an application package into Turbo Studio, please follow these steps:
- Open Turbo Studio and click on the Advanced tab in the task bar
- Click the Import Configuration button
- Select File import type and then click Next
- Browse to the Configuration file to import and then click Next
- Browse to the Destination folder to where the output will be stored and then click Next
- Wait for the import process to complete. This may take a few minutes.
- Review the import summary for any warnings and then click Finish
Once the import is complete, the configuration will be saved to your destination folder and opened in the Turbo Studio editor.
App-V Import
Support for App-V packages is currently in beta and is available in Turbo Studio 22.9+.
To import an App-V package, follow the import wizard to the Select source configuration file step and select an .appv file. Once the import completes, the import summary will display a list of Turbo configuration files that were created as part of the import process. These Turbo configration files include:
- MyApp.xappl: The base configuration file that contains all virtual files, virtual registry objects, application entry points, and metadata from the App-V package.
- MyApp_Config.xappl: The extensions configuration file that contains all extension points from App-V package. This include shortcuts, shell extensions, file assocations, and other extension points contained in the App-V package manifest.
Next it is recommended to open each .xappl file in Turbo Studio and click Build to create the Turbo images. You may also Build and Run the base configuration to confirm that the application launches correctly.
The following sections describe how to import dynamic configurations and how to deploy the newly built Turbo images to users.
Dynamic Configurations
Support for App-V dynamic configurations is currently in beta and is available in Turbo Studio 22.11+.
Dynamic configurations allows package publishers to customize how their packages run for users or machines without rebuilding the entire package. Turbo supports this same functionality through layering.
When importing an App-V package, the importer will look for any .xml files in the same directory that are valid dynamic configurations by checking their root element tag name and xmlns. Any valid dynamic configurations will be imported and the following Turbo configuration files will be output:
- MyApp_UserConfig.xappl: A user configuration file corresponding to each user configuration file located in the App-V package folder.
- MyApp_DeploymentConfig_User.xappl: A deployment user configuration file corresponding to each deployment configuration file located in the App-V package folder. This includes all user configurations from the deployment configuration.
- MyApp_DeploymentConfig_Machine.xappl A deployment machine configuration file corresponding to each deployment configuration file located in the App-V package folder. This includes all machine configurations from the deployment configuration.
It is recommended to open each .xappl file in Turbo Studio and click Build to create the Turbo images.
Deploying imported App-V images
Turbo images created from the App-V import process can be deployed by running the installi command. Different user and machine configurations can be achieved through the use of layering.
For example to deploy an imported App-V package with default extensions to the current user, the extensions image can be layered on top of the base image:
turbo installi MyApp,MyApp_Config
Once installed, the current user will see shortcuts, file assocations, shell extensions, and other extension points defined in the extensions image. Opening a shortcut, clicking a file with an matching file assocation, or clicking a shell extension will launch the application in the Turbo virtual environment.
We recommend using the following layer combinations to simulate App-V deployments:
-
__MyApp,MyApp_Config__: Layers the base image with the default extensions. Equivalent to publishing the App-V package without dynamic configs -
__MyApp,MyApp_UserConfig__: Layers the base image with user extensions. Equivalent to publishing the App-V package a dynamic user configuration. -
__MyApp,MyApp_DeploymentConfig_Machine,app_DeploymentConfig_User__: Layers the base image with machine extensions. Equivalent to publishing the App-V package a dynamic deployment configuration. -
__MyApp,MyApp_DeploymentConfig_Machine,app_UserConfig__: Layers the base image with user and machine extensions. Equivalent to publishing the App-V package a dynamic user configuration and a dynamic deployment configuration.
For more information on deploying applications with Turbo, see Deploying to a Desktop.
App-V Import Known Issues
App-V packages may define multiple application entry points rather than a single startup file. If the App-V package defines a single application entry point then it will be set as the startup file in the Turbo configuration, otherwise no default startup file will be set and the user should select one manually in Turbo Studio after import.
Dynamic configurations registry key deletions are implemented in the Turbo configuration with Hide isolation. Any registry keys with Hide isolation will also hide native registry key of the same name. This differs from the App-V dynamic configuration which will only remove the registry key from the virtual registry.
UserScripts and MachineScripts are not imported automatically. Scripts with application startup and shutdown triggers may be added manually in Turbo Studio from the Settings > Startup > Scripts menu.
Known Issues
Some application package formats may include settings that are not available in the Turbo Studio configuration or vice versa. After importing application packages, the Turbo Studio configuration should be reviewed and tested.
For example, applications that require advanced settings such as Chromium Virtualization must be applied manually in Turbo Studio after import.
Standalone Executables
A popular option for organizations that have an existing endpoint management solution like LANDesk Management Suite ®, Microsoft System Center, or Novell ZENworks is to deploy containerized applications as standalone executables. These executables are built on the SVM architecture and work just like a container.
Deploying applications within containers is convenient for running different versions of applications like Internet Explorer 8 and 11 side-by-side on the same system.
To produce an executable output, set the Project Type to ISV Application in Turbo Studio. Executables can be deployed directly to the users device or to a network share and do not have any dependency requirements.
An enterprise license for Turbo Studio is required to enable executable outputs. Contact our sales team for more information.
Command Line Options
Standalone executables have many command line options to change settings at runtime. The following is a list of available options. Note that these are case sensitive and must be specified before any command line options to the application itself.
- /XEnv=VariableName=Value specifies additional environment variables. Multiple /XEnv arguments can add additional environment variables.
- /XLayerPath=c:\path\to\image.svm adds the given SVM into the virtual environment. Multiple /XLayerPath arguments can add additional virtual layers. Refer to 'Specify Additional SVMs for a Container' for more information.
- /XSandboxPath=SandboxPath specifies the path for the application sandbox.
- /XShellEx=Command specifies a shell execute command to launch from within the virtual application environment. This option overrides any startup files specified in the virtual application configuration. Only one /XShellEx argument can be specified.
- /XShellExVerb=CommandVerb specifies the verb to use in conjunction with the /XShellEx command. The default verb is OPEN.
- /XLogPath=LogPath specifies the destination path for generated log files (only applies to executables running in diagnostic-mode). This path can include a custom file name pattern (ex.
/XLogPath=c:\logs\mylog*.log). The output directory must exist for the logs to be written. - /XSpawnVmExceptions=ProcessExceptions specifies a semi-colon delimited list of processes to add to the child process exception list.
- /XRegRoot=c:\path\to\RegistryCacheRoot specifies an override to the runtime-registry-cache portion of the sandbox.
- /XEnable=Setting and /XDisable=Setting enables or disables specific process configuration options. These options include:
- BootstrapWait
- ChildProcAsUser
- DeleteSandbox
- DEPCompat
- Diagnostics
- DRMCompat
- ExeOptimization
- IndicateElevated
- IndicateVirtualization
- IsolateWindowClasses
- NotifyProcStarts
- ReadOnly
- ReadShare
- ShutdownProctree
- SpawnComServers
- SpawnVM
- SuppressCollisionCheck
See VM Settings for details on the available settings.
- /XCollisionCheck=FALSE disables detection of multiple apps attempting to use the same sandbox at the same time. This should only be used to support legacy behavior.
Deploying Patch Layers
When you have updates or patches that must be deployed, Turbo Studio can be used to specify additional image layers (SVMs) to load dynamically at runtime. Turbo Studio provides two mechanisms to accomplish this. Both methods support path tokens (ie. @APPDIR@) and must specify the full path to the image dependencies.
Using Studio
One mechanism is to specify the SVM dependencies in Turbo Studio.

The patch dependency editor can be accessed by going to the Layers panel and then clicking the Patches... button.
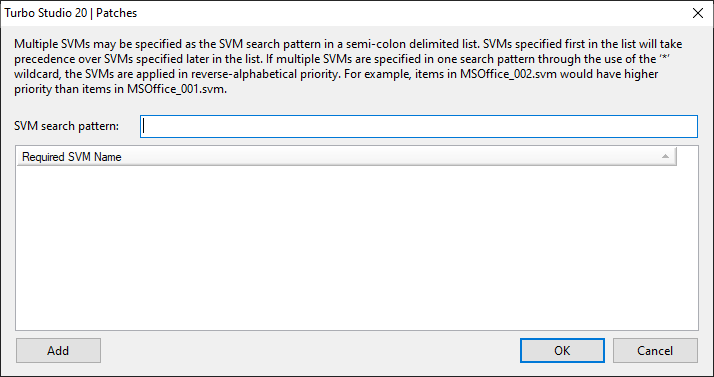
The SVM Search Pattern field specifies the complete path to where patch image layers may be located. This can be a path directly to a specific SVM file or can be a wildcard pattern to dynamically discover SVM files to load. An example of using a wildcard in the search field is @APPDIR@\patches\*.svm. This search pattern will load any .SVM file found in the "patches" directory where the virtual executable is located. Care must be taken to avoid loading arbitrary .SVM files which happen to reside in the same location.
Multiple search pattern paths may be specified by seperating with a semi-colon. SVM files specified first in the list will take precedence over SVM files specified later in the list. If multiple SVMs match a search pattern through the use of the "*" wildcard, the SVM files are applied in reverse-alphabetical priority (ex: items in patch_002.svm would have higher priority than items in patch_001.svm).
The Required SVM Name list specifies which of the SVM files specified in the search pattern are required to execute the container. Wildcard characters are not valid for this and a specific path must be used. If the file is not found during application launch, an error will be reported and the launch will be aborted.
Using Command Line
Another mechanism is by using the /XLayerPath= command line option. This parameter takes a path to additional SVMs to load. This can be useful for dynamically creating container environments depending on other user settings. These runtime settings augment any which are built into the SVM.
An example of a specified SVM path using full path:
# look for 'patches.svm' in the same directory as 'virtual-app.exe'
> virtual-app.exe /XLayerPath=@APPDIR@\patches.svm

# look for 'patches.svm' in a specific location on the local machine
> virtual-app.exe /XLayerPath=c:\path\to\patches.svm

# look for 'patches.svm' on a unc share
> virtual-app.exe /XLayerPath=\\server\dir\patches.svm
An example of specifying SVMs from multiple locations:
> virtual-app.exe /XLayerPath=@APPDIR@\patches.svm /XLayerPath=@APPDIR@\officepatches.svm
An example using a path with wildcard:
> virtual-app.exe /XLayerPath=c:\path\to\patches\*.svm
This performs a wildcard match finding any files that match the pattern, such as 'c:\path\to\patches\patch_001.svm'.
Note: SVMs that are discovered by wildcard are applied in reverse-alphabetical priority. For example, items in 'patch_002.svm' have higher priority than items in 'patch_001.svm'.
Startup File Triggers
A container package can define several startup files. These can all be activated on launch or they can be configured to only be launched given a specified trigger. This is useful for suite applications (like Microsoft Office) where most of the container package is shared.
In Turbo Studio, the startup file triggers are managed in the 'Startup Files' dialog.
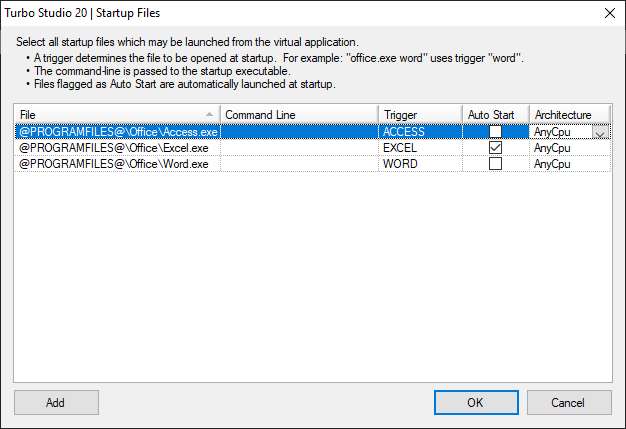
In this example, an application package is defined with three startup files; word, excel, and access. Any startup files that don't have a specific trigger or have Auto Start enabled will be launched by default. Any startup file that has a trigger (but not 'auto start') will not be launched unless the trigger is specified. Multiple startup files can have the same trigger to enable grouped launching.
To launch a startup file by its trigger, specify its trigger as the first parameter to the container .exe:
# to launch word
> virtual-app.exe WORD

# to launch access
> virtual-app.exe ACCESS

# to launch excel
> virtual-app.exe EXCEL

# to launch excel as the default
> virtual-app.exe
To create an easy-to-access shortcut for a trigger, right-click on your packaged executable and select Create shortcut. Then, right-click on the newly created shortcut and append the trigger to the Target field. Change the shortcut name and icon to differentiate the application entry point that will be launched when the user runs the shortcut.
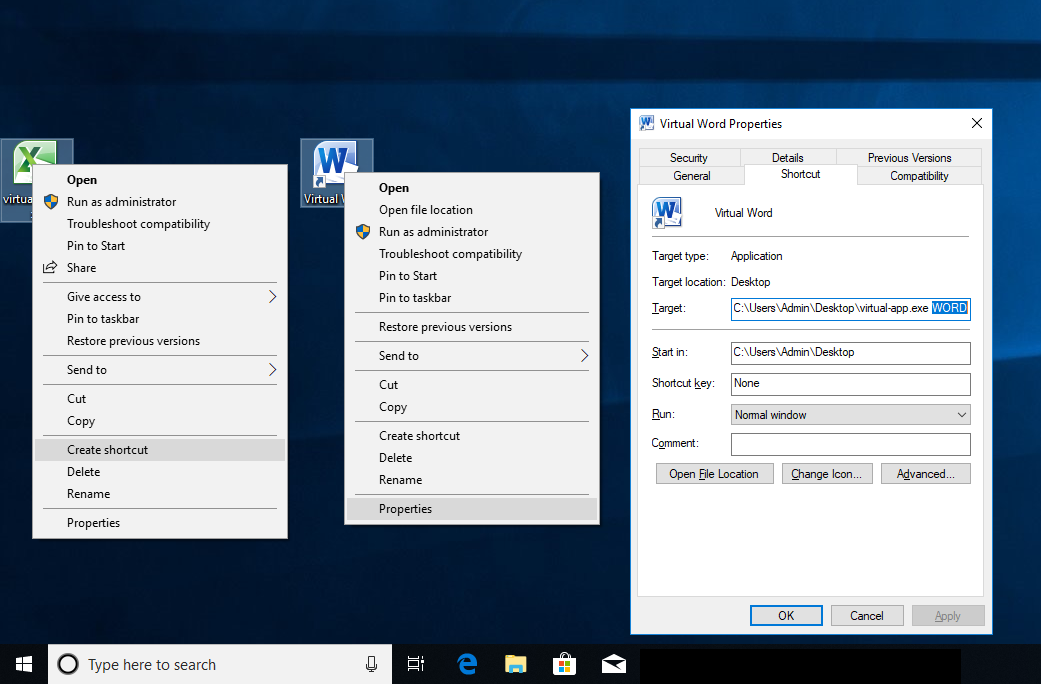
Debugger
The Turbo Studio Debugger is a tool to aid in virtual machine log analysis. It contains many tools to filter and compare logs.
Getting Started

Containers can be executed in diagnostic mode to produce log files of the inner workings of the virtual processes in that container session. There is one log file, xclog[pid].txt_, for each virtual process in the container. These log files contain lists of all system calls that pass through the Turbo virtual machine as well as other process information. There will also be one network log file, xcnetwork[pid].txt_, for each virtual process in the container. These logs files contain information about all the network communications that take place. See Diagnostic Logs for more information on enabling diagnostic mode and log file formats.
Open the Turbo Studio Debugger by clicking the Debugger button in the Advanced ribbon menu in Turbo Studio or from the start menu shortcut.

In the Turbo Studio Debugger, open the session log folder by clicking on File > Open Session Log. Select the folder than contains the session logs and press Select Folder.
After the session logs are loaded, a tree view of the processes in the session will be presented to vizualize how the processes are related to each other. Double clicking the process will open the log file for that process.
After the process log is loaded, the full log is shown with options to filter and resolve the timestamps.
Options

There are several options that can be configured for the Turbo Studio Debugger.
Text Editor sets the editor to be used when opening a log in an external editor. The default is to use the system .txt editor. Turbo commands can be set here to use any tool from a turbo.net or turbo server hub (ex: turboplay turbo run npp/notepadplusplus --isolate=merge).
Text Comparison Tool sets the text compare tool to use whenever performaning diffs. The default is to use winmerge from the turbo.net hub.
Color Scheme sets the color scheme of the window. Setting this will also change the color scheme of the main Turbo Studio window after it restarts.
Save Workspace sets whether the current tabs are maintained between debugger sessions. Values include Never, Always, and Ask. The default is Never.
Session Log View

The session log view shows a tree of all the virtual processes in the session. Processes for the child nodes in the tree were launched from the processes for the parent nodes in the tree. If the session log folder contains logs from multiple container sessions then all sessions will be shown. If a process was started outside the virtual environment from a process inside, then this process will not have a log file (for example, if the process were excluded via the Child Process Exception rules). Double-clicking a node in the tree will open the log file in a new tab.
Selecting a node in the tree will show information about the log which is represented at the bottom of the debugger window. Information includes the process ID (or PID), the size of the log file, the system time that the process executed, the duration of the process execution, and the name of the file.
Right-clicking on a node in the tree view will show a menu of additional functionality.
Open In External Editor will open the log file in the system default text editor or the text editor defined in the Turbo Debugger options.
Copy Full Path will put the path to the log file on the clipboard.
Search will perform a text or regular expression search in the selected log file. The regular expression syntax is the same as the findstr system tool.
Search All will perform a text or regular expression search in all the logs in the session log folder.
Show VM Environment Info will display the VM version and architecture as well as the operating system version information from where the process was executed.
Show VM Settings Flags will display the virtual machine settings which are enabled for this process.
Open Network Logs will open the network logs for the process (if they exist).
Refresh will reload the session log folder.
Process Log View

A process log is an individual log file for a specific process that was executed inside the virtual environment. Every process that is running inside the virtual environment will have a log file. The process log contains a lot of information about what is happening inside the virtual process, including all system API function calls that go through the virtual machine. Since there is so much detail included in these logs, they can be difficult to analyze to find root causes of problems. The process log viewer provides functionality to make this process easier.
Selecting a line of the log will display a parsed view of the trace at the bottom of the debugger window. In addition to pulling out the information that is already visible in the trace, system flags and contants which are passed as parameters to system API functions will be shown.

In this example, the trace for NtOpenFile is shown. The access flags, 0x100020 are shown as FILE_EXECUTE, FILE_TRAVERSE, and SYNCHRONIZE. These are constants defined in the Windows SDK that are documented on the Microsoft Developer Network website. When hovering the mouse over these constants, their values are shown.
Filters

There are several filters that are defined that can be useful in narrowing down the scope of the log file to make possible errant behaviors easier to see.
None shows the original, unfiltered log file.
Error shows only traces those with trace level WRN, ERR, or LOG if they contain error code information. This may be a good first filter to quickly check if there is anything that stands out. Note that there are many legitimate reasons why a level LOG trace may have an error code so these alone do not indicate a problem and even level ERR can also be benign.

COM shows only traces which have to do with Component Object Model (COM) API function calls (CoCreateInstance, CoRegisterClassObject, COM related registry key accesses, etc). This can be useful if the error being investigated is related to COM object instantiation. Note that errors here may not necessarily be a problem either. There are many COM objects that are optional components and their failure does not cause problems.

Windows shows only traces related to the Window subsystem API function calls (CreateWindowExW, FindWindowW, GetClassInfoExW, etc). This can be useful if the error being investigated is related to the application's user interface, especially in legacy applications which are being made compatible with the latest versions of the Windows operating system.

DLLs shows only traces related to DLL loading, Windows Side-by-Side (SxS), and manifests. Many application problems can be attributed to incorrect versions of DLLs being loaded. This is especially true when getting legacy applications to work on modern operating system.

In addition to filtering the log, the trace tick time can be transformed into a more useful value. Either absolute time or time relative to the beginning of the log.
Absolute time can be useful when trying to find connections to information from other sources such as application log files, Windows event viewer, etc.

Relative time can be useful when comparing to logs in other sessions or when investigating performance issues.

Process Log Reports
If a process log is being displayed or if a log is selected in the session log tree, the Create Reports button is available to generate reports on that log.

Three reports are available: path inventory, error inventory, and DLL inventory.
Path Inventory Report shows a list of all filesystem and registry paths that were accessed in the log and the exit codes returned when accessing these paths. It says nothing about how the path was accessed (for example, creating, opening, writing, etc). This can be useful if the set of potential problem paths is known but is most useful when comparing to logs from a working session.

Error Inventory Report shows the same list of paths and exit codes as the path inventory report but it sorts the information so that error with many occurrences are at the top, then all other errors, and then successes. Reviewing the common errors can reveal possible problem areas.

DLL Inventory Report shows a similar list of paths but only for .DLL file types. It also shows the version of the DLL that was accessed in each case. This can be useful when comparing to working sessions.

Session Log Comparison View
Often the easiest way to discover the source of a problem is by comparing two session log sets with each other. If one session log set is from a working environment and another is from a failing environment, the logs can be compared to see how they differ to bring to light the reason for difference in behavior. Another way to compare session logs is to copy the logs from before and after errant behavior occurs. This makes it possible to see what happened in between the two events to narrow down the scope of logs that require analysis.
To compare two session log sets, open both of them in the debugger and press the Create Comparison button. This will bring up a window which allows you to assign the left and right sets. Assign the sets or leave the defaults and press OK.

This will bring up a new view with the session log trees side-by-side and show additional functionality that is available to compare the logs in the sets.

Session Log Comparison Tools
When a session log comparison view is selected, many new ribbon menu options become available: View Differences, Inventory Report, and Create Delta Log.
View Differences
The View Differences menu shows a number of different ways to filter and compare two logs. These differences will be displayed in text comparison tool which is specified in the debugger options (default is using WinMerge from the turbo.net hub). In all cases the logs will be normalized to make them more comparable (lower cased, remove transient data such as process ID, thread ID, time stamps, memory addresses, user names and IDs, etc). Because of this normalization there will be a loss of information in the text compare tool that may need to be cross referenced with the original logs.

Full will compare the entire logs files. This can be very slow if the logs are large. This can also have limited utility depending on the logs being compared. If the logs were taken from different operating systems then the number of differences can be so large that no useful information can be easily determined. This can be more useful when comparing delta logs (see Create Delta Log below for more information).
Full with Time will convert the ticks to relative time and then do a full compare. This will create a very messy text comparison but can be useful when tracking down a series of events that lead to errant behavior.
Threads allows for comparing the traces for specific threads in two different log files. When this option is selected, the debugger will prompt for the thread ID to compare from each log. Then every trace written from a different thread will be removed before the logs are compared.
Filesystem and Registry filters out all traces except those for filesystem and registry accesses.
Errors filters out all successful API function calls and information log traces, leaving only trace level ERR, WRN, and LOG where it includes an error code.
COM filters to only show traces related to the Component Object Model (COM) such as CoCreateInstance, CoRegisterClassObject, etc.
Windows filters to only show traces for the windows subsystem such as CreateWindowEx, RegisterClassObject, etc.
DLLs filters to only show traces for DLL loading, Windows Side-by-Size (SxS), and manifests.
Network compares the network logs for the processes.
VM Settings compares the virtual machine settings flags for the processes.
Path Inventory compares the Path Inventory Report from the two logs. A quick scan can reveal if certain paths had different return codes.
DLL Inventory compares the DLL Inventory Report from the two logs. A quick scan can reveal if certain DLLs had different versions or return codes which may indicate a possible source of problems.
Search compares the search results from the two logs.
Inventory Report
The Inventory Comparison Report can be used to quickly see relevant differences in how paths are accessed in two different logs. When the two log sets compared are from working and failing cases, this may be the most useful tool in quickly determining the source of a problem.

In the report, paths and their return codes are shown. The paths are sorted into buckets of "differences" (those where the paths are in both but have different return codes), "in both" (those where the paths and the return codes are the same in both), "in only left" (those paths that are only in the left log), and "in only right" (those paths that are only in the right log). For paths to DLL files, the comparison will also take into account their version if available. Focus should be in the section highlighting "differences" where one log has a success code and the other log has an error code. These can often be problematic and are worth analysis. These lines in the report will have an asterisk (*) next to them.
Create Delta Log
A Delta Log is the log file that is produced by removing the traces that are shared in the two log files, leaving only traces for VM initialization and those that are only present in the later version of the log. This is only useful when comparing the same log file at two points in time, like before and after when an error occurs. This can be an incredibly useful tool in order to narrow the scope of the log that requires analysis. To further the utility, two delta logs (one from working set and one from failing set) can be compared with the other comparison tools. This can produce the easiest to analyze logs.

When a delta log is created, it will be placed in the session log folder where the largest version of the log file resides. It will appear in the tree view as a child of the log from which it was produced.
Log Tools
There are several tools which are specific to logs. They can be found in the ribbon menu: Lookup Flags and Resources.
The Lookup Flags window offers the same functionality that is built into the process log viewer where trace fields are broken down so that flags and constants can be resolved. This is useful when copying traces from sources outside the debugger where this is done automatically (ex: text compare tool, external log files, snips from emails, etc).

The Resources menu has a collection of links to Microsoft documentation that is frequently useful when analyzing logs. These include HRESULT, NTSTATUS, and System Error Codes which are returned from API function calls. HRESULT values will be displayed in traces with "hr" field name, NTSTATUS values will be displayed in traces with "status" field name, and system error codes will be displayed with "gle" field name.

General Tools
In the Tools ribbon menu, there are some additional tools which can be useful depending on the situation.

Compare
The Compare tool is a simple tool to compare two sets of text. The tool will normalize the text depending on how the text is to be interpreted. It is then passed to the configured text compare tool.

As Text will compare the text exactly as it appears in the window.
As Trace Log will normalize the text as a VM log file in the same manner that all previously discussed filters and comparison operations do.
As Configuration (.xappl) is used to compare two .xappl files and will normalize the text to remove all transient data (timestamps, etc). This can be useful when comparing two versions of an application xappl to narrow down the differences between them.
As Process Monitor XML is used to compare two XML files which were produced from Process Monitor (procmon) traces. This can be useful if trying to compare behavior between a native application and a virtual application since a native application will not have vm logs).
CLSID Lookup
The CLSID Lookup tool is used to quickly see what a CLSID is configured to be on the current system. When the CLSID is entered, press the Find button. The description field will be shown and all occurrences of the CLSID in the registry will be displayed. Press the Open Key button to open the registry editor to the selected key.

Thread Security Descriptor
The Thread Security Descriptor tool will look up the security descriptor of the specified thread object (not the thread user's security descriptor) and display the Security Descriptor Definition Language (SDDL) string. The string can be copied from the message box with CTRL+C.

File and Folder Attributes
The File Attributes and Folder Attributes tools show the file system attributes of the file or folder selected. For more information on file system attributes, see File System Attributes.

Apply Configuration
The Apply Configuration tool will copy the contents of the specified configuration to the host machine, including both registry and filesystem. This can be useful for troubleshooting issues where the installation media is not available. This operation cannot be undone so it is strongly encouraged to only use this on a virtual machine that can be restored and not on desktop system.
Command Line Tools
The command-line version of Turbo Studio is called XStudio.exe and can be found in the Turbo Studio installation directory. See below for a list of command-line arguments and options for the XStudio tool.
Note: If running XStudio displays the error <SandboxCollision> is missing from the string table the XStudio application cannot be run while Turbo Studio is also running. Turbo Studio must be closed before running XStudio via the command line.
Build
Build the specified container configuration.
> xstudio.exe [path-to-xappl] [optional]
Optional parameters:
- /l [path] specifies a path to the license file to use. The license file needs to be stored in Unicode format. This is only necessary if the license file was not installed on the machine through Turbo Studio.
- /o [path] overrides the path to the output file.
- /component overrides the Project Type to be Layer resulting in an SVM output rather than EXE output.
- /d enables the Generate diagnostic-mode executable setting.
- /compressed enables the Compress payload setting.
- /uncompressed disables the Compress payload setting.
- /deletesandbox enables the Delete sandbox on application shutdown setting.
- /v [version] assigns the Version of the output exe.
- /startupfile [path] overrides the Startup File of the output file.
Setup Capture
Start the capture recording.
> xstudio.exe /capture start /destination [path]
Parameters:
- /destination [path] specifies the path to where the XAPPL configuration and files are to be saved after the capture is complete.
Stop the capture recording.
> xstudio.exe /capture stop
Note: Configuration files that are generated from the capture will not have an output file specified in the XAPPL configuration file. When using scripting for captures, it may be necessary to apply changes to the generated XAPPL file, either manually or programmatically.
Snapshot
Take a before snapshot.
> xstudio.exe /before /beforepath [path]
Parameters:
- /beforepath [path] specifies the path to where the snapshot file is to be saved.
Take an after snapshot.
> xstudio.exe /after /beforepath [path] /o [path]
Parameters:
- /beforepath [path] specifies the path to where the snapshot file is to be loaded.
- /o [path] specifies the path to where the resulting container configuration file will be saved.
Note: Configuration files that are generated from the command-line after using the /after flag do not have an output file specified in the XAPPL configuration file. When using scripting for snapshots, it may be necessary to apply changes to the generated XAPPL file, either manually or programmatically.
Import
Import MSI, AXT, or ThinApp configurations.
xstudio.exe /import /i [path] /o [path]
Parameters:
- /i [path] specifies the path to the configuration file to be imported.
- /o [ath] specifies the path to where the resulting container configuration file is to be saved.
Merge Layers
Combine two or more SVM layers into a single file.
xstudio.exe /merge [path-to-layer1.svm] [path-to-layer2.svm] ... /o [path]
Parameters:
- [path-to-layer1.svm] specifies the path to the first SVM layer file.
- [path-to-layer2.svm] specifies the path to the second SVM layer file.
- ... specifies the path of additional SVM layer files to combine.
- /o [path] specifies the path to output combined SVM file.
Sandbox Merge
Merge the contents of a sandbox into a container configuration.
xstudio.exe /sandboxmerge [path-to-sandbox] /i [path] /o [path]
Parameters:
- /i [path] specifies the path to source configuration file.
- /o [path] specifies the path to output merged configuration file.
Dump Settings
Dump a list of all configuration settings in the specified configuration file, container image, or standalone executable.
xstudio.exe /vmsettings [setting] /i [path]
Parameters:
- [setting] specifies the name of a specific setting to return the value of. This is optional and if not specified will show the values of all the available settings.
- /i [path] specifies a path to a .xappl, .svm, or .exe.
- /nologo is an optional flag that specifies that the Turbo Studio copyright and logo information is to be suppressed. Useful when consuming the output in scripts.
Transform Path
Transform a path to its tokenized form or back from its tokenized form. For example, to convert "c:\program files\internet explorer\iexplore.exe" to "@PROGRAMFILES@\internet explorer\iexplore.exe". This tool can also be used for registry paths.
xstudio.exe /pathreplace [path-to-transform] [optional]
Optional parameters:
- /reg specifies that the path is a registry path, not filesystem.
- /revert specifies that the path is tokenized and is to be converted back to native machine path.
- /nologo specifies that the Turbo Studio copyright and logo information is to be suppressed. Useful when consuming the output in scripts.
Turbo Studio in Azure
A preconfigured application capture environment can be deployed to Azure via the Turbo Studio Azure Marketplace Image (AMI). A Turbo Studio AMI deployed instance has Turbo Studio and Turbo Client preinstalled on a clean machine to allow for accurate application captures whether the Setup Capture or Snapshot method is used.
Users will need the following to deploy the Turbo Server AMI:
- Azure subscription
- Feee Turbo.net account
The Remote Desktop Protocol (port 3389) is open by default once the Turbo Studio AMI is deployed.
Note: While there are no extra charges to deploy the Turbo Studio AMI, the Azure subscription will still be charged for any usage.
Deployment
To deploy the Turbo Studio AMI go to portal.azure.com, click Create a resource, search for "Turbo Studio", select the desired plan, and click Create.
The following information will be needed to deploy the Turbo Studio AMI:
- Resource group: Resource group to deploy the AMI
- Region: Azure region to deploy the AMI
- Virtual Machine Name: Hostname of the VM
- Username and password: Local administrative account on the VM
Click Create when all the required information is added to the deployment and the review step passes validation.
When the deployment completes, open a Remote Desktop Protocol (RDP) conection top the VM using the Public IP address from the Overview page of the deployed Turbo Studio AMI VM in the Azure Portal.
The deployed Turbo Studio AMI can now be used to capture applications using the Setup Capture or Snapshot methods.
4.3 Advanced Topics
Large Applications
Issues with Large Applications
Large applications, particularly those over 1GB in size, pose special deployment and performance issues:
- Windows has a hard-coded limit of 4GB for EXE type files. Attempting to execute a virtual standalone EXE over 4GB will result in an error.
- The Windows loader performs preprocessing on EXE files prior to execution. A very large EXE file may introduce undesired startup latency. Minimizing the executable file size also minimizes application startup time.
Factoring Large Applications
It is recommended to factor large applications into two or more pieces consisting of a single small EXE file and one more larger SVM files. Turbo can then combine these layers at runtime. This can be done using the Factor Configuration tool in Turbo Studio or manually using the steps below.
To split your existing application image:
-
Save a copy of your current application as
data.xappl -
Open
data.xapplin Turbo Studio-
Change the Project Type to Layer (SVM)
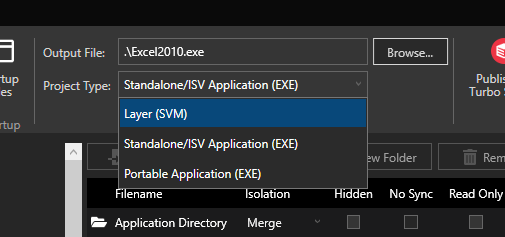
-
Change the Output File to data.svm
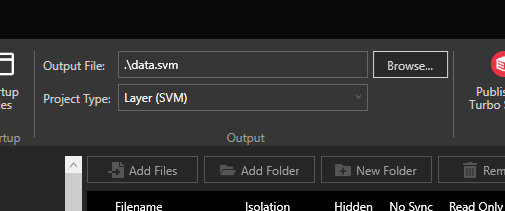
-
Save the file and build
-
-
Open your existing XAPPL in Turbo Studio
-
Add @APPDIR@\data.svm to the SVM Search Pattern and data.svm to the list of required layers
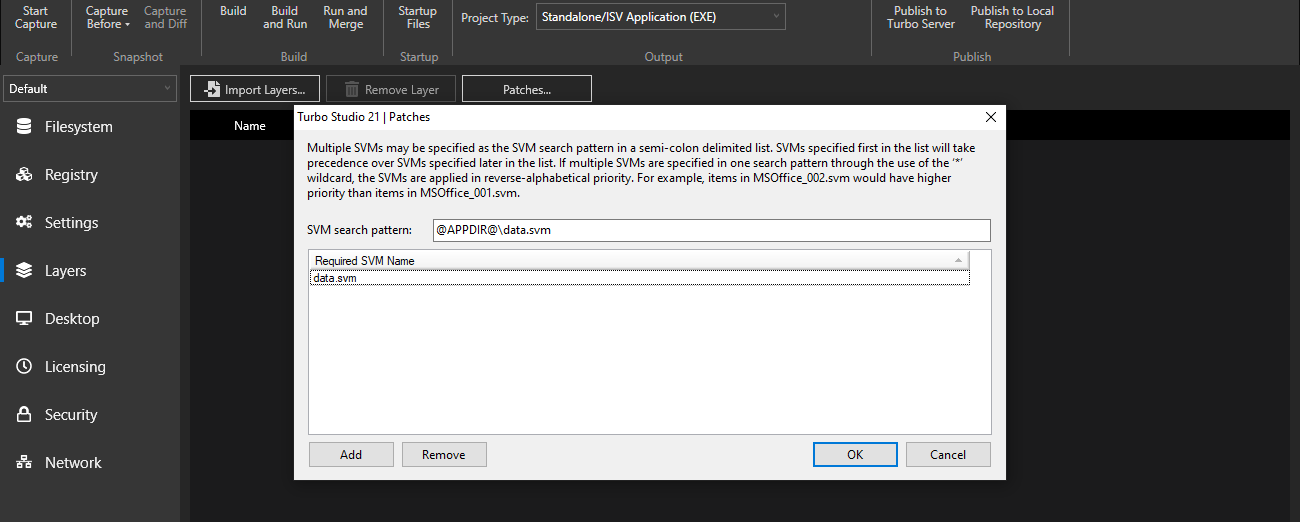
-
Remove everything from Filesystem and Registry nodes. If you have multiple layers, you can remove all layers other than the default layer. If your application is configured to inherit metadata and icons from the startup file, then you will need to keep the startup file .exe in the Filesystem node, including its full directory hierarchy.
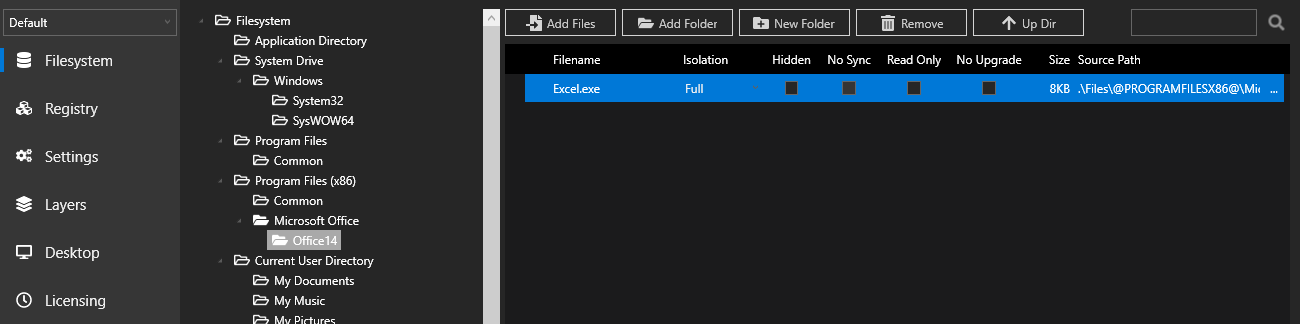
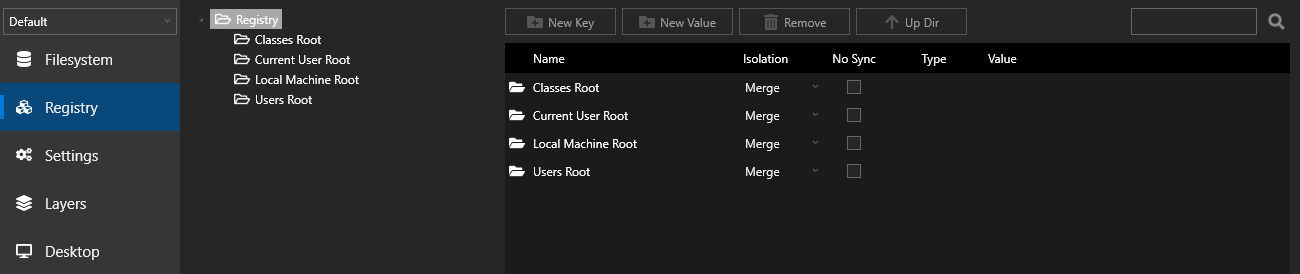
- Save the file and build
-
-
To deploy, place your EXE and SVM in the same directory. This can be repeated for multiple SVMs by adding additional file names or a wildcard pattern into the SVM Search Pattern
Alternately, external SVMs can be imported explicitly via the command line using the /XLayerPath= command line option. This parameter takes a path to additional SVMs to load.
An example of a specified SVM path using full path:
# look for 'patches.svm' in the same directory as 'virtual-app.exe'
> virtual-app.exe /XLayerPath=@APPDIR@\patches.svm

# look for 'patches.svm' in a specific location on the local machine
> virtual-app.exe /XLayerPath=c:\path\to\patches.svm
Startup/Shutdown Scripts and Shims
Turbo Studio allows for custom operations to be performed at the beginning and end of a container's life. This allows for application specific configuration steps to be performed before a container starts (ie. install a necessary driver) or clean up to be performed afterward.
Container Life Cycle
Containers are managed with a root parent process known as a "bootstrap process". This process hosts the virtual machine engine from which the rest of the container executes. In the Turbo command line environment, turbo.exe hosts a shared bootstrap process for each instance of the same container. For Turbo standalone executables ("ISV Applications"), a seperate bootsrap process is used for each invocation of the .exe.
Startup shims and scripts are executed when the first container bootstrap process is started but before the startup files are launched. Execution of the shims and scripts will block the startup files so any long running operations will delay container startup.
Shutdown shims and scripts are executed when the last process inside the container is closed.
Scripts
For simple tasks, a .bat or .cmd script can be configured.
Put the script in the container file system (a full isolated folder in @SYSDRIVE@ such as "scripts" is recommended). Specify the full path to the script in studio. Note that the untokenized form of the path must be used here (c:\scripts\init.cmd rather than @SYSDRIVE@\scripts\init.cmd). Environment variables can also be used in the path (ex: %systemdrive%\scripts\init.cmd) if they are defined on the machine or in the container's custom environment variables.

An example startup script might look like this:
    @ECHO Initializing environment
    if exist C:\workspace\first goto Skip

    :Create-Workspace
    @ECHO Preparing Workspace
    mkdir C:\workspace\first
    echo print("Hello World!") > C:\workspace\first\helloworld.py
    goto Done

    :Skip
    @ECHO Workspace already created, skipping step

    :Done
    @ECHO Done.
    exit
A common use of startup scripts is to install some required component (driver, etc) to the native system if not already present. Such installers will require admin privileges so will require UAC elevation. Below is one way this can be accomplished using a runtime generated VBS script:
    # create vbs script to ShellExecute a command with "runas" verb to show the UAC prompt if required
    echo Set UAC = CreateObject^("Shell.Application"^) > "%temp%\elevate.vbs"
    echo UAC.ShellExecute "cmd.exe", "/c ""c:\path\to\installer.exe", "", "runas", 1 >> "%temp%\elevate.vbs"

    # execute the vbs script and wait until it completes
    start /b /wait >nul cscript /nologo "%temp%\elevate.vbs" 2>&1

    # clean up
    del "%temp%\elevate.vbs"
To troubleshoot script issues, set the __DEBUGINITSCRIPTSHIM environment variable to true. This will show the command window that is executing the script so you can see output and any generated errors.
Shims
For complex tasks, a DLL can be written to be executed. DLLs can be written in any programming language that supports them but do note any framework requirements must be configured inside the container.
The shim must conform to Turbo Studio interface in order to be loaded properly. Startup shims must be compiled with an exported OnInitialize function. Shutdown shims must be compiled with an exported OnShutdown function. The same DLL can be used for both if both functions are exported.
Shim function signatures:
typedef BOOL (__stdcall *FnOnInitialize) (LPCWSTR pwcsInitializationToken);
typedef void (__stdcall *FnOnShutdown)(LPCWSTR pwcsShutdownToken);
The return value of the startup shim indicates to the bootstrap process whether it should proceed with execution of the container.
The functions are acquired by the virtual machine with LoadLibrary and GetProcAddress win32 APIs.
    LPCWSTR pwcsInitToken = "VendorSpecificToken";
    HMODULE hShim = ::LoadLibrary("c:\path\to\shim.dll");
    FnOnInitialize fnOnInit = (FnOnInitialize)::GetProcAddress(hShim, "OnInitialize");
    BOOL fResult = fnOnInit(pwcsInitToken);
Note that the DLL must be compiled for the correct architecture (x86 or x64) in order to be loaded. Since the DLL is loaded by the bootstrap process, it must match its architecture, not the startup file.
4.4 Working with Containers
Containers
In this section you'll learn a variety of methods for managing and building containers and images with Turbo Studio and the command-line interface. You'll also learn how to integrate containerization with your continuous integration server.
Creating Containers
The turbo new command starts new containers. You must specify a base image to provide the virtual filesystem and registry for the container. If no files or registry keys are necessary, use the empty clean image.
# Launch a command window in a new container with clean as the base image
> turbo new clean
Operations executed in the new command window are applied to the container, not the host system. This means you do not have access to local files, the container is fully isolated.
To avoid confusion, the prompt is prepended by the image name and the first 8 characters of the container ID when a command window is running in a container. Alternatively, a container can be assigned a name, this will be illustrated in the Installing MSI Packages in Containers section.
# Host command window
> turbo new clean

# Container command window
(clean#0bad25c4) >
Edit and modify the container's virtual filesystem and registry using the same command-line interfaces available in Windows Command Prompt.
Installing MSI Packages
Installing MSI packages in containers is supported, but in some instances an install may fail e.g. a custom action may attempt to runs but fails when run in the fully isolated Turbo VM. If an MSI install fails, try creating the container using Turbo Studio.
This section will detail steps for creating a container for InstEd, a popular MSI editor.
Begin by downloading the application here
Copy the MSI to a new directory: C:\Installers on your local machine.

By design the Turbo VM is fully isolated and does not permit access to local files. In order to use the MSI in your local C:\Installers directory, you must poke a hole in the isolation. Use the --mount flag to poke a hole in the isolation. Use the -n flag to set a name for the container.
# Poke a hole in isolation
> turbo new clean --mount="C:\Installers" -n=instedcont
Launch the install.
# Install InstEd
(instedcont#95c15a32) > C:\Installers\InstEd-1.5.15.26.msi
When prompted, click Next.
Click on the checkbox to agree to accept the terms in the license agreement and then click Next.
Click Next.
Click Install followed by Finish.
Exit the Turbo VM from the launched command prompt.
# Close Turbo VM
(instedcont#95c15a32) > exit
Once you finish editing a container, it can be saved and distributed in the form of images. For more information on images, read on here.
Ensure the --startup-file flag is set to the application's main executable. Provide an image name, in this example use instedit.
# Commit container into an image
> turbo commit instedcont --startup-file="C:\Program Files (x86)\instedit.com\InstEd\InstEd.exe" instedit
By default, the commit command merges sandbox changes with the base images and builds a new image from these merged layers. Specifying the "--no-base" option builds a new image of the sandbox changes without merging the base images.
Test the new InstEd image.
# Launch a new instance of Insted using the instedit image
> turbo new instedit

Accessing Local Files
You may notice when attempting to open an MSI on your local machine, you will not have access to it. Similarly, when creating a new MSI and attempting to save to a local machine directory, you will not be able to save locally. This is expected behavior. By default containers run in full isolation. Use the --isolate flag to launch a new instance of InstEd with isolation set to merge with the local system.
Launch application with access to local files.
# Launch instedit image
> turbo new instedit --isolate=merge
You will now have access to any local files.
Pushing Images to the Hub
We created an image which can be pushed to our Hub and run by anybody. To do this, we must first login to Turbo.net from the command prompt. Enter turbo login and then enter your turbo username and password when prompted.
# Login
> turbo login
Push the image by entering turbo push %lt;imagename>.
# Login
> turbo push instedit
Publishing Images
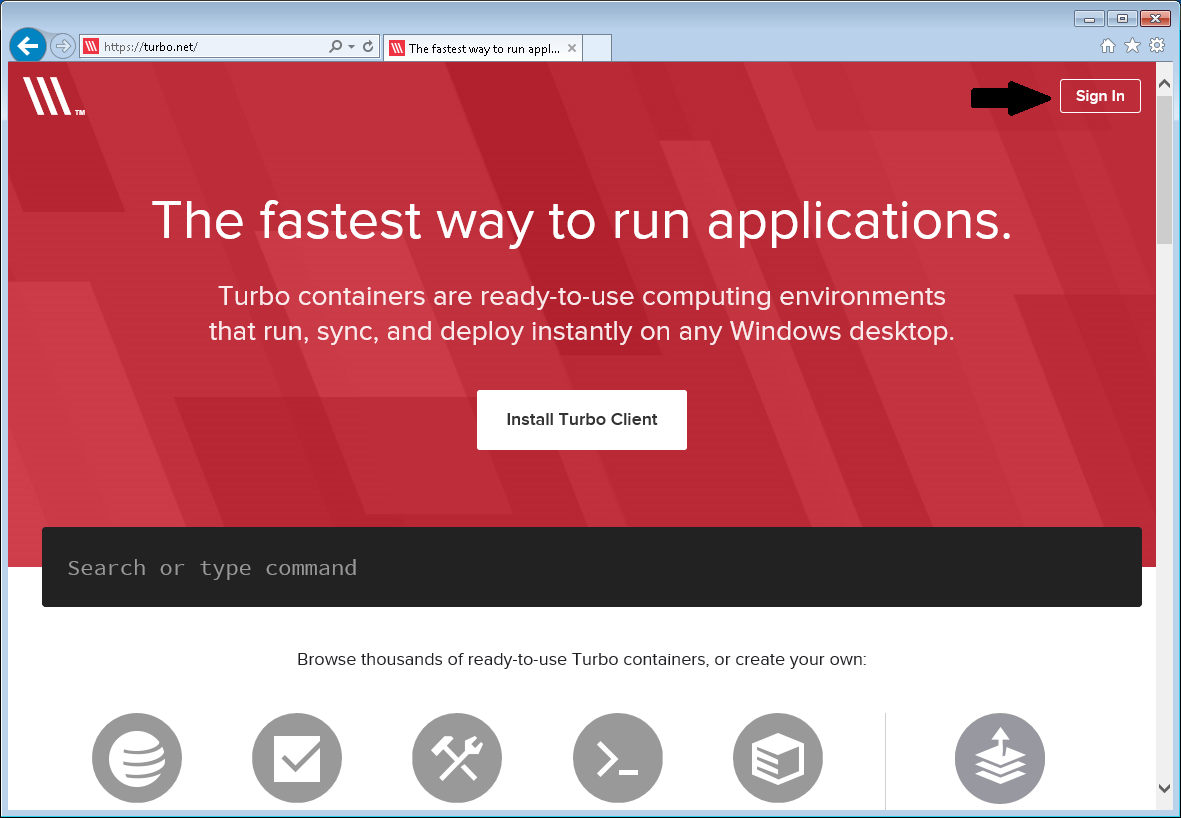
Our image has been pushed to the Hub. Now we will configure the repo settings and other publishing settings. Navigate to Turbo.net and clicking Sign In.

If you do not have a Turbo.net account click Sign Up to create a new account. If you do have a Turbo.net account, enter your Turbo.net username and password and then click Sign In.

After logging into Turbo.net you are presented with your home screen that contains your applications. Click on instedit.
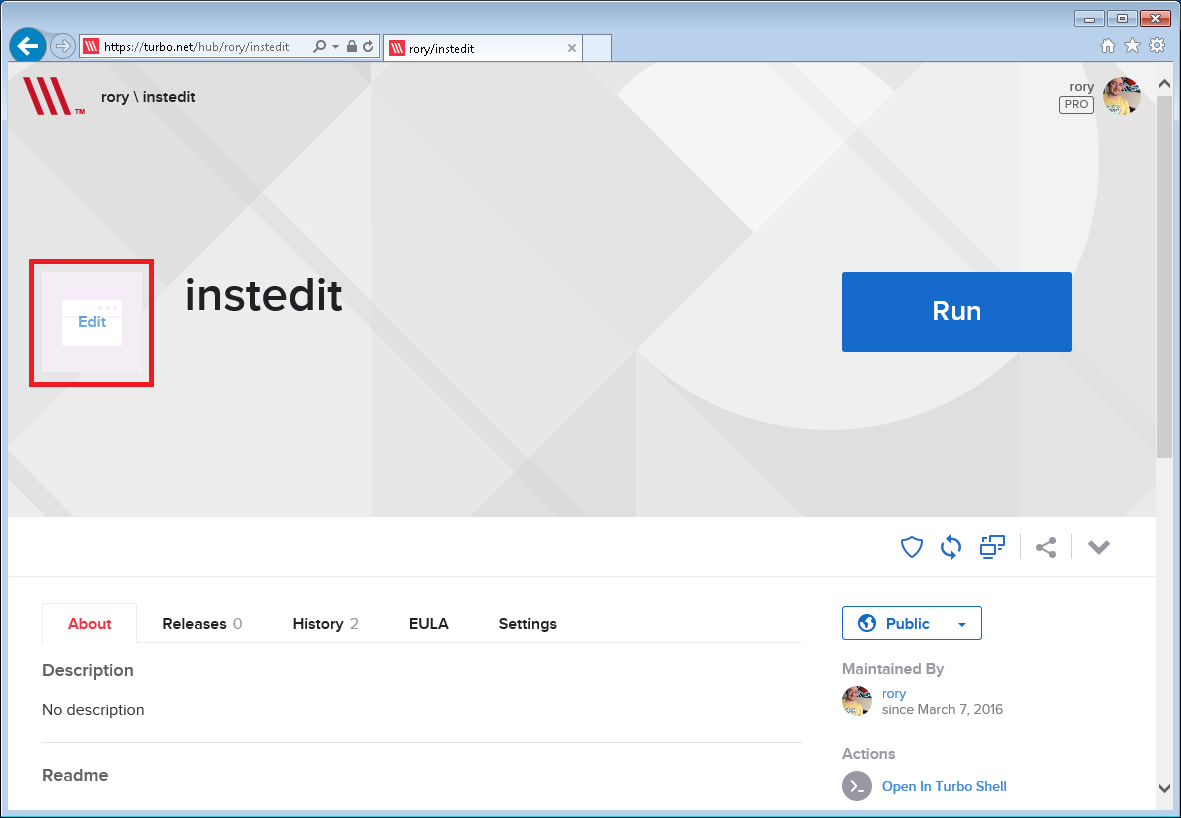
Hover over the large icon in the header of the page to upload a suitable image for the application. Hover just below the instedit text in the banner and click edit to provide a description.
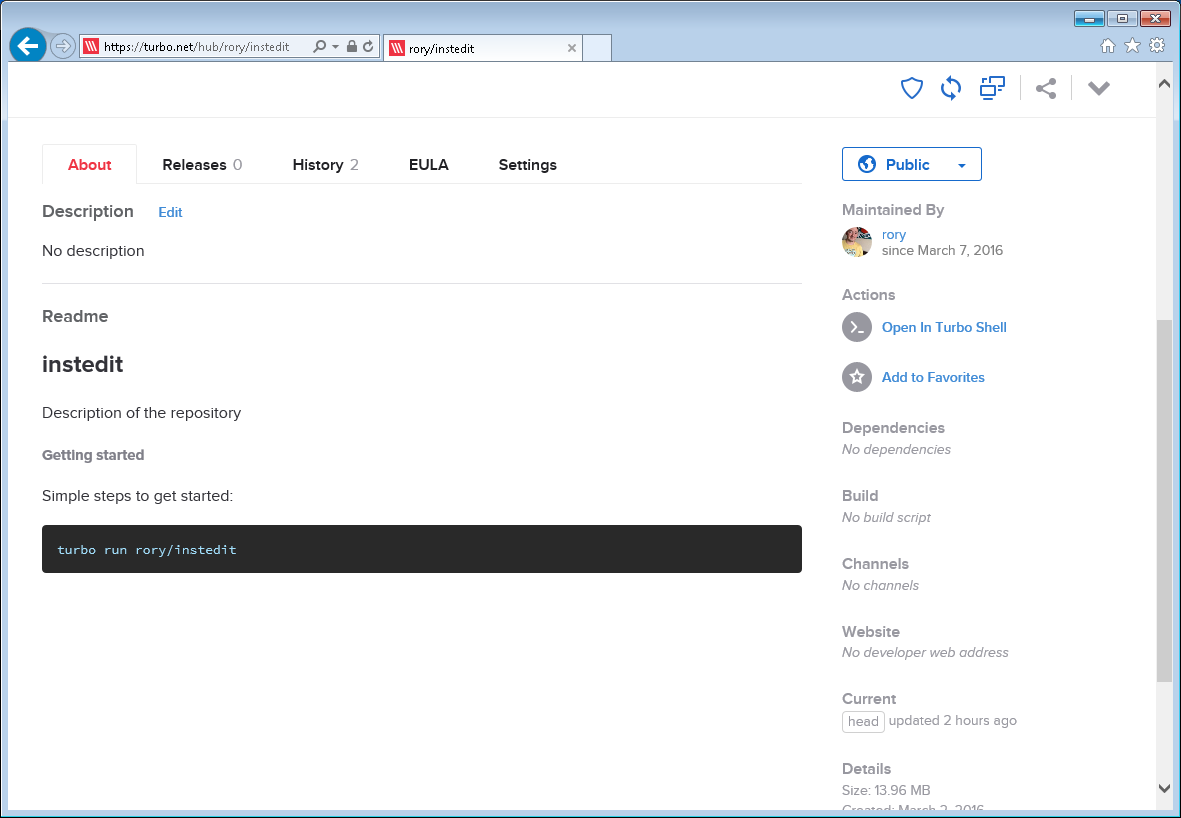
On the same page, hover beside the description heading and click edit to provide a description of the application. When complete, hover over the readme heading and click edit to provide information useful to people who may try to use your image. e.g. what commands should be used.
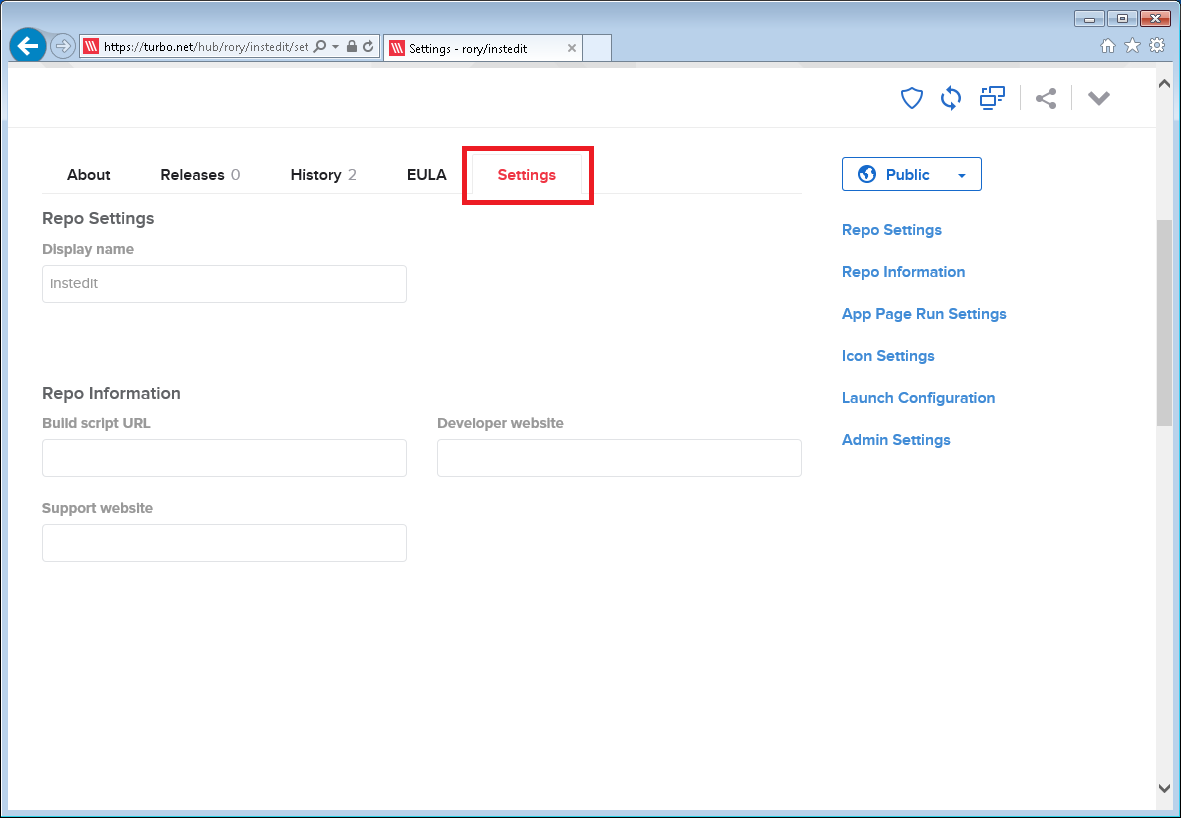
Navigate to Settings. A default display name is set, you can change this to something more appropriate such as Instedit or Insted.
Optionally, under Repo Information enter a build script URL if you have one. For more information on how to create a build script read on here. Enter a Developer website and Support website if desired. This information will be displayed on the application's repo page. When using a free account, click Update as there will be no other options available for you.
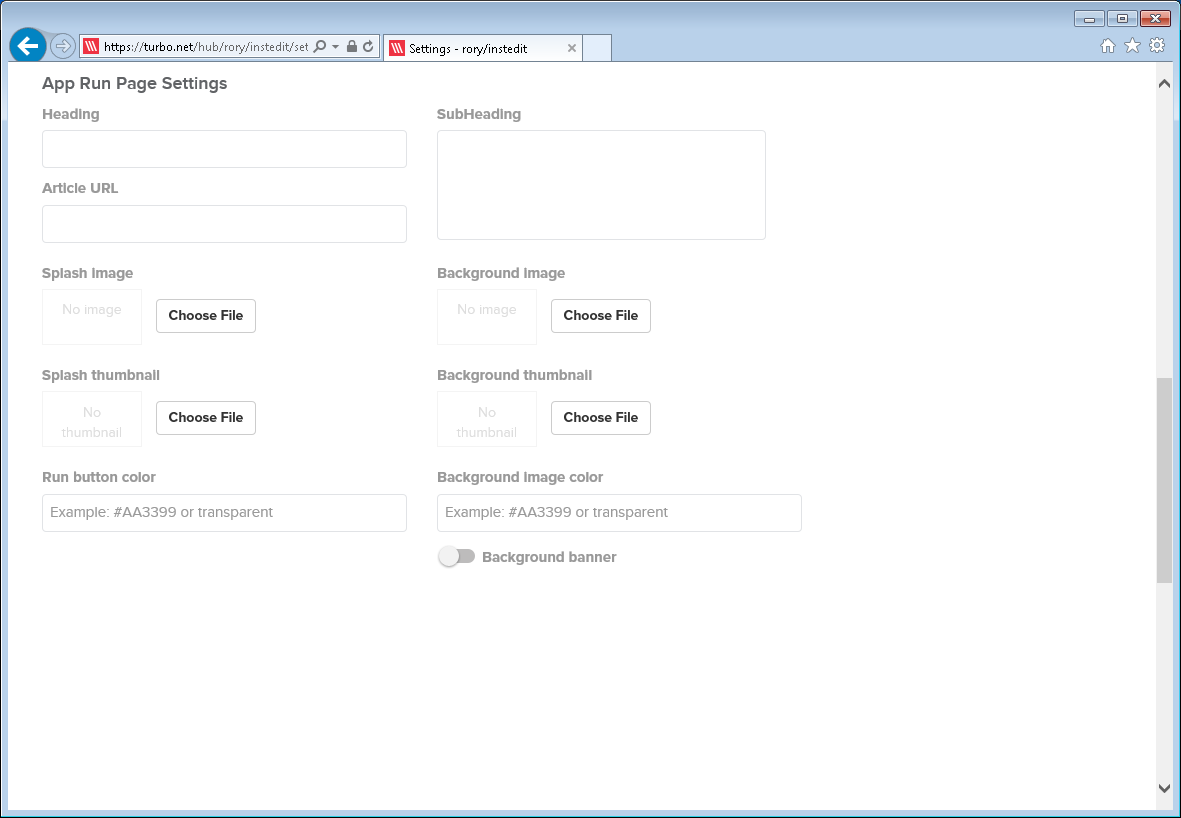
The Turbo.net Hub provides the ability to create custom run pages for applications. For an example of this, click here. The run page provides a great presentation and end user experience. If enabled, this run page can also be embedded within a website or blog. For an example of an embedded run page click here and scroll to the bottom of the page.
Enter a Heading, which will be the application name displayed to the end users. Enter a SubHeading which should contain a brief description of the application. Optionally enter an Article URL which will provide a hyperlink to a source page e.g. if you choose to host an application you created, you can link to your own hosted blog with information about the application.
Click on Choose File to upload a Splash image. (1033 x 752 px is a good size for this) This could be a static screenshot of the application or possibly an animated gif of the application being used. Click on Choose File to upload a Background image. Optionally repated these steps to upload a Splash thumbnail and Background thumbnail image.
Optionally, enter a Run button color and Background image color. This may be useful if the background you choose conflicts with the color of the button.
If you do not wish to use a Splash image you may choose to enable a Background banner. This will present a banner across the run page containing your run page information.

Navigate to Icon Settings and set a Background color. If the icon you uploaded has a white background, it is best to enter transparent as the value for the Background color. Optionally select if the icon should Padded. This will trim the edges of the image. In some cases, this can make certain icons look much better.

Navigate to Launch Configuration. If any additional flags are required for the application to function, enter these here. For a list of available flags read here. Enter additional Image layers if you wish to launch the application with other dependent images. Always ensure the application you wish to launch is in the last image in the list. Seperate each image you wish to layer with a comma.
To force the use of a certain version of the Turbo VM enter the version number under VM version.
In the above example, InstEd requires local file access. This can be permitted by setting File Isolation to Write Copy of Merge.
Enable Isolate network to isolate all tcp,udp and named object calls within the container.

Navigate to Admin Settings. Under Shortcut Icon (.ico) click Choose File to upload an icon file for the application. Click on the dropdown menu for Categories to assign the relevant categories for the application to appear in on the Turbo.net Hub.
Enable the application as Official to ensure it can be found in Turbo Launcher and from a search on the Turbo.net Hub. Click Embeddable to allow the run page to be embedded on websites and blogs.
When complete. Click Update.
We are always looking for new applications to host on the Turbo.net Hub. If you would like to share your work with everybody, please reach out to us via Twitter: @turbohq or alternatively send us an e-mail to: support@turbo.net.
Managing Containers
Once created, track and manage containers with these commands.
# List containers with base images, commands, creation date, and status
> turbo containers

ID           Images            Command       Created          Status
03bddd8bef   spoonbrew/clean   cmd           8/14/2014 1:03   Stopped
52hd888xa3   local/server-app  startup.bat   8/14/2014 1:00   Running

# Remove a specific container from the host system
> turbo rm 03bddd8bef

# Remove all containers
> turbo rm -a
Note that running containers must be stopped before being removed.
Processes and Stopping Containers
The life cycle of a container is controlled by the processes within that container. Processes in a container spawn as child processes of the Turbo VM executable, which manages the container environment.
When a process within a container exits or completes, the container exits as well.
# You can forcefully exit a container from the native command window
> turbo stop <container id>
This command kills the Turbo VM managing process along with any child processes.
You can also explicitly shut down a container from a command window running in the container by typing exit or entering Ctrl+C.
# If necessary, restart a closed container and specify the container ID
> turbo start 8dpp9eb5
Debugging
If you experience crashing or other issues with Turbo containers, here are several commands to help you debug and fix these problems.
# If your container unexpectedly crashes, enable diagnostic mode
> turbo run --diagnostic <image>

# Then fetch the logs created by the run
> turbo logs
This command returns logs of all the standard streams (STDIN, STDOUT, STDERR) for the specified container.
Please note that enabling diagnostic mode will cause your container to run slower than expected. Therefore we recommend only enabling this mode for diagnostic/debugging purposes.
# You can also debug by viewing changes to a container's filesystem and registry
> turbo diff 8dpp9eb5

# Similarly you can revert changes to get the container back to a running state or to debug changes
> turbo revert 8dpp9eb5
IP Routing
Turbo container IP routing can be used to map container network ports to those on the native machine. This is possible using the --route-add flag.
The syntax for the --route-add flag is <protocol>://<containerPort>:<hostPort>. For example, to map container TCP port 8080 to host port 80, you would use the command flag --route-add=tcp://8080:80.
In addition, the ip protocol is supported which applies routing to all IP-based communication. For example, the command --route-block=ip blocks all IP traffic. Subsequent --route-add flags can be appended to whitelist specific IP addresses.
It is also possible to map a container port to a random high host port for security purposes or to avoid binding conflicts. This port can subsequently be queried with the turbo netstat command. To map container TCP port 4321 to a high random host port, use the flag --route-add=tcp://4321:0. The 0 here represents a randomly assigned high port.
Sample: PuTTY Whitelisting
PuTTY is a popular free Telnet client for Windows. To create a PuTTY container with all outbound access blocked except to IP address 10.0.0.34:
> turbo new putty --route-block=ip --route-add=ip://10.0.0.34
Now let’s reroute all traffic from 1.1.1.1 to 10.0.0.34, making it possible to connect to host at 10.0.0.34 typing address 1.1.1.1 in PuTTY:
> turbo new putty --route-block=ip --route-add=ip://10.0.0.34 --route-add=ip://1.1.1.1:10.0.0.34
It is also possible to block or map IP ranges using the CIDR notation. For example, the following command allows PuTTY in the container to connect only to hosts in the 192.168.1.0/24 network:
> turbo new putty --route-block=ip --route-add=ip://192.168.1.0/24
To disallow connection to a set of specific set of IP addresses or ranges (“blacklisting”), simply specify them in the --route-block parameter:
> turbo new putty --route-block=ip://10.0.0.34
The --route-add and --route-block command flags are also supported within the commit command, so it is easy to save custom network stacks into deployable images.
Host Name-based IP Restrictions
This syntax also allows specifying host names instead of IP addresses. Often using a human-readable domain name is easier to setup, more readable, and is automatically maintained across IP address changes. When a host name is specified, it is treated as if its IP address had been specified. Cases where multiple IP addresses are resolved — including IPv6 — are handled properly. Note however that you cannot specify a host name on the right side of a route-add mapping since the result would be ambiguous if the host name resolved to multiple IP addresses.
For example, to run a Chrome container allowing only access to the turbo.net and blog.turbo.net domains, you can use the command:
> turbo new --route-block=ip --route-add=ip://turbo.net --route-add=ip://blog.turbo.net chrome https://turbo.net
Wildcards are supported in host name routing. For example, to unblock turbo.net and all of its subdomains, use the command:
> turbo new --route-block=ip --route-add=ip://*.turbo.net chrome https://blog.turbo.net
Taking this a step further, to run a Chrome container disallowing access to the facebook.com domain and all of its subdomains:
> turbo new --route-block=ip://*.facebook.com chrome
Creating IP Routing Layers
If you need to apply the same set of IP routing rules across multiple applications, it is inconvenient to repeat them each time you create a container. In this situation, you can create a layer containing the appropriate IP routing rules and apply it to all of the applicable containers.
For example, to create a layer that blocks access to all IP addresses except the turbo.net domain, the network 192.168.1.0/24, and 127.0.0.1, first create a container with the rules:
> turbo new --name=network-blocking-container --route-block=ip --route-add=ip://turbo.net --route-add=ip://192.168.1.0/24 --route-add=ip://127.0.0.1
We then commit the routing container to a new image called network-blocking-layer:
> turbo commit network-blocking-container network-blocking-layer
We can now use this layer together with any image:
> turbo new network-blocking-layer,firefox https://turbo.net
> turbo new network-blocking-layer,putty -ssh 192.168.1.1
These applications can in turn be committed to a new image that is ready for deployment:
> turbo commit firefox firefox-restricted
> turbo run firefox-restricted
IPv6 Routing
IPv6 address are also supported by this network syntax. The colons in IPv6 addresses causes conflicts with this syntax however. To solve this, IPv6 addresses in Turbo commands are enclosed in square brackets.
For example, to block the localhost address, use the command:
> turbo new putty --route-block=ip://[::1]
To block all IP traffic except the link local IPv6 space. Notice we can use the CIDR notation to specify a range of addresses.
> turbo new putty --route-block=ip --route-add=ip://[fe80::c218:85ff:febd:5c01/64]
To redirect traffic from a specific IPv6 address to localhost:
> turbo new putty --route-block=ip --route-add=ip://[2001:cdba::3257:9652]:[::1]
Routing Files
While working with long routing lists (eg to block advertising or other undesired sites) it is inconvenient to add many --route-block and --route-add flags to command line or TurboScript file. To simplify this, we use the --route-file flag.
The routing file has a simple INI-style syntax:
[<protocol-action>]
Host-address
The header contains the definition for how the below addresses should be interpreted. Supported protocols are ip, tcp, and udp and supported actions are add and block.
To block/unblock all IP addresses we can use the 0.0.0.0 literal or *.
For example, a routing file that blocks all IP traffic except turbo.net/spoon.net addresses:
[ip-block]
*
[ip-add]
*.turbo.net
*.spoon.net
The route file can be used with all other container management commands. For example:
> turbo try firefox --route-file=routes.txt --name=turbo-firefox
It can also be used during commit to persist routing settings into an image:
> turbo new firefox --name=fx
> turbo commit fx turbo-firefox –route-file=routes.txt
And can be included in a TurboScript build command:
> turbo build turbo.me --route-file=routes.txt
Blocked Site Routing
IP routing can also be used to reroute traffic from blocked sites to an internal network. As an example, we will reroute all traffic from nytimes.com to an internal containerized web server.
First, we run a preconfigured Apache server that binds to local port 80:
> turbo new apache/apache-samples --detach
Next, we run firefox with routing enabled:
# route nytimes.com traffic to local web server
turbo new firefox --route-add=ip://*.nytimes.com:127.0.0.1
After typing nytimes.com in browser it shows our custom page, instead of original site:

Sample: Creating Single Site Browsers
Turbo’s IP routing capabilities can be used to create custom browsers that allow access only to a specific site or set of sites. A simple solution was shown in previous articles, eg:
> turbo new firefox --route-block=ip --route-add=ip://*.turbo.com --route-add=ip://*.spoon.com
The above command works for simpler websites, but more advanced websites use resources from multiple external sources. We need to allow access to those external sites for the site to load properly.
To simplify the process of creating a routing file for this scenario, we have published a PowerShell script to help. In this example we will show how to obtain this script and use it to create a forbes.com limited browser.
First, download the script from turboapps repository: route-file-builder.ps1
Example script usage:
PS> Route-file-builder.ps1 -urls “http://turbo.net”

PS> Route-file-builder.ps1 -urls (“http://turbo.net”, “http://spoon.net”) -routeFile c:\path\to\routes.txt
When the -routeFile flag is not passed, output is printed to the console.
The script runs the container in the background with a fully blocked network and iteratively unblocks hosts that the website tries to connect to.
Let’s run it for forbes.com:
PS > .\route-file-builder.ps1 -urls forbes.com -routeFile c:\s\forbes-routes.txt
Security warning
Run only scripts that you trust. While scripts from the Internet can be useful,
this script can potentially harm your computer. If you trust this script, use
the Unblock-File cmdlet to allow the script to run without this warning
message. Do you want to run C:\s\route-file-builder.ps1?
[D] Do not run [R] Run once [S] Suspend [?] Help (default is "D"): R
Running browser...
Did everything work correctly? (y/n):
In every iteration, the script opens firefox to the forbes.com site. After closing the browser it asks the user if the site was displayed correctly. Repeat the process until the web page displays correctly.

In the first iteration firefox is not displaying anything, so we choose n
Running browser...
Did everything work correctly? (y/n): n
Running browser...
Did everything work correctly? (y/n): n
Running browser…
Did everything work correctly? (y/n): y
After the fourth iteration the site is displayed correctly. Now we answer yes and script ends.

Now we can open the forbes-routes.txt file and check all the unblocked hosts:
[ip-add]
*.forbes.com
127.0.0.1
tiles.r53-2.services.mozilla.com
tiles.services.mozilla.com
location.services.mozilla.com
i.forbesimg.com
a1586.g1.akamai.net
self-repair.mozilla.org
shavar.services.mozilla.com
shavar.prod.mozaws.net
aus5.mozilla.org
aus5.external.zlb.scl3.mozilla.com
safebrowsing.google.com
sb.l.google.com
services.addons.mozilla.org
olympia.prod.mozaws.net
versioncheck-bg.addons.mozilla.org
blocklist.addons.mozilla.org
ocsp.digicert.com
search.services.mozilla.com
tiles-cloudfront.cdn.mozilla.net
www.googletagmanager.com
b.scorecardresearch.com
stats.g.doubleclick.net
tags.bluekai.com
consent.truste.com
contextual.media.net
rt.liftdna.com
www.googletagservices.com
cs9.wac.phicdn.net
tracking-protection.cdn.mozilla.net
connect.facebook.net
content.dl-rms.com
h.nexac.com
forbescount.xmlshop.biz
a1.vdna-assets.com
ml314.com
load.amexp.exelator.com
ox-d.forbesbidder.servedbyopenx.com
partnerad.l.doubleclick.net
us-ads.openx.net
ib.adnxs.com
ssum.casalemedia.com
medianet-d.openx.net
qsearch.media.net
[ip-block]
0.0.0.0
As an additional step, it is possible to manually cleanup the list (eg remove the Mozilla sites) and prepare a minimal working configuration.
The routing data can later be committed into a new image with turbo commit --route-file command.
Tips
Running Containers as Different Domain Users
By default Turbo containers will run in the security context of the user executing the turbo command. But what if we need to run as a different user?
In this example, let's run SQL Server Management Studio as a different domain user than the currently logged in user. In our scenario we have the Turbo.net Client installed in the local profile (the default behavior).
Our first attempt is to just use the runas command to execute the command turbo run ssms2012:
> runas /user:user@domain "turbo run ssms2012"
Enter the password for user@domain:
Attempting to start turbo run ssms2012 as user "user@doamin" ...
RUNAS ERROR: Unable to run - turbo run ssms2012
5: Access is denied.
Unfortunately with the Turbo.net Client installed in the local profile I cannot use runas to run SSMS in the user context I want since it does not have access to that user's profile.
One workaround then is to install the Turbo.net Client for all users and then use runas:
# install the client for all users
> turbo-client.exe --all-users

# run as a different user
> runas /user:user@domain "turbo run ssms2012"
This works well but we may not want to reinstall the plugin or may not want to install it for all users.
We can solve this by using runas with the /netonly flag:
> runas /netonly /user:user@domain "turbo run ssms2012"
The /netonly flag forces the application to use the runas account for remote resources and the logged in account for local resources.
4.5 Continuous Integration
Create automated, clean, and consistent test environments with Turbo while keeping the Continuous Integration (CI) server free from conflict causing dependencies.
Existing CI servers may have many varying libraries, runtimes, custom settings, and applications, possibly in different languages and versions, that are required for the various automated builds. Sometimes these dependencies collide to create inconsistent test environments and headaches when configuring automated builds.
With Turbo no installed dependencies are required on the CI server. All dependencies are built into containers providing consistent environments and a dependency-free CI server. This eliminates the possibility of dependency collision and makes automated build configuration very simple.
The basic steps for integrating Turbo into a CI server are to create a TurboScript, integrate it into an automated build on a CI server, and finally run and test the container.
Create TurboScript
The TurboScript contains all the steps necessary to build the container.
# Creates a new container from the specified images
layer nodejs/nodejs git/git

# Clone a project in the container
cmd mkdir c:\root
cmd git clone https://github.com/project/repo c:\root

# Install Node.js depencies
cmd cd c:\root\server & npm install
Save your script as a .me file. See the TurboScript reference for more information on TurboScript script instructions.
Integrate into the CI server
The next step is to configure an automated build on the CI server that will execute the TurboScript and create an image. You'll need to configure the necessary triggers, schedules, notifications, etc., which will vary between CI servers.
Now add the follow commands to your automated CI build script:
# Log in if images from a hub repository are specified
turbo login <username> <password>

# Execute the TurboScript and build a new image
turbo build -n=<name> C:\path\to\turbo.me

# Export the image to a location on the host system
turbo export <name> c:\root\image.svm
Rather than exporting the image to the host system, you can also turbo push the image to the hub where other users could pull it down and test.
See the Command Line Interface page for more information on turbo commands.
Run the container
# First import the image to your local registry
> turbo import -n=<name> C:\root\image.svm

# Run the image
> turbo run <name> <command>
If you alternately pushed to the hub then use these commands to pull and run:
> turbo pull <account name>/<name>
> turbo run <account name>/<name> <command>
Example use case: running tests inside a container on the CI server
We would like to run the tests of a project inside a turbo container, all within a CI server job.
Let's assume we have an ready-built image, pushed to the hub, containing the project source code and all the development dependencies: jdk,maven,git.
layer jdk,maven,git

cmd mkdir c:\root
cmd git clone https://github.com/JodaOrg/joda-time.git C:\root
The CI server job that runs the tests inside a turbo container would look like this:
turbo login %SPOON_USER% %SPOON_PWD%

rem pull latest changes and run the tests
turbo run turbo/sample -n=ci-example --attach -w="C:\root\joda-time" /c git pull ^&^& mvm clean test
set TESTS_EXITCODE=%errorlevel%

rem capture the test results from the container, make them available to the CI server
mkdir surefire-reports
turbo cp ci-example:C:\root\joda-time\target\surefire-reports surefire-reports

rem discarding container
turbo rm ci-example

rem exit using the testrun's exit code
exit /b %TESTS_EXITCODE%
The CI server stores the Turbo credentials as environment variables SPOON_USER and SPOON_PWD
When running the image, it first pulls latest code changes and then launches the build and runs the tests.
After the tests complete, there are two things that need to be done, before it finally exits:
-
test results need to be made available outside of the container, for tasks like test results parsers, which display rich information about test failures.
-
the temporary container needs to be discarded.
Once these things completed, the script exits using the original tests run exit code. This to ensure that if the test run failed, the CI server will detect this by the exit code returned.
Using Turbo Studio Snapshot
While many application can be installed directly into Turbo containers through a normal install process or be built using a TurboScript, some applications require the use of snapshots to create a working image.
Snapshotting is a technique for creating images of virtual applications by detecting file system and registry modifications made during installation.
Here we will discuss how to create an automated pipeline for creating snapshot-based application images using Turbo Studio, Vagrant and Jenkins. Jenkins is an automation server used to manage automated processes. Vagrant is a tool used to manage virtual machine instances (in our case, VirtualBox).
The Basics
Creating a virtual application image using snapshots is a multi-step process. It includes taking a snapshot of a clean operating system image before installing an application, performing the installation, and taking the second snapshot after the setup completes. Extra time is required for managing a virtual machine or downloading the application installer. Overall, building application images via snapshot manually is time consuming, so the process benefits dramatically from scaling via automation.
The TurboScript plugin for Jenkins provides a build step to automate creating snapshot-based application images. With a small amount of configuration Jenkins can perform all tasks necessary to create an application image via snapshot:
- Boot a clean virtual machine
- Take the before snapshot
- Install an application
- Take the after snapshot
- Build an application image
- Import an application image to the local repository on the host machine
- Delete the virtual machine
Features available off the shelf in Jenkins help to further customize the workflow by triggering a build by an external event, downloading an application installer or publishing an image to the Turbo.net Hub.
As an example, we will show how to create a Jenkins build project for FL Studio, a popular music production system.
Initial Setup
The configuration presented below was tested using Jenkins 2.134, Vagrant 1.7.4, and VirtualBox 4.3 installed on Windows 8.1 and Windows Server 2012 R2.
First, install Jenkins for Windows, Vagrant, VirtualBox, and Turbo Studio.
The TurboScript plugin for Jenkins uses PowerShell to call external tools like Vagrant and Turbo Studio. To enable execution of PowerShell scripts on the Jenkins host machine, run the command below in an elevated command prompt:
> powershell -Command Set-ExecutionPolicy RemoteSigned
Configure Jenkins
Open the Jenkins Plugin Manager and install the latest version of TurboScript Plugin.
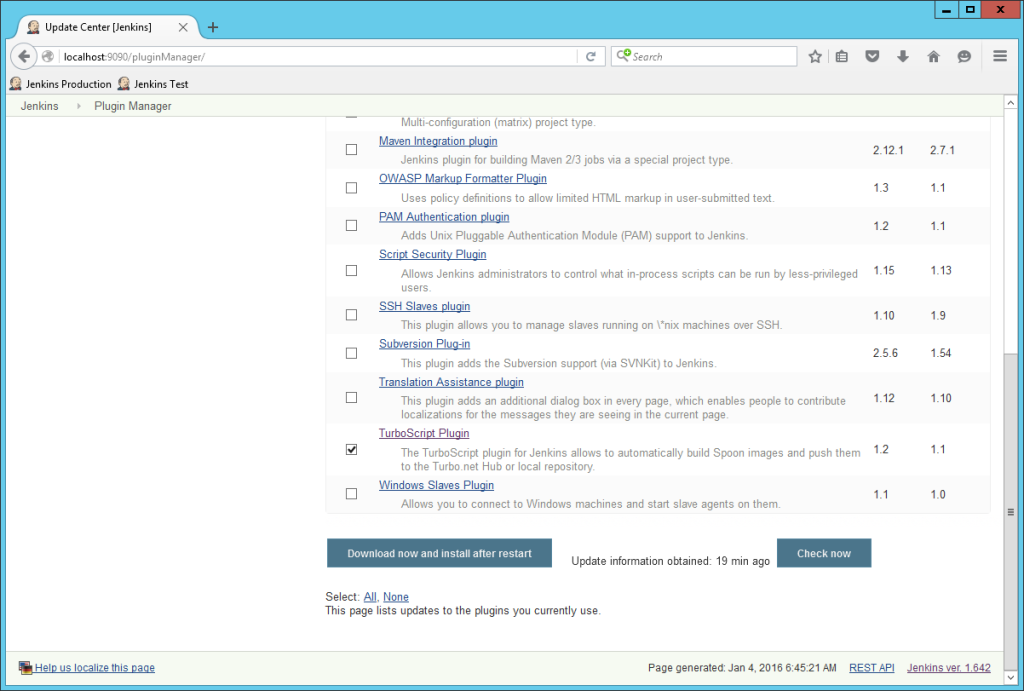
Go to the Jenkins configuration page and scroll down to the Studio Snapshot section.

Specify the file paths to XStudio.exe in the Turbo Studio install directory and a license file on Jenkins host machine. If you installed Turbo Studio using default settings, XStudio.exe can be found in the C:\Program Files (x86)\Turbo.net\Turbo Studio 18 folder.
Optionally, you may want to change the default virtual machine used to take snapshots. Boxes are downloaded from Vagrant's Service. The list of boxes is available here.
Create the Build Project
Go to the Jenkins dashboard and create a new Turbo Project. Name it FL Studio Snapshot and click OK.

Create a PowerShell script file which downloads the latest FL Studio installer. You can copy the code snippet below:
(New-Object System.Net.WebClient).DownloadFile(
    "http://support.image-line.com/redirect/FLStudio_Installer",
    "install.exe")

 $versionInfo = (Get-Item -Path "install.exe").VersionInfo

 $tag = ("{0}.{1}.{2}.{3}" -f $versionInfo.FileMajorPart,
     $versionInfo.FileMinorPart,
     $versionInfo.FileBuildPart,
     $versionInfo.FilePrivatePart)

 "flstudio:$tag" | Set-Content "image.txt"
Optionally, the script may create an image.txt file in the current working directory. The file should contain the name of the output image. It is considered a best practice to include a product version. In the sample code above the product version is extracted from file attributes.
Save the script file on the Jenkins host machine and execute it in a build step.
To add a build step, use the Execute Windows batch command option.

Specify the following command in the build step configuration:
powershell.exe -File "path_to_the_script"
Next, add a build step Take Studio snapshot and setup it in the following way:

Select the Generate using template option for installation script.
Specify /S to force a silent install.
Select the Ignore exit code checkbox.
Use a Fixed startup file set to @PROGRAMFILESX86@\Image-Line\FL Studio 12\FL.exe. For most applications, the default startup file selection made by Turbo Studio is sufficient.
Optionally, select the Overwrite checkbox if you want Jenkins to continue the build in case an image with the same version is already available in the Turbo.net Hub. Otherwise, the build will be aborted.
Save the build project and go back to the main Jenkins dashboard.
Trigger the Build
Open the context menu next to project name and click Build Now.

The build should finish in approximately half an hour. The FL Studio image will be saved in a local repository. If you want to publish it to the Turbo Hub, simply add the build steps Login to Turbo Hub and Push Turbo image.
4.6 Scenarios
Turbo.net Build Scripts
The build scripts for images in the Turbo.net hub are open source and stored on in a github repository. While these are written for our automated build system, any of these scripts can be downloaded and modified for your own use. And don't forget, contributions are always welcome!
Browser Ad Blocking
Ad blocking is important for improving user experience, maximizing performance, and eliminating an important source of security vulnerabilties.
Turbo automatically provides ad blocking in popular web browsers such as Chrome and Firefox. In addition, any application running in a Turbo container can be ad blocked using Turbo container networking.
This article will explain Turbo's built-in browser ad blocking and network routing-based container ad blocking technology.
Browser Ad Blocking on Turbo.net
Popular web browsers in the Turbo Hub such as Chrome and Firefox come pre-configured with ad blocking.

Turbo uses the uBlock Origin plugin, a popular open source system currently installed on millions of devices. Turbo augments the default configuration with data on additional advertising networks. The ad block plugin and databases are automatically updated as part of Turbo's automatic browser patching system -- users or administrators don't need to do anything!
If you wish to use a non-adblocked version of a browser, use the "Base" version in the Hub. For example, the mozilla/firefox-base image is a default Firefox image with no adblocking or other plugins applied.
IP-based Ad Blocking
Turbo also provides an alternate approach to ad blocking based on virtual network configuration in the container. Recall that Turbo supports custom IP routing rules within containers. The Turbo Hub provides a pre-configured routing table with known advertising networks and hosts blocked. Applying this layer blocks access to these advertising networks. This allows ad blocking for applications other than web browsers, where ad blocking plugin interfaces are not available.
Applications containing advertising in the Turbo.net Hub have this layer enabled by default. Examples include Skype and uTorrent.
To enable network-based ad blocking on your own applications, right-click on the application and press the Settings context menu button in the Applications tab of the dashboard. Then select the Network tab and click the Add button next to the Block Ad Networks layer:
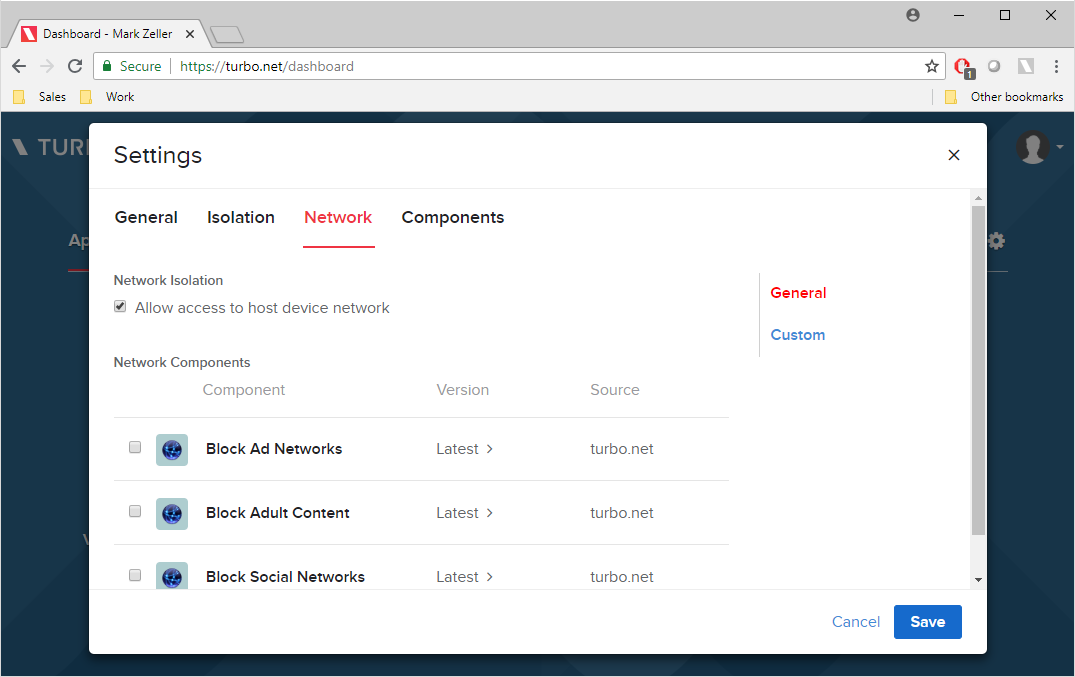
Finally, click Save.
The Block Ad Networks layer is an aggregation of multiple databases of advertising network hosts and IP addresses. These are updated nightly by TurboBuild and pushed automatically when automatic patching is enabled. Additional manual customizations can be applied on top of the layer by clicking on the Custom sub-tab.
Customizing IP Blocking
Administrators can easily build custom network blocking rules and apply them to organization containers.
For a small group of hosts which is unlikely to change, use the route block TurboScript instruction to add blocked hosts or IP addresses.
route block ip://ads.com
See the Skype or uTorrent TurboScripts for more detailed examples.
If there are a large number of hosts to block, it is easiest to define routing rules in a route file. A simple route file is below:
[settings]
PreResolveHostNames=false

[ip-block]
*.host1.com
*.host2.com
The declaration PreResolveHostNames=false instructs Turbo to skip resolving DNS names until the first time they are used. This significantly reduces the time required for launching an application when the configuration contains thousands of hosts.
Before submitting an application image, you may want to verify how an application behaves when hosts are blacklisted. The Turbo command line interface provides --route-block and --route-file options for this purpose:
> turbo try google/chrome --route-block=ip://host.com
> turbo try google/chrome --route-file=routes.ini
Once the changes have been tested, they can be applied with the turbo commit command using the same flags.
Blocking Adult Content
The Block Adult Content routes layer can be used with any Turbo container, including web browsers, email clients, instant messengers, or any other applications. The layer contains a set of IP routing rules that automatically block connections to adult content sites.
The host list in the Block Adult Content routes layer is updated automatically by TurboBuild based on published databases of adult content sites. Updates are propagated automatically to subscribed devices if automatic updates are enabled.
To enable network-based adult content blocking on your own applications, right-click on the application and press the Settings context menu button in the Applications tab of the dashboard. Then select the Network tab and click the Add button next to the Block Adult Content layer.
The layer can also be applied using the command line interface. To use the layer, insert block-adult-routes into the image list. For example, to run Chrome with adult sites blocked, use the command:
> turbo run block-adult-routes,chrome
Blocking Social Networks
The Block Social Networks routes layer can be used to block access to popular social networking sites (Facebook, Twitter, YouTube, etc) from any Turbo web browser. A full list of the blocked sites are listed here.
As with ad and adult content blocking, you can add this layer from your turbo.net dashboard with Block Social Networks layer or from the command line:
> turbo run block-social-routes,chrome
SQL Test Lab Environments
Turbo.net is a great way to provide online learning and test lab environments for SQL Server and other complex applications. Turbo VMs provide the user with a ready-to-use database server, sample content, and test IDE environment -- without requiring any setup or modifying the host desktop.
Here we will show you how to create a SQL Server Turbo VM lab that can be easily executed in your lab environment. In our example, we will create a lab environment for this article from SQL Server Central, one of the world's largest SQL Server communities: http://www.sqlservercentral.com/articles/T-SQL/130558/.
Prerequisites
If you want to follow along building this example, you will first need to download the Wildcard Searches.sql file. This will require an account at SQL Server Central.
The Basics
Our SQL environment will consist of three Turbo container images:
- sqlserver/sqlserver-express
- sqlserver/ssms
- A content layer that will provide content specific to the article for which the image is being created. Typically this is a SQL script, but could also include a database or other resources.
Step 1: Create the Lab Image
Specify a Sample SQL Script
Create a folder on your system for the contents of the content layer and change the directory of the command window to that folder.
> mkdir %UserProfile%\Desktop\article-content
> cd %UserProfile%\Desktop\article-content
Copy the Wildcard Searches.sql file into the article-content folder. The SQL Script must be named script.sql.
Create a turbo.me file which will be used to build the image. If prompted, select to save or create the file.
> notepad turbo.me
Add the following content to the turbo.me file:
# This TurboScript creates a content image to use with sqlserver/sqlserver-express

# Copy the content from the TurboScript directory.
copy script.sql c:\sql-content\script.sql
We will be using the tempdb which is in our SQL Server Express container, so we can skip to Build the Custom Image. If you want to use a custom database as sample content, follow the instructions in the Adding a Sample Database to the Custom Image section.
Adding a Sample Database to the Custom Image
Note: This section is optional and not required for the example.
To use your own sample database, create a new container on top of the base images using the following command:
> turbo new --name=content-for-article-container sqlserver/sqlserver-express:2012,sqlserver/ssms:2012
After SSMS launches, configure the sample database. You can connect to the .\sqlexpress instance with username sa and password password1.
Alternatively you can restore the database from a backup file. To do this, use the mount option to specify the folder on the host system where the backup database file resides. In this example, the mount point is set to the folder C:\SampleDB.
> turbo new --name=content-for-article-container --mount=C:\SampleDB sqlserver/sqlserver-express:2012,sqlserver/ssms:2012
After SSMS launches, configure the sample database by restoring the .bak file.
When configuration is complete, close SSMS and the content will be saved into a container called content-for-article-container.
Copy the SQL DATA folder from the container to the host (run this command from the same directory as your turbo.me file):
> turbo copy content-for-article-container:"C:\Program Files (x86)\Microsoft SQL Server\MSSQL12.SQLEXPRESS\MSSQL\DATA" host:.
Remove the files that are not needed:
> del DATA\model.mdf DATA\modellog.ldf DATA\MSDBData.mdf DATA\MSDBLog.ldf DATA\tempdb.mdf DATA\templog.ldf
NOTE: This assumeed you made changes to 'master' database. The point of the exercise is to remove all the database files that you don't need as many files are there by default.
Once the data is copied out of the container, it may be discarded:
> turbo rm content-for-article-container
Now that the sample database is present, append a line to the turbo.me file to copy the DATA folder into the custom image during the image build process:
# This TurboScript creates a content image to use with sqlserver/sqlserver-express

# Copy the content from the TurboScript directory.
copy script.sql c:\sql-content\script.sql
copy DATA c:\sql-content\
When the SSMS container starts, the user will have to attach the database to access the data. You can also put your database files directly in the SQL Server DATA directory to be attached automatically.
Build the Lab Image
Now that we have the contents ready for the lab image, we can build the image using the turbo.me file. Use an appropriate name in place of sql-sample-content. For example, if the VM corresponds to an article, a good practice would be for the image name to match the article title. Our example is based on an article titled SQL Wildcard Searches so we will name our image turbouser/sql-wildcard-searches. The placeholder turbouser should be set to your login name (you can find your login name with the command turbo login).
> turbo build --name=turbouser/sql-wildcard-searches turbo.me
After the build completes, test the new image.
> turbo run --route-block=tcp --name=testing-for-article-container sqlserver/sqlserver-express:2012,sqlserver/ssms:2012,turbouser/sql-wildcard-searches
Publish the Custom Image
Once the image has been tested, push the sql-wildcard-searches image to Turbo.net:
> turbo push turbouser/sql-wildcard-searches
For ease, this example is already available on the Turbo.net hub: sqlserver/sqlserver-samples.
> turbo run sqlserver/sqlserver-samples
Login to the default instance with sa and password1:

From inside the container SSMS, open c:\sql-content\script.sql and execute:
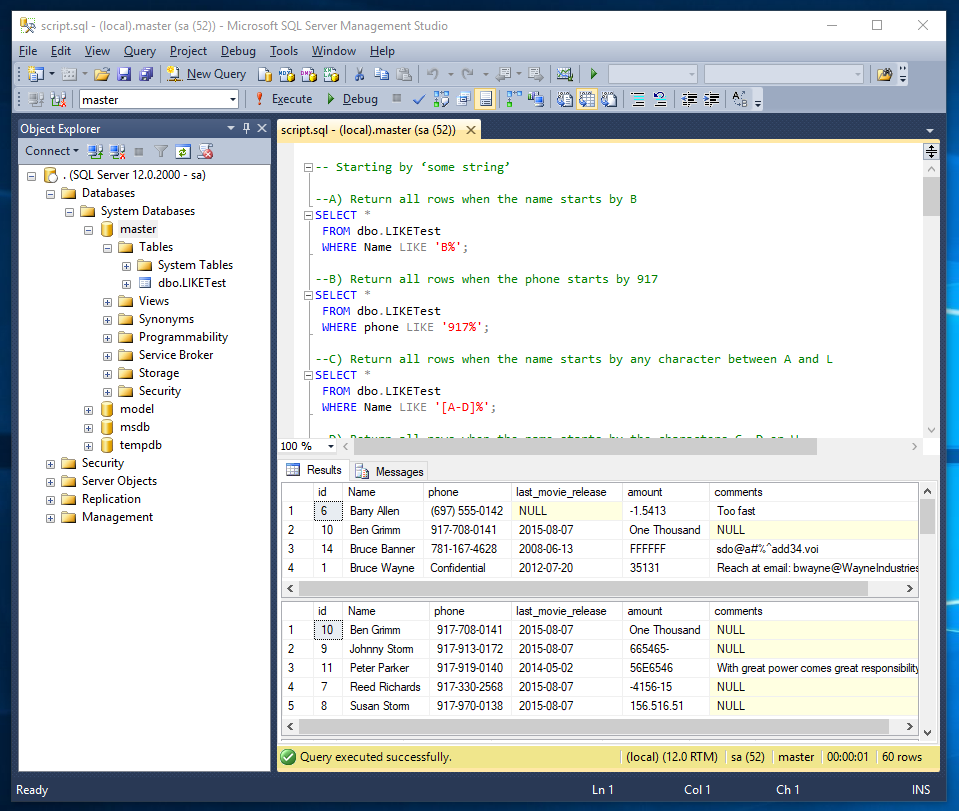
Legacy SQL Server
Some legacy applications have dependencies on legacy versions of SQL Server. Here it will be shown how to create and configure a SQL Server 2005 Express Edition image using Turbo Studio and the snapshot method.
Prerequisites
Perform the snapshot on a clean Windows 7 x64 system that has all the latest Windows Updates. It is important to ensure that no Microsoft Visual C++ Redistributable packages are installed as they will be missed during the snapshot. Note that uninstalling the packages will leave behind files and registry keys that will render the resulting snapshot incomplete so they must never have been installed on the machine.
Install Turbo Studio. See downloads for the latest version.
The Build
-
In Turbo Studio, press the Capture Before snapshot button.
-
Install SQL Server 2005 Express Edition. You can download the installer here: https://www.microsoft.com/en-us/download/confirmation.aspx?id=21844
-
Install SQL Server 2005 Service Pack 4 - kb2463332
-
Configure SQL as needed. For example, you may want to add users with access or pre-configure databases.
-
Stop all SQL related services. The services have a lock on required files that prevents them from being copied to the Files snapshot folder.
# in an admin console
> sc stop sqlwriter
> sc stop sqlbrowser

# assuming the default instance name of SQLEXPRESS
> sc stop mssql$SQLEXPRESS
-
In Turbo Studio, press the Catpure and Diff snapshot button.
-
Clear out all startup file entries as well as any shortcuts that were picked up by the snapshot. This will avoid starting unnecessary processes and creating undesired shortcuts when using SQL Server Express as a component of other applications.
-
To isolate the instance, edit the .xappl configuration in a text editor and add the following to NamedObjectIsolation ("SQLEXPRESS" is the default name of the instance, if your instance name is different then you will use it below). If the instance is isolated then only application from inside the same container will be able to connect to it.
<NamedObjectIsolation enabled="False">
    <Exception regex="SQLEXPRESS" />
    <Exception regex="sql\\query" />
</NamedObjectIsolation>
Troubleshooting
The SQL Server service logs are stored in the following location inside the container C:\Program Files (x86)\Microsoft SQL Server\MSSQL.1\MSSQL\LOG.
Legacy Internet Explorer and Java
A common use case in enterprise environments is using legacy Internet Explorer browser with old versions of Java. Many line of business web applications and plugins no longer work with the latest browsers. Using a legacy browser container can solve that problem and still allow your users to have all the latest operating system patches.
Below is a step-by-step guide showing how to build a standalone executable that packages Internet Explorer 8 with Java 6.
Begin by installing the Turbo Client and Turbo Studio. You can get the latest version of each here.
With the Turbo Client installed, pull the images that we need from the Turbo.net hub:
# pull internet explorer 8
> turbo pull ie:8

# pull java 6
> turbo pull jre:6
Now we will need to import those images into Turbo Studio to use. Starting with our Java 6 image, import the image from the local repository.
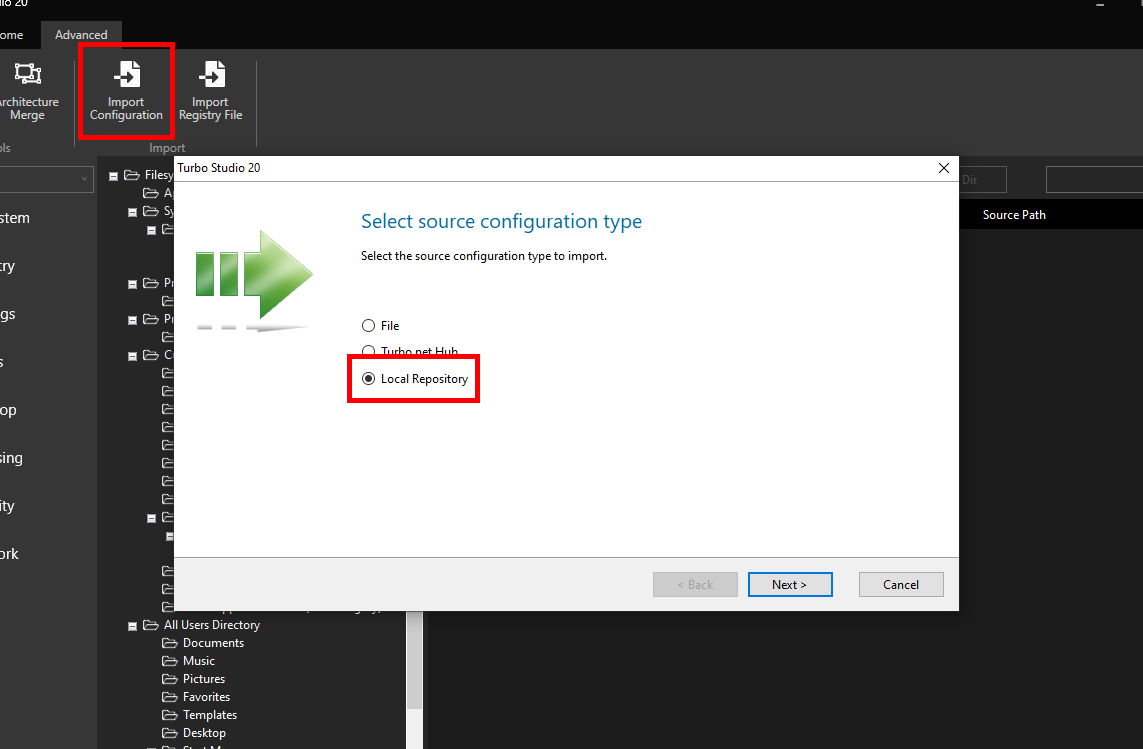
Select oracle/jre:6.45.
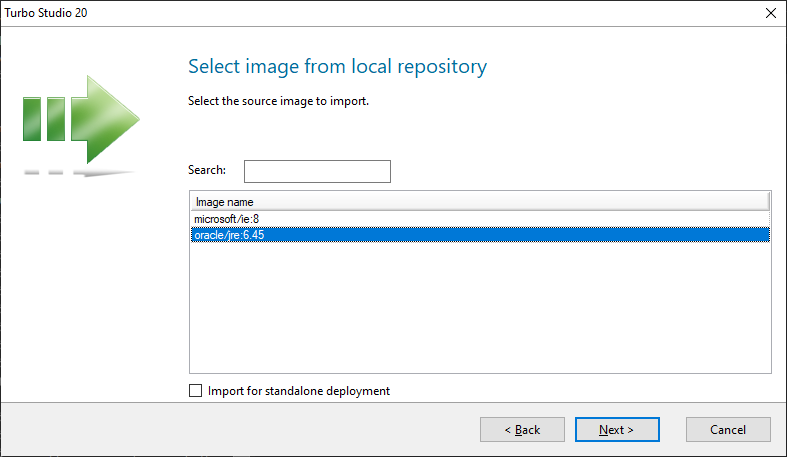
Save the imported image to a location on your machine. Here, c:\turbo\jre-6.45 was chosen.
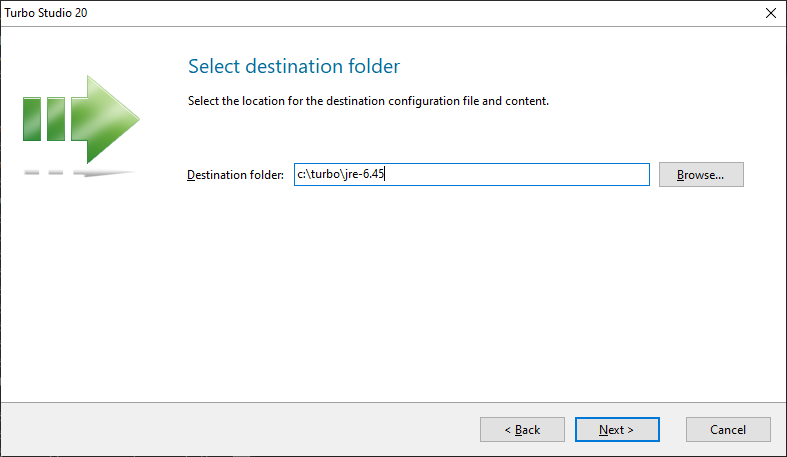
Once the import is complete, set the Project Type to "Layer (.svm)" and set the Output File to "jre-6.45.svm". Save and build. You will now have c:\turbo\jre-6.45\jre-6.45.svm.
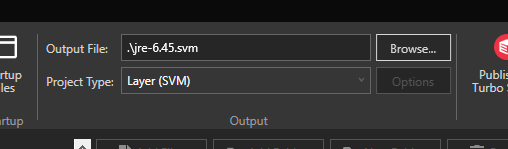
Now we need to import our Internet Explorer 8 image. Import from the local repository and select microsoft/ie:8.

Save the imported image to c:\turbo\ie-8.

Change the Output File to "IE8+JRE6.exe" (or any other appropriate name for your scenario).
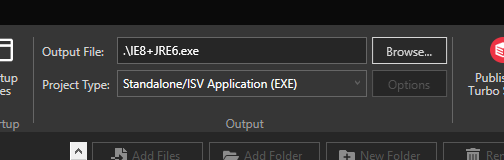
Add jre-6.45.svm to your layers library by clicking the Layer button and then Import Layers.... Select c:\turbo\jre-6.45\jre-6.45.svm. Select jre-6.45 in the layers list.
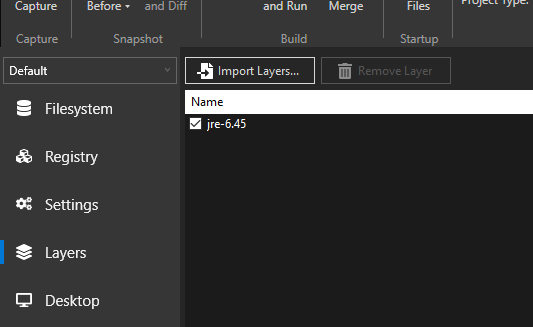
Save and build. Below is an image of our new IE8+JRE6 standalone executable running side-by-side with native Internet Explorer 11 on Windows 10.

Microsoft .NET Core
.NET Core is a free and open-source managed software framework for Windows, macOS and Linux. It allows you to build managed applications and deploy them across many different platforms. Below are the steps to create a custom .NET Core container image for use with your applications.
Building
Download the .NET Core Binaries from https://www.microsoft.com/net/download/dotnet-core/2.1. These instructions are the same whether you are producing a build for x86 or x64 versions of either SDK or Runtime. Select the variants required for your scenario.
Decompress the .NET Core .zip file to you application build working directory. For this example, we will assume that the working directory is c:\dotnetcore-build and our .NET Core files were unzipped to c:\dotnetcore-build\dotnet-sdk-2.1.811-win-x64.
Open Turbo Studio and save the empty configuration to c:\dotnetcore-build\dotnetcore.xappl. Set the Startup File to @SYSTEM@\cmd.exe, the Project Type to Layer (.svm), and the Output File to c:\dotnetcore-build\dotnetcore.svm. Note, depending on your scenario and deployment method, your settings may vary.
Make sure that the Copy added files to configuration folder option is enabled (see the Option menu at the top-left corner of the Turbo Studio interface).
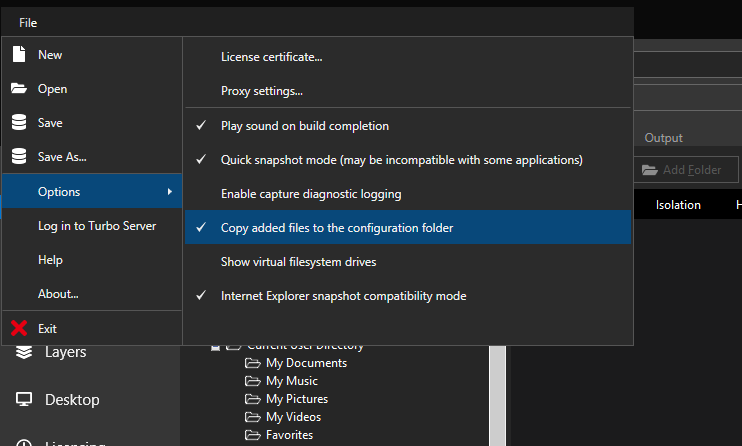
Then select System Drive in the Filesystem editor window. Click the Add Folder button and select c:\dotnetcore-build\dotnet-sdk-2.1.811-win-x64. This will add the folder to your configuration, copying the files to the c:\dotnetcore-build\Files directory.
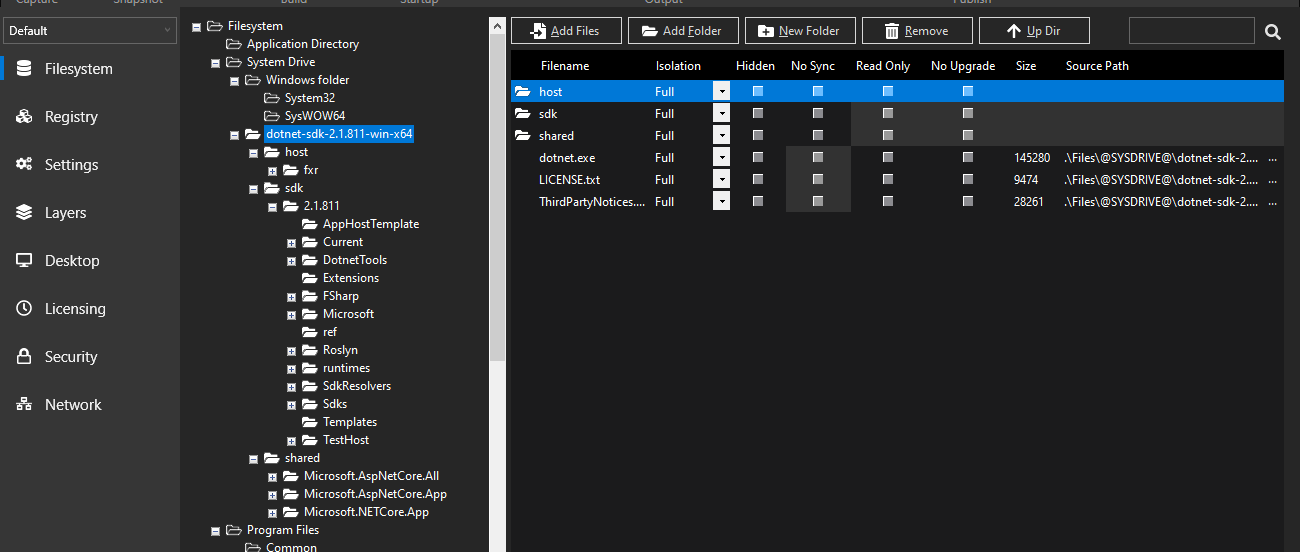
Next add two environment variables to the configuration. Add PATH in WriteCopy isolation mode with a value of @SYSDRIVE@\dotnet-sdk-2.1.811-win-x64 (or whatever the installation path is in your container environment). This value will be added to the existing PATH value for applications that run inside the container. Also add DOTNET_SKIP_FIRST_TIME_EXPERIENCE in Full isolation mode with a value of true. This will make first runs execute much faster as unused components will not be pre-cached.

Depending on where this image is deployed, the Microsoft Visual C++ 2015 Redistributable Update 3 may be required. This can be added to your container environment from the Turbo.net hub with the microsoft/vcredist:2015 image. For standalone executables, see the article on Legacy Internet Explorer and Java for an example of how to add a dependency from the Turbo.net hub.
Save your configuration and build the image.
Testing
To test your new container image, first import into your local Turbo repository:
> turbo import svm c:\dotnetcore-build\dotnetcore.svm --name=dotnetcore
Create a new container with this image with the new command:
> turbo new dotnetcore
Start the .NET Core sample MVC website:
(container)> cd c:\dotnet-sdk-2.1.302-win-x64
(container)> dotnet new mvc
(container)> dotnet restore
(container)> dotnet publish

# start the webapp on http://localhost:5000
(container)> dotnet run

# note: this can fail with an error about 'Unable to start Kestrel' because a valid certificate was not found.
#       if so, follow their instructions and re-run:
(container)> dotnet dev-certs https
(container)> dotnet dev-certs https --trust
(container)> dotnet run

Using launch settings from C:\dotnet-sdk-2.1.302-win-x64\Properties\launchSettings.json...
info: Microsoft.AspNetCore.DataProtection.KeyManagement.XmlKeyManager[0]
      User profile is available. Using 'C:\Users\turbouser\AppData\Local\ASP.NET\DataProtection-Keys' as key repository and Windows DPAPI to encrypt keys at rest.
Hosting environment: Development
Content root path: C:\dotnet-sdk-2.1.302-win-x64
Now listening on: https://localhost:5001
Now listening on: http://localhost:5000
Application started. Press Ctrl+C to shut down.
Microsoft Office 2010
Microsoft Office 2010 is commonly used with legacy plugins or line of business applications. This can be problematic as enterprises rush to migrate their users to the latest version of Office 365 or Office 2016 which are not able to run side-by-side with Office 2010.
Fortunately it is possible to run Office 2010 applications inside a Turbo container allowing them to be isolated from existing installations. Below are the steps required to build your own Office 2010 image.
Building
In order to make an Office 2010 build, you will need to use Turbo Studio to perform a snapshot. You will need a clean machine or VM to do this on (no other applications installed, Office not previously installed). For maximum compatibility it is recommended to use a Windows 7 x64 snapshot machine and Office 2010 x86 installer.
Download the Microsoft Office 2010 Deployment Kit for App-V. This contains licensing service components that allow Office 2010 to run in a container. You want the version of the the kit (64- or 32-bit) to match the system architecture (x64 or x86), not the installation type of Office itself.
Extract the files from the deployment kit to your snapshot machine. Install the office licensing service from the extracted deployment kit:
> msiexec /i OffVirt.msi PROPLUS=1
NOTE: The parameters to pass to OffVirt.msi depend on the Office 2010 product you are installing. See How to sequence Microsoft Office 2010 for information about the options that are available.
Use Turbo Studio to Start Capture.

Install Microsoft Office 2010. NOTE: this must be done with a KMS or VLK installer. Retail licenses will not work properly.
If there are any additional components or plugins that are to be included in the build, install those now.
Once the installation is complete, run the Office applications that were installed to ensure that initial configuration and licensing is correct.
Complete the capture.
After the snapshot is complete, the Microsoft Office Snapshot wizard will present you with some options to isolate the configuration file. In almost all scenarios you will want the first option, to isolate from the native system. This will allow you to run side-by-side with native versions of Microsoft Office. In scenarios where the Office 2010 container is run with native components and plugins, then it may be required to select the second option. However, this option generally doesn't allow for side-by-side operation with native Office installations.
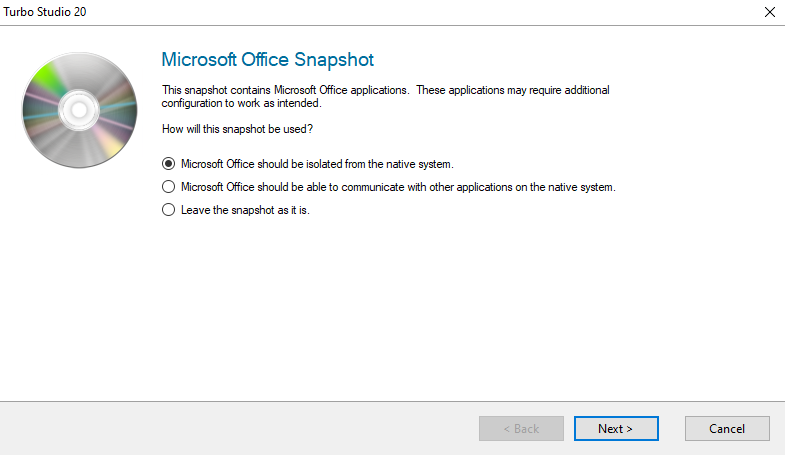
Set the Project Type to Standalone/ISV Application (EXE), save the configuration, and build.
Testing
To test your Office 2010 build, copy the output .exe to a new machine. You will have to install the Microsoft Office 2010 Deployment Kit for App-V in the same manner as you did on the snapshot machine.
Integration with Native Applications
Often it is desirable to integrate containers with application toolchains that are installed natively on the machine. Turbo containers have the flexibility to allow this kind of integration. Below we will walk through how to open a .PDF file defined in a container with Adobe Reader which is installed natively on the system.
Opening with native Adobe Reader
We will start by creating a simple container image which has a .PDF in it that we will want to open. I will source the .PDF from a file on my desktop and copy it into a new folder called "MyPDFs".
# start the new container, mounting the directory where the files will be sourced from
> turbo new clean --mount="%USERPROFILE%\desktop" -n=mypdfs-container

# inside the new container, create a folder and copy the files in
(container)> mkdir c:\MyPDFs
(container)> copy "%USERPROFILE%\desktop\test.pdf" c:\MyPDFs
(container)> exit

# now commit the container to a new image
turbo commit mypdfs-container mypdfs
Now that we have the new container image mypdfs, let's use it with a natively installed Adobe Reader instance. Since the container will need to be able to view the native machine in order to "see" the Adobe Reader files, we will run in Write-Copy isolation mode. In this mode, the native machine is visible to the container but any attempts to write to the native machine will be redirected to the container's sandbox.
Also note the use of adobe/disable-reader-sandbox. This is used for compatibility of the Adobe Reader instance inside the container.
> turbo run mypdfs,adobe/disable-reader-sandbox --isolate=write-copy --startup-file="C:\Program Files (x86)\Adobe\Acrobat Reader DC\Reader\AcroRd32.exe" -- c:\MyPDFs\test.pdf
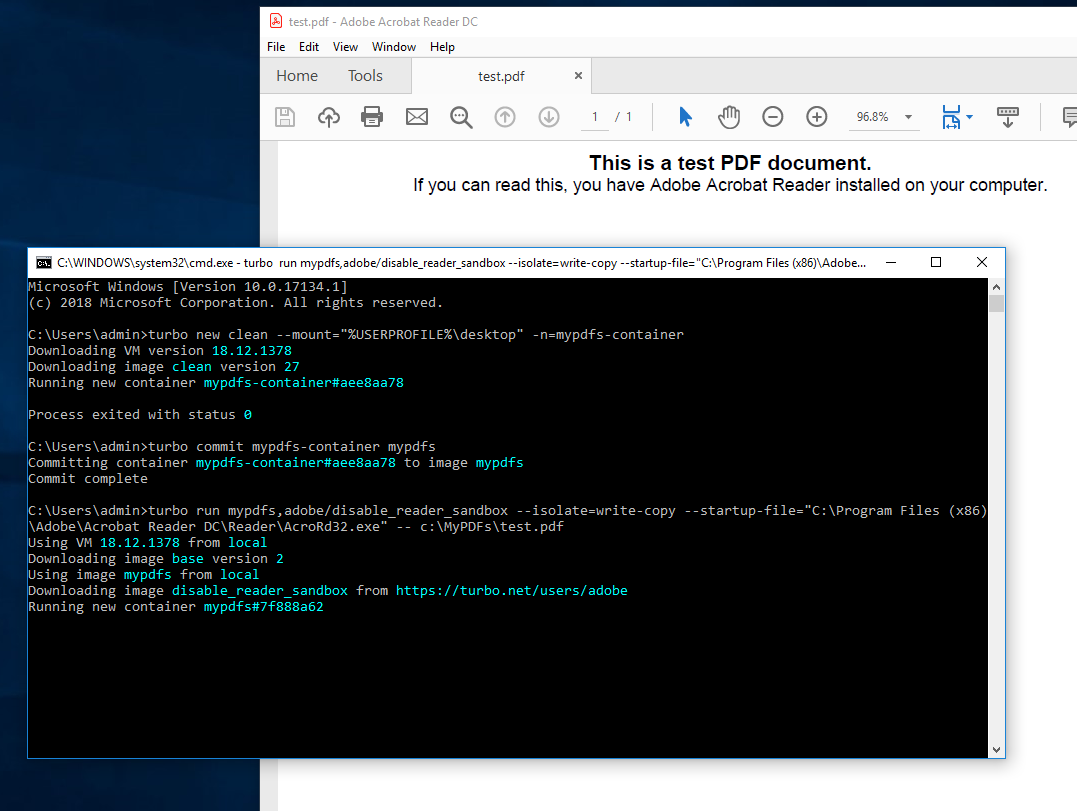
5.0 Server
5.1 Overview
Turbo Server is an application deployment platform that enables you to launch applications instantly from websites, portals and client desktops (Windows, MacOS, iOS, Android, or any HTML5 browser).
Unlike traditional deployment methods, applications streamed from Turbo Server do not require download, installation, rebooting, administrative privileges, or separate setup steps.
Turbo Application Server allows you to run application workloads on a server for your users. Turbo Application Server can source applications from the Turbo.net Hub or an on-premises Turbo Hub Server.
Getting Started
Turbo Server is available for deployment on-premises, as well as in the cloud via the Turbo Server Azure Marketplace Image (AMI).
For more information on setting up Turbo Server on-premises, please refer to the On-Premises documentation.
For more information on setting up Turbo Server in Azure, please refer to the Azure Marketplace Image (AMI) documentation.
Architecture
There are four major server roles in a Turbo Server deployment:
-
The Hub Server stores all application images and user session data. The Hub may be hosted in the Turbo.net cloud or run in a customer managed cloud or on-premises server. On-premises Hub servers can federate containers to and from other Hubs.
-
The Portal Server hosts the application web portal where users can log in to view and launch applications, open files, and manage Turbo resources. A portal server also provides API services allowing other client types to interact with the Turbo environment.
-
One or more Application Servers runs containerized applications and streams sessions to clients. A typical deployment uses multiple application servers in a pool to handle load volumes and provide redundancy. Application servers can be hosted in the cloud or on-premises.
-
The Broker Service controls how remote applications are executed in the application server pool and routes client requests to the appropriate servers.
If Turbo is used to deliver applications to endpoints or third-party streaming products for execution, only the Hub Server or a standard file server is required.
Network Diagram
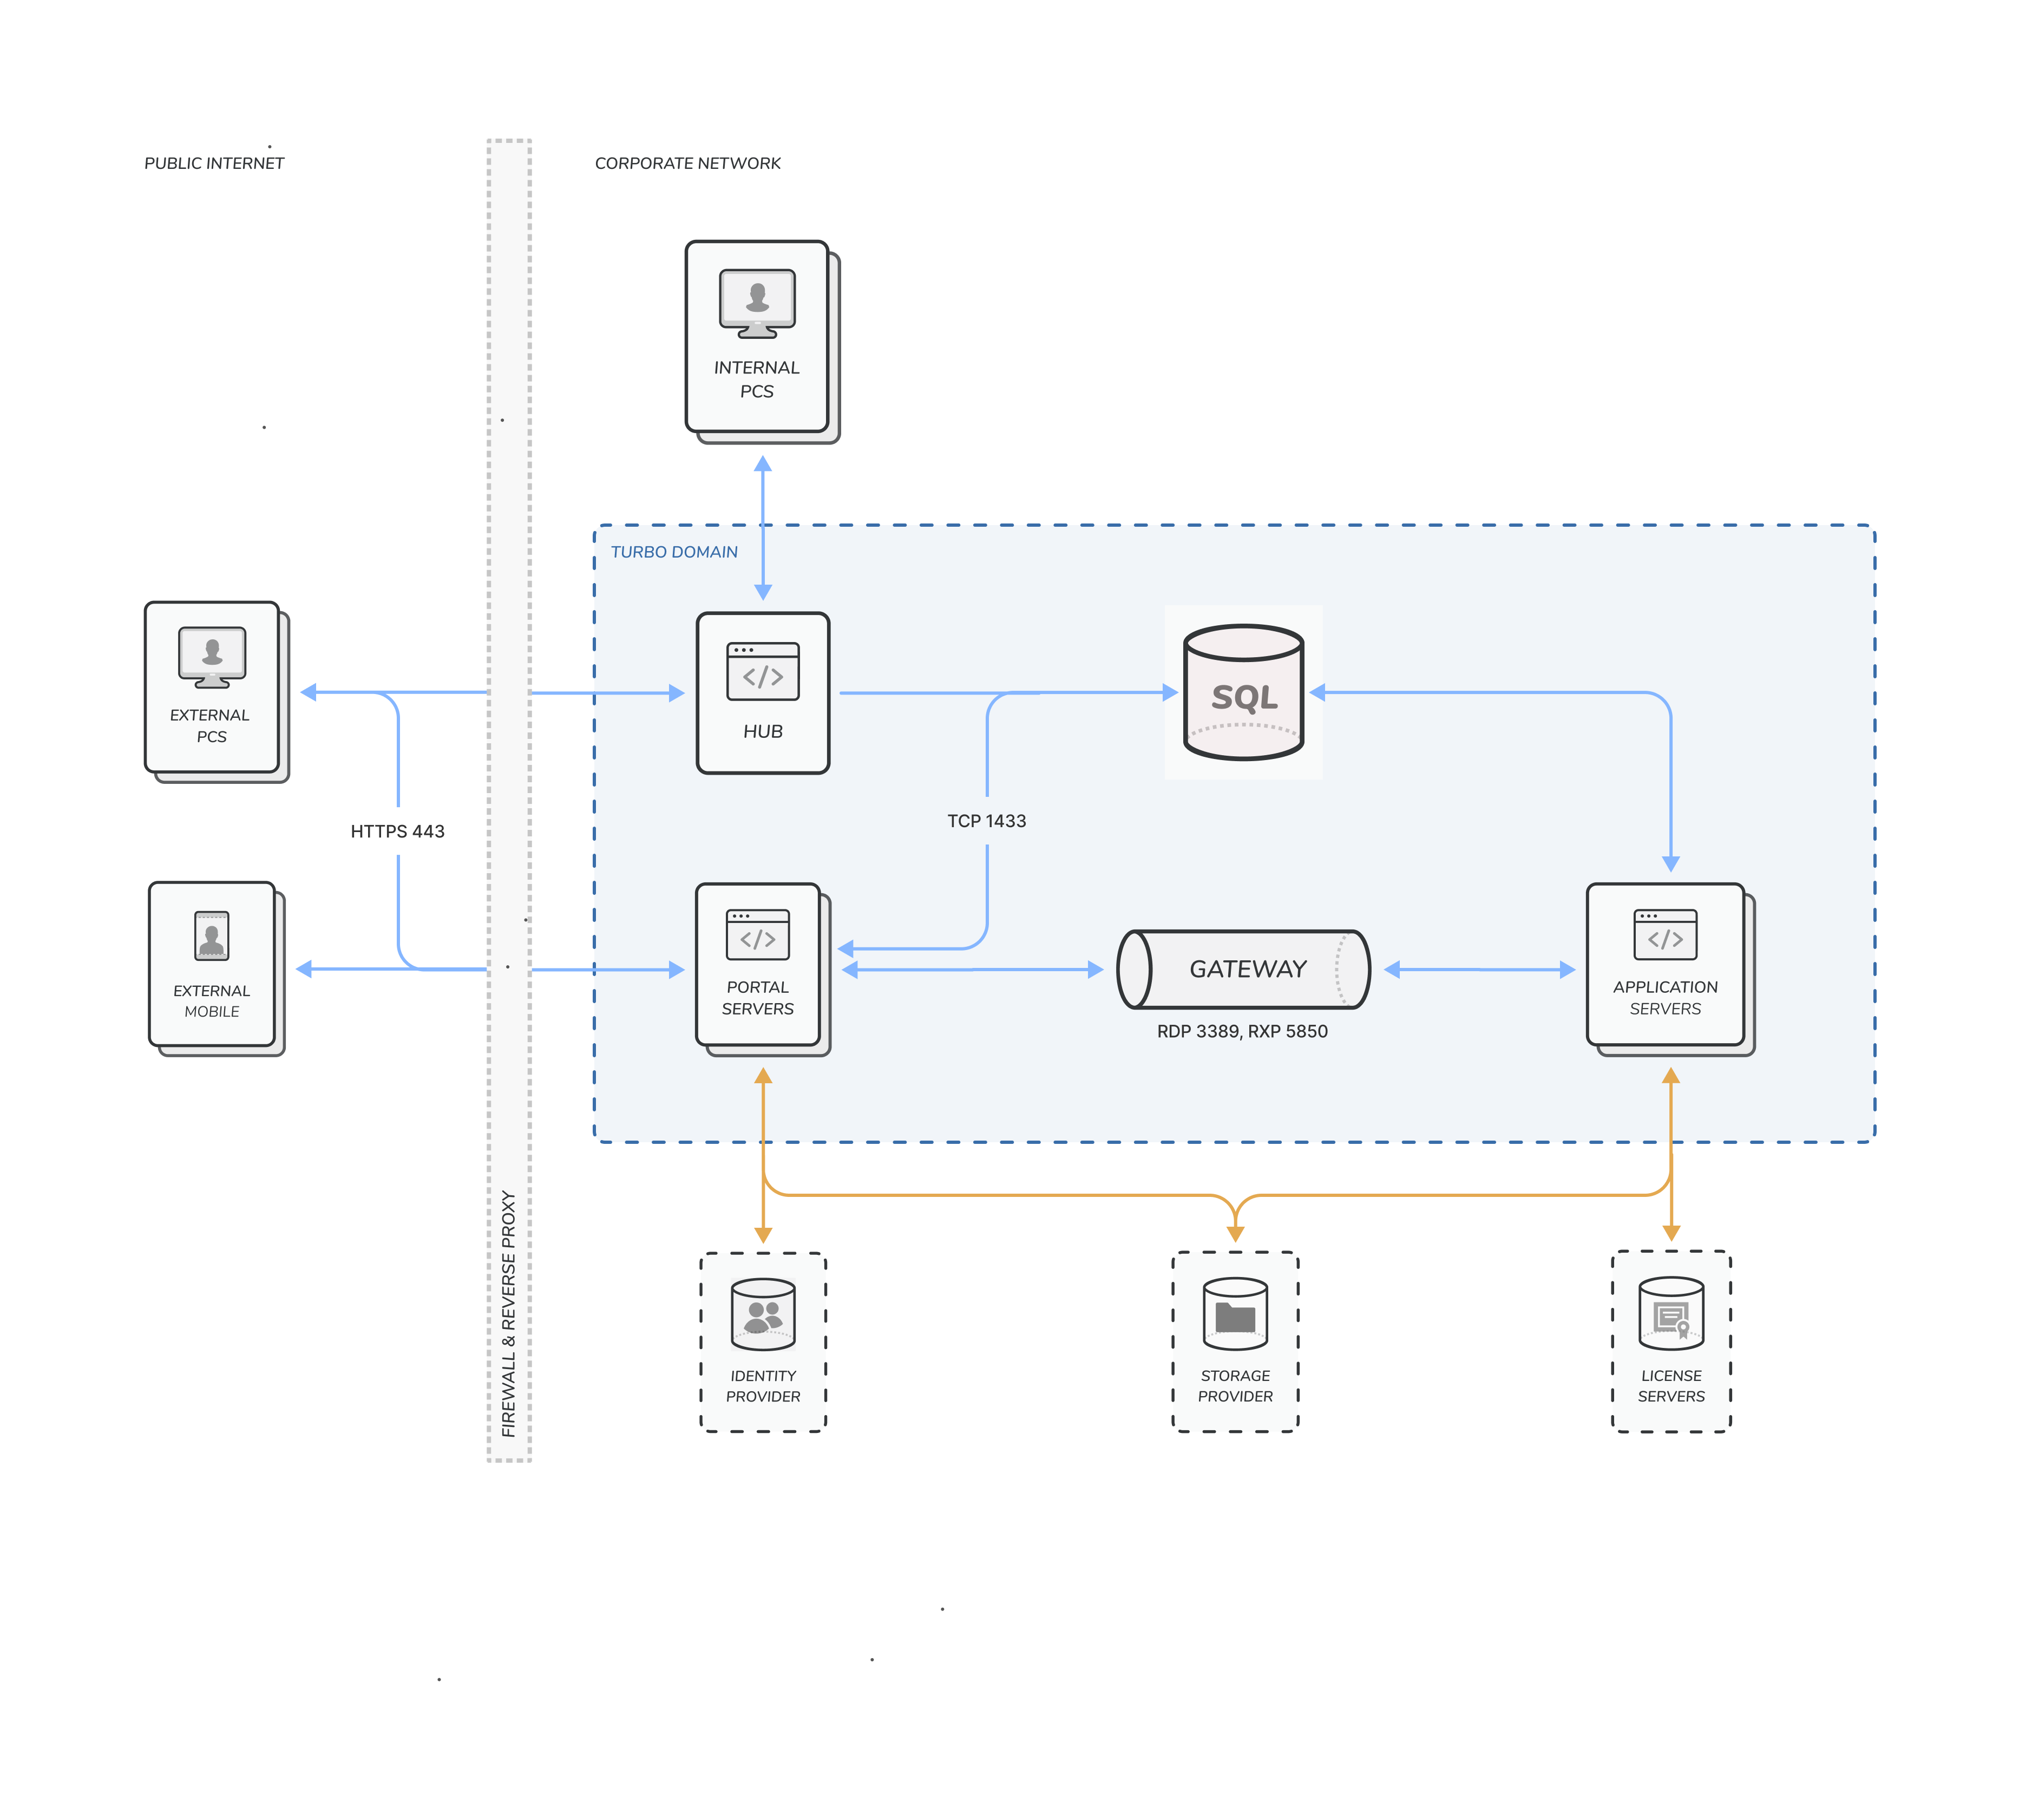
Technology
Turbo Streaming
Turbo Application Server allows an application to be executed in an application server pool while streaming the application to the client machine.
Native clients are available for Windows, Mac, iOS, and Android. An HTML5 client is also available allowing any HTML5-capable web browser to access applications.
Using Turbo container technology on the application servers allows for increased user density and less maintenance than traditional remote desktop solutions.
Features
Turbo Server enables you to accomplish the following goals:
-
Host containers on the web. You can stream Turbo containers from the Turbo Streaming Server portal site, custom external sites via HTML, or third-party collaborative web portals such as Microsoft SharePoint, IBM WebSphere, and Novell Teaming.
-
Provide your organization with a single access point to your application portfolio. Instead of moving desktop-to-desktop to upgrade or install software, you can publish an application to Turbo Streaming Server's portal site; this provides licensed end-users with immediate access and full functionality.
-
Launch applications faster over the Internet and intranets. Streamed applications launch immediately without the need to download. Turbo Streaming does not require any special ports or proprietary protocols.
-
Empower a mobile workforce. Turbo containers require no installation or administrative privileges, meaning they can launch from anywhere, even on secure, locked-down desktops such as airport and hotel kiosks.
-
Run multiple versions of applications side-by-side without conflicts or dependencies. Turbo containers run in isolated sandboxed environments. This enables you to avoid conflicts and dependency issues associated with natively-installed applications.
-
Migrate with confidence to Microsoft Windows 11 or Windows 10. Turbo enables you to run legacy applications as they stand on newer operating systems, including Microsoft Windows 7 and 8/8.1, without the need to recode, retest, or reinstall.
Supported Platforms
Turbo Server is compatible with the following platforms:
- Microsoft Windows Server 2022
- Microsoft Windows Server 2019
- Microsoft Windows Server 2016
- Microsoft Windows Server 2012 R2
- Microsoft Windows 11 Enterprise multi-session (Azure)
- Microsoft Windows 10 Enterprise multi-session (Azure)
Turbo Server supports x64 (64-bit) processor architectures.
End users can access Turbo Server from Microsoft Windows 11, Microsoft Windows 10, Microsoft Windows 8.1, Microsoft Windows 8, and Microsoft Windows 7 platforms. Turbo Portal Server supports Microsoft Edge, Internet Explorer, Chrome, Safari, Firefox, Opera, and other HTML5-compliant browsers.
Note: Versions of Internet Explorer prior to Internet Explorer 8 are not supported. If you are accessing the Portal Site with a newer version of Internet Explorer, but experiencing problems, be sure to disable compatibility mode. This feature is enabled automatically for intranet sites and serves to emulate Internet Explorer 7 which is not supported by the Portal Site.
5.2 Setup and Deployment
Prerequisites
In this section you will learn about system and software requirements for installing the various Turbo Server components.
System Requirements
- 64-bit 2.5 GHz CPU with 4 cores or better
- Microsoft Windows Server 2012R2+
- Microsoft Windows 10+ Enterprise multi-session (Azure)
- At least 8 GB of RAM
Additional requirements for Portal role:
- Memory usage grows with the number of streamed application connections. At minimum, 2 GB plus 50 MB of memory per concurrent user.
Additional requirements for Hub role:
- Memory usage grows with the number and size of applications pushed to the server. It also grows with the number of users pulling applications and session persistence data from the Hub storage. At minimum, 4 GB plus 50 MB per concurrent user. Typical installations have between 8 to 12 GB of memory allocated for the Hub role.
- Hard disk usage grows with the number and size of applications pushed to the server as well as the number and size of containers synchronized with the Hub.
Additional requirements for the Application role:
- The server system must meet the hardware requirements for the applications that will be executed on it for application streaming. For example, if your application requires a GPU for rendering, the server must have a compatible GPU card.
- Hard disk usage grows with the number and size of applications executed on the server as well as the number and size of the user's containers.
- RDS Licensing must be configured.
For quick demo or testing:
- Standalone installation option is sufficient with all roles on the same machine.
For proof of concept or production up to 100 users:
- Farm installation option.
- Hub and Portal roles on the same server.
- One or more Application servers depending on application requirements and expected load.
For more than 100 users:
- Farm installation option.
- Hub role on its own server.
- One or more Portal servers depending on expected load. Each portal server can support 300 concurrent users.
- One or more Application servers depending on application requirements and expected load.
For additional sizing and technical guidance, contact Turbo at support@turbo.net.
Database Requirements
For production and farm install scenarios, an external database is required. It is recommended to use Microsoft SQL Server or Azure SQL. Microsoft SQL Server Express is also supported, but will require pruning because the Analytics database grows with usage and may exceed the 10GB limit over a very long period of time.
For demonstration and testing scenarios, Turbo Server is installed with an embedded Microsoft SQL 2017 Express database when selecting the standalone install mode.
Disk Space Requirements
The initial installation of Turbo Server requires 1.05 GB of free space on your hard drive.
The amount of disk space required varies based on how many applications your server hosts as well as how many users you have.
Turbo DB uses data deduplication to minimize storage consumption when multiple copies of the same data are stored on the server, so your exact needs may vary based on the content being stored.
Firewall and Security
The Turbo Server installation automatically creates firewall rules for the selected roles. These rules allow external connections to access the Turbo Server sites and services. The opened ports are listed below:
Hub Server
| Port | Protocol | Description | Required Externally |
|---|---|---|---|
| 80 | TCP | Administration Site HTTP | Yes |
| 443 | TCP | Administration Site HTTPS | Yes |
Portal Server
| Port | Protocol | Description | Required Externally |
|---|---|---|---|
| 80 | TCP | Portal Site HTTP | Yes |
| 443 | TCP | Portal Site HTTPS | Yes |
Application Server
| Port | Protocol | Description | Required Externally |
|---|---|---|---|
| 80 | TCP | HTTP Service | No |
| 443 | TCP | HTTPS Service | No |
| 3389 | TCP | Application Server RDP | No |
| 5850 | TCP | Application Server RDP Proxy | No |
If your Turbo Server is running behind an external firewall that restricts these ports, you may need to configure the external firewall manually. For instructions on opening ports and for recommendations on how to best secure Turbo Server, refer to Configure Turbo Server Security.
If you have disabled outbound internet traffic from your Turbo Server but want to import the pre-built application packages available on Turbo.net Hub, the following addresses must be allowed:
- https://hub.turbo.net
- https://start.turbo.net
- https://start-c.turbo.net
Deploying On-Premises
In this section you will learn about installing, configuring, and running an on-premises Turbo Server.
Before you install
Before you install Turbo Server, please ensure that you have prepared the necessary servers configurations, certificates, and information that will be required during the installation process as described in the following sections.
Prepare the server roles deployment
As described in the architecture overview, there are three server roles to provision: Hub, Portal, and Application Server. Each machine hosting Turbo Server must have at least one server role installed. Typically, for medium-size workloads (less than 200 simultaneous users), Hub and Portal share a machine, and there are one or more Application Servers for streaming the applications. The minimum requirements for Hub/Portal role are listed here.
When you need to prepare for a bigger workload (more than 200 simultaneous users), we recommend putting Hub and Portal on separate machines. For performance and high availability reasons, you may provision multiple Portal instances (one instance is capable of handling 300 user sessions). They need to be put behind a load balancer. Such setup is described in a separate doc.
Prepare a Windows account for Turbo services
For security reasons, we recommend using a Windows account other than SYSTEM for running Turbo services. Make sure that the account password does not expire. This account also accesses the SQL Server instance (unless you won't use Windows authentication), so if you are in a domain environment, the Turbo service account should be a domain account. During the setup, the installer makes sure that the account has the necessary "Log on as a service" security policy set on the local machine. On the Application Server machine, the account must be a member of the Administrators group.
Prepare the database server
Turbo Server requires an instance of SQL Server, which is accessible by all the machines running Turbo Server roles. During the setup, the installer asks for connection strings to two databases:
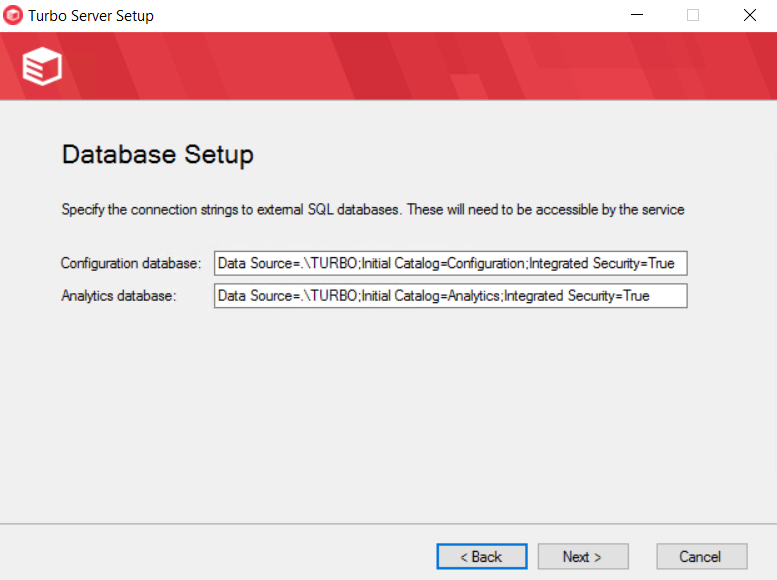
The default connection string to a Configuration database is Data Source=.\TURBO;Initial Catalog=Configuration;Integrated Security=True. Data Source is the SQL Server instance address, where . is the local machine. If you have SQL Server installed on a different server, place its DNS name or IP address here. Initial Configuration is the name of the database. Integrated Security=True specifies the way how Turbo services authenticate to the database server. Integrated Security is a different name for Windows authentication, and it's the recommended value. To use it, you need to make sure that the service account (configured in the previous paragraph) can authenticate to the database server and has a db_owner membership on the Configuration and Analytics databases:
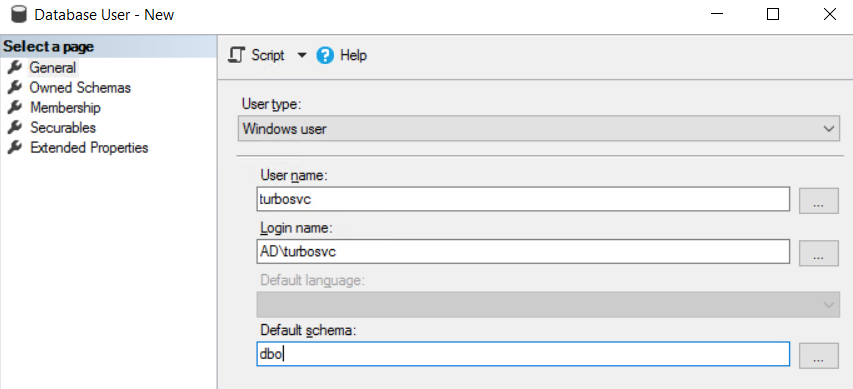
Alternatively, when SQL Server allows the mixed-mode authentication, you may specify a username and password, for example, Data Source=dbserver;Initial Catalog=ConfigurationUser Id=myUsername;Password=myPassword;.
Prepare certificates for web servers
Although both Portal and Hub can serve pages using HTTP, we highly recommend configuring HTTPS. Only the Portal machine needs to be publically accessible. However, both Portal and Hub require valid TLS certificates (Let's Encrypt certificates are OK). If Hub is on the same machine as Portal, only one certificate is needed as they share the domain address. Otherwise, Hub uses a certificate for its custom domain.
Open necessary ports
All servers hosting Turbo Server roles could be placed in one internal network. Ensure all required ports are available as described here. You may need to disable IIS if it is enabled on your server and occupies required ports.
Only Portal should be accessed from the Internet and requires HTTP (80) and HTTPS (443) ports to be available externally. When HTTPS is configured, all traffic from HTTP port is redirected to HTTPS.
Installation
This section describes the installation steps. The user which runs the installation must have read and write permissions to the database since Turbo server installation will provision the necessary database tables.
Download and run the Turbo Server Installer
Download the Turbo Server installer and run the setup application.
Provide the License Certificate
After buying a Turbo Server license, you should receive from us an XML file, which is the license certificate. If you don't have it, please contact support@turbo.net. Copy the file content and paste it into the text area:
Choose the installation folder
When installing the Hub role, make sure that the installation path points to a drive with enough space to hold the application images (we recommend at least 500GB).
Similarly, Application Server also requires a bigger drive (we recommend at least 200GB) as it caches the recently used images from the Hub. Additionally, make sure the system drive on the Application Server is big enough to store user containers. For files created by users, such as project files or documents, we highly advise using OneDrive (described later); however, there are always some application internal files or configuration settings that land in the container. They usually don't take much data, but we recommend at least 128GB free space on the system drive.
There are no special space requirements for the Portal role.
Specify the Turbo Server role(s)
It is a crucial step when you decide which server roles are to be installed on a given machine. We highly recommend dedicating a separate machine for the Application Server role. For medium-sized environments, it is accepted to install Hub and Portal roles on the same machine.
Configure the webserver URL
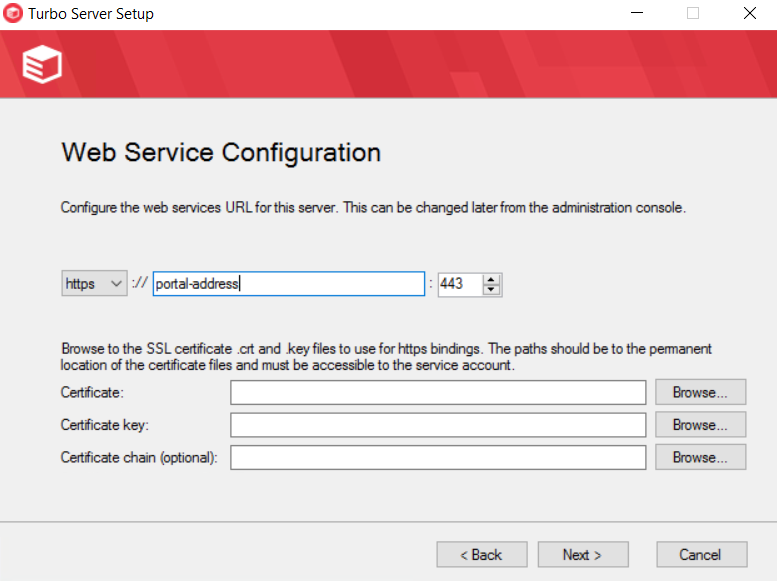
You will see this step only when configuring the Hub or the Portal role. The address in this field is the address at which the Portal/Hub will listen for connections. If the webserver is behind a load balancer, the address in this field should be the public address of the load balancer.
If Microsoft IIS is already on the machine then port 80 may already be in use. Verify that the ports assigned to the Administration and Hub sites are not already in use.
Configure the database connection strings
If the Farm server role was selected, the Database Setup page will request database connection information to an external SQL Server Database. When using an external SQL Server Database, be sure that the "Log On" user for the Turbo Server Windows Service has the appropriate access to the database. It may be necessary to modify the Log On user for the service by editing the service details after installing Turbo Hub Server.
Note: Turbo Server supports all versions of Microsoft SQL Server 2005 or newer and Azure SQL. Any connection string format supported by Microsoft SQL Server may be used.
Please check the section above when we prepare the database.
Configure the Turbo services account

In this step, provide the credentials for the account the Turbo services should use. Please check the preparation steps if in doubt.
The password must conform to the Turbo Server password policy.
Configure the Hub administrator account
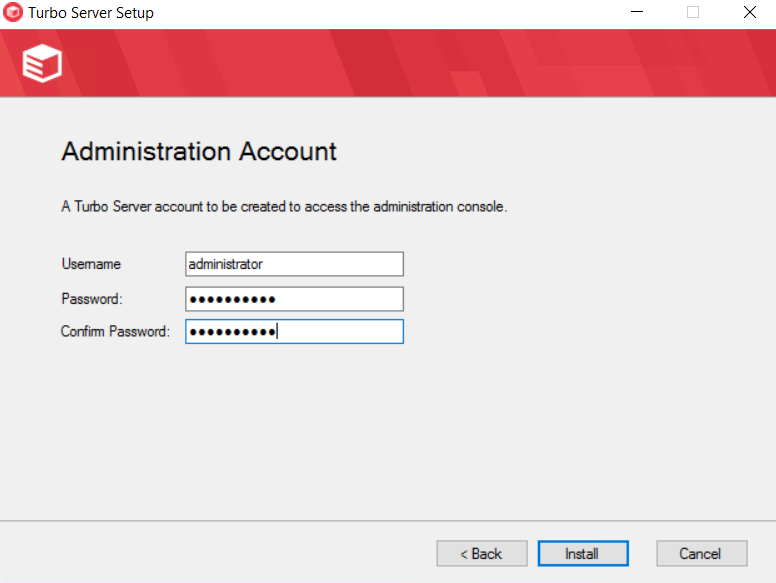
It is the account you will later use to administer the Turbo Server environment.
After this step, the installation starts and should finish within about five minutes. If you experience any errors, please check the setup logs in the {install-dir}\Logs folder. If it is still unclear why the setup failed, please zip the logs and send them to support@turbo.net.
Post-installation configuration
Some of the settings are available only after the server is installed, and we describe them in this section.
Authentication
The Users tab in the administrative screen allows the administrator to manage the user accounts as well as change the way Portal authenticates the users.
If you plan to use custom or Active Directory accounts, please visit this page in our documentation.
If you plan on configured Single Sign-On, Turbo Server supports identity providers that support SAML 2.0 and OpenID Connect authentication. Please visit the SAML 2.0 and OpenID Connect authentication pages for more information.
Cloud Storage and other settings
To enable OneDrive mounting in user sessions, you need to register a OneDrive client ID and secret in the Cloud Storage section. The steps how to do that are described here.
Licensing servers
If you use software that requires a license server, you may configure network connectivity between the Application Servers and the license server. That will work for streamed (cloud) sessions.
For native launches, we provide a tunneling option (in preview) through Portal. In this scenario, the Portal needs to have connectivity with the license server. The tunnel allows users to runs the licensed applications natively. To learn the details, please contact support@turbo.net.
Changing the database connection string
To change the database connection string after installation on any server in the domain:
- Open
c:\programdata\turbo server\settings.xml. - Edit the DbConfigurationConnection and DbAnalysisConnection element values in the xml.
- Open Task manager and restart Turbo service.
- Verify on the admin domain page the server status is
Online.
Deploying to Azure
In addition to on-premises deployment, a preconfigured Turbo Server instance can be deployed via the Turbo Server Azure Marketplace Image (AMI). The Turbo Server AMI has multiple plans which are preconfigured with the following components:
- Hub and Portal
- Hub, Portal, and Application
- Application
Users will need the following to deploy the Turbo Server AMI:
- Azure subscription
- Purchased or trial Turbo Server license
The following network ports are open by default once the Turbo Server AMI is deployed. These can be adjusted as necessary via the Azure Portal when the deployment is complete.
- 3389: RDP
- 80: HTTP
- 443: HTTPS
Note: While there are no extra charges to deploy the Turbo Server AMI, the Azure subscription will still be charged for any usage.
Hub and Portal Role Deployment
To deploy a Turbo Server AMI that includes the hub and portal roles go to portal.azure.com, click Create a resource, search for "Turbo Server", select a desired plan which includes the hub and portal roles, and click Create.
The following information is required to deploy Turbo Server AMIs prior to version 21.7:
- Resource group: New resource group to deploy the AMI
- Region: Azure region to deploy the AMI
- Virtual machine name: Hostname of the VM
- Administrative username and password: Local administrative account on the VM
- Database username and password: SQL account that will be used to access the SQL databases
- DNS prefix: Prefix of the DNS record automatically created during deployment
- Turbo Server license: Valid Turbo Server license to apply during deployment of the AMI
The following additional information is required if deploying version 21.7+ of the Turbo Server AMIs:
- Turbo Server administrative username and password: Administrative account for the Turbo Server instance
- Database username and password: SQL account that will be used to create and access the Azure SQL databases
Note: The virtual machine size can be altered prior to deployment. On the Virtual Machine Settings tab click Change size to select a different virtual machine size.
Click Create when all the required information is added to the deployment and the review step passes validation.
It takes about 10 minutes to complete the deployment. When it is complete, go to the administrative URL of the deployed Turbo Server AMI. This is the DNS name from the Overview page of the deployed Turbo Server AMI VM in the Azure Portal.
Configure administrative user
Note: This step is not needed if deploying version 21.7+ of the Turbo Server AMIs.
The Turbo Server instance is deployed without an administrative account. To setup an administrative account go to the administrative URL of the deployed Turbo Server AMI. This is the DNS name from the Overview page of the deployed Turbo Server AMI VM in the Azure Portal.
To get to the administrative portal add "/admin" to the URL.
From the administrative portal go to Users.
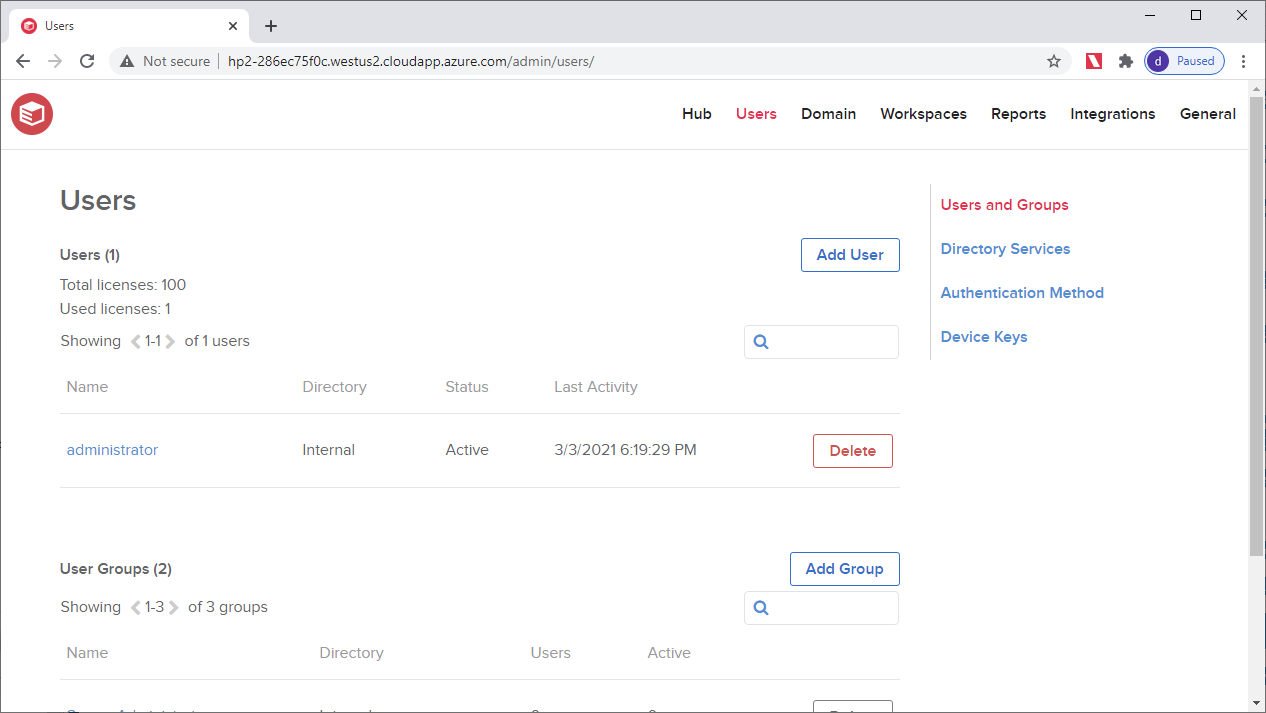
Select "administrator", add a new password, and click Save.
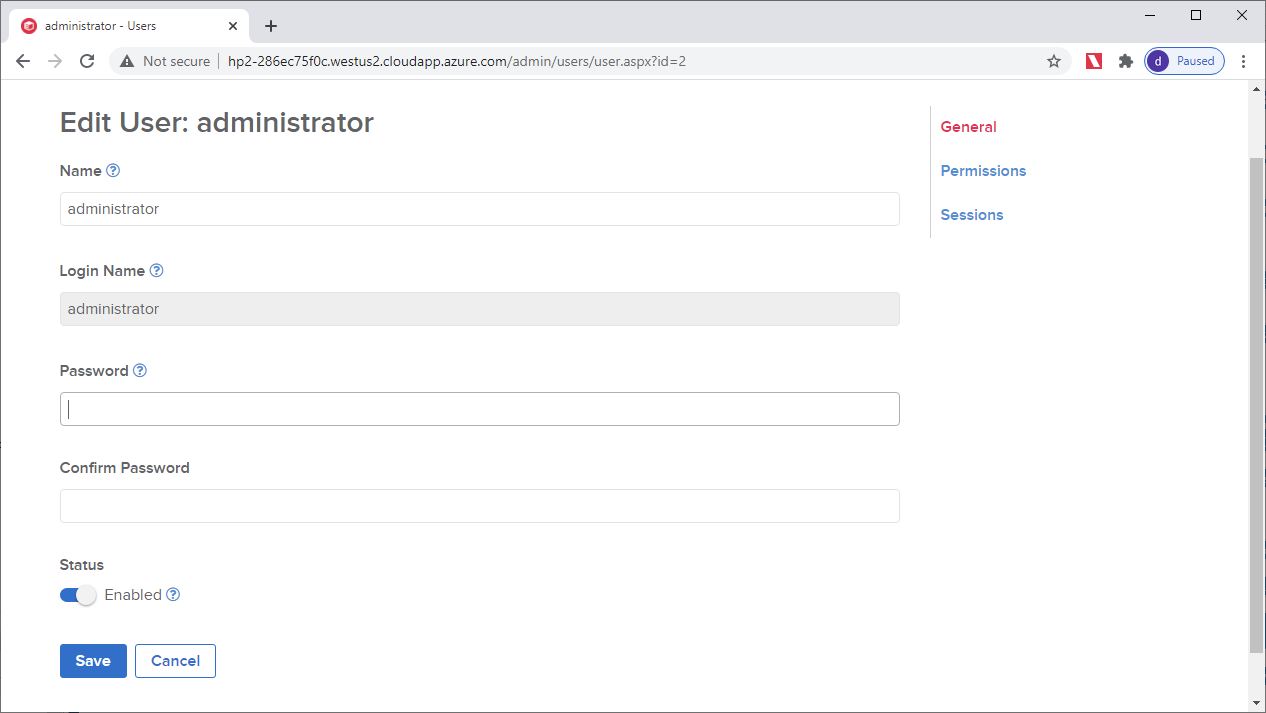
Next step is to add the "administrator" user to the Server Administrators group. This will grant Turbo Server administrative permissions to the "administrator" user. From the administrative portal go to Users.
Open the Server Administrators group, click Add Members, select the "administrator" account, and click Save twice.
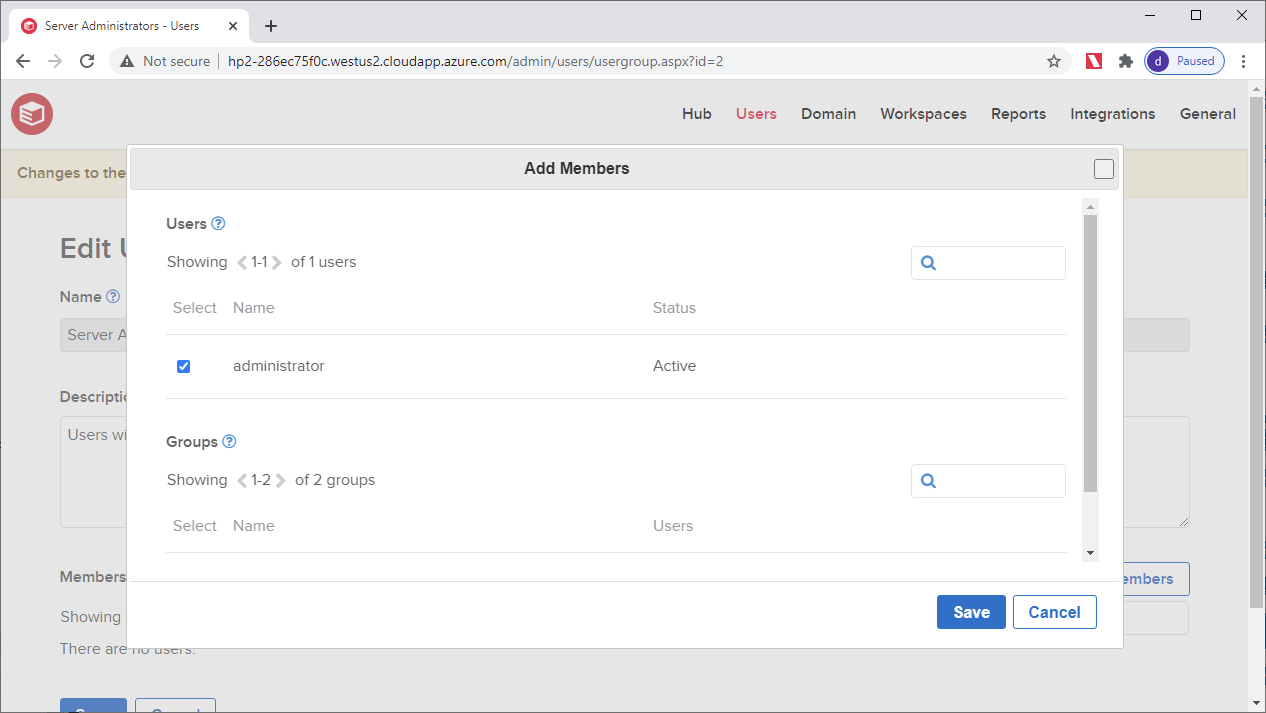
This will add the administrator user to the Server Administrators group. This will also cause the Turbo Server Service to restart to complete the changes. Once the restart is complete you will be redirected to the sign-in page. Sign-in with the "administrator" user to verify access.

The required post deployment steps for the hub and portal roles are complete if the sign-in was successful. However, for security reasons, it is strongly recommended to switch the portal to HTTPS. Please check the Managing a Server section to setup HTTPS.
App Role Deployment
To deploy a Turbo Server App AMI go to portal.azure.com, click Create a resource, search for "Turbo Server", select the App plan, and click Create.
Note: An existing Turbo Server AMI with the Hub and Portal roles is required to deploy the App role AMI.
The following information is required to deploy Turbo Server App AMI prior to version 21.7:
- Resource group: New resource group to deploy the AMI
- Region: Azure region to deploy the AMI. It is required to deploy to the same region as the existing Hub and Portal VM.
- Virtual machine name: Hostname of the VM
- Administrative username and password: Local administrative account on the VM
- Hub server address: Internal hostname or IP address of the Hub and Portal AMI the App AMI will be attached to
- Database username and password: Existing SQL account from the Hub and Portal AMI the App AMI will be attached to
- Turbo Server license: Valid Turbo Server license to apply during deployment of the AMI
The following additional information is required if deploying version 21.7+ of the Turbo Server App AMI:
- Azure SQL Private Endpoint URL: Private endpoint URL for the Azure SQL instance created for the Hub and Portal AMI. To find this URL go to the resource group of the Hub and Portal AMI, open the Private endpoint resource and click DNS configuration. The required URL is the FQDN listed under config1. It will look similiar to random-string.privatelink.database.windows.net
- Database username and password: SQL account that will be used to create and access the Azure SQL databases
The same virtual network and subnet for the Hub and Portal AMI is required on the App AMI. This is the Virtual network/subnet from the Overview page of the deployed Hub and Portal AMI VM in the Azure Portal. Apply the same virtual network and subnet to the App AMI on the Virtual Machine Settings tab.
Note: The virtual machine size can be altered prior to deployment. On the Virtual Machine Settings tab click Change size to select a different virtual machine size.
Click Create when all the required information is added to the deployment and the review step passes validation.
Additional configuration steps to setup Turbo Server:
- Add applications to the Hub
- Configure Users, Directory Services, and Groups
- Configure Workspaces
Virtual Desktop Infrastructure (VDI)
Virtual Desktop Infrastructure
The following documentation describes how to setup Turbo Server in a Virtual Desktop Infrastructure (VDI) environment.
Windows Virtual Desktop
The following are required to add applications from a Turbo Server workspace to Microsoft Windows Virtual Desktop (WVD) session hosts in Azure:
- Shared image disk
- Turbo Client installed and configured
Shared Image Disk
A shared image disk is a central repository of the application images. A central repository is recommended to reduce the application image transfers and to save disk space on the WVD session hosts.
An Azure managed disk with sharing enabled can be used for this purpose and can be created with the Azure CLI or the Azure Portal:
Azure CLI:
az disk create -g <wvd-resource-group> -n <sharedimagedisk-name> --size-gb 1024 -l <azure-location> --sku Premium_LRS --max-shares
Azure Portal:
Follow the Azure documentation to create a managed disk and be sure to set Enable shared disk and set the Max shares to an appropriate number. https://docs.microsoft.com/en-us/azure/virtual-machines/windows/attach-managed-disk-portal#add-a-data-disk
Note: Different disk sizes may have a different max shares limit. https://docs.microsoft.com/en-us/azure/virtual-machines/disks-shared
The shared image disk will need to be attached to each WVD session host. This can be accomplished with the following methods:
-
Manually attach the disk to the WVD sesison hosts: https://docs.microsoft.com/en-us/azure/virtual-machines/windows/attach-managed-disk-portal#add-a-data-disk
-
Attach the disk during deployment via an Azure Resource Management Template:
  "dataDisks": [
      {
          "lun": 0,
          "createOption": "attach",
          "caching": "None",
          "writeAcceleratorEnabled": false,
          "managedDisk": {
              "id": "/subscriptions/b11ccec5-c64c-4633-8e45-5dfd5db5e408/resourceGroups/path/to/shared-image-disk/providers/Microsoft.Compute/disks/<sharedimagedisk>"
          }
      }
  ]
Turbo Client
The following are needed to setup the Turbo Client on the WVD session hosts:
- Install the Turbo Client and point to the Turbo Server URL
- Login to Turbo Server with the Turbo Client
- Subscribe to the applications in a workspace
These commands can be run manually if the session host VM images are deployed from a custom image, added to an image builder configuration (i.e Packer), or run automatically during session host VM deployment with the Azure Custom Script Extension.
Sample command to install the Turbo Client, set the Turbo server URL, and set the image path to the shared image disk created above:
turbo-client-setup.exe --all-users --silent --domain=<turbo-server-url> --add-trusted-source=<turbo-server-url> --image-path=<path-to-sharedimagedisk>
Sample commands to login to the Turbo Server with a user account or an API key:
turbo.exe login --all-users
turbo.exe login --all-users --api-key=<api-key>
Turbo Subscribe is used to add all the applications from a workspase on to the local computer. Here is a sample command to subscribe to the applications in a Workspace:
turbo.exe subscribe --all-users <workspace>
WVD Portal
When the above steps are complete the applications from the Turbo Server workspace will be visible on the WVD session hosts. Access these hosts via the WVD Portal.
Refer to the Turbo Server workspace or Add/Remove Programs application on the WVD session hosts to verify which application were added.
5.3 Licensing
Turbo Server License
The standard Turbo Server license, Turbo Server Enterprise Edition, consists of a server license and a custom number of unique or simultaneous end-users. The standard license enables an unlimited number of applications to be hosted on Turbo Server.
Users are typically accounted for with a username and password. However, you can use anonymous users. In this case, each user is defined by the domain of the hosted Turbo Server and a specific username, such as SomeCompany\SomeUser.
The Turbo Server administrator can activate and deactivate users as needed, or add additional allowed users or devices by upgrading the license. For more information about managing users refer to Managing Users and Authentication. For instructions on applying a new license to Turbo Server, refer to General.
RDS License
Servers with the Application role must have RDS licensing configured, please refer to the Microsoft documentation on how to do so.
Please note that RDS Per User CALs are not supported with the default Temporary Profile login mode. Per the Microsoft documentation, RDS Per User CALs can only be assigned to Active Directory users and temporary profiles use local non-Active Directory users.
If using Temporary Profile login mode, the application servers must be configured with RDS Per Device CALs.
Application License
Application licenses can be implemented by the native application, such as connecting to a license server, or controlled by Turbo administrative settings. Turbo allows administrators to limit the number of concurrent and named user or devices on a per application basis. See the Workspace Applications documentation for details.
5.4 Portal
Overview
The Turbo Server Portal is a web portal where users can log in to view and launch applications. Applications can be streamed from the Turbo Application Server using the Turbo Clients or HTML5 client, or ran locally using Turbo for PC. Additionally, the portal provides API services allowing other client types to interact with the Turbo environment.
Logging In
Portal user authentication is determined by the Authentication Type configured in the Turbo Server administration site.
If the server has an Authentication Type that requires users to log in with a username and password, users must provide valid credentials to access the Portal and launch applications. However, if the server has enabled anonymous access, users can access the Portal and launch applications without logging in.
If you are a user and need to log in but do not know your username and password, contact your Administrator to retrieve your credentials.
Installing the Turbo Client
For the best experience, it is recommended to install and use one of the native Turbo.net clients on your device. Turbo.net provides clients for all major desktop and mobile platforms.
If you do not use one of Turbo.net client applications, you can still use Turbo via the HTML5 interface in any major web browser.
If you are on a device issued by your organization, your system administrator may already have installed the necessary Turbo Client on your device.
Browser Support
The Turbo Portal supports the latest versions of modern browsers. For the best experience, we recommend using one of the following browsers:
- Google Chrome
- Apple Safari
- Mozilla Firefox
- Microsoft Edge
Using unsupported browsers or older versions may prevent some site features from functioning as expected. Some features have additional browser requirements, which are noted in the appropriate documentation.
Dashboard
The Dashboard is the primary end user interface provided by the Portal. Once the user logs in and accepts the optional notice and consent form, they are presented the Default Workspace, or a list of workspaces if they have permissions to more than one.
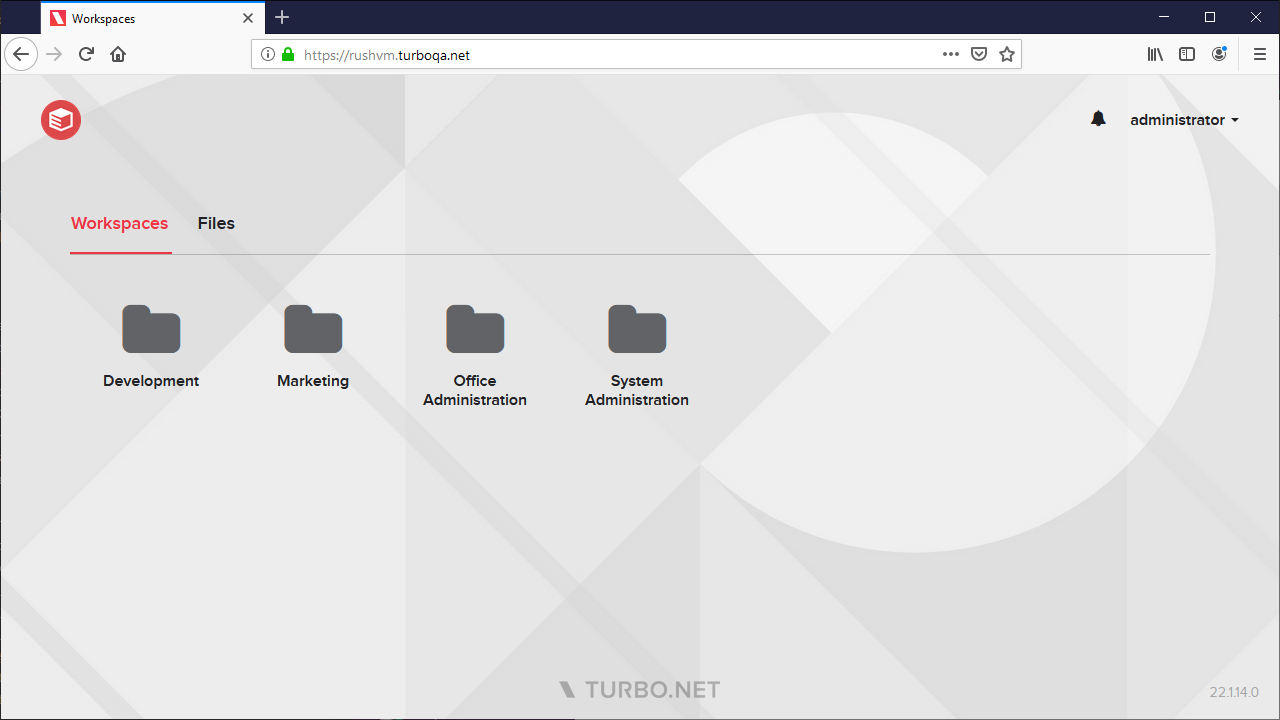
Click on a workspace to navigate into the workspace. The workspace will show a list of applications which the user has access to. To navigate back, use the breadcrumb at the top of the page.
Applications
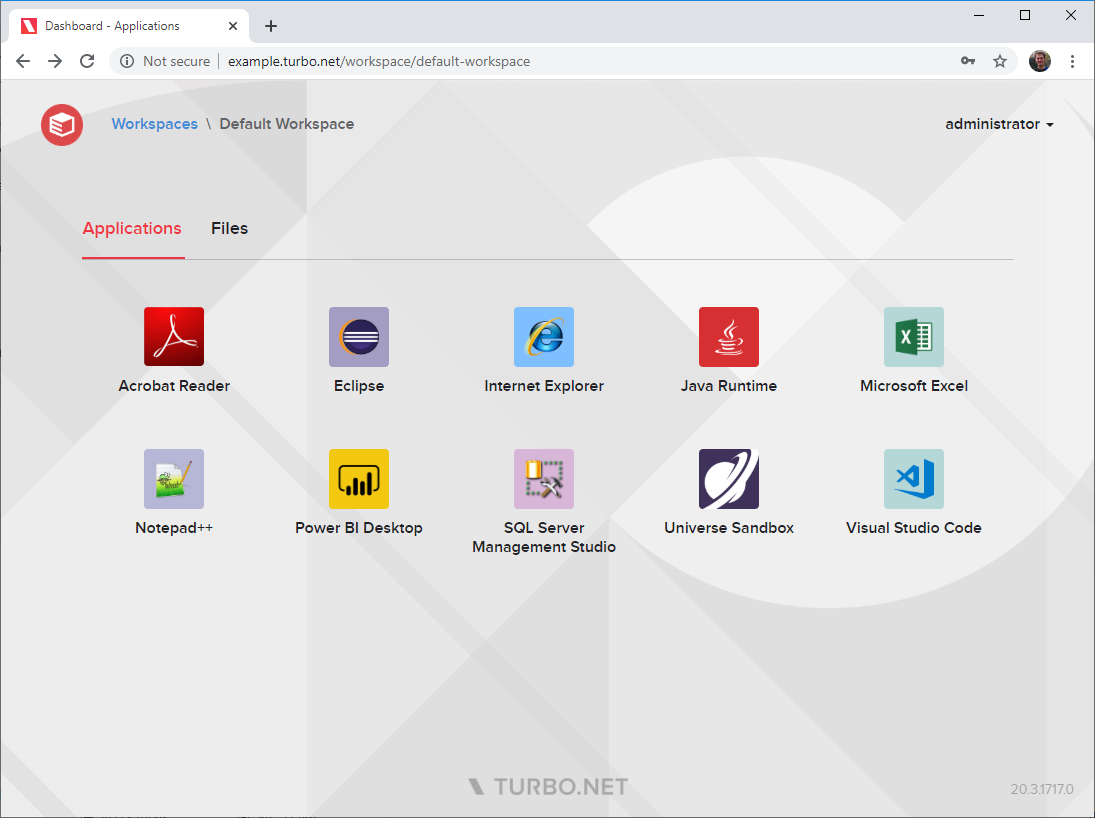
Run applications by clicking on them. The application will run with the default launch method, which by default is Run in Cloud (HTML5). The administrator can change the default in the Workspace Application settings. Right click on the application to access addition launch methods if available.
Application Context Menu
The application context menu provides additional launch methods and controls for running sessions.

The following context options will launch the application
- Run in Cloud (HTML5): Launches in the cloud and connect using HTML5 client running in the browser.
- Run in Cloud (Windowed): Launches in the cloud and connects using the natively installed Turbo Client. The client must be installed.
- Run on My PC (Local): Launches in the local device if the device is capable of running the application.
The Install on My PC option will make the application available on the local device if supported.
The following context options are available if the application is currently running in the cloud:
- Disconnect: Disconnects any connected client from the cloud session. The session may be reconnected by launching again via any cloud option. If the administrator logs off the session immediately on disconnect then the application may have to be relaunched from scratch.
- Logoff: Logs off the user from the cloud session. The application must be relaunched and unsaved work may be lost.
Files

The Files tab allows users to browse and open files from their connected cloud storage providers. Cloud storage providers may be connected from the user settings Storage page.
Clicking on a folder will navigate into that folder. Users may navigate out of a folder by using the breadcrumb at the top of the page.
Clicking on a file will open it with the associated application. If no associated application exists, the view file action will be performed instead.
File associations may be managed from the workspace administration site.
File Context Menu
Right-clicking a file or folder will open a context menu with additional actions. For files, the available actions are:
- Open in Cloud (HTML5): Opens the file with the associated application in the HTML5 client.
- Open in Cloud (Windowed): Opens the file with the associated application on the application server and streams to the local Turbo client.
- Open on My PC (Local): Opens the file with the associated application in the local Turbo client.
- Download: Downloads the file to the local device.
- View: Opens the file in the local client browser. If the browser supports the file type, the browser will show a preview of the file.
- Delete: Deletes the file from the storage provider. A confirmation dialog is shown before deletion.
For folders, the available actions are:
- Delete: Deletes the folder and all of its contents from the storage provider. A confirmation dialog is shown before deletion.
Uploading Files
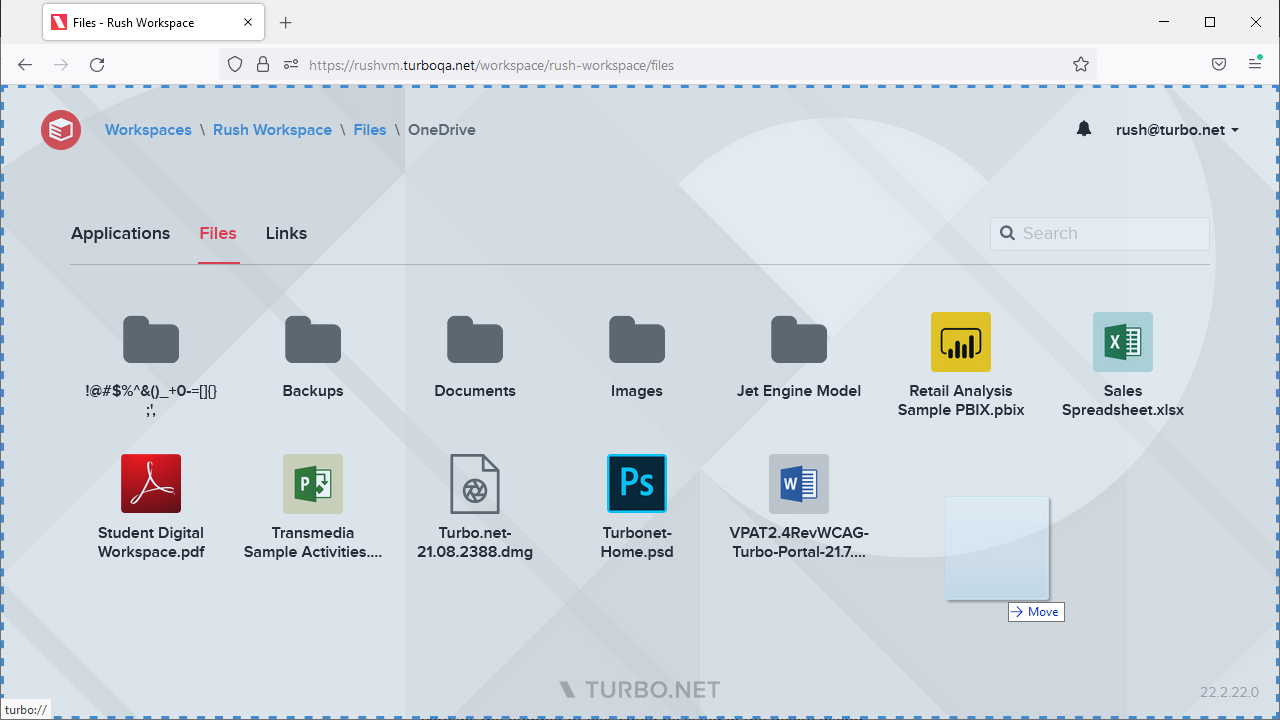
Users may upload files by dragging & dropping files from their local device into the file browser. Files may be dropped anywhere on the screen and will be uploaded into the current folder.
Links
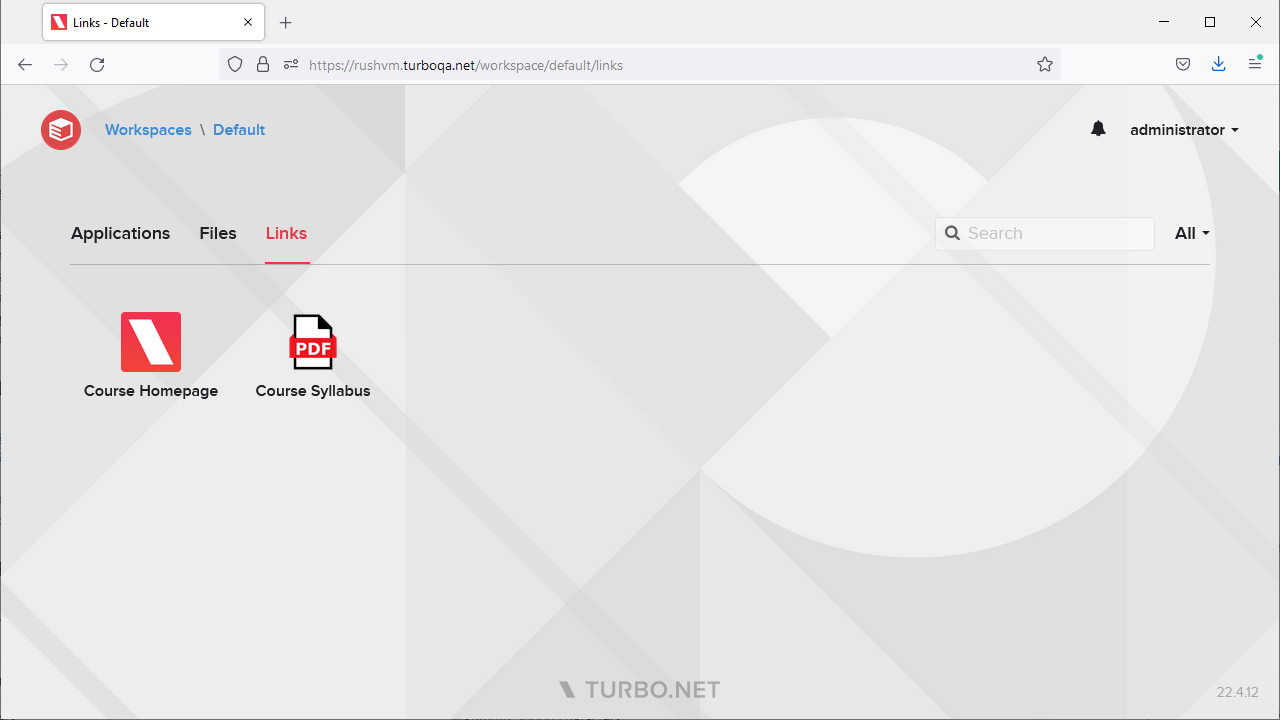
The links tab contains links to external web resources such as file downloads and web sites.
Links may be managed from the workspace administration site.
Notifications
A notifications icon is displayed at the top of the Turbo Portal dashboard. clicking the notification icon will expand the notifications dropdown and list notifications in chronological order. A new notification icon will be displayed if there are unread notifications.
Search
The search text box searches the current workspace tab for related items by name.
Running Applications
Turbo applications can be ran using the Turbo Server Portal or, if installed to your local machine, directly from the Start Menu or Applications folder.
Portal
To run an application, go to the Turbo Server Portal and click on the application you want to run.
By default, applications launches will open the HTML5 client and stream the application session to the web browser. Alternately, you can run the application in one of the Turbo Clients by right-clicking on the icon and selecting Run in Cloud (Windowed).
If you are on a PC that meets the application requirements, you also have the option of running the application on your own device. There are no separate installation steps required to run applications once the Turbo for PC application is installed.
To select a specific way to run the application, right-click on the application and select one of the following:
- Run in Cloud (HTML5): The application will run in the cloud and stream to your device inside the web browser.
- Run in Cloud (Windowed): The application will run in the cloud and stream to your device via the Turbo.net native application.
- Run on My PC (Local): The application will be downloaded and run on your device.
- Install on My PC: The application will be installed on your device.
The default and available launch locations may be configured by your server administrator.
User Settings
The Settings pages allows users to manage a variety of user-related settings, such as their cloud storage connections and remote authentication.
This page is accessible from the Portal via the Settings link in the user dropdown.
Storage

The Storage page allows users to manage their cloud storage connections. Once connected, files from that cloud service will be made available in the Portal Files browser. Furthermore, applications launched in the cloud will automatically map their cloud storage folder to the T: drive.
For more information on connecting storage services and accessing files, see the End User Guide
Authentication

The Authentication page allows users to save Windows login credentials that will be used to login to the application server when launching cloud applications with Ask authentication. Users may also save their Windows login credentials when launching an application in the HTML5 client by checking the "remember me" checkbox on the login form.
Credentials are encrypted and stored in local browser storage and are never stored on the server. Users must re-enter their credentials on new browsers, devices, and Turbo login sessions.
If the stored credentials are invalid, an authentication error will be shown and the user will be asked to re-enter their credentials. Credentials may be removed from the settings page at any time.
This feature is not available in Internet Explorer 11 or below. The Turbo Server must have SSL enabled to use this feature.
5.5 Administration
Overview
The Turbo Server Administration Site enables you to manage and control all aspects of your Turbo Server.
The default location of the Administration Site is: http://localhost:80/admin, and consists of the following links:
-
Hub: This page lists all applications repositories on your Turbo Server. From here Federation can be configured to source application repositories from a master hub. API Keys can be defined to allow access to your hub without using a password (useful for automation, tooling, federation, and other similar scenarios). For more information refer to Managing Hub.
-
Users: This page list all users and groups on your Turbo Server. From here Directory Services can be configured to import users from LDAP or Active Directory. Authentication Method allows you to configure how users will authenticate with the Turbo Server. Device Keys allows you to manage all registered devices. For more information refer to Managing Users and Authentication.
-
Domain: This page lists all servers that are included as part of the current Turbo Server installation. Server settings such as roles, web service bindings, and SSL certificates may be configured here. For more information refer to Managing the Domain.
-
Workspaces: This page lists all workspaces on your Turbo Server. From here workspaces may be added, configured, and deleted. For more information refer to Managing Workspaces.
-
Reports: This page provides preconfigured customizable analytics reports, sorted according to Administration, Hub, and Users. For more information refer to Reports.
-
Integrations: This page provides options to configure integrations with variety of third-party services, such as cloud storage providers and Learning Management Systems. For more information refer to Integrations.
-
General: This page contains a summary of your Turbo Server license, and information and options for configuring Turbo Server. For more information refer to General.
Browser Support
The Turbo Server administration site supports the latest versions of modern browsers. For the best experience, we recommend using one of the following browsers:
- Google Chrome
- Apple Safari
- Mozilla Firefox
- Microsoft Edge
- Internet Explorer 11 (limited support)
Using unsupported browsers or older versions may prevent some site features from functioning as expected. Some features have additional browser requirements, which are noted in the appropriate documentation.
Hub

All application repositories on Turbo Server are managed from the Hub page of the Administration Site.
For more information on adding application repositories to the Hub, see Deploying to Turbo Server
Managing Repositories

On the repository edit page, a repository display name can be modified. This shows up in the hub administration page list. The repository ID field cannot be modified and is assigned when the first container image is pushed to the hub.
The versions list shows all available images that are available for this repository. They can be referenced by their tag or their ID (ex, "mozilla/firefox:64.0" or "mozilla/firefox#44397e23bf46a08a8a567ba13b2c215668d451c9dde41b030706779dc977cc02"). Accessing a repository without a tag or ID will use the latest available image (ex, "mozilla/firefox"). Note that any repository updates may take up to 24hrs to be automatically retrieved by the Turbo Client.
The Dependencies and Used By lists shows all images referenced by and referencing this repository image. Dependencies are downloaded on-demand when creating a new session. For more information on dependencies, see Dependencies
The Pre-cache setting specifies whether to cache the repository on application servers. Pre-cached repositories are pulled onto the application servers every 10 minutes. A workspace may also pre-cache the repository.
The Federation section allows enabling or disabling repository federation from a configured federation source. The selected federation source's settings will be used to determine the federation behavior. If you wish to create a new federation source, please see Federation.
Importing Repositories

With the Import Repository feature, you can import repositories from an external Hub server, such as the Turbo.net Hub, into your local Turbo Server Hub. To import a repository, click the Add Repository dropdown on the Hub page and click Import Repository. The import page has the following options available:
-
Hub Source URL: The Hub server from which the repository will be imported. By default only app.turbo.net is available, however if you have domain federation enabled the source domain will also be available.
If your Turbo Server is running behind a firewall or proxy you may need to whitelist app.turbo.net to import repositories from the public Turbo Hub.
-
Repository Id: The name of the external repository. For example,
mozilla/firefox. -
Release: Only revisions with this release are imported from the external repository. Leave blank to import without release restrictions.
-
Revision History Length: The number of revisions to pull from the remote repository. The default value is 1 revision. Revisions are imported in descending release order.
-
API Key: The API key used to access private repositories from the source Hub. This field is not required for public repositories.
After setting the properties, click Import. The import may take a few minutes to complete depending on the size of the repository. After the import is complete you will see the new repository in your main repository list on the Hub administration page.
Imported repositories will enable federation from the import source URL by default. Federation may be disabled from the repository settings page.
API Keys
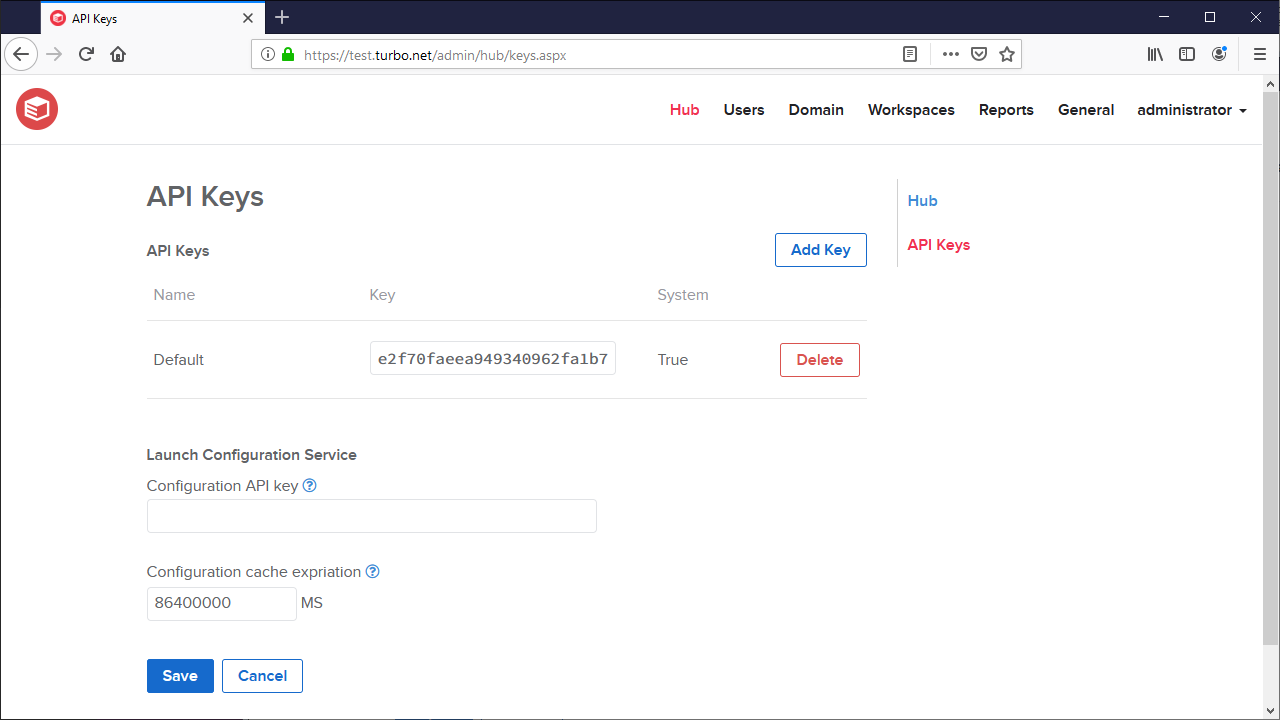
API Keys allow you to login to your hub with a code other than with a username/password. This is useful when configuring automation or in other scenarios where a plain text password is not desirable. If an API Key has been compromised, it can be refreshed to a new value or deleted to immediately revoke access.
Additional, you can configure a Configuration API Key used by the Launch Configuration Service to post custom application configurations. Configurations posted with this API key are publicly accessibly. This setting is recommended if you will be using an external portal instead of the Turbo Portal.
The length of time (in milliseconds) that a configuration is valid after it is added to the launch configuration service can be configured with that Configuration Cache Expiration setting. This timeout is reset any time the application configuration is accessed, such as during an application launch.
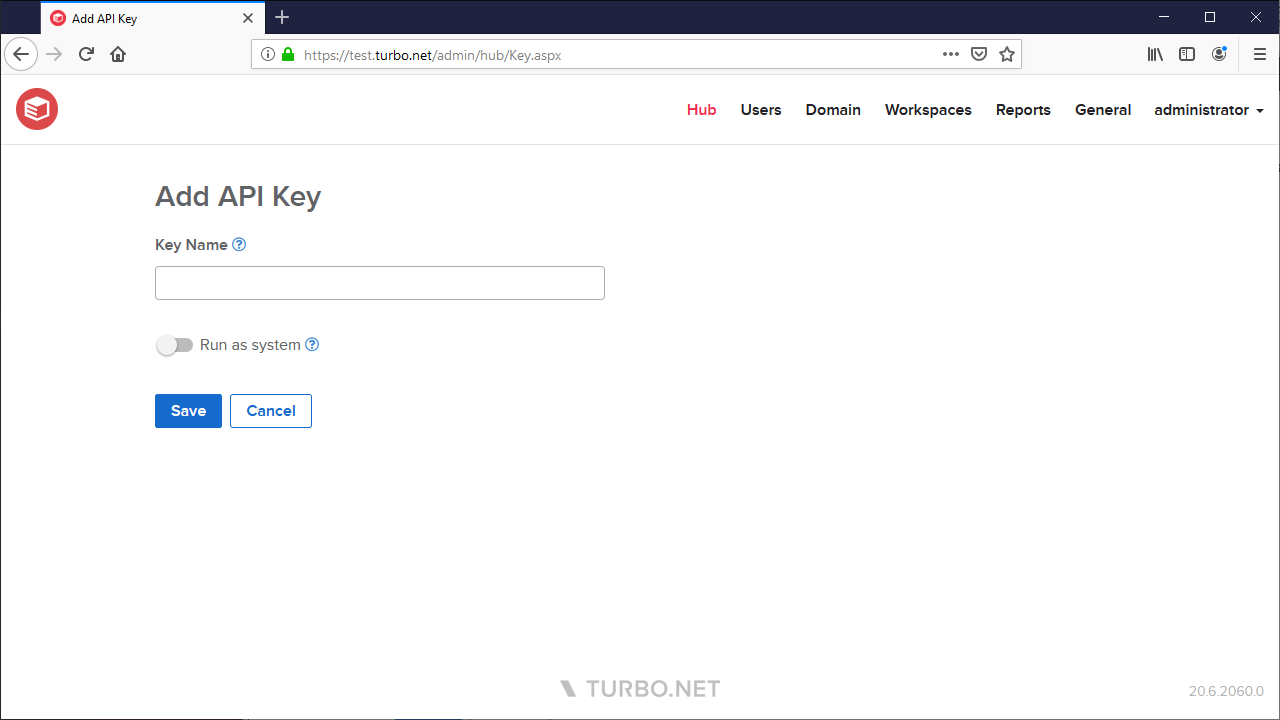
When adding an API Key, give it a name that describes the general usage of the key. It is also recommended to have distinct keys for distinct usages so that if one is compromised or updated, all usages will not require update. Run as System controls whether the key is given administrative privileges to push new images or delete repositories. Without this setting, the API key will only have read access to repositories.
Federation
The Federation page allows you to configure repository federation sources, which can be selected during repository import or applied to individual repositories to reduce setup time and keep repositories in sync across domains. Repositories that have federation enabled will periodically check the source domain for updates and pull any changes.
Please be aware that any setting changes to a federated repository will be overwritten by the repository settings on the source domain.
Federation sources can be configured with the following settings:
- Source Domain URL: The federation source domain URL from which repositories will be replicated.
- API Key (Optional): The API key used to access repositories from the federation source. This API key must be configured as a system-level key on the source server. This setting is not required for public hubs. For more information, see API Keys.
- Default Synchronization Frequency: The frequency at which this server will check the federation source for updates.
Users

Turbo Server users are tracked and managed via the Administration Site. Users are entered manually or via automated import from LDAP or Active Directory directory services. Users and user groups can be viewed and managed on the Users page. From this page you can view user directories, status, and available actions. Displayed above the user list is the total number of licenses available and the number of licenses currently in use.
Users can be internally created users, synchronized users from external directory services, or a user associated from a API key. API key users cannot be deleted unless the API key is deleted.
Managing a User

To manage a user, select the user name from the list on the Users page. The following fields are displayed on the page:
-
Name: Full name of the user.
-
Login Name: The unique login name for the user.
-
Enabled: Determines whether a user can access Turbo Server. After a user is disabled he no longer consumes a seat.
User Permissions
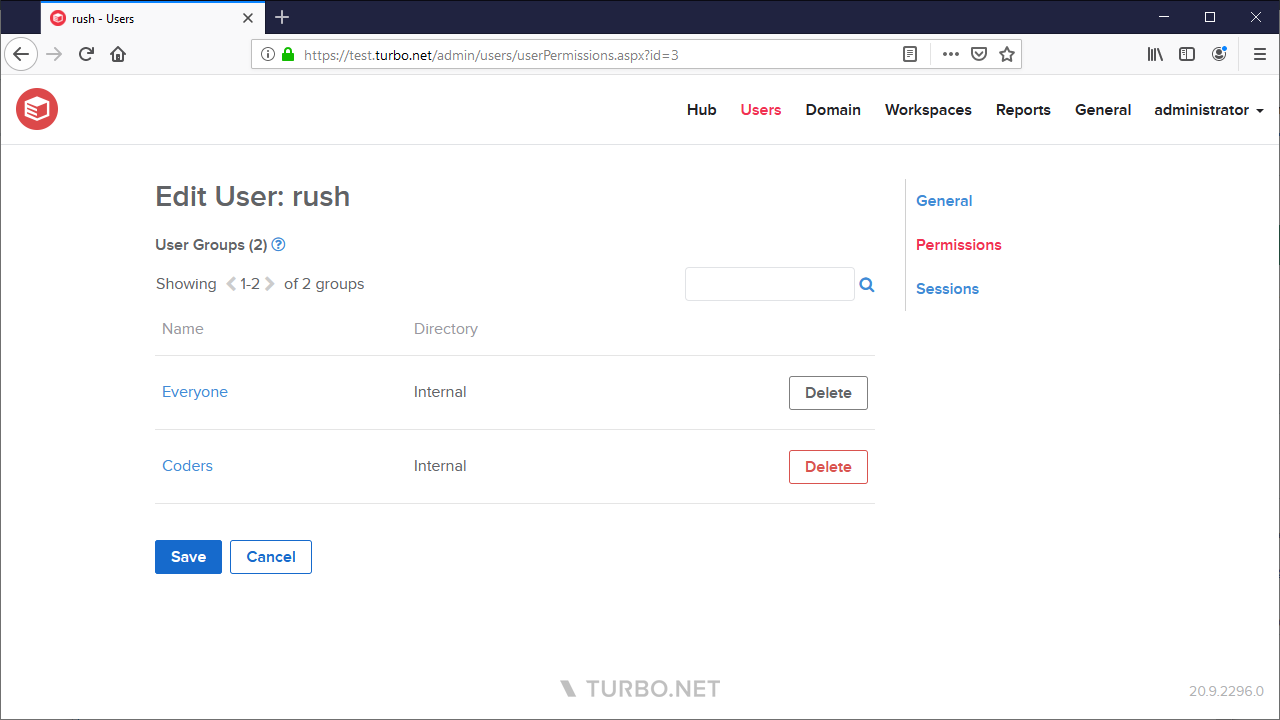
The Permissions tab lists all user groups to which the user belongs. User groups determine which workspaces a user can access.
For more user group management options, please see Managing a User Group.
User Sessions

The Sessions tab lists all persisted sessions for the user. Session persistence is enabled by the Sessions are persistent workspace application setting, which automatically synchronizes the user state and settings with Turbo Server.
Reset: Resetting a user session will delete all of the synchronized state and settings from Turbo Server. Sessions that are cached on the user's local device will be reset the next time they run with session persistence enabled.
Delete: Deleting a user session will delete all of the synchronized state and settings from Turbo Server. Sessions that are cached on the user's local device will not be deleted. To prevent the locally cached session from synchronizing to the server you may disable session persistence in the application settings.
Managing a User Group

To create a user group select Add Group. The Add User Group screen displays. This screen contains the following fields:
-
Name: The group name that displayed on the user screen.
-
Description: A group description (optional).
-
Members: Users and groups that are members of this group. Users and groups are inherited when including other groups as members. Add users or other groups by selecting Add Members.
The following groups are special groups that are created automatically and cannot be deleted:
-
Administrators: This group will be able to log into the administration site and push shared images. Note that changes to the Administrators group will require a service restart before they are honored by the hub services. Access to the administration site will be honored immediately.
-
Analysts: Users in the Analysts group will have access to the administration reports. No other administrative permissions are granted beyond access to reports.
-
Anonymous: This group automatically includes any user discovered when the authentication mode is set to Anonymous.
-
Everyone: This group automatically includes all users regardless of authentication mode.
Adding an External Directory Service
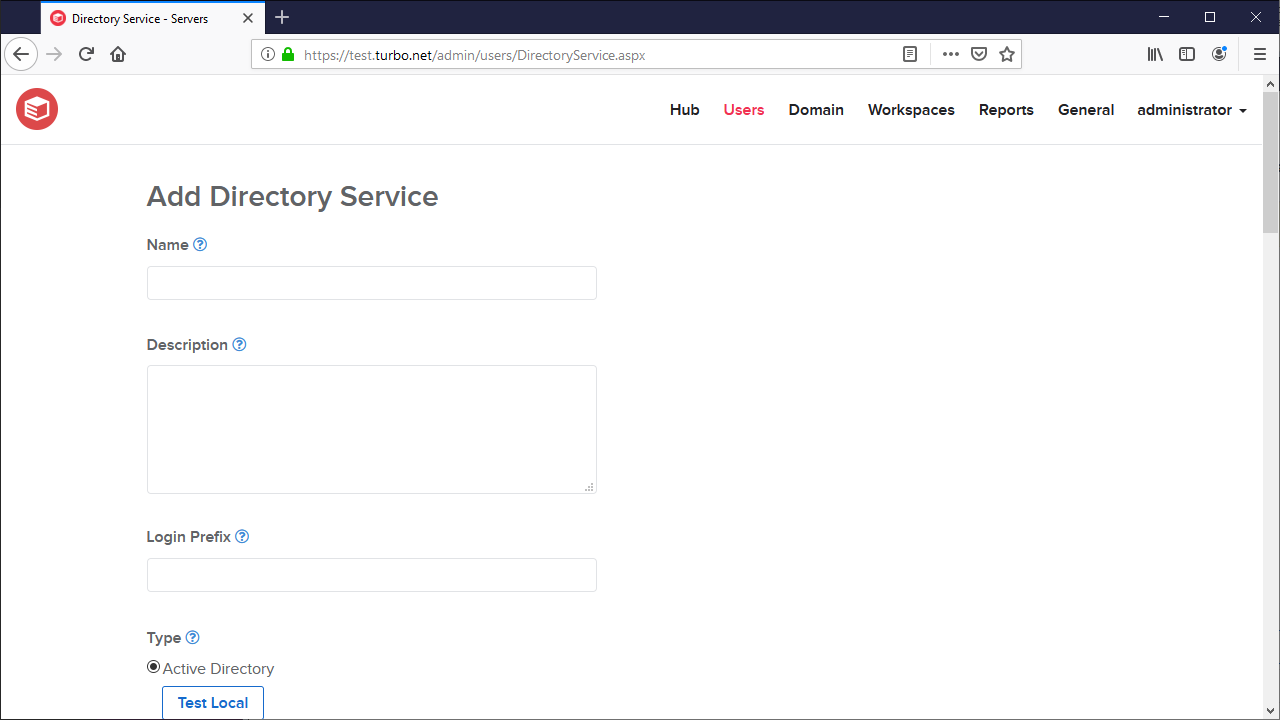
Using Turbo Server you can add an external directory service, such as Active Directory. This enables you to manage users with the touch of a button and easily import existing users and groups into Turbo Hub Server. Complete the following steps to add an external directory service:
-
Open a Turbo Server administration site page in your web browser.
-
Choose the Users category from the top navigation bar.
-
Select Manage Directory Services.
-
Select Add Service. The Add Directory Service screen displays.
-
Enter your specific settings into Turbo Server. Each section is detailed below.
Note: When synchronizing external directory-services containing of over 5,000 users, the command-line administration utility should be used instead of the Administrator web site. For more information on using the administration utility, see Manage Turbo Server from the Command Line. Synchronizing large directory services uses up to 1 GB memory per 500,000 users and groups on the hub server. Ensure that your hub server has enough memory to handle ordinary load when the directory service sync is running.
|
Section |
Description |
|---|---|
|
Name |
This field indicates which service is being added or controlled by the entry. The Name field must not be the same as the service or server you are using. |
|
Description |
(Optional) |
| Login Prefix |
Login prefixes are given to each user in the directory service to use when they log into the server and are helpful in distinguishing users across different directories. For example, if the directory's login prefix is "acme" and the users name is "aaron", they would log on using the full name "acme\aaron." Once this login prefix is chosen for a directory, it cannot be changed. If you must change the login prefix, the directory service can be deleted and a new one added for the same directory; settings for all users from that directory are lost. |
| Type | In the Type section you can choose the type of the directory service from which to import users and groups. There is variability in location, security, and schema settings for directory services. Turbo Server provides two templates: Active Directory and Other LDAP. The local Active Directory can be found by selecting Try Local. When found, working connection settings are set automatically. To synchronize with the local Microsoft Windows domain's Active Directory service, select Try Local. This loads default settings into the Connection and Directory Schema fields. For large directories this can take several minutes. If the operation is unsuccessful, continue to the Choosing Your Connection Settings section. If the operation is successful, continue to the Choosing the Directories to Synchronize section. |
| Server |
This section can be used to specify your connection settings to the LDAP directory you are trying to connect to. For more on this section, scroll down on this page to Choosing Your Connection Settings |
| Binding Type |
This field is used to specify the form of security being employed by the LDAP server you are connecting to. If "Default" is chosen for Port in the Server section, changing the Binding Type will automatically change the port to the standard LDAP port number for that setting. |
| Synchronization Account | This field specifies the account to use when synchronizing users with the directory services. For more information, scroll down on this page to Choosing Your Connection Settings. |
| Directory Schema | Allows the administrator to specify which names in the LDAP directory will be imported into the Turbo Server user information. For more information, see Directory Schema, further down this page |
| Page Size | The page size used when synchronizing the directory service. Typically, the default value for Active Directory services is 1000. Some LDAP implementations do not support the PageSize property, and should be set to 0. |
| Synchronized Items | Used to identify items in the directory tree that should be synchronized with Turbo Hub Server. For more information, see Choosing Items to Synchronize, further down this page. |
Choosing Your Connection Settings
Complete the following steps to choose your connection settings:
-
Enter the settings for the Server section. The Host, Port, and Top directory are initialized with typical values, but you can customize them to match your directory service settings. They are best discovered using the management tools for the application that hosts them, such as Microsoft Windows or Apache Directory Services.
- The Top directory should be specified to avoid potential login issues that are difficult to troubleshoot.
-
Set the Binding Type. Changing the Binding Type will change the Port to the standard LDAP port number for that setting, if you have not specified another port number.
- Choosing the Simple binding type is not recommended if you are binding to Active Directory, but it can be useful while on the page in diagnosing connection problems via the Test button.
-
Enter your credentials at the Synchronization Account section. To connect with a specific account in the Synchronization Account section, specify the username:
-
Active Directory: The domain login (e.g. acme\aaron)
-
Generic LDAP: The distinguished name (e.g. uid=aaron,ou=acme,ou=system)
-
-
To test these settings, click on the Test button.
-
Once the test is successful, proceed to the Directory Schema section.
Directory Schema
Directory schema settings are customizable within any directory service; you can change these settings to match the names in your directory service. The most common schema values are tried by selecting Discover. You can select Discover when you are not satisfied with the result in the Synchronized Directories section. Complete the following steps to use the Discover functionality:
-
Select Refresh from the Synchronized Directories section and inspect the results. If the users and groups shown there are accurate, leave the directory schema settings as they are.
-
If the Synchronized Directories does not accurately depict the users and groups you expect, select Discover and wait for the schema settings text boxes to fill with the recommended values. Test these values at any time from using Refresh in the Synchronized Directories section.
-
If you know the correct schema name for the given properties, you can enter it manually. If there are more than one name for the same value you can enter each name separated by a semicolon. Each is searched during synchronization.
-
To reset the settings to the Turbo Server default, select Defaults.
Choosing Items to Synchronize
You may limit the scope of users and groups that will be synchronized from your directory service, either by choosing specific directories within the service, or by selecting the user groups in which you are interested.
Choosing directories
Your directory service might contain some subdirectories that have useful information and others that contain unwanted information. You can choose which subdirectories to synchronize using Synchronized Items, selecting the Directories option. Complete the following steps to use Synchronized Items:
-
Select Refresh to use the current connection and directory schema settings to scan your directory service. Information about discovered sub-directories is available via tooltip popups. For large directories this operation can take several seconds to complete.
-
To narrow the scope of your synchronization to specific directories complete the following:
a. Uncheck Include All. b. Filter results using the search text box (group name prefix). c. Check directories to include.
Choosing groups
You may have a specific subset of existing users that will use Turbo Server, in a group or groups native to your directory service. You can choose which groups to synchronize using Synchronized Items, selecting the Groups option. Complete the following steps to use Synchronized Items:
-
Select Refresh to use the current connection and directory schema settings to scan your directory service. Information about discovered group is available via tooltip popups. For large directories this operation can take several seconds to complete.
-
To narrow the scope of your synchronization to specific groups complete the following:
a. Uncheck Include All. b. Filter results using the search text box (group name prefix). c. Check groups to include. All members of that group will be synchronized, including contained groups and all of their members.
When you are satisfied with your settings, select Save. At this point, the users and groups in your directory service are not synchronized with Turbo Server. From the Manage Directory Services page, click the synchronization button and verify there are positive counts for users and/or groups when it has finished. For large directories this can take several seconds.
NOTE: External users synchronized from active directory should not use the login prefix when logging in. User names must be unique, so if there are two users from different active directory sources, only the first one will be synchronized. Password verification is passed through to the active directory service and are not stored on Turbo Server.
Authentication Method
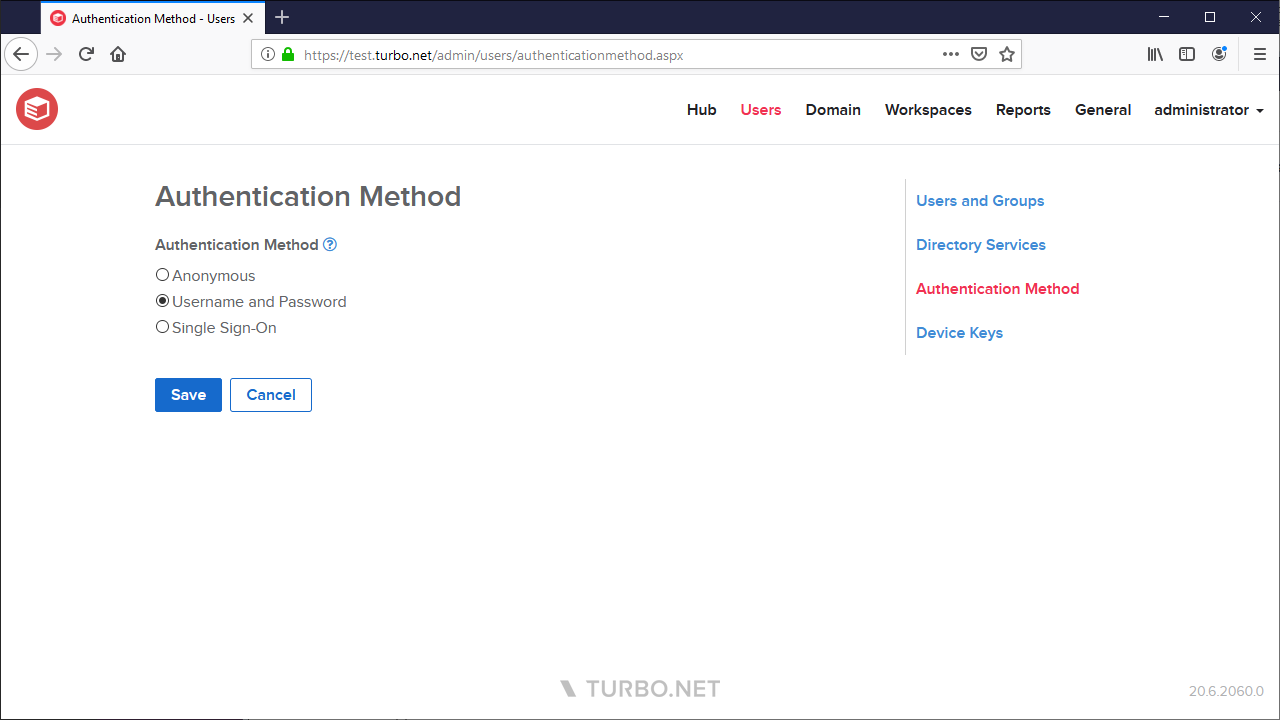
The Authentication Method page configures which Authentication Method is used when an end-user logs into the Hub Site and Turbo Client. The supported methods are:
-
Anonymous: Anonymous authentication allows users to access the Portal without logging in. All anonymous users are added to the Anonymous Users group.
-
Username and Password: Username and Password authentication requires users to provide their username and password in order to log in. Passwords may be managed from the user settings page.
-
Single Sign-On: Single Sign-On authentication allows users to login to Turbo Server using an external directory service, such as Azure AD or ADFS. Turbo Server currently supports the following Single Sign-On Methods:
-
OpenID Connect: This option will redirect users an identity provider login page that supports OpenID Connect authentication. Upon a successful login, the user will be redirected back to Turbo Server and an account will be created using the basic profile information provided by the OpenID claims. Some example identity providers that support OpenID Connect include AzureAD and Google. For more information, refer to OpenID Connect.
-
SAML 2.0: This option will redirect users an identity provider login page that supports SAML 2.0 authentication. Upon a successful login, the user will be redirected back to Turbo Server and an account will be created using the basic profile information provided by the SAML response attributes and claims. Some example identity providers that support SAML 2.0 include AzureAD and ADFS. For more information, refer to SAML 2.0.
-
-
Ticket Expiration Time: The amount of time that a login ticket is valid. By default the login ticket when logging in from the Portal will be kept for 7 days if the remember me checkbox is enabled.
-
Check for compromised passwords: Checks the haveibeenpwnd database for compromised passwords when creating setting the password for internal users.
-
Integrated Windows Authentication Host: The IP or hostname of the domain controller for clients using IWA. Select Default to automatically detect the domain controller's IP address.
Device Keys
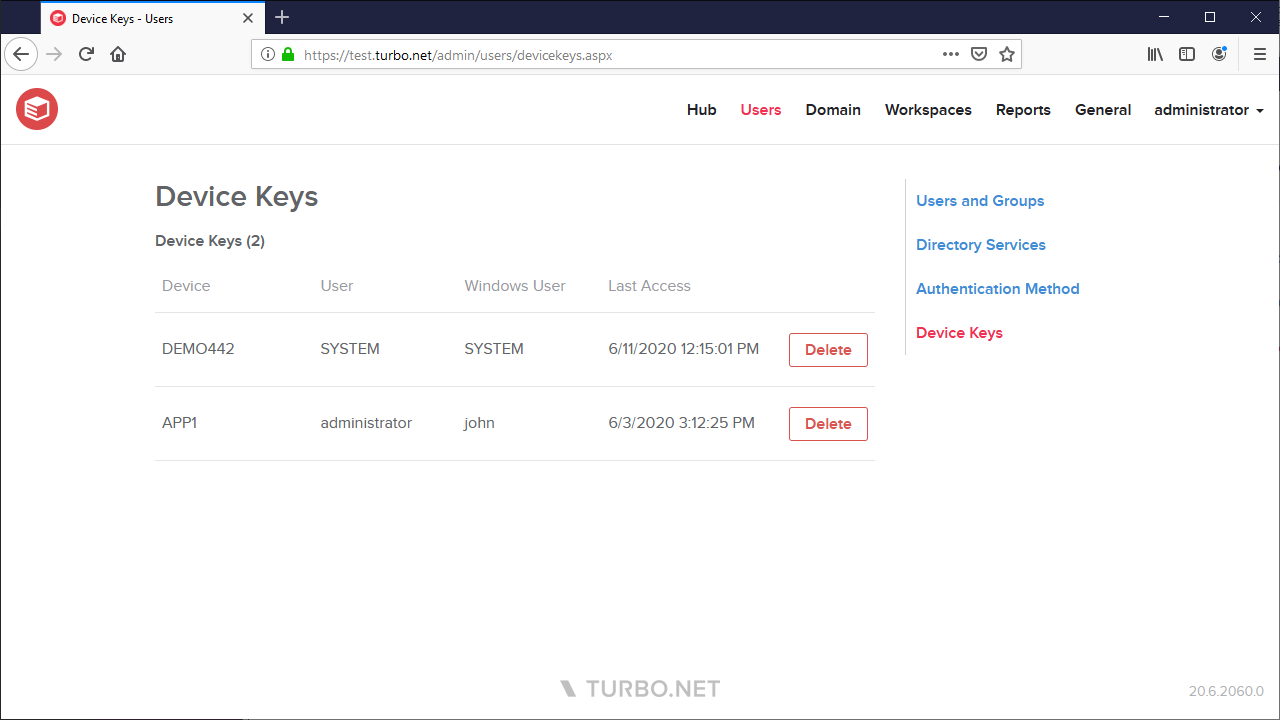
The Device Keys page lists all devices that are registered to the Hub Server. Devices are automatically registered with the Hub Server when subscribing or installing applications. Device Keys may be deleted in order to immediately revoke that device's access to the Hub Server.
Domain
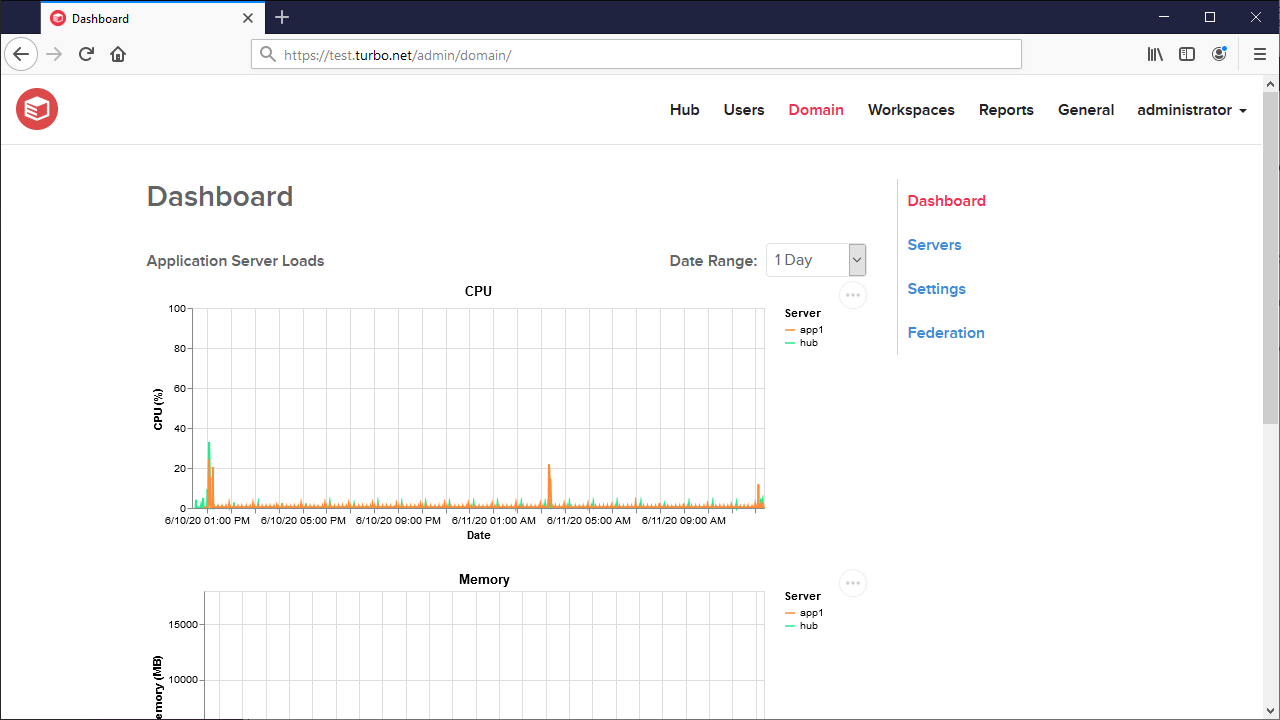
The Dashboard page shows real-time graphs detailing the total CPU, memory, number of sessions, and other resource usage information for the application servers.
Domain Servers
The Server page lists all servers that are included as part of the current Turbo Server installation, along with their current status. Clicking a server name will navigate to the server configuration page.
Add Server
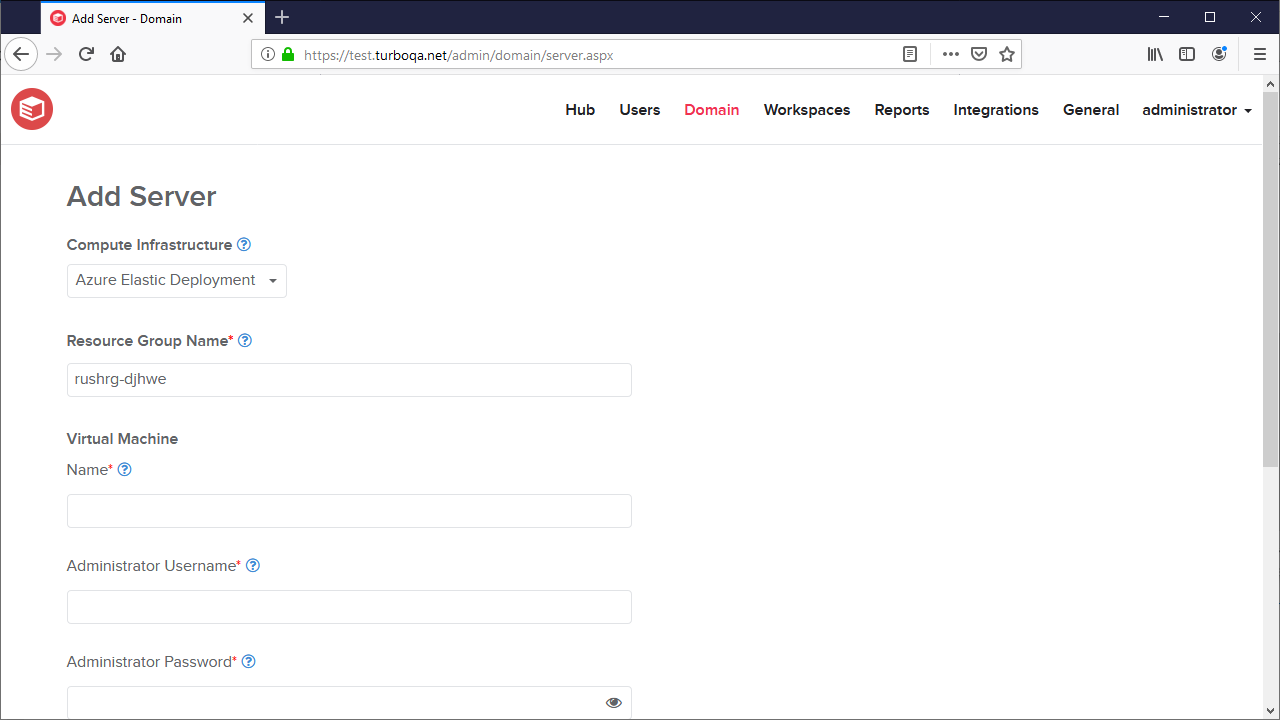
The Add Server page allows administrators to add additional application servers to the current Turbo Server farm.
Prerequisites
Add Server currently only supports deploying application servers to Azure environments. Support for other compute infrastructures may be added in the future.
The Turbo Server farm must be running in Azure with an Azure SQL Database connection. Adding Azure application servers to a on-premises Turbo Server installation is not supported.
In order to add a server you must first setup a Compute Infrastructure and follow the Setup Guide. This feature is only available in Turbo Server 23.1 and above.
Deploying an Application Server
To deploy an application server, complete the Add Server form with the following values:
- Compute Infrastructure: Select the compute infrastructure configured in the Compute Infrastructure section
- Resource Group Name: Leave as default to use the same resource group that is configured in the compute infrastructure setting, or enter a new resource group name. A new resource group will be created if the specified resource group is not found.
- Server Name: Enter any descriptive name for the application server (ex
turbo-app1) - Administrator Username: Enter any desired administrator username that conforms to the compute infrastructure's username requirements
- Administrator Password: Enter any desired administrator password that conforms to the compute infrastructure's password policies
- Confirm Password: Re-enter the password from above
- Public IP Address: It is recommended to disable the Public IP address in production environments
Once you have completed the form, click Add to deploy the application server. After a short delay a new tab will open to the Azure deployment status page. The deployment will take several minutes, you may view the current status as well as any deployment errors on the Azure deployment status page.
Once the deployment is complete the application server will automatically be added to the Domain server list and start accepting application loads.
Domain Settings
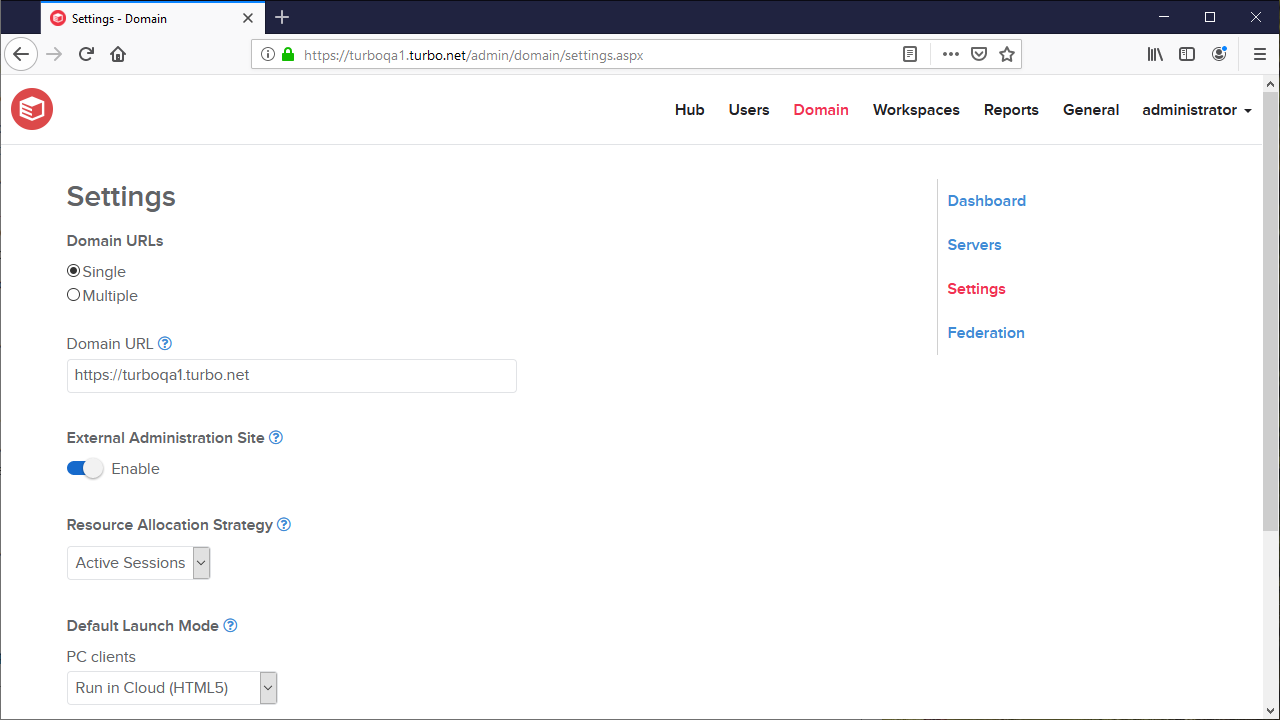
The Settings page lists allows you to configure domain-wide settings, including:
-
Domain URL: The public facing URL intended for end users to access Turbo. The firewall or load balancer should resolve this to your portal instances. For more information, see Understanding the Domain URL.
-
Hub Domain URL: The public facing URL for Turbo Hub web services. If this field is not specified, the Domain URL is used.
-
Portal Domain URL: The public facing URL for Turbo Portal web services. If this field is not specified, the Domain URL is used. Users must use this URL to access the portal and is typically the same as the Domain URL.
-
External Administration Site: Allows external network access to the administration site from the domain url.
-
API Rate Limiting: Limits the maximum number of API requests allowed per IP address per second. If this limit is exceeded, the request is rejected with a 429 Too Many Requests error response. Rate limiting is enabled by default with a limit of 20 requests per IP address per second. Enable rate limiting to deter denial of service or brute force password cracking attacks. The rate limit should be disabled if there will be many users attempting to use the service from a single IP address.
-
Resource Allocation Strategy: The load balancing strategy used to allocate applications to application servers. The available strategies are:
- Active Sessions: New application requests will be allocated to the active application server with the lowest active session count. Note that active session counters may be delayed until the application is fully launched and may not be balanced if a user launches many applications at the same time.
- Total Sessions: New application requests will be allocated to the active application server with the lowest total session count.
- CPU Load: New application requests will be allocated to the active application server with the lowest CPU load.
-
Default Launch Mode: The default launch location used when launching applications from the dashboard. If an application is configured with its own launch location, that setting will take precedence. The available options are:
- Run in Cloud (HTML5): Application launches will open a new browser tab to which the application will stream from the application server.
- Run in Cloud (Windowed): Application Launches will open a new browser tab and attempt an auto-launch. If a native client is installed, the application will stream from the application server.
- Run on My PC (Local): Application Launches will open a new browser tab and attempt an auto-launch. If a native client is installed, the application will run on the local machine.
-
URL Redirects: Redirects requests from the host name to the target URL with a permanent redirect response (301). The host name must resolve to the domain in order for the redirect to occur.
Domain Federation
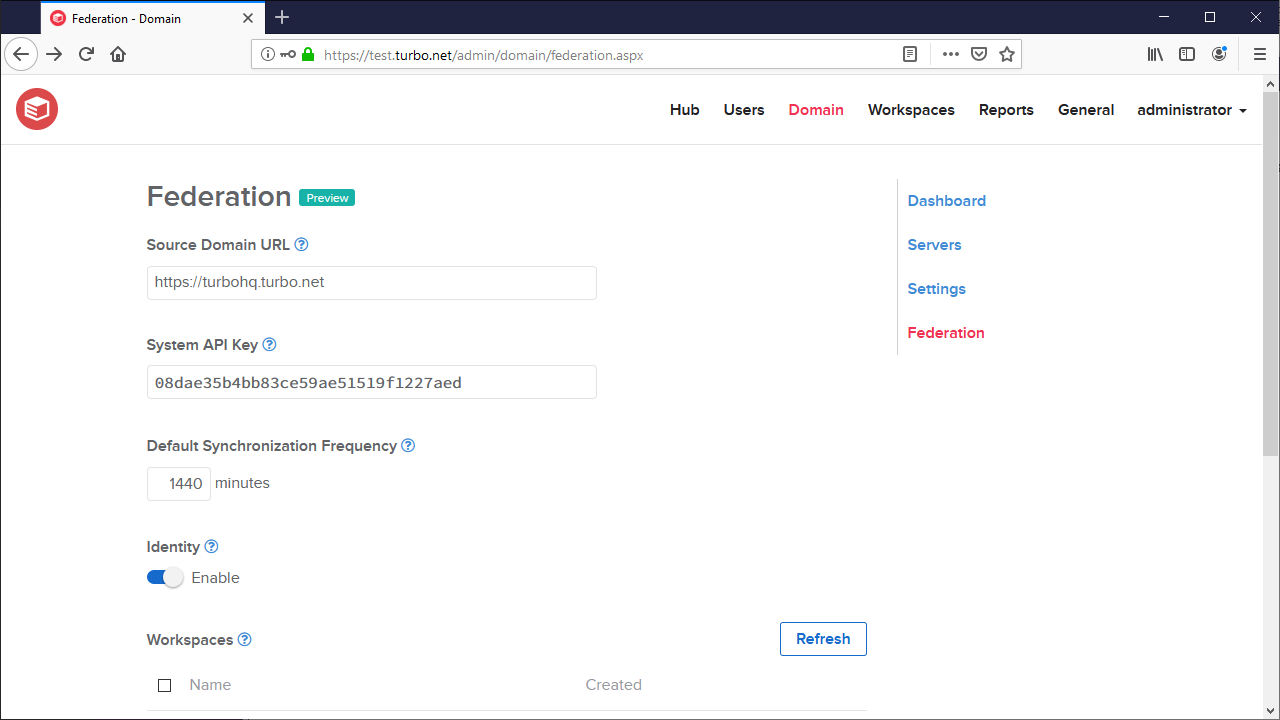
The Federation page allows you to configure federation across multiple domains to reduce setup time and keep domain resources in sync. According to these settings, the server will will periodically check the source domain for updates and replicate any changes.
A domain federated server replicates the source server's workspaces, workspace permissions, and the workspaces' associated image repositories. In addition, the source server's users, groups, directory services, and identity method are also replicated to allow the users to run applications from workspaces using the same login identity. If the identity method is an external authentication method such as Azure AD, the subdomain's redirect url must be added in the Azure Portal.
If an existing login name or built in group, directory service, or user exists on the server, it will not be replicated. For example, the built in SYSTEM user will not be replicated. Replicated users will automatically belong to the 'Everyone' built in user group, but not the Anonymous or Administrator built in user groups.
If an existing workspace with the same url friendly ID exists on the subdomain, it will be overwritten. If the source workspace permission references a built in group (Anonymous, Administrators, or Everyone), it will be normalized to reference the subdomain's built in group and automatically apply to the users belonging to those groups.
The available configurations are described below:
-
Source Domain URL: A federation source URL from which domain resources will be replicated.
-
System API Key: The API key used to access federation resources from the federation source. This API key must be configured as a system-level key on the source server. See Managing API Keys for information on configured API keys.
-
Default Synchronization Frequency: The frequency at which this server will check the federation source for updates.
-
Identity: Federate identity data from the source domain, including users, groups, directory services, and authentication settings.
- Include Admininistrators Group: Identity federation will also include the Server Administrators group permissions.
-
Workspaces: Federate all or selected workspaces from the source domain. All repositories associated with the selected workspaces will also be federated. The available options are:
- Enable: Federates all workspaces on the source domain, automatically adding new workspaces.
- Custom: Federates selected workspaces from the source domain. New workspaces from the source domain must be manually added.
-
Request Forwarding: Automatically pull repositories from the federated domain when a local repository is not found.
-
Revision History Length: Number of application revisions to pull from the remote repository.
Managing a Server
Server Dashboard

The Server Dashboard page displays a summary of the server load, alerts, and setting updates.
The Alerts table lists important status alerts such as server health warnings. Servers with Fatal alerts may fail to perform their given role or may cease operation completely. To resolve a Fatal alert, follow the action recommended in the alert Event to repair the server then click the Clear action to restore server operation.
The Pending Changes table list server setting changes that have been saved but have not yet been applied to the server. The Recent Changes table lists server setting changes that have been applied in the last 10 minutes. Setting changes that occurred more than 10 minutes ago are located in the audit logs under Reports > Events.
Server Sessions

The Sessions section lists all user sessions that are running on the server except for the local system user. This section is only available for servers with the application role.
Administrators may manually log off users by clicking the Close action, which will issue a log off command from the Turbo service user. In order for this action to succeed, the Turbo service user must have permission to log off the user. Please be aware that logging off users may result in the loss of unsaved data.
Server Settings

-
Name: A display name for the server, shown in the Administration Site.
-
Role: The roles for which this server is responsible, including: Hub , Portal, and Application Server. Changing the server role will trigger a service restart which may take a few minutes to complete.
-
Internal Web Service Root: Configures the web service bindings for where the hub, portal, broker, and public web services will be hosted.
-
Internal Hostname or IP Address: The hostname or IP address used to resolve all internal services, such as RDP. If this field is not specified, the Internal Web Service Root is used.
-
Web Service SSL Certificate: Configures the SSL certificate files that are used for HTTPS web service bindings. The provided file paths must point to permanent locations that are available to the service account.
-
Use Advanced Video Coding: Enables the use of Advanced Video Coding (H.264) for remote application streaming if the Application Server supports it. This setting is only available for servers with the Application role enabled.
-
User Profile Pool Size: Number of pre-created user profiles on the application server. The default size is 25. The recommended size is the number of concurrent launches expected for the server.
-
Cache Temporary User Profiles: Enables caching of temporary profiles for application server role indefinitely. If disabled, any files saved by a temporary profile user on the application server will be removed along with the profile 10 minutes after the session ends. Users should be instructed to save to cloud storage or a redirected network drive. All non-administrative local accounts will be removed according to the Temporary User Profile Lifespan setting.
-
Temporary User Profile Lifespan: Length of time since last login that a temporary profile will be cached, if cache temporary user profiles is enabled. Default to 7 days. Profile expirations are checked in 10 minute intervals.
-
Application Image Path: The path where the application server will store SVM images. The default value is 'allusers'. Leave blank to prevent the service from setting the value. If the value is changed to a different folder such as 'E:\turbo-images', it must be changed to 'allusers' to restore the default value. Clearing the textbox will leave the value to 'E:\turbo-images'. Multiple application servers may share the same folder.
-
Image Cleanup: Removes images on the server after the given interval. Leave blank to disable image cleanup. Target image cache size must be specified if image cleanup is enabled.
-
Java Virtual Machine Settings: Configures the JVM settings for the Hub and Broker Java processes. Available settings include:
- Heap Space: Configures the maximum JVM heap space allocated for the Hub and Broker Java processes. This setting is only available for servers with the Hub or Portal roles enabled.
- Proxy Server: Configures the JVM proxy server for all outgoing http(s) requests from the Hub Java process. This setting is only available for servers with the Hub role enabled.
-
Hub Image Cache: Configures an image cache path where the Hub will store SVM images. This prevents the redownload of the same application when ran by different users. This can be a local file path which will be shared by all users on the same device, or a network path which may be shared by all users across multiple devices. This setting is only available for servers with the Hub role enabled.
The Cache action may be used to manually populate the image cache with the latest revision of all repositories in the Hub.
Images in the cache are removed if the repo's revision are deleted from the Hub. Cached images may be manually removed from the server by deleting the file from the Windows Explorer.
-
Hub Storage Path: Sets the hub storage path to a custom path. Ensure the target path is empty and not used by other applications, and has sufficient storage for storing all images and persisted data. The path can be changed later, but will require momentary downtime of the hub depending on how much data will be moved. The service user must have full access to the target path. Please see the Backup and Recovery documentation for additional details and troubleshooting.
-
Hub CDN URL: The Hub block storage CDN URL. The Hub CDN URL must be a valid absolute http(s) URL. If the URL is not specified, blocks will be fetched from the original Hub URL.
For more information on the Hub CDN and common CDN configurations, see Configuring Content Delivery Network (CDN)
-
Hub CDN Max File Size: The maximum file size supported by the CDN provider, in megabytes. Supporting clients will download files exceeding this size using the Turbo synchronization protocol.
-
Block Storage: Scans and repairs errors in the block storage. Images should not be pushed to the server until the repair is complete. This action is only available for servers with the Hub role enabled.
-
Optimize Storage: Scans and deletes unreferenced blocks from the block storage. This action is only available for servers with the Hub role enabled. Optimize storage requires free space equal to the current size of the block storage size to complete successfully.
Server Security
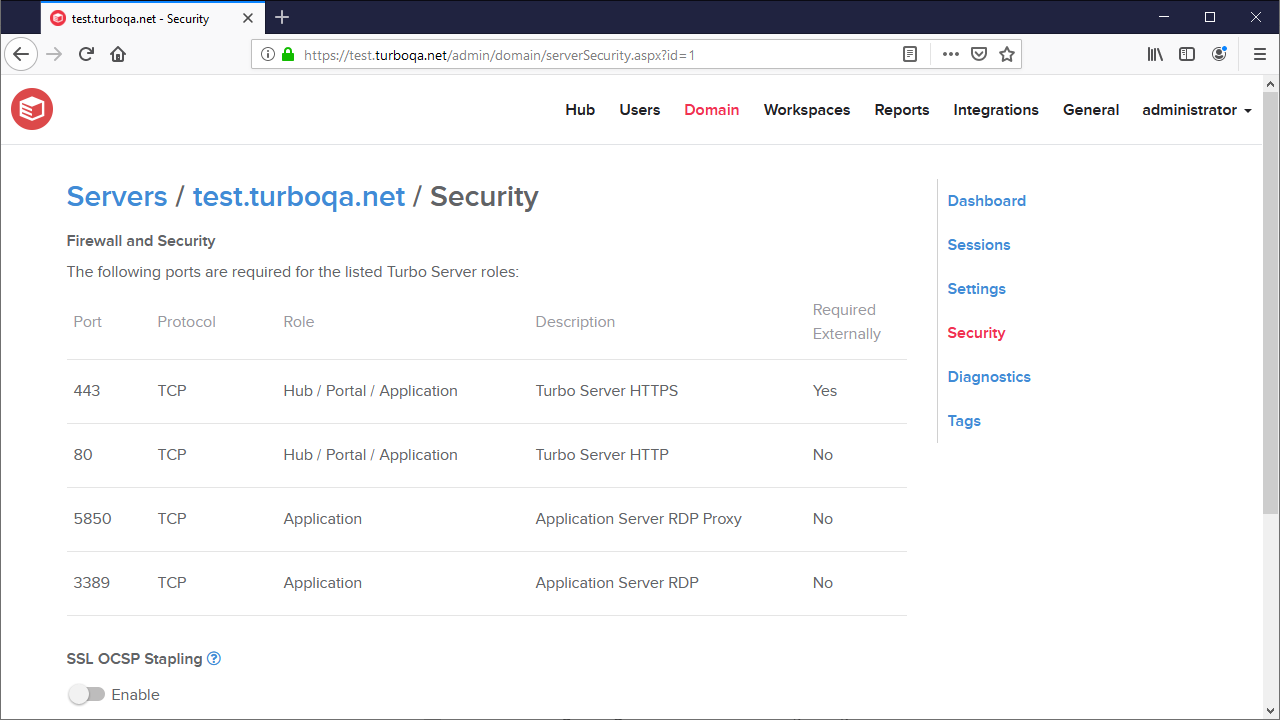
The Server Security page displays the required Windows Firewall configurations as well as other configurable security settings.
-
Firewall and Security: A list of ports that are required by the selected server roles. For a full list of ports that are used by Turbo Server, please refer to Firewall and Security.
-
SSL OCSP Stapling: Enables OCSP Stapling for SSL. SSL must be enabled with the intermediate certification file specified.
-
HTTP Strict Transport Security: Enables the HTTP Strict Transport Security (HSTS) header on all requests. The HSTS header uses a 1-year expiration and leaves all other options as default. The header is disabled by default.
NOTE: If you downgrade your server to HTTP, the HSTS setting must be cleared from the client browser in order to re-enable access the server.
Server Diagnostics

The Server Information page displays the start time and up time of the Windows server that Turbo Server is installed on.
Clicking the Reboot Server button will reboot the server (shutdown and restart Windows). Any sessions running on the restarting server will be terminated without warning, and any Windows updates listed in the Pending Windows Updates section will be installed. Use the Reboot Server button in case the server appears unresponsive as a last resort.
The Service Information section displays the start time and up time of the Turbo Server service.
The Pending Windows Updates section displays all Windows updates that require a system reboot and are pending install on the Windows server.
The Operations table lists all operations that are managed by the Turbo service as well as their last know status. If an operation failed to complete successfully, the operations table will report an Error status and a short description of the error.
The Server Logs section displays the most recent Turbo service logs. From this page administrators can create and download log archives directly from the administration site.
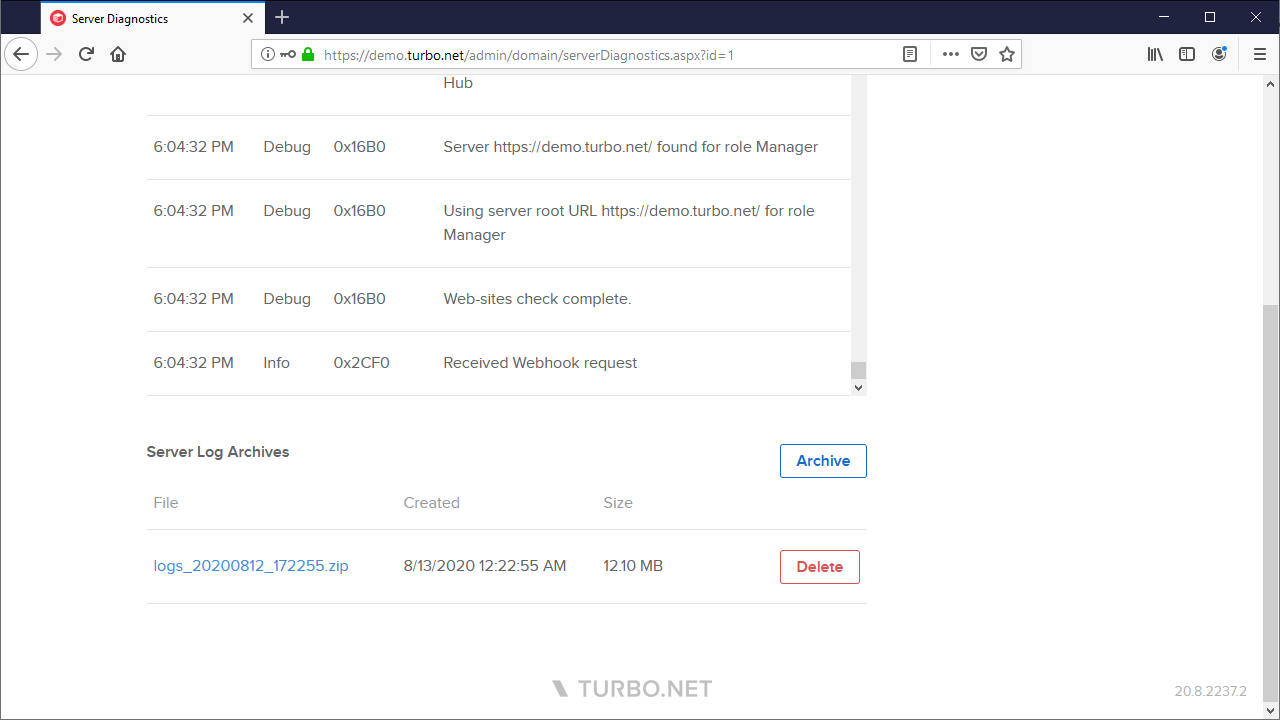
Clicking the Archive button will gather all of the logs across the various Turbo Server services and compress then into a single .zip file. Once compressed, the archive will be made available for download and the original log files will be cleaned up.
Server Tags
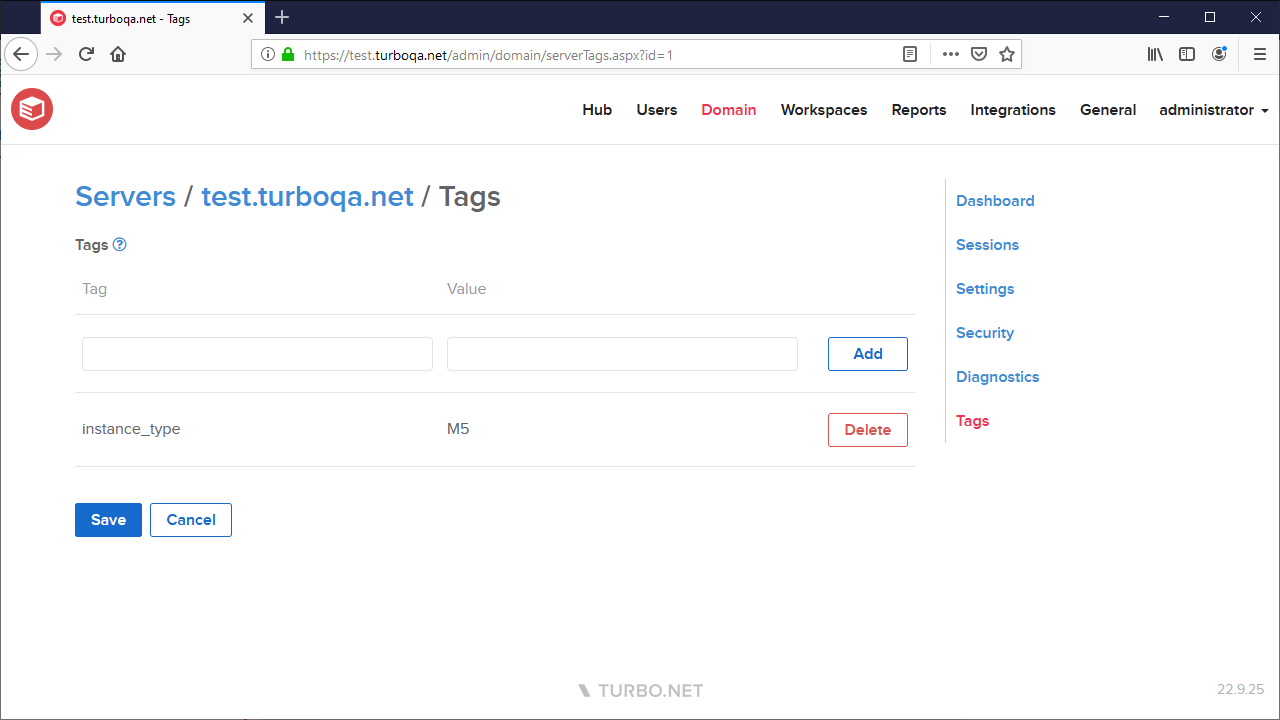
Server Tags are user-defined name value pairs that can be used to organize, manage, and filter servers. Server tags must include a name and may optionally include a value. Server tag names and values are case-insensitive.
For example, tags may be used to restrict workspace application launches to application servers that meet certain requirements, such as GPU capabilities or licensing.
Workspaces
A workspace defines a set of applications and user permissions. These workspaces are shown on the Turbo Portal and on the Turbo Clients to users with sufficient permissions. By default there is a single Default Workspace with User permissions granted to the Everyone user group, allowing access to all users. Applications, permissions, and analytics can be managed from the the Workspace Administration page.
Server Administrators, as well as users with Administrator permissions to the workspace, may click the Manage button to access the Workspace Administration site.
Workspace Dashboard
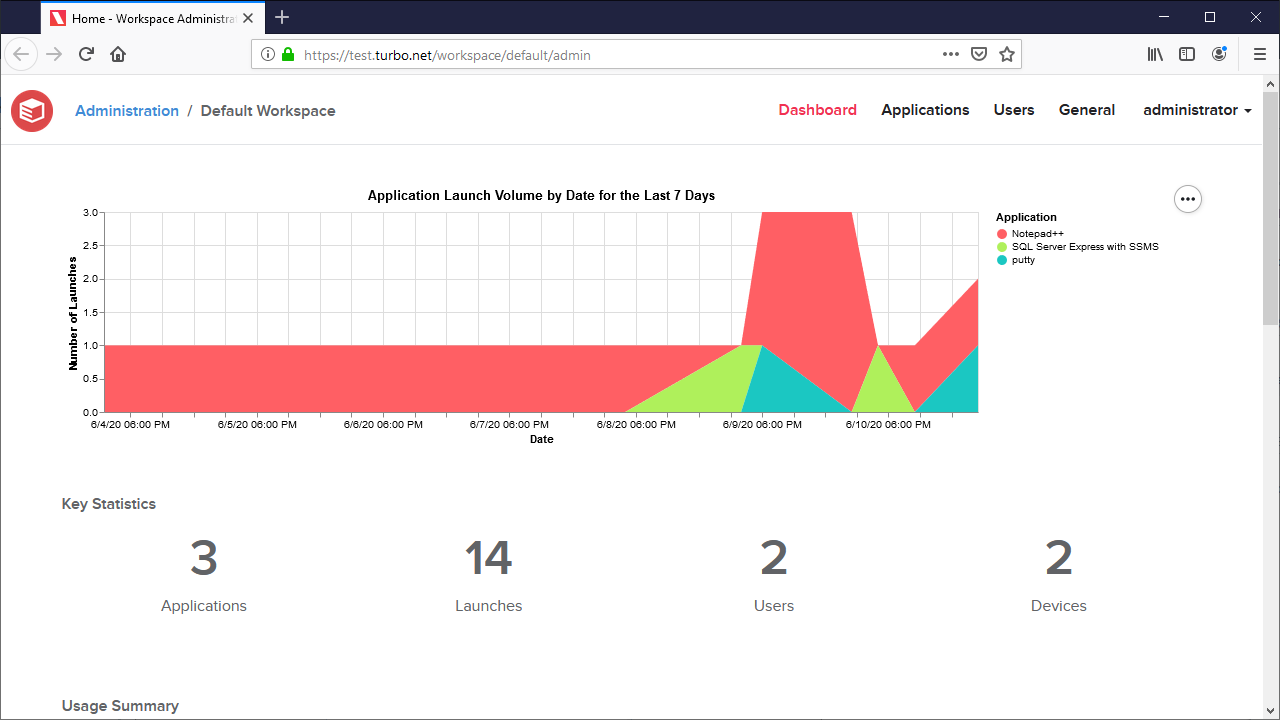
The Dashboard page shows application usage analytics for the workspace. The analytics are separated into 4 sections:
-
Application Launch Volume: A graph visualizing the application launch volume for the past week.
-
Key Statistics: A summary of the unique applications, launches, users, and devices for the past week.
-
Usage Summary: A table grouped by application summarizing each application's launch volume for the past week.
-
Recent Activity: A table detailing the last 100 application launches.
Workspace Applications
The Applications page lists all applications that have been added to this workspace and provides management options such as adding, editing, and deleting applications. Applications added to the workspace will be displayed on the portal to users will sufficient permissions and will be available for launch.
Applications are broken down into several different types:
PC Applications
A PC Application is a Windows desktop application that runs in a containerized environment using the Turbo VM. These applications can be configured with a variety of launch, virtualization, and display settings.
PC Applications can be managed from the Application Settings page and contain the following fields:
General
- Display Name: The application display name shown on the portal.
- Icon: The icon that will be displayed to end users on the Portal. The icon must be a valid image type and at most 1MB in size. We recommend using a square icon that is at least 60px x 60px. If no icon is configured, the repository icon will be displayed.
- Repository: The name of the image repository used by this application.
- Application Version: The application version that will be launched. By default, the latest version will be used. The available application versions are sourced from the base repository.
- Allowed Launch Modes: Application launch modes that are available for applications on the portal. Disallowed launch modes will be disabled.
- Default Launch Mode: The launch mode the application will use by default if the user does not specify a launch mode. The is the default left-click behavior on the portal.
- Video Encoding: The preferred video encoding used for remote execution. Video encoding support depends on the application server settings and hardware.
- Startup File: The startup file that is used when launching the application. By default the image's startup file is used.
- Startup File Arguments: Arguments passed to the application startup file.
- Profile Mode: The login mode used when launching applications in the cloud. Possible options are:
- Temporary Profile: A temporary user profile will be created on the Application Server. Temporary profile persistance can be configured on the Server Settings page.
- Ask for Credentials: The user will be prompted to enter their Windows credentials for the Application Server. Both down-level and UPN logon names are accepted. Users must enter the UPN logon name format for Windows 10+ Enterprise multi-session. NOTE: HTML5 file integration may not function properly if the down-level domain is entered along with a UPN.
- Kerberos: The user will be prompted to login using Kerberos authentication.
- Restrict to AD Groups: Restricts the application's visibility to members of the specified AD group. If a value is provided, then only members of that AD Group will see the application on the portal. If no value is provided, then all users with access to the workspace will see the application.
- VM Version: The VM version is a version string that specifies which Turbo VM version will be used for execution. The available VM versions are sourced from the Turbo Virtual Machine system image. See VM Version.
- Enable Assembly cache: Enables pre-caching of application DLL and EXE files on the Application Servers’ local disk for faster loading. See Use DLL cache.
- Launch on Install: Automatically launch the application when it is registered onto a device, such as when running the
subscribe <workspace> --registercommands from the Turbo client. - Container Name: The container name that is used when launching the application. By default the image's name is used.
Isolation
-
Access Local User Folders: Allows the application to access the host device's local user folders, such as Desktop, Downloads, Documents, Music, Pictures, and Videos. See Access local user folders.
Set to Inherit from Workspace to inherit this setting from the corresponding workspace setting, or select a custom isolation settings to override the workspace setting.
-
File Isolation: Determines the level of file visibility and access from the vm to the host environment. By default, local launches use Full isolation and cloud launches use Write Copy isolation. See Isolation Settings.
Set to Inherit from Workspace to inherit this setting from the corresponding workspace setting, or select a custom isolation settings to override the workspace setting.
Network
- Isolate Network: Isolates the virtualized network environment from the host device's network. See Isolate network.
- Tunneling: Tunneling allows the application to tunnel traffic from the virtual environment to the specified targets accessible from the Portal server. Tunneling currently supports TCP and IP protocols and requires SSL (https) to be enabled on the domain. UDP is not supported. See Proxy Settings.
- Network Routes: A whitelist or blacklist of network routes that are accessible by the virtual network environment. See Controlling Outbound Traffic.
Components
- Components: A list of additional image repository IDs that are added to the base image as layers. See Components.
Storage
- Sessions are persistent: Persists the application state and settings on the host machine, enabling persistence across multiple sessions. Typically this setting should be enabled in order to prevent loss of data. This setting defaults to true.
- Synchronize across devices: Automatically synchronizes the application state and settings with the Hub server, enabling persistence across multiple devices. Sessions are persistent must be enabled to change this setting. This setting defaults to false.
- Drive Visibility: Controls which drives are visible in the virtualized application environment during cloud runs. This setting does not apply to local runs. By default, only the system drives and T: Drive are visible.
- Mount Points: A list of mount points that mount file paths from the host into the container. Supports NTFS paths, UNC paths, and special folder variables (see Folder Variables)
Licensing
- Licensing: Restricts the number of users or devices that can launch the application. The license counters are reset when the setting is modified. Available options are:
- Unlimited: No limits to the application. Set to unlimited to reset previously assigned named licenses.
- Named Users: Restricts the total number of named user that can run the application. A named user is a distinct Turbo user, which includes anonymous users and api-key sessions.
- Concurrent Users: Restricts to the number of users allowed to run the application at a given time.
- Named Devices: Restricts the total number of devices that can run the application. A named device is base on the end user operation system SID and MAC address.
- Concurrent Devices: Restricts to the number of devices allowed to run the application at a given time.
IP Restrictions
-
IP Access Rules: A whitelist or blacklist of IPs that control access to this workspace application. Clients that access the Portal dashboard from a blacklisted IP will not be able to view the application.
Detailed access control information may be found at Access Control.
Server Assignment
-
Server Tag Rules: Restricts cloud application launches to application servers that satisfy the tag rules. An application server must contain the exact tag name and value for all tags in order to qualify. Comparisons are case-insensitive and empty tag values will match against any value.
For information about configuring Server tags, see Managing a Server
Installation
-
Shell Integration: Enables or disables shell integrations that determine how installed applications interact with the host device, such as by adding shortcuts, file associations, and shell extensions. By default, all shell integrations will be enabled except for services and the default start menu shortcut.
Web applications only support the default start menu shortcut and cannot be customized.
Shell integrations are configured in the application image. For more information on configuring shell integrations in Turbo Studio, see Desktop Integration.
For more information on using shell integrations, see Shell integration
PC Native Applications
A PC Native Application is a Windows desktop application that launches an existing installed application on the application server or local client host in a containerized environment using the Turbo VM.
When adding a Native Application to a workspace, a list of applications will be recommended based on the link files in the application servers' all users (common) Desktop and Start Menu folders. Selecting an application will set the launch settings to the link file's target and arguments. The application list is updated on service start and every 30 minutes thereafter.
If you do not see your desired application, check to see if the application has shortcuts in the common Desktop or Start Menu folders on the application server. This may be the case for Internet Explorer if is not installed on the server (no shortcuts, but still exists in program files). You may also select Custom application to manually enter your settings. We recommend setting the Startup File to the target file path instead of a link file path to ensure that the path is resolved correctly. Please ensure that the file path exists on the target Application Servers and client hosts, or else the application will fail to launch.
The Native Application isolation must be set to write-copy or merge in order to access the natively installed application. Using full isolation will cause the application to fail to launch.
Native Applications offer the same launch, virtualization, and display settings as PC Applications. These settings may be managed from the Application Settings page.
Web Applications
A Web Application is a link to an external website or resource that is opened in a new virtual browser environment.
When adding a Web Application to a workspace, you must select a repository with the browser category. Repository categories may be managed from the Repository Settings page.
Web Applications offer the same launch, virtualization, and display settings as PC Applications, in addition to the following Web Application specific fields. These settings may be managed from the Application Settings page:
- URL: The target URL that is opened when launching the web application.
To launch the browser with more complex startup arguments, the placeholder value %web-url% may be added to the Startup File Arguments field. This placeholder will be replaced with value in the URL field.
Workspace Startup
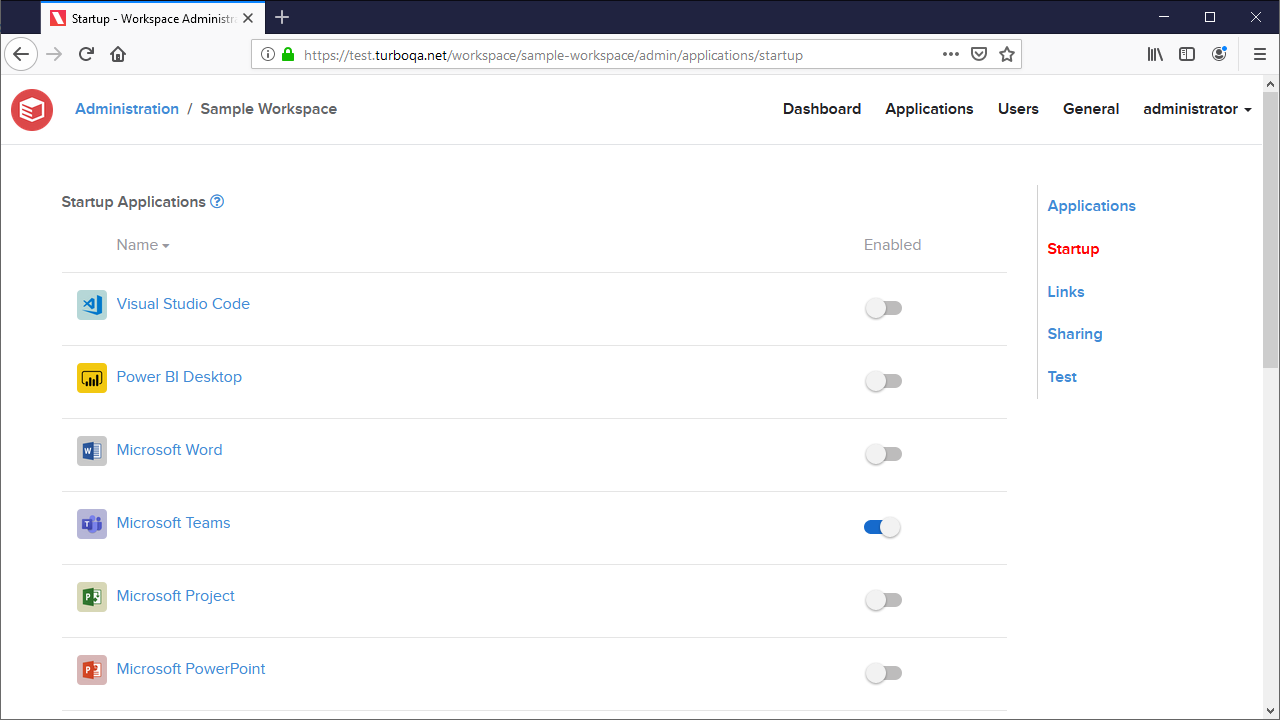
The Startup page allows administrators to configure the startup behavior for installed workspace applications.
The Startup Applications table lists all workspace applications and and their startup settings. Applications with startup enabled will run automatically when the application is installed to the device. This setting is disabled by default.
When an application is marked as a startup application, commands that install that application to the device such as turbo subscribe --register and turbo subscription register will run the application automatically. The application is launched by shell executing the default shortcut. If the application has no shortcuts then the application will not be launched. For more information on configuring shortcuts with Turbo Studio, see Desktop Integration Settings
Workspace Links
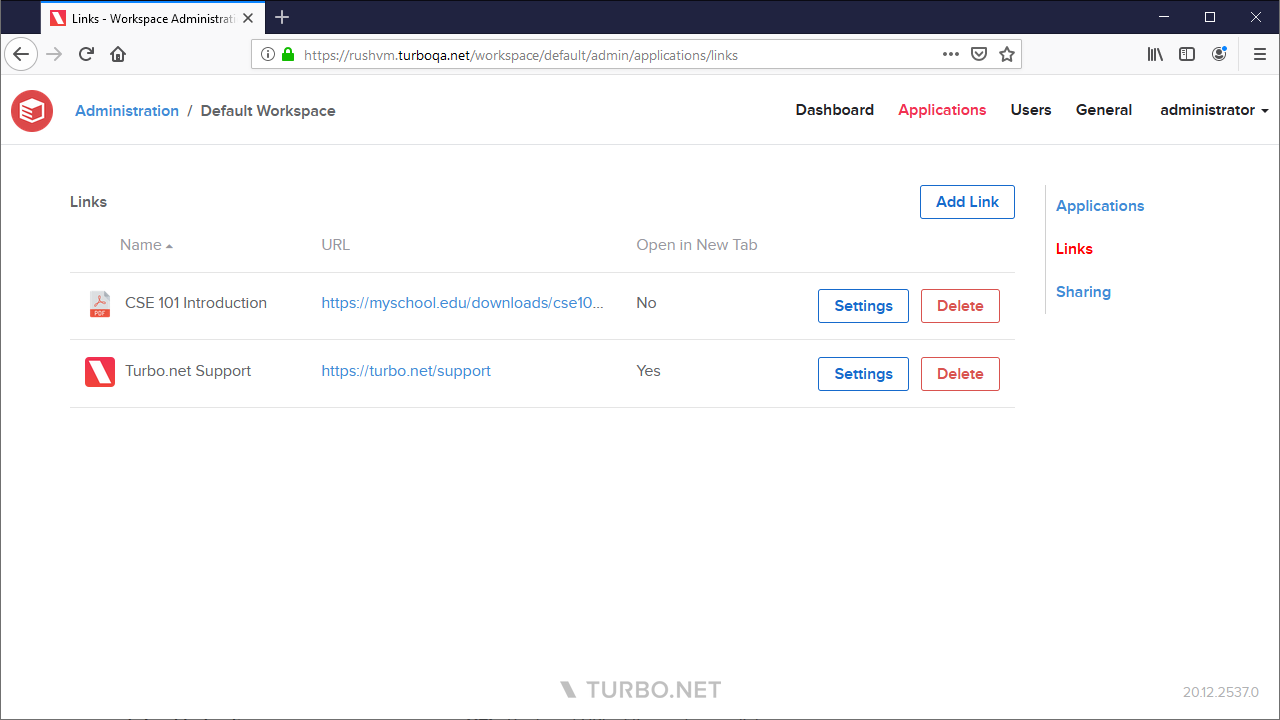
The Links page allows administrators to create and customize web links for end users to open URLs from their dashboard. These links appear under the Links tab on the Portal dashboard.
To create a new workspace link, click the Add Link button and enter your preferred options:
- Name: The name that will be displayed to end users on the Portal.
- URL: The target URL of the workspace link. If a URL is not include a protocol, then "https://" will be prepended automatically.
- Open in New Tab: If enabled, the link will be opened in a new browser tab. Otherwise, the link will be opened in the current browser tab.
- Icon: The icon that will be displayed to end users on the Portal. The icon must be a valid image type and at most 1MB in size. We recommend using a square icon that is at least 60px x 60px. If no icon is configured, a default icon will be displayed.
Sharing a Workspace Application

The Sharing page allows administrators to create shareable URLs for end users to run applications without having to log into the portal.
To create a new shareable URL, first create a non-system API key using the API Key administration page.
Next, click the Share Application button and select your preferred launch options:
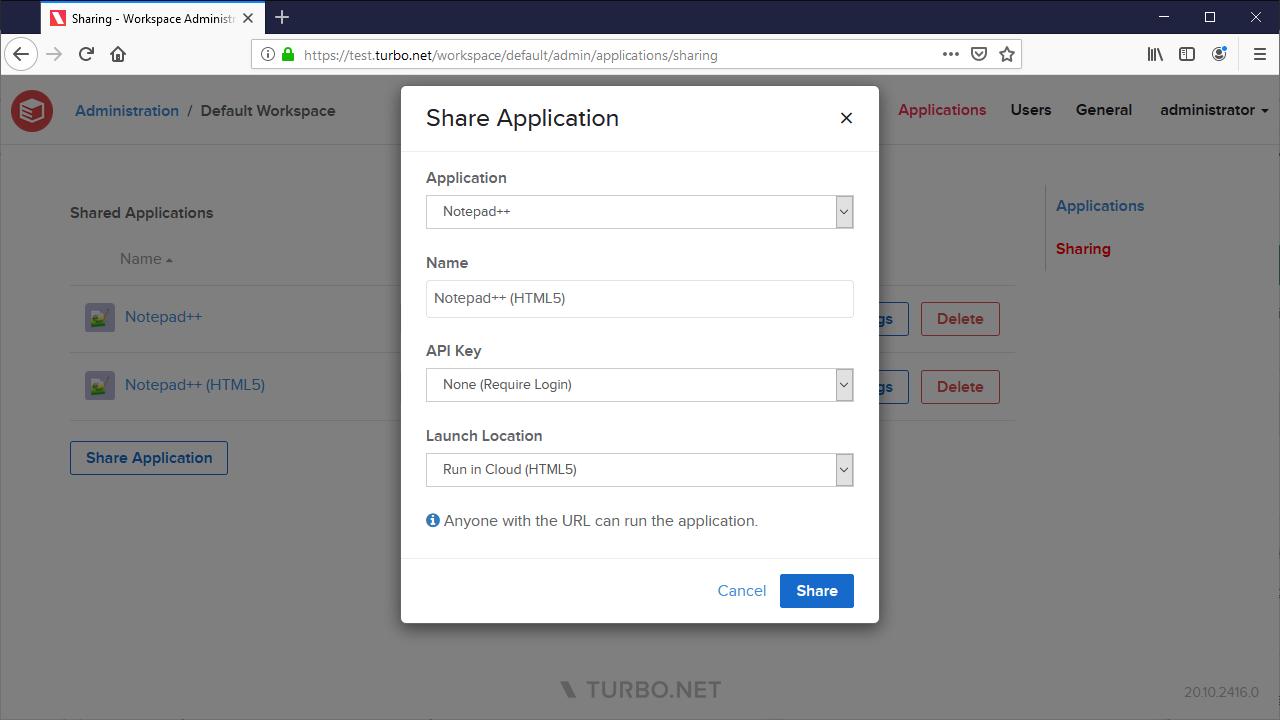
- Application: The workspace application that will be launched.
- Name: A display name for the share link. This name is only displayed on the workspace administration site to help differentiate share links.
- API Key: The API key that will be used to authentication anonymous users who use this share link. If None is selected, user's will authenticate using their logged in credentials. The API Key Name must be added to the Workspace User Permissions as a User or the shared application will fail to launch due to insufficient permissions.
- Launch Location: The location where the application will be launched.
To test your link, open an incognito browser window without logging into Turbo.net and paste the URL into the browser address bar. The application should run without requiring a login. Please be aware that the Share URLs use an API Key that allows access to your organization's applications and should be kept secure within the organization.
If you wish to modify or revoke your Share URL, you may do so by clicking Settings button on the appropriate Share URL.
Testing Workspace Applications
The Test page allows administrators to perform multiple workspace applications launches simultaneous with various test configurations. Each application is launched in the HTML5 client with a unique temporary profile. These tests can, for example, simulate heavy application server loads and identify load related issues.
The following form fields are described below:
- Application: The application that will be launched. Applications must belong to the current workspace to be selectable.
- Instances: The number of application instances that will be launched. Each application instance is assigned an incrementing ID that creates a unique session. The ID is specified by the
instanceURL query parameter in the HTML5 client. The test will always start at instance ID 0, which will reuse any existing test sessions. This allows the tester to know exactly how many sessions of the application is running. - Server Assignment: The rules that dictate the application servers to which the test workload is assigned.
-
Auto: The application server will be assigned without restriction based on the resource allocation strategy configured in the domain.
-
Application Server: The selected appliation server will be assigned.
-
Server Tag Rules: Filters the application servers that can be assigned the application instance according to their tags. A server must satisfy all of the supplied tag rules to qualify for launch.
Tag name and values are case-insensitive. If no rules are provided then a server will be assigned without tag restriction.
-
Additional supported query params on the HTML5 client:
- cache-mode: A number that determines which caches will be enabled or disabled for this launch. Missing or empty will launch with all caches enabled. The cache mode value uses the following bitmasks to determine the cache behavior:
- 1 (0b01): Launch with the Portal caches disabled
- 2 (0b10): Launch with the Broker caches disabled
- 3 (0b11): Launch with both portal and broker caches disabled
- no-logoff: Determines the remote session behavior on browser tab closure. By default, the remote session will be logged off on tab closure. If this query parameter is present, the remote session will instead disconnect and will logoff according to the configured Streaming settings.
Clicking the Run button will execute the test, opening an HTML5 client browser tab for each application instance.
NOTE: Some browsers may attempt to popup block the test instances. If your browser notifies you about blocked popups, please allow them for the Turbo Server administration site.
Diagnosing Test Results
The following section describes some resolutions to common issues when testing an application.
Application launches are slow with some instances that fail to start
Check the HTML5 client's browser console logs. If the PUT session request fails with 502 error, then the Broker may not be responding in time due to a resource constraint. Increase the number of Portal and application servers to improve the performance.
Application launches are slow with instances in session closed state
Check the CPU and memory usage on the application server when launching a large number of instances. If the sessions are bound by the CPU, they may not start in a timely manner resulting in the RDP protocol to disconnect. Increase the number of application servers or CPU cores on the application server.
Workspace Users
The Users page allows administrators to manage user-related settings, assign user and group entitlements, and manage channels.
Please note that changing or removing an existing workspace permission may take up to 5 minutes to be reflected on the Portal site. During this time, a user that is upgraded from User to Administrator may not see the workspace listed in the account dropdown or be able to access the workspace administration site. Likewise, a user that was downgraded or removed may still see the workspace listed in their account dropdown, however they will not be able to access the workspace administration site. The user may logout then login to see the change immediately.
General
The users General page allows the administrator to configure the following settings:
- Default Item Permission: The default user entitlement for workspace items. If this setting is disabled, workspace items will not be visible to users unless they have been granted access, such as through channel membership. Permission is enabled by default.
- Default Active Directory Domain: Sets the default Active Directory domain used to login when launching applications in the cloud with non-temporary profiles.
Permissions
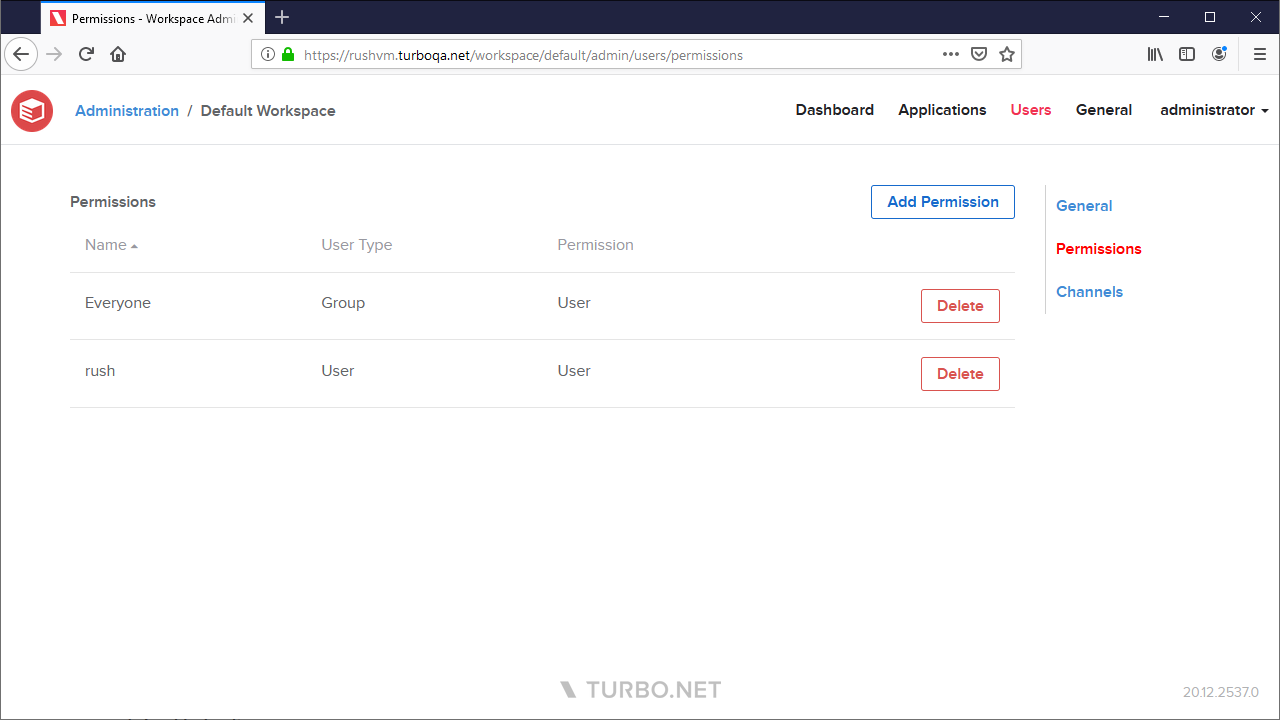
The users Permissions page lists all user and user group permissions that have been added to the workspace and provides management options such as adding and deleting permissions. The following permissions are available:
- User - Grants read access to the worksapce dashboard.
- Read-Only Administrator - Grants read access to the workspace APIs, in addition to access granted by User.
- Administrator - Grants full access the workspace administration site and workspace APIs, in addition to access granted by Read-Only Administrator and User.
Channels
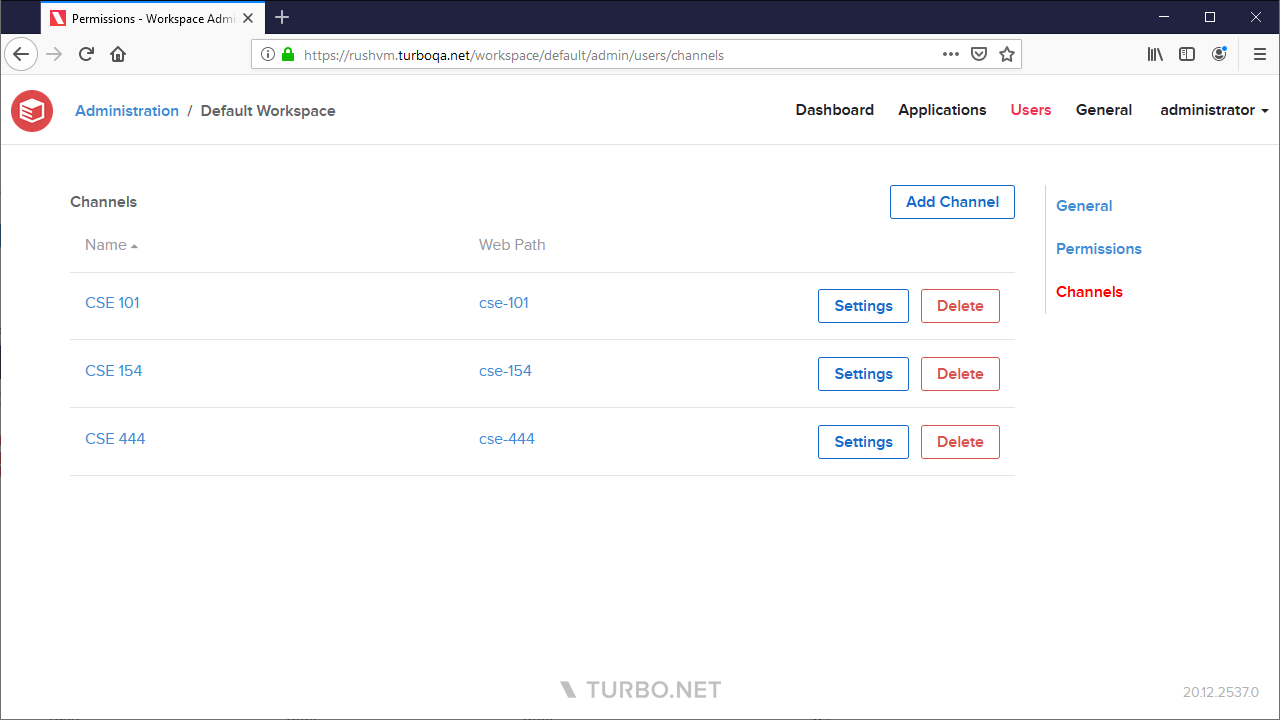
A channel is a collection of workspace items such as applications, links, and files that are made available to a configurable list of users and groups. Channels are visibile on the Turbo Server portal to users with sufficient permissions.
The users Channels page lists all channels that have been added to this workspace and provides management options such as adding and deleting channels.
Channels can be managed from the following channel settings pages:
General
The channel General page allows the administrator to configure the following settings:
- Display Name: The name that will be displayed to end users on the Portal.
- Web Path: The web path that uniquely identifies this channel, used to form the channel URL.
Items
The channel Items page lists all workspace items that have been added to the channel and allows the administrator to add and remove workspace items.
To add a workspace item to a channel link, click the Add button and select the workspace item type that you wish to add. The add dialog will list all items of the corresponding type that exist in the workspace. Items must be added to the workspace before they can be added to a channel.
Users
The channel Users page lists all user and user group permissions that have been added to the channel and provides management options such as adding and deleting permissions. Granting User permissions will allow that user or user group to access the channel, while granting Administrator permissions will allow that user or user group to access the channel administration page on the portal.
The Everyone group is automatically added with User permissions when the channel is created.
If the Default Item Permission workspace setting is enabled, all channel items will be visible from the workspace dashboard regardless of channel membership.
Workspace General
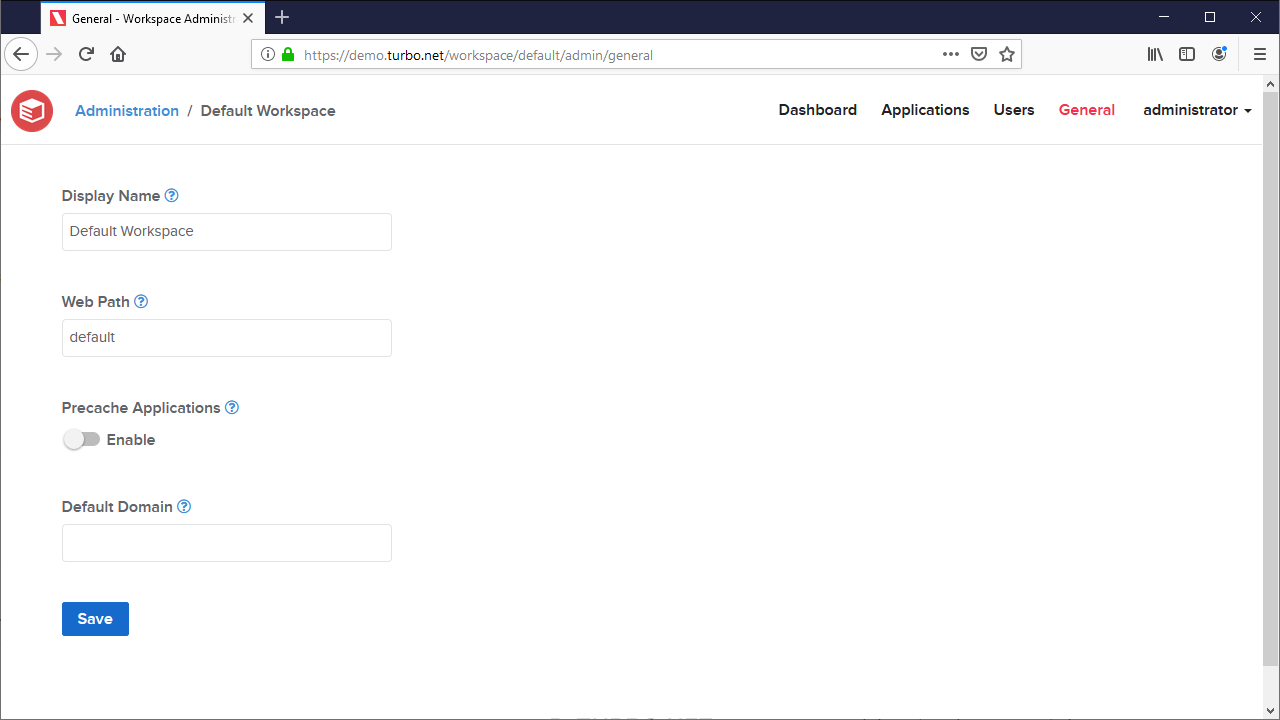
-
Display Name: The display name of the workspace.
-
Web Path: Folder name consisting of letters and numbers used to form the workspace URL.
-
Precache Applications: Controls whether this workspace is automatically cached to the Application Server.
-
Access Local User Folders: Allows workspace applications to access the host device's local user folders, such as Desktop, Downloads, Documents, Music, Pictures, and Videos.
The Reset action will reset all workspace applications in this workspace to Inherit from Workspace local user folder access.
-
File Isolation: Determines the level of file visibility and access that workspace applications have from the vm to the host environment. By default, local launches use Full isolation and cloud launches use Write Copy isolation.
The Reset action will reset all workspace applications in this workspace to Inherit from Workspace file isolation.
URL Handlers
Desktops and mobile devices handle URLs by launching an application registered to the URL's scheme (often described as a protocol handler). For example, HTTP or HTTPS URLs are opened by the device's natively installed web browser.
Organizations may require that URLs that match a specific scheme and optional authority plus path should be opened by a Turbo application instead of by the device's native application.
The scheme and host of the URL determines the application used to run the URL. Turbo Client opens a Turbo application associated with that URL. URL paths are pattern matched using a pattern string along with a match mode to launch different Turbo applications or passed through to the native application protocol handler.
Turbo Client registers the protocol handlers in the OS for the user's Workspaces that contain Workspace URL handlers. Once the URL handler is triggered by the OS by a user action such as clicking on a URL link or typing in the command prompt, the Turbo application launches with the URL as the parameter as if the application was installed and registered as the native protocol handler.
The supported launch methods are remote HTML5, remote native, and local if the platform requirements are met.
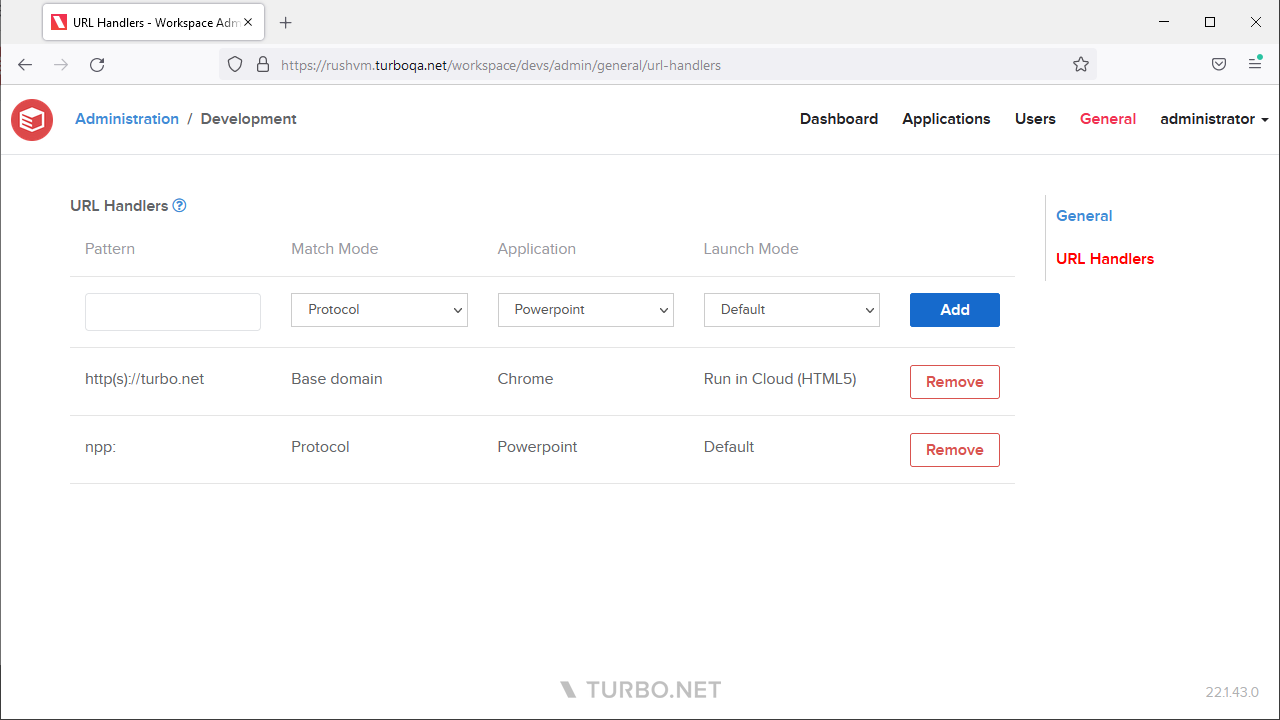
The following table describes the match modes used by the Workspace URL handlers:
|
Match Mode |
Description |
|---|---|
Protocol |
Matches if the protocol matches. If http or https, match uris with either HTTP or HTTPS schemes. Pattern should be valid uris with just the scheme e.g. https:, turbo:, magnet: |
Base Domain |
Matches the top level and second level doman names. |
Host |
Matches the full host, including the subdomain and port. |
Starts With |
URLs are matched if they start with the pattern string. |
Exact |
URLs are matched if they are equal to the pattern string. |
Examples of patterns and matched URLs:
|
Match Mode |
Pattern |
Results |
|---|---|---|
Protocol |
https: |
http://turbo.net mailto:support@turbo.net |
Base Domain |
https://turbo.net |
http://turbo.net https://app.turbo.net https://docs.turbo.net https://yahoo.com |
Host |
https://app.turbo.net |
http://app.turbo.net https://docs.turbo.net |
Starts With |
https://app.turbo.net/run |
http://app.turbo.net/run https://app.turbo.net |
Exact |
https://app.turbo.net/run |
http://app.turbo.net/run https://app.turbo.net/run/ https://app.turbo.net/run?id=5 |
File Associations
File associations allow user's files and registered desktops to open the specified file types with a workspace application.
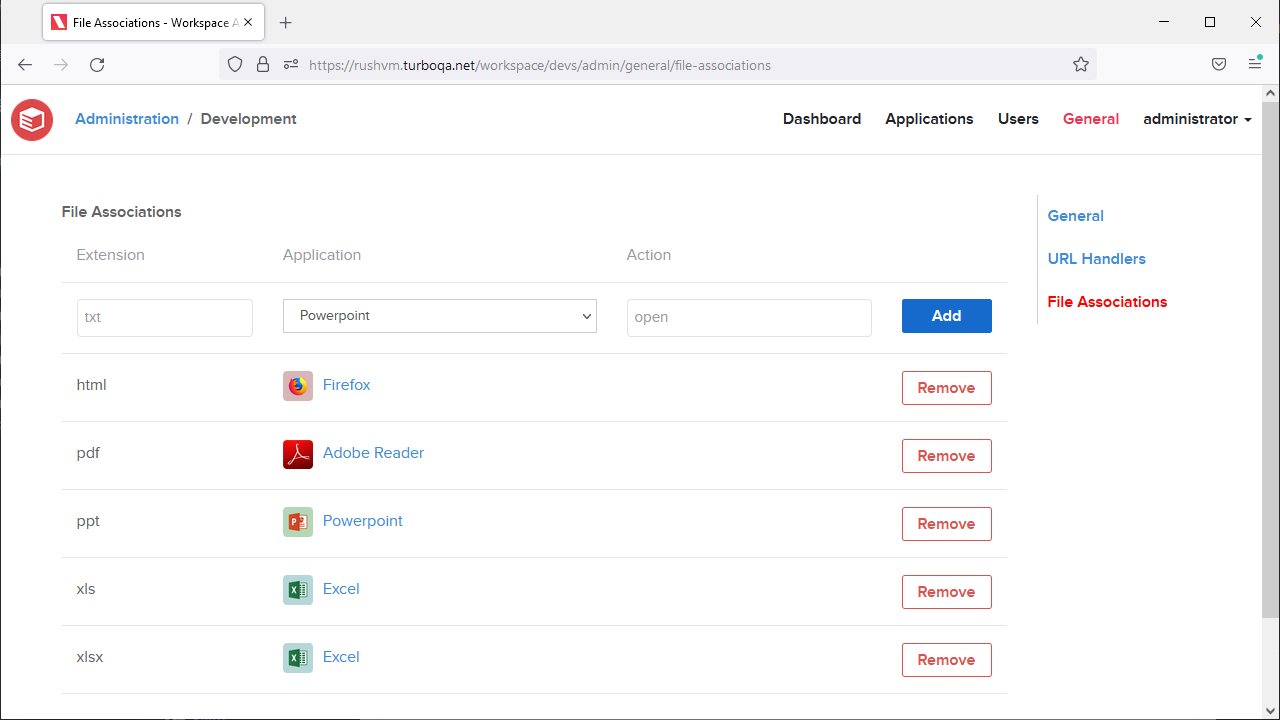
- Extension - The file extension that maps a file to a workspace application. The extension must be non-empty. Extensions are case-insensitive and are normalized on submission.
- Application - The workspace application that will be launched for files with the matching file extension.
- Action - The action that will be performed on the file, such as
openoredit. This field is optional.
The equivalent command to open the file via Turbo CLI is turbo run <application> --startup-file=<file> --startup-verb=<action>.
Administrators must ensure the application is configured to handle the verb for the give file type, see Studio Desktop Integration.
Reports

The Reports page provides pre-configured, detailed analytic reports, broken-down into categories. Selecting a report takes you to the Report page, which consists of a Date Range control and the Report Viewer. Use the Date Range control to adjust the time period for the selected report.
Note that if the server uses Anonymous login mode, the user name in the reports will display the Windows login profile name. This applies even for logged in users with cached credentials.
Administration Reports
- Events: Presents a record of all Turbo Server alerts. Common events include errors and administrative changes.
- Application Sessions: Presents a detailed record of each application session.
- Application Usage: Provides a detailed breakdown and comparison of the usage for each application.
- Session Logs: Provides a detailed record of all session events, including launching or stopping an application.
- User Sessions: Provides a detailed record of each application session, broken-down by user.
- User Usage: Presents a detailed breakdown and comparison of application usage for each user
- Performance: Presents performance metrics for each application launch.
Use the Download button located at the top of the Report Viewer to perform the following tasks export the report to a file in any of the following formats:
- Adobe Acrobat (PDF) file
- Comma-Separated Values (CSV) file
Integrations
The Integrations page provides options to configure integrations with variety of third-party services, such as cloud storage providers and Learning Management Systems.
Storage Providers

The Storage Providers page allows administrators to view and manage connections with various cloud storage providers such as OneDrive and Dropbox. End-users may then use these connections to login to their cloud storage accounts and access their files while running applications.
Storage Provider Settings

-
Storage Type: The storage type you are integrating with Turbo Server. Instructions for setting up a Storage Provider connection are available for:
-
Name: The display name of the storage provider connection.
-
Client ID/Secret/Other: The application registration information for the storage provider. Varies by storage provider type, see instructions above for more information.
-
T: Drive Path: The full file path where the storage provider will be mounted. Defaults to T:\{storage-type}.
-
Supported Account Types: The account types that are allowed to login and access thier files with this storage integration. Multitenant allows users from any tenant to login, while Single tenant restricts users to a single tenant.
-
Test: Storage provider configurations may be tested before committing any changes by clicking on the Test button. Common errors such as invalid or missing credentials or application registration misconfigurations will be reported during the testing process.
Compute Infrastructure
The Compute Infrastructure page allows administrators to view and manage connections with various compute infrastructures such as Azure. These connections may be used to deploy additional applications servers and join them to the Turbo Server farm.
Prerequisites
Compute Infrastructure currently only supports Azure environments. Support for other compute infrastructures may be added in the future.
The Turbo Server farm must be running in Azure with an Azure SQL Database connection. Adding Azure application servers to a on-premises Turbo Server installation is not supported.
For more information on setting up an Azure Turbo Server farm, see the Turbo Server AMI setup docs: /docs/server/setup-and-deployment/deploying-to-azure#hub-and-portal-role-deployment.
Azure Setup Guide
Before any application servers can be deployed to Azure, the Azure tenant must be configured with an application registration that has permissions to create new resources.
First, the application registration must be created. This application will be used to generate an access token to the Azure tenant with a limited set of permissions. To create the application registration:
- Login to the Azure Portal and switch to your desired directory
- Go to App Registrations and click New Registration
- Enter a descriptive name such as
Elastic Deploymentthen click Register. The other settings can be left as default. - Make note of the Application (client) ID and Directory (tenant) ID for later
- Go to API Permissions > Add a permission
- Select Azure Service Management > user_impersonation then click Add permissions
- Click Grant admin consent
- Go to Certificates & secrets
- Click Client secrets > New client secret
- Enter a desired description and expiration date then click Add. Make note of the key value for later.
Next, the application registration must be granted the Contributor role. This will allow the application registration to create Azure resources within the Azure subscription. To grant the Contributor role:
- Login to the Azure Portal and switch to your desired directory
- Go to Subscriptions > Pay-As-You-Go. Make note of the Subscription ID for later.
- Go to Access control (IAM) > Role Assignments
- Click Add > Add role assignment
- Select the Contributor role
- Click Members
- Click Select Members and add the application registration that you created in the previous section
- Click Review + Assign
Compute Infrastructure Settings

- Platform: The compute infrastructure that is being integrated, such as Azure.
- Name: The display name of the compute Infrastructure that will be shown on the Turbo Server administration site.
- Client ID: The Client ID from the compute infrastructure application registration. For Azure this is the Application (client) ID from the Setup Guide.
- Secret: The Client Secret from the compute infrastructure application registration. For Azure this is the Client secret value from the Setup Guide.
- Directory ID: The Directory ID from the compute infrastructure application registration. For Azure this is the Directory (tenant) ID from the Setup Guide.
- Subscription ID: The Subscription ID from the compute infrastructure application registration. For Azure this is the Subscription ID from the Setup Guide.
- Region: The region to which resources will be deployed, such as westus or eastus2. The region must be available in your subscription.
- Resource Group Name: The name of the resource group to which resources will be deployed. A new resource group will be created if the specified resource group is not found.
- Virtual Network Name: The name of the Virtual Network to which deployed resources will be assigned.
- Virtual Network Subnet: The name of the Virtual Network Subnet to which deployed resources will be assigned.
- Virtual Network Resource Group Name: The name of the resource group where the Virtual Network is located
The above configurations can be tested by clicking the Test button. This will verify that the Client ID, Secret, Directory ID, Subscription ID are present and configured correctly in Azure. It will also check that the Region is available in the subscription.
Learning Management Systems (LMS)

The Learning Management Systems (LMS) page allows administrators to view and manage connections with various LMSs such as Canvas, Moodle, and Blackboard. Once configured, students may access the Turbo Portal and launch applications through their LMS.
Instructions for setting up an LMS connection are available for Canvas, Moodle, and Blackboard.
The following sections describe the avaiable LMS configurations:
Show in Course Navigation
When the LTI Configuration URL is used, Turbo Server sends user interface instructions to the LMS Platform. These UI instructions include a Turbo icon, description and the following fields:
- Placement location: Course Navigation
- Link text: Apps (customizable)
- Visibility: public
- Default: enabled (customizable)
When Show in Course Navigation is disabled, the Default setting changes to disabled. New courses then hide the apps link from students by default until an instructor chooses to enable it.
Show in Course Navigation and Link Text settings will not affect LMS Platforms using the LTI Tool Provider URL.
Turbo must be removed and then re-added to the LMS platform for changes to these settings to take effect.
User Identity
Upon receiving a LTI 1.0/1.1 Launch Request from the LMS platform, Turbo Server must determine the user identity requesting access. Turbo identifies users with two values, both of which must be unique and immutable:
- Login Name: User friendly identifier for signing in to Turbo resources.
- User ID: User's primary key in your organization's Learning Information System (LIS) or Directory Service.
By default, Turbo will look for these values in LTI Launch Request fields specific to each LMS Product. The following table describes the default fields used for identity for a given LMS.
| LMS | Login Name | User ID |
|---|---|---|
| Canvas | custom_canvas_user_login_id | user_id |
| Moodle | ext_user_username | user_id |
| Blackboard | list_person_sourcedid | user_id |
| Other | lis_person_contact_email_primary | user_id |
If your organization has modified the platforms’ identity settings, you may configure Turbo Server to find the Login Name and User ID under custom field names.
Navigate to the LTI page of the Turbo administrator site. Under the relevant value, check Custom to override the default field, then type in the name of the LTI Launch Request field for Turbo Server to use.
Workspace
Associating a workspace with the LMS integration allows configuration of where end users will be redirected to when launching Turbo from the LMS. Additionally, this determines the workspace to which channels will be added when Automatically Create Channels is enabled.
Selecting "None" will redirect users to the Turbo Portal homepage. If the user has access to exactly one workspace then that workspace will be displayed, otherwise a list of available workspaces will be displayed.
Automatically Create channels
Automatically creates a new channel in the specified workspace for unknown courses. A workspaces must be selected to enable this setting.
If the role of the user is an instructor, content developer, or administrator, grant the user administrative permissions to the channel when the channel is created. The instructor will be able to add users and applications to the channel from the portal.
Automatically Grant Permissions
Automatically grants user level permissions for the user to the target workspace.
Courses
Adding a Course to the Turbo Server allows configuration of a custom link to a particular Workspace or Channel. When a user launches Turbo from a known course, they are routed directly to the configured view.
To add a course to Turbo, it must first exist in the LMS. To edit an existing course, click on its name in the Courses table.
- Name: Administrative display name for the course, not seen by users.
- Course ID: Unique identifier for the course given by the LMS. Refer to the section below to obtain the value for the desired courses.
- Workspace: The Workspace users from the course will be routed to.
- Channel: The Channel view that users will be routed to. If left blank, users will be routed to the Workspace view.
- Default Channel Access: Automatically grant channel access to users from the LMS course. If the setting is not enabled, users must be granted permissions to the channel manually. Users must also have access to workspace regardless of this setting.
Renaming or deleting a course does not affect the LMS itself; these properties affect only how Turbo interacts with the course.
The following section desribes how to locate the course ID for supported LMS.
CANVAS
Navigate to any page of the desired course in Canvas. The URL will take a form similar to:
https://canvas.instructure.com/courses/2307642/quizzes
The number immediately after /courses/ is the Course ID. In this example, that number is 2307642.
BLACKBOARD LEARN
Navigate to the Blackboard Administrator Panel. Under the section Courses, click on the Courses link.
Locate your course in the table. The Course ID is shown for the course.
MOODLE
Navigate to the settings page of the desired course.
The settings page can be reached by clicking the gear icon on the course’s home page or the gear icon on the listing in Course and category management.

The Course ID is located under General. If the course does not yet have an ID, one must be given.
General

The General page provides options to configure and customize Turbo Server. The page contains the following sections:
-
License: Provides an overview of information associated with the current Turbo Server license, including number of seats, allowed portals, computer name, and machine identifier. If server users are licensed to run applications on more than one machine, this number is reflected here. This section also contains a link to add a New License; you can use this to update an existing license as well.
-
Administrator Email: Users are directed to this email address if they encounter any errors or issues while using Turbo Server.
-
Notice and Consent: Users will see a notice and consent dialog after logging into the Portal. They must accept the notice and consent dialog before using the Portal. Markdown syntax is supported for links, headers, font styles, and more.
Notifications
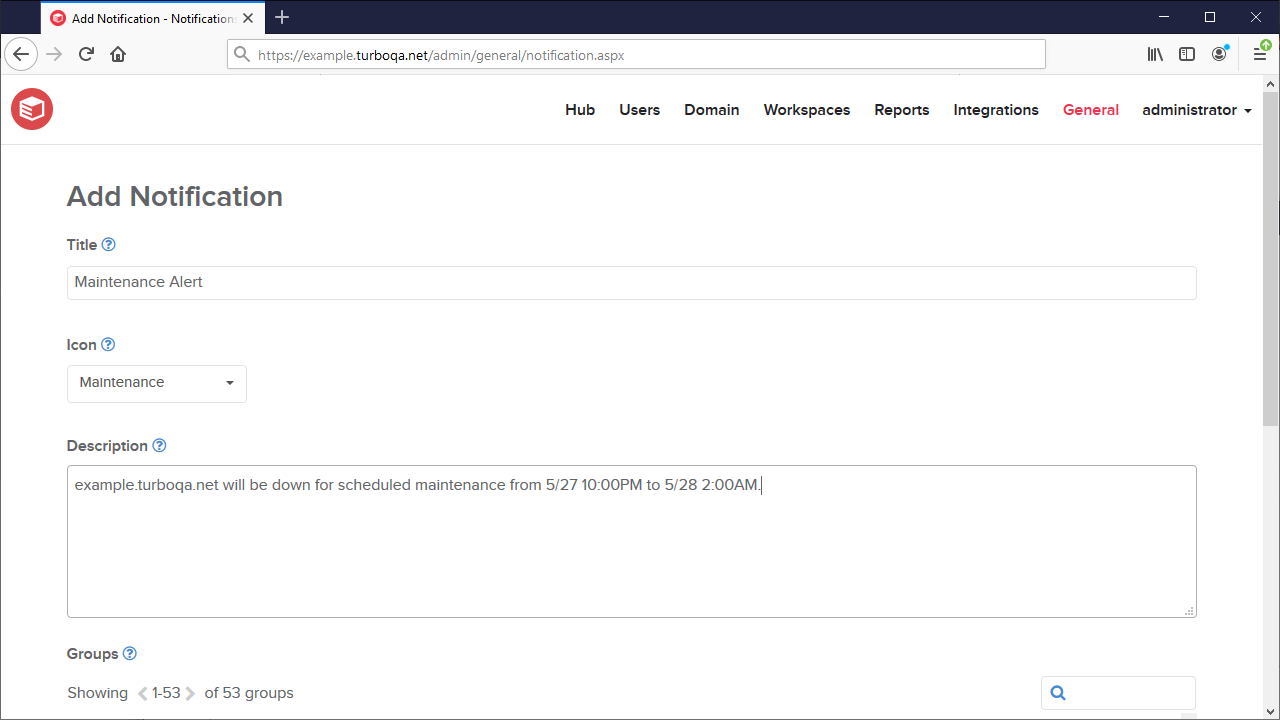
The Notifications page allows admins to notify groups of Turbo Server users with custom message, such as service maintenance periods or product updates. Notifications may be customized with the following fields:
- Title: The message title that will be displayed to the end user in the notification.
- Icon: A preset or custom icon that will be displayed to the end user in the notification. When uploading a custom icon, we recommend using an image that is at least 80px x 80px.
- Display Type: The display type for this notification. The available types are:
- Default: A low priority notification, displayed in a notification dropdown. This is the default setting.
- Toast message: A notification that is shown at the top of the Portal dashboard. This notification may be dismissed and does not interrupt the user.
- Description: The message body that will be displayed to the end user in the notification.
- Groups: The user groups that this notification will be sent to.
The end-user may view their notifications on the Turbo Portal under the notifications dropdown, which are listed in order from most recent to least recent. Notifications are sent immediately upon submit, but may be changed later on through the notifications settings page.
Streaming

The Streaming page provides remote application streaming configurations for the Application servers.
-
Active sessions: The maximum amount of time that a Remote Desktop Services session can be active before it is automatically disconnected.
This setting corresponds to the Set time limit for active Remote Desktop Services sessions Group Policy setting. The value 0 will set the Group Policy setting to
Never.Turbo Server defaults this setting to
21600000. -
Active but idle sessions: The maximum amount of time that an active Remote Desktop Services session can be idle (without user input) before it is automatically disconnected.
This setting corresponds to the Set time limit for active but idle Remote Desktop Services sessions Group Policy setting. The value 0 will set the Group Policy setting to
Never.Turbo Server defaults this setting to
21600000. -
Disconnected sessions with running applications: The maximum amount of time that a disconnected session remains active on the server.
This setting corresponds to the Set time limit for disconnected sessions Group Policy setting. The value 0 will set the Group Policy setting to
Never.Turbo Server defaults this setting to
300000. -
Disconnected sessions without running applications: How long a user's RemoteApp session will remain in a disconnected state after closing all RemoteApp programs before the session is logged off from the RD Session Host server.
This setting corresponds to the Set time limit for logoff of RemoteApp sessions Group Policy setting. The value 0 will set the Group Policy setting to
Immediately.Turbo Server defaults this setting to
600000.NOTE: Windows terminal services will honor this value only if the RemoteApp session remains connected until the application is successfully terminated. If the HTML5 client browser process is terminated before the application can disconnect vai RemoteApp shutdown procedure, the session will remain for a longer than expected disconnected state. The RemoteApp shutdown procedure takes up to 20 seconds after the application window is closed. To learn more, see the Microsoft documentation.
-
Enable Drive Redirection: Enables the mapping of client drives when streaming remote applications.
This setting corresponds to the Do no allow drive redirection Group Policy setting.
The Turbo Server installer does not define a default value for this setting. Resetting this value will set it to
Not configured.The default Windows value for this setting is
Not configured. -
Network Drives: Maps network drives when streaming remote applications. Network drives will be mapped when users run sessions on the application server. Network drive paths support Windows environment variables.
The
\\tsclient\{path}can be used as the network drive path but is only supported when connecting with clients that redirect drives. For example,\\tsclient\ccan be used to map the to local C: drive when connecting using Turbo for PC, and\\tsclient\Homemay be used to map to the local Home folder when connecting using Turbo for Mac.NOTE: Network drives will not be mounted if the path is invalid or inaccessible to the remote user. Furthermore, network drive letters that conflict with existing local or network drives will not be mounted.
-
Require NLA: Enables Network Level Authentication, requiring users to authenticate before establishing a remote connection.
This setting corresponds to the Require user authentication for remote connections by using Network Level Authentication Group Policy setting.
Turbo Server defaults this setting to
Disabled. -
Restrict NTLM: Incoming NTLM traffic: Allows or denies incoming NTLM traffic from client computers, other member servers, or a domain controller.
This setting corresponds to the Network security: Restrict NTLM: Incoming NTLM traffic Group Policy setting.
The Turbo Server installer does not define a default value for this setting. Resetting this value will set it to
Allow all.The default Windows value for this setting is
Not defined, which is equivalent toAllow all. The server will allow all NTLM authentication requests. -
Restrict NTLM: NTLM authentication in the domain: Allows or denies NTLM authentication within a domain from this domain controller.
This setting corresponds to the Network security: Restrict NTLM: NTLM authentication in this domain Group Policy setting.
The Turbo Server installer does not define a default value for this setting. Resetting this value will set it to
Disable.The default Windows value for this setting is
Not defined, which is equivalent toDisable. The domain controller will allow all NTLM authentication requests in the domain where the policy is deployed. -
Preemptive Authentication: Allows the HTML5 client to show a login dialog when launching applications with Ask for Credentials authentication. If disabled, the HTML5 client will connect without credentials and defer to the remote login window. This setting does not apply to other clients or profile modes.
The default value for this setting is
Enables.NOTE: If Network Level Authentication is required, then launching applications in the HTML5 client with Ask for Credentials will fail with an authentication error.
The Inherit from Group Policy option will not update the local group policy and the behavior will be determined by existing GPOs or Windows defaults.
The Custom option updates the Local Group Policy on all application servers in the Turbo Server farm. Please be aware that this setting will always be overriden if your server is joined to a domain and the equivalent Domain Group Policy is defined.
The Reset button will reset the local group policies to their Turbo Server default values and remove all configured network drives on each application server. See each individual setting for more information on their default values. Confirming the reset confirmation dialog will apply the changes and reload the page, saving the settings form is not required.
Setting changes are applied approximately once every 20 seconds. You may need to exit and relaunch the group policy editor (gpedit.msc) to see the updated settings on the application servers if it was already opened.
Appearance
The Appearance page provides customization options for the Turbo Server portal, such as icons and background images. Appearance changes can take up to a couple minutes to apply to the Portal site.
-
Dashboard Theme: Changes the appearance of the Portal dashboard site by altering the text colors and default background image. The available themes are:
-
Light: Dark text on a light background.
-
Dark: Light text on a dark background.
The light theme is used by default.
Internet Explorer 11 only supports the light theme. Viewing alternate themes in Internet Explorer 11 or below and may result in degraded visuals.
-
-
Show Launch Page: When enabled, application launches will open a new browser tab to a launch landing page. This page provides detailed launch status information and a Turbo client download link.
When disabled, application launches will launch directly from the dashboard without opening a new tab. A notification will be displayed at the top of the page with some basic launch status information.
Run in Cloud (HTML5) is not affected by this setting and will always open a new tab to the HTML5 client.
The launch page is enabled by default.
-
Show Client Download Banner: When enabled, a download banner will appear at the top of the Portal dashboard page that provides a Turbo client download link appropriate for the user's device. If no such client is available, the download banner is not shown. This banner can be dismissed by the end-user.
The download banner is enabled by default.
-
Show Help Link: When enabled, a "Help" link will appear in the Portal's header that opens the provided URL in a new browser tab.
The help link is disabled by default.
5.6 Applications
Overview
Turbo Server supports following types of applications:
- PC applications: Virtual applications packaged in the SVM format.
- Native applications: Applications installed natively on an application server.
- Web application: Browser based applications with a URL and potentially plugin layers.
To add applications to a workspace, refer to Workspace Applications.
Applications can be packaged using Turbo Studio or imported directly from the Hub.
Access Control
Turbo Server allows workspace administrators to control access to workspace applications according to a configurable set of access rules.
Access rules may be configured per workspace application on the workspace administration site. For more details on the workspace application administration, see the Workspace Applications.
IP Access Rules
Workspace administrators may configure IP access rules to restrict workspace application access by user IP address. Users that access the Portal dashboard from a blacklisted IP will not be able to view the workspace application.
IP access rules can be organized using the following rule sets:
- Disallow all except: Only users accessing the workspace from an IP address included in the access rules can view the workspace application. Users accessing the workspace from an IP address that is not included in the access rules will not be able to view the workspace application.
- Allow all except: Users accessing the workspace from an IP address included in the access rules will not be able to view the workspace application. Users accessing the workspace from any other IP address can view the workspace application.
- Custom (apply rules in order): Access rules are applied in the order that they are configured. Rules may be reordered at any time.
IP access rules can be configured by IP Address and Country.
IP Address
IP address rules can be configured as an exact IP address or address range in CIDR notation.
Exact IP addresses can be specified in either IPv4 (ex. 192.168.99.0) or IPv6 (ex. 2001:1234::). The access rule will apply if the user's IP is an exact match.
Address ranges must be specified in Classless Inter-Domain Routing (CIDR) notation (ex. 192.168.99.0/24 or 2001:1234::/64). This notation specifies an IPv4 or IPv6 address and a number of significant bits separated by a slash (https://turbo.net/undefined). All IPv4 addresses can be specified using 0.0.0.0/0, and all IPv6 addresses can be specified using ::/0. If the access rule and user IP are not using the same address family, the access controller will attempt to map the user IP to the same address family. The access rule will apply if the user's IP falls within the address range.
Country
Country rules can be configured using the corresponding 2-letter country code in ISO 3166-1 alpha-2 format (ex. US or AU).
When a user accesses the workspace, the user's IP addresses is looked up using the IP address to country database. The access rule will apply if the county code lookup finds a matching country code. Administrators may supply their own lookup database following the instructions listed under Import IP Addresses to Country Database.
Import IP Addresses to Country Database
The default list of IP to country database is sourced from the IP to Country Lite database. The database is imported using a Turbo Server administator tool which takes a CSV file.
To import an up to date list of IP addresses to country, download the update database in CSV format. Open the Turbo Server Administration Command Prompt through the start menu, or manually using the command line "C:\Program Files (x86)\Turbo Server\Server.exe" /XShellEx=cmd.exe /k pushd "C:\Program Files (x86)\Turbo Server"
Run the command IpCountryImporter.exe import [<ip2countrylist.csv>]. If the import fails and you wish to import the default list, run IpCountryImporter.exe import. For help with additional commands run IpCountryImporter.exe help.
KMS Licensing
The following section describes how to set up application servers to run Microsoft Office in Turbo, using KMS license activation.
- Remote into your application server.
- Copy the contents of the Office-MachinePrep-20.6.1353.0.zip archive.
- Run the MachinePrep.exe tool in an elevated administrator command prompt to apply the licensing for the product you wish to use.
# Apply KMS licensing for Project 2016
# Note: use the --license-server flag to specify the hostname or IP of the license server if your system is unable to automatically detect your KMS server
> MachinePrep.exe Project-2016

# For additional options, see the help
> MachinePrep.exe --help
- Import the Microsoft Project 2016 (microsoft/project) repository from Turbo.net Hub by going to the Admin portal > Add Repository > Import Repository to make it available for your workspace.
The following section describes how to set up application servers to run natively installed Microsoft Office using an application stub.
- Use the Office Customization Tool https://config.office.com/deploymentsettings to create the installation configuration file and Export it.
- Install the Office Deployment Tool https://www.microsoft.com/en-us/download/details.aspx?id=49117 on the application servers and run the following commands:
# Download Office
setup.exe /download installation-config.xml
# Install Office
setup.exe /configure installation-config.xml
- Create a new application configuration in Turbo Studio and add the native Office EXE as the Startup File. For example, if creating a stub for Excel 2019, the Startup File would be "C:\Program Files\Microsoft Office\root\Office16\EXCEL.EXE"
- Build the application stub and use the Publish to Turbo Server wizard to push to Turbo Server.
- Add the application stub to a workspace and test.
Troubleshooting
An error dialog appears with the text: The application has encountered an error.
The office license script requires cscript.exe. Your security settings or antivirus may be blocking execution of the file C:\Windows\System32\cscript.exe. Please check the security settings to allow execution.
If the error continues, please run with the diagnostics command line flag:
> MachinePrep.exe /XEnable=Diagnostics <project>
Logs will be generated in the same folder. Please send the logs to support@turbo.net.
An error dialog appears with the text: The products we found in your account cannot be used to activate Office in shared computer scenarios.
This is an Microsoft 365 Apps licensing error and is unrelated to Turbo Server. Please refer to the Troubleshoot issues with shared computer activation for Microsoft 365 Apps document to resolve this error.
5.7 Authentication
SAML 2.0
Turbo Server supports logging in users via Single Sign-On (SSO) using an external identity provider that supports SAML 2.0 authentication. The SAML 2.0 authentication protocol is supported by many identity providers, such as AzureAD, ADFS, and WSO2.
Prerequisites
The following section describes the requirements to use SAML 2.0 with Turbo Server.
Identity Provider Account
You must have access to an identity provider (IdP) that supports the SAML 2.0 protocol and an account that has permission to create and configure an application with that IdP.
Turbo Server Configuration
Single Sign-On requires all servers in the farm to use https in order to keep users data secure. Make sure SSL is enabled during installation or install SSL from the Domain > Servers > Server page.
Turbo Server must be configured to use SAML 2.0 authentication with configurations obtained from the IdP from the Users > Authentication Method page.
Identity Provider Attibutes and Claims
SAML 2.0 obtains a response token from the identity provider containing user information during the authentication process. Turbo Server uses the following token attributes and claims to create or login to the associated Turbo account:
nameIDorhttp://schemas.xmlsoap.org/ws/2005/05/identity/claims/nameidentifier- Used as the Turbo account username. If both claims are defined,nameIDwill be used.http://schemas.xmlsoap.org/ws/2005/05/identity/claims/givenname- Used in combination with surname as the Turbo account display name.http://schemas.xmlsoap.org/ws/2005/05/identity/claims/surname- Used in combination with givenname as the Turbo account display name.http://schemas.xmlsoap.org/claims/group- User groups to which the Turbo account will be assigned.
The identity provider must be configured to accept the requested attributes and claims.
Certificate File
Turbo Server uses the SAML Signing Certificate to verify that the SAML response received during login is signed by the expected identity provider.
This certificate file is provided by your identity provider and must be manually installed on the Hub server. Please refer to the provider-specific documentation for more information on locating and installing this certificate.
How Turbo Users and Groups are created
When SSO is configured, a Turbo Server user will be created on a successful login if the user does not already exist. Users are created using the name identifier, given name, and sur name attributes and claims as specified in the Identity Provider Attributes and Claims section. User groups received in the groups claim will be created and the user assigned to them on each login. Users must be manually removed from the Turbo Server if removed in the external identity provider.
Automatically created user groups from SSO will be created in the Single Sign-On directory service. The user's group membership will be automatically removed from the group if removed in the external identity provider on the next sucessful login. If the SSO user is manually added to an internal group, then the user's group membership must also be manually removed.
Supported Identity Providers
Turbo Server supports Single Sign-On against any identity provider that supports SAML 2.0 authentication. Setup guides are available for the following identity providers:
For other identity providers, please refer to the identity provider documentation for information on configuring the claims listed in the Identity Provider Attributes and Claims section, as well as how to obtain the fields required by the Turbo Server user authentication form.
Troubleshooting
If an error is reported by the Turbo Server after logging into the external identity provider, the first place to check will be the Hub logs.
Failed to validate SAML token
Error log located in the API log file:
04/07/2020 17:44:42.6736 - Critical - 0x070C: Failed to validate SAML token: System.IdentityModel.Tokens.SecurityTokenValidationException:
The X.509 certificate CN=Microsoft Azure Federated SSO Certificate is not in the trusted people store.
The X.509 certificate CN=Microsoft Azure Federated SSO Certificate chain building failed.
The certificate that was used has a trust chain that cannot be verified.
Replace the certificate or change the certificateValidationMode.
A certificate chain processed, but terminated in a root certificate which is not trusted by the trust provider.
The Hub server failed to validate the SAML token. This can be caused by a missing or invalid SAML Signing Certificate. Please ensure that the SAML Signing Certificate has been added to the certificate store.
04/07/2020 17:44:42.6736 - Critical - 0x070C: Failed to validate SAML token: System.IdentityModel.Tokens.SecurityTokenException: The issuer of the security token was not recognized by the IssuerNameRegistry. To accept security tokens from this issuer, configure the IssuerNameRegistry to return a valid name for this issuer."
The Hub server did not recognize the token issuer identified by the Signing Certificate Thumbprint and Signing Certificate Common Name. This can be caused by missing or invalid Signing Certificate values. Please ensure that the correct values were configured in Turbo Server, and that the Signing Certificate has been added to the certificate store.
OpenID Connect
Turbo Server supports logging in users via Single Sign-On (SSO) using an external identity provider that supports OpenID Connect (OIDC) authentication. The OIDC authentication protocol is supported by many identity providers, such as Azure Active Directory or Google.
Prerequisites
The following section describes the requirements to use OpenID Connect (OIDC) with Turbo Server.
Identity Provider Account
You must have access to an identity provider (IdP) that supports the OIDC protocol and an account that has permission to create and configure an application with that IdP.
Turbo Server Configuration
SSO requires all servers in the farm to use https in order to keep users data secure. Make sure SSL is enabled during installation or install SSL from the Domain > Servers > Server page.
Turbo Server must be configured to use OIDC authentication with configurations obtained from the IdP from the Users > Authentication Method page.
Identity Provider Scopes and Claims
OpenID Connect obtains claims from the identity provider containing user information during the authentication process. Turbo Server uses the following claims to create or login to the associated Turbo account:
email- Used as the Turbo account username.sub- Used as the Turbo account username if the email does not exist.given_name- Used in combination withfamily nameas the Turbo account display name.family_name- Used in combination withgiven_nameas the Turbo account display name.groups- (Optional) User groups to which the Turbo account will be assigned. Some providers supply group information through different means, see the provider-specific setup guides for more information.
Turbo Server sends the following scopes during authentication to authorize access to the required claims: profile, openid, and email.
The identity provider must be configured to accept the requested scopes and return the requested claims.
How Turbo Users and Groups are Created
When SSO is configured, a Turbo Server user will be created on a successful login if the user does not already exist.
The Turbo accounts' username comes from the email claim if it exists, otherwise it comes from the sub claim. The Turbo accounts' display name comes from the given_name, and family_name claims.
User groups received in the groups claim will be created and the user assigned to them on each login. Users must be manually removed from the Turbo Server if removed in the external identity provider.
For more information on these claims, see Identity Provider Scopes and Claims.
Automatically created user groups from SSO will be created in the Single Sign-On directory service. The user's group membership will be automatically removed from the group if removed in the external identity provider on the next sucessful login. If the SSO user is manually added to an internal group, then the user's group membership must also be manually removed.
Supported Identity Providers
Turbo Server supports SSO against any identity provider that supports OIDC authentication. Setup guides are available for the following identity providers:
For other identity providers, please refer to the identity provider documentation for information on configuring the claims and scopes listed in the Identity Provider Scopes and Claims section, as well as how to obtain the fields required by the Turbo Server user authentication form.
Azure Active Directory with SAML 2.0
Turbo Server can be configured to allow users to log in via Azure Active Directory (Azure AD) Single Sign-On (SSO) using the SAML 2.0 authentication protocol.
For prerequisites and additional information about the SAML 2.0 authentication protocol, please refer to the SAML 2.0 Prerequisites section.
Configure Azure AD
The following section describes how to integrate Turbo Server with Azure AD SSO using SAML 2.0.
To enable Azure AD SSO, a new Enterprise Application must be registered in your Azure AD tenant. From your Azure AD homepage, click Enterprise applications and then New Application. Enter your desired name then click Add.

Once the application has been created, click on the Single sign-on tab and select the SAML authentication method.
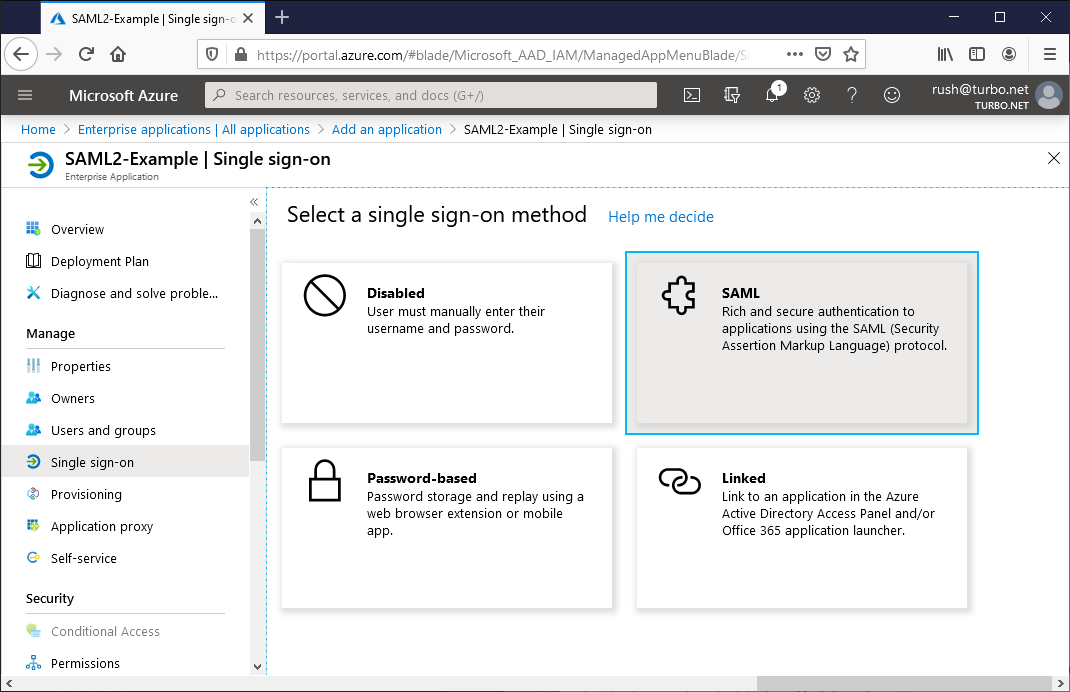
Once selected, you will need to configure the application to point to the correct Turbo Server URLs. Please configure the following settings and claims:
Basic SAML Configuration
- Identifier (Entity ID): - A unique identitier that will be the audience of the SAML response. For example:
https://example.turbo.net. - Reply URL (Assertion Consumer Service URL): The default reply URL for the SAML response. This must match the endpoint listed on the Turbo Server authentication method page. For example:
https://example.turbo.net/auth/saml/return.
User Attributes and Claims
-
Unique User Identifier (Name ID): The claim that will uniquely identify the user and will be used for their Turbo Server username. This claim must have the following properties:
- Namespace:
http://schemas.xmlsoap.org/ws/2005/05/identity/claims - Name:
nameidentifier - Format:
Email address - Source Attribute:
user.userprinciplename
- Namespace:
-
Given Name: The claim that will be used for the user's first name display in Turbo Server. This claim must have the following properties:
- Namespace:
http://schemas.xmlsoap.org/ws/2005/05/identity/claims - Name:
givenname - Source Attribute:
user.givenname
- Namespace:
-
Surname: The claim that will be used for the user's last name display in Turbo Server. This claim must have the following properties:
- Namespace:
http://schemas.xmlsoap.org/ws/2005/05/identity/claims - Name:
surname - Source Attribute:
user.surname
- Namespace:
-
Group: The group claim that will be used to assign group membership for the user in Turbo Server. This claim must have the following properties:
- Namespace:
http://schemas.xmlsoap.org/claims - Name:
group - Source Attribute:
DNSDomain\sAMAccountName - Emit groups as role claims:
unchecked
- Namespace:
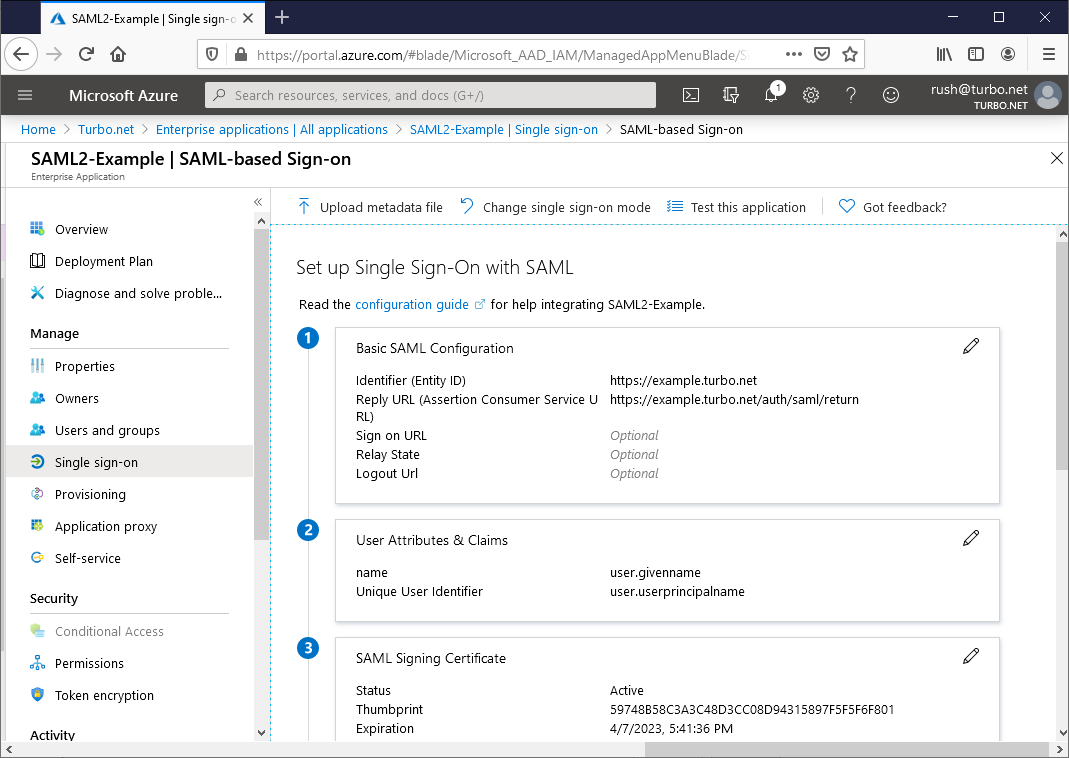
Users and Groups
On the Users and groups tab, add the users and groups that will have permissions to login with this application.
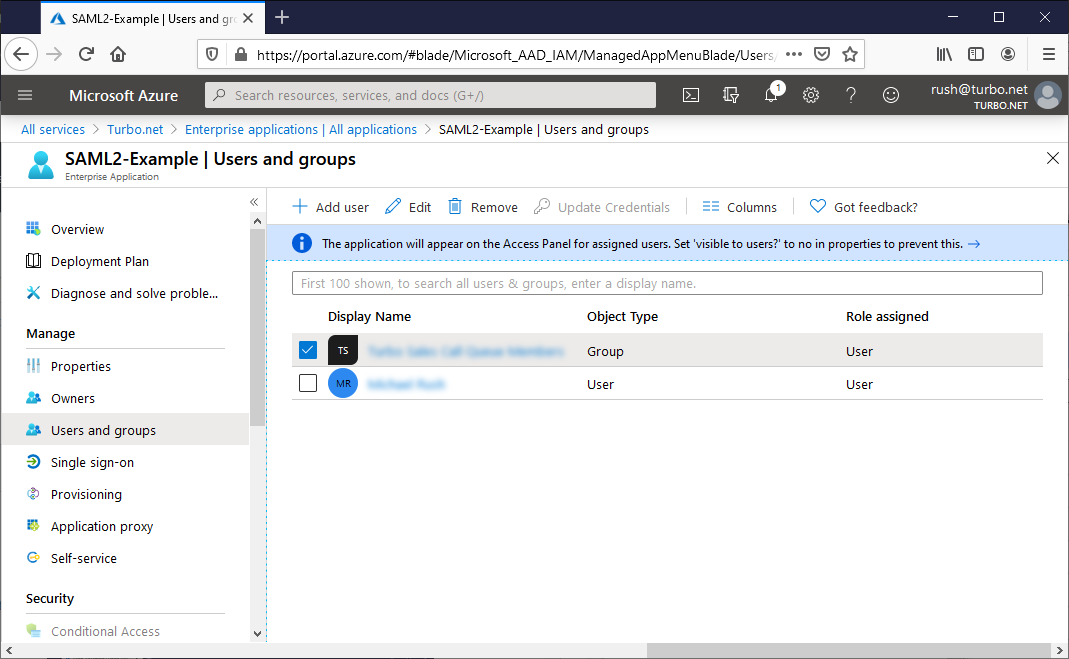
Configure Turbo Server
Once you have configured Azure AD, you are ready to enable SSO on Turbo Server.
Open the Turbo Server administration site and navigate to the Users > Authentication Method page. Change the Authentication Method to Single Sign-On and the Single Sign-On Method to SAML 2.0.

Fill in the following fields according to the Azure AD configuration:
- Application Id: The Application Id as configured in the Azure AD Overview section.
- Issuer: The Identifier (Entity ID) as configured in Azure AD Basic SAML Configuration section.
- Entry Point: The Login URL as configured in Azure AD Set up [Application Name] section.
- Logout URL: The Logout URL as configured in Azure AD Set up [Application Name] section.
- Signing Certificate Thumbprint: The Thumbprint as configured in Azure AD SAML Signing Certificate section.
- Signing Certificate Common Name: The Common Name as configured in Azure AD SAML Signing Certificate section.

Install the SAML Signing Certificate
The SAML Signing Certificate is used by Turbo Server to ensure that the SAML response is signed by the expected identity provider. This certificate must be manually installed on the Hub server.
First, download the certificate from Azure AD. This can be found listed as Certificate (Base64) in the SAML Signing Certificate section:
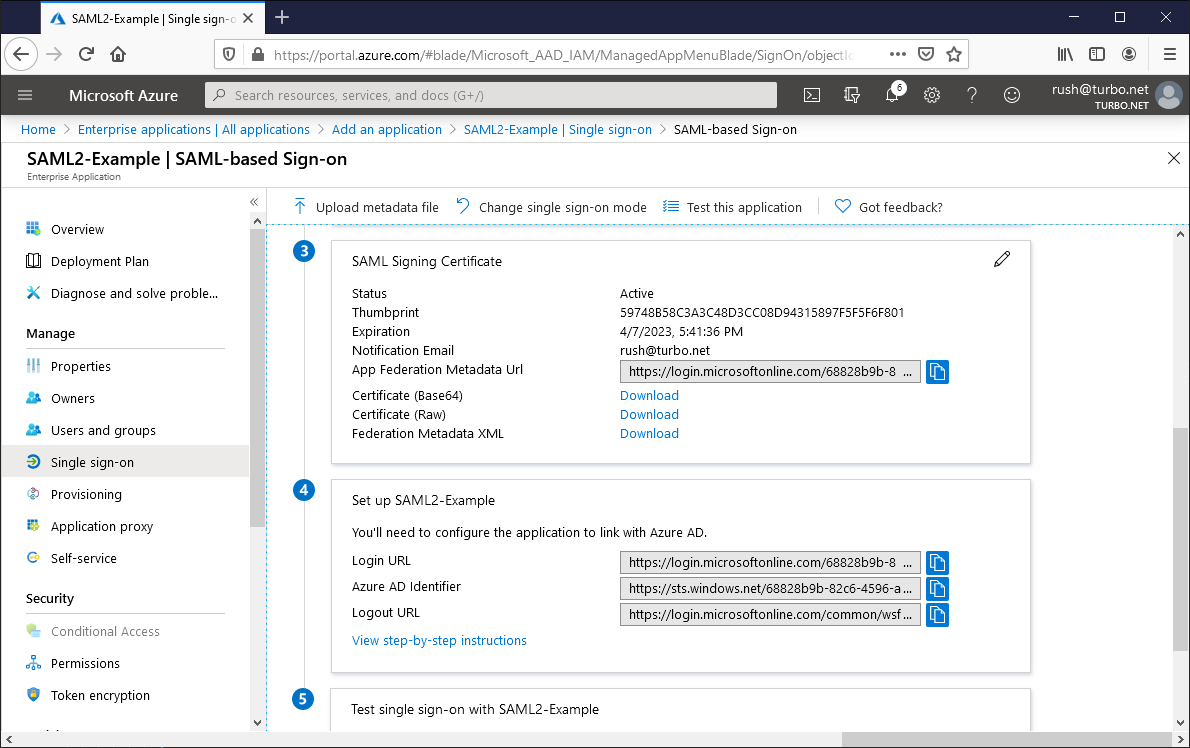
Next, login to the Windows Server machine that the Hub server is installed on as an administrator. Install the certificate with the following steps:
- Select Run from the Start menu and enter
mmc. - Click on File then click Add/Remove Snap In.
- Select the
Certificatesoption then click Add - Select Computer account, select Local computer, and then complete the dialog.
- Complete the rest of the import wizard with the default options.
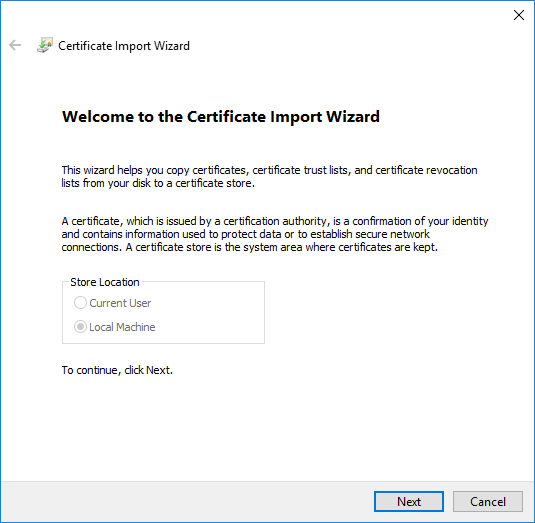
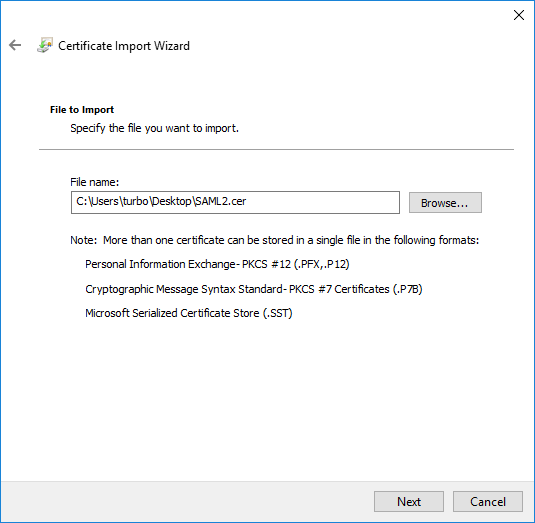
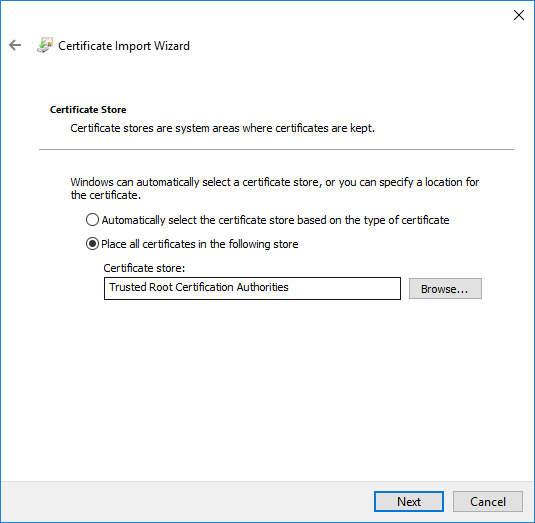
Once installed, Turbo Server portal logins should now complete successfully.
Troubleshooting
Please refer to the SAML 2.0 Troubleshooting section.
Azure Active Directory with OpenID Connect
Turbo Server can be configured to allow users to log in via Azure Active Directory (Azure AD) Single Sign-On (SSO) using the OpenID Connect (OIDC) authentication protocol.
For prerequisites and additional information about the OpenID Connect authentication protocol, please refer to the OpenID Connect Prerequisites section.
Configure Azure AD
The following section describes how to configure your Azure AD using the Azure Portal for use with Turbo Server.
To enable Azure AD SSO, a new application must be registered in your Azure AD tenant. Although it is possible to use the Service Principal account for authentication, we stongly recommend creation of a separate application with permissions only to authenticate users against Azure AD.
To create the application, log into your Azure Portal, navigate to the App registrations page and click New registration. Enter the following fields and submit the form:
- Name: Your desired display name for this application.
- Supported account types:
Accounts in this organizational directory only (Turbo.net only - Single tenant)
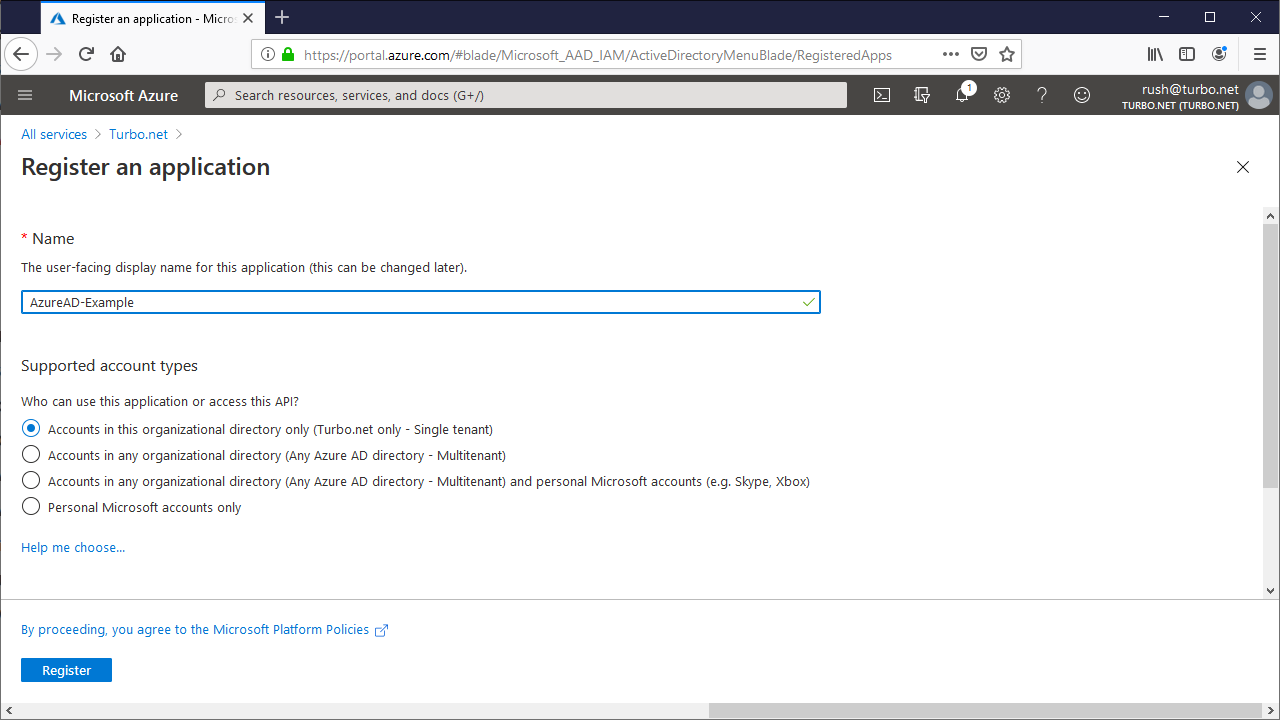
Once created you will be redirected to the Overview page. Click on the Endpoints link in the header and save the OpenID Connect metadata document URL so that it can be added to Turbo Server later.
Authentication
From the Authentication tab, click Add a platform and follow the setup guide using the following fields:
Platform: Web
Redirect URI: The default reply URL for the Azure AD response. This must match the endpoint listed on the Turbo Server authentication method page. For example: https://{Web Service Root}/auth/openid/return.
Implicit Grant: ID tokens
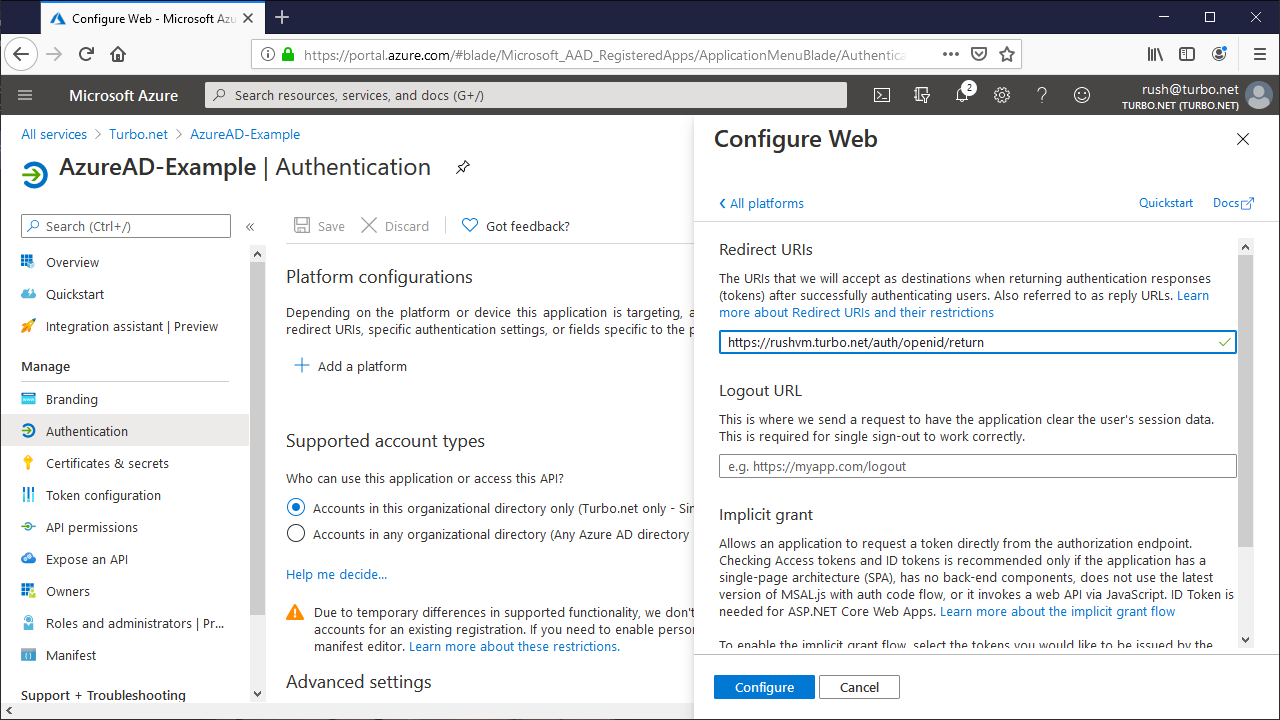
API Permissions
From the API permissions tab, click Add a permission and add the following permissions:
- Microsoft Graph > Delegated permissions > User > User.Read
- Microsoft Graph > Delegated permissions > Directory > Directory.Read.All
The User.Read permission allows Turbo to create a Turbo account with the user's basic profile information upon successful Azure AD authentication.
The Directory.Read.All permission allows access control of Turbo Portal content based on Active Directory group membership. To access this information, Turbo uses the memberOf method of the Microsoft Graph API.
Click Grant admin consent and Save to grant consent on behalf of all users in this directory, ensuring that end users will not be required to consent when using the application.
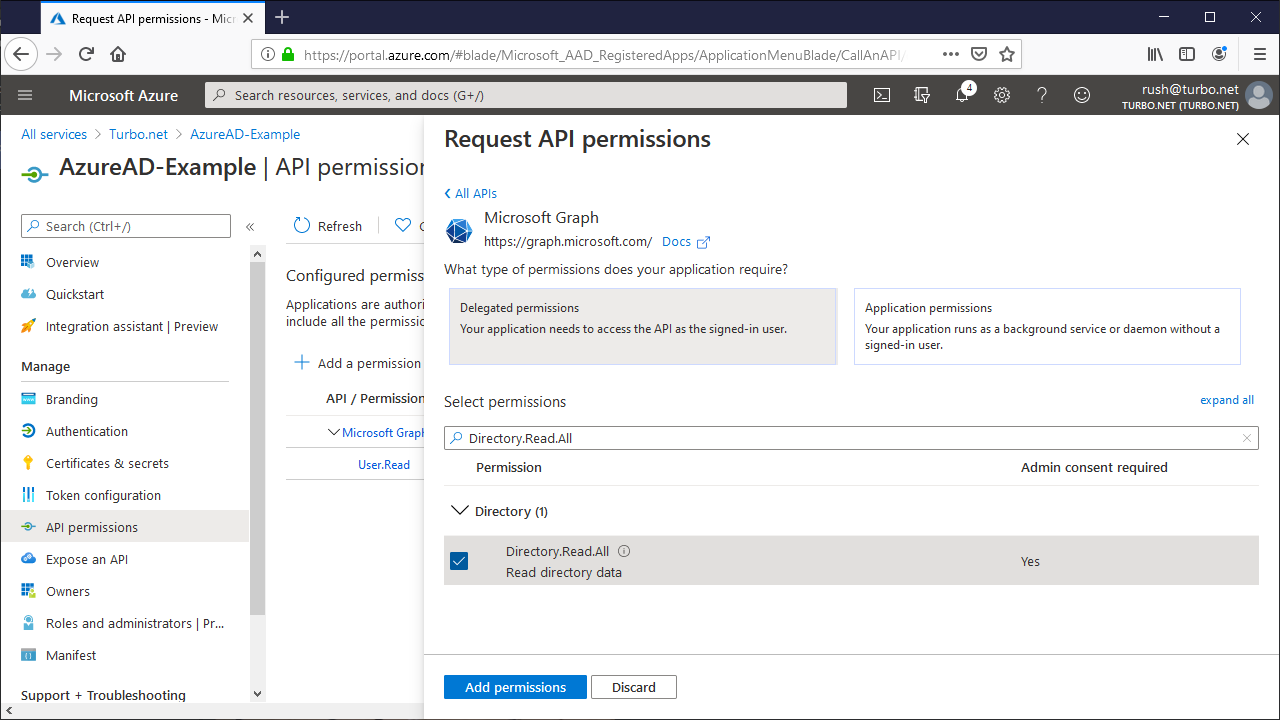
Client Secret
From the Certificates & secrets tab, click New client secret and enter your desired description and expiration date. Once created, save the Client Secret value so that it can be added to Turbo Server later.
Configure Azure AD for Moble Clients
To enable SSO from mobile clients you must register a new Azure AD native client application that is separate from the Azure AD web application registration. Follow the Configure Azure AD instructions to create a new application registration, replacing the Web platform in the Authentication section with Mobile and desktop applications, and leaving the Certificates & secrets section blank.
Client applications are not configured with secrets because they run on the user's device and are not trusted to keep the secret. The web application runs as part of Turbo Server so it's considered a confidential client and is trusted to keep the secret. Please refer to the Microsoft documentation for more information.
To check that the application is a native application, navigate to the Azure Portal app registration manifest and verify the manifest has the field "allowPublicClient": true.
Configure Turbo Server
Once you have configured Azure AD, you are ready to enable SSO on Turbo Server.
Open the Turbo Server administration site and navigate to the Users > Authentication Method page. Change the Authentication Method to Single Sign-On and the Single Sign-On Method to OpenID Connect.

Fill in the following fields according to the Azure AD configuration:
- Provider Metadata URL: The OpenID Connect metadata document from your application registrations overview > endpoints page.
- Web Application ID: The Application ID from your web application registration overview page.
- Web Application Secret: The Client Secret from your web application registration's certificates & secrets page.
- Native Application ID: The Application ID from your native client application registration overview page.
Troubleshooting Azure AD App Registration Permissions
You may review which permissions the app registration requires by forcing the consent dialog to appear during login. To do so, please consult to Microsoft docs: https://docs.microsoft.com/en-us/azure/active-directory/manage-apps/configure-user-consent#force-user-consent-through-a-url-request
Active Directory Federation Services
This section describes the steps required to configure Single Sign-On (SSO) against an ADFS server using the SAML 2.0 authentication protocol. Turbo currently supports ADFS2 and ADFS3.
For prerequisites and additional information about the SAML 2.0 authentication protocol, please refer to the SAML 2.0 Prerequisites section.
Configure ADFS
The following section describes how to integrate Turbo Server with ADFS SSO using SAML 2.0.
Create a Relying Party Trust
A relying party trust object specifies identifiers, claims, and rules that allow Turbo Server to interact with the local Federation Service.
To create the relying party trust:
-
Open the ADFS management window and go to Trust Relationships > Relying Party Trusts settings. Then right-click on the Relying Party Trusts and add a new Relying Party:
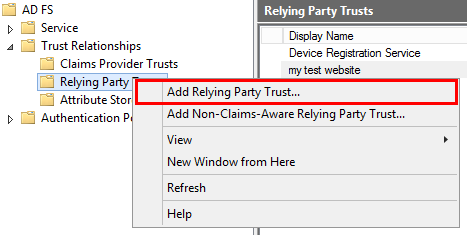
-
In the Wizard choose Enter data about the relying party manually setting and click Next.

-
Fill the Display Name with a meaningful name, for instance,
Turbo Portal, and click Next. -
Choose AD FS profile as we will be using SAML tokens to authenticate and click Next.
-
Leave the token encryption certificate data empty and click Next.

-
Set the URLs for WS-Federation and SAML 2.0 to
https://{Web Service Root}/auth/saml/return, replacing{Web Service Root}with your Turbo Server portal host, and click Next.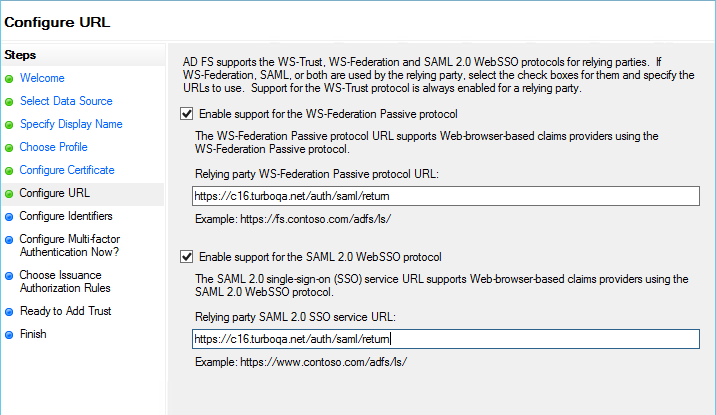
-
In addition to the URL from the previous step, add a relying party trust identifier to be used by the Turbo Client,
https://{Web Service Root}/turbo-client, and click Add and then Next.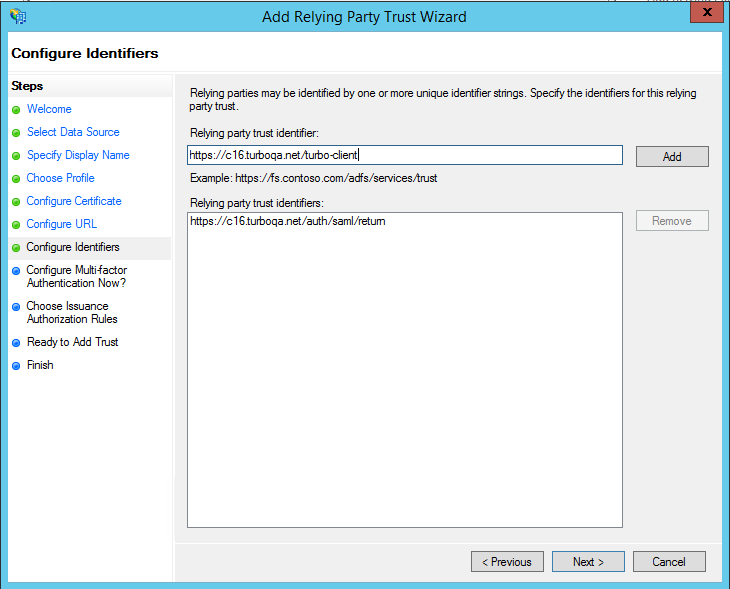
-
Click Next through the rest of the wizard and Close at the end.
Create new claims
Once the relying party trust is created, a few claim rules will need to be added to pass the user's name and AD groups to the Turbo Portal.
To add the claims:
-
Open the Edit Claim Rules window from the relying party trust.
-
Click on the Add Rule... button, choose the Send LDAP Attributes as Claims option, and click Next.
-
Set Attribute store to Active Directory, add the Claim Rules from the table below, and click Finish:
LDAP Attribute Outgoing Claim Type Display-Name Name User-Principal-Name UPN E-Mail-Addresses E-Mail Address Token-Groups - Qualified by Domain Name Group
Set the Authentication Policy
To configure how users will log into ADFS:
-
Open the Global Authentication Policy settings from the Authentication Policies administration panel.
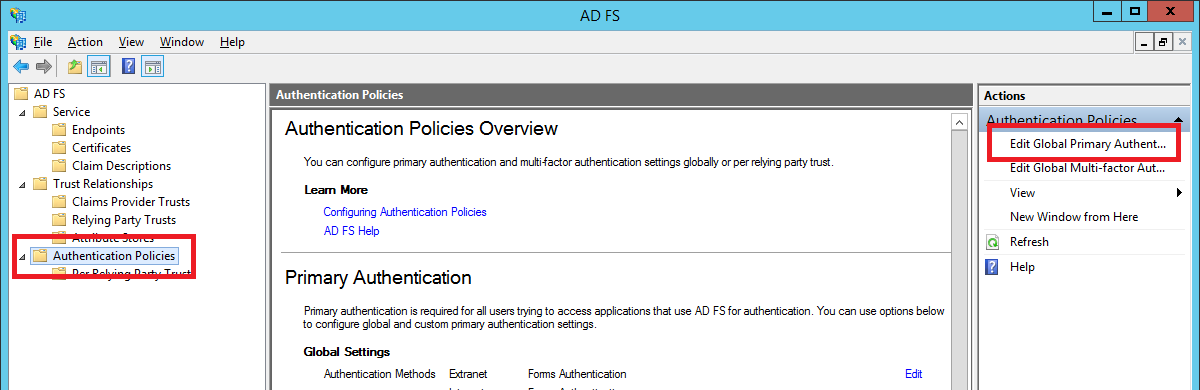
-
Forms Authentication must be enabled for both Extranet and Intranet.
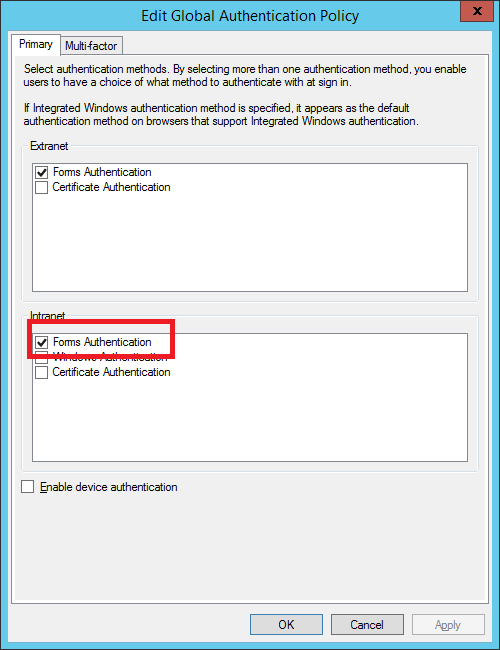
Get the Token-Signing Certificate
- From the ADFS management window go to Service > Certificates.
- Double-click on the Token-signing certificate.
- Click Details and copy the thumbprint and common name. These values will be used when configuring the Turbo Server.
Configure ADFS for Native Clients
Native Client App access can be configured on ADFS using the Add-AdfsClient command in an elevated powershell cmdlet.
(ps)> Add-AdfsClient -ClientId <CLIENT_ID> -Name <APP_NAME> -RedirectUri <REDIRECT_URI>
- CLIENT_ID is a GUID. Used guidgen.exe or other method to generate a new value.
- APP_NAME is the name of the app. This can be anything but must be unique.
- REDIRECT_URI is an unused but required value. This can be anything but must be unique.
Example command:
(ps)> Add-AdfsClient -ClientId 54707E09-E6A2-4F22-9C73-638610AFE38A -Name Turbo-Client -RedirectUri http://turbo.net
Configure Turbo Server
Once you have configured ADFS, you are ready to enable SSO on Turbo Server.
Open the Turbo Server administration site and navigate to the Users > Authentication Method page. Change the Authentication Method to Single Sign-On and the Single Sign-On Method to SAML 2.0.
Fill in the following fields according to the ADFS configuration:
- Application Id: The Application ID used to configure your Native Client App, see Configure ADFS for Native Clients.
- Issuer: The issuer of the relying party login request. This must match one of the relying party Identifiers, as configured in your ADFS relying party.
- Entry Point: The ADFS login URL. Specified by the SAML 2.0/WS-Federation URL in your ADFS service endpoints (ADFS > Service > Endpoints).
- Logout URL: The ADFS logout URL. By default, this URL is constructed by adding
?wa=wsignout1.0to your Entry Point URL. - Signing Certificate Thumbprint: The ADFS Token-Signing Certificate's thumbprint, see Get the Certificate.
- Signing Certificate Common Name: The ADFS Token-Signing Certificate's common name, see Get the Certificate.
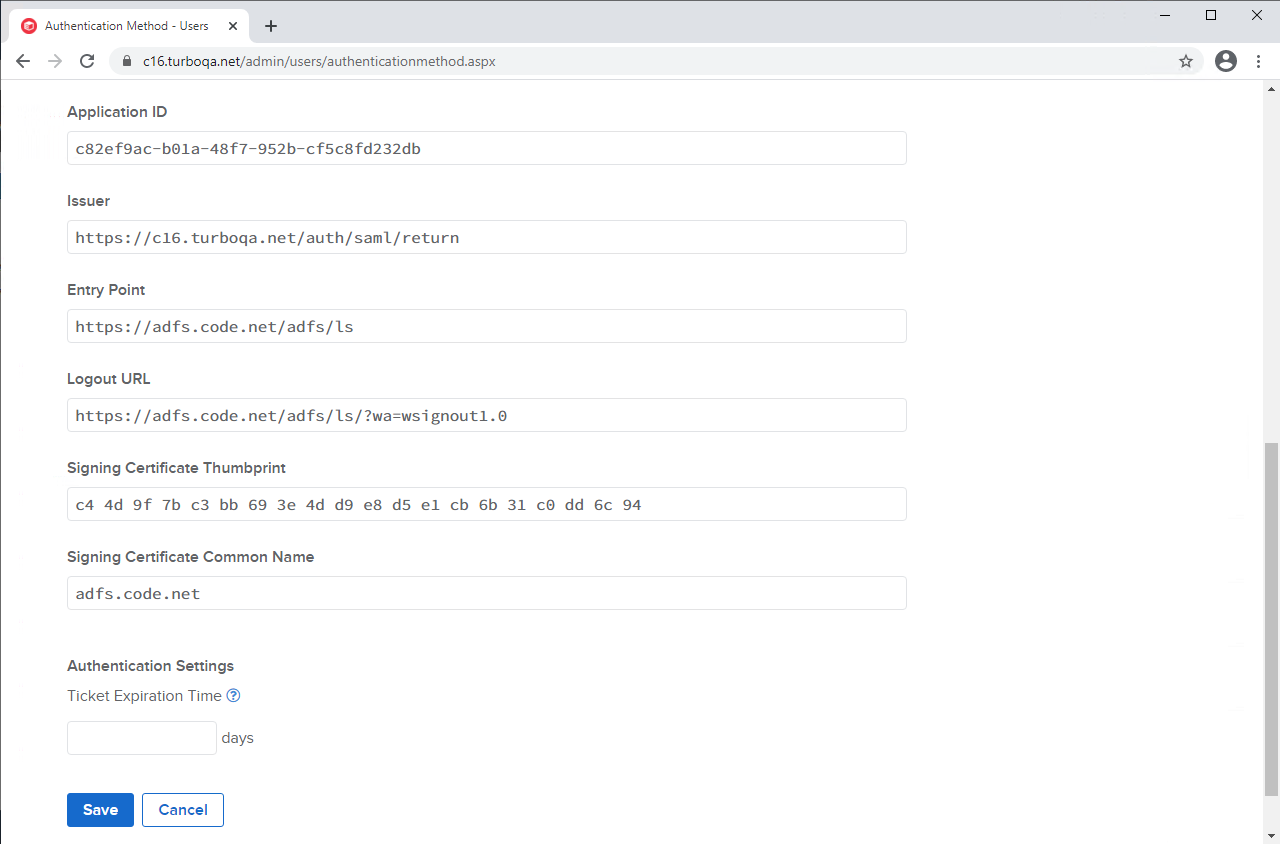
Troubleshooting
Please refer to the SAML 2.0 Troubleshooting section.
Kerberos
Turbo Server applications can be configured to allow user credential delegation using the Kerberos protocol in order to avoid multiple logins when launching a web application.
Azure AD SSO requires all servers in the farm to use https in order to keep users data secure. Make sure SSL is enabled during installation or install SSL from the /admin/servers/ page.
Configure Turbo Server
To enable Kerberos delegation during application launches, navigate to the workspace administration site and push the Settings button on the application for which the feature is desired. On the application's General Settings page, scroll down to Profile Mode and select Kerberos from the dropdown.

This feature is currently only implemented for the Windows native client. HTML5 and mobile clients will behave as if the Ask for Credentials profile mode is selected.
Configure Client Machines
Each client machine where users will connect to the Application Server requires the Credentials Delegation policy to be configured and the SSL gateway be disabled on the Turbo Client.
In the Group Policy Editor, go to Computer Configuration > Administrative Templates > System > Credentials Delegation > Allow delegating default credentials.
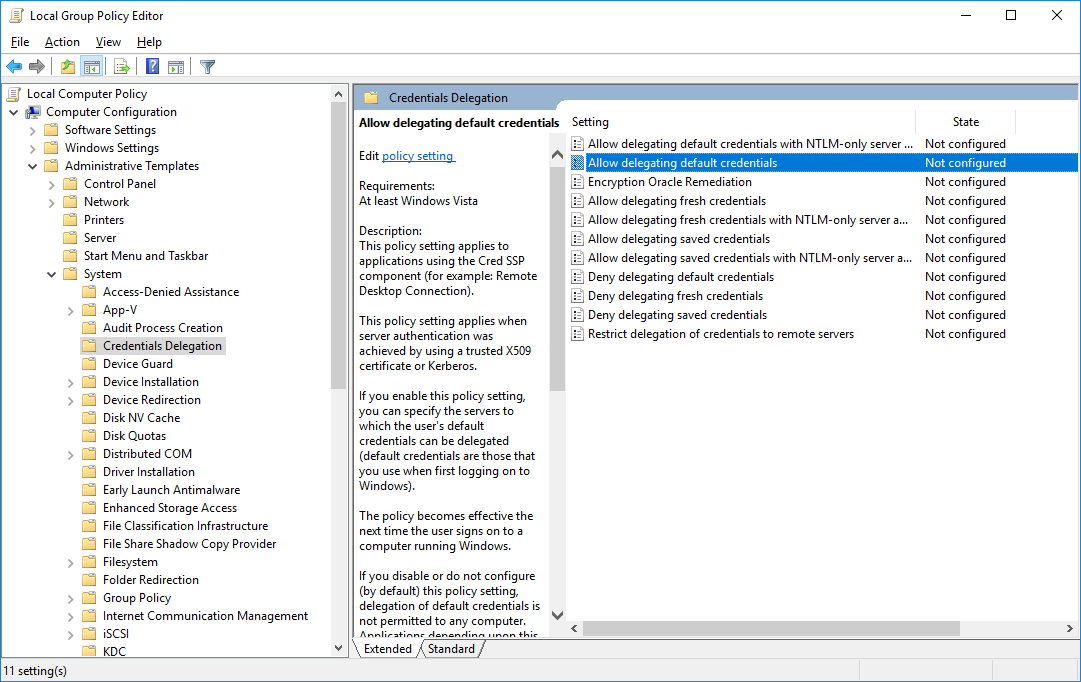
Check the Enabled checkbox and press the Show... button. For each Application Server that is in the Turbo Server farm, add an entry in the following format: TERMSRV/[server], where server is the fully qualified domain name of the Application Server. For example, if the domain name is test.net and the Application Server name is turbo1, then the correct entry value would be TERMSRV/turbo1.test.net.
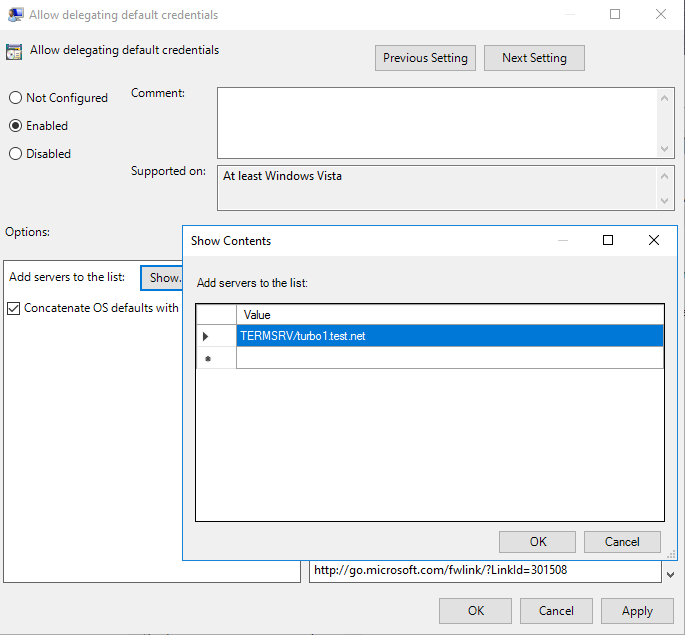
Add "enableRdpGateway":"false" to C:\Users\username\AppData\Local\Turbo\Containers\settings.json while maintaining proper JSON syntax.
Example settings.json:
{"enableRdpGateway":"false","settingsVersion":3}
Run turbo config to verify SSL gateway is disabled:
> turbo config
Domain URL: https://turbo.net/
Turbo Drive (T: drive): Enabled
SSL gateway: Disabled
Image cache size: unlimited
Image GC interval: never
Image GC expiration: 90 days
Trusted sources:
  https://turbo.net
  http://turbo.net
When SSL gateway is disabled the client system will connect to the application servers directly.
Google LDAP
To configure Turbo Server to authenticate against Google LDAP, add an external directory service.
Refer to the Google LDAP documentation to set up the Google LDAP service for your Google Workspace.
Connection Details
Google requires client side certificate to validate the connection over SSL. Obtain the client certificate and key files as described in the Google LDAP documentation.
You must add the client certificate to the Windows Certificate store, as a single combined certificate and key file in pkcs12 format. To combine the cert and key file from google you will need openssl.
> openssl pkcs12 -export -in <path-to-cert>.crt -inkey <path-to-key>.key -out <path-to-cert-key>.pfx
Next, login to the Hub server as the service user and import the certificate-key file to the Current User windows keystore under Personal Certificates. Restart the Turbo Service to pick up the new certificate.
Connect using the following settings when adding the external directory service:
Type: Other LDAP
Host: ldap.google.com
Port: 636
Top Directory: dc=example,dc=com
Binding Type: SSL
Synchronization Account: Ensure you connect with a specific account if required by your Google LDAP configuration, in addition to SSL certificate authentication.
Directory Schema Consult the Google LDAP schema documentation to configure the Directory Schema settings. Example settings are provided below.
-
Users
- Filter: (objectClass=inetOrgPerson);(objectClass=posixAccount)
- Class: inetOrgPerson;posixAccount
- Login name: uid;cn
- First name: givenName
- Last name: sn
- Full name: displayName;cn
-
Groups
- Filter: (objectClass=posixGroup)
- Class: posixGroup
- Name: displayName
- Description: description
- Members: member
Page Size: 0
Integrated Windows Authentication
Integrated Windows Authentication
The Turbo Client can be configured to login with the user's current Windows credentials instead of specifying a username and password.
This authentication method is desirable in centralized and VDI environments where an administrator deploys Turbo-packaged applications with the use of scripting, because it does not prompt the user to login in order to authenticate themselves to the Turbo Server. Since the user is authenticated as themselves instead of using a shared API key, this also allows fine-tuning of application permissions and accurate collection of analytics.
Configure Turbo Server
- Join the Turbo Server system to your domain.
- Set the service user to the desired user. If the service worker is a local system user, skip step 3.
- Add an SPN record for the Turbo Server to your domain.
> setspn -S HTTP/hostname domain\serviceuser
> setspn -S HTTP/hostname.domain domain\serviceuser.
- Synchronize users from your Active Directory.
Configure Turbo Client
- Ensure the Turbo Client system is joined to the domain.
- Login to Windows as a domain user.
- Point the Turbo Client to your Turbo Server:
turbo config --domain=https://turboserver.turbo.net. For all users:turbo config --domain=https://turboserver.turbo.net --all-users - Login with integrated authentication. You must be logged in as a domain user:
turbo login --auth=integrated.
Example login script:
# Point Turbo Client to your Turbo Server.
turbo config --domain=https://turboserver.turbo.net

# Optionally point Turbo Clint to image share for VDI scenario.
# See (Image Streaming|https://app.turbo.net/docs/server/advanced-topics/image-streaming)
turbo config --image-path=\\networkshare\turboimages

# Authenticate Turbo Client.
turbo login --auth=integrated

# Register shortcuts to Start Menu for Default workspace
turbo subscribe default --register
Troubleshooting
Integrated login works from Turbo Server system, but not Turbo Client system.
The Turbo Client system reports Error: Unable to login to http://turboserver.domain as domain\user, because Turbo Server is unable to decode the user’s Kerberos ticket.
To resolve this issue, ensure that you have added the correct SPN record for your Turbo Server to your domain.
> setspn -S HTTP/hostname domain\serviceuser
> setspn -S HTTP/hostname.domain domain\serviceuser.
Integrated login fails from any system.
Ensure that you are logged in Windows as a domain user that has been synchronized to Turbo Server via Active Directory synchronization.
5.8 Network and Load Balancing
Installing Redundant Roles
Turbo Server allows installing redundant roles across multiple servers. To install the role on separate servers, run the Turbo Server installer and select the role you would like to install.
The administrator can also add or remove roles on that server after installation. For more information refer to Managing the Domain.
It is recommended to install more than one Portal server for failover purposes, or for a large number of concurrent users (see Portal System Requirements). The number of application servers should depend on the number of concurrent users and the resource requirement of the applications being ran.
For maximum redundancy, a redundant domain should be setup that uses federation to replicate the workspaces and authentication settings from the primary domain.
Configuring Network
The administrator may want to use a reverse proxy to accesss the internal Turbo Server services. The administrator can configure which URLs the services and clients will use to talk to each other. For more information refer to Domain Addresses.
Configuring Content Delivery Network (CDN)
Turbo SVM images may be delivered over standard content delivery networks. To enable CDN for the Hub block storage, set the Hub CDN URL.
CDN support works best when delivering Turbo images using the Turbo synchronization protocol. Supporting clients will automatically select the Turbo synchronization protocol for objects over the configured Hub CDN Max File Size. Please consult your CDN provider to ensure that the correct max file size is configured. If you chose not to specify a max file size, then the automatic protocol selection will not occur.
For clients that do not support automatic protocol selection, users should have direct download disabled in the Turbo Client configuration.
If direct download is used, be aware that certain CDN providers limit the object size which may be exceeded by certain Turbo images. In that case the image must be delivered by the origin server.
Be aware that images delivered over the CDN may be downloaded from the public internet. Ensure that there is no confidential data in the images when delivering them over a CDN.
Sample CDN Configurations
Here are sample configurations for using Cloudflare, AWS CloudFront, and Azure CDNs with Turbo Server.
Cloudflare
Create a CNAME that resolves the URL of the Turbo Server instance and turn Proxy status on. The CNAME will be the Hub CDN URL in Turbo Server.
Create two Page Rules in Cloudflare:
- Cache Level: Cache Everything
- Edge Cache TTL: a month
Set the Hub CDN URL in Turbo Server to the CNAME address created in Cloudflare. Set the Hub CDN Max File Size to the maximum file size your Cloudflare subscription allows.
AWS Cloudfront
Create a CloudFront distribution with the following options:
- Origin domain: URL of the Turbo Server instance
- Path pattern: Default (*)
- Viewer protocol policy: Match the HTTP configuration of the Turbo Server instance
- Allowed HTTP methods: GET, HEAD
Set the Hub CDN URL in Turbo Server to the Distribution domain name. Set the Hub CDN Max File Size to the maximum file size your CloudFront subscription allows.
Azure CDN
Create an Azure CDN resource with the following options:
- Pricing tier: Standard Microsoft
- Check Create a new CDN endpoint
- Origin type: Custom origin
- Origin hostname: URL of the Turbo Server instance
Set the Hub CDN URL in Turbo Server to the Endpoint hostname. Set the Hub CDN Max File Size to the maximum file size your Azure subscription allows.
Load Balancing
To load balance Application Servers, install the Application Server role on the desired servers. Then, configure the load balancing strategy as described in Domain Settings.
To load balance Portals, set the Domain URL to an external load balancer.
Understanding the Domain URL
The Domain URL is the URL for any end user or client to access the Turbo Server services. The Domain URL must be accessible on the network the end user is intended to run Turbo applications from. It should map to the server with the Portal role installed. End users can access the web portal through the domain hostname using a web browser. When logging in with the android or iOS application, the end user should put in the Domain URL under the server setting. For example, if the Domain URL is https://mydomain.com, the administrator should assign their dns entry at mydomain.com to the Turbo Server farm's Portal role server. End users can then navigate to https://mydomain.com to view the web portal.
The command line interface (CLI) should be configured using the Domain URL. Run the command turbo config --domain=mydomain.com to set the CLI to the correct domain. For more information refer to Command Line Reference
In addition to being used to accessing the web portal, the Domain URL will also be used to query the service topology for the underlying Turbo Server services. The endpoints that are exposed, using the above example, is the https://mydomain.com/service/settings and https://mydomain.com/service/topology. These endpoints are used to determine what server services are available, such as the Hub's IO service, the login service, and Application Server Broker.
Alternatively, the administrator may leave the Domain URL setting blank to have it be defaulted to the first server with the Portal role installed.
5.9 Security
Application Security
Application servers provide end users the ability to run Turbo applications remotely in containers. The container model provides limited security against malicious users by preventing users to modify files and registry outside of the containers isolation setting. Additional care must be taken since the user may upload and attempt to execute arbitrary applications.
AppLocker can be used to prevent malicious applications from executing. Please refer to the documentation. You may also choose any off the shelf software that can perform application whitelisting.
Network
Application server users may attempt to probe the network using tools that can be run in the Turbo virtual runtime. Ensure that application servers do not have network access to resources that are not intended for the target end user.
In addition, a user could attempt to download and run Wireshark in the virtual runtime to capture network packets. However, if WinPcap is not installed (driver) then the user cannot capture anything.
If the application server is isolated in their own virtual network, make sure to configure two way https access to the Hub server and SQL server.
Securing Remote Access
Turbo uses temporary profiles for running applications on application servers. Temporary profiles are anonymized local machine accounts with randomized passwords that do not require domain authentication, and so application servers are not required to join the domain and will keep the domain secure by design. NTLM is the default authentication method for local machine accounts connecting via RDS.
It may be desirable for an organization to fully disable NTLM authentication for compliance purposes. The following settings allow administrators to disable NTLM when running Turbo remote sessions. Under admin/general/streaming.aspx Network Security section set the following settings:
Require Network Level Authentication Custom: Not enabled
NLA should not be required as RDP authentication must be used when running applications using temp profiles. If the users will authenticate to application servers using AD Kerberos then NLA can be required.
The default Windows value for this setting is Not Configured.
Restrict NTLM: Incoming NTLM traffic Custom: Deny all accounts
The default Windows value for this setting is Allow all.
Restrict NTLM: NTLM authentication in this domain Custom: Deny all
The default Windows value for this setting is Disable.
The following table describes there EnableSspSupport will be used in the native client to connect to cloud RDP sessions.
| Require NLA | Restrict NTLM Traffic | EnableCredSSPSupport |
|---|---|---|
| false | false | false* |
| false | true | false* |
| true | false | true |
| true | true | true* |
| not set | any | true |
*Native clients will always set EnableCredSSPSupport to true when using Kerberos login mode as it is required for Kerberos login.
*Temp profile will not work if both Require NLA and NTLM traffic is restricted settings are set to true. Applications must use Ask or Kerberos login modes to run in the cloud.
*The HTML5 client will not work if both Require NLA and NTLM traffic is restricted settings are set to true. The Server Administrator should disable the Run in Cloud (HTML5) launch mode to ensure users launch using the Run in Cloud (Windowed) mode via the Turbo Client.
If require NLA is not set, EnableCredSSPSupport is true because modern operating systems require NLA by default. Under gpedit > administrative templates > windows components > remote desktop services > remote desktop session host > security > require user authentication for remote connections by using network level authentication:
If you do not configure this policy setting, the local setting on the target computer will be enforced. On Windows Server 2012 and Windows 8, Network Level Authentication is enforced by default.
Securing Execution using AppLocker
AppLocker can be used to enforce that only Turbo runs on the application server. The following configuration allows only the Turbo Client to execute on the application server.
<AppLockerPolicy Version="1">
  <RuleCollection Type="Appx" EnforcementMode="NotConfigured" />
  <RuleCollection Type="Dll" EnforcementMode="NotConfigured" />
  <RuleCollection Type="Exe" EnforcementMode="Enabled">
    <FilePathRule Id="921cc481-6e17-4653-8f75-050b80acca20" Name="(Default Rule) All files located in the Program Files folder" Description="Allows members of the Everyone group to run applications that are located in the Program Files folder." UserOrGroupSid="S-1-1-0" Action="Allow">
      <Conditions>
        <FilePathCondition Path="%PROGRAMFILES%\*" />
      </Conditions>
    </FilePathRule>
    <FilePathRule Id="a61c8b2c-a319-4cd0-9690-d2177cad7b51" Name="(Default Rule) All files located in the Windows folder" Description="Allows members of the Everyone group to run applications that are located in the Windows folder." UserOrGroupSid="S-1-1-0" Action="Allow">
      <Conditions>
        <FilePathCondition Path="%WINDIR%\*" />
      </Conditions>
    </FilePathRule>
    <FilePathRule Id="fd686d83-a829-4351-8ff4-27c7de5755d2" Name="(Default Rule) All files" Description="Allows members of the local Administrators group to run all applications." UserOrGroupSid="S-1-5-32-544" Action="Allow">
      <Conditions>
        <FilePathCondition Path="*" />
      </Conditions>
    </FilePathRule>
    <FilePublisherRule Id="a7863604-0cfa-429d-b8b0-3a9716e75757" Name="Signed by O=CODE SYSTEMS CORPORATION, L=SEATTLE, S=WASHINGTON, C=US" Description="" UserOrGroupSid="S-1-5-32-555" Action="Allow">
      <Conditions>
        <FilePublisherCondition PublisherName="O=CODE SYSTEMS CORPORATION, L=SEATTLE, S=WASHINGTON, C=US" ProductName="*" BinaryName="*">
          <BinaryVersionRange LowSection="*" HighSection="*" />
        </FilePublisherCondition>
      </Conditions>
    </FilePublisherRule>
  </RuleCollection>
  <RuleCollection Type="Msi" EnforcementMode="NotConfigured" />
  <RuleCollection Type="Script" EnforcementMode="NotConfigured" />
</AppLockerPolicy>
To install run this in an elevated Powershell prompt:
Set-AppLockerPolicy -XMLPolicy c:\<path-to>\applocker-turbo-server-working.xml
Open Group Policy Editor, navigate to Local Computer Policy > Computer Configuration > Windows Settings > Security Settings > Application Control Policies > Applocker > Executable Rules, and verify the rules have been imported.
Restart the AppIDSvc Windows Service.
To view blocked EXE events open Event Viewer and navigate to Application and Services Logs > Microsoft > Windows > Applocker > EXE and DLL.
Note that the whitelist rule applies specifically to the Remote desktop users group, and that it does not prevent executable running within the Turbo virtual environment. To prevent specific executables in the Turbo environment, add additional FilePathRule rules:
<FilePathRule Id="b68894c7-ecc7-4cc0-abe9-2317221bf221" Name="EXE Name Block: C:\*\minergate*.exe" Description="" UserOrGroupSid="S-1-5-32-555" Action="Deny">
  <Conditions>
    <FilePathCondition Path="C:\*\minergate*.exe" />
  </Conditions>
</FilePathRule>
FAQ
How are Turbo application verified when end users launch the application?
Application are configured by the administrator of the workspace. The configurations are hashed using SHA-256 and verified by the Turbo client prior to launching. If a malicious user attempts to tamper the application configuration in any way, the client will detect a hash mismatch and refuse to launch the application.
What is a device key and why are there locally generated private keys?
The device key is used by the local machine to register the device (under a specific Turbo user) to Turbo Server. The local private key is used to sign the device's identity to validate itself to Turbo Server. The private key should be kept secure on the local device. In the event the key is leaked, delete the device key registration using the administrative site located at /admin/users/devicekeys.aspx.
Can end users modify the system drive on application servers?
Not by default. Turbo uses low privilege local users to run Turbo applications on the application server, and by default those users should not have write access to the system drive. If the application isolation is set to Merge then any user attempt to write to the system drive will attempt to pass through and fail. In full or write-copy isolation mode, the virtual environment will allow users to write to the system drive but is sandboxed within the virtual environment. The user will perceive that the drive is writable, but is not. In addition, an application server can be configured to disallow any modfications to a drive using the standard built in ACL in Windows. Refer to the Microsoft Windows documentation to achieve this.
How are Turbo applications verified before they are executed on end user devices?
Users must agree to trusting a domain before running an application from a Turbo Server portal. Once the domain is trusted, the application's image and settings are verified using SHA-256 hash to ensure integrity of the application from the domain. If the hash does not match then the client will prevent the execution of the application.
Password Policy
The following password policy is enforced by Turbo Server when creating internal users to ensure the server is more secure against password attacks. This password policy does not apply to users created with the Anonymous or Single Sign-On authentication methods.
Complexity Requirements
- The password must be at least 8 characters in length
- The password must not be the same as the username
Data Breach Requirements
The following requirements only apply if the Check for Compromised Passwords setting is enabled:
- The password must not be contained in a data breach. Turbo Server checks the HIBC database for compromised passwords.
5.10 Cloud Storage
OneDrive
To allow users to connect their OneDrive accounts and access them while running their applications, you must first configure a OneDrive application registration. This OneDrive application controls the permissions, branding, and routing for the OneDrive SSO.
If you are using Azure Active Directory with OpenID Connect Authentication, you may configure OneDrive to automatically connect on login by using the same application registration. See Automatically Connect OneDrive
Setup the OneDrive Application
Create a new OneDrive Application
The following section describes how to create a new OneDrive application that can be integrated with Turbo Server.
-
Follow the Microsoft docs to set up a OneDrive application registration. If you are using Turbo Server 22.4 or earlier, make sure to select one of the Multitenant supported account types when creating the application registration.
-
Add the following Redirect URLs:
https://{Web Service Root}/oauth/onedrive/callback/login
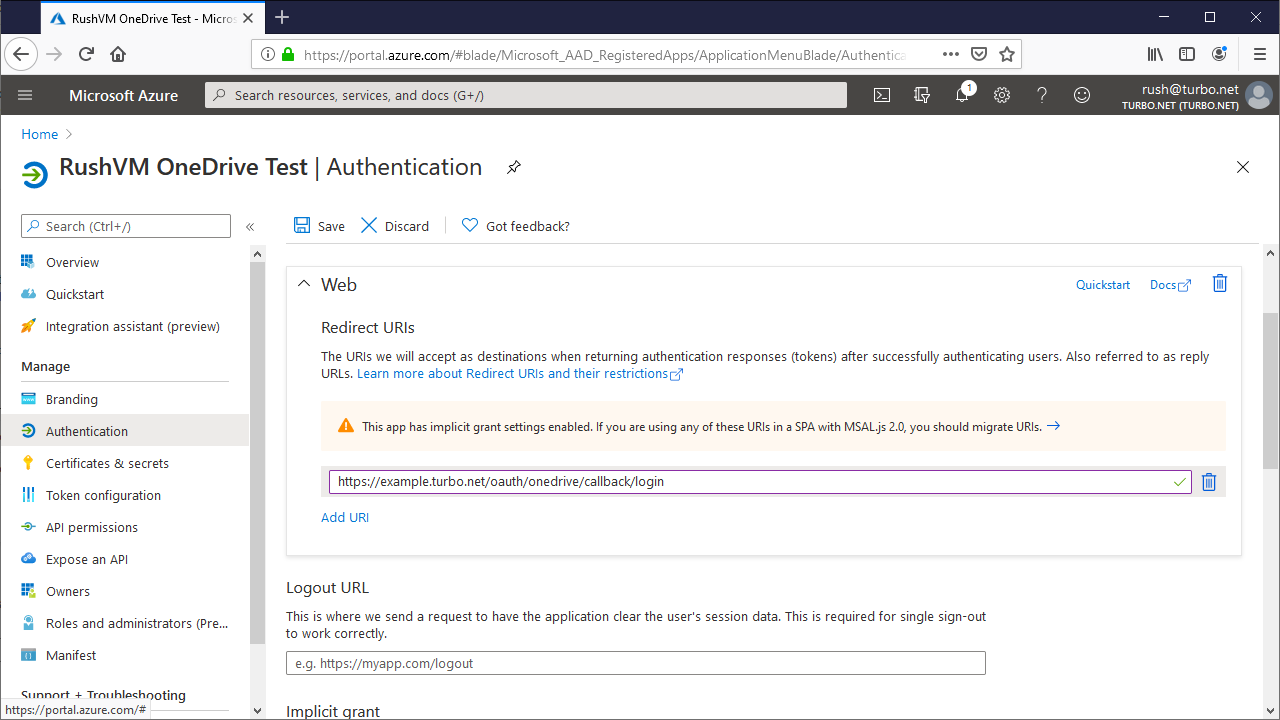
-
Enable the following Delegated Permissions:
Files.ReadWrite.Alloffline_access
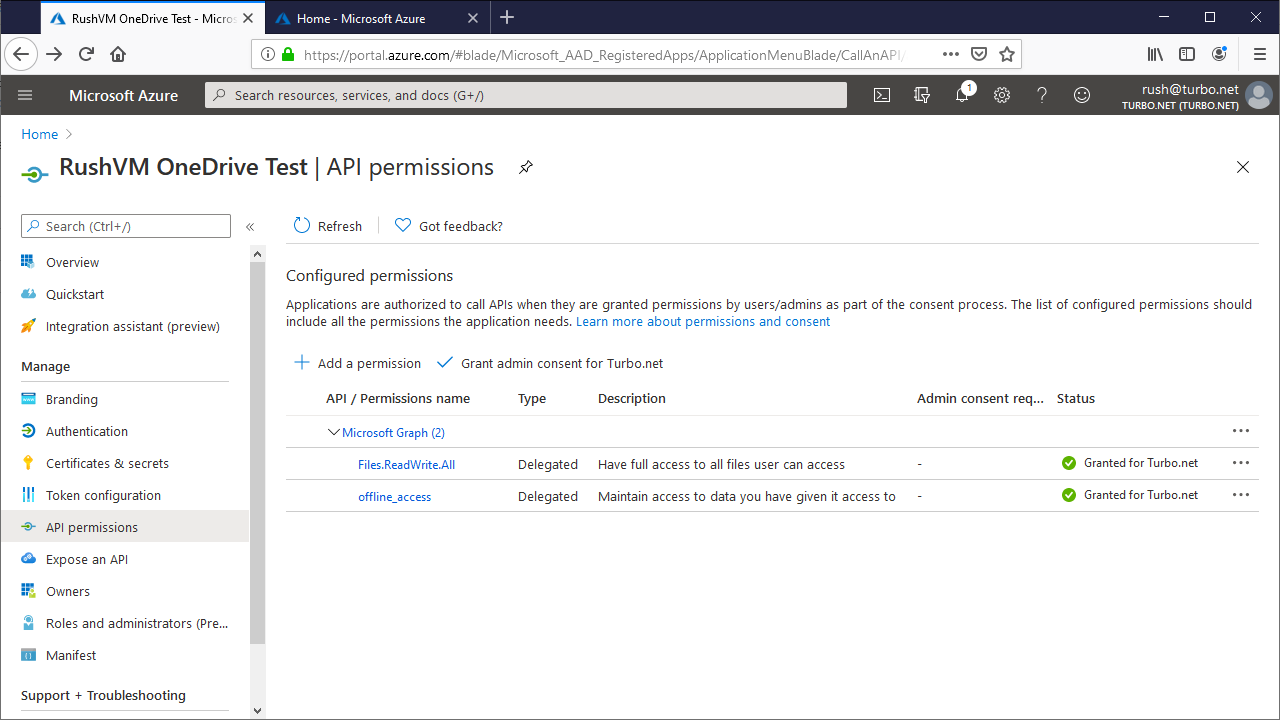
Update an Existing Application
The following section describes how to update an existing Azure Active Directory with OpenID Connect application to automatically connect OneDrive when users login to the Portal using Single Sign-On.
-
Add the following Redirect URL:
https://{Web Service Root}/oauth/onedrive/callback/login
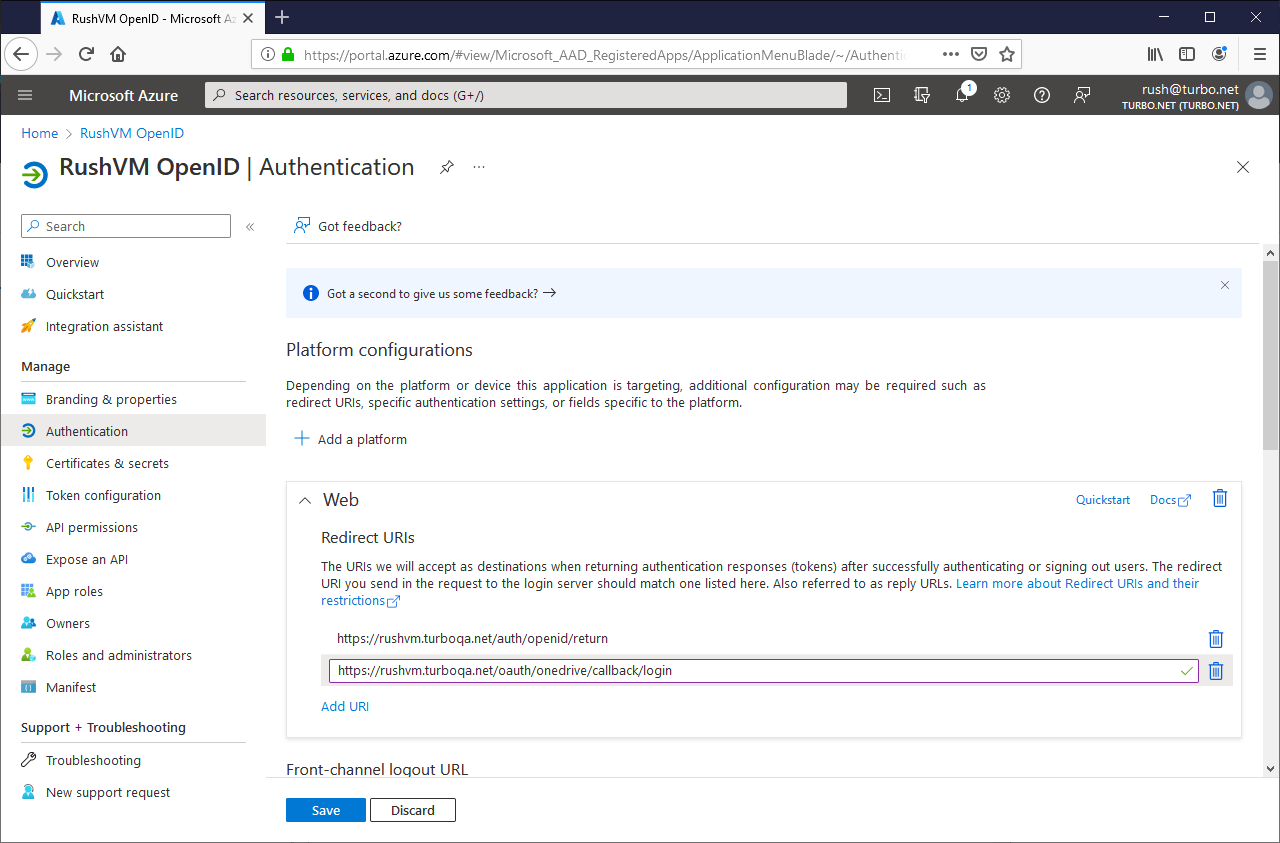
-
Enable the following Delegated Permissions:
Files.ReadWrite.Alloffline_access

Configure Turbo Server
Next, Turbo Server must be configured to use the newly created OneDrive application. Once configured, users may connect their OneDrive account from the portal settings.
- Go to the Turbo Server Administration site Integrations > Storage Providers page.
- Click on Add.
- Select OneDrive as the storage type.
- Enter the OneDrive Application Id into the corresponding Client Id field.
- Enter the OneDrive Application Secret into the corresponding Secret field.
- Select the Supported account types you selected when creating the application registration. If you selected single tenant, enter the OneDrive Directory ID into the corresponding Directory ID field.
- Save your settings. Setting changes may take a couple minutes to take affect.
Troubleshooting
The following section contains solutions for issues with regards to setting up cloud storage.
Issue:
User sign in results in error message "[The Azure Application] is not configured as a multi-tenant application. Usage of the /common endpoint is not supported for such applications created after ‘[Some date]’. Use a tenant-specific endpoint of configure the application to be multi-tenant."
Solution:
This error occurs when the OneDrive integration is configured with Multitenant supported account types, but the OneDrive application registration was created with Single tenant supported account types.
Open the OneDrive storage provider settings page and ensure that the Single tenant supported account type was selected.
In server 22.4 an earlier, only multitenant application registrations were supported.
Issue:
When the user is prompted to grant permission they’re warned about the domain being "unverified".
Solution:
This document explains how to resolve the unverified message:
How to: Configure an application's publisher domain
The setting is located in Azure Portal > App registrations > Branding > Publisher Domain
Issue:
User sign in results in error message "AADSTS50011: The reply url specified in the request does not match the reply urls configured for the application: '[Application ID]'."
Solution:
Ensure the correct Redirect URI is set. The setting is located in Azure Portal > App registrations > Authentication > Redirect URIs.
Issue:
User sign in results in error message "Need admin approval".
Solution:
Follow the instructions to grant admin consent for the Turbo OneDrive app registration for the entire tenant.
Alternatively if you would like each user to agree to consent, follow the instructions to configure how end-users consent to applications.
Issue:
The OneDrive folder does not appear in the T: drive. User has tried disconnecting and reconnecting to the storage provider but the issue persists.
Solution:
The Hub server is unable to reach the OneDrive services. This is typically caused by a proxy or firewall misconfiguration or other network issues. To resolve, ensure the https://login.microsoftonline.com/common/oauth2/v2.0/token URL is accessible from the Hub server.
Dropbox
To allow users to connect their Dropbox accounts and access them while running their applications, you must first configure a Dropbox app registration. This Dropbox app controls the permissions, branding, and routing for the Dropbox SSO.
Setup the Dropbox Application
-
Create a Dropbox app registration.
-
Add the following Redirect URI:
https://{Web Service Root}/oauth/dropbox/callback/login -
Set the Permission type to:
Full Dropbox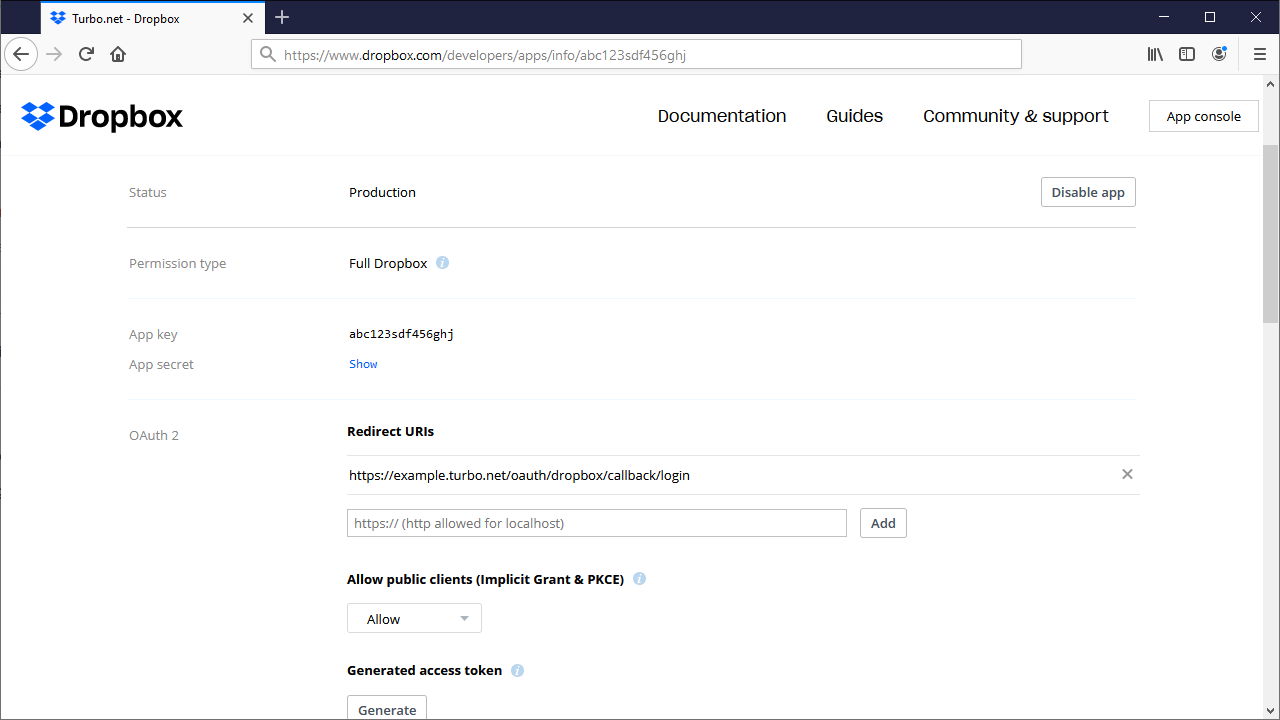
Configure the Turbo Server
Next, Turbo Server must be configured to use the newly created Dropbox application. Once configured, users may connect their Dropbox account from the portal settings.
- Go to the Turbo Server Administration site Integrations > Storage Providers page.
- Click on Add.
- Selected Dropbox as the storage type.
- Enter the Drobpox App key into the corresponding Client Id field.
- Enter the Dropbox App Secret into the corresponding Secret field.
- Save your settings. Setting changes may take a couple minutes to take affect.
Google Drive
To allow users to connect their Google Drive accounts and access them while running their applications, you must first configure a Google application. This application controls the permissions, branding, and routing for the Google Drive SSO.
Prerequisites
We recommend that you have a G Suite account. Accessing Google Drive files from Turbo Server requires a restricted scope that is only available to internal G Suite users by default. If you wish to allow integration with public Google accounts, this application will need to go through the Google verification process.
Setup the Google Application
-
Go to the Google API Console and log in as your G Suite user.
-
Click CREATE PROJECT and create a new project with your desired project name.
-
Click on the Library tab and search for
Google Drive. Click Google Drive API, then click Enable to add Google Drive access to your application.
-
Click on the OAuth consent screen tab, select the
InternalUser Type, then click Create.* Internal user selection requires you to be a G Suite user. If you wish to allow external users, your application will need to go through the Google verification process.
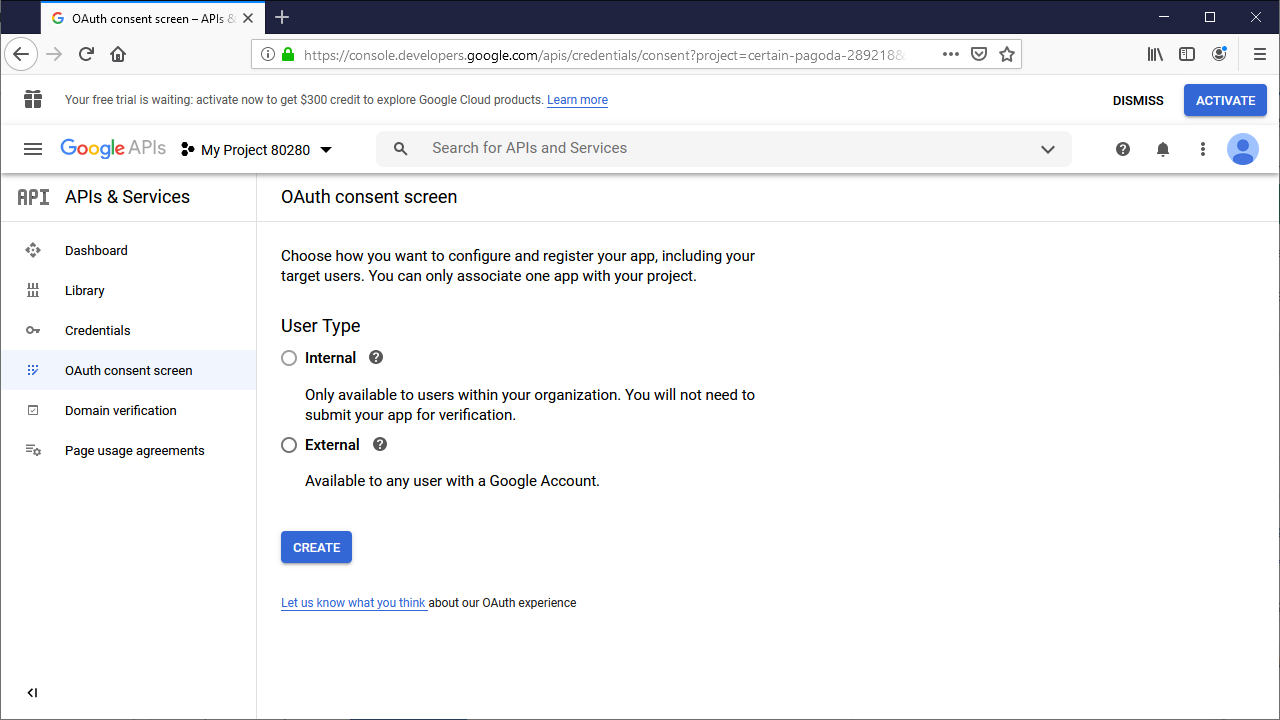
-
Under Scopes for Google APIs add the
../auth/drivescope.
-
Click on the Credentials tab then click CREATE CREDENTIALS > OAuth client Id.

-
For the Application Type select
Web application, and for the Authorized redirect URIs enterhttps://{Web Service Root}/oauth/googledrive/callback/login.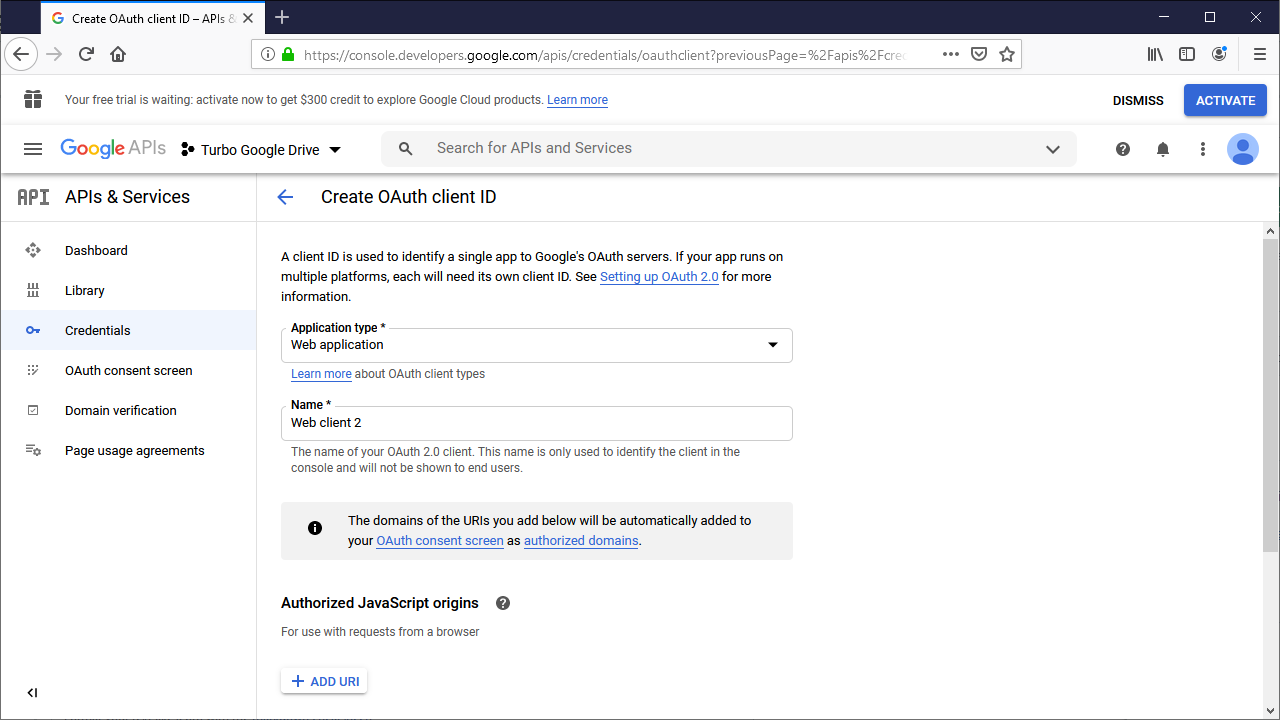
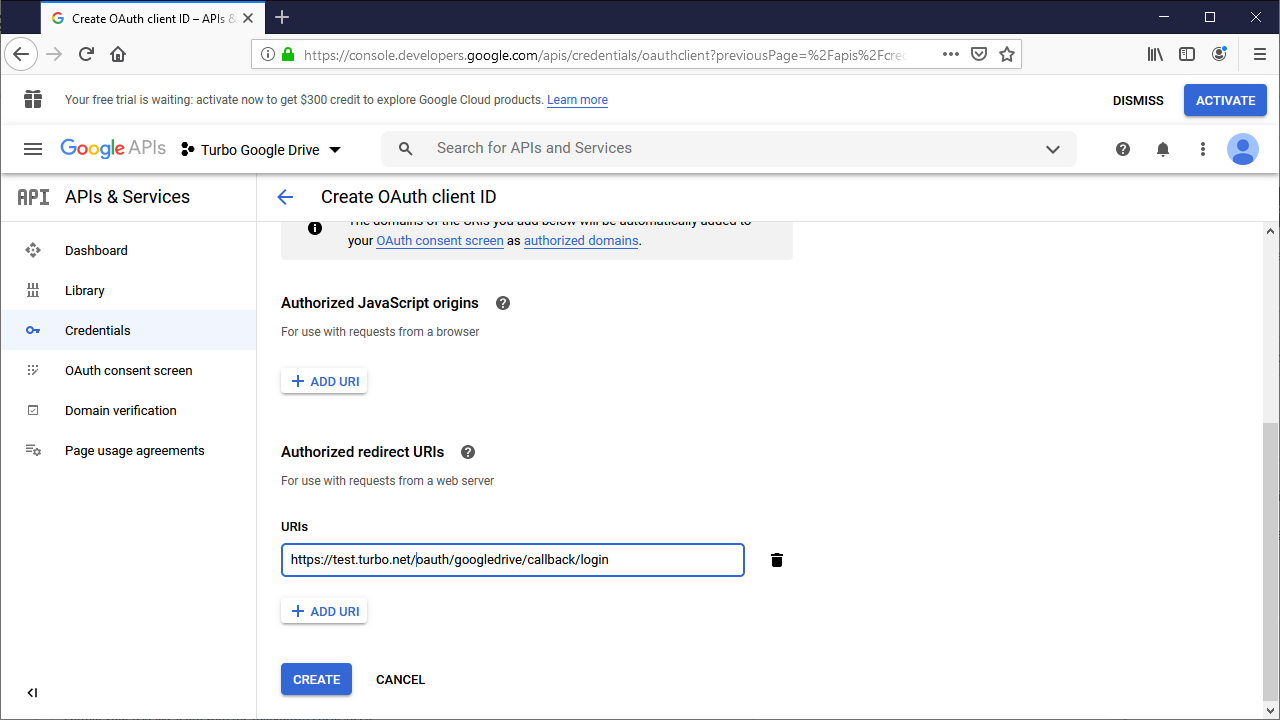
-
Once created you will receive a Client ID and Client Secret. Save these values for later as they will be used on the Turbo Server administration site.
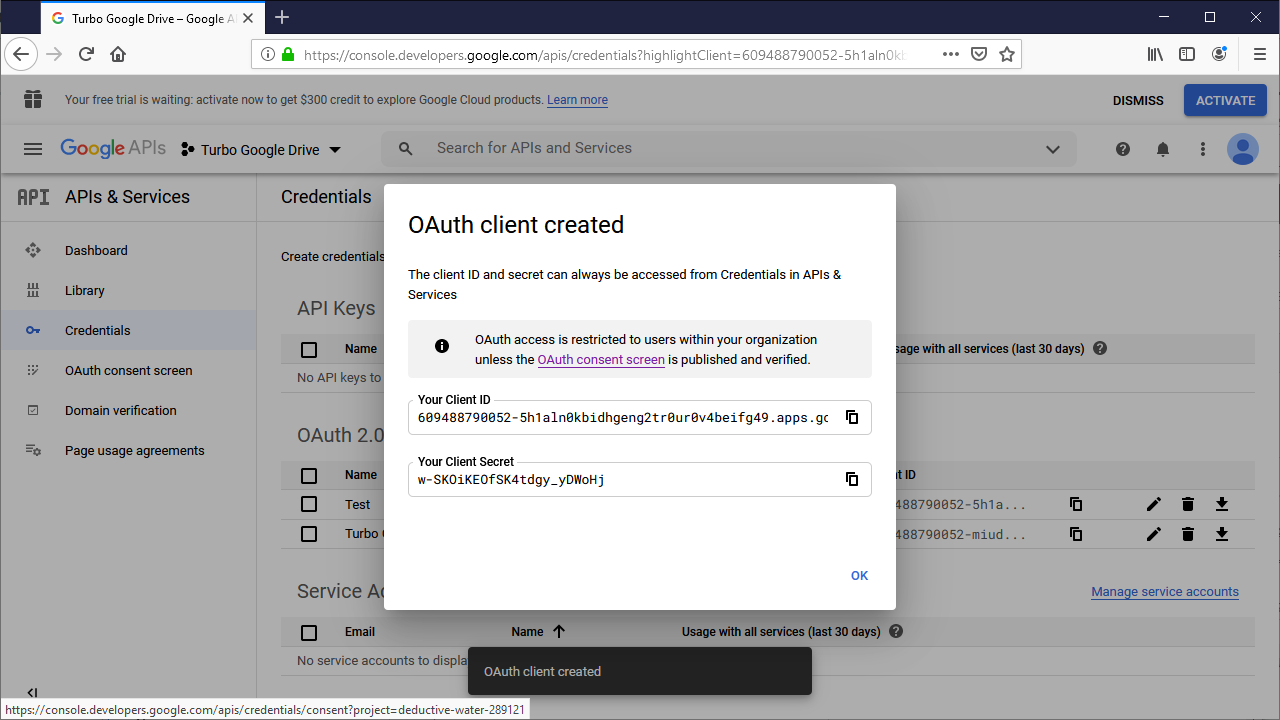
Configure the Turbo Server
Next, Turbo Server must be configured to use the newly created Google application. Once configured, users may connect their Google Drive account from the portal settings.
- Go to the Turbo Server Administration site Integrations > Storage Providers page.
- Click on Add.
- Selected Google Drive as the storage type.
- Enter the Google application client id into the corresponding Client Id field.
- Enter the Google application client secret into the corresponding Secret field.
- Save your settings. Setting changes may take a couple minutes to take affect.
Filr
To allow users to connect their Micro Focus Filr accounts and access their My Files while running their applications, you must set up a Filr Server with accounts for your users.
Prerequisites
The Filr integration requires Filr version 4.3 or higher.
Setup Filr Server
- Follow the Micro Focus documentation to set up a Filr Server and Filr accounts for your users.
- Add the following Redirect URI:
https://{Web Service Root}/oauth/filr/callback/login
Configure Turbo Server
Next, Turbo Server must be configured to use the newly created Filr application. Once configured, users may connect their Filr account from the portal settings.
- Go to the Turbo Server Administration site Integrations > Storage Providers page.
- Click on Add.
- Select Filr as the storage type.
- Enter the display Name for the Filr Storage Provider.
- Enter the Authentication URL for the Filr Server.
- Enter the Filr Application Id into the corresponding Client ID field.
- Enter the Filr Application Secret into the corresponding Secret field.
- Enter the full path where the service provider will be mounted. If left blank, the default
T:\{storage type}will be used. - Save your settings. Setting changes may take a couple minutes to take affect.
File Share (SMB)
The file system storage provider integration allows users to store their files on a local file system folder or a network share (SMB) through the T: Drive. The files under the configured path can be set to read only, or scoped to each individual user's private folder.
Configure the File Share
The SMB file share must be accessable by each Portal server via a UNC path such as \\SERVERNAME\path. The Portal service user must have full control access to the SMB file share.
If you are using a single portal solution, the storage path can be a local drive path, such as D:\shared.
Quota Enforcement
Storage quotas can be enforced via the underlying OS's quota enforcement tools. A quota error message will be displayed to the user when they upload a file that exceeds the configured quota to the Portal files shell or T: Drive with Background Sync disabled.
For Windows Server, quotas can be configured using the File and Storage Services server role.
To install this role:
- Launch the Server Manager and click on Manage > Add Role and Features
- Continue to Server Roles and select File and Storage Services > File and iSCSI services > File Server Resource Manager
- Complete the wizard and wait for the role install
Then, to configure the storage quota:
- Click on Tools > File Server Resource Manager
- Open Quota Management > Quota Templates
- Select your desired template then click Create Quota from Template…
- Enter your root share path into Quota path.
If you are using Shared storage it is recommended to select Create quota on path.
If you are using Per User storage it is recommended to select Auto apply template and create quota on existing and new subfolders. This will automatically apply the quota to each user subfolder.
- Complete the dialog making any desired changes then click Create.
Configure Turbo Server
- Go to the Turbo Server Administration site Integrations > Storage Providers page.
- Click on Add.
- Select File System as the storage type.
- Enter the file system provovider Name.
- Enter the file system File Share Root.
- Select the desired File Share Target Path.
- Per User mode restricts access to the user's sub folder under the path.
- Shared (Read-Only) mode allows read-only access to all files and folders under the path.
- Shared (Read-Write) mode allows read-write access to all files and folders under the path.
- Select the desired Background Upload setting, which determines whether files will be uploaded to the storage provider asynchronously or synchronously when using the T: Drive. Synchronous uploads will display upload error messages to the user.
- Enter the desired T: Drive Path.
- Save your settings. Setting changes may take a couple minutes to take affect.
Users can access their file share from the portal dashboard Files tab and Turbo Client's T: Drive.
End User Guide
To enable cloud storage for end users, they must add their cloud storage account using the Portal interface. Applications launched in the cloud by the end users will automatically map their cloud storage folder to the T: drive.
The following is a setup-by-step user guide to connect and access files from the cloud:
-
From your Portal, click on Files to manage the cloud storage services connected to your account. Click on the Connect button and select your desired cloud storage service to link the storage service to your account.
-
You will be asked to authenticate your account with the storage service. Once the authentication succeeds, the storage service status will show as connected.
-
Files from the storage service will now be available under the T:\ drive for applications running in the cloud.
Access from Local Launches
Cloud storage integration requires WinFsp drivers which are automatically installed on the application server, but not is not included in the Turbo Client installer for end users. Download and install WinFsp 1.4.19016 if you wish to launch local with the same T: drive integration.
If WinFsp drivers are not installed, T: drive will automatically map to the local OneDrive folder.
Troubleshooting
Upload failed due to quota limit
This error occurs when the total size of your files exceeds the user storage quota limit on the connected storage provider. Please try deleting some of your files and try again.
Upload failed due to insufficient permissions
This error occurs when you do not have permission to upload a file to the current folder. Please try uploading to a different folder, or contact your administrator about granting you permission to that folder.
Upload failed due to restricted file type
This error occurs when the file type of the uploaded file is not allowed by the connected storage provider. Please change your file to a different file type and try again.
Upload failed due to file size limit
This error occurs when the size of the uploaded file exceeds the maximum file upload size configured on the connected storage provider. Please try reducing the file size, such as by compressing the file, and try again.
The connection to OneDrive expired. Please reconnect OneDrive to Turbo.net.
The administrator may have changed a setting that requires users to reconnect to the cloud storage provider. Log in to the portal and reconnect the corresponding cloud storage provider from the Files tab.
Tdrive does not start or launching a file from the Portal exits immediately.
An antivirus may be preventing the TDdrive driver to launch correctly. Please disable any antiviruses on the system and try again.
Files API
The following documentation describes the Files API implemented by the Turbo Server Portal. The Files API allows users to view and manage files stored in their connected cloud storage accounts.
For more information cloud storage integrations and connecting cloud storage accounts, see:
All request paths described in this document are relative to the base Portal URL: https://{portal}
Authorization
All requests expect an X-Turbo-Ticket header with a JWT access token value. If this token is missing or invalid, a 401 unauthorized response error is returned.
Request and response formats
Date format
All dates returned by the Files API are in UTC time and ISO 8601 format:
2015-05-15T15:50:38Z
Resource Address Format
File resources are uniquely located by their resource address. The resource address is formatted in standard unix path formatting (ex. /my-onedrive/path/to/file.txt). The root path segment is the storage provider slug, which identifies the remote storage provider that contains the resource, and the remaining path segments are the resource address within the remote storage provider.
The Files API metadata object include the resource’s address in its address field. Resource addresses should be used as-is and should not be manually altered or created.
The root folder is addressed by an empty string or /.
Endpoints
Create Folder
Creates a new folder at the given path in the storage provider.
POST /rest/0.1/files/create-folder

Request Body:
A CreateFolderRequest object

Response:
A FolderMetadata object
Example
POST /rest/0.1/files/create-folder

Request Headers:
Content-Type: application/json

Request Body:
{
  "parentAddress": "/fsshare/Homework",
  "name": "chemistry"
}

Response Body:
{
  "address": "/fsshare/Homework/chemistry",
  "path": "/Shared Files/Homework/chemistry",
  "name": "chemistry",
  "itemType": "folder",
  "created": "2022-07-19T23:55:16.201Z",
  "modified": "2022-07-19T23:55:16.201Z",
  "permissions": [
    "read",
    "write",
    "delete"
  ],
  "attributes": []
}
Delete
Deletes the file or folder at the given path from the storage provider.
DELETE /rest/0.1/files/delete

Request Body:
A ResourceRequest object

Response:
<empty>
Example
DELETE /rest/0.1/files/delete

Request Headers:
Content-Type: application/json

Request Body:
{
  "address": "/googledrive/12Df5FLeWhGtN6WgJkR23VKpq8NvUxNKx"
}

Response:
<empty>
Download File
Downloads the file content for the given path from the storage provider. Response headers are passed through as-is from the storage provider.
POST /rest/0.1/files/download

Request Body:
A ResourceRequest object

Response:
File content
Example
POST /rest/0.1/files/download

Request Headers:
Content-Type: application/json

Request Body:
{
  "address": "/googledrive/12Df5FLeWhGtN6WgJkR23VKpq8NvUxNKx"
}

Response Body:
File content
Get Metadata
Returns a metadata object that includes detailed information about the file or folder.
POST /rest/0.1/files/get-metadata

Request Body:
A ResourceRequest object

Response:
A FileMetadata or FolderMetadata object
Example
POST /rest/0.1/files/get-metadata

Request Headers:
Content-Type: application/json

Request Body:
{
  "address": "/googledrive-turbo/1iP4Os3sJItDjf2OcEEFqyKOB1BRb-xj2"
}

Response Body:
{
  "address": "/googledrive-turbo/1iP4Os3sJItDjf2OcEEFqyKOB1BRb-xj2",
  "path": "/Google Drive Turbo/clients/turbo-client.vhd",
  "name": "turbo-client.vhd",
  "itemType": "file",
  "created": "2022-07-18T21:42:37.343Z",
  "modified": "2022-07-18T21:42:37.975Z",
  "size": 252157952,
  "permissions": [
    "read",
    "write",
    "delete"
  ],
  "attributes": []
}
List Directory
Returns a list of file and folder metadata objects that are contained within the specified folder.
POST /rest/0.1/files/list-folder

Request Body:
A ResourceRequest object

Response:
A ListFolderResult object
Example
POST /rest/0.1/files/list-folder

Request Headers:
Content-Type: application/json

Request Body:
{
  "address": "/fsshare/homework"
}

Response:
{
  "items": [
    {
      "address": "/fsshare/homework/Prime_Numbers.txt",
      "path": "/Shared Files/homework/Prime_Numbers.txt",
      "name": "Prime_Numbers.txt",
      "itemType": "file",
      "size": 7212,
      "created": "2022-07-14T22:38:28.054Z",
      "modified": "2022-07-15T00:32:06.474Z",
      "permissions": [
        "read",
        "write",
        "delete"
      ],
      "attributes": []
    },
    ...
  ]
}
Move
Moves a file or folder from the source address to the destination address. If the destination address conflicts with an existing file, that file will be overwritten.
POST /rest/0.1/files/move

Request Body:
A MoveRequest object

Response:
A FileMetadata or FolderMetadata object
Example
POST /rest/0.1/files/move

Request Headers:
Content-Type: application/json

Request Body:
{
	"fromAddress": "/onedrive/path/to/turbo-client-22.6.vhd",
	"toParentAddress": "/onedrive"
}

Response:
{
  "address": "/onedrive/turbo-client-22.6.vhd",
  "path": "/OneDrive/turbo-client-22.6.vhd",
  "name": "turbo-client-22.6.vhd",
  "itemType": "file",
  "created": "2022-07-18T21:42:37.343Z",
  "modified": "2022-07-18T21:42:37.975Z",
  "size": 252157952,
  "permissions": [
    "read",
    "write",
    "delete"
  ],
  "attributes": []
}
Rename
Renames a file or folder from the address with the specified name. If the new name conflicts with an existing file, that file will be overwritten.
POST /rest/0.1/files/rename

Request Body:
A RenameRequest object

Response:
A FileMetadata or FolderMetadata object
Example
POST /rest/0.1/files/rename

Request Headers:
Content-Type: application/json

Request Body:
{
	"address": "/onedrive/turbo-client-22.6.vhd",
	"name": "turbo-client.vhd"
}

Response:
{
  "address": "/onedrive/turbo-client.vhd",
  "path": "/OneDrive/turbo-client.vhd",
  "name": "turbo-client-22.6.vhd",
  "itemType": "file",
  "created": "2022-07-18T21:42:37.343Z",
  "modified": "2022-07-18T21:42:37.975Z",
  "size": 252157952,
  "permissions": [
    "read",
    "write",
    "delete"
  ],
  "attributes": []
}
Upload File
Uploads a file to the storage provider. If the upload would conflict with an existing file, that file will be overwritten.
If Allocation-Size is defined and valid, then a file of that size will be created and any file content will be ignored. This can be used to check the disk quota before uploading the file content.
POST /rest/0.1/files/upload

Request Headers:
Parent-Address - The resource address of the parent folder to which the file will be uploaded
File-Name - The name that will be assigned to the uploaded file
Allocation-Size - Creates a file of the allocation size in bytes, filled with zero bytes

Request Body:
<File content>

Response:
A FileMetadata object
Example
POST /rest/0.1/files/upload

Request Headers:
Parent-Address: /my-onedrive/logs
File-Name: app1-logs_20220720_110704.zip
Content-Type: application/octet-stream

Request Body:
<File content>

Response:
{
  "address": "/my-onedrive/logs/app1-logs_20220720_110704.zip",
  "path": "/My OneDrive/logs/app1-logs_20220720_110704.zip",
  "name": "app1-logs_20220720_110704.zip",
  "itemType": "file",
  "created": "2022-07-20T22:56:35.520Z",
  "modified": "2022-07-20T22:56:35.520Z",
  "size": 2898334,
  "permissions": [
    "read",
    "write",
    "delete"
  ],
  "attributes": []
}
Errors
The Files API errors return an error status code in addition to a JSON object in the response body with additional details.
The following section describes the various error responses that should be handled by consuming clients.
400: Bad Request
A 400 error response indicates that the provided arguments were invalid or the requested operation failed. For example:
- A required header or JSON body was not provided
- An invalid header or JSON body was provided
- The supplied arguments resulted in an endpoint-specific error, such as an missing resource, path conflict, incorrect file type, etc.
For example, a list-folder request with an address that does not point to a file or folder would return a 400 error with the following JSON:
{
  "code": "itemNotFound",
  "message": "The resource could not be found."
}
The message may also contain additional information about the error. To resolve this issue, check the error response and adjust your arguments accordingly.
401: Unauthorized Response
A 401 error response indicates that the user is not authorized to access the requested file or folder. This occurs when then user did not provide a valid ticket.
For example, a get-metadata request with an expired ticket would return a 401 error with the following JSON:
{
  "code": "unauthorized",
  "message": "The caller is not authenticated."
}
To resolve this issue, check the error response and adjust your provided authentication header accordingly.
5xx: Server Error
A 5xx error response indicates that an unexpected error occurred while processing the request.
5xx errors are not guaranteed to return a JSON response body.
Error Codes
| Reason Code | Description | Code |
|---|---|---|
| accessDenied | Access to resource denied | 400 |
| cannotCopySharedFolder | Cannot copy a shared folder. | 400 |
| cannotDeleteRootFolder | Cannot delete a root folder. | 400 |
| cannotModifyRootFolder | Cannot modify root folder. | 400 |
| cannotModifyRootFolderContent | Cannot modify root folder content. | 400 |
| cannotMoveBetweenRootFolders | Cannot move resources between root folders. | 400 |
| cannotMoveIntoRootFolder | Cannot move resources into a root folder. | 400 |
| cannotMoveRootFolder | Cannot move a root folder. | 400 |
| cannotMoveSharedFolder | Cannot move a shared folder. | 400 |
| cannotNestSharedFolder | Cannot nest a shared folder. | 400 |
| cannotTransferOwnership | Cannot transfer ownership. | 400 |
| duplicateOrNestedPaths | The request contains duplicate or nested paths. | 400 |
| fileContentRestricted | The file content is restricted. | 400 |
| fileTypeRestricted | The file type is restricted. | 400 |
| fileTypeUnsupported | The file type is not supported by the requested operation. | 400 |
| fileTooLarge | The file is too large. | 400 |
| folderCannotContainItself | A folder cannot be added as a subfolder of itself. | 400 |
| insufficientPermissions | The caller does not have sufficient permissions for the requested operation. | 400 |
| invalidRequest | The request is malformed or incorrect. Please check the request body and headers and try again. | 400 |
| itemAlreadyExists | The resource already exists. | 400 |
| itemLocked | The resource is busy or locked. Please wait or stop the locking process and try again. | 400 |
| itemNotFound | The resource could not be found. | 400 |
| methodNotAllowed | The resource does not support this operation. | 400 |
| notFile | The requested path is not a file. | 400 |
| notFolder | The requested path is not a folder. | 400 |
| operationNotPermitted | The operation is not permitted. Please check that the service user has permission to perform the action on the file. | 400 |
| quotaLimitReached | The caller has reached their quota limit. | 400 |
| serverError | The server encountered an unexpected error. | 500 |
| tooManyFiles | The request contains too many files. | 400 |
| tooManyWriteOperations | There are too many active write operations. Please wait and try again. | 400 |
| unauthorized | The caller is not authenticated. | 401 |
Object Models
Request Objects
CreateFolderRequest
A JSON object sent in named resource request bodies, such as create folder.
- parentAddress - {ResourceAddress} The address of the parent folder
- name - {String} The name of the file or folder
MoveRequest
A JSON object sent in move request bodies.
- fromAddress - {ResourceAddress} The address of the source file or folder
- toParentAddress - {ResourceAddress} The address of the parent folder that will contain the moved file or folder
RenameRequest
A JSON object sent in rename request bodies.
- address - {ResourceAddress} The address of the resource that will be renamed
- name - {String} The new name of the file or folder
ResourceRequest
A JSON object sent in resource request bodies, such as list folder.
- address - {ResourceAddress} The address of the file or folder
Response Objects
ListFolderResult
A JSON object returned in the list-folder response body.
- items - {Array of FileMetadata | FolderMetadata} A list of file or folder metadata objects
FileMetadata
Metadata that describes various attributes about a file.
- address - {ResourceAddress} A string that uniquely locates the file
- path - {String} The display path to the file. Paths are not guaranteed to be unique and cannot be used to lookup files.
- name - {String} The file display name
- itemType - {String} The item type. Supported values are
fileandfolder - size - {Number} The size of the file in bytes
- modified - {Timestamp} The datetime at which the file was last modified on the server, in ISO 8601 datetime format
- created - {Timestamp} The datetime at which the file was created on the server, in ISO 8601 datetime format
- permissions - {String[]} A list of strings that specify the user’s file permissions. Valid values are
read,write, anddelete. - attributes - {String[]} A list of strings that specify the file attributes. For example,
readonlyorhidden. - webViewLink - {String} A URL to view the file in an external web viewer, such as Google Sheets. Can be absent if no external web viewer exists for the file.
FolderMetadata
Metadata that describes various attributes about a folder.
- address - {ResourceAddress} A string that uniquely locates the folder
- path - {String} The display path to the folder. Paths are not guaranteed to be unique and cannot be used to lookup files.
- name - {String} The folder display name
- itemType - {String} The file type. Supported values are
fileandfolder - modified - {Timestamp} The datetime at which the file was last modified on the server, in ISO 8601 datetime format
- created - {Timestamp} The datetime at which the file was created on the server, in ISO 8601 datetime format
- permissions - {String[]} A list of strings that specify the user’s folder permissions. Valid values are
read,write, anddelete. - attributes - {String[]} A list of strings that specify the folder attributes. For example,
readonlyorhidden.
Types
ResourceAddress
A string that uniquely locates a file resource in Resource Address Format.
Examples
Download all files to a local folder
The following C# console application demonstrates how a client can iterate through a user's connected cloud storage providers and download all files and folders to a local folder:
using System.Net.Http.Headers;
using System.Text.Json;
using System.Text.Json.Serialization;

internal class Program
{
    const string ApiServer = "https://<your-server-hostname>";

    private static async Task Main(string[] args)
    {
        // For demonstration purposes these values are left as hardcoded placeholders.
        // In practice these values should be passed in or loaded dynamically.
        var outputFolder = Path.Combine(AppDomain.CurrentDomain.BaseDirectory, "out");
        var accessToken = "<jwt-token>";

        await CopyTurboDriveToLocal("", outputFolder, accessToken);

        Console.WriteLine("Press any key to exit");
        Console.In.ReadLine();
    }

    /// <summary>
    /// Recursively, asynchronously copies all files and folders from the remote address to the outputfolder.
    /// </summary>
    private static async Task CopyTurboDriveToLocal(string remoteAddress, string outputFolder, string accessToken)
    {
        var listFolderArgs = new AddressedResourceArgs() { Address = remoteAddress };
        var listFolderRes = await ListFolder(listFolderArgs, accessToken);

        if (listFolderRes != null)
        {
            var listFolderTasks = new List<Task>();
            var downloadTasks = new List<Task>();

            if (!Directory.Exists(outputFolder))
            {
                Directory.CreateDirectory(outputFolder);
            }

            foreach (var item in listFolderRes.Items)
            {
                if (item.IsFile)
                {
                    var downloadFileArgs = new AddressedResourceArgs() { Address = item.Address };
                    var filePath = Path.Combine(outputFolder, item.Name);

                    // Create a task that will download this file asynchrounosly
                    var downloadTask = Task.Run(async () =>
                    {
                        try
                        {
                            using (var downloadStream = await DownloadFile(downloadFileArgs, accessToken))
                            using (var fileStream = File.OpenWrite(filePath))
                            {
                                if (downloadStream != null)
                                {
                                    downloadStream.CopyTo(fileStream);
                                }
                            }
                        }
                        catch (Exception e)
                        {
                            Console.Error.WriteLine($"Failed to download file {filePath} with error: {e.Message}");
                        }
                    });
                    downloadTasks.Add(downloadTask);
                }
                else
                {
                    // Create a task that will list this subfolder asynchrounosly
                    var listFolderTask = Task.Run(async () =>
                    {
                        await CopyTurboDriveToLocal(item.Address, Path.Combine(outputFolder, item.Name), accessToken);
                    });
                    listFolderTasks.Add(listFolderTask);
                }
            };

            // Concurrently download all files and list all subfolders.
            await Task.WhenAll(downloadTasks.Concat(listFolderTasks).ToArray());
        }
        else
        {
            Console.Error.WriteLine($"Failed to download folder {remoteAddress}");
        }
    }

    /// <summary>
    /// Asynchronously fetches a download stream for the requested resource.
    /// Returns null if the request cannot be processed or if an error response is returned
    /// </summary>
    private static async Task<Stream> DownloadFile(AddressedResourceArgs args, string accessToken)
    {
        try
        {
            var uri = new Uri(ApiServer + "/rest/0.1/files/download");
            var reqContent = new StringContent(JsonSerializer.Serialize(args));
            reqContent.Headers.ContentType = new MediaTypeHeaderValue("application/json");
            reqContent.Headers.Add("X-Turbo-Ticket", accessToken);

            var httpClient = new HttpClient();
            var res = await httpClient.PostAsync(uri, reqContent);
            if (res.IsSuccessStatusCode)
            {
                return await res.Content.ReadAsStreamAsync();
            }
            else
            {
                var resContent = await res.Content.ReadAsStreamAsync();
                var result = JsonSerializer.Deserialize<ErrorResult>(resContent);

                if (result == null)
                {
                    Console.Error.WriteLine($"DownloadFile query for address {args.Address} returned error status {res.StatusCode}");
                }
                else
                {
                    Console.Error.WriteLine($"DownloadFile query for address {args.Address} returned error status {res.StatusCode} with details: {result.Code}, {result.Message}");
                }
                return null;
            }
        }
        catch (Exception e)
        {
            Console.Error.WriteLine($"DownloadFile query for address {args.Address} failed with error: {e.Message}");
            return null;
        }
    }

    /// <summary>
    /// Asynchronously lists the folder contents of the requested resource
    /// Returns null if the request cannot be processed or if an error response is returned
    /// </summary>
    private static async Task<ListFolderResult> ListFolder(AddressedResourceArgs args, string accessToken)
    {
        try
        {
            var uri = new Uri(ApiServer + "/rest/0.1/files/list-folder");
            var reqContent = new StringContent(JsonSerializer.Serialize(args));
            reqContent.Headers.ContentType = new MediaTypeHeaderValue("application/json");
            reqContent.Headers.Add("X-Turbo-Ticket", accessToken);

            var httpClient = new HttpClient();

            var res = await httpClient.PostAsync(uri, reqContent);
            if (res.IsSuccessStatusCode)
            {
                var resContent = await res.Content.ReadAsStreamAsync();
                var result = JsonSerializer.Deserialize<ListFolderResult>(resContent);
                return result;
            }
            else
            {
                var resContent = await res.Content.ReadAsStreamAsync();
                var result = JsonSerializer.Deserialize<ErrorResult>(resContent);

                if (result == null)
                {
                    Console.Error.WriteLine($"ListFolder query for address {args.Address} returned error status {res.StatusCode}");
                }
                else
                {
                    Console.Error.WriteLine($"ListFolder query for address {args.Address} returned error status {res.StatusCode} with details: {result.Code}, {result.Message}");
                }

                return null;
            }
        }
        catch (Exception e)
        {
            Console.Error.WriteLine($"ListFolder query for address {args.Address} failed with error: {e.Message}");
            return null;
        }
    }

    public class AddressedResourceArgs
    {
        [JsonPropertyName("address")]
        public string Address { get; set; }
    }

    public class ListFolderResult
    {
        [JsonPropertyName("items")]
        public List<ItemMetadata> Items { get; set; }
    }

    public class ItemMetadata
    {
        [JsonPropertyName("address")]
        public string Address { get; set; }
        [JsonPropertyName("attributes")]
        public string[] Attributes { get; set; }
        [JsonPropertyName("created")]
        public string Created { get; set; }
        [JsonPropertyName("itemType")]
        public string ItemType { get; set; }
        [JsonPropertyName("modified")]
        public string Modified { get; set; }
        [JsonPropertyName("name")]
        public string Name { get; set; }
        [JsonPropertyName("path")]
        public string Path { get; set; }
        [JsonPropertyName("permissions")]
        public string[] Permissions { get; set; }
        [JsonPropertyName("Size")]
        public ulong Size { get; set; }
        [JsonPropertyName("webViewLink")]
        public string WebViewLink { get; set; }

        public bool IsFile
        {
            get
            {
                return ItemType == "file";
            }
        }
    }

    public class ErrorResult
    {
        [JsonPropertyName("code")]
        public string Code { get; set; }
        [JsonPropertyName("message")]
        public string Message { get; set; }
    }
}
5.11 Integrations
Canvas LMS
Configuring Turbo Server with Canvas allows students and instructors to access their Portal Dashboard with one click from Canvas. Turbo Server functionality is added to Canvas LMS as an external application from the Canvas user interface.
Turbo Server uses the open Learning Tools Interoperability (LTI) specification (version 1.0) to communicate with Canvas.
Getting Started
Canvas requires the following to connect to Turbo Server Application:
- Consumer Key
- Shared Secret
- Config URL
The values can be obtained from the Turbo Server administration site. Navigate to Integrations > Learning Management Systems (LMS) > [LMS Provider].
The Turbo Server must be publically accessible for the Canvas service to connect to it.
Adding Turbo to Canvas
A canvas account can be created at https://canvas.instructure.com.
Turbo can be linked with an individual course by an instructor or with all courses by a Canvas Administrator. Navigate to the Course or Administrator Account you wish to link.
Adding Turbo to an Administrator Account will require a single setup for all courses. Every instructor will see the option to enable Turbo in their Course Navigation.
Navigate to the desired course. Go to Settings > Apps.
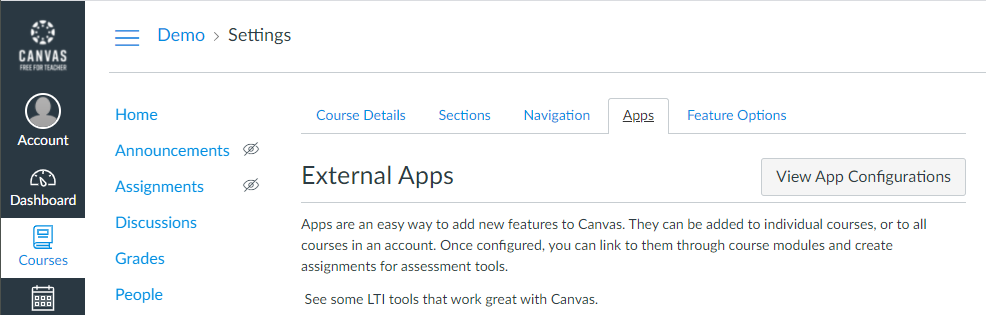
Click on View App Configurations and then +App. Change the Configuration Type dropdown to By URL.

Enter the information from the Turbo Server administrator site:
- Consumer Key
- Shared Secret
- Config URL
Click on Submit and refresh the page (F5 in browser). The Turbo application will now be available in the course navigation tab.
Enabling Turbo in the Course Navigation
Turbo can be enabled or disabled for each individual course. Whether the Turbo application is enabled by default is controlled by the Show in Course Navigation setting in the LMS provider settings in Turbo Server (default is enabled).
- Navigate to the desired course.
- Go to Settings > Navigation.
- Find the Turbo Server application in the course navigation list. The item will appear as the name given by Link Text under the connected LMS provider settings in Turbo Server (default is "Apps"). Note that after adding the external application, you will need to refresh the page (F5 in browser) to see the item.
- Drag the item up to the list of shown items or down to the list of hidden items.
- Press Save.
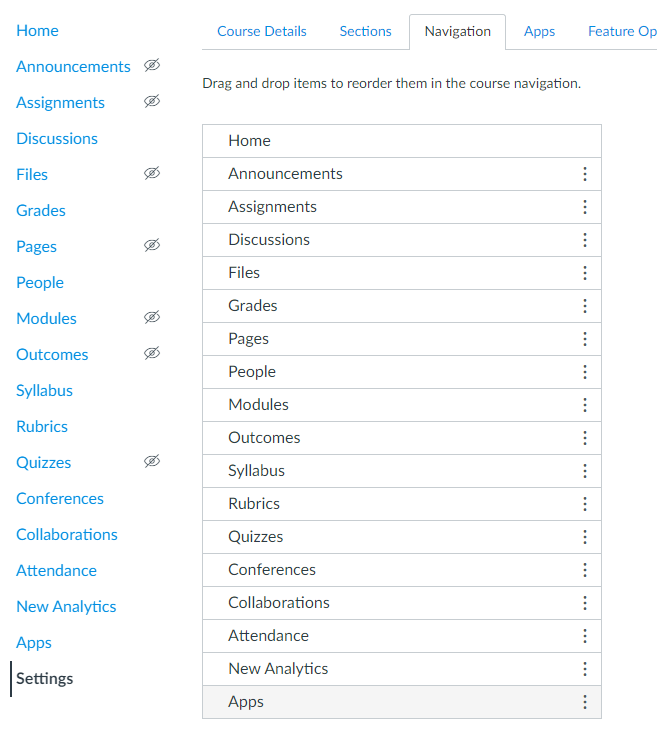
Blackboard Learn
Configuring Turbo Server with Blackboard Learn allows students and instructors to access their Portal Dashboard with one click from Blackboard.
Turbo Server uses the open Learning Tools Interoperability (LTI) specification (version 1.0) to communicate with Blackboard.
Getting Started
Obtain a blackboard license from https://www.blackboard.com/.
Blackboard requires the following to connect to Turbo Server Application:
- Consumer Key
- Shared Secret
- Tool Provider URL
The values can be obtained from the Turbo Server administrator site. Navigate to General > Learning Management System.
Adding Turbo to Blackboard Learn
Before adding Turbo to an individual course, an administrator account must configure Turbo site-wide from the Blackboard administration site.
From System Admin, navigate to LTI Tool Providers, listed under Integrations. Select Register LTI 1.1 Provider.
Under Provider Domain Status, in the Provider Domain box, enter the hostname portion of the Tool Provider URL shown on the Turbo Server administrator site. Set the Provider Domain Status to Approved.

Under Default Configuration, select Set Globally. Fill in the Tool Provider Key and Secret with the values from the Turbo Server administrator site.
Under Institution Policies, configure the following:
- Send user data only over SSL
- User Fields to Send: check all boxes

Click Submit.
Add a Turbo Placement (Original UI)
If your organization has any courses set to Original UI, the following steps are required for instructors of those courses to see Turbo. Administrator privileges are required.
From the LTI Tool Providers page, open the Options Menu dropdown beside Turbo.
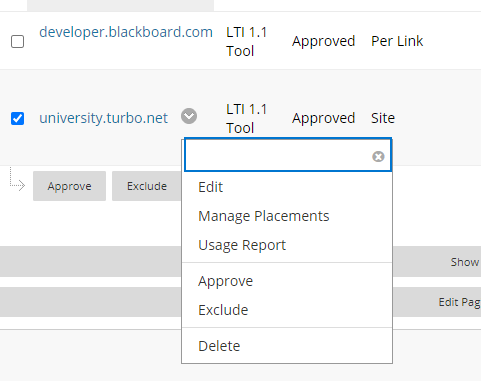
Select Manage Placements. Then select Create Placement. Under Placement Information, set Label to Turbo.net and Handle to something unique for your Blackboard Site.
Turbo supports the following options for Type:
- Course content tool, without grading
- Course tool, with student access
- System tool
- Administrator tool
The Turbo Icon can be downloaded here.
Under Tool Provider Information, enter the Tool Provider URL from the Turbo Server administrator site.

Click Submit.
Activate Turbo on a Course (Original UI)
These steps require at least instructor privileges and do not apply to courses with the Ultra UI. An administrator must have already added Turbo site-wide and created a Course Placement. The administrator and end users must also be enrolled in the course to access Turbo.net.
Navigate to the Content page of the desired course
Open the Tools dropdown. Select More tools.

Select Turbo.net. Configure as desired and click Submit.
Activate Turbo on a Course (Ultra UI)
These steps require at least instructor privileges and apply only to courses with the Ultra UI. An administrator must have already added Turbo site-wide. The administrator and end users must also be enrolled in the course to access Turbo.net.
Navigate to the Ultra course desired. Click the plus icon and select Create to add Course Content.

From the right sidebar, select Teaching tools with LTI connection.
Set as Visible to students.
Under Configuration URL, enter the Tool Provider URL from the Turbo Server administrator site.
Troubleshooting
Accessing Turbo.net from course content page fails with error "The specified object was not found."
The error occurs after Turbo.net has been added to Blackboard by an administrator and activated on the course.
Solution: Ensure your user is enrolled in the course. Blackboard prevents unenrolled users (including administrative users) from accessing LTI apps.
Accessing Turbo.net from course content page fails with "401 Unauthorized"
The error occurs when the secret does not match.
Solution: Ensure the secret in the Blackboard administration site matches the secret from the Turbo administration LTI page.
Moodle
Configuring Turbo Server with Moodle allows students and instructors to access their Portal Dashboard with one click from Moodle.
Turbo Server uses the open Learning Tools Interoperability (LTI) specification (version 1.0) to communicate with Moodle.
Getting Started
Download Moodle from moodle.org then follow the installation instructions.
Moodle requires the following to connect to Turbo Server Application:
- Consumer Key
- Shared Secret
- Tool Provider URL
The values can be obtained from the Turbo Server administrator site. Navigate to General > Learning Management System.
Adding Turbo to Moodle
Instructors will be able to add Turbo to their courses with a few clicks. Administrator privileges within Moodle are required.
Navigate to Site administration > Plugins. Navigate to Manage tools, listed under Activity modules > External tool.
Select configure a tool manually.
Fill in the following fields:
- Tool name: “Turbo.net”
- Tool URL: enter the Tool Provider URL from the Turbo Server administrator site
- LTI version: LTI 1.0/1.1
- Consumer key and Shared secret: enter values from the Turbo Server administrator site
- Tool configuration usage: “Show as preconfigured tool when adding an external tool”
- Under Show more…
- Icon URL and Secure icon URL: https://start-c.turbo.net/images/turboiconlarge.png
- Privacy > Share the launcher’s name with tool: Always
- Privacy > Share the launcher’s email with tool: Always
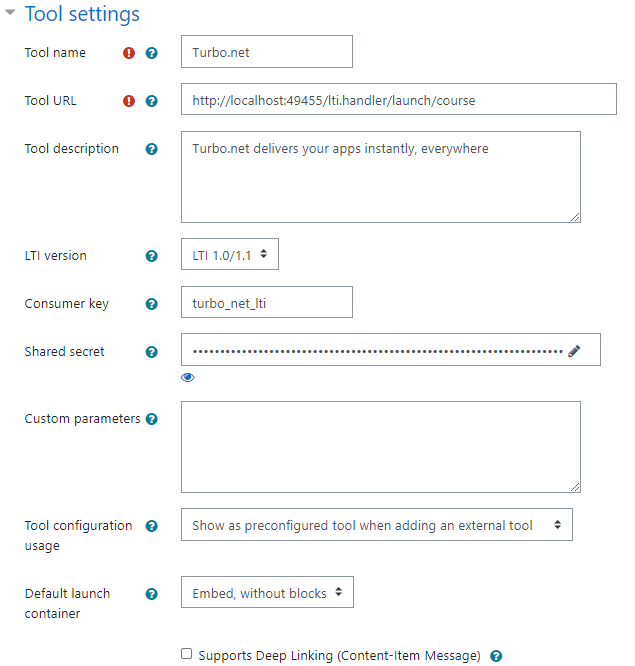
Activate Turbo on a Course
Turbo must already be configured by a Moodle administrator. Instructor level privileges are required for the course.
Browse to the desired course in Moodle. Select Turn Editing On.
Locate the place Select + Add an activity or resource.
Under Activities, select External tool.
Under General, select Turbo.net from the Preconfigured tool dropdown. Set Activity Name to Turbo.net.
Click Save and return to course.
Configure Turbo for a specific Course
If Turbo has not been configured site-wide by a Moodle administrator, instructors can configure Turbo specifically for their course. Instructor level privileges are required for the course.
Browse to the desired course in Moodle. Select Turn Editing On.
Locate the place Select + Add an activity or resource.
Under Activities, select External tool.
Under General, click Show more… and configure as follows:
- Activity name: Turbo.net
- Preconfigured tool: “Automatic, based on tool URL”
- Tool URL and Secure tool URL: set both to the Tool Provider URL from the Turbo Server administrator page
- Consumer key and Shared secret: enter values from the Turbo Server administrator site
- Icon URL & Secure Icon URL: https://start-c.turbo.net/images/turboiconlarge.png
Under Privacy, ensure “Share launcher’s name with tool” and “Share launcher’s email with the tool” are both checked.
Click Save and return to course.
5.12 Optimization
The following document describes optimizations that can be made to improve Turbo Server performance.
Memory
Memory sharing can be optimized for applications that have large memory requirement. Turbo can utilize Window's dll and exe sharing by using the precache command. This will reduce the startup time and memory consumption of applications ran by different users on the application server.
For example, to allow dll and exe memory sharing for the application MATLAB:
# Verify the image has been pulled and cached locally
> turbo images
1a2b3c  mathworks/matlab

# Run the precache command
> turbo precache mathworks/matlab
Using VM 20.6.1523 from local
Using image clean:30 from local
Using image matlab from local
Precaching assemblies in mathworks/matlab
Precached 3023 files in 0:00:37.2151653
Next, enable the Enable Assembly Cache setting under the workspace application's general tab from the admin site.
Networking
Maximum Number of Request Threads
Turbo Server runs an Apache reverse proxy to various web services such as APIs and the Portal site. This proxy is configured with a maximum number of request threads. If the number of concurrent connections exceeds this value, then incoming requests will hang until Apache is able to service them. For example, this may surface to an end user as a hang when accessing the external Portal URL.
Each thread incurs a fixed startup memory cost in addition to a maximum runtime memory usage, which varies based on configuration and workload, so be mindful not to set this setting beyond your server's capacity. To support an even larger number of concurrent requests, we recommend looking into Load Balancing.
Turbo Server administrators may configure this setting through the admin command-line interface using the following command:
Server.exe admin global request-threads 2000
For more information on using the admin CLI, see Command Line Management
By default, this value is set to 2000 in Turbo Server 21.9 and later. Previous releases defaulted to 150.
This value maps to the mpm_winnt ThreadsPerChild setting.
Graphics
Graphic application routing support will be coming soon.
5.13 Advanced Topics
This section describes advanced topics you may encounter when implementing Turbo Server.
Extending Portal request timeouts
The Portal has a global request timeout that aborts HTTP requests after a certain amount of time. In Turbo Server 21.9.3284.5 and earlier, the Portal was configured with a default 30s request timeout. Future versions of the Portal are configured with a default 120s request timoeut.
If you wish to extend this default request timeout in Turbo Server 21.9.3284.5 and earlier, you may do so manually with the following steps:
- RDP onto your Portal server.
- Open an administrator command prompt and run the command:
<install path>\Server.exe /XShellEx=cmd, replacing<install path>with the install path of your Turbo Server. - In the new command prompt, run the command
notepad C:\portal\node_modules\turbo-web-core\build\http\httpHelper.js. - Search for the line
options.timeout = 1000 * 30;and replace it with your desired timeout in milliseconds. For example:options.timeout = 1000 * 60 * 3;. - Save the file, close notepad, and close the command prompts.
- Open Services from the start menu and locate
Turbo Server. Right-click it and click Restart. - Wait a few minutes for the Turbo service to restart, then load the portal website and confirm the change.
NOTE: This change only affects the Portal timeout and does not affect other services that impose timeouts such as the reverse proxy.
WARNING: This change will be lost when upgrading your Turbo Server. Please reapply the change after upgrade.
Override Single Sign-On Authentication Method
Internal Turbo Servers users may sign in to a Portal configured to use the single sign-on authentication method by appending the ?mode=forms URL parameter to the login page:
http://my-turbo-server/login?mode=forms
This override can be used when testing and troubleshooting the Turbo Server configuration.
Locale Settings
Turbo Server uses the service user's language and region settings to format user-facing dates, times, and other locale-sensitive data.
To update your locale settings:
- Login to your Turbo Server host machine as the service user.
- Open the Language control panel and confirm that the language pack for your desired language is installed. To install a missing language pack, add the language using Add a language and then click Options on the newly added language.
- Open the Region control panel and select your desired Format.
- Restart the Turbo Server service to apply your changes.
Change the Turbo Server Service User
The Turbo Server service user is specified during the initial Turbo Server install.
The service user can be set to a different account from the Services management console (services.msc). Locate the Turbo Server service and Right-click > Properties. In the Log On tab, enter the credential of the new account. Note that the service user requires the Log On As a Service right, which is automatically granted when you apply the change.

After changing the service user, update the security settings of the following file to grant Read and Write permissions for the new user and remove the rights of the old user:
- C:\ProgramData\Turbo Server\Settings.xml
Update the security settings of the following folders to grant the Write permission for the new user and remove the rights of the old user:
- C:\Windows\Microsoft.NET\Framework64\v4.0.30319\Temporary ASP.NET Files
- C:\ProgramData\Turbo Server\io (or the Hub Storage Path if set)
- C:\Program Files (x86)\Turbo Server\Sandbox (or the Turbo Server install directory\Sandbox folder if using a non-default install path)

The service user must also be a member of the Performance Monitor Users group so that it can collect and report server resource loads. For information on adding the service user to this group, see the Performance Counters documentation.
Finally restart the Turbo Server service for the changes to take effect.
Hide System Drives on Application Servers for Cloud Launches
Administrators can hide the application server's system drives to prevent users from accessing them when launching applications using the Run in Cloud launch modes by configuring the Drive Visibility setting in the Workspace Application Settings.
Note that configuring Drive Visibility will prevent PC Native Applications from seeing the binaries on the native filesystem if the setting is configured to hide the drive that the application is installed on. In this case, administrators may configure the following group policy to hide (but still access) the drive icons in the File Explorer dialog: User Configuration > Administrative Templates > Windows Components > File Explorer > Hide these specified drives in My Computer.
Command Line Management
The Turbo Server executable, server.exe, is located in the installation directory of Turbo Hub Server (usually C:\Program Files (x86)\Turbo Server). It has many administrative options that are accessible by using command line parameters.
When using the Turbo Server command line administrative tools, it is important to remember the following:
-
Run the command window as Administrator (right-click Run as Administrator).
-
When working in the command window place quotation marks around parameters and paths that include a space.
Server.exe Command Format
Server.exe can be used with the following arguments to manage provisioning, uninstall, upgrade, and service recycling:
|
Option |
Description |
|---|---|
|
|
Creates the Turbo Hub Server data and sites. For additional details use |
|
|
Uninstalls Turbo Hub Server. |
|
|
Restarts Apache web service gracefully. |
|
|
Installs native services. Valid options include: api, admin |
|
|
Uninstalls native services. Valid options include: api, admin |
|
|
Prints this usage information. |
install-services command
The install-services command installs the specified services, such as the API and Admin site IIS Express servers, onto the native environment. By default these services run in the virtual environment, however they can be installed natively to resolve certain issues such as antivirus incompatibility.
When a service is installed, the files required to run the service are copied out of the virtual environment and into a native service installation folder parallel to the Turbo Server installation folder. For example, if Turbo Server is installed at E:\Turbo Server, the native services will be installed at E:\Turbo Server Native.
Please note that it may take a couple minutes for these changes to take affect.
Server.exe admin Command Format
Server.exe can also be used to create and update applications, as well as to manage other server settings. This is done by specifying any of the given topics after the Server.exe admin command.
Server.exe admin --directory-services
|
Option |
Description |
|---|---|
|
|
Prints the current list of directory services. |
|
|
Creates a new directory service with default settings. |
|
|
Deletes the given service. |
|
|
Prints help information. |
Examples:
-
Print the current directory services:
Server.exe admin --directory-services
-
Create a new directory service with prefix "loc":
Server.exe admin --directory-services new loc
-
Delete the "loc" directory service:
Server.exe admin --directory-services delete loc
Server.exe admin --directory-service
|
Option |
Description |
|---|---|
|
|
Attempts to connect to local Active Directory. If it succeeds, the connection and schema settings are printed. |
Server.exe admin --directory-service <login prefix>
|
Option |
Description |
|---|---|
|
|
Prints the current settings for the directory service. |
|
|
Prints the current value of <property>. |
|
|
Sets the value of <property> to <value>. |
|
|
Imports the settings from a file, or standard input if no file is specified. Settings files are in the same format as the output of the print function. |
|
|
Attempts to connect to local Active Directory. If it succeeds, the connection and schema settings are printed. |
|
|
Scans the directory service for recommended schema settings. |
|
|
Prints the subdirectories within this directory service. |
|
|
Prints the user groups within this directory service. |
|
|
Synchronizes users and groups from the directory service. |
|
|
Prints the current synchronized items. |
|
|
Adds an item to be synchronized. |
|
|
Deletes all sync items. |
|
|
Prints help information. |
An external directory service may have particular configurations which a directory service must accommodate. In addition to standard settings like name and description, there are the following important categories of options:
-
Connection settings: host, port, binding type, username, password
-
Schema settings: user and group attribute names used by the external directory service
-
Synchronized items: if the entire external directory should not be imported, the items commands should be employed to add specific user groups or LDAP directories to include
The following examples describe a typical set of steps to set up a directory service for the local Active Directory.
-
Print the settings of directory service "ad":
Server.exe admin --directory-service ad
-
Change the name of directory service "ad":
Server.exe admin --directory-service ad name "Local Active Directory"
-
Dump the settings of directory service "ad" to a file:
Server.exe admin --directory-service ad print > ad-settings.txt
-
Discover the schema of directory service "ad":
Server.exe admin --directory-service ad discover
-
Copy/paste the recommended schema from the console to the ad-settings.txt file.
-
Print all the groups found in "ad":
Server.exe admin --directory-service ad groups
-
Specify a user group to be synchronized:
Server.exe admin --directory-service ad items add Group "cn=All,dc=acme,dc=com"
-
Set all the settings of "ad" from a file:
Server.exe admin --directory-service ad set ad-settings.txt
Server.exe admin --global
|
Option |
Description |
|---|---|
|
|
Prints the current global settings. |
|
|
Prints the current value of <property>. |
|
|
Sets the value of <property> to <value>. |
|
|
Prints help information. |
Examples:
-
Print the current settings:
Server.exe admin --global
-
Print the Default Launch Mode settings:
Server.exe admin --global default-launch-mode
-
Set the Default Launch Mode settings:
Server.exe admin --global default-launch-mode 2
Server.exe admin --hub
|
Option |
Description |
|---|---|
|
|
Prints the current hub settings. |
|
|
Prints the current set of API keys. |
|
|
Creates an API key with the given name. Specify "system" or "user" for the type of key to create. |
|
|
Regenerates the value of the API key with the given name. |
|
|
Deletes the API key with the given name. |
|
|
Builds an image from the specified file and adds it to the local repository |
|
|
Prints help information. |
Examples:
-
Print the current settings:
Server.exe admin --hub print
-
Add an API key:
Server.exe admin --hub key create "Test Lab Key" system
Server.exe admin --license
|
Option |
Description |
|---|---|
|
|
Prints the current license. |
|
|
Sets the license to the contents of the given text file. |
|
|
Prints help information. |
Examples:
-
Print the current license:
Server.exe admin --license print
-
Set the current license:
Server.exe admin --license set ss-license.txt
Server.exe admin --server
|
Option |
Description |
|---|---|
|
|
Prints the current primary server settings. |
|
|
Prints the current value of <property>. |
|
|
Sets the value of <property> to <value>. |
|
|
Prints help information. |
Examples:
-
Print the current primary server settings:
Server.exe admin --server
-
Print the root web address:
Server.exe admin --server <server-name> web-root
-
Set the root web address:
Server.exe admin --server <server-name> web-root https://acme/turbo
-
Set the SSL certificate file path:
Server.exe admin --server <server-name> ssl-certificate-file c:\programdata\acme\cert.txt
Server.exe admin --users
|
Option |
Description |
|---|---|
|
|
Prints the current users and groups. |
|
|
Changes the current authentication type. |
|
|
Gets or sets the number of days that a login ticket is valid when "remember me" is selected. The default is 1 week. The minimum value is 1 day. The maximum value is 200 years (73000 days). |
|
|
Prints help information. |
Examples:
-
Print information about current users and groups:
Server.exe admin --users
-
Change the authentication type to "Forms":
Server.exe admin --users authentication-type Forms
-
Change the login timeout duration to four weeks:
Server.exe admin --users ticket-timeout 40320
Server.exe admin --user-groups
|
Option |
Description |
|---|---|
|
|
Prints the current list of user groups. |
|
|
Creates a new user group with default settings. |
|
|
Deletes the given group. |
|
|
Prints help information. |
Examples:
-
Print the current groups:
Server.exe admin --user-groups
-
Create a new group with name "Power Users":
Server.exe admin --user-groups new "Power Users"
-
Delete group 2:
Server.exe admin --user-groups delete 2
Server.exe admin --user-group
|
Option |
Description |
|---|---|
|
|
Prints the current settings for the user group. |
|
|
Prints the current value of <property>. |
|
|
Sets the value of <property> to <value>. |
|
|
Imports settings from a file, or standard input if no file is specified. Settings files are in the same format as the output of the print function. |
|
|
Removes all members from the group. |
|
|
Prints help information. |
Examples:
-
Print the settings of group 2:
Server.exe admin --user-group 2
-
Print the properties and members of group 2:
Server.exe admin --user-group 2 print
-
Remove all members from group 2:
Server.exe admin --user-group 2 clear
Server.exe admin workspace app add [repoId] [workspace] --isolate=[isolation]
Adds application with repoId namespace/name:release to workspace. If workspace is ommited, then server attempts to add the application to the default workspace. Accepted values for the optional isolation flag are full, write-copy or merge.
Server.exe admin workspace app remove [repoId] [workspace]
Removes all applications with repoId namespace/name:release from the workspace. If workspace is ommited, then server attempts to remove all matching applications from the default workspace.
Server.exe admin workspace app list [workspace]
Lists applications in a workspace. Lists the default workspace if workspace is ommited. The workspace application ID and display name is printed.
> Server.exe admin workspace app list default
32 Adobe Reader
33 Chrome
34 Firefox
35 Microsoft Excel
36 Microsoft Word
37 Microsoft Project
38 Power BI Desktop
40 qBittorrent
41 Explorer
42 Chrome
44 Paint
Server.exe admin workspace app settings [appId]
Set and prints settings for a workspace application. Ommit flags to print the current settings. Use the numerical application ID.
> Server.exe workspace app settings 32 --persistence=false --isolation=full --app-title="Adobe Reader" --ad-groups=sales,engineering --components=google/chrome --mounts=c:\users\demo\downloads=c:\users\demo\downloads,c:\temp=c:temp
  Application settings for application ID 32:
  ad-groups=sales,engineering
  app-title=Adobe Reader
  components=google/chrome
  isolation=full
  mounts=c:\users\demo\downloads=c:\users\demo\downloads,c:\temp=c:temp
  persistence=False
Federation
Understanding Federation
Federation feature allows distributing hub servers across different regions to achieve faster streaming for end users and allows higher availability by redundancy. Federation works by assigning a root server from which the child hub servers to copy repositories from.
Federation child communicates with the root server using an API key which is a secret key between the servers. API keys can be disabled and recreated on demand from the admin user interface to ensure repository access to the server is secure. API keys can be configured to grant low privilege tokens which ensure the key is used only to read repository data from the root server.
Federation repositories can be explicitly cached and synchronized on the child hub by adding them from the federation repository page. Federation repositories can also be automatically forwarded to the root server by using request forwarding. Request forwarding is achieved by forwarding https requests to the root hub.
If the root hub is unavailable due to network outage or maintenance, the child hub will continue to service requests against explicitly synchronized repositories without any downtime to the end users. Request forwarding will be temporarily unavailable. If the child hub becomes unavailable, then the end users will only be able to use their locally cached applications.
Configuring Federation
Follow the documentation to setup a Hub Server and your repositories to the hub. The server which will contain the source of the repositories will be called the root server.
-
Setup an API Key
On the root server, navigate to
https://{root}/admin/hub/keys.aspx. Add an API Key with a descriptive name such as "Federation Key for {child}".Run as systemsetting is not required. Copy the generated API key. -
Add the federation source to child hub
On the child hub(s), navigate to
https://{child}/admin/hub/federationsource.aspx. Change theHubtext box to theroothub host's URL. Add the previously copied API Key and press save. -
Add a federated repository
Navigate to
https://{child}/admin/hub/federation.aspx. Add a federated repository by using the repository identifiernamespace/name(example:mozilla/firefox), and press save. The repository should begin to synchronize immediately with the status displayed on the federation page. -
Use the federated repository
Once the repository has finished synchronizing, you may begin using the repository on the child server from a workspace.
You can also install the repository image directly using the turbo cli on the user's machine.
turbo config --hub={child}
turbo login {user}
turbo installi namespace/name
The application should be available from the start menu.
Launch Configuration Web Service
The launch configuration web service provides storage for application configurations which may be used to execute applications from a custom web portal using turbo urls. If the Turbo Portal is used as your application portal, this service is not necessary.
Enabling the Launch Configuration Web Service
The launch configuration service may be configured using the API Keys form on the admin site.
In this example, the authentication key is set to F207AC681BBD40A0BF56ECF95B344EBC. This value is required to be passed to all POST requests to the service in the X-Config-Api-Key HTTP header. The authentication key can be any string value but should be something long and randomly generated.
NOTE: It is important that this authentication key be kept secret to prevent unauthorized users from generating malicious application configurations. Any usage of the key or the code to submit a configuration must be done on the web portal's server side code (not in the browser client where a user can retrieve the key).
Submitting a Application Configuration
To submit an application configuration, a simple web POST such as shown in the follow example may be used:
// Create an application configuration object using either the workspace application id or repository id.

// Example 1: Use a workspace application id to create an application configuration with the workspace application settings as defaults.
// This example assumes a workspace application with the id `716b5ebc-6588-4c54-b74b-4506bbc968d3` already exists. The application id may be found in the URL path of the workspace application's settings page.
var appConfig = { appId: "716b5ebc-6588-4c54-b74b-4506bbc968d3" };

// Example 2: Use a repository id to create an application configuration with default settings.
// This example assumes a repository with the id `gnu/wget` already exists. The repository id may be found in the administration site repository settings page.
var appConfig = { repoId: "gnu/wget", "v": 1, verb: "run", isolation: "write-copy" };

// submit the application configuration to the service
var request = new XMLHttpRequest();
request.open("POST", "http://[hub-server]/start/app");
request.setRequestHeader("Content-Type", "application/json");
request.setRequestHeader("X-Config-Api-Key", "F207AC681BBD40A0BF56ECF95B344EBC");
request.send(JSON.stringify(appConfig));
request.onreadystatechange = function () {
   if(request.readyState === 4) {
      if(request.status === 200) {
         console.log(request.responseText);
      }
      else {
         console.log("request failed with status code: " + request.status);
      }
   }
};
Submit a POST request to the web service with the configuration json string, note the required request headers of Content-Type and X-Config-Api-Key. The response json contains a set of turbo urls that can be used to execute the application from the browser, for example:
{
   "url": "turbo://[hub-server]/start/app?t=config&h=sha256:66a123724dd6f8fb5ee050644a5494795fed2a1901d0c56def4030d8a6a26175&scheme=http&v=2",
   "urlInternal": "turbo://[hub-server]/start/app?t=config&h=sha256:66a123724dd6f8fb5ee050644a5494795fed2a1901d0c56def4030d8a6a26175&scheme=http&v=2"
}
Once submitted, the configuration will be available for the configured timeout period. This can be set on the server administration website (the default is 24-hour). The timeout is reset whenever the configuration is retrieved.
You may also lookup configs from the launch configuration service by performing a GET request on the same URL with an HTTP/S scheme, for example:
http://[hub-server]/start/app?h=sha256:66a123724dd6f8fb5ee050644a5494795fed2a1901d0c56def4030d8a6a26175&scheme=http&v=2
Executing an Application Configuration
// open turbourl to config
var url = "turbo://[hub-server]/start/app?t=config&h=sha256:66a123724dd6f8fb5ee050644a5494795fed2a1901d0c56def4030d8a6a26175&scheme=http&v=2";
window.open(url);
To execute a submitted configuration file, you must use a turbo protocol url. Your web portal can open these turbo urls to attempt to execute the configuration. The turbo protocol is handled by the Turbo Client if installed and will execute the configuration that it points to.
The first time you attempt to open a turbo url, the browser will show a security message like the following (each browser is different). The user can choose to hide future messages for turbo urls.

After the turbo url is allowed by the browser, a security message from the Turbo Client will be shown (see below). This message is to ensure that the user trusts the hub that the container is coming from. It is important that user do not execute containers from untrusted hubs. The user can choose to run this instance or trust all instances from the same hub.

After this the user will be prompted to login if necessary. Once logged in (or if login is not necessary), the container will execute.
Application Configuration JSON Format
{
   // The configuration JSON format version, defaults to the latest.
   "v": 1,

   // Hub repository image. A repoId or appId is required.
   "repoId": "mozilla/firefox",

   // The application ID. A repoId or appId is required.
   "appId": "716b5ebc-6588-4c54-b74b-4506bbc968d3",

   // Specifies a version of the repo to run.
   "appVersion": "3.5",

   // Specifies the display name title for this application session.
   "appTitle": "Firefox 3.5",

   // Container name generated for the application
   "containerName": "Firefox",

   // Enables vm diagnostics
   "enableDiagnostics": false,

   // The turbo command used to execute the application. Possible values are "try", "run", and "new". Required.
   "verb": "try",

   // Options for installing the application.
   "integrationFlags": 0,

   // Whether network isolation is enabled in the container. Optional, default is false.
   "isolateNetwork": false,

   // The isolation mode to run in. These are the same as those that can be passed to turbo run commands with `--isolate` flag. Optional, default is "full".
   "isolation": "full",

   // Allows merge access to special user folders such as documents. Optional, default is false.
   "mergeUser": false,

   // List of paths to mount during the session
   // Example: [{"sourceContainerId": <string>, "sourcePath": <string>, "targetPath": <string>}]
   "mounts": [],

   // List of network routes
   // Example: [{"rule": <string>, "type":<string>}]
   "routes": [],

   // Active directory permissions
   "adConfig": {"domainPermissions": [], "groupPermissions": []},

   // A list of network mappings. Optional, default is empty.
   // Example: routes:[{"rule":"ip","type":"deny"},{"rule":"ip://*.turbo.net","type":"allow"}],
   "routes": [],

   // A list of additional image repository IDs that are permanently layered in to the container. Optional, default is empty.
   // Example: layers: [{"repoId":"npp/notepadplusplus","enabled":true}],
   "layers": [],

   // Overrides the default startup file. Optional, default is no override.
   "startupFile": "cmd.exe",

   // Overrides the default startup verb. Default is 'open'.
   "startupVerb": "open",

   // Command line parameters that are passed to the startup file of the container. Optional, default is empty.
   // Example: cmdLineArgs: "echo test",
   "cmdLineArgs": "",

   // Automatically synchronizes the application state and settings with the Turbo Hub server. Optional, default is false.
   "sync": true,

   // Enables pre-caching of application DLL and EXE files on the Application Servers’ local disk for faster loading. Optional, default is false.
   "enableAssemblyCache": false,

   // Specifies drive visibility in the virtual application using the format: <*|V:|-V:>[,...]. Optional, default is *,-T:.
   "hideDrive": "*,-T:",

   // Specifies user's display name where appropriate
   "overrideUserDisplayName": "user",

   // The VM version is a version string that specifies which Turbo VM version will be used for execution. Optional, default is latest.
   "vm": "19.6.1427.29"
}
Hub Storage
The Hub Server stores repositories and sessions in a file system based database. The database is located under the path C:\ProgramData\Turbo Server\io (formerly C:\turbo-server\io). Administrators should back up that folder in case of drive failure.
The legacy default folder C:\turbo-server\io is a virtualized folder, which will store files in the Turbo Server installation folder sandbox. In addition, any folder under the installation folder will be virtualized and stored in the sandbox. It is recommended to migrate to a folder outside of any virtualized folders.
The recommended action to migrate the legacy Hub storage is to clear the Hub storage setting field which will migrate the data to the new default folder (C:\ProgramData\Turbo Server\io). Prior to migration, please ensure that the Hub storage has been backed up in case of unexpected failures, and that there is enough room in the destination drive.
Image Streaming
By default Application Servers download the application images from Hub before running them. It is however possible to stream the images directly from Hub. To configure the streaming, follow the steps listed below.
1. Prepare a file share on Hub
The first step is to create a file share where Hub will store the images. Clients will use it as an image cache. For this document, let's assume we want to use the path D:\image-share. It is available for client machines as a Windows share at an address \hub\share (hub is the name of Hub in the internal network).
2. Configure the image cache on Hub
Now, it’s time to configure Hub. Sign in as an administrator, go to the Server list and click on the server in the hub role. Scroll to the bottom, and there should be an Image Path section. You need to type there the local path of the share folder with images subfolder. In our example, it will be:
After saving the settings, Hub will restart, and new images will automatically appear in the image cache.
3. Configure the image path on the clients
To enable streaming, we need to configure the clients to use the hub image cache. It is as simple as running: turbo config --image-path=\\hub\share --all-users.
Side note:
The latest Turbo client (19.12.2108) added new options for configuring the machine-scope client settings. The --all-users flag behavior is inconsistent between various commands. Thus we introduced a TURBOAS environment variable to define the scope of the running commands. For example, to set the image-path globally, you may run the following commands in PowerShell:
$env:TRUBOAS=”all-users”
turbo config --image-path=\\hub\share --as-override (if you want to allow users to change this setting, use --as-inherit)
4. Use the stream (turbo run/installi)
With the image path configured, you may use turbo run or installi on the clients’ machines, and they should directly use the images from the image cache.
Secure Sockets Layer (SSL)
Testing HTTPS (SSL) with a Self-Signed Certificate
Follow these steps to test Turbo Hub Server with SSL enabled using a self-signed certificate.
-
Configure the container server to use HTTPS/SSL with the Turbo Hub Server command line administration utility.
# change hub url to use https > server.exe admin /server web-address https://[hub-server-host] # set certificate files > server.exe admin /server ssl-certificate-file [path to .crt file] > server.exe admin /server ssl-certificate-key-file [path to .key file] # set the certificate key chain file if required by the certificate > server.exe admin /server ssl-certificate-chain-file [path to chain file] -
On the client machine, double-click on your certificate.crt file to install it in the "Trusted Root Certification Authorities for Windows"
-
Access the hub using the Turbo Client command line tools, Turbo Launcher, or connected Turbo Streaming Server portal.
Disabling TLS/SSL certificate validation on Portal requests
The Portal performs TLS/SSL certificate validation when making TLS connections, rejecting connections with expired or otherwise invalid certificates.
If you wish to disable certificate validation, you may do so manually with the following steps:
- RDP onto your Portal server.
- Open an administrator command prompt and run the command:
<install path>\Server.exe /XShellEx=cmd, replacing<install path>with the install path of your Turbo Server. - In the new command prompt, run the command
notepad C:\portal\build\main.js. - At the top of the file, add the line:
process.env.NODE_TLS_REJECT_UNAUTHORIZED = '0';. - Save the file, close notepad, and close the command prompts.
- Open Services from the start menu and locate
Turbo Server. Right-click it and click Restart. - Wait a few minutes for the Turbo service to restart, then load the portal website and confirm the change.
WARNING: Disabling TLS/SSL certificate validation allows the Portal to make insecure HTTPS requests and is strongly discouraged in production environments.
WARNING: This change will be lost when upgrading your Turbo Server. Please reapply the change after upgrade.
Security
Configure Turbo Server Security
This section explains how to manually configure Turbo Server's security settings on common Microsoft Windows platforms. These settings restrict external connections to the Turbo Server sites and services.
To secure the Turbo Server, enable Microsoft Windows Firewall with Advanced Security. The default settings of Microsoft Windows Firewall with Advanced Security block all external connections to the Administration and Portal Sites (assigned to port 80 by default). After Microsoft Windows Firewall with Advanced Security is enabled, add exceptions to the default settings to provide licensed users with access the Hub Site.
Complete the following steps to enable Microsoft Windows Firewall with Advanced Security for access to the Hub Site:
-
Open the Control Panel and select System and Security.
-
Open Administrative Tools, then select Windows Firewall with Advanced Security.
-
Select Inbound Rules and choose New Rule.
-
Select Port.
-
Select TCP and Specific local ports. Add the ports required by your server role as described in Firewall and Security.
-
Select Allow the Connection.
-
Select the domain, private, and public profiles.
-
Add a name and description.
Setup
Turbo Hub Server enables you to configure settings during setup. Using this process you can control the database connection strings used by Turbo Hub Server and the domain names for the Administration and Hub Sites. Turbo Hub Server supports the use of any connection string format used by Microsoft SQL Server.
Complete the following steps to install Turbo Server:
-
Download the Turbo Hub Server setup file and save it locally.
-
Open a Microsoft Windows Command Prompt and navigate to the directory of the saved setup file.
-
Enter the following command:
Setup.exe /noprovision. This brings up a file installation wizard. Navigate through the prompts until file installation is complete, and then select Finish.
Complete the following steps to manually configure Turbo Server:
-
Return to the Microsoft Windows Command Prompt and navigate to the directory where the installation files are saved. You specified this location in the previous step; the default location is C:\Program Files\Turbo Server.
-
To manually configure Turbo Hub Server, type the command: Server.exe /provision [ADMINISTRATOR EMAIL]. Add any of the optional command-line arguments from the following table. Omitting any command-line arguments causes the default setting to apply.
|
Command Line Argument |
Setting |
|---|---|
|
|
Configures the connection string for the library database where settings and user information is stored. |
|
|
Configures the connection string for the manager database where usage information is stored. |
|
|
Assigns the port and fully qualified domain name for the hub site. |
|
|
Assigns the port and fully qualified domain name for administration site. |
The following is a sample command to set all four settings:
server.exe /provision admin@acme.com /dblibrary "Integrated Security=true;Data Source=acme;Initial Catalog=Library;" /dbmanager "Integrated Security=true;Data Source=acme;Initial Catalog=Manager;" /wwwsite http://www.acme.com /adminsite http://www.acme.com:81
Note: The Microsoft SQL Server connection string will depend on the Microsoft SQL Server configuration. For more information about the connection string, contact the database administrator. Before configuring the Turbo Server, confirm that the running user for the Windows service has appropriate access rights to the database. The service runs under the Local System account by default but the running user can be changed in the Windows services settings.
Select Enter to submit the command and choose Y to proceed.
Fully-qualified domain names can be specified on the Domain page of the Administration Site. For more information about modifying servers refer to Managing the Domain.
5.14 Troubleshooting
Application Streaming
The following documentation describes commonly encountered issues when streaming a remote application using Run In Cloud (HTML5/Native) and how to resolve them.
Application immediately closes after initial splash screen in Cloud HTML5 or Cloud Windowed mode
Microsoft RemoteApp disconnects sessions after the initial window is shown then dismissed, and no subsequent windows are shown after a short timeout. Remove any custom splash screens that may cause the timeout to happen, as Turbo will automatically detect the first shown window and delay the timeout as appropriate. If the application itself has transition delays between its windows, then a custom solution may be required. Please contact support@turbo.net. See the Microsoft Documentation for more information.
Users are unable to launch more than one application at a time
This behavior is determined by the Restrict Remote Desktop Services users to a single Remote Desktop Services session Group Policy setting on the Application Server that is running the applications.
If this setting is enabled, users who log on remotely by using Remote Desktop Services will be restricted to a single session (either active or disconnected) on that server. If the user leaves the session in a disconnected state, the user automatically reconnects to that session at the next logon.
If this setting is disabled, users are allowed to make unlimited simultaneous remote connections by using Remote Desktop Services.
To allow users to run multiple applications concurrently, ensure that this group policy setting is disabled.
Applications take a long time to start during application server user profile logon
The application server generate temporary windows profiles and should be fast to logon after the temporary profile has been created. If using kerberos or ask for login mode, the application servers may attempt to load the user profile from the network using roaming profiles or user profile disks. This is unecessary since Turbo will handle the application data caching and sychronization under the application settings. Disable roaming profiles and user profile disk.
Application launches and synchornization is slow
The hub server or application servers may be running anti virus scans. Log in to the servers and check the server CPU / disk utilization.
Applications launch with non-tunneled connections, but stay at starting/connecting with tunneled connections
Tunneled connections send application streaming traffic through the Broker service. This extra network hop may cause issues depending on your environment's network and security settings. By default, both HTML5 and native streaming clients use tunneled connections.
Please check your antivirus and load balancing software for packet filtering or software whitelists that may be blocking Turbo traffic, and check their logs for more detailed information about the blocked traffic. If this problem persists, please contact Turbo support.
The service is not available. Please try again or contact your administrator for assistance. NResult error code: -1
The RDS connection failed with error. Open the application server's log file in C:\Program Files (x86)\Turbo Server\Logs\rdpproxy.log.
The following log indictates the failure was caused by blocking NTLM traffic on the server:
12:20:15.569 000033fc [rdpNego         ] state: NEGO_STATE_FINAL
12:20:15.569 000033fc [rdpNego         ] Negotiated NLA security
12:20:15.569 000033fc [rdpNego         ] nego_security_connect with PROTOCOL_NLA
12:20:15.569 000033fc [rdpTls          ] TLS handshake started
12:20:15.632 000033fc [rdpTls          ] TLS handshake finished
12:20:15.632 000033fc [nla             ] SPNEGO failed with NTSTATUS: 80090302
12:20:15.632 000033fc [rdp             ] rdp err -2146893054
12:20:15.632 000033fc [rdp             ] unhandled -2146893054, returning generic fail
12:20:15.632 000033fc [rdpNego         ] Failed to connect with NLA security
12:20:15.632 000033fc [rdpConnection   ] Error: protocol security negotiation or connection failure -1
To resolve the issue, configure the server according to the Network Security documentation.
Cloud HTML5 client application launches are interrupted by a reconnection message
The HTML5 client opens a websocket connection to the Broker service that streams the application session. If this websocket is closed unexpectedly, the HTML5 client will attempt to reconnect and show a reconnecting message to the user.
This websocket connection uses the Domain URL configured in Turbo Server. If the Domain URL points to a load balancer, then this connection is subject to the load balancer's request timeout configurations. If this request timeout is equal to or less than the HTML5 client websocket keep-alive interval (30s), then the websocket connection will be closed prematurely and a reconnection will occur. For example, the Azure Application Gateway has a Backend Request time-out setting that controls this timeout.
If you are expericing this issue and you are using a load-balanced Domain URL, please ensure that the request timeout configurations are greater than 30s to resolve this issue. We recommend a timeout of at least 60s.
Websocket Tunnel Reconnection Error
The remote application tunnel failed to reconnect due to too many reconnection attempts.
Occurs when the client machine cannot access the Application server. For example, the client machine may be experiences a network issue or the Application server service may be down.
Please check your network connection and wait a few minutes, then relaunch the application. If the error persists, logon to the Application server and check that the Turbo.AppServer service is running.
Websocket Events Unauthorized
The events websocket failed to authenticate.
Occurs when the user's Portal login session is missing or invalid. For example, the user's login session may be expired, or the authentication key used to sign the user's login session may have changed.
To resolve this issue, please log out and back into the Portal and then relaunch the application.
Websocket Events Error
The events websocket connection could not be established.
Occurs during Portal service interruptions or connection errors. Please ensure that the portal is available and accessible by your browser.
Session Creation Repo Not Found
The requested repository could not be found. Please ensure that the repository exists on the Hub server.
You may manage your repositories from the administration site Hub page.
Session Creation Session Not Found
The remote session could not be found.
Occurs if the remote session is not present in the Broker cache. Please relaunch the application to create a new remote session.
Session Creation No RDP Hosts Available
No application servers are currently available. Occurs when there are no application servers running, or when the Broker service cannot access the application servers. Please refer to the Application Server troubleshooting documentation to diagnose.
Session Creation Bad Request
The remote session could not be created due to invalid arguments.
Occurs when the application configuration is missing or invalid.
Session Creation Unauthorized
The remote session could not be created due to an authentication failure.
Occurs when the user's Portal login session is missing or invalid. For example, the user's login session may be expired, or the authentication key used to sign the user's login session may have changed.
To resolve this issue, please log out and back into the Portal and then relaunch the application.
Session Creation Not Found
The remote session could not be created because the Broker service could not be found.
Please ensure that the Broker is available and accessible by the portal.
Session Creation Timed Out
The remote session could not be created due to a request timeout. This can occur if the Broker service is slow or unresponsive or if there is a network issue between the Portal and Broker services.
Please ensure that the Broker is available and accessible by the Portal and then relaunch the application.
Session Creation Unavailable
The remote session could not be created due to Broker service availablility.
Occurs when the Broker service is restarting.
Please wait a few minutes for the Broker service to become available and then relaunch the application.
Session Creation Error
The remote session could not be created due to an unknown server error.
Occurs when the application or broker server is unavailable. Please refer to the Application Server troubleshooting documentation to diagnose.
Launch Configuration Bad Request
The launch request could not be created due to invalid arguments.
Occurs when the application configuration is missing or invalid.
Launch Configuration Unauthorized
The launch request could not be created due to an authentication failure.
Occur when the user's Portal login session is missing or invalid. For example, the user's login session may be expired, or the authentication key used to sign the user's login session may have changed.
To resolve this issue, please log out and back into the Portal and then relaunch the application.
Launch Configuration Not Found
The launch request could not be created because the API service could not be found. Please ensure that the API service is available and accessible by the portal.
Launch Configuration Timed Out
The launch request could not be created due to a request timeout. This can occur if the Broker service is slow or unresponsive or if there is a network issue between the Portal and Broker services.
Please ensure that the Broker is available and accessible by the Portal and then relaunch the application.
Launch Configuration Unavailable
The launch request could not be created due to API service availablility.
Occurs when the API service is restarting.
Please wait a few minutes for the API service to become available and then try relaunching the application.
Launch Configuration Error
The launch request could not be created due to an unknown server error.
Turbo Client Not Found
The remote application failed to launch because the Turbo Client was not found on the application server. The Turbo Client may be missing due to an installation failure, a change to the Turbo Client install or path, or missing registry keys for RemoteApp.
To resolve this issue, please reinstall the Turbo Server on the application server. After install, the Turbo Client install directory should be added to the Windows PATH and it should contain "turboplay.exe".
Ensure the following registry keys are on the system:
[HKEY_LOCAL_MACHINE\SOFTWARE\Microsoft\Windows NT\CurrentVersion\Terminal Server\TSAppAllowList\Applications\turbo]
"CommandLineSetting"=dword:00000001
"Path"="C:\\Program Files (x86)\\Turbo\\Cmd\\turbo.exe"
"turboplay"=""

[HKEY_LOCAL_MACHINE\SOFTWARE\Microsoft\Windows NT\CurrentVersion\Terminal Server\TSAppAllowList\Applications\turboplay]
"CommandLineSetting"=dword:00000001
"Path"="C:\\Program Files (x86)\\Turbo\\Cmd\\turboplay.exe"
"turboplay"=""

[HKEY_LOCAL_MACHINE\SOFTWARE\Microsoft\Windows NT\CurrentVersion\Terminal Server\TSAppAllowList\Applications\turbow]
"CommandLineSetting"=dword:00000001
"Path"="C:\\Program Files (x86)\\Turbo\\Cmd\\turbow.exe"
"turboplay"=""
RDP Error Code Reference
The following are RDP logon or disconnection errors that can cause the connection to the remote application to fail. These error codes may be found in the Details section on the HTML5 launch error page.
disconnectReasonByServer
Remote disconnection by server.
This may indicate that the Windows user does not have permission to login remotely to the application server. Please make sure that the Windows user is part of the Remote Desktop Users group:
- Log on to the application server.
- Open Server Manager and click on Tools > Computer Management.
- From the Computer Management window, click on Local Users and Groups > Users.
- Right-click on the user that was listed in the HTML5 error details and click Properties.
- Click on the Member Of tab and check that the Remote Desktop Users group is listed.

- If the group is not listed, click Add and enter
Remote Desktop Users, then click OK.
disconnectReasonLicensingFailed
Occurs when license negatiation failed due to an expired or invalid RDS license. Please make sure that the RDS license installed on the application server is valid.
For information on setting up RDS licensing, please refer to the Microsoft documentation.
ERRINFO_RPC_INITIATED_DISCONNECT
The disconnection was initiated by an administrative tool on the server in another session.
Occurs when an administrator manually disconnects the user, or a script running as an administrator disconnects the user.
ERRINFO_RPC_INITIATED_LOGOFF
The disconnection was due to a forced logoff initiated by an administrative tool on the server in another session.
Occurs when an administrator manually logs off the user, or a script running as an administrator logs off the user.
ERRINFO_IDLE_TIMEOUT
The idle session limit timer on the server has elapsed.
This timeout is controlled by the Set time limit for active but idle Remote Desktop Services Group Policy setting. The default value set by Turbo Server is 21600000 milliseconds.
To configure this timeout, see Streaming for more information.
ERRINFO_LOGON_TIMEOUT
The active session limit timer on the server has elapsed.
This timeout is controlled by the Set time limit for active Remote Desktop Services sessions Group Policy setting. The default value set by Turbo Server is 21600000 milliseconds.
To configure this timeout, see Streaming for more information.
ERRINFO_DISCONNECTED_BY_OTHERCONNECTION
Another user connected to the server, forcing the disconnection of the current connection.
Only one connection is allowed at a time per user per application per application server.
To resolve this issue, close all open connections by the user and then relaunch the application.
LOGON_FAILED_BAD_PASSWORD
The logon failed because the logon credentials are not valid.
For non-temporary user authentication, such as Ask and Kerberos, this indicates that the user provided an incorrect password.
For temporary user authentication, this indicates that the temporary login credentials cached by the Broker service differ from the Windows login credentials. This may occur due to manual accounts changes, or due to a Broker service error causing the login credentials to get out of sync.
To resolve the issue:
- Restart the Turbo Server service on all Portal instances to clear the Broker service cache.
- If the error persists, delete the temporary Windows account and then restart the Turbo Server services on the Portal(s) again. The Broker service will recreate the temporary user the next time the user runs an application.
STATUS_LOGON_FAILURE
The attempted logon is not valid. This is due to either an incorrect user name or incorrect authentication information.
For temporary user authentication, this indicates that the temporary login credentials cached by the Broker service differ from the Windows login credentials. This may occur due to manual accounts changes, or due to a Broker service error causing the login credentials to get out of sync.
To resolve the issue:
- Ensure the Turbo.AppServer service is running on the application server. Restart the service if it was running but encountering an error.
- Restart the Turbo Server service on all Portal instances to clear the Broker service cache.
- If the error persists, delete the temporary Windows account and then restart the Turbo Server services on the Portal(s) again. The Broker service will recreate the temporary user the next time the user runs an application.
STATUS_PASSWORD_MUST_CHANGE
The user must update their password to continue logging on.
To manually remove this login requirement from a user:
- Log on to the application server.
- Open Server Manager and click on Tools > Computer Management
- From the Computer Management window, click on Local Users and Groups > Users.
- Right-click on the user that was listed in the HTML5 error details and click Properties.
- Uncheck the User must change password at next logon setting.
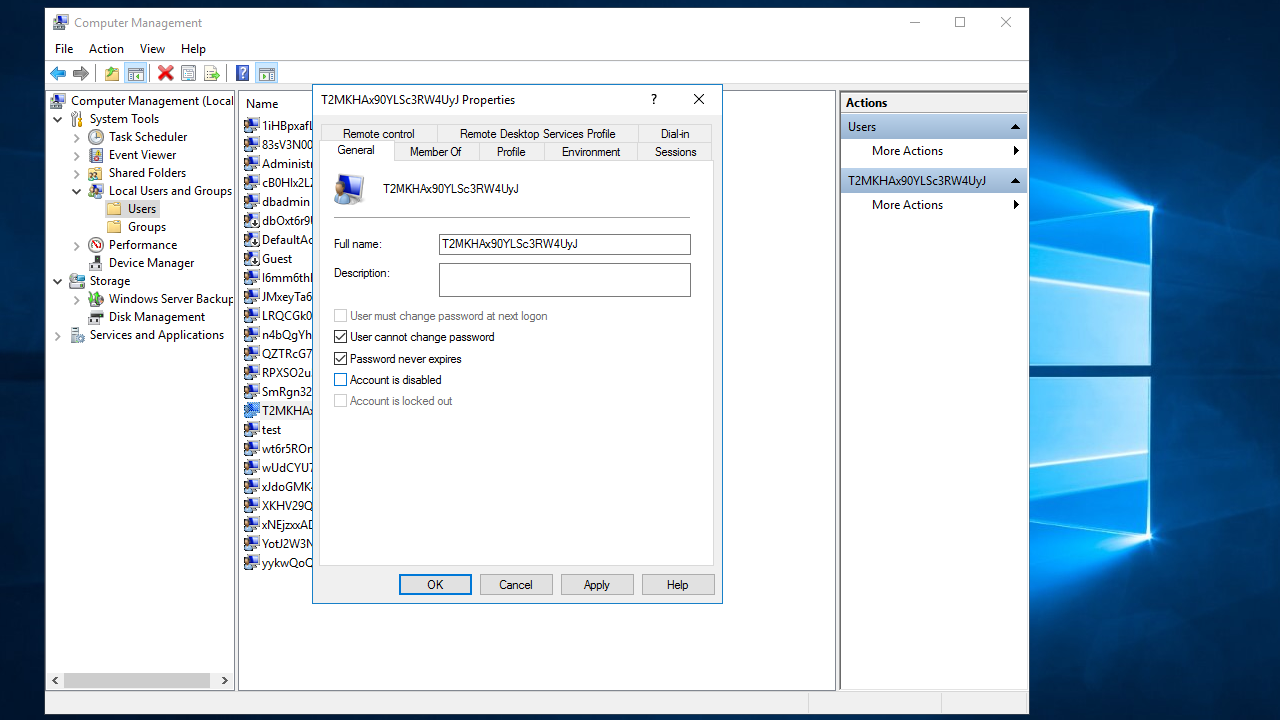
SSL_ERR_ACCOUNT_DISABLED
The Windows account that is running the remote application session is disabled.
To manually enable a user:
- Log on to the application server.
- Open Server Manager and click on Tools > Computer Management.
- From the Computer Management window, click on Local Users and Groups > Users.
- Right-click on the user that was listed in the HTML5 error details and click Properties.
- Uncheck the Account is disabled setting.
SSL_ERR_ACCOUNT_LOCKED_OUT
The Windows account that is running the remote application session is locked out.
Account lockout is controlled by the Account lockout threshold Group Policy setting. If you wish to change your account lockout behavior, please update your Group Policy setting:
To manually update a user's lockout status:
- Log on to the application server.
- Open Server Manager and click on Tools > Computer Management.
- From the Computer Management window, click on Local Users and Groups > Users.
- Right-click on the user that was listed in the HTML5 error details and click Properties.
- Uncheck the Account is locked out setting.
SSL_ERR_PASSWORD_EXPIRED
The Windows account that is running the remote application session has an expired password.
Account password expirations are controlled by the Maximum password age Group Policy setting. If you wish to change your account password expiration behavior, please update your Group Policy setting:

To manually set a user's password to never expire:
- Log on to the application server.
- Open Server Manager and click on Tools > Computer Management
- From the Computer Management window, click on Local Users and Groups > Users.
- Right-click on the user that was listed in the HTML5 error details and click Properties.
- Check the Password never expires setting.
Users are unable to see the HTML5 file upload explorer
HTML5 file integration may not function properly if the down-level domain is entered along with a UPN. Please ensure the user enters the correct login format when running applications that require login, e.g: domain\user, user@domain.com.
The server denied the connection
The launch fails because the Remote Desktop Connection Broker service is not running or has not fully initialized yet.
When this occurs, errors will be present in Event Viewer at Server Roles\Remote Desktop Services1.
Possible causes:
- The service needs to finish initializing after a system reboot.
- The service has been stopped.
- The service may fail to start on reboot due to sluggish performance.
- The service cannot allocate the required memory.

Resolution:
Ensure this service is started and operating properly.
Application Issues
If your application fails to start when launched from the Turbo Server workspace, identify what causes the failure.
Test Known Application
Confirm that there isn't a problem with Turbo Server by launching an application that is known to work.
A good example is npp/notepadplusplus from Turbo.net Hub, which can be added to Turbo Server from Admin > Hub > Add Repository > Import Repository.
If this application fails similarly, then the problem is likely with Turbo Server rather than the application configuration. In this case, see the Application Server Troubleshooting section.
If the issue is isolated to your application, see the Application Troubleshooting section.
Launch Modes
Check the application behavior in each launch mode by right-clicking on the application in the workspace and selecting Run in Cloud (HTML5), Run in Cloud (Windowed), and Run on My PC.
If the application works in HTML5 but not Windowed mode (or vise versa), it is likely a bug in the Turbo Server or Client. Please report the issue to us.
If the application works with Run in Cloud but not Run on my PC, it is probably an application issue. See the Application Troubleshooting section.
If the application works with Run on my PC but not Run in Cloud, test an application that is known to work to determine if the issue is with the server or application configuration.
Command-Line Launch
Run the application from the command-line by opening a command prompt and executing the following to launch the application in a new temporary container: turbo try application-image. Perform this test on the system where the application fails to start (for example, the application server).
If the application fails, then the issue is probably related to the configuration. See the Application Troubleshooting section.
If the application works, then the issue may be caused by a corrupted sandbox or the workspace application settings, such as container isolation or components.
Sandbox Problem
Check if the application launches successfully when using a clean sandbox. The easiest way to perform this test is to create a temporary internal user by going to Admin > Users > Add User and using it to launch the application.
If the application launches successfully, clear the persisted session from the Hub for the affected user by going to Admin > Users > Username > Sessions.
In addition, clear the local session sandbox on systems where the issue occurs by opening a command prompt and executing turbo containers & turbo rm containername or deleting the session folder from C:\Users*username*\AppData\Local\Turbo\Containers\Sandboxes.
Component Conflict
Remove all components that are not required to start the application from the Workspace Application settings > Components to check if the issue is caused by a conflict with one of its component.
If the application launches successfuly, see the Application Troubleshooting section to troubleshoot the component issue.
Container Isolation
The default container isolation mode is set to Full isolation, which would hide most applications installed on the system and may cause launch failures in some cases. Decrease the container isolation mode to Write-Copy or Merge to check if this is the cause for the failure.
If the application launches successfully after changing the isolation, review the application configuration for missing dependencies.
Generate VM Diagnostic Logs
For some applications issues, it may be necessary to generate and analyze VM diagnostic logs. To generate the logs, append &diagnostic= to the launch page URL.
Original: https://turboserver/run/3c3120d5-0151-41fa-9f35-bb2a8082c291?loc=2&title=Notepad%2B%2B
Diagnostic Logging Enabled: https://turboserver/run/3c3120d5-0151-41fa-9f35-bb2a8082c291?loc=2&title=Notepad%2B%2B&diagnostic=
The VM logs will be written to the container sandbox folder on the local system (when using Run on my PC) or application server (when using Run in Cloud). By default, this would be in %LOCALAPPDATA%\Turbo\Containers\sandboxes*sandbox-guid*\logs.
For more information on analyzing VM logs, see the Application Troubleshooting section.
Application Updates
If you have recently published an application update, ensure that the new application image is being used by opening a command prompt and running turbo images on the system where the application is executed. Confirm that the application image ID matches your updated image.
The Turbo Client checks for application updates once every 24 hours. If you have pushed an update recently, perform a manual pull to update the client repository immediately instead of having to wait for the automatic update check by running the following in a command prompt: turbo pull application-image.
Licensing
Some applications and licensing mechanisms require the application to be executed under an Active Directory Windows user.
If the application has this requirement, set the Workspace Application settings > General > Profile Mode to Ask for Credentials, then launch the application and enter your user credentials when prompted to execute it under your user.
Security Software
If a particular application runs on one environment and not another, it could also be related to the security software installed on the particular system. Please refer to the Antivirus and Security Software documentation.
Internet Explorer Does Not Launch Inside Virtual Application
If Internet Explorer is required by your application, ensure the application isolation is set to write-copy or merge. Full isolation may not be compatible with applications that require external software built into Windows such as Internet Explorer.
Application Server
Group Policy Settings
A common point of failure is due to the group policy applied to the application server. In a typical enterprise scenario the administrator has applied Microsoft's security baseline group policies on Windows servers. There are some group policies that will prevent the application server from functioning. Some of these policies may not appear in your Group Policy editor if the template is missing from your Windows Policy folder, but must be changed to install correctly. Ensure the following group policies are either unconfigured or set to the following values in the table:
|
Path |
Setting |
Value |
Comment |
|---|---|---|---|
| Administrative Templates > Windows Components > Remote Desktop Services > Remote Desktop Session Host > Security | Always prompt for password upon connection | Disabled | A login prompt will prevent remoteapp applications from launching. |
| Require use of specific security layer for remote (RDP) connections | Enabled (SSL) or not configured | Enhances security by requiring TLS 1.0 to authenticate the RD Session Host server during RDP connections. | |
| Require user authentication for remote connections by using Network Level Authentication | Enabled or not configured | Enhances security by requiring user authentication earlier in the remote connection process. Some clients may require NLA authentication to login. | |
| Administrative Templates > Windows Components > Remote Desktop Services > Remote Desktop Session Host > Connections | Allow users to connect remotely by using Remote Desktop Services | Enabled or not configured | If this is not configured and users are able to connect then it may be left as not configured. |
| Administrative Templates > Windows Components > Remote Desktop Services > Remote Desktop Session Host > Device and Resource Redirection | Do no allow drive redirection | Disabled or not configured (Recommended) | Disables the mapping of client drives when streaming remote applications. |
| Administrative Templates > Windows Components > Remote Desktop Services > Remote Desktop Session Host > Session Time Limits | Set time limit for active Remote Desktop Services sessions | 21600000 (Recommended) | The maximum amount of time that a Remote Desktop Services session can be active before it is automatically disconnected. |
| Set time limit for active but idle Remote Desktop Services sessions | 21600000 (Recommended) | The maximum amount of time that a Remote Desktop Services session can be active before it is automatically disconnected. | |
| Set time limit for disconnected sessions | 300000 (Recommended) | The maximum amount of time that a disconnected session remains active on the server. | |
| Set time limit for logoff of RemoteApp sessions | 600000 (Recommended) | How long a user's RemoteApp session will remain in a disconnected state after closing all RemoteApp programs before the session is logged off from the RD Session Host server. | |
| Windows Settings > Security Settings > Local Policies > User Rights Assignment | Deny access to this computer from the network | Remove Local account | Local users must be able to remote into application server to run applications and configure the machine using the --app-server install. This is not required if using active directory authentication. |
| Deny log on through Remote Desktop Services | Remove Local account | Local users must be able to remote into application server to run applications. This is not required if using active directory authentication. | |
| Allow log on through Remote Desktop Services | Add Users | Click object types and check "groups" then add the object "Users". | |
| Windows Settings > Security Settings > Application Control Policies > AppLocker > Executable Rules | Allow Everyone | %OSDRIVE%\PROGRAMDATA\TURBO\* | Turbo VM images may be cached in the PROGRAMDATA folder. |
| Windows Settings > Security Settings > Application Control Policies > AppLocker > Executable Rules | Allow Everyone | %OSDRIVE%\USERS\*\APPDATA\LOCAL\TURBO\* | Turbo Container Sandboxes may be cached in the user's local AppData folder. |
| Windows Settings > Security Settings > Local Policies > Security Options | Interactive Logon: Machine inactivity limit | 0 or Not Defined | Prompts user to login after idle timeout. Use Admin > General > Streaming settings instead. |
Diagnosing WinRM Errors (LEGACY)
The following group policies enables WinRM for legacy (prior to version 2019.7.26) Turbo Broker:
|
Path |
Setting |
Value |
Comment |
|---|---|---|---|
| Administrative Templates > SCM: Pass the Hash Mitigations | Apply UAC restrictions to local accounts on network logons | Disabled or not configured | Security baseline will enable this value. If the policy path is missing, locate the ptH.admx and add it in your group policy templates folder. |
| Administrative Templates > Windows Components > Windows Remote Management > WinRM Client | Allow Basic authentication | Enabled or not configured | Security baseline default value is not configured. |
| Allow unencrypted traffic | Enabled or not configured | Security baseline will set this to disabled. The winrm command will test the connection using basic http. | |
| Administrative Templates > Windows Components > Windows Remote Management > WinRM Service | Allow remote server management through WinRM | Enabled or not configured | Application server provision requires WinRM. If enabled, make sure you set the IPv4 and IPv6 filters correctly. |
| Allow Basic authentication | Enabled | Application server provision requires WinRM. | |
| Allow unencrypted traffic | Enabled | Application server provision requires WinRM. | |
| Windows Settings > Security Settings > Local Policies > User Rights Assignment | Deny access to this computer from the network | Remove Local account | Application server provision requires WinRM potentially over the local administrator account. |
In a command prompt on the application server, issue the following command:
>winrm identify -r:http://localhost:5985 -auth:basic -u:{adminuser} -p:{password} -encoding:utf-8
The command should be an IndentifyResponse. If command fails and you have checked the group policies have been properly set, try the winrm quickconfig command. Note that the quickconfig command will request LocalAccountTokenFilterPolicy. Turbo does not require that setting to be enabled.
>winrm quickconfig
WinRM service is already running on this machine.
WinRM is not set up to allow remote access to this machine for management.
The following changes must be made:

Configure LocalAccountTokenFilterPolicy to grant administrative rights remotely to local users.

Make these changes [y/n]? y

WinRM has been updated for remote management.

Configured LocalAccountTokenFilterPolicy to grant administrative rights remotely to local users.

>winrm quickconfig
WinRM service is already running on this machine.
WinRM is already set up for remote management on this computer.
RemoteApp Registry Settings
The application server provisioner should make the required changes to enable RemoteApp execution. Ensure these registry settings were applied properly:
|
Path |
Setting |
Value |
Comment |
|---|---|---|---|
| HKLM:\SOFTWARE\Policies\Microsoft\Windows NT\Terminal Services | fDenyTSConnections | 0 (DWORD) | Enables Terminal Services. |
| fResetBroken | 1 (DWORD) | ||
| fDisableCam | 0 (DWORD) | Enables audio. | |
| DisablePasswordSaving | 0 (DWORD) | ||
| fPromptForPassword | 0 (DWORD) | ||
| fEncryptRPCTraffic | 0 (DWORD) | ||
| MinEncryptionLevel | absent | Remove this value. | |
| Shadow | 1 | Enable admin session shadowing. | |
| fSingleSessionPerUser | 0 | Allows the user to run multiple applications in separate sessions. | |
| HKLM:\SOFTWARE\Policies\Microsoft\Internet Explorer\Main | DisableFirstRunCustomize | 1 (DWORD) | Disable IE first run dialog |
| HKLM:\Software\Policies\Microsoft\Windows\CurrentVersion\Internet Settings\Zones\1 | 2500 | 0 (DWORD) | Enable IE Protected mode for local intratet, avoiding warning on first use |
| HKLM:\Software\Policies\Microsoft\Windows\Windows Error Reporting | DontShowUI | 1 (DWORD) | Disable crash report UI |
| HKLM:\Software\Policies\Microsoft\Windows\WindowsUpdate | ElevateNonAdmins | 0 (DWORD) | Disable Windows Update UI for non-admins |
| HKLM:\SOFTWARE\Microsoft\Windows\CurrentVersion\Policies\Ext | RestrictToList | 1 (DWORD) | Disable IE addons dialogs |
| HKLM:\SOFTWARE\Microsoft\Windows NT\CurrentVersion\Terminal Server\TSAppAllowList | fDisabledAllowList | 1 (DWORD) | Enables the RemoteApp allowed program list. |
| CustomRDPSettings | authentication level:i:2 (String) | Specifies RemoteApp custom settings such as the authentication level. | |
| HKLM:\SOFTWARE\Microsoft\Windows NT\CurrentVersion\Terminal Server\TSAppAllowList\Applications\turboplay | Path | C:\Program Files (x86)\Turbo\Cmd\turboplay.exe (String) | Make sure turboplay is allowed. |
| HKLM:\SOFTWARE\Microsoft\Windows NT\CurrentVersion\Terminal Server\TSAppAllowList\Applications\turbo | Path | C:\Program Files (x86)\Turbo\Cmd\turbo.exe (String) | Make sure turbo is allowed. |
| HKLM:\SYSTEM\CurrentControlSet\Control\Terminal Server\WinStations\RDP-Tcp | SecurityLayer | 2 (DWORD) | Require TLS 1.0 to authenticate the RD Session Host server. |
| UserAuthentication | 1 (DWORD) | Enable Network Level Authentication. |
Windows Updates
The following Windows updates are required to establish secure connections between the client and RD Session Host. Not installing the following updates on the application server may prevent connections between the client and application server from functioning:
|
Operating System |
Update |
Comment |
|---|---|---|
| Windows Server 2012 | KB4103730 or KB4103726 | Security update for Remote Desktop connections. |
| Windows Server 2016 | KB4103723 | Security update for Remote Desktop connections. |
Windows Update Notifications
Disable Automatic Updates if Windows Update notifications are being shown on remote sessions:
First open the Local Group Policy Editor:
> gpedit.msc
Set Configure Automatic Updates to disabled under Computer Configuration/Administrative Templates/Windows Components/Windows Update.
Application Launch Issues
The remote application failed to launch
There is a 20 second interval when the Turbo Server service is starting where the communication between the Broker and Application Server is out of sync. The application launch should succeed once the interval has elapsed.
Application Server performance is poor
Ensure that background processes such as Windows updates is disabled when the Application Server is expected to be in use. Log in as administrator and open Task Manager. If the TiWorker.exe is running with high CPU usage then it indicates that a Windows update is in progress.
Application Server is unavailable
The broker logs indicate the application server is unavailable
To check if an application server is running and accessible, logon to the Portal server and try opening a browser tab to http://{app-server-host}/server/, replacing {app-server-host} with the internal hostname of your application server (Internal Hostname or IP Address in your domain server settings). A successful response will show a page listing the server version:
If this page return a IIS 404 error page, then uninstall IIS from the server. If IIS is using the same port as the Application server, then the Application server will not be reachable.
If this page returns a Not Found (404) response code, then the application server may be down or the internal hostname may be incorrect. To verify that the application server is running, logon to the application server and check that the Turbo.AppServer service is running.
If this page returns a Connection Timeout, then there may be a Windows firewall issue. To verify your Windows firewall configuration, please refer to the Firewall and Security documentation. If the firewall appears to be configured correctly, restart the Turbo service.
If this page returns a Service Unavailable (503) response code, then the application server is most likely restarting. Please wait a few minutes and try again. If the failure persists, please contact support.
Application Issues
If the application itself is encountering errors or hangs, the first step to troubleshoot the issue is to log into the application server directly and attempt to run it there using the turbo command line interface (ie. turbo run [app]). If the problem reproduces in this way then see application troubleshooting suggestions here.
Run in Cloud launch mode shows prompt to Select a session to reconnect to
Users will encounter the Select a session to reconnect to dialog when they use a Run in Cloud launch mode and the following conditions are met:
- The applications launched use the Ask for Credentials profile mode.
- The Windows user has more than one disconnected session on the application server.
If the user selects the correct session for the application, they will successfully reconnect to the session.
If the user selects the wrong session for the application, they will be switched to the correct session. However, the switch requires them to enter their password again.
If this is a new application launch, then the new application will be launched in the selected session. In this case, the user would see both the new application and the old application from the disconnected session in the same session.
This issue does not apply to applications configured with a Temporary Profile mode, because a unique session is created for each application.
The user may also avoid this dialog by completely exitting their applications before closing the browser tab, which closes the sessions instead of leaving them running in a disconnected state.

Run in Cloud launch mode shows another application in the same session
Users may see another application when they use a Run in Cloud launch mode and the following conditions are met:
- The applications launched use the Ask for Credentials profile mode.
- The Windows user has a disconnected session on the application server.
When this occurs, the user will reconnect to the disconnected session to launch the new application. They would also see the already running application from the disconnected session.
This issue does not apply to applications configured with a Temporary Profile mode, because a unique session is created for each application.
The user may also avoid this dialog by completely exitting their applications before closing the browser tab, which closes the sessions instead of leaving them running in a disconnected state.
Application window disappears (Windowed) or shows lock screen (HTML5) after idling
If users report that their application window disappears when using the Run in Cloud (Windowed) launch mode or shows the lock screen when the Run in Cloud (HTML5) launch mode and the portal shows that the application is still active and connected, the application server may have the following group policy configured: Windows Settings > Security Settings > Local Policies > Security Options > Interactive Logon: Machine inactivity limit.
To resolve this issue, set the Interactive Logon: Machine inactivity limit to 0 and use the Streaming settings to control the application session length.
Application server is online but is not servicing application launches
If an application server configured as part of your Turbo Server topology is online but is not servicing any application launches, there may be a fatal error that is preventing workloads from being assigned to that server. For example, an application server may not be properly configured to accept RDP connections.
The Turbo Server administrator should check the Server Dashboard on the Turbo Server administration site to see if there are any Fatal errors under the Alerts section. Fatal errors indicate that the server is unable to perform its assigned role and requires manual fixes.
If a Fatal alert is present, please follow the action recommended in Event column to repair the server then click the Clear action to restore server operation once you have confirmed the fix.
Administration
Administration site login results in the same login form
The server may have had its clock changed causing the credentials to be invalid. Ensure the clock is accurate and restart the server.
Unable to connect to SQL Server instance
Connecting to SQL Server remotely requires the following:
- Enable remote connections for the database through SSMS
- Enable TCP/IP in SQL Server Network Configuration
- Open the port (default 1433) in Windows Firewall inbound rules
- SSMS on a remote computer may require the port specified (e.g. TURBOSERVER\turbo,1433)
- Enable both Windows and SQL authentication for the server through SSMS
See Stack Overflow for additional links.
End User
This section provides information to help troubleshoot common end user issues.
User cannot upload files using the HTML5 client with "Send error no permissions" message.
The service does not have permissions to upload a file on behalf of the user due to missing domain credentials when running the application in ask for domain login mode. Users must use the down-level style login (domain\username) when asked to login to the application, or have the administrator set the default domain if the end user omits it during login. To allow users to omit the domain, please set the default domain of the intended for the workspace under admin -> general section located at https://{portal-host}/workspace/{workspace-name}/admin/general.
User gets locked out of cloud sessions when idling after a short period of time.
The lock screen timeout is controlled via group policy setting. To configure custom session timeouts, please refer to the Streaming section on the Turbo Server administration site.
For older versions of Turbo Server, you may change the group policy setting manually. Please refer to the microsoft documentation to disable or extend the timeouts.
Users cannot access client drives when streaming a remote application from the native client.
By default, client drives are made available when streaming a remote application from the native client. This behavior can be controlled via group policy setting. To enable or disable drive redirection, please refer to the Streaming section on the Turbo Server administration site.
Users cannot access network drives when streaming a remote application.
Network drives may be configured in the Streaming section on the Turbo Server administration site, and are only made available when streaming remote applications.
If a configured network drive is not visible, please check that the network drive letter does not conflict with an existing local or network drive. Also check that the network drive path is correct and accessible to the remote user. Paths such as \\tsclient\{path} that map to local drives are only available when streaming the application with a client that redirect drives.
Network Drive changes can take up to 20 seconds to apply to the application servers and are mounted on user logon. If a user is already has an active remote session they must close all of their remote applications, wait to be logged out of the application server, and then relaunch their application to see the new drives. We recommend waiting for the period configured by the Disconnected sessions without running applications streaming setting before relaunching to ensure that the user is logged off.
Additional error details may be found in the network-drives_*.log log file located in the user folder in the Server Diagnostics log archive.
Users are unable to sign in to the workspace portal.
If the Turbo Server with the Hub role is not running, users would not be able to sign in to the workspace portal. The Portal log will contain a message that it failed to load the public key, similar to the following:
[2020-12-08T22:39:30.584] [INFO] default - Fetching JWT public key from https://hubserver/
[2020-12-08T22:39:51.672] [ERROR] default - Failed to load JWT public key: Error: connect ETIMEDOUT 10.1.2.4:443
[2020-12-08T22:39:54.378] [WARN] default - Failed to decode ticket, JWT public key is not available.
To resolve the issue, start the Turbo Server with the Hub role and wait a minute for the Portal to successfuly load the public key.
Install on my PC results in error message: Failed to register application to the desktop.
The turbo log will contain the following message:
Critical - 0x3E74: Failed to install image mozilla/firefox-esr:78.8.0: System.Runtime.InteropServices.MarshalDirectiveException: Marshaler restriction: Excessively long string.
The error occurs due to a corrupt Turbo Client installation. Please uninstall and reinstall the client, then try again.
Run on My PC results in error message: Image download failed. Image did not match hash.
The image download failed due to network error. In newer clients, disconnected downloads will be automatically resumed. Please upgrade to the latest client.
If the issue persists the following workaround may be used:
- Export the image from a system that has the image in the cache. You may use the Run on My PC launch to cache it.
> turbo export agisoft_metashape/metashape:1.7.2 "%USERPROFILE%\Desktop\agisoft_metashape-metashape-1.7.2.svm"
-
Upload the SVM file to a network share, OneDrive, or another place where the user can download it.
-
Instruct the user to download the SVM file and then import the image on their PC. This process would need to be repeated for any dependency or component SVMs, if your workspace application has been configured to use them.
> turbo import svm -n=agisoft_metashape/metashape:1.7.2 "C:\Path-to-download\agisoft_metashape-metashape-1.7.2.svm"
Installation

This section provides information to help troubleshoot common issues you might encounter while installing Turbo Server.
Common Issues
The following table lists common issues/questions and their solutions:
|
Issue/Question |
Solution |
|---|---|
| There is an error during installation: Turbo Server installation failed, please contact the administrator. | This may occur if there is a timeout when starting or accessing the database services. Go to Control Panel > Administrative Tools > Services and try restarting the Turbo Server service. |
| The Turbo Server service fails to start. | This may occur if there is a timeout when starting or accessing the database services. Go to Control Panel > Administrative Tools > Services and try restarting the Turbo Server service. If the service continues to fail to start, review the required ports for the installed roles. Ensure that other services such as IIS do not conflict with required ports. |
|
I am unable to access the Administration Site or Hub Site from another machine. |
Microsoft Windows security settings might be restricting external connections to the ports assigned to the Administration and/or Hub sites. For information about configuring Turbo Server security settings, refer to Configuring Turbo Server Security. |
|
My application does not appear on the Turbo Server portal. |
Verify that the application has been pushed to the correct org account dashboard (for turbo.net hub) or namespace (for Turbo Server). For more information about publishing application versions, refer to Managing Applications. |
|
Where do I install a new license? |
New licenses can be applied by clicking the New License link found on the Admin page in the Administration Site. |
| Turbo Server is no longer accessible after making a Network Configuration change | Turbo Server service may need to be restarted after making a network configuration change. Go to Control Panel > Administrative Tools > Services and try restarting the Turbo Server service. |
|
HTML5 cloud launch fails to start the application and results in the generic error page. |
Review the SSL troubleshooting documentation. If it is not a certificate issue, the application server may not be accessible from the broker. Check that port 80 or 443 can be accessed from the broker to the application server. |
|
HTML5 cloud launch fails to start the application with The service not available error. |
This error may occur if the application login mode is set to ask, and the user attempts to login with a user that is not part of the Remote Desktop Users group. Ensure the user is part of the Remote Desktop Users group. |
|
Help! I forgot the administrator account password and can't access the Administration Site. |
Remove the admin group by using the server cli. Open a command prompt as administrator and navigate to the installation folder. Run `Server.exe admin user-group 2 clear` which clears all users from the server administrator's group. This allows you to access the the Administration Site without login. Reset the admin user's password and add the user back to the administrator's group to secure the Administration Site. |
|
An error occurs when pushing large images to the hub. |
Hub JVM may require more memory to synchornize large images. Navigate to the admin's /admin/domain/servers.aspx page and navigate to the Hub server's settings. Increase the Hub heap max setting. |
|
The admin site displays Compiler Error Message: The compiler failed with error code -1073741502. |
The service user does not have permissions to modify the asp.net temporary compiler cache. Stop the Turbo service. Delete C:\Windows\Microsoft.NET\Framework\{version}\Temporary ASP.NET Files. Restart the Turbo service. |
|
Unable to run applications remotely on Application Server due to Windows Interactive Login Message feature. |
Use the **Notice and Consent** setting under /admin/general. Remove the group policy as described [here](https://docs.microsoft.com/en-us/windows/security/threat-protection/security-policy-settings/interactive-logon-message-text-for-users-attempting-to-log-on), and disable the following registry keys: |
|
Error 'The remote name could not be resolved' when accessing the administration site. |
Open command prompt on the Hub server and issue ping commands to well known hosts. If the ping commands fail then the DNS server may not be resolving correctly. Switch to a public DNS server and see if the ping commands work. If they work then the error is due to the previous DNS server. |
|
Upgrade fails with error 'Cannot start service Turbo on computer'. |
Unknown error in Windows service control manager. Restart the computer and try again. |
|
Requests to the Portal site, APIs, or other external web services hang when the Turbo Server is under heavy usage. |
The Turbo Server Apache configuration may need to be updated to increase the number of request threads. Please refer to the Network Optimization documentation. |
Performance Counters
Turbo Server uses performance counters to track and report server load information. These reports may be viewed on the Turbo Server administration site Domain page.
If the load information for a server is missing, then the Turbo service user may not have permission to access performance counter data. To grant permission to the Service user:
- Log on to the application server.
- Open Server Manager and click on Tools > Computer Management.
- From the Computer Management window, click on Local Users and Groups > Users.
- Right-click on the service user and click Properties.
- Click on the Member Of tab and check that the Performance Monitor Users group is listed.
- If the group is not listed, click Add and enter Performance Monitor Users, then click OK.
This group is automatically added to the service user during Turbo Server installation.
Enable Diagnostic Mode
Enabling diagnostic mode generates debug output logs. These can be used to help the Turbo support staff diagnose and debug issues.
Turbo Client
Diagnostic logs are written to the c:\users[user]\appdata\local\turbo\logs directory.
Turbo Server
When troubleshooting an issue related to the general administration of Turbo Server, enable diagnostic mode for Turbo Server. Complete the following steps to enable diagnostic mode for Turbo Server:
-
Open a Windows Command Prompt as an administrator (cmd.exe).
-
Enter the following command: net stop turbo
-
Navigate to C:\ProgramData\Turbo Server and open settings.xml with Notepad or another text editor.
-
Add a new element called TraceLevel with value Debug as a child element to Settings; after adding this element the file should resemble the following:
<?xml version="1.0" encoding="utf-8"?> <settings> <InstallPath>[Path]</InstallPath> <InstalledVersion>[Version]</InstalledVersion> <DbLibraryConnection>embedded</DbLibraryConnection> <DbManagerConnection>embedded</DbManagerConnection> <TraceLevel>Debug</TraceLevel> </settings> -
Enter the following command: net start turbo
Locating Log Files
There are several types of logs available for Turbo Server, including logs for the installation process, Apache, and SQL Server. The log file locations are dependent on the install location of Turbo Server. The default location is "C:\Program Files\Turbo Server".
Turbo Server Installation Logs
- [Install Directory]\logs\Setup.log
Turbo Server Service Logs
- [Install Directory]\logs\*.log
Turbo Server Web Services Logs
- [Install Directory]\Sandbox\MODIFIED\@PROGRAMFILESX86@\Turbo Server\Web\logs\*.log
- [Install Directory]\Sandbox\MODIFIED\@PROGRAMFILESX86@\Turbo Server\Web\Hub\logs\*.log
Turbo Server SQL Server Logs (Embedded SQL Server Express)
- [Install Directory]\Sandbox\MODIFIED\@PROGRAMFILESX86@\Microsoft SQL Server\MSSQL.1\MSSQL\LOG
Turbo Server Apache Logs
- [Install Directory]\Sandbox\MODIFIED\@PROGRAMFILESX86@\Apache Software Foundation\Apache2.2\logs\error.log
Turbo Server Logs
- Portal and Broker servers write all log traces to the console. These are archived in their container logs xcstream_*.txt files. Use
turbo logs [container] --export=c:\pathto retrieve the logs. - Application Server provisioning logs are stored in C:\Program Files (x86)\Turbo\ApplicationServer\logs.
Starting and Stopping the Turbo Server Service
Oftentimes, troubleshooting and fixing problems in Turbo Server requires the Turbo Server service be restarted.
There are currently two ways of doing this, through either the Control Panel or the Command Prompt. Each method is listed, below:
-
Through the Control Panel
a. Navigate to Control Panel > Administrative Tools > Services or Control Panel > System and Security > Administrative Tools > Services
b. Restart the Turbo Server service
-
Via the Command Prompt using the net command
a. Run a new command prompt (cmd.exe) as Administrator
b. Type the command net stop turbo to stop the Turbo Server service
The expected output for this command is:
The Turbo Server service is stopping.
The Turbo Server service was stopped successfully.
c. Type the command net start turbo to start the Turbo Server service
The expected output for this command is:
The Turbo Server service is starting.
The Turbo Server service was started successfully.
Windows Event Viewer
The Windows Event Viewer is another useful source of information. If there is an issue starting the Windows service for Turbo Server there may be information reported in the Window Event Viewer to help diagnose the problem.
Setup Failed!
Error details: A network related or instance-specific error occurred while establishing a connection to SQL Server. The server was not found or was not accessible. Verify the instance name is correct and that SQL Server is configured to allow remote connections.
The error may occur during setup due to the database being unavailable. Please ensure the SQL server can be connected from the server with the specified installation credentials. If installing in standalone server mode, the embedded database may not be available yet. Check to see if the Turbo Server Service was installed correctly and is in the process of booting up. If so, then wait a few minutes and attempt to access the administration website (typically available at http://localhost/admin).
Single Sign-On
This section provides information to help troubleshoot common Single Sign On (SSO) issues.
For information on how to configure Turbo Server to use SSO, please refer to the Authentication Method section.
Azure Active Directory
unsupported_response_type
Occurs when the application registration was not configured with the correct implicit grant type. Please ensure that you have configured your application registration to issue ID tokens.
See Configure Azure AD for more information on configuring the implicit grant types.
access_denied
Occurs when the application registration was not configured with the correct API permissions. Please ensure that you have configured your application configuration to grant User.Read and Directory.Read.All permissions.
See Configure Azure AD for more information on configuring the API permissions.
In _validateResponse: jwt is not active
Occurs when the system clock on the server machine is out of sync with the real time. To resolve this issue, correct the system clock and then restart the Turbo service.
In collectInfoFromReq: invalid state received in the request
The login response did not return the state that was expected by the Portal.
This may occur for various reasons, for example:
The login request was invalidated by another login or logout request by the same user
To resolve, close any browser tabs with active login attempts then click on the Portal Login button to initiate a new login request.
The login took too long to complete
To resolve, click on the Portal Login button to initiate a new login request and complete the login before the time limit expires.
By default the login request expires in 1 hour.
The user exceeded the maximum number of concurrent login requests
To resolve, close any browser tabs with active login attempts then click on the Portal Login button to initiate a new login request.
By default a user can have a maximum of 5 concurrent login request.
The Portal service restarted after the user initiated the login request.
The Portal server stores the expected login response states server-side in an in-memory cache. If the Portal restarts mid login request, the expected login response state will be cleared from memory, and the login request will fail.
To resolve, wait for all Portal service restart to complete then click on the Portal Login button to initiate a new login request.
The Portal connect.sid cookie saved on the client machine is invalid
The connect.sid cookie associates the client browser to the server-side user session cache where the state expected by the login response is stored. If this state becomes invalid for any reason, the login response validation will fail.
This can be resolved by removing the connect.sid cookie from the client machine. To remove this cookie from your browser:
Chrome: Visit chrome://settings/siteData and search for your Portal server's hostname. Click on the matching search result, then click Remove All to clear all Portal cookies.
Firefox: Visit about:preferences#privacy and click Manage Data under Cookies and Site Data. Search for your Portal server's hostname, then click Remove All Shown to clear all Portal cookies.
Edge: Visit edge://settings/siteData and search for your Portal server's hostname. Click on the matching search result, then click Remove All to clear all Portal cookies.

In _authCodeFlowHandler: failed to redeem authorization code
Occurs when the login request fails to authenticate due to an application registration or Turbo Server configuration error, such as:
- The configured return URL does not match the Portal return URL endpoint.
- The configured secret does not match the application registration's secret.
See Configure Azure AD for more information.
Response_type 'id_token' is not enabled for the application.
Error AADSTS700054 occurs when ID tokens (used in implicit and hybrid flows) is not enabled. To resolve this issue, enable this token in the application registration under Authentication > Implicit grant and hybrid flows.
Turbo Server
Login failed: Missing UPN claim
The Turbo user could not be created due to a missing user principal name (UPN) claim.
Turbo Server expects the following claim to be returned in email format by the identity service:
http://schemas.xmlsoap.org/ws/2005/05/identity/claims/nameidentifier
If you are using AzureAD with SAML 2.0, see Configure Azure AD for more information on setting up the claims.
If you are using ADFS with SAML 2.0, see Configure ADFS for more information on setting up the claims.
Login failed: Missing Email claim
The Turbo user could not be created due to a missing email claim. Turbo Server expects the email claim to be returned by the identity service.
If you are using AzureAD with OpenID Connect, see Configure Azure AD for more information on setting up the claims.
Login failed: Missing sub claim
The Turbo user could not be created due to a missing sub claim. Turbo Server expects the sub claim to be returned by the identity service.
If you are using OpenID Connect, see OpenID Connect for more information on the required claims.
Failed to load OpenID provider metadata
The Portal was unable to load the OpenID Provider Metadata from the Provider Metadata URL configured in the authentication method. This could be caused by an incorrect URL or a network error.
Please ensure that the correct Provider Metadata URL was provided and that the URL is accessible from the Portal server. If you are using AzureAD with OpenID Connect, see Configured Turbo Server.
User creation failed (401)
The Turbo user could not be created due to an authentication failure.
Occurs when the Portal service has a missing or invalid API key. The Portal may have started with invalid settings due to a configuration change or database access error.
To resolve, please restart the Turbo service on the Portal server and try again in a few minutes.
User creation failed (503)
The Turbo user could not be created due to API service availablility.
Occurs whens the API service is restarting. Please wait a few minutes and try again.
Login failed (401)
The user could not be logged in due to an authentication failure.
If you are using Azure AD OpenID, please make sure that the following API permissions are added to your application registration:
- Microsoft Graph > Delegated permissions > User > User.Read
- Microsoft Graph > Delegated permissions > Directory > Directory.Read.All
If you are using SAML authentication, please make sure that your values for the Signing Certificate Thumbprint and Signing Certificate Common Name are correct and that your signing certificate is installed on the Hub server. See Configure Turbo Server for more information on setting up the signing certificate.
Login failed (503)
The user could not be logged in due to API service availability.
Occurs when the API service is restarting. Please wait a few minutes and try again.
Login failed (404)
The login failed because the user could not be found in the SSO directory service. The directory service user is created dynamically when logging in from SSO. If the user with the same login name already exists in another directory service then the user create will not occur. Delete the existing user with the same login name and try again.
SSL Troubleshooting
Portal has limited functionality after installing certificates
Unable to login to the portal after installing SSL certificates. Unable to launch applications remotely on application server. Please check the portal logs. The logs contain the following error(s):
[ERROR] default - Failed to load JWT public key: Error: self signed certificate in certificate chain
[ERROR] default - Failed to authenticate: self signed certificate in certificate chain
Solution: If the specified certificate is self-signed, the Hub and Portal must have the root certificate installed into the Trusted Root Certification Authorities store.
If the certificate requires an intermediate certificate, the certificate must be installed into the Intermediate Certificatation Authorities store on both the Hub and Portal servers.
Unable to login to the portal with the following log:
[ERROR] default - Failed to authenticate: {User} unable to verify the first certificate
Solution: The SSL chain file is missing or invalid. Use openssl to test the certificate chain:
> openssl s_client -showcerts {hubserverhost}:443

CONNECTED(00000005)
depth=0 CN = hubserverhost
verify error:num=20:unable to get local issuer certificate
verify return:1
depth=0 CN = hubserverhost
verify error:num=21:unable to verify the first certificate
verify return:1
The error can be further validated using ssllabs.com by entering the host of the Turbo Server to analyze. Expand the certification paths section to see which part of the certificate chain is missing. If parts of the certificate chain is missing, contact the administrator to obtain the correct certificate chain.
IMPORTANT: The chain file should be in crt format. If the cert extension is .p7b you must convert that to crt using the following opensll command:
openssl pkcs7 -print_certs -in old.p7b -out new.crt
Portal does not load web pages after installing SSL certificates
Check the proxy-apache.log file in the C:\ProgramData\Turbo\Logs folder.
[ssl:emerg] [pid 2828:tid 1084] AH02561: Failed to configure certificate s27-2016-2.start.turbo.net:443:0, check C:/c/cert.crt
[ssl:emerg] [pid 2828:tid 1084] SSL Library Error: error:0906D06C:PEM routines:PEM_read_bio:no start line (Expecting: CERTIFICATE) -- Bad file contents or format - or even just a forgotten SSLCertificateKeyFile?
[ssl:emerg] [pid 2828:tid 1084] SSL Library Error: error:140AD009:SSL routines:SSL_CTX_use_certificate_file:PEM lib
AH00016: Configuration Failed
You may have a DER encoded file. Use openssl to convert it to PEM.
openssl x509 -inform der -in certificate.cer -out certificate.crt
Check the proxy-apache.log file in the C:\ProgramData\Turbo\Logs folder.
[ssl:emerg] [pid 1976:tid 1108] AH02577: Init: SSLPassPhraseDialog builtin is not supported on Win32 (key file C:/ssl-certs/cert.key)
[ssl:emerg] [pid 1976:tid 1108] AH02312: Fatal error initialising mod_ssl, exiting.
[ssl:emerg] [pid 1976:tid 1108] AH02564: Failed to configure encrypted (?) private key my.turboserver.com:443:0, check C:/ssl-certs/cert.key
[ssl:emerg] [pid 1976:tid 1108] SSL Library Error: error:0D0680A8:asn1 encoding routines:ASN1_CHECK_TLEN:wrong tag
You may have an encrypted KEY file, which is not currently supported by Turbo Server.
Remove the encryption from the KEY file to resolve this error.
> openssl rsa -in encrypted-key.key -out key.key
Admin portal does not load after installing SSL certificates
Attempting to access the Admin portal shows the following error message:
The remote certificate is invalid according to the validation procedure.
This error occurs when validation of the SSL certificates fail.
Solution: Check that the certificates match the configured Internal Web Service Root URL and that they are not expired.
Confirm that your certificates are trusted by the Windows operating system and perform the troubleshooting steps above.
Temporarily disable HTTPS to access the admin site and make configuration changes:
# Change directory to Turbo Server install folder
> cd "C:\Program Files (x86)\Turbo Server"

# Get name and web-root of the hub server
> Server.exe admin --server

# Switch from HTTPS to HTTP to regain access to the admin portal
> Server.exe admin --server <hub-name> http://<hub-web-root>
Images fail to push and containers fail to upload
Check the corresponding log in %LOCALAPPDATA%\turbo\logs. If the logs indicate an SSL failure during sync:
02/16/2021 11:27:45.6419 - Debug - 0x1118: {"log":"*** Sync encountered an error: Received fatal alert: handshake_failure","msSinceStart":1795}
02/16/2021 11:27:45.9703 - Debug - 0x1118: {"log":"(javax.net.ssl.SSLHandshakeException)\n\njavax.net.ssl.SSLHandshakeException: Received fatal alert: handshake_failure
...
02/16/2021 11:27:45.9703 - Debug - 0x1118: exit -1
Trouble shoot your SSL certificate using ssllabs.com.
Server does not start after changing certificate or after installation / upgrade
Check the Proxy-apache.log file in C:\ProgramData\Turbo\Logs folder. The following logs indicate a failure to load the certificate file due to DER file format:
[Mon Apr 26 19:48:03.852387 2021] [ssl:info] [pid 9760:tid 1340] AH01887: Init: Initializing (virtual) servers for SSL
[Mon Apr 26 19:48:03.853388 2021] [ssl:info] [pid 9760:tid 1340] AH01914: Configuring server {server}:443 for SSL protocol
[Mon Apr 26 19:48:03.853388 2021] [ssl:debug] [pid 9760:tid 1340] ssl_engine_init.c(1758): AH10083: Init: ({server}:443) mod_md support is unavailable.
[Mon Apr 26 19:48:03.854385 2021] [ssl:emerg] [pid 9760:tid 1340] AH01895: Unable to configure verify locations for client authentication
[Mon Apr 26 19:48:03.854385 2021] [ssl:emerg] [pid 9760:tid 1340] AH02312: Fatal error initialising mod_ssl, exiting.
AH00016: Configuration Failed
Open the certificate files using notepad and look for the certificate file which is not in plain text (PEM) format. Convert the certificate file to PEM format using the following openssl command:
openssl x509 -inform der -in certificate.crt -out certificate.pem.crt
Self-signed certificate disappears from Windows certificate store
Self-signed certificates added to the Third-Party Root Certification Authorities are periodically deleted when Windows updates its certificate store. To avoid this issue, install self-signed certificates to the Trusted Root Certification Authorities store.
Generating a self-signed certificate
Self-signed certificates, typically used in testing environments, may be generated using OpenSSL. Use the Subject Alternative Name field to specify the web service roots and Domain URLs for your Turbo Server farm. When prompted for the Common Name, specify the Domain URL or portal web serivce root, if Domain URL is not configured.
The example below would create a self-signed certificate for a farm of one hub server, one portal server, two application servers, and the domain URL:
openssl req -x509 -newkey rsa:4096 -nodes -keyout self-signed-key.pem -out self-signed-cert.pem -days 3650 -addext "subjectAltName = DNS:turbo.domain.com,DNS:turbo-portal.domain.com,DNS:turbo-hub.domain.com,DNS:turbo-app1.domain.com,DNS:turbo-app2.domain.com"
Performance
Applications take too long to launch
Ensure there are enough application servers to service peak loads. See the Server Prerequisites documentation.
Applications occasionally freeze up
Ensure the applications do not exhibit this behavior running natively, or virtually on an idle server that meets the hardware requirements. If the issue only occurs under load, check Windows Task manager and the Performance Monitor to see if additional hardware resources are required.
If memory, CPU, and disk utilization appear normal, check the Event Viewer logs for hardware related errors. For example, while disk usage may appear normal, there may be disk failures reported as Windows events, which show up as errors or alerts in the Performance category. See examples below:
This may also coincide with any hardware changes that have been made recently.
5.15 Upgrading
Upgrading Turbo Server
The following documentation describes how to upgrade Turbo Server to the latest version.
Preparing to upgrade
Make sure the administrator who will be running the setup file has SQL database access. Database read and write permissions are required because the setup will upgrade any database schema changes. There will be a brief maintenance window during the upgrade process. Ensure there is sufficient time to perform the upgrade process. Allocate at least approximately 30 minutes for possible maintenance downtime.
Upgrading steps
- Download the latest Turbo Server executable here.
- Log in as an administrative user who must have database read and write access to the Turbo Server databases. Alternatively you may change the connection strings to use password security which will allow any user login to access the database during upgrade.
- Run the Turbo Server setup executable on the Hub server. If you have additional roles installed on other servers then you should run the setup executable on the other servers with no particular order required. It is recommended to upgrade in the following order: hub -> portal -> application servers.
- Check that the Hub administrative site is accessible, then the Portal. It may take a minute or two after the upgrade to access the sites.
Releases
Turbo Server Releases
Turbo Server releases are scheduled for 2-3 month release cycles. Turbo Server releases will support upgrading from previous release versions, unless specified. Any incompatible release upgrade features will be documented in a migration guide.
The release change list can be found in Releases.
Release downloads can be found in Downloads.
Release Patches
Release patches will be provided for any major defects (regressions) for a specific release. Patches must be installed using the install executable similar to an upgrade.
Security
Security issues are treated as major defects and may be immediately patched in the current release. If a customer cannot wait for a release patch, the installation may be directly patched by Turbo.net support.
Dependencies
Dependencies included as part of the Turbo Server installation will also be patched and upgraded when appropriate. End users does not need to worry about patching as they are upgraded during installation or upgrade. The SQL Server instance used in conjunction with Turbo Server should be patched by the administrator, and not by Turbo. The operating system should also be patched by the responsible party of the machine.
Turbo Client Releases
Turbo Client releases follow the server release schedule. Turbo Clients will automatically upgrade to the latest release when installed on end user devices using the standard software upgrade process for the device's operating system.
Turbo VM Releases
Turbo VM updates are published regularly to the Turbo.net Hub to provide bug fixes, new features, and compatbility support for new Windows releases.
Turbo Server releases include the latest Turbo VM from the Turbo.net Hub at the time the release ships. Server administrators may also manually pull the /xvm image from Turbo.net Hub and push it to their Turbo Server environment in order to receive the Turbo VM update without having to upgrade the Turbo Server:
turbo config --domain=turbo.net
turbo pull /xvm
turbo config --domain=https://myturboserver
turbo login administrator
turbo push /xvm
By default, Turbo Server uses the latest Turbo VM version from its Hub repository. Note that it may take up to 24 hours for a Turbo VM update, applied as a result of upgrading Turbo Server or manually pushing a new Turbo VM, to propagate to the Application servers and end user devices.
Rarely, a Turbo VM update may cause an issue with a specific application. If this occurs, workspace administrators should set a known working VM Version for the affected application in the Workspace Application Settings as well as report the issue to Turbo Support so that it gets fixed.
21.3.2732.2 Migration Guide
Turbo Server 21.3.2732.2 has updated Web Applications to improve customization and consistency with other application types. The follow migration guide details the process required to migrate existing Web Applications when upgrading from Turbo Server 21.1.2640 to 21.3.2732.2 or later.
If you do not have any Web Applications, do not wish to migrate your Web Applications, or are upgrading from an earlier version, no changes are required.
Migrating Web Applications using a Virtual Browser
To migrate your existing Web Applications that are configured to use a virtual browser, you must first collect the Web Application information before upgrade, and then create new Web Applications using that information post upgrade.
Before upgrade
Please perform the following steps before upgrading:
- Open the Workspace administration applications page.
- Click Settings on the desired Web Application.
- Write down the Display Name and URL.
- Write down the repository used by the Browser.
- If you were using a custom icon, right click the icon in the Applications table, click Save Image As.., and save it for later.
Repeat this process for each of your Web Applications. Once complete, you may upgrade your Turbo Server.
After upgrade
Once your upgrade is complete, please update the repositories used by your browsers. This will allow the repositories to be selected when creating Web Applications.
- Open the Hub administration page and click on the repository used by your Web Application's browser.
- Add
browserto the Categories field and click Save.
Repeat this process for each of your browser repositories.
Finally, please recreate your Web Applications:
- Open the Workspace administration applications page.
- Click on Add > Web Application.
- Enter the Display Name, URL, and Browser used by your Web Application.
- Click Add. You will be redirected to the settings page.
- Upload the icon and click Save.
Repeat this process for each of your Web Applications.
Migrating Web Applications using a Local System Browser
To migrate your existing Web Applications that are configured to use a local system browser, you must create a Link with equivalent settings to your Web Application. Links are availables from the Links tab on the dashboard.
Before upgrade
Please perform the following steps before upgrading:
- Open the Workspace administration applications page.
- Click on the Links tab in the right sidebar.
- Click Add Link.
- Enter the Display Name, URL, and Icon used by your Web Application.
- Click Add.
Repeat this process for each of your Web Applications. Once complete, you may upgrade your Turbo Server.
5.16 Backup and Recovery
The Backup and Recovery page outlines the requirements for a complete backup and recovery strategy.
Note: The Backup and Recovery process also covers migrating Turbo Server to a different server.
Backup
The following items are required to take a complete backup of Turbo Server:
-
Hub storage location: The directory where the Hub role storage is located. Default location is C:\ProgramData\Turbo Server.
-
Databases: The Configuration and Analytics SQL databases.
-
Settings.xml: Turbo Server service configuration file.
-
Image cache: Images(.svm) pushed to hub will be cached at the location.
It is not required to backup servers hosting only the Application role unless another process is storing data there.
It is not required to backup servers hosting only the Portal role.
It is not required to backup the installation directory and sandbox as it will be recreated during the restore process.
Hub Storage
It is critical to backup the Hub storage directory. This is where the application images and user session data are stored. The default location is C:\ProgramData\Turbo Server\io.
There are no specific or required methods to capture a backup of the Hub storage directory. However, it is required that the Turbo Server service be stopped while the backup is captured. If the service is running when the backup is captured there is a possibility that a running transaction will cause the Hub backup to be corrupted making a successful restore impossible.
If the Hub storage is low on disk space, you may find it necessary to move the Hub storage to another disk. Use the Hub Storage Path setting to migrate the database. Ensure there are no other programs using the source and destination directories during the migration (after you save the new path setting).
If a failure occurs during migration, the Hub server will not start. You may attempt to manually complete the migration using the following troubleshooting steps:
- Stop the Turbo Server service on the Hub server.
- Open File Explorer to the old Hub storage path, assuming we are working with a partial migration.
- Ensure the remaining Turbo Hub database files are migrated. The database files are located in the Hub storage path sub directories:
- b-large-files
- del
- search\index
- sys
- user
- Delete the old Hub storage path directory once you are confidient all Turbo database files have been moved to the location. It is highly recommended to move the old path to another location temporarily.
- Start the Turbo Server service and verify the Hub server starts.
- Pull a few images to ensure the Hub is working.
- Delete the old path if it was manually moved to a temporary location to complete the process.
If you are not confident on resolving the issue, please contact support@turbo.net for additional assistence.
Databases
It is critical to backup the Configuration and Analytics SQL databases. This is where the Turbo Server configuration and collected analytics data is stored.
There are no specific or required methods to capture a backup of the SQL databases. However, it is strongly recommended to use native or purpose-built tools to backup the SQL Server databases.
Settings.xml
It is critical to backup the Settings.xml file. It contains the configuration data necessary to start the Turbo Server service. The default location is C:\ProgramData\Turbo Server\Settings.xml.
There are no specific or required methods to capture a backup of Settings.xml.
Image Cache
The image cache is an optional storage location set on the Hub server. The image cache writes any images(.svm) files to the path whenever an image is pushed to the Hub. This allows clients to be configured to look at the image cache location to run images directly instead of downloading and caching the images locally. The image cache should also be backed up and restored in case the image files are lost.
Recovery
A successful Turbo server restore requires the following elements:
-
New Turbo Server instance
-
SQL databases restored to an accessible location
-
Hub storage directory restored to its original location
-
Post-restore tasks
Turbo Server Installation
Restoring Turbo Server requires a brand new and empty installation on the new server.
This installation needs to be the same version and should be installed into the same directory as the previous install. The version and install directory of the previous install can be found in the Settings.xml file. The default location is C:\ProgramData\Turbo Server\Settings.xml.
Refer to the Turbo Server Setup document to complete the installation.
Stop the Turbo Server service of the new installation before moving to the next steps.
SQL Databases
Use native or purpose-built tools to complete the SQL database restores.
Refer to the Turbo Server Setup document to complete the database installation.
Hub Storage Directory
Restore the Hub storage directory to the same location as the previous install.
Note: Skip to the next step if the previous Hub storage directory is not known.
Image Cache Directory
Restore the Hug image cache directory to the same location as the previous install if necessary.
Post Restore Tasks
Update or confirm the SQL database connection strings in Settings.xml. The default location is C:\ProgramData\Turbo Server\Settings.xml.
Start Turbo Server service.
Use this procedure if the Hub storage restore step was skipped due to not knowing the previous location:
-
Open the Adminstration Site and navigate to Domain > Servers
-
Open the Hub / Portal server and note the Hub Storage Path directory
-
Stop the Turbo Server service
-
Restore the Hub storage backup to the Hub Storage Path.
-
Start the Turbo Server service
5.17 Monitoring
The following document describes external services that can be used to check the health status of Turbo Server.
Nagios
Nagios can be used to monitor the health of a Turbo Server environment.
The following configuration monitors the HTTP response times and SSL certificate validity of the Portal.
define service {
use local-service
host_name <turbo-server-hostname>
service_description HTTP Response Time
check_command check_http!<turbo-server-hostname>!https://<turbo-server-hostname>!5!10!-S
}
define service {
use local-service
host_name <turbo-server-hostname>
service_description SSL Certificate Expiration Check
check_command check_http_cert!<turbo-server-hostname>!14
}
The HTTP Response Time check will cause a WARNING alert if the response time is over 5 seconds and a CRITICAL alert if over 10 seconds or not responding. The SSL Certificate Expiration Check will cause alerts if the certificate will expire in under 14 days.
The following configuration monitors the Turbo Server Windows Services.
define service {
use generic-service
host_name <turbo-server-hostname>
service_description Turbo Server Hub/Portal Service
check_command check_nt!SERVICESTATE!-d SHOWALL -l Turbo
}
define service {
use generic-service
host_name <turbo-server-hostname>
service_description Turbo Server Application Service
check_command check_nt!SERVICESTATE!-d SHOWALL -l Turbo.AppServer
}
The Windows Service check will cause alerts if the services are not running.
The following configuration monitors the disk space on C drive on Turbo Server.
define service {
use generic-service
host_name <turbo-server-hostname>
service_description Turbo Server Disk Space
check_command WinCheckDriveSize!c!20%!10%
}
The check will cause Warning alerts if the free space on the C drive drops below 20% and Critical alerts if it drops below 10%.
Datadog
Datadog can be used to monitor the health of a Turbo Server environment.
The following configuration monitors the HTTP response times and SSL certificate validity of the Turbo Server portal instance.
- name: <turbo-server-hostname>
url: https://<turbo-server-hostname>
seconds_warning: 5
seconds_critical: 10
check_certificate_expiration: true
disable_ssl_validation: false
days_warning: 14
This check will cause a WARNING alert if the response time is over 5 seconds and a CRITICAL alert if over 10 seconds or not responding. This check also cause an alert if the certificate will expire in under 14 days.
The following configuration monitors the Turbo Server Windows Services.
- services:
- Turbo
- Turbo.AppServer
The Windows Service check will cause alerts if the services are in a not running state.
The following configuration monitors the disk space on C drive on Turbo Server.
{
"name": "Disk space is low on {{device.name}} / {{host.name}}",
"type": "query alert",
"query": "avg(last_15m):avg:system.disk.in_use by {host,device} > 0.9",
"message": "message @alerts-email@corp.com",
"options": {
"include_tags": true,
"thresholds": {
"critical": 0.9,
"warning": 0.8
},
"require_full_window": true,
"notify_no_data": false,
"renotify_interval": 0,
"escalation_message": "",
"no_data_timeframe": null,
"new_group_delay": 300,
"silenced": {}
},
"priority": null,
"restricted_roles": null
}
The check will cause Warning alerts if the free space on the C drive drops below 20% and Critical alerts if it drops below 10%. The above configuration can be imported via the Datadog UI.
5.18 Logs
The following document describes the logs generated by Turbo Server.
Server Logs
Each Turbo Server domain server writes logs into the local file system. The Turbo Server service logs are written to the install directory's logs folder, typically C:\Program Files (x86)\Turbo Server\Logs.
Client Logs
User generated Turbo client logs are written to the %localappdata%\Turbo\Logs folder. System generated client commands are written to the %programdata%\Turbo\Logs folder.
Archiving
Turbo Server automatically archives all logs on service restart. Archives can be manually deleted by the administrator, or through the administration website.
Both Server and client logs archives are written to the C:\Program Files (x86)\Turbo Server\Logs\archives folder.
Web Interface
Turbo Server logs can be managed from the administration website.
6.0 VM
6.1 Virtual Machine
Overview
Unlike other virtualization solutions that require an entire copy of the host operating system, Turbo's container technology only emulates the features required to run application. Turbo containers have the same performance characteristics as native applications, but without any changes to system infrastructure.
The core of Turbo virtualization technology is the Turbo Virtual Machine (VM) kernel. Occupying just a few megabytes of storage and minimal performance overhead, Turbo VM is a lightweight implementation of core operating system APIs, including file system, registry, process, and threading subsystems.
Turbo VM is implemented entirely within the user-mode space, meaning Turbo applications can run without any driver installation or administrative privileges.
Turbo containers interact with a virtualized file system, registry, and process environment contained in the kernel, rather than directly with the host device operating system. Requests are handled internally within the virtualized environment, but can also be redirected or overridden based on your configuration.
Technology Change Tracking
A key benefit to Turbo virtualization technology is the assurance of forward compatibility of applications as new version of the underlying operating system are released.
Turbo VM provides a translation layer that mitigates incompatibilities across diverse operating system variants, providing a consistent environment for the application and its dependencies.
Turbo conducts continuous testing against OS builds distributed on the Windows Insider Track and makes VM updates as required. These updates are periodically published to Turbo.net but are not pushed to users. Specific VM versions may be pulled and tested by application publishers prior to general availability.
Upon availability of a new Windows Semi-Annual Channel release, Turbo validates and publishes the corresponding VM update. Unless otherwise specified by the administrator, users are automatically updated at that time to the latest Turbo VM via the Turbo.net cloud.
Layering
The Turbo VM is capable of running multiple images in a single virtual machine container by layering the file system and registry of each image.
This allow's users to create modular components that can be reused by larger projects.
In this section, the term layer is used interchagibly with image, since a layer within a container is always created by an image.
Layering Scenarios
Layering is used to support Turbo Studio components. It is also used when dependencies are created.
Conflicts Between Layers
In most scenarios, image layers will define unique resources that do not conflict with each other. However, it is possible for the layers to have conflicting resources and settings.
If multiple layers define different isolation modes for the same path, the first layer that defines the isolation mode will be used.
For example, if a container includes a git image with c:\git set to full isolation and a nodejs image with c:\git set to merge isolation, the conflict between the isolation settings will be resolved by the ordering of the layers.
The following command will create a container with the folder c:\git set to full isolation.
> turbo run git,nodejs
The following command will create a container with the folder c:\git set to merge isolation.
> turbo run nodejs,git
Folder Variables
Turbo VM maps well known root folders such as Documents and Program Files based on the host operating system at runtime.
These variables may also be used in TurboScript and as part of command-line arguments when building images or starting Turbo containers.
Note: Folder variables are case sensitive. They must appear in all caps to be recgonized by the command processor.
|
Variable |
Description |
|---|---|
@APPDIR@ |
(Application Directory): Folder where the virtual application executable resides. |
@WINDIR@ |
(Windows): The operating system installation location root as in c:\windows. |
@SYSDRIVE@ |
(System Drive): The root folder of the drive containing the operating system installation as in c:\. |
@PROGRAMFILES@ |
(Program Files): The 64-bit Program Files folder. |
@PROGRAMFILESX86@ |
(Program Files (x86)): The 32-bit Program Files folder. Program Files on 32-bit platform, and Program Files (x86) on 64-bit platform. |
@PROGRAMFILESCOMMON@ |
(Program Files\Common): The 64-bit Program Files\Common folder. |
@PROGRAMFILESCOMMONX86@ |
(Program Files (x86)\Common): The 32-bit Program Files folder\Common. Program Files\Common on 32-bit platform, and Program Files (x86)\Common on 64-bit platform. |
@SYSTEM@ |
(Windows\System32): The Windows 64-bit System32 folder. |
@SYSWOW64@ |
(Windows\SysWOW64): The Windows 32-bit System32 folder. Windows\System32 on 32-bit platform and Windows\SysWOW64 on 64-bit platform. |
@APPDATALOCAL@ |
(Current User Directory\AppData\Local): The folder that serves as a common repository for application-specific data used by the current, non-roaming user. |
@APPDATALOCALLOW@ |
(Current User Directory\AppData\LocalLow): The folder that serves as a common repository for application-specific data used by the current, non-roaming user for applications running with the Low integrity level. |
@APPDATA@ |
(Current User Directory\AppData\Roaming): The folder that serves as a common repository for application-specific data for the current roaming user. |
@STARTUP@ |
(Current User Directory\Start Menu\Programs\Startup): The folder containing the current user's startup items. |
@PROGRAMS@ |
(Current User Directory\Start Menu\Programs): The folder containing the user's program groups. |
@STARTMENU@ |
(Current User Directory\Start Menu): The folder containing the user's Start Menu contents. |
@DESKTOP@ |
(Current User Directory\Desktop): The current user's Desktop folder. |
@TEMPLATES@ |
(Current User Directory\Templates): The folder that serves as a common repository for the current user's document templates. |
@FAVORITES@ |
(Current User Directory\Favorites): The current user's Favorites folder. |
@DOCUMENTS@ |
(Current User Directory\Documents): The current user's Documents folder. |
@MUSIC@ |
(Current User Directory\Music): The current user's Music folder. |
@PICTURES@ |
(Current User Directory\Pictures): The current user's Pictures folder. |
@VIDEOS@ |
(Current User Directory\Videos): The current user's Videos folder. |
@DOWNLOADS@ |
(Current User Directory\Downloads): The current user's Downloads folder. |
@PROFILE@ |
(Current User Directory): The folder that stores the current user's profile data. |
@APPDATACOMMON@ |
(All Users Directory\Application Data): The folder that serves as a common repository for application-specific data shared by all users. |
@STARTUPCOMMON@ |
(All Users Directory\Start Menu\Programs\Startup): The folder containing startup items for all users. |
@PROGRAMSCOMMON@ |
(All Users Directory\Start Menu\Programs): The folder containing components shared across applications. |
@STARTMENUCOMMON@ |
(All Users Directory\Start Menu): The folder containing the Start Menu contents for all users. |
@DESKTOPCOMMON@ |
(All Users Directory\Desktop): The shared Desktop folder. |
@TEMPLATESCOMMON@ |
(All Users Directory\Templates): The folder that serves as a common repository for shared document templates. |
@FAVORITESCOMMON@ |
(All Users Directory\Favorites): The shared Favorites folder. |
@DOCUMENTSCOMMON@ |
(All Users Directory\Documents): The shared Documents folder. |
@MUSICCOMMON@ |
(All Users Directory\Music): The shared Music folder. |
@PICTURESCOMMON@ |
(All Users Directory\Pictures): The shared Pictures folder. |
@PICTURESCOMMON@ |
(All Users Directory\Pictures): The shared Pictures folder. |
@PROFILECOMMON@ |
(All Users Directory): The folder that stores shared profile data. |
@PROFILECOMMON@ |
(All Users Directory): The folder that stores shared profile data. |
Runtime Settings
The behaviour of containers and images can be modified by changing VM settings at runtime.
Effect the settings below using the --enable=VALUE or --disable=VALUE flags with the turbo run or turbo build command. For standalone executables, use the /XEnable=VALUE and /XDisable=VALUE flags.
# Example
turbo run --enable=IsolateWindowsClasses nodejs cmd
Altering VM settings for a container will override the settings of the base image(s).
|
Flag |
Default |
Persisted to Images |
Behavior |
|---|---|---|---|
BootstrapWait |
Disabled |
No |
Forces the bootstrap process to remain alive even if otherwise would be terminated after spawning startup files. Useful if maintaining the process tree hierachy is required. |
ChromiumSupport |
Disabled |
Yes |
Enables support for the Chromium sandbox (used in Google Chrome, Microsoft Edge, etc). |
DEPCompat |
Disabled |
Yes |
Enables compatibility for systems with Data Execution Protection (DEP) enabled. Enable this setting for containerized applications running on Windows 2003. |
DRMCompat |
Disabled |
Yes |
Enables additional compatibility with common DRM systems such as Armadillo. |
FaultExecutables |
Disabled |
Yes |
Forces all executable files to be faulted into the application container. |
HonorWow6464Access |
Enabled |
Yes |
Grants registry access to 32-bit applications snapshotted and running on 64-bit operating systems. |
IndicateElevated |
Disabled |
Yes |
Forces an application to run as if it has elevated security privileges even if the application does not. Enabling this setting will also eliminate UAC security prompts for elevation and subsequent application crashes. |
IsolateWindowsClasses |
Enabled |
Yes |
Prevents a containerized process from viewing window classes that are registered by external processes. You can use this to prevent interaction between containerized and non-containerized versions of the same program when the application checks for existing class registrations. |
MergeStartupDir |
Disabled |
Yes |
If executing a shell operation, instead of setting isolation level to Merge for the startup file only, set it for its parent folder and all subfolders except well-known root folders. |
PeriodicRegFlush |
Disabled |
No |
Enables a container's registry to be periodically flushed to disk storage. |
ReadOnly |
Disabled |
Yes |
Any attempts to write to a file or registry value will result in an access denied error code. |
ReadShare |
Disabled |
Yes |
Forces any files opened within the container to open with the `READ_SHARE` flag. Enabling this setting may help resolve compatibility issues caused by sharing violations. |
ShutdownProcTree |
Disabled |
Yes |
Forces all child processes in the container to shutdown when the root process exits. |
SpawnComServers |
Enabled |
Yes |
Forces any COM servers to be isolated from the host device. By default, COM servers are created outside the virtual environment to allow COM communication between containerized processes and native applications. |
SpawnVM |
Enabled |
Yes |
Forces all child processes of a container to be launched inside the container with access to the virtual environment. |
SuppressPopups |
Enabled |
Yes |
Suppresses any error popup dialogs that the virtual environment generates during application runtime. |
Standalone Executable Commandline Options
Standalone executables have several additional settings that can be customized on the command line.
- /XCollisionCheck=false - Disables the sandbox collision check.
- /XDeleteSandbox=[path] - Deletes the sandbox rooted at the specified path.
- /XDisable=[setting] - Disables the specified VM setting.
- /XEnable=[setting] - Enables the specified VM setting.
- /XEntry=[path] - Specifies the path to the entry SVM.
- /XLayerPath=[path] - Specified the path to an additional SVM to be layered into the virtual environment.
- /XLogPath=[path] - Specifies the path where logs are to be stored. By default they are created in the same directory as the virtual .exe. The directory must exist before the application is executed or else the logs will not be written.
- /XRegRoot=[path] - Specifies the path where the registry sandbox is stored (ex: "@HKCU@\Software\TurboSandboxes"). Default is "HKCU\Software\Spoon\SandboxCache".
- /XSandboxPath=[path] - Specifies the path where the filesystem sandbox is to be stored. Default is defined in the entry SVM settings.
- /XShellEx=[path] - Specifies a path to a file which is shell executed on startup. This is used to override the startup file behavior that is built into the entry SVM. Path can use tokenized paths (ex: "@SYSTEM@\cmd.exe").
- /XShellExVerb=[verb] - Specifies the shell execute verb to use. Default is "open".
- /XSpawnVmExceptions=[exceptions] - Specifies a list of processes that are execptions to the SpawnVm setting. Processes are to include the extension and are semi-colon delimited (ex: "/XSpawnVmExceptions=regedit.exe;notepad.exe"). Must be accompanied by an explicit declaration of SpawnVm with either /XEnable or /XDisable or the exceptions will not be honored (to avoid ambiguity about meaning when there are layers with conflicting SpawnVm settings).
6.2 Advanced Topics
DEP Compatibility
Background
Data Execution Protection (DEP) is a combined hardware and software technology designed to prevent execution of malicious code. DEP prevents memory pages not explicitly marked as executable from executing.
DEP has been supported on Windows since Windows XP SP2 and is supported by both Intel (via Execute Disable Bit or XD) and AMD (via No-Execute Page Protection or NX).
Issues with DEP
Certain applications may execute memory not marked as executable content as part of their dynamic runtime behavior. This behavior is detected by Windows if DEP is enabled and causes the application to crash. Such applications may require DEP to be disabled on the system.
DEP Compatibility Mode
The DEP Compatibility Mode in Turbo VM allows applications otherwise incompatibile with DEP to execute successfully without modifications to the host OS settings.
DEP Compatibiity Mode works by forcing Turbo VM to apply executable permissions to all memory pages used by applicable virtual processes.
This option is enabled via the Turbo Studio intefarce under the Process Settings or via the DEPCompat flag.
Note that enabling this option disables protections provided by DEP. This option is disabled by default and should only be enabled when required for compatibility purposes.
6.3 XML Configuration
XML Configuration (XAPPL)
XAPPL files specify the configuration for a container image created with Turbo Studio. XAPPL files are in XML format so it's easy to edit a container's configuration in a text editor just as you can with Turbo Studio user interface.
Here is a list that describes the purpose of each of the tags you see in XAPPL files created with Turbo Studio:
OutputLocation
Path to the folder where the output is saved after a successful build. This can be a local path, a UNC path, or a mapped drive.
OutputFile
Name of the image file output (ie. image.svm or application.exe).
ProjectType
The type of output that is created when built.
Possible values:
- Component - A Turbo component is a .svm file which is used with the Turbo.net Hub, Turbo Server, and as application dependencies.
- Application - A Turbo standalone executable is a .exe file which can run without any additional Turbo.net components.
- TurboApplication - A Turbo portable executable is also a .exe but requires the Turbo Client Runtime to be installed on the machine as a prerequisite.
Expiration
The expiration settings for the output image.
Attributes:
- daysLimit - Denotes the number of days that the image can be used on a machine before expiration.
- expirationDate - Gives a hard date for expiration.
- expirationWarningDays - The number of days prior to expiration that a warning message is displayed.
- webTimeUrl - A trusted url that is used by Turbo Studio to get the current time. Set to empty to use the machine system time.
- expireOnWebFail - Whether the launch will fail if the web time url is not accessible. Not applicable when using the system time.
The child elements ExpiredMessage, ExpirationWarning, and UnreachableWarning are the text messages that are displayed.
Output
The output options for the application build.
Attributes applicable to standalone applications:
- diagnosticMode - Enable diagnostic mode by default. Can also be enabled at runtime with
/XEnable=Diagnosticscommand line parameter.
Attributes applicable to portable applications:
- includeRuntimeDotNetImage - Include the Turbo Client Runtime .NET 4.5 image in the package. The .NET image will add more than 400MB to the size of the package so only use if you expect to target platforms that will not have the .NET runtime already present.
- allowFullIsolation - Allows the full isolation setting at runtime. Enabling this setting will force the clean image to be included from the Turbo.net hub which will add more than 200MB to the package size.
- enableSync - Enables sandbox sync for the container.
- enableAutoUpdate - Enables automatic updates for images which are included in the package.
- showLaunchSettings - Gives the user configuration options on application start (isolation, sync, etc).
- isolationLevel - The default isolation settings for the application container.
- hub - The hub where the package images are located. This can be https://turbo.net or the url of a Turbo Hub Server.
- isolationOptions - Additional isolation options to use in the application container. Currently the only available option is MergeUser which makes the user folders (desktop, documents, etc) merge isolated no matter the container's isolation settings.
Msi
The output settings for the MSI setup file.
Attributes:
- outputMsiPath - The location where the setup MSI is built.
- title - The value of the MSI title property.
- subject - The value of the MSI subject property.
- keywords - The value of the MSI keywords property.
- productName - The value of the MSI product name property.
- productVersion - The value of the MSI product version property.
- manufacturer - The value of the MSI manufacturer property.
- productLanguage - The value of the MSI product language property.
- author - The value of the MSI author property.
- description - The value of the MSI description property.
- manufacturerUrl - The value of the MSI manufacturer URL property.
- autoBuild - Whether the MSI should build when the application build completes successfully.
- isolatePerUser - Whether the MSI setup should be installed on a per-user basis or installed for all users. When installing per-user, the install root path is Application Data. When installing for all users, the install root path is Program Files.
- applicationFolder - The folder where the application should be installed.
- upgradePreviousVersion - Whether the setup should maintain the same Upgrade Code when it builds or change the Upgrade Code for each build version. This allows the setup to upgrade previous versions when they are installed or allow them to exist side-by-side. If enabled, the Product Version field must be updated in Turbo Studio to update the Upgrade Code automatically.
- productCode - The value of MSI product code property.
- upgradeCode - The value of MSI upgrade code property.
- componentId - The value of the MSI component id property.
Network
Contains a Proxy element.
Proxy
The network proxy settings for the container image.
Attributes:
- enableTCP - Enables the proxy for TCP network traffic.
- enableUDP - Enables the proxy for UDP network traffic.
- serverAddress - The hostname of the proxy server.
- serverPort - The connection port of the proxy server.
- type - The type of proxy connection. Possible values are Socks5, Socks4, Https, and Http.
- enableAuthentication - Whether the proxy requires authentication.
- username - The username to authenticate the proxy.
- password - The password to authenticate the proxy.
- useSpoonTicket - Whether the currently logged in Turbo user ticket is passed for authentication. Used for Turbo Tnlr.
Clipboard
The clipboard settings for the container (ie. copy-paste operations).
Attributes:
- isolationMode - The isolation mode which separates the container clipboard from native. Possible values are: Merge and Full. If fully isolated, will only be able to paste things that were copied inside the container.
EnvironmentVariableExGlobalSettings
The global environment variable settings.
Attributes:
- isolationMode - The isolation mode for environment variables. Possible values are: Inherit, Full, and WriteCopy. Inherit uses whatever isolation settings are specified on the environment variable registry keys (HKCU\Environment or HKLM\System\CurrentControlSet\Control\Session Manager\Environment).
Dependencies
Contains a collection of Dependency elements. These only affect container environments run through the Turbo.net Client Runtime platform and have no effect on standalone executable builds.
Dependency
Specifies a Turbo.net Hub dependency for the image.
Attributes:
- Identifier - The fully qualified identifier of the Turbo.net Hub dependency (ex: mozilla/firefox-base:61.0.2).
- Hash - The hash of the dependency image (ex: d54de61a9fd54a5467e5bb084e0dcabacb0689cab5c329558d2916d7d3f1bf38).
- BakedIn - Whether the dependency image configuration has already been merged into the current image configuration or if it is to be merged at runtime.
Requirements
Contains a collection of Requirement elements. These only affect container environments run through the Turbo.net Client Runtime platform and have no effect on standalone executable builds.
Requirement
Specify various requirements that are enforced at runtime.
Attributes:
- type - The type of runtime requirement. At this time this value can only be minosver which specifies a minimum required Microsoft Windows version.
- value - The value to pass to the type handler. Currently this can be the minimum version of Microsoft Windows to allow execution (Win7 is "6.1", Win8 is "6.2", Win8.1 is "6.3", and Win10 is "10.0")
Packages
Configuration settings of runtime packages which are included in the image. Contains Java and a collection of Package elements.
Attributes:
- trimDotNet - Performs a build-time process to attempt to trim included .NET packages to the minimum set of binaries required. This only works for .NET packages added from Turbo Studio runtimes. Custom .NET packages added in Layers panel are not subject to trimming operations.
Package
Indicates that a layer is to be merged into the image at build-time. Turbo Studio searches the local Layers cache for matching packages. The Layers cache is in C:\Users[user]\Documents\Turbo.net\Components and is configured in the Turbo Studio Layers panel.
Attributes:
- name - The name of the layer package. This comes from the layer standard metadata if present or else the name of the file.
- platform - The system architecture where the package is configured. This is deprecated and always x86 now.
- version - The version of the layer package. This comes from the layer standard metadata if present or else is 1.0.0.0 by default.
Java
Configuration settings for the virtual java runtime. Contains Runtime and Settings elements.
Runtime
Configuration settings for the virtual java runtime.
Attributes:
- name - The name of the package. In this context it will always be Java.
- platform - The target platform for the java package. In this context it will always be x86.
- version - The version of the java package to use.
Settings
Configuration settings for the virtual java runtime.
Attributes:
- startupType - The startup type for the java application. Possible values are Class and JAR.
- startup - The name of the class or jar file to execute.
- classpath - The path to search for the class files to execute. Only used with type Class.
- options - Additional command line parameters which are passed to java.exe.
VirtualizationSettings
Virtual machine configuration settings which affect runtime behavior. Also contains a ChildProcessVirtualization element.
Attributes:
- suppressBranding - Disables the Turbo runtime splash. Default is True
- deleteSandbox - Removes the sandbox runtime environment when the application exits. This is used to ensure a fresh sandbox environment on every launch. Default is False.
- shutdownProcessTree - Kills all the virtual processes when the root process exists. This is used to ensure that services and other spawned processes don't hang around after the application exists. Default is False.
- enhancedDEPCompatibility - Provides compatibility for Windows 2003 systems with Data Execution Protection enabled. Default is False.
- notifyProcessStarts - Causes a notification to be sent as a debugging output string whenever a new process is started within the virtual environment. Default is False.
- enableLegacySecurityPassthrough - Causes calls to NtSetSecurityObject to be ignored. Default is False.
- trimUACManifest - Removes items from the application manifest that may cause the application to require elevation and show a UAC prompt.
- forceFIPSCompliance - Disables runtime FIPS check for application compatibility on locked down devices. To be used only if application security can be ensured by other means. Default is False.
- forceReadShareFiles - Forces any file opened by any process within the virtual environment to do so with the READ_SHARE flag set to prevent files from being locked. Default is False.
- isolateWindowClasses - Isolates window classes used in the Windows GUI framework (using RegisterClass or RegisterClassEx system APIs). For example, this would allow a virtualized Firefox instance to run side-by-side with a native instance. Default is False.
- readOnlyVirtualization - Prevents any modifications to files or registry keys in the container. All requests to open files or keys for read access will return access denied errors. Default is False.
- disableXenocodeCommandLine - Disables the virtualization command line switches used to customize behavior at runtime (such as /XShellEx, /XEnable, etc). Default is False.
- suppressSandboxCollisionCheck - Disables detection of multiple applications trying to access the same sandbox at the same time with different settings. Doing this could corrupt the sandbox but on rare occasion is necessary to work around other problems. Default is False.
- subsystem - The Windows platform subsystem to use and determines whether it is launched as a windowed or console application. This can be Inherit (default), GUI, or Console. Inherit will determine the subsystem from the startup file.
- targetArchitecture - The system architecture that the application is expected to run in. This controls the nodes that are available in Turbo Studio filesystem editor and affects file and registry path mappings at runtime. Possible values are x86 and x64. In most cases this should be set to x64 unless the configuration was generated from a snapshot on an x86 machine.
Note that if targetArchitecture is set to "x86" then any .NET application which has a target platform of "Any CPU" will run as 32-bit on 64-bit machines. - sandboxPath - The base path for where the container's runtime sandbox is stored. The sandbox records all changes to full or writecopy isolated files and registry keys in the container. Default path is under the current user's local application data folder. This value is only used for standalone applications.
- exeOptimization - The startup file will be attempted to be launched from within the initial virtual machine boot process rather than spawn a new process. This is only possible if there is a single startup file to be launched. Default is False.
- compressPayload - Compresses the data which is included in the container package. This decreases the size of the package but increases the initial launch time as data must be decompressed to use. Default is False.
- forceIndicateRunningElevated - Creates an environment where the container processes believe they are running with elevated priviledges when they are not. This is to work around some application requirements for full administrator access. Default is False.
- launchChildProcsAsUser - Causes all child processes to be launched with the same security priviledges as the root container process. Default is False.
- enableDRMCompatibility - Enables enhanced compatibility with applications that are protected by DRM software such as "Armadillo". Default is False.
- faultExecutablesIntoSandbox - Causes all .exe and .dll files to be faulted into the sandbox before being loaded rather than read from within the container package. This can work around some .dll load issues that result in application errors. Default is False.
- minStackSize - The minimum amount of reserve and commit stack space (in bytes) that used when creating a new thread. Used if a legacy application did not specify a sufficent amount of stack to run on modern OSes. Default is 0 which uses what is in the application.
- minSandboxSpaceAvail - The minimum amount of disk space (in MB) on the sandbox volume that is required to launch the container. Default is -1 (no limit).
- honorWow6464AccessFlag - Allows the use of the KEY_WOW64_64KEY registry key access flag. Disabling this can work around application errors caused because it wasn't properly snapshotted for x64 machines. Default is True.
- suppressPopups - Hides all error dialogs shown by the virtual machine. This can be used as a work around for stubborn errors that cannot be solved other ways. This should be used very sparingly as it will potentiall hide real problems. Default is False.
- hideShellWindow - Causes the main desktop window to be hidden from processes in the container. This is used for compatibility in Internet Explorer 6 containers. Default is False.
- isDriverSVM - For internal use only. Indicates that the image has special handling in the Turbo Client Runtime environment. Default is False.
- forceEntryLayerIsolation - Disables the patching behavior of layer dependencies in regards to isolation settings so that the base layer isolation is always used over patch layers. Default is False.
- stubExeCachePath - Specifies a cache path for virtual machine stubexe processes. By default this is blank and all stubexes are stored in the container sandbox.
- spoonCachePath - Specifies a cache path for temporary runtime files. By default this is blank and all temp files are stored under %TEMP%.
- waitForChildOnly - Causes the container to exit when the startup file exits rather than wait for all container processes to exit. Spawned processes will remain unless shutdownProcessTree is also enabled. This is only applicable if exeOptimization is disabled. Default is True.
- httpUrlPassthrough - Causes http/https URLs to be opened outside the container with the native handler. Default is False.
- mergeStartupDir - Causes the directory where the startup file is located to automatically be set to merge isolation. Useful when the startup file is dynamic (ie. set with /XShellEx) and needs access to process files. Default is False.
- allowGlobalWindowHooks - Enables global hooks using the SetWindowsHookEx system API. By default this is False which automatically converts any global hooks into a local thread hook.
- breakIdenticalSendMessageRecursion - Enables detection of identical SendMessage calls in buggy software which may cause a stack overflow error. Default is False.
- extendedWinXPCompatibility - Enables additional compatibility for applications which rely on undocumented APIs in Windows XP. Default is False.
- isolateProcessNames - Appends the sandbox hash string to the end of process names. This is used to allow side-by-side execution for applications which have logic to find existing processes to prevent mulitple instances. Default is False.
- isolateNonSystemDrives - Hides access to non-system drives on the machine. Default is False.
- isolateNetworkShares - Hides access to network shares defined on the machine. Default is False.
- disableProxySupportForRouteMaps - Disables network isolation and routing support to work around compatibility issues with some network security products. Default is False.
- isolateDDE - Prevents DDE messages (Dynamic Data Exchange) from passing between native and container environments. Default is False.
- extendedAppLockerCompatibility - Prevents some application errors when using AppLocker DLL Rules technology. Default is False.
- chromiumSupport - Enables support for the Chromium sandbox. This is automatically enabled for Google Chrome and Microsoft Edge browsers. Default is False.
ChildProcessVirtualization
Settings for how child processes are handled in the container. Contains a collection of ChildProcessException elements.
Attributes:
- spawnVm - Indicates that by default child processes should be spawned inside the container. Processes named in ChildProcessException will be the opposite behavior of this setting. Default is True.
- spawnExternalComServers - COM servers will be accessible to other native processes. Default is False.
ChildProcessException
Indicates a child process that is to have different spawnVm settings than the default specified in ChildProcessVirtualization.
Attributes:
- name - The name of the process to exclude (ex: splwow64.exe).
XLayers
Allows a container to search for additional layers to load at runtime. Contains a collection of RequiredXLayer elements.
Attributes:
- xlayerSearchPattern - A path pattern that is used at runtime to search for layers to load. Layers discovered are loaded in alphabetical order. For example: @APPDIR@\patches_.svm* and \networkshare\patches*.svm.
RequiredXLayer
Specifies which layers are required to be present in order for the container to launch. The search pattern in XLayers element must be specified.
Attributes:
- name - The name of a required layer which is to be discovered in the xlayerSearchPattern (ex: shared.svm). If the layer is not discovered then an error will occur and the container will not start.
NamedObjectIsolation
Allows isolation of specific named objects in the container (such as events, mutexes, and semaphores). Contains a collection of Exception elements.
Attributes:
- enabled - Whether named object isolation is enabled by default. This can be overwritten with Exception elements. Default is False.
Exception
Specifies exceptions to the default named object isolation rules.
Attributes:
- regex - The regular expression pattern to match named object names. For example, "ieframe" will match any named object with "ieframe" anywhere in the name and "\RPC Control\OSPPC.*" will match objects with names such as "machine\rpc control\osppc0123".
- replacement - Optional value used to rename matching named objects. For example, if regex were set to "NAMEDOBJ\d+" and replacement was set to "NAMEDOBJ" then an object with a name "NAMEDOBJ25" would be renamed to "NAMEDOBJ". Default is empty so no replacement operation is performed.
Dns
Specifies DNS mappings inside the container environment. Contains a collection of Entry elements.
Entry
Specifies a mapping for hostnames and IPs from one to another.
Attributes:
- name - The source hostname or IP to map (ex: google.com).
- redirect - The target hostname or IP to map to.
Device
Overwrites device characteristics of the machine where the container is executed. Contains elements for MachineName, MachineSid, NetworkAdapters, and ComputerSystemProduct. Use xstudio.exe /capture-device to fill in the information.
MachineName
Overwrites the name of the machine which is returned from GetComputerNameEx and GetComputerName system APIs. Does not change the COMPUTERNAME environment variable.
MachineSid
Overwrites the SID (Security Identifier) of the machine.
NetworkAdapters
Replaces the network adapters which appear available to the container. Contains a collection of NetworkAdapter elements which contain a PhysicalAddress element. The PhysicalAddress element accepts the MAC address of the adapter that will be returned by the GetAdaptersAddresses system API (ex: 000d83b1c08e).
ComputerSystemProduct
Overwrites the machine system product UUID returned from Win32_ComputerSystemProduct WMI. Contains a UUID element (ex: FAF76B96-798C-11D2-AAD1-006008C78BC7).
EnvironmentStats
Contains information about the snapshot machine where the application configuration was created. For non-snapshot scenarios, this element is empty.
Attributes:
- osVersion - The version of Microsoft Windows operating system.
- x64 - True if was a 64-bit operating system.
- ieVersion - The version of Microsoft Internet Explorer
WorkingDirectory
Specifies which directory the virtual application will execute from.
Attributes:
- option - The working directory mode used. Possible values are StartupFileDirectory (the directory where the startup file resides), CurrentDirectory (the directory where the virtual application is launched from), or SpecificDirectory (uses the value from the specifiedDirectory attribute). Default is StartupFileDirectory.
- specifiedDirectory - Sets the working directory to a specific directory. Only applicable if the option mode is set to SpecificDirectory.
DisabledVmSettings
A list of VM settings which are to be disabled in the Turbo.net Client Runtime environment (including portable executables). Not applicable to standalone executables or their dependencies. Contains a collection of DisabledVmSetting elements.
DisabledVmSetting
Specifies a VM setting to be disabled in the Turbo.net Client Runtime environment.
Attributes:
- name - The name of the VM setting to disable.
StartupShims
A list of user defined shims that will be executed on container startup. Contains a collection of Shim elements.
ShutdownShims
A list of user defined shims that will be executed on container shutdown. Contains a collection of Shim elements.
Shim
A user defined DLL that contains custom functionality to be executed before or after a container's life.
Attributes:
- path - The path to where the shim DLL is located. At build time the shim will be copied into the container where it will be executed from at runtime.
- param - A string parameter that is passed to the shim DLL.
Scripts
A user defined shell script file (.bat or .cmd) that is executed before or after a container's life.
Attributes:
- startup - The path in the container environment where the startup script is located. Must use the full, resolved virtual path (no tokens such as @SYSDRIVE@).
- shutdown - The path in the container environment where the shutdown script is located. Must use the full, resolved virtual path (no tokens such as @SYSDRIVE@).
- runAsAdmin - The scripts will be executed in an elevated user context.
- exitOnNonZeroReturnValue - Whether the startup script can abort the application launch by returning a non-zero exit code.
ActiveDirectory
Specifies launch restrictions based on Active Directory group or domain membership.
Attributes:
- domain - The name of an Active Directory domain that is required.
- group - The name of a an Active Directory group that the current user must be a member of.
StandardMetadata
Configures standard metadata properties. For standalone executables, these values show up in .exe properties. For layers, these values will be used when displaying information when imported in the Layers panel in Turbo Studio. Contains a collection of StandardMetadataItem elements.
StandardMetadataIte
Standard metadata which is applied to the image.
Attributes:
- property - The name of the standard metadata field. Possible values are Title, Publisher, Description, Website, and Version.
- value - The value of the standard metadata field. This can be set to @INHERIT@ to get the value automatically from the startup file (if only one is specified).
CustomMetadata
Configures custom metadata properties. For standalone executables, these values show up in .exe properties. Contains a collection of CustomMetadataItem elements.
CustomMetadataItem
Custom metadata which is applied to the image.
Attributes:
- property - The name of the custom metadata field.
- value - The value of the custom metadata field.
SplashImage
Defines a splash image that is displayed while the startup file is being executed.
Attributes:
- path - The path to the image.
- transparency - The color used to indicate transparent pixels. This is the name of a system-defined color. The default is Magenta (#FFFF00FF).
- seconds - The length of time (in seconds) the splash image is displayed. Configure this to be less than the startup time for your application.
StartupFiles
Defines the available files that can be executed to start the container. Contains a collection of StartupFile elements.
StartupFile
Defines a file that can be used to start the container.
Attributes:
- node - The full, virtual path to the file (.exe, .cmd, etc). The file doesn't need to be present in the container but must be accessible given the applicable isolation settings. The path should use tokens for maximum compatibility (ex: @SYSDRIVE@, @PROGRAMFILES@, etc).
- tag - A name that can be given to a group of startup files (also known as trigger in some contexts). For standalone executables, the tag name can be passed as the first parameter to run all the startup files in the group. For the Turbo.net Client Runtime environment, the
--triggerparameter can be used to specify the group to execute. If this is empty, it will be executed by default (same as default attribute). - commandLine - Additional command line parameters to pass to the startup file when it is executed.
- default - If this startup file is executed by default when no other tag value is specified.
- architecture - The architecture where the startup file is valid. Possible values are x64, x86, or AnyCpu (ex: x64 startup files are only launched on 64-bit operating systems).
Layers
Defines layers of virtual operating system settings which are merged together at runtime. Layers are loaded in the order that they are defined in the xappl. Conflicting settings (ie. a file defined in multiple layers with different isolation settings) are won by the layer that is loaded first. Containers a collection of Layer elements.
Layer
Defines a layer of the virtual operating system. Contains elements for Condition, Filesystem, Registry, EnvironmentVariables, EnvironmentVariablesEx, PortMaps, ObjectMaps, Services, Shortcuts, ProgIds, Extensions, DefaultPrograms, SnapshotDirectories, and ShellExtensions.
Attributes:
- name - The name of the layer. The name Default defines the main layer which is the foundation for all other layers. There can only be one Default layer. The names for the other layers should be set to convey the reason for the layer's existance.
Condition
Defines a condition that must pass at runtime for the layer to be applied.
Attributes:
-
variable - The type of the condition. Possible values include:
- OS - Checks against the operating system version. Possible values are Win10, Win81, Win8, Win7, and WinXP. All comparison operator values are applicable (ie. Less, LessEqual, Equal, NotEqual, GreaterEqual, Greater).
- IE - Checks against the version of Microsoft Internet Explorer that is present. Value is the version of IE to compare to (ex: 10.0). All comparison operator values are applicable.
- Machine - Checks against the architecture of the operating system. Possible values are x64 and x86 (ex: x64 matches against a 64-bit operating system). This condition does not use the operator attribute, assuming that the operator is Equal.
- MachineRuntime - Same as Machine.
- KEY - Checks for the presence of a registry key. Only applicable for use in the Turbo.net Client Runtime environment. Values are the full registry key path. Possible operator values are Exists and DoesNotExist.
- FILE - Checks for the presence of a file. Only applicable for use in the Turbo.net Client Runtime environment. Values are the full file path. Possible operator values are Exists and DoesNotExist.
- BOOL - Combines multiple Condition elements into logical statements. Possible operator values are AND, OR, and NOT. Condition elements are included as children of boolean conditions.
-
operator - The operator used in the condition. Possible values are context specific and include Less, LessEqual, Equal, NotEqual, GreaterEqual, Greater, AND, OR, NOT, Exists, and DoesNotExist.
-
value - The comparison value for the condition. Acceptable values are context specific.
Filesystem
Defines the virtual filesystem. Contains a collection of root Directory elements.
Root directory elements include:
- @APPDATA@ - Resolves to the user's roaming application data folder (ex: c:\users\turbouser\appdata\roaming).
- @APPDATACOMMON@ - Resolves to the machine's common application data folder (ex: c:\programdata).
- @APPDATALOCAL@ - Resolves to the user's local application data folder (ex: c:\users\turbouser\appdata\local).
- @APPDATALOCALLOW@ - Resolves to the user's low privilege application data folder (ex: c:\users\turbouser\appdata\locallow).
- @APPDIR@ - Resolves to the directory where the virtual application is located.
- @DESKTOP@ - Resolves to the user's desktop folder (ex: c:\users\turbouser\desktop).
- @DESKTOPCOMMON@ - Resolves to the shared desktop folder (ex: c:\users\public\desktop).
- @DOCUMENTS@ - Resolves to the user's documents folder (ex: c:\users\turbouser\documents).
- @DOCUMENTSCOMMON@ - Resolves to the shared documents folder (ex: c:\users\public\documents).
- @DOWNLOADS@ - Resolves to the user's downloads folder (ex: c:\users\turbouser\downloads).
- @FAVORITES@ - Resolves to the user's favorites folder (ex: c:\users\turbouser\favorites).
- @FAVORITESCOMMON@ - Resolves to the shared favorites folder (ex: c:\users\public\favorites).
- @MUSIC@ - Resolves to the user's music folder (ex: c:\users\turbouser\music).
- @MUSICCOMMON@ - Resolves to the shared music folder (ex: c:\users\public\music).
- @PICTURES@ - Resolves to the user's pictures folder (ex: c:\users\turbouser\pictures).
- @PICTURESCOMMON@ - Resolves to the shared pictures folder (ex: c:\users\public\pictures).
- @PROFILE@ - Resolves to the user's profile folder (ex: c:\users\turbouser).
- @PROFILECOMMON@ - Resolves to the shared profile folder (ex: c:\users\public).
- @PROGRAMFILES@ - Resolves to the 64-bit program files directory (ex: c:\program files). This does not resolve for 32-bit applications.
- @PROGRAMFILESCOMMON@ - Resolves to the 64-bit common program files directory (ex: c:\program files\common files). This does not resolve for 32-bit applications.
- @PROGRAMFILESX86@ - Resolves to the 32-bit program files directory (ex: c:\program files (x86) on 64-bit operating system, c:\program files on 32-bit operating system).
- @PROGRAMFILESCOMMONX86@ - Resolves to the 32-bit common program files directory (ex: c:\program files (x86)\common files on 64-bit operating system, c:\program files\common files on 32-bit operating system).
- @PROGRAMS@ - Resolves to the user's start menu programs folder (ex: c:\users\turbouser\appdata\roaming\microsoft\windows\start menu\programs).
- @PROGRAMSCOMMON@ - Resolves to the shared start menu programs folder (ex: c:\users\public\appdata\roaming\microsoft\windows\start menu\programs).
- @STARTMENU@ - Resolves to the user's start menu folder (ex: c:\users\turbouser\appdata\roaming\microsoft\windows\start menu).
- @STARTMENUCOMMON@ - Resolves to the shared start menu folder (ex: c:\users\public\appdata\roaming\microsoft\windows\start menu).
- @STARTUP@ - Resolves to the user's startup folder (ex: c:\users\turbouser\appdata\roaming\microsoft\windows\start menu\programs\startup).
- @STARTUPCOMMON@ - Resolves to the shared startup folder (ex: c:\users\public\appdata\roaming\microsoft\windows\start menu\programs\startup).
- @SYSDRIVE@ - Resolves to the system drive (ex: c:)
- @SYSTEM@ - Resolves to the 64-bit system directory (ex: c:\windows\system32). This does not resolve for 32-bit applications.
- @SYSWOW64@ - Resolves to the 32-bit system directory (ex: c:\windows\syswow64 on 64-bit operating system, c:\windows\system32 on 32-bit operating system).
- @TEMPLATES@ - Resolves to the user's template folder (ex: c:\users\turbouser\appdata\roaming\microsoft\windows\templates).
- @TEMPLATESCOMMON@ - Resolves to the shared template folder (ex: c:\users\public\appdata\roaming\microsoft\windows\templates).
- @VIDEOS@ - Resolves to the user's video folder (ex: c:\users\turbouser\videos).
- @WINDIR@ - Resolves to the Windows folder (ex: c:\windows).
Directory
Defines a directory in the virtual filesystem. Contains a collection of Directory and File elements.
Attributes:
- name - The name of the directory.
- isolation - The isolation of the directory. Possible values include Full, WriteCopy, and Merge.
- readOnly - If the directory is marked as read-only. If True, all write attempts to this directory will return access denied errors.
- hide - If the folder is hidden from all folder enumeration. Only full paths to files under hidden directories will work.
- noSync - If the directory should use the local sandbox. The local sandbox contains changes that will only be persisted on the local machine and not get sync to other sessions.
- source - If defined, files from the source path will be added to the folder at build time.
File
Defines a file in the virtual filesystem.
Attributes:
- name - The name of the file.
- isolation - The isolation level of the file. Possible values include Full or Hidden.
- readOnly - If the file is marked as read-only. If True, all write attempts to this file will return access denied errors.
- hide - If the file is hidden from all file enumeration. Only full paths to the file will work.
- created - The creation timestamp of the file when it was added to the configuration.
- modified - The last modified timestamp of the file when it was added to the configuration.
- upgradeable - If the file is allowed to be updated by later patch layers.
- source - The path to the source file that will be used at build time.
- system - An optional value that indicates that a file should have the SYSTEM file attribute applied.
- privatize - An optional value that can be used for .DLL files which causes all references to the file in the virtual filesystem from other fils to be rewritten. This can be used to isolate references to low level system .DLLs for compatibility with old applications on new operating systems.
Registry
Defines the virtual registry. Contains a collection of root Key elements.
Root registry key elements include:
- @HKCR@ - Resolves to the classes root registry key.
- @HKCU@ - Resolves to the current user root registry key.
- @HKLM@ - Resolves to the local machine root registry key.
- @HKU@ - Resolves to the all users root registry key.
Key
Defines a registry key in the virtual registry.
Attributes:
- name - The name of the registry key.
- isolation - The isolation level of the registry key. Possible values are Full, WriteCopy, and Merge.
- noSync - If the key and its values are stored in the local sandbox. The local sandbox is only stored on the local machine and will not follow the session to other machines.
Value
Defines a registry key value in the virtual registry.
Attributes:
-
name - The name of the registry value. Set to empty string for the default value.
-
isolation - The isolation level of the registry key. Possible values are Full and Hidden.
-
type - The type of registry value. Possible values include:
- String - A null-terminated string. Translates to REG_SZ in the registry.
- ExpandString - A null-terminated string which contains environment variables to be resolved at runtime. Translates to REG_EXPAND_SZ in the registry.
- StringArray - An array of null-terminated strings. Translates to REG_MULTI_STRING in the registry. Each string in the array is represented by a child String element (ex: <String value="..." pathInformationTuples="..."/>).
- DWORD - A 32-bit integer value. Translates to REG_DWORD in the registry.
- QWORD - A 64-bit integer value. Translates to REG_QWORD in the registry.
- Binary - A binary blob value in hexidecimal string format (ex: 00AB385128...). Translates to REG_BINARY in the registry.
-
value - The registry value in string format. See above type for format. This is not applicable to StringArray types.
-
pathInformationTuples - An optional value that is set for the string types if the value was normalized during the snapshot process. The three values in the tuple are:
- Flags for how the string value was on the snapshot machine... 1 - was all uppercase, 2 - was all lowercase, 4 - was in short file format (ex: xxxxxx~1). The value can be a combination of these flags (ex: 5 means all uppercase and short format).
- The start index of where in the string the replacement occurs.
- The length of the replacement.
EnvironmentVariables
Deprecated. See EnvironmentVariablesEx.
EnvironmentVariablesEx
Defines virtual environment variables. Contains a collection of VariableEx elements.
VariableEx
Defines a virtual environment variable.
Attributes:
- name - The name of the environment variable (ie. path).
- isolationMode - The isolation mode for the environment variable. Possible values are Inherit, Full, and WriteCopy. If set to Inherit the value is taken from the global value defined in EnvironmentVariableExGlobalSettings.
- value - The value of the environment variable.
- mergeMode - The manner in which the the environment variable value is merged with the native value at runtime. Possible values are Replace, Host, Prepend, and Append.
- mergeString - The string that separates the virtual value from the native value if they are to be merged. The default is ";".
PortMaps
Defines mappings between virtual network ports and native ports. Contains a collection of PortMap elements.
PortMap
Defines a mappings between a virtual network port and a native port.
Attributes:
- value - The mapping value in the format: [to port]:[from port]/[protocol], where all occurrences of [to port] are mapped to [from port] for the given protocol. The protocol can be tcp or udp but can omit /[protocol] to target both protocols.
ObjectMaps
Defines name mappings for various Windows objects. Contains a collection of ObjectMap elements.
ObjectMap
Defines a name mapping for various Windows objects.
Attributes:
- value - The mapping value in the format: [type]://[name]:[mapping], where [name] and [mapping] are type specific (see table below).
Possible values:
| Type | Name | Mapping |
|---|---|---|
| pipe - Indicates that a named pipe should be isolated from the native system. | The name of the pipe that is to be isolated. | Unused. Must be assigned to the value "0". |
| ip - Maps requests to the specified IP address to another IP address. | The IP address to map from. The name can include an optional flag to not preresolve hostnames. This is done be prefixing the name with $$donotpreresolvehostnames$$ (ex: ip://$$donotpreresolvehostnames$$1.1.1.1:2.2.2.2). | The IP address to map to. To deny access to the named IP, set this value to 0.0.0.0. This value can be made identical to the IP to map to allow the IP if there are other generic mappings to deny it (ex: ip://1.1.1.1:1.1.1.1). |
| host - Maps requests to the specified host name to another host or IP address. | The host name to map from. A wildcard character is supported at the beginning (ex: * or *.google.com). | The IP address or host name to map to. To deny access to the named IP/host, set this value to 0.0.0.0. This value can be made identical to the name to map to allow the host if there are other generic mappings to deny it (ex: host://*.google.com:*.google.com if host://*:0.0.0.0 also exists). |
| window - Indicates that a window class name should be isolated from the native system. | The name of the window class to be isolated. | Unused. Must be assigned to the value "0" (ex: window://IEFrame:0 will isolate Microsoft Internet Explorer's main window from the native environment). |
Services
Defines virtual services. Contains a collection of Service elements.
Service
Defines a virtual service.
Attributes:
- name - The name of the service. This will be used to start the service inside the container via
sc startcommand. - commandLine - The command that is executed to start the service.
- friendlyName - The friendly name of the service.
- description - The description of the service.
- keepAlive - If the service continues to run after the container has closed.
- start - The method by which the service is started. Possible values are AutoLoad (started on container start), LoadOnDemand (started manually from inside the container), or Disabled (cannot be started).
- type - The type of the service. This must be set to 16 (SERVICE_WIN32_OWN_PROCESS, service started in its own process).
- group - Unused, leave empty.
- errorControl - Unused, leave empty.
- objectName - Unused, leave empty.
- serviceSidType - Unused, leave 0.
- wow64 - Unused, leave False.
Shortcuts
Defines shortcuts that will be added with desktop registration or MSI deployments. Contains a collection of root Folder elements.
Root shortcut folders include:
- Desktop - Resolves the user's desktop folder (ex: c:\users\turbouser\desktop).
- Programs Menu - Resolves the user's startup menu programs folder (ex: c:\users\turbouser\appdata\roaming\microsoft\windows\start menu\programs).
- SendTo - Resolves the user's sendto folder (ex: c:\users\turbouser\appdata\roaming\microsoft\windows\sendto).
Folder
Defines a folder where shortcuts will reside that will be added with desktop registration or MSI deployments. Contains a collection of Folder and Shortcut elements.
Attributes:
- name - The name of the folder.
Shortcut
Defines a shortcut that will be added with desktop registration or MSI deployments. The shortcut must point to an existing startup file. Optionally contains an IconResource element.
Attributes:
- name - The name of the shortcut.
- targetPath - The full virtual path to the shortcut target. Must match the path of a defined startup file.
- targetParameter - The trigger for the referenced startup file.
- arguments - Command line arguments to the shortcut target.
- showCmd - Controls how the target is launched. Possible values are 1 (normal), 3 (maximized), or 7 (minimmized).
- description - The description of the shortcut.
IconResource
The icon to use for the shortcut.
Attributes:
- data - The icon image data in hexidecimal format (ex: 0001000000ffffffff01000000000000000c0200000049547572626f2...). Set this in Turbo Studio.
ProgIds
Defines virtual COM ProgIDs that will be added with desktop registration or MSI deployments. Contains a collection of ProgId elements.
ProgId
Defines a virtual COM ProgID that will be added with desktop registration or MSI deployments. This is used for file associations. Contains a collection of Verb and IconResource elements.
Attributes:
- name - The name of the ProgID (ex: Excel.Sheet.12).
- description - The description of the ProgID.
Verb
Defines shell verbs that can be used with associated files.
Attributes:
- name - The name of the verb (ex: open).
- command - The name of the verb as it is displayed in the Windows shell. The ampersand character can be used to denote the hotkey for the command (ex: &Open).
- target - The full virtual path to the handler application. If empty, the behavior is inherited from the virtual registry definitions.
- arguments - The command line arguments to pass to the target handler (if defined). Use %1 to use the path to the associated file.
- default - If the verb is the default behavior in the shell (ie. used when double clicking an associated file).
IconResource
The icon to use for the file extension mapped to this ProgID. If not present then the Windows default empty document icon will be used.
Attributes:
- data - The icon image data in hexidecimal format (ex: 0001000000ffffffff01000000000000000c0200000049547572626f2...). Set this in Turbo Studio.
Extensions
Defines the file associations which will be added with desktop registration or MSI deployments. Contains a collection of Extension elements.
Extension
Defines a file association which will be added with desktop registration or MSI deployments.
Attributes:
- name - The file extension (ex: .xml).
- progId - The virtual ProgID to use to handle file operations.
- mimeType - The MIME type of the file extension (ex: text/xml).
DefaultPrograms
Deprecated. Leave empty.
SnapshotDirectories
Records the native environment where a snapshot was taken. These mappings are used at runtime to resolve paths in opaque data structure (ie. application files) that couldn't be resolved at build time (like can be done for registry key values). Contains a collection of Directory elements.
Directory
Records a mapping for root filesystem directory nodes. These are used instead of the standard mappings.
Attributes:
- rootNode - The root folder node to be mapped.
- path - The path where the root folder node was pointing on the machine where a snapshot occurred.
- enabled - If the mapping is enabled at runtime or is just recorded for information. Enabling system folder mappings (ex. @WINDIR@, @SYSTEM@, etc) will often break applications if the mappings are not consistent with the execution machine.
ShellExtensions
Defines shell extensions that will be added with desktop registration. Contains a collection of ShellExtension elements. For internal use only.
ShellExtension
Defines a shell extension that will be added with desktop registration.
Attributes:
- dllPath - The full virtual path to the DLL which exposes the shell extension.
- IID - The IID of the shell extension COM object.
- additionalFiles - A semi-colon seperated list of paths to additional required files.
Publishers
Unused. Leave empty.
HarvestSettings
Deprecated. Leave empty.
Id
A unique GUID for the configuration.
Attributes:
- value - A GUID string (ex: {075FB3D6-D9CB-4304-BFC4-C755268AD9CD}).
6.4 Troubleshooting
Once your container package is built, it is time to test on the platforms that you expect to encounter. When issues surface there are several things that can be done to track down the cause.
Viewing the Container Environment
Some problems are caused because the xappl configuration didn't render an environment as was expected. To determine if files and registry keys are as they should be, instances of Windows command prompt or registry editor can be started in the container.
To start a command prompt instance in a virtual application's container environment:
> turbo run <image> --startup-file=cmd.exe
-OR-
> virtual-app.exe /XShellEx=cmd.exe
This will start a command prompt inside the application's container. Now you can move around the file system to see exactly what the application's in the container can see. Make special considerations for paths that have 32-bit vs 64-bit implications (ie. "program files" vs "program files (x86)"), especially when troubleshooting environments with mixed process architectures.
Note, it is easy to forget that a command prompt is for the container rather than for your native system. To prevent confusion it is recommended to set the title of the command prompt by executing title in container which will put "in container" as the prompt title.
To start a registry editor instance in the virtual application's container environment:
> turbo run <image> --startup-file=c:\Windows\system32\regedt32.exe
-OR-
> turbo run <image> --startup-file=c:\Windows\syswow64\regedt32.exe
-OR-
> virtual-app.exe /XShellEx=c:\Windows\system32\regedt32.exe
-OR-
> virtual-app.exe /XShellEx=c:\Windows\syswow64\regedt32.exe
This will start an instance of the registry editor inside the container environment. Note that Windows only allows one instance of the registry editor to be running so close down all other instances before running this command or else you may not be viewing what you think you are.
The 32-bit vs 64-bit registry is also something to be aware of with the registry editor. Select the registry editor to launch based on the architecture of the process that you are investigating.
Turbo.net Professional Services
Turbo has a team of knowledgable support engineers to help you build your packages. We can help you through any problems that you face. Email our team at support team. See Support Programs for more information on the services that we offer.
Diagnostic Logs
When troubleshooting issues with containers, it is often useful to generate diagnostic logs for analysis. These logs show detailed information about system calls and error codes that were generated during the application life.
If you are running with the Turbo cli, use:
# Start the container in diagnostic mode
turbo run -n=<container-name> --diagnostic <image>
# Use the container to reproduce the issue or error
# Export the logs to a folder
turbo logs --export=<path> <container-name>
If you are running a standalone executable, use:
# Start the package in diagnostic mode. Logs are written to the same folder as the packaged EXE.
> virtual-app.exe /XEnable=Diagnostics
# Start the package in diagnostic mode with a specified log output location.
> virtual-app.exe /XEnable=Diagnostics /XLogPath=<path>
Alternatively, an environment variable can also be set to enable diagnostic logs. This allows access to diagnostic information when the command line options are not easily modified (ex. service containers, container launched from non-container, etc).
> SET __VMDIAGNOSTICS=true
> virtual-app.exe
NOTE: __VMDIAGNOSTICS can also be set to a path to where the logs will be saved. NOTE: Can also specify this as a global environment variable.
In diagnostic mode, a log file will be created for each process that is spawned in the container environment. By default the virtual machine logs are named "xclog_[pid].txt" and the network logs are named "xcnetwork_[pid].txt", where "pid" is the process ID in hexidecimal format. The virtual machine logs show diagnostic information about the code executing in the process. The network logs show specifics about network handling, virtual proxies, and routing.
Log Analysis Strategies
Virtual machine logs are frequently very large and it can be a difficult task to isolate which of the many error conditions are causing problems. There are several techniques that can be employed to make the task easier.
The first technique is to compare working logs to failing ones. In many cases, a container will work in most situations but fails in a certain environment. Collecting logs on both working and failing machines allows us to ignore the errors that are "expected" and focus only on those that are unique. This technique is most useful when there are working and failing cases on very similar platforms (ie. both Win7 x64). Comparing logs from different platforms (ie. WinXP vs Win10) often have too many differences to be of much use. To compare the logs, tools such as WinDiff or WinMerge can be used. Even having the files open side-by-side can produce results.
The second technique is to narrow the scope of the logs that you have to look through. For example, if an error only occurs after a button is pressed, then copying off the logs immediately before and after the button press will allow you to determine the set of log entries that were written for the operation that led to the error (the difference between the before and after logs). This can be especially effective when coupled with the first technique of comparing working to failing logs.
The Turbo Studio Debugger allows filtering logs and comparing the logs side-by-side to find errors.
Virtual Machine Logs
Virtual machine logs show every system function call that comes from the process.
An example of a log entry is below:
pid:1240, tid:5416, tick:0x1757B5, lvl:LOG, func:NtQueryValueKey, status:0xC0000034, name:"InprocServer32", class:0x2, length:0x90, resultlength:0x0, handle:0x79E, path:"\Registry\Machine\Software\Classes\CLSID\{4B429D05-8931-11D2-A213-0008C71AB540}\InprocServer32"
The fields of the log entry are:
pid - The ID of the process that generated the log entry.
tid - The ID of the thread that generated the log entry.
tick - The tick count when the log entry was written. Tick count is the number of elapsed milliseconds since the machine was started.
lvl - The severity of the log entry. Possible values include "OK", "LOG", "WRN", and "ERR". "OK" indicates the entry was a success case. "LOG" indicates that the function failed or was other informative non-function call log entry. "WRN" indicates that something failed unexpectedly and may suggest a problem. "ERR" indicates that something failed unexpectedly and is likely a problem. Note that not all "LOG" entries are ignorable and every "ERR" entry is a problem, any log entry requires analysis based on the context of the call.
func - The function where the log entry was written from. Most often these will be Windows APIs that have entries in Microsoft Docs or Microsoft Developer Network that can give more context about the parameters in the log entry.
status - The NTSTATUS code that is returned from the function. See NTSTATUS Values for a list of values. In this case we see 0xC0000034 which is for STATUS_OBJECT_NAME_NOT_FOUND. Not all functions return NTSTATUS codes. Some may have "gle" which is the system error code returned from GetLastError. See System Error Codes for a list of values. Other functions have "hr" which is for an HRESULT code. HRESULT values are usually very context specific so no single resource catalogs their values. A quick web search will often find their meaning.
After the return value, the log entry will show the list of parameters that were passed to the function. This will depend on the function being called and is where checking the Microsoft documentation can be helpful.
In our example for "NtQueryValueKey", the Microsoft documentation is here. Note, many of the function calls in the virtual machine are at a very low level and will be listed in the documentation for drivers with "Zw" rather than "Nt" (ie. "ZwQueryValueKey" not "NtQueryValueKey"). This is Microsoft naming convention for user-mode and kernel-mode APIs.
In this doc, we see that the signature for "NtQueryValueKey" is:
NTSYSAPI NTSTATUS ZwQueryValueKey(
HANDLE KeyHandle,
PUNICODE_STRING ValueName,
KEY_VALUE_INFORMATION_CLASS KeyValueInformationClass,
PVOID KeyValueInformation,
ULONG Length,
PULONG ResultLength
);
From this Microsoft documentation, we see that the purpose of this function is "return a value entry for a registry key" and the remaining fields of the log entry are:
name - The name of the value entry to obtain data for.
class - A KEY_VALUE_INFORMATION_CLASS value that determines the type of information returned in the KeyValueInformation buffer. For more information about the values that this can be, see the doc on KEY_VALUE_INFORMATION_CLASS.
length - The size, in bytes, of the KeyValueInformation buffer.
resultlength - The size, in bytes, of the key information.
handle - The handle to the key to read value entries from. This was created by a previous call to NtCreateKey or NtOpenKey.
path - The resolved path in the container that the handle represents.
From viewing this log entry, we can determine that this thread was looking up a COM GUID to determine how it should be activated. It was not able to find the information it was looking for at this location. This might be a problem or it might continue its search in another location (ie. in HKCU, etc). NOTE: There are always many error codes returned by system calls so determining which error is causing a problem can be tricky.
This is just one example but following the same procedures to cross reference with Microsoft documentation can be used to decipher most any log entry.
Network Logs
Network logs show details about any network operations that pass through the process.
An example of a log is below:
Bind succeeded: 127.0.0.1
Connect succeeded: 127.0.0.1
GetAddrInfoW resolving detectportal.firefox.com
Host detectportal.firefox.com resolved to: 104.80.89.26
Host detectportal.firefox.com resolved to: 104.80.89.24
GetAddrInfoW resolving detectportal.firefox.com
Connect succeeded: 104.80.89.26
Host detectportal.firefox.com resolved to: 104.80.89.26
Host detectportal.firefox.com resolved to: 104.80.89.24
DnsQuery_A resolving a1089.d.akamai.net
GetAddrInfoW resolving location.services.mozilla.com
Host location.services.mozilla.com resolved to: 34.252.164.43
Host location.services.mozilla.com resolved to: 52.16.107.9
Host location.services.mozilla.com resolved to: 52.17.111.251
GetAddrInfoW resolving location.services.mozilla.com
Host location.services.mozilla.com resolved to: 34.252.164.43
Host location.services.mozilla.com resolved to: 52.16.107.9
Host location.services.mozilla.com resolved to: 52.17.111.251
DnsQuery_A resolving locprod1-elb-eu-west-1.prod.mozaws.net
Host locprod1-elb-eu-west-1.prod.mozaws.net resolved to: 52.16.107.9
Host locprod1-elb-eu-west-1.prod.mozaws.net resolved to: 52.17.111.251
Host locprod1-elb-eu-west-1.prod.mozaws.net resolved to: 34.252.164.43
This log snippet was generated by starting an instance of a Mozilla Firefox browser container. Here we see that the winsock calls to GetAddrInfo, DnsQuery, etc were made as well as how each of the hosts were resolved. These logs can be especially useful when troubleshooting issues with virtual network routing and proxies.
Common Errors
Antivirus and Security Software
Turbo applications are compatible with all major antivirus and security software vendors. However, there are many configurations of these which can cause errors or hangs in Turbo applications. If encountering issues, a good first step is to disable any security software to rule it out as a possible cause.
Turbo Virtual Machine 0x0003
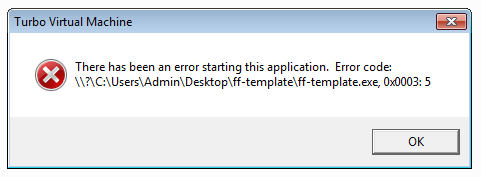
This error indicates that there is a problem accessing the container executable from itself. This can occur from security software that limits what applications have access to or if the application was started with a low privilege user which doesn't have access to the folder where the executable resides.
Try adding exclusions to your security software for the application. Also, try enabling the Launch child processes as user setting.
Unable to load a required virtual machine component

This error indicates that the container cannot access files in the environment found in the application directory. The most common reason for this is that the application path is not being resolved correctly. This can happen if there are path resolution rules defined for the container. For example, if there is a Snapshot Directory mapping from @PROGRAMFILES@ to c:\program files (x86), then running the container from c:\program files will fail. See xappl reference for more information.
Large Applications
If you attempt to execute an EXE file over 4GB in size you will get the error message:
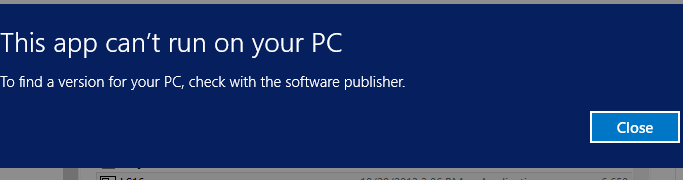
See the article on handling Large Applications for information on containerizing and optimizing large applications.
Command Line Errors
Applications cannot be run by anonymous users
Applications cannot be run by anonymous users.
Would you like to upgrade your account now? (y/n)
Ensure the correct domain is set and login to a valid Turbo Server account:
turbo config --domain=<your domain>
turbo login <username>
Sandbox is already in use
Critical error: An unhandled exception has occured
Please contact support@turbo.net
Sandbox is already in use.
There is an existing instance of the application that is in use. Use turbo stop <containerid> to stop the existing instance. If the command does not succeed, find the corresponding turbo.exe process using Task Manager and kill process. If the process cannot be found, use Process Explorer to find the process. You can find virtual processes by searching for the string handle _xvm_mtx.
Antivirus and Security Software
Turbo applications are compatible with all major antivirus and security software vendors. However, there are many configurations of these which can cause errors, hangs, or false positives in Turbo applications. If encountering issues, a good first step is to disable any security software to rule it out as a possible cause. If disabling the security software fixes the issue, further analysis is required to determine if there is indeed a security compromise or if it is an incompatability with your application.
Add Turbo Folders To Whitelist
Whitelist the following Turbo folders in your security software to avoid issues caused by security hooks and false positive detections:
- Turbo Client folder for current user: C:\Users\*\AppData\Local\Turbo
- Turbo Client folder for all users: C:\Program Files (x86)\Turbo
- Turbo Client repository folder for all users: C:\ProgramData\Turbo
- Turbo Client folder alias for current user: C:\Users\*\AppData\Local\Spoon (if it exists)
- Turbo Client folder alias for all users: C:\Program Files (x86)\Spoon (if it exists)
Sophos Endpoint Protection
In some configurations, Sophos Endpoint Protection application hooks can cause hangs in Turbo applications. If this is the case, exclusions can be added to prevent Sophos from inserting itself into the application.
Add the Turbo Folders from the section above to the Global Exclusions. For more information on adding Global Exclusions, please see docs.sophos.com.
Configure an Exploit Mitigation Exclusion to prevent Sophos from affecting the container environment. For more information on configuring Exploit Mitigation Exclusions, please see docs.sophos.com.
Application Restriction Software
Turbo applications may be blocked by system security settings or third-party security software.
Software Restriction Policies
When Turbo applications are blocked by Software Restriction Policies, users may observe an error that the program is blocked by group policy (0x800704EC) in a dialog or in the Turbo Client logs.
This program is blocked by group policy. For more information, contact your system administrator. (Exception from HRESULT: 0x800704EC)
at System.Runtime.InteropServices.Marshal.ThrowExceptionForHRInternal(Int32 errorCode, IntPtr errorInfo)
at Turbo.Vm.VirtualProcess.x12cb12b5d2cad53d(VirtualAppSession x1789a265a1108ddf, String xec0f124a7b85667a, VirtualAppStartInfo x650dda3e03fb5a9e, Boolean xa6a8bc5bc368bc71, Boolean x07100de31e1be915, IDictionary`2 x966cca5672ec6936)
at Turbo.Vm.VirtualAppSession._xcf1682d7276daad0(String xc6e100ad3a65deca, String xaf6a3319e1db77a1, String xb7644b5d9a43f566, String x98b7b04a664dbfaf, String x29544171d168e2c9, String x69f8fd408366b54c, IDictionary`2 x966cca5672ec6936)
at Turbo.Client.Manager.Pipeline.Execution.x731f69fa672a5774.x160a0bf4de8f6bd0(String xc6e100ad3a65deca, String xaf6a3319e1db77a1, String x9bf12c1ae17c44a0)
at Turbo.Client.Manager.ClientRequest.ExecuteDownload(String sArguments, Boolean fForceArguments)
To resolve the issue, add an exemption in the Software Restriction Policies for the Turbo Client folders by creating the following rules:
- Name: %LOCALAPPDATA%\Turbo\*.* Type: Path Security Level: Unrestricted
- Name: C:\Program Files (x86)\Turbo\*.* Type: Path Security Level: Unrestricted
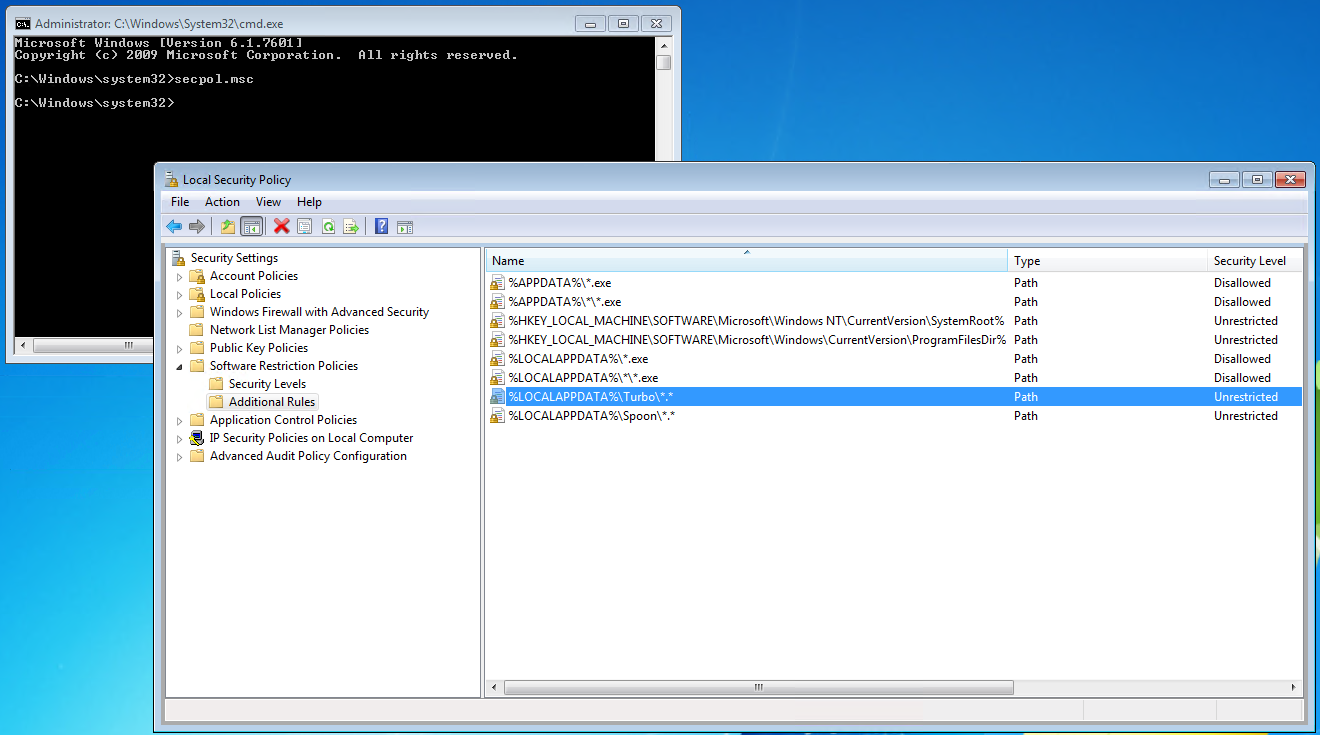
Windows Applocker
When Turbo applications are blocked by Windows Applocker, users may observe an error that the program is blocked by group policy (0x800704EC) in a dialog or in the Turbo Client logs.
Administrators will also see an event in Event Viewer\Applications and Services Logs\Microsoft\AppLocker when a software is blocked.
To resolve the issue, add an exemption in the AppLocker Executable Rules for the Turbo Client folders by creating the following rules:
- Permission: Allow User or group: Everyone Condition: Path: C:\Users\*\Appdata\Local\Turbo\*
- Permission: Allow User or group: Everyone Condition: Path: C:\Program Files (x86)\Turbo\*
- Permission: Allow User or group: Everyone Condition: Path: C:\ProgramData\Turbo\*
Symantec Endpoint Protection
For customers who use Symantec Endpoint Protection, the system administrator should review the security configuration under SEP Manager > Application and Device Control policy > Application Control to ensure that Turbo applications are not being blocked.
Debugging
The following document describes how to obtain a .DMP file for a running application that is in an erroneous state for diagnostics.
Create .DMP File
Open taskmgr.exe (defaults to 64 bit if trying to debug turbo server service). The 32 bit taskmgr.exe can be found under c:\windows\syswow64 on 64 bit Windows.
For Turbo Server service, you can find the process by looking at the command line column by right clicking the task manager column. Look for Turbo Virtual Machine with command line TurboServer-Service.exe.
Right click on the process and select Create Dump File.
Alternatively, you can use WinDbg to create the file. A portal version can be found here.
To create a dump file using WinDbg, attach the process and run the command:
> .dump /ma c:\path\to\your\dump
Automatically Create .DMP File
Windows can be configured to automatically create a dump file when an application crashes.
To configure this feature, add the following values to "HKEY_LOCAL_MACHINE\SOFTWARE\Microsoft\Windows\Windows Error Reporting\LocalDumps":
DumpFolder - The path where the dump files are to be stored.
DumpCount - The maximum number of dump files to store in the folder.
DumpType - The type of dump to create. Set to 2 for a full dump.
If the application filename is known, then these settings can be put under "HKEY_LOCAL_MACHINE\SOFTWARE\Microsoft\Windows\Windows Error Reporting\LocalDumps\[app.exe]" so that dump files are not collected for other applications.
An example PowerShell script which adds the necessary settings to collect dumps for a crashing notepad.exe:
New-Item -Path "HKLM:\SOFTWARE\Microsoft\Windows\Windows Error Reporting" -Name "LocalDumps"
New-Item -Path "HKLM:\SOFTWARE\Microsoft\Windows\Windows Error Reporting\LocalDumps" -Name "notepad.exe"
New-ItemProperty -Path "HKLM:\SOFTWARE\Microsoft\Windows\Windows Error Reporting\LocalDumps\notepad.exe" -Name "DumpFolder" -Value "%LOCALAPPDATA%\CrashDumps" -PropertyType "ExpandString"
New-ItemProperty -Path "HKLM:\SOFTWARE\Microsoft\Windows\Windows Error Reporting\LocalDumps\notepad.exe" -Name "DumpCount" -Value 10 -PropertyType DWord
New-ItemProperty -Path "HKLM:\SOFTWARE\Microsoft\Windows\Windows Error Reporting\LocalDumps\notepad.exe" -Name "DumpType" -Value 2 -PropertyType DWord
Debugging Dump Files
To debug the .DMP file, open in windbg x64 using file open crash dump.
You can debug .NET applications by using the sos module:
> .loadby sos clr
> !eestack -ee
If .loadby fails with some load module errors, make sure the bitness of windbg is correct. Detailed documentation can be found here.
To look at a stack on a specific thread, ex: thread #6
> ~6s
> !dumpstack
7.0 Reference
7.1 Command Line
Command Line Interface
The Turbo command line interface (CLI) is accessible from the Windows command prompt using the turbo command.
The Turbo CLI provides programmatic access to all major Turbo functions and can be used, for example, to automate processes or interface with third party products.
The Turbo CLI is installed as part of any of the Turbo Client, Turbo Server, and Turbo Studio setups.
This section provides a general reference for all Turbo CLI commands. For details on using the CLI for specific purposes (eg for automated desktop deployments or SCCM integration), see the appropriate section in the Turbo documentation.
build
The build command is used to automate the creation of images. The build command can build images from a TurboScript or a .xappl configuration file.
Usage: turbo build <options> <path>
<options> available:
--diagnostic Enable diagnotic logging
-e, --env=VALUE Set environment variables inside the container
--env-file=VALUE Read in a line delimited file of ENV variables
--format=VALUE Use json format for output
--mount=VALUE Mount a host folder into the container. Format: [other-container:]SourceFolder=TargetFolder
-n, --name=VALUE Name of the image
--no-base Do not merge the base image into the new image
--overwrite Overwrite existing image
--route-file=VALUE Specify a routing rules file
--vm=VALUE The Turbo VM version to run the container with
--wait-after-error Leave program open after error
--wait-after-exit Leave program open after it exits
To build an image from an existing container, use the commit command.
Using TurboScript
A TurboScript is a list of instructions that Turbo will follow to create a container. After the last instruction in a script, Turbo will automatically run turbo commit on the recently created container, creating a new image.
When building from a .me script, Turbo will take the following steps:
- Create an empty container from all of the base images specified in the
frominstruction -- this is equivalent toturbo run <image> - Perform the remaining instructions in the newly created container
- Commit the container to a new image
- Remove the container from the local machine
If there are any conflicts between a TurboScript instruction and a command-line flag then the TurboScript instruction will take precedence.
Using .xappl Files
A .xappl file is an XML file that contains all of the filesystem, registry, and configuration information for a given image. A .xappl file can be built using Turbo Studio.
Environment Variables
Environment variables can be added to the container through the -e or --env-file flags. These environment variables are initialized at container creation and thus may be overridden by variables created with the env instruction in the build script.
To create multiple environment variables in the container, use multiple -e flags. For example, the following command would add two environment variables, VAR1 with value 1 and VAR2 with value 2, to the built image.
> turbo build -e=VAR1=1 -e=VAR2=2 C:\TurboScript
Alternatively, use the --env-file flag and specify all of the environment variables you wish to add to the image in a line-delimited text file. For example, the previous command could be replicated using the following command:
> turbo build --env-file=C:\env-vars.txt C:\turbo.me
where env-vars.txt has the contents:
VAR1=1
VAR2=2
Note: If the --env-file and -e flags are used in the same command, the env-file flag is always processed before the -e flag. In the case of a conflict, the -e flag always takes precedence.
Other Command Line Flags
Name images using the -n flag and overwrite existing images with the same name using the --overwrite flag.
> turbo build -n=my-new-image C:\turbo.me
...
Output Image: my-new-image
# Try to build the same image second time
> turbo build -n=my-new-image C:\turbo.me
Error: The image already exists. You can overwrite with the --overwrite flag
# Try third time, with --overwrite flag
> turbo build -n=my-new-image C:\turbo.me --overwrite
...
Output Image: my-new-image
# Tags can be optionally added to the -n flag
> turbo build -n=my-new-image:1.0 C:\turbo.me
...
Output Image: my-new-image:1.0
The build command will create the intermediate container and output image using the latest version of the Turbo VM. To use a legacy version, specify the version number you wish to use with the --vm flag.
# Build the image using version 11.6.205 of the Turbo VM
> turbo build --vm=11.6.205 C:\turbo.me
The --diagnostic flag enables logging within the intermediate container. This flag does not create diagnostic-mode images.
Merging Images
The build command will include all images, which are referenced with the from statement in the script. For example, when the script uses from spoonbrew/git, spoonbrew/nuget, then these two containers will be merged and stored into the newly built container.
The --no-base option will not merge in the script. Instead, the images are included at runtime.
JSON output
When --format=json option was passed this command will provide output in JSON format. It will contain either an image object with information about result image or an error object if command failed.
commit
The commit command builds an image from a container. The image is built from the container's most recent state.
Usage: commit <options> <container> <image> [--args <startup file params>]
<options> available:
--ad-domain-allow=VALUE Allow execution from the Active Directory domain
--ad-domain-deny=VALUE Disallow execution from the Active Directory domain
--ad-group-allow=VALUE Allow execution for members of the Active Directory group
--ad-group-deny=VALUE Disallow execution for members of the Active Directory group
-e, --env=VALUE Set environment variables inside the container
--env-file=VALUE Read in a line delimited file of ENV variables
--format=VALUE Use the specified format for output. Supported values: json
--hosts=VALUE Add an entry to the virtual /etc/hosts file (<redirect>:<name>)
--no-base Do not merge the base image into the new image
--no-base-file-assocs Do not merge the file associations from the base image into the new image
--overwrite Overwrite existing image
--route-add=VALUE Add route mapping. Supported protocols: ip, pipe, tcp, udp
--route-block=VALUE Block specified route or protocol. Supported protocols: ip, tcp, udp
--route-file=VALUE Read in a INI file of routing configuration
--startup-file=VALUE Override the default startup file and save it to the committed image
--trigger=VALUE Execute named group of startup files
--wait-after-error Leave process open after error
--wait-after-exit Leave process open after it exits
Merging Images
The commit command will merge all the base images used in the container. This behavior can be overridden with the --no-base flag.
For example, if a container were created with the command turbo run git/git,nuget/nuget and later committed with the command turbo commit <container id> my-new-image, the new image would contain:
- Any files and registry keys created or modified in the container
- The files and registry keys from the git/git image
- The files and registry keys from the nuget/nuget image
However, if the same container were committed with the command turbo commit --no-base <container id> my-new-image, my-new-image would only contain the files and registry keys created or modified in the container. The git/git and nuget/nuget images are included as a dependency at runtime.
Startup File
To alter the selected startup file, apply the new value with --startup-file parameter. All parameters which are passed after the --args flag will be used as parameters to the startup file.
JSON output
When --format=json option was passed this command will provide output in JSON format. It will contain either an image object with information about commited image or an error object if command failed.
config
The config command displays and allows modification of the current configuration settings.
Usage: config <options>
<options> available:
--add-trusted-source=VALUE Add a source hub to the trusted sources list. Use * to trust all hubs by default.
--all-users Applies the configuration settings to all users
--as-inherit Sets the all users settings as the inherited values which can be overridden by the
user
--as-override Sets the all users settings as the values which override the user values
--block-trusted-source=VALUE Add a source hub to the blocked sources list. Use * to block all hubs by default.
--container-path=VALUE Overrides container storage to the specified path
--debug-vm-path=VALUE Path to debug VM
--disable=VALUE Disables a feature: DirectDownload, MergeIsolation, TurboDrive, LocalNetworkAccess,
AssemblyCache, AutoPrecache
--domain=VALUE The domain to log into
--enable=VALUE Enables a feature: DirectDownload, MergeIsolation, TurboDrive, LocalNetworkAccess,
AssemblyCache, AutoPrecache
--format=VALUE Use the specified format for output. Supported values: json
--gci-expiration=VALUE The number of days an image can be unused before it can be garbage collected. Set
to 0 to disable.
--gci-interval=VALUE The number of minutes between automatic image garbage collection checks. Set to 0
to disable.
--image-cache-size=VALUE Limits the maximum image cache size, in megabytes. Set to 0 for unlimited.
--image-path=VALUE Overrides image storage to the specified path. Supported values: full path, or "
allusers" to use the system wide shared folder.
--no-verify Disables verification of the domain. Setting the domain without verification may
result in slower performance during runtime and is not recommended.
--remove-trusted-source=VALUE Remove a source hub from the trusted sources list. Use * to restore default
behavior.
--reset Reset configuration to default values
--storage-path=VALUE Path to local container and image storage
--using=VALUE Use specified images as temporary dependencies
--wait-after-error Leave process open after error
--wait-after-exit Leave process open after it exits
If turbo config is executed without command line parameters then the current settings are returned.
To modify any settings, specify them as command line flags and assign a value to the flag. This value will then be applied to that setting.
Change the Server
The server that Turbo will connect to, and thus push to and pull from, can be configured with the --domain flag.
By default, Turbo is configured to connect to https://turbo.net.
Change the Storage Path
The storage path points to the directory where images and containers are saved. By default, images and containers are saved in %LOCALAPPDATA%\Turbo\Containers. Use the --storage-path flag to set the storage path to a different location.
It may be more efficient to share a repository of images in multi-user environment while keeping container storage in a separate, per user location.
Use the --container-path flag to specify a new location for container storage.
Finally, the storage path can also be overwritten by the TURBOREPO environment variable which may be useful for testing an alternate location quickly without updating the client configuration.
Set the Image Cache Size
The image cache size flag will set the amount of disk space local images will consume before deleting lesser prioritized images. Set the value to 0 for unlimited cache size. The default value unlimited.
> turbo config
Image cache size: unlimited
# Set cache size to 2 GB
> turbo config --image-cache-size=2048
Image cache size: 2.00 GB
# Back to unlimited
> turbo config --image-cache-size=0
Image cache size: unlimited
Example
# Set container and image root path to C:\ProgramData\Turbo\Containers
> turbo config --storage-path=C:\ProgramData\Turbo\Containers
# Set the container storage path to %LOCALAPPDATA%\Turbo\Containers\sandboxes
> turbo config --container-path=%LOCALAPPDATA%\Turbo\Containers\sandboxes
> turbo config
Hub server: https://turbo.net/
Storage path: C:\ProgramData\Turbo\Containers
Container storage path: C:\Users\matt\AppData\Local\Turbo\Containers\sandboxes
Browser redirection: enabled
# Switch storage path to %LOCALAPPDATA%\Turbo\Containers\repo\images
# Keep container storage path in %LOCALAPPDATA%\Turbo\Containers\sandboxes
> SET TURBOREPO=%LOCALAPPDATA%\Turbo\Containers
# Sets the image repository storage path to C:\ProgramData\Turbo\Containers for all users
> turbo config --image-path=allusers --all-users
Enable Turbo Drive
Turbo Drive is a special drive (T:) mounted in your system, which allows you to access your cloud storage accounts. Turbo Drive requires WinFSP to be installed in the system, and a Cloud Storage accounts to be configured in the Turbo Server. Turbo Drive uses a persistent cache to make working with the cloud files faster. The cache is located in the encrypted (EFS) folder at %TEMP%\TURBO\cmd\turbo-drive.
To enable Turbo Drive, run turbo config --enable=TurboDrive.
Resetting Config Settings
The configuration settings for Turbo can be reset to their default values by issuing the config command with the --reset flag.
JSON output
When --format=json option was passed this command will provide output in JSON format. It will contain either a configuration object with information about configuration or an error object if command failed.
containers
The containers command lists all containers on the local machine.
Usage: turbo containers <options>
<options> available:
--csv Print output with tab-separated columns
--format=VALUE Use json format for output
--include=VALUE Specify a column that is to be returned
-l, --latest List the most recently created container
-n, --number=VALUE List the 'n' most recently created containers
--no-trunc Don't truncate output
Command line flags for the containers flag serve to modify or filter the command's results.
# Only show most recently created container
> turbo containers -l
ID Images Command Created Status
-- ------ ------- ------- ------
db4d5baff206 spoonbrew/clean 9/3/2014 11:26:35 AM Stopped
# Show last 'n' created containers
> turbo containers -n=3
ID Images Command Created Status
-- ------ ------- ------- ------
db4d5baff206 spoonbrew/clean 9/3/2014 11:26:35 AM Stopped
b5c63c6d242e nodejs/nodejs node app.js 9/3/2014 11:25:18 AM Running
b92981a3dd27 nodejs/nodejs node app.js 9/3/2014 11:05:36 AM Stopped
If the value specified for -n is greater than the number of containers present on the local machine, all of the containers are listed (same result as running turbo containers).
Formatting Results
The table that is returned by the containers command is space-formatted. If you wish to return the table with tabs between each column then use the --csv flag.
> turbo containers --csv
Data in the table returned by the containers command is truncated so that it prints nicely and is easily readable in a command prompt. If you wish to view the untruncated data in each column, use the --no-trunc flag.
> turbo containers --no-trunc
The --no-trunc flag includes additional columns in the output, Ports, Settings and VM version, as seen below.
ID Images Command Created Status Ports Settings VM version
-- ------ ------- ------- ------ ----- -------- ----------
df6ac93f8b6147b986d4c7849c3dcef0 ghost:0.5.1 8/26/2014 3:27:17 PM Running 8080:2368 SpawnVm 11.6.270
d6e44ae706c44ed1bd75a0830bed3239 ghost:0.5.1 8/26/2014 3:22:14 PM Stopped SpawnVm 11.6.270
The Ports column contains active port mappings. See the turbo netstat command for more information. The VM version contains version number of VM used to create and run container.
JSON output
When --format=json option was passed this command will provide output in JSON format. It will contain either a containers array with information about available containers or an error object if command failed.
continue
The continue command downloads the last state of a container and then starts it.
Usage: turbo continue <options> <state-id>
<options> available:
-a, --attach Attach to stdin, stdout, and stderr of the
container
--admin Run the container as admin user
-d, --detach Run the container in the background
--diagnostic Enable diagnotic logging
--disable=VALUE Disable the specified Turbo VM setting
--disable-sync Disable container synchronization
-e, --env=VALUE Set environment variables inside the container
--enable=VALUE Enable the specified Turbo VM setting
--enable-sync Enable container synchronization
--env-file=VALUE Read in a line delimited file of ENV variables
--format=VALUE Use json format for output
--hosts=VALUE Add an entry to the virtual /etc/hosts file
(<redirect>:<name>)
-i, --isolate=VALUE Set isolation level: full, write-copy or merge
--link=VALUE Add link to another container
(<container>:<alias>)
--mount=VALUE Mount a host folder into the container. Format:
[other-container:]SourceFolder[=TargetFolder]
--private Synchronize this container privately, visible
only to me
--public Synchronize this container publicly, visible to
everyone
--route-add=VALUE Add route mapping. Supported protocols: ip, pipe, tcp, udp
--route-block=VALUE Block specified route or protocol. Supported protocols: ip, tcp, udp
--route-file=VALUE Specify a routing rules file
--startup-file=VALUE Override the default startup file
--startup-verb=VALUE Override the default startup verb
--trigger=VALUE Execute named group of startup files
--using=VALUE Use selected images as a temporary dependency
--vm=VALUE The Turbo VM version to run the container with
--wait-after-error Leave program open after error
--wait-after-exit Leave program open after it exits
--with-root=VALUE Set the containers root directory
If the continue command is run against an already-running container then no action will be taken.
To enable diagnostic logging for the container, specify the --diagnostic flag.
To run the container in the background, specify the -d or --detach flag.
JSON output
When --format=json option was passed this command will provide output in JSON format. It will contain either a container object with information about executed container or an error object if command failed.
copyi
The copyi command copies an image to another repository on your local machine. cpi is an alias for this command.
Usage: turbo copyi <options> <image> [<repository>/]<image>[:<tag>]
<options> available:
--format=VALUE Use json format for output
--overwrite Overwrite existing image
--wait-after-error Leave program open after error
--wait-after-exit Leave program open after exit
If the repository specified in the command does not already exist, a new one is automatically created.
# Copy nodejs/nodejs to a new repository
> turbo copyi nodejs/nodejs my-node
Output image: my-node
# Copy the image to the existing repository with a new tag
> turbo copyi nodejs/nodejs my-node:1.0
JSON output
When --format=json option was passed this command will provide output in JSON format. It will contain either an image object with information about forked image or an error object if command failed.
cp
The cp command copies a files from one container to another or between a container and the native filesystem.
Usage: turbo cp [<source-container>:]<path-from> [<target-container>:]<path-to>
<options> available:
--format=VALUE Use json format for output
Examples
# Copy a file from a container to the native system
> turbo cp 2de7:C:\project\file.txt C:\Users\Turbouser
# Copy a file from a container to another container
> turbo cp 2de7:C:\project\file.txt 3vj3:C:\other-project
# Container paths must be absolute
> turbo cp 2de7:file.txt C:\Users\Turbouser
ERROR
# Native paths are relative to the current prompt
C:\Users> turbo cp 2de7:C:\project\file.txt \Turbouser
JSON output
When --format=json option was passed this command will provide output in JSON format. It will contain only an exit code data or an error object if command failed.
diff
The diff command shows changes made in a container's filesystem.
Usage: turbo diff <options> <container>
<options> available:
--format=VALUE Use json format for output
--path=VALUE Only show changes in subdirectories of the specified path
--registry-path=VALUE Only show changes in subkeys of the specified registry path
--subsystems=VALUE Show only diff for selected subsystems: files, registry
Changes are shown relative to the base images that the container was created from.
# Show all changes made in a container
> turbo diff <container id>
Interpreting Results
The leading character of each line denotes the type of change made at that path.
|| Character || Type of Change || || A || Added || || C || Changed || || D || Deleted ||
If a file is changed, the diff results will show the a change in the folder along with the change to the file.
For example, if one added a file to a container at C:\Users\Turbouser\file.txt:
> turbo diff --subsystems=files <container id>
File system changes:
C C:\Users\Turbouser
A C:\Users\Turbouser\file.txt
Filtering Results
The diff command will show changes in the virtual filesystem and registry. To change this behavior use the --subsystems flag.
# Only show changes to the registry
> turbo diff --subsystems=registry <container id>
# Only show changse to the filesystem
> turbo diff --subsystems=files <container id>
To only show changes beneath a certain node in the filesystem or registry directory tree, use the --path or --registry-path flags.
# Only show changes in HKCU
> turbo diff --registry-path=@HKCU@ <container id>
# Only show changes in system32
> turbo diff --path=C:\Windows\system32
JSON output
When --format=json option was passed this command will provide output in JSON format. It will contain either a diff object with information about differences or an error object if command failed.
export
The export command copies an image from the local registry to a specified path on your local machine or network.
export - Export an image from the local repository to the specified path
Usage: turbo.exe export <options> <image> <path>
<options> available:
--format=VALUE Use the specified format for output. Supported values: json
--type=VALUE Export image type. Supported values: svm, exe
--wait-after-error Leave process open after error
--wait-after-exit Leave process open after it exits
Examples
# Export an image to the local file system
> turbo export image C:\path\to\image.svm
# Export an image to a network share
> turbo export image \\server\folder\image.svm
# Export an image to a portable exe
> turbo export --type=exe image C:\path\to\image.exe
JSON output
When --format=json option was passed this command will provide output in JSON format. It will contain either a file object with information about export file or an error object if command failed.
fork
The fork command creates a copy of an existing container.
Usage: turbo fork <existing container> [<new container name>]
<options> available:
--format=VALUE Use the specified format for output. Supported values: json
--images=VALUE Use specified images for new container
--wait-after-error Leave process open after error
--wait-after-exit Leave process open after it exits
The `--images' flag replaces all images in the new container with the ones that are specified. Any images from the original container that are required in the new container would need to be specified again.
Examples
# Create an unnamed copy of a container
> turbo fork 28c
# Create a named copy of a container
> turbo fork test-container copy-of-test-container
# Create a copy with Java & Firefox as new main images
> turbo fork chrome-container --images=oracle/jre,mozilla/firefox
JSON output
When --format=json option was passed this command will provide output in JSON format. It will contain either an container object with information about cloned container or an error object if command failed.
gc
The gc command garbage collects unused containers. By default a container is considered unused if not run within the past 30 days. Installed or running containers are not deleted.
Usage: gc <options>
<options> available:
--all-users Applies the configuration settings to all users
--days=VALUE Number of days until a container is considered unused. Default is 30 days.
--forks Remove only forked containers
--format=VALUE Use the specified format for output. Supported values: json
--trial Run without deleting the containers
--wait-after-error Leave process open after error
--wait-after-exit Leave process open after it exits
gci
The gci command garbage collects unreferenced images.
Usage: gci <options>
<options> available:
--all-users Applies the configuration settings to all users
-f, --force Force the garbage collection operation despite warnings
--format=VALUE Use the specified format for output. Supported values: json
--ignore-containers Remove images even if they are referenced by containers
--ignore-recent Remove images even if they are recently used
--keep-known-images Keep all known images, clean out orphan junk files only
--keep-latest Keep the latest version of a image
--trial Run without deleting the images
--wait-after-error Leave process open after error
--wait-after-exit Leave process open after it exits
Images used in containers, subscriptions, or installed images are kept in local repository cache. All other images are considered unreferenced and removed.
gcl
The gcl command garbage collects logs.
Usage: gcl <options>
<options> available:
--all-users Applies the configuration settings to all users
--days=VALUE Remove logs after the specified number of days. Default is 7 days.
--format=VALUE Use the specified format for output. Supported values: json
--wait-after-error Leave process open after error
--wait-after-exit Leave process open after it exits
Removes logs older than 7 days, or by the specified number of days.
help
To list the available commands in Turbo, execute turbo without parameters.
> turbo
To view help for a specific instruction, execute turbo help <command>.
See below for a list of all of the commands available through Turbo's command-line interface.
history
The history command lists all images used in the past.
Usage: turbo history <options> <image>
<options> available:
--csv Print output with tab-separated columns
--format=VALUE Use json format for output
-n=VALUE List the 'n' most recently used images
--no-trunc Don't truncate output
The most used recent images are listed first.
# List the recently used images
> turbo history
ID Last used Name Tag
-- --------- ---- ---
73dfe6973074 8/29/2014 4:51:08 PM nodejs/nodejs
07b66f57ed8d 8/29/2014 4:50:33 PM git/git
To show the history of a certain image, use turbo history image-name.
By default 50 entries are shown. Specify -n flag to show more entries.
The results of turbo history are truncated so that they are most readable in the command prompt. To prevent Turbo from truncating data, specify the --no-trunc flag.
The --csv flag can be specified to return the output as a tab-separated table.
JSON output
When --format=json option was passed this command will provide output in JSON format. It will contain either an images array with information about list of recently images or an error object if command failed.
images
The images command lists all of the images present in the local registry.
Usage: turbo images <options>
<options> available:
--csv Print output with tab-separated columns
--format=VALUE Use json format for output
--no-trunc Don't truncate output
The results are truncated so that they are most readable in the command prompt. To prevent Turbo from truncating data, specify the --no-trunc flag.
The --csv flag can be specified to return the output as a tab-separated table.
Examples
# List all images in local registry
> turbo images
ID Name Tag Created Size
-- ---- --- ------- ----
7a85fe8f7ad1 chocolatey/chocolatey 8/22/2014 11:34:19 AM 3.6 MB
JSON output
When --format=json option was passed this command will provide output in JSON format. It will contain either an images array with information about available images or an error object if command failed.
import
The import command is used to add Turbo images or non-Turbo file types from your local machine to your local registry.
Usage: import <options> <type> <path>
<options> available:
--all-users Applies the configuration settings to all users
--format=VALUE Use the specified format for output. Supported values: json
-n, --name=VALUE Name of the image
--overwrite Overwrite existing image
--precache Prepopulates assembly cache
--wait-after-error Leave process open after error
--wait-after-exit Leave process open after it exits
The type must be specified when importing external configurations into the Turbo registry.
svm Turbo image
msi Microsoft Software Installer
thinapp Thinapp Configuration
You can optionally specify a name for the newly-imported image. Use the --overwrite flag to overwrite an existing image.
# Import a thinapp config
turbo import -n=my-thinapp-image thinapp C:\s\package.ini
# Import a turbo image
turbo import -n=my-svm-image svm C:\s\my-image.svm
Turbo Studio users can use this command to import their existing components.
JSON output
When --format=json option was passed this command will provide output in JSON format. It will contain either an image object with information about imported image or an error object if command failed.
inspect
The inspect command displays contents of the image.
inspect - Inspect changes to the image
Usage: turbo inspect <options> <image>
<options> available:
--exclude=VALUE Show details for all subsystems, except the
specified ones
--format=VALUE Use json format for output
--include=VALUE Show only details for selected subsystems:
dependencies, files, registry, services, startu-
p, dns, ports, env
Examples
# Show all details about the image
> turbo inspect my-image
# Show filesystem changes only
> turbo inspect --include=files my-image
# Show all changes, but files and registry
> turbo inspect --exclude=files,registry my-image
JSON output
When --format=json option was passed this command will provide output in JSON format. It will contain either an inspect object with all available information about image or an error object if command failed.
install
The install command creates a shortcut for the specified container in the Start Menu
Usage: turbo.exe install <options> <container> [run flags...]
<options> available:
--format=VALUE Use the specified format for output. Supported values: json
--no-desktop-integration Don't integrate with the host machine for installed applications
--no-desktop-shortcuts Don't create desktop shortcuts for installed applications
--no-file-associations Don't register file associations for installed applications
--no-send-to-shortcuts Don't create Send To menu shortcuts for installed applications
--no-shell-extensions Don't register shell extensions for installed applications
--no-start-menu-shortcuts Don't create Start menu shortcuts for installed applications
Installation integrates the container into the Windows shell by adding a Start Menu shortcut for the specified container.
Use the turbo containers --no-trunc command to see the list of installed containers.
There are two options for removing the container from the system:
- Use the
turbo uninstallcommand - Uninstall from "Add/Remove Programs" or "Programs and Features"
Any supplied run flags are passed to the run command when an installed application is executed. For example, turbo install [container] --vm=1.2.3.4 --diagnostics will result in shortcuts that have a run command like turbo start [container] --vm=1.2.3.4 --diagnostics [additional installation params]. These can be used to customize the installation behavior.
JSON output
When --format=json option was passed this command will provide output in JSON format. It will contain exit code and an error object if command failed.
installed
The installed command lists all images and containers that have been installed to the user on the local machine.
Usage: turbo installed <options>
<options> available:
--all-users Applies the configuration settings to all users
--csv Print output with tab-separated columns
--format=VALUE Use the specified format for output. Supported values: json
--wait-after-error Leave process open after error
--wait-after-exit Leave process open after it exits
Command line flags for the installed flag format or filter the command's results.
# List applications installed for all users
> turbo installed --all-users
Name Images Subscription
---- ------ ------------
7-Zip 7-zip/7-zip default
Wget gnu/wget default
winscp winscp/winscp default
turbo installed will return a list of installed apps under the current user.
The --csv flag can be specified to return the output as a tab-separated table.
JSON output
When --format=json option was passed this command will provide output in JSON format. It will contain either an installed array with information about list of installed apps or an error object if command failed.
installi
The installi creates Start menu shortcuts for the specified image set.
Usage: installi <options>
<options> available:
-- Parameters after -- are added as run flags
--all-users Applies the configuration settings to all users
--format=VALUE Use the specified format for output. Supported values: json
-n, --name=VALUE Name of installed image
--no-desktop-integration Don't integrate with the host machine for installed applications
--no-desktop-shortcuts Don't create desktop shortcuts for installed applications
--no-file-associations Don't register file associations for installed applications
--no-send-to-shortcuts Don't create Send To menu shortcuts for installed applications
--no-shell-extensions Don't register shell extensions for installed applications
--no-start-menu-shortcuts Don't create Start menu shortcuts for installed applications
--offline Allows the images to be installed without a hub connection if all images are present
locally
--overwrite Ovewrite existing install
--pull Pulls images to be installed from the hub if not already present
--register-services Register services for installed applications
--skip-installed Skip installation if already installed
--wait-after-error Leave process open after error
--wait-after-exit Leave process open after it exits
Any supplied run flags after -- are passed to the run command when an installed application is executed. For example, turbo installi 7-zip -- --vm=1.2.3.4 --diagnostics will result in shortcuts that have a run command like turbo run 7-zip --vm=1.2.3.4 --diagnostics [additional installation params]. These can be used to customize the installation behavior.
Offline
It is sometimes desired to configure your installed containers to execute completely offline to manage deployment and updates manually. Special planning must be considered if this is your goal.
Before running the installi command, all images must be present. The installi command will fail if any of the required images are not present.
# if using FULL isolation mode
> turbo pull clean
# if using MERGE or WRITE-COPY isolation modes
> turbo pull base
# pull the container vm engine
> turbo pull /xvm
# or if a specific version is desired
> turbo pull /xvm:1.2.3.4
# pull or import your application image
> turbo pull [application]
> turbo import svm c:\path\to\application.svm --name=[application]
Once the images are present, the installi command can be executed.
> turbo installi [application] --offline
# or if a specific version of the container vm engine is required to be locked in
> turbo installi [application] --offline --vm=1.2.3.4
If this is for a multi-user workstation, then additional steps are required to make components available to all users.
# install the client for all users on the machine
> turbo-client.exe --all-users
# configure shared image cache so that multiple copies of the application are not on the machine
# once the image cache path is updated, all future pulls and imports will save images to that location
> turbo config --all-users --image-path=allusers
# install the container for all users
> turbo installi [application] --offline --all-users
Services
Virtual services defined in the images are not installed by default as they will be executed from the user's container automatically or on-demand as configured in the image. Virtual services will be installed to the Windows Service Control Manager and will be run as SYSTEM account by default.
There are a couple ways to organize your images with virtual services:
- Client application with services that are not shared - If the services are not needed to be shared among all users on the machine but rather are only necessary for the user's session (for example, a local SQL database service), then the services should not be installed.
- Client application with services that are shared - If the services are to be shared by all users on the machine then the services in the images will need to be installed but must be configured in such a way that they are not automatically started when the user's container is executed. Otherwise when a user runs from an installed container's shortcut, the user container will try to spawn the service as well and fail.
- Shared services without a client application - If an image contains a service without a client (for example, a web server or SQL database), then can install with the services without changes as no shortcuts will be created.
Specifying an Image Cache Path
To specify a custom image cache path for a particular installation, use the flag --TURBOREPO=<path>. The application will treat the path as the local repository root (the image will be stored in --pull to ensure the image is pulled into the location on install.
kill
The kill command kills running Turbo processes in the current Windows session.
Usage: kill <options>
<options> available:
--all-users Includes all running Turbo proccesses on the host
--format=VALUE Use the specified format for output. Supported values: json
--wait-after-error Leave process open after error
--wait-after-exit Leave process open after it exits
To kill all processes on the host, run the kill command with the --all-users flag.
login
The login command is used to log a user into the current remote registry.
Usage: turbo login [<username> <password>]
<options> available:
--all-users Applies the login to all users on the machine. Requires admin privilege.
--api-key=VALUE Login with specified API key
--auth=VALUE Login with the specified authentication method. Supported values: 'basic', 'integrated', 'sso'
--format=VALUE Use json format for output
API Keys
API Keys can be used to login to a user account or an organization without providing a username and password. It eliminates the need to hard code passwords or pass them in as parameters to automation scripts. API Keys are generated and revoked from the Hub > API Keys section on the Admin portal.
Authentication Methods
- Basic authentication prompts the user for their username and password.
- Integrated authentication method attempts to login the user their current windows credentials. The user must have Integrated Windows Authentication configured, preferably with Kerberos.
- SSO prompts the user with the SSO provider's login webform.
Examples
# Log in by specifying username and password
> turbo login turbouser password-here
# Without parameters, returns state of logged-in user
> turbo login
turbouser logged in at 8/25/2014 at 5:40:45 PM
# Log in to shared user credentials
> turbo login --all-users
Login: turbouser
Password: ********
Logged in as turbouser
# Login in by specifying API key
> turbo login --api-key=key-here
turbouser logged in at 8/25/2014 at 5:40:45 PM
See turbo config for information about setting your remote registry location.
JSON output
When --format=json option was passed this command will provide output in JSON format. It will contain either an user object with information about logged user or an error object if command failed.
logout
The 'logout' command is used to log the current user out of the remote registry.
Usage: turbo logout
<options> available:
--format=VALUE Use json format for output
--all-users Logout from the shared user credentials. Requires admin privilege.
Examples
# Logout the current user
> turbo logout
turboiuser logged out
# Logout from shared user credentials
> turbo logout --all-users
turbouser logged out
# No action taken if a user isn't currently logged in
> turbo logout
You are not currently logged into Turbo
JSON output
When --format=json option was passed this command will provide output in JSON format. It will contain only an exitCode value or an error object if command failed.
logs
The logs command displays the logs for a container. This is especially useful for debugging or inspecting containers.
Usage: turbo logs <options> <container>
<options> available:
--diagnostic Show diagnostic logs
-f Follow log output
--format=VALUE Use json format for output
--list List available logs
--pid=VALUE Show logs for specified process (default: 0=main process of container)
-s Show stream prefixes of log entries
--stderr Only show the stderr logs
--stdout Only show the stdout logs
-t Show timestamps of log entries
--tail=VALUE Only show the last VALUE lines of each log file
Only the standard streams for a container are recorded and logged. To enable more comprehensive logging, use the --diagnostic flag of the run command when the container is created or of the start command when the container is restarted.
Previous logs are kept until the next start of a given container instance. Logs can be viewed at any time. To see available logs, use the --list flag.
# Show only stdout or stderr logs
> turbo logs --stdout 2de7fda8
> turbo logs --stderr 2de7fda8
# Show timestamps for log entries
> turbo logs -t 2de7fda8
# Show stream prefixes of log entries
> turbo logs -s 2de7fda8
# Follow log output in real-time
> turbo logs -f 2de7fda8
# Similar to Unix 'tail', only show last 5 lines
> turbo logs --tail=5 2de7fda8
# Show diagnostic logs instead of standard streams
> turbo logs --diagnostic 2de7fda8
# Show logs for specified process
> turbo logs --pid=666 2de7fda8
# List available logs
> turbo logs --list 2de7fda8
JSON output
When --format=json option was passed this command will provide output in JSON format. It can contain streamLogs and diagnosticLogs arrays if asked for list of logs, a log string if asked for specific log, or an error object if command failed.
netstat
The netstat command displays active port mappings, name resolution information, and links for the specified container.
Usage: turbo netstat <container>
<options> available:
--format=VALUE Use json format for output
Examples
> turbo run --route-add=tcp://80:0 --route-add=tcp://8081:0 --hosts=localhost:lhost --link=0218:service -d <image> 63621076457c4b4fb7fff3fcbfda06b1
> turbo netstat 6362
Active port mappings:
49767:80
Name resolution overrides:
localhost lhost
Container links:
021833f5b86c4a80980eff9e5e9f39e2 as service
Note: only active port mappings are printed. Since the container in the example did not expose any service on tcp port 8081, the mapping corresponding to flag --route-add=tcp://8081:0 was not present in the output.
JSON output
When --format=json option was passed this command will provide output in JSON format. It will contain ports, dns and containerLinks arrays with information about container or an error object if command failed.
new
The new command creates new container from an image.
Usage: turbo.exe new <options> [<image>] [--name=<name>]
<options> available:
-- Parameters after -- are passed directly to the container process
-a, --attach Attach to stdin, stdout, and stderr of the container. This setting is not saved in the
container.
--ad-domain-allow=VALUE Allow execution from the Active Directory domain
--ad-domain-deny=VALUE Disallow execution from the Active Directory domain
--ad-group-allow=VALUE Allow execution for members of the Active Directory group
--ad-group-deny=VALUE Disallow execution for members of the Active Directory group
--admin Run the container with administrative permissions
--all-users Applies the configuration settings to all users
--api-key=VALUE Login with specified API key
-d, --detach Run the container in the background
--diagnostic Enable diagnostic logging
--disable=VALUE Disable the specified Turbo VM setting. This setting is not saved in the container.
-e, --env=VALUE Set an environment variable inside the container. This setting is not saved in the
container.
--enable=VALUE Enable the specified Turbo VM setting. This setting is not saved in the container.
--enable-sync Enable container synchronization. This setting is not saved in the container.
--env-file=VALUE Read in a line delimited file of environment variables. This setting is not saved in the
container.
--format=VALUE Use the specified format for output. Supported values: json
--hide-drive=VALUE Hide specified drives. This setting is not saved in the container. Format: <*|V:|-V:>[,..
.]
--hosts=VALUE Add an entry to the virtual /etc/hosts file (<redirect>:<name>). This setting is not
saved in the container.
-i, --isolate=VALUE Set isolation level: full, write-copy, merge or merge-user.
--install Installs the container after it is created
--link=VALUE Add link to another container (<container>:<alias>). This setting is not saved in the
container.
--mount=VALUE Mount a host folder into the container. This setting is not saved in the container.
Format: [other-container:]SourceFolder[=TargetFolder]
-n, --name=VALUE Name of created container
--network=VALUE Run container in specified named network. This setting is not saved in the container.
--no-pull Uses local images to run the container if possible. If not present, will pull from the
hub.
--no-run Create the container without executing it
--proxy-password=VALUE Password used to connect to the proxy server. It is not required when using Tnlr. This
setting is not saved in the container.
--proxy-server=VALUE Proxy or Tnlr server (Tnlr requires TLS). This setting is not saved in the container.
Format: [socks5|http|https|tnlr]://proxy-address:port.
--proxy-targets=VALUE A list of addresses (separated by semicolons) which will be proxied. If not set, all
traffic will go through the proxy. The address could be either a DNS name or an IP
address.
--proxy-username=VALUE Username used to connect to the proxy server. It is not required when using Tnlr. This
setting is not saved in the container.
--pull Pulls base images from hub before running, if they exist
--route-add=VALUE Add route mapping. Supported protocols: ip, pipe, tcp, and udp. This setting is not
saved in the container.
--route-block=VALUE Block specified route or protocol. Supported protocols: ip, tcp, and udp. This setting
is not saved in the container.
--route-file=VALUE Read in a INI file of routing configuration. This setting is not saved in the container.
--set-startup-file=VALUE Override the default startup file permanantly
--set-startup-verb=VALUE Override the default startup verb permanantly
--show-window=VALUE Controls how window is shown. Supported values: max, default
--startup-file=VALUE Override the default startup file. This setting is not saved in the container.
--startup-verb=VALUE Override the default startup verb. This setting is not saved in the container.
--stream Enable streaming of the image if available
--temp Remove container when it exits
--trigger=VALUE Execute named group of startup files. This setting is not saved in the container.
--using=VALUE Use specified images as a temporary dependency
--vm=VALUE Use the specified Turbo VM version for execution
-w, --working-dir=VALUE Set the initial working directory inside the container. This setting is not saved in the
container.
--wait-after-error Leave process open after error
--wait-after-exit Leave process open after it exits
Turbo new can be used to specify multiple images by separating each image with a comma. If the same file, registry entry, or environment variable exists in multiple images, then the one from whichever image was specified last will win the conflict and be used in the virtual environment. Virtual machine settings are taken from the last specified image. Due to this "layering" approach, it is a good practice to specify images with newer versions of applications or libraries after images with older versions.
# Create a container with the apache/apache image
> turbo new apache/apache
# Create a container with apache and mysql
> turbo new apache/apache,mysql/mysql
# Create a container with .NET 3 and 4
> turbo new microsoft/dotnet:3.5.1,microsoft/dotnet:4.0.3
To use images temporarily, without committing them to the final image, use the --using switch. This is handy for a tool like 7zip and Git that may only needed during the build process.
# Create a container using git temporarily to get a project
> turbo new --using git/git clean
# Clone a git project
(0x3842xd) C:\> git clone https://github.com/JodaOrg/joda-time.git C:\root
# Build project...
# Exit and commit image
(0x3842xd) C:\> exit
# Git will not be part of the container after shutdown
Containers are started with the startup file specified in the last passed image that is not a modifier layer. A modifier layer is an image that has no startup file or auto-start services defined. Regardless of its position on the command line, it is never used as the entry point to the container.
If a startup file is not set in the base image then cmd.exe /k is used.
# Default startup file is used to start container
> turbo new oracle/jdk
# Override the startup file to use the command prompt
> turbo new --startup-file=cmd.exe oracle/jdk
When passing arguments to a startup file or command, we recommend separating these arguments from the rest of the command with a --. Arguments specified after the -- mark are passed directly to the startup file/command.
If a -- mark is not used, any argument matching a new command flag will be interpreted by Turbo which may lead to unexpected behavior.
# Turbo will interpret the /d flag and execute a container in detached mode
> turbo new spoonbrew/clean /d
# /d flag is passed to cmd.exe, disabling execution of AutoRun commands from the registry
> turbo new spoonbrew/clean -- /d
A container's standard streams (stdin/out/err) can be redirected to either the current command prompt or the background using the --attach and --detach flags.
# Redict standard streams to current command prompt
> turbo new -a <image>
# Detach the container from the native prompt
> turbo new -d <image>
Detaching from a container will allow further work to be done in the native prompt while the container is running.
The initial working directory for the container can be set with the workdir instruction or the -w flag. The current directory will be used if workdir was not specified and no --startup-file parameter was provided when building the image.
# By default, a container's working directory matches the host's working directory
C:\Users> turbo new git/git
(0x3842xd) C:\Users>
# This sets the working directory to the root of the C drive
C:\Users> turbo new -w="C:\" git/git
(0x3842xd) C:\>
Containerized applications can be distinguished from normal apps with skin layering. Passing +skin(color) switch after image names pulls skin layer from hub. Skin layer paints colored border around all containerized application windows.
# Opens detached, containerized notepad with blue border around its window
turbo new --startup-file=notepad -d clean+skin(blue)
Turbo VM settings can be enabled or disabled with the --enable and --disable flags, respectively. For a list of Turbo VM settings, see VM Settings section of the documentation.
When the --diagnostic flag is used, the container will generate diagnostic logs that detail all of the operations that occur within the container. These diagnostic logs can later be viewed using the turbo logs command and be used to troubleshoot errors and configuration issues.
Please note that turbo.exe always runs outside of the container on the host even if executed from within the container.
Adding Environment Variables
Environment variables can be added to a container with the -e or --env-file flags.
# Add environment variable 'foo' with value 'bar'
> turbo new -e=foo=bar <image>
# Specify multiple env vars with multiple flags
> turbo new -e=foo=bar -e=x=2 <image>
If your container requires several environment variables then we recommend creating an env-file. An env-file is a line-delimited text file that lists all the environment variables to add to the container. The example file below lists 3 environment variables:
foo=bar
utensil=turbo
my-var=10
Environment variables are always expanded on the host system before they are added to the container.
> echo %PATH%
C:\Windows\system32;C:\Windows;
> turbo new -e=%PATH%;C:\Users <image>
(2fedfja3) > echo %PATH%
C:\Windows\system32;C:\Windows;C:\Users
Virtual Networks
By default, containers run in the host network, meaning that any services exposed by a container can be accessible to the outside world just as if the application was running natively on the host. However, it is possible to run containers in virtualized network environments by specifying a network name other than "host" with the --network flag. Running a container in virtualized network environment prevents it from exposing services to the outside world (unless --route-add flag is used appropriately) while allowing for easy communication between containers running in the same virtualized network environment. In a virtual network, containers can connect to each other using their names as specified with the --name flag if there was any or auto-generated from the image name otherwise.
# Launch a new container in the host network context (the default)
> turbo new --network=host <image>
# Launch two containers in a "mynet" virtual network
> turbo new -d --network=mynet --name=web <image>
web#88e3bb0e
> turbo new -d --network=mynet myself/webbrowser http://web
webbrowser#dd73e48a
# The former will accessible by its name "web" within the network,
# and the latter by its auto-generated name: "webbrowser"
Note: When connecting, always use the container name and not the network name. After all, what should your application connect to if there were two separate containers exposing the same services on the same virtual network if you connected by network name instead of container name?
Port Mapping
All network operations (opening/closing ports, for example) are passed through to the local machine when running in the host network context. To remap container ports to other ports on the local machine, use the --route-add flag. This flag also works when running in a virtualized network environment (by specifying the --network flag).
# Map container tcp port 8080 to local port 80
> turbo new --route-add=tcp://8080:80 <image>
# Map udp traffic on container port 8080 to local port 80
> turbo new --route-add=udp://8080:80 <image>
# Map container tcp port 80 to random port on local machine
# The random port can be later queried using the netstat command
> turbo new --route-add=tcp://80:0 <image>
The default policy of allowing containers to bind to any port on the local machine can be changed with the --route-block flag. It isolates all services bound to container ports on specified protocols (tcp or udp). They can only be opened using the --route-add flag.
# Isolate all tcp services of a container
> turbo new --route-block=tcp <image>
# Isolate all tcp and udp services, but allow container tcp port 3486
# be bound to port 80 on local machine
> turbo new --route-block=tcp,udp --route-add=tcp://3486:80 <image>
Container-to-Container Links
If you decided to not expose any services running in a container to the public by specifying the --route-block flag and not --route-add, you may still want to be able to connect to the services in your container from another container on the same machine. Although this is best achieved by running the containers in the same virtual network using the --network flag, container linking can be used for this purpose as well.
When creating a container with the turbo new command, you can use the --link flag to link it to any existing containers and the new container will be able to connect to any services exposed by the linked containers. Such connection creates a parent-child relationship where the newly created container is the parent.
With each link, an alias name must be specified. Name resolution overrides are added to the parent container so it can refer to its children by these names. Note how with container links the name that a container will use to refer to another container is defined by the former (the parent) using a parameter, instead of by the name of the container as is the case with virtual networks (the --network flag).
Container links also work between containers running in different virtual networks.
Example
First create two containers, each exposing web sites on private port 80, but with no services exposed outside the containers. Run them in detached mode.
> turbo new --route-block=tcp,udp -d <image>
image#05bf1aa4
> turbo new --route-block=tcp,udp -d <image>
image#94a38820
Then create a web browser container linked to the previously created containers.
> turbo new --link=05bf:web1 --link=94a3:web2 myself/webbrowser http://web1 http://web2
You will be able to browse websites served by the linked containers even though they are not publically available.
Controlling Outbound Traffic
The --route-add and --route-block not only provide a way to create rules that apply to inbound network traffic with the tcp and udp protocols, but also rules that apply to outbound network traffic. For the outbound rules, the ip protocol is used. The rules can be implemented using a whitelist or a blacklist approach. It is also possible to reroute traffic from one IP address/host to another, effectively defining an IP address alias.
Routes can be defined using IPv4, IPv6 addresses, or based on hostnames. Note however that you cannot specify a host name on the right side of a --route-add mapping since the result would be ambiguous if the host name resolved to multiple IP addresses.
Routes cannot be used to restrict traffic to loopback addresses like 127.0.0.1.
If your container requires several routing rules then we recommend creating a route-file. A route-file is an INI based, line-delimited text file that lists all the routing rules to add to the container. It can be added with --route-file flag.
Examples
Create a PuTTY container with all outbound access blocked except to IP address 10.0.0.34 (whitelist approach):
> turbo new --route-block=ip --route-add=ip://10.0.0.34 putty
In addition to the above, reroute all traffic to 1.1.1.1 to 10.0.0.34, making it possible to connect to host at 10.0.0.34 typing address 1.1.1.1 in PuTTY:
> turbo new --route-block=ip --route-add=ip://10.0.0.34 --route-add=ip://1.1.1.1:10.0.0.34 putty
It is also possible to use IP ranges using the CIDR notation. The following command allows PuTTY in the container to connect only to hosts in the 192.168.1.0/24 network:
> turbo new --route-block=ip --route-add=ip://192.168.1.0/24 putty
To disallow the app to connect to a set of specific IP addresses (blacklist approach), simply specify them in the --route-block flags:
> turbo new --route-block=ip://192.168.1.55 --route-block=ip://192.168.1.57 putty
When working with IPv6 addresses, it is necessary to enclose them in square brackets:
Block an IPv6 address:
> turbo new --route-block=ip://[2001:4860:4860::8888] putty
Block all IP traffic, except link local IPv6 space:
> turbo new --route-block=ip --route-add=ip://[fe80::c218:85ff:febd:5c01/64] putty
Reroute traffic to an IPv6 address to localhost:
> turbo new --route-block=ip --route-add=ip://[2001:cdba::3257:9652]:[::1] putty
To simplify working with mutliple IP addresses it is possible to use hostnames on the left side of all commands. When a hostname is specified with ip --route-add or --route-block, it is resolved to an IP address when the container starts, and the behavior is effectively the same as if the IP address was specified in place of the hostname. Additionally, all DNS resolves are intercepted and whenever a known hostname resolves to a previously unknown IP address, the IP address is added to the appropriate route table. This feature is what allows wildcard hostnames to work, since otherwise it would not be possible to infer the IP addresses of all possible subdomains.
For example, to run a Chrome container allowing only access to the turbo.net and blog.turbo.net domains, you can use the command:
> turbo new --route-block=ip --route-add=ip://turbo.net --route-add=ip://blog.turbo.net chrome https://turbo.net
Wildcards are supported in host name routing. So, for example, to unblock turbo.net and all of its subdomains, use the expression:
> turbo new --route-block=ip --route-add=ip://*.turbo.net chrome https://blog.turbo.net
Or, to run a Chrome container disallowing access to the facebook.com domain and all of its subdomains:
> turbo new --route-block=ip://*.facebook.com chrome
Another option is to use an INI based route-file which defines rules for blocking and allowing network traffic. The example below blocks all network traffic and then unblocks 192.168.198.0/24 and all turbo.net and spoon.net subdomains:
[ip-block]
*
[ip-add]
192.168.198.0/24
*.turbo.net
*.spoon.net
To create a firefox container with above route-file use this command:
turbo new --route-file=c:\turbo-rules.txt firefox https://turbo.net
If a large list of hostnames is used, such as in the turbobrowsers/block-ad-routes image, the default behavior as described above of resolving all of them to IP addresses at the start of the container would cause container startup to take too long. It can be overriden with the PreResolveHostNames=false setting in a route file, as shown below:
[settings]
PreResolveHostNames=false`
[ip-block]
adserver1.com
adserver2.com
...
Adding Custom Name Resolution Entries
All containers use name resolution provided by the host operating system. You can add specific name resolution overrides using the --hosts flag. The syntax is similar to that of the hosts file of the operating system.
# Make name my-test-service resolve to whatever the name
# test-service-43 resolves
> turbo new --hosts=my-test-service:test-service-43 <image>
# Make name mysite.net resolve to IPv4 address 127.0.0.1 and
# name ipv6.mysite.net resolve to IPv6 address ::1
> turbo new --hosts=127.0.0.1:mysite.net --hosts=::1:ipv6.mysite.net <image>
Using Startup Triggers
Images can be created with TurboScript that have multiple startup files. Collections of startup files can be linked together by a trigger name and executed together.
# in turbo.me file to create "test-trigger" image...
startup file ["c:\windows\system32\notepad.exe", "c:\windows\regedit.exe"]
startup file doc=[("c:\windows\system32\notepad.exe", "c:\doc\welcome.txt"), ("c:\windows\system32\notepad.exe", "c:\doc\howto.txt")]
# from command-prompt...
# launch both notepad and regedit are launched
> turbo new test-trigger
# launch welcome.txt and howto.txt in notepad
> turbo new test-trigger --trigger=doc
Using Mount
The mount option provides a way to mount folders from the host into the container, giving access to resources from the host system.
The mounted folder's content is not committed to the image nor synchronized to the Turbo Hub and therefore is not available when using the continue command.
If the source folder doesn't exist, the mount option is ignored. If the target folder doesn't exist, it is created.
Example for mounting a folder.
turbo new --mount "C:\FolderOnHostSystem=C:\FolderInContainer" clean
Mounts are useful to share a cache folder, like a local Maven repository:
turbo new --mount "%USERPROFILE%\.m2=%USERPROFILE%\.m2" jdk,maven
Mounting multiple folder is done by repeating the mount parameter:
turbo new --mount "C:\Mount1=C:\InContainer1" --mount "C:\Mount2=C:\InContainer2" clean
It is also possible to mount a folder from another container:
turbo new --mount <containerid>:"C:\FolderInSourceContainer=C:\FolderInTargetContainer" clean
Isolation Settings
The isolate parameter enables different levels of visibility and access from the vm to the host environment. The full isolation setting prevents read and write to the host system and registry. This is the preferred setting if you want the vm to run like a clean, completely isolated system.
The write-copy isolation setting allows the vm to read the host file system and registry but not write to the host. This is the preferred setting if you want the vm to be able to access host applications and settings, but not alter the host in any way.
The merge isolation setting allows read and write access to the host system.
Note that the vm isolation setting does not override more restrictive isolation settings that already exist in the image. For example, if you created an image in Turbo Studio and set specific folders and keys to full isolation, those settings would be preserved even if the vm isolation is set to merge.
For applications like Gimp or Notepad++ where you want to allow the vm to edit and save files you work with to the host file system, but otherwise do not want to let the application litter the host system for example with settings stored in the file system or the registry, there is the +merge-user isolation modifier. Used as full+merge-user or write-copy+merge-user, it uses merge isolation for user folders like Desktop or Documents, but keeps the base full or write-copy isolation for the rest of the system, making sure that the host system is kept clean. The preferred mode is full+merge-user.
The well-known root folders affected by the +merge-user modifier are: @DESKTOP@, @DESKTOPCOMMON@, @DOCUMENTS@, @PICTURES@, @DOWNLOADS@, @MUSIC@, @VIDEOS@, and @TEMPLATES.
As a separate convenience feature, if the startup verb is not empty, the startup file of the container is set to merge isolation, regardless of the isolation level that it would otherwise have. This way, when executing a shell operation like opening a file on the host system through a Turbo application that has host system file associations set, it is possible for the virtualized application to access and make changes to the file. The MergeStartupDir vm flag takes this feature one step further and sets the isolation level to merge for the whole parent folder of the startup file and all its subfolders except well-known root folders. For example, if the startup file was C:\myproject.proj and the flag was enabled, the folder C:\myproject-files would have merge isolation, but e.g., C:\Windows or C:\Program Files, being well-known root folders, would have isolation level unchanged.
Exit code
When the container stops, the exit code of startup file is displayed in decimal form.
Selecting VM version
A specific VM version can be selected by using the --vm=version flag. If the selected version is lower than the minimum version that is required by turbo.exe, then the minimum version will be used instead.
JSON output
When --format=json option was passed this command will provide output in JSON format. It will contain either a container array with information about created container or an error object if command failed.
Auto Update
The new command checks once a day for new image releases. Specify the --pull option to force checking for the latest release.
Updates are download within the specified release: turbo new firefox updates to the latest Firefox.
turbo new firefox:42 updates to the Firefox within release 42, like 42.0, 42.1 42.2 etc.
ps
The ps command returns a list of all the processes running in containers on the local machine.
Usage: turbo ps <options> [<container>]
<options> available:
--csv Print output with tab-separated columns
--format=VALUE Use json format for output
-l Display long format
--no-trunc Don't truncate output
Examples
# View all processes running in containers
> turbo ps
PID Name Container User
--- ---- --------- ----
2252 cmd.exe f1ea9fe59eeb Administrator
# View the "long-format" results for additional information
> turbo ps -l
PID Name Container User UTime KTime Command
--- ---- --------- ---- ----- ----- -------
2252 cmd.exe f1ea9fe59eeb Administrator 00:01:05 00:01:10 "C:\Windows\system32\cmd.exe"
The UTime is the amount of CPU time the process spent in user-mode code.
The KTime is the amount of time spent in system calls within the kernel.
JSON output
When --format=json option was passed this command will provide output in JSON format. It will contain processes array with information about running processes or an error object if command failed.
pull
The pull command syncs an image from a remote registry to your local registry.
Usage: pull <options> [<namespace>/]<image>[:<release>]
<options> available:
--all-users Applies the configuration settings to all users
--force Forces the image to be downloaded even if it exists locally
--format=VALUE Use the specified format for output. Supported values: json
--wait-after-error Leave process open after error
--wait-after-exit Leave process open after it exits
The image to pull can be specified with up to 3 identifiers, only 1 of which (the name) is mandatory:
- Namespace (user or org on the remote hub)
- Name of the remote repository
- Tag
If a namespace is not specified then it will default to that of the current user.
If a tag is not specified then the head tag is applied.
JSON output
When --format=json option was passed this command will provide output in JSON format. It will contain either an image object with information about pulled image or an error object if command failed.
push
The push command syncs an image from your local registry to the remote registry.
Usage: turbo push <options> <image> [<remote image>]
<options> available:
--format=VALUE Use json format for output
--no-default-namespace Does not use your username as the default namespace if not explicitly specified
--wait-after-error Leave program open after error
--wait-after-exit Leave program open after exit
If the namespace is not specified then Turbo will look for a repository belonging to the current user that corresponds to the image name. If this does not exist, a new, public repository will be created and the image will be pushed there.
JSON output
When --format=json option was passed this command will provide output in JSON format. It will contain either an image object with information about pushed image or an error object if command failed.
release
The release command applies a new release to an image.
Usage: turbo release <image> <release>
<options> available:
--format=VALUE Use json format for output
Apply a new release to the head version of an image.
> turbo release my-image 1.0
Output image: my-image:1.0
JSON output
When --format=json option was passed this command will provide output in JSON format. It will contain either image object with information about newly released image or an error object if command failed.
releases
The releases command returns all the available releases for an image.
Usage: turbo releases <image>
<options> available:
--format=VALUE Use json format for output
All the available releases are displayed.
> turbo releases my-image
All available releases of my-image:
head (local)
1.0 (local)
0.1.29
JSON output
When --format=json option was passed this command will provide output in JSON format. It will contain either releases array with list of available releases or an error object if command failed.
resume
The resume command resumes a paused container.
Usage: turbo resume <container>
<options> available:
--format=VALUE Use json format for output
If the container specified is not paused then no action will be taken.
JSON output
When --format=json option was passed this command will provide output in JSON format. It will contain container object with information about resumed container or an error object if command failed.
revert
The revert command is used to undo all changes to a container.
Usage: turbo revert <container>
<options> available:
--format=VALUE Use json format for output
Configuration settings and metadata will be maintained but all changes to the container's filesystem and registery will be reverted.
JSON output
When --format=json option was passed this command will provide output in JSON format. It will contain either a container array with information about reverted container or an error object if command failed.
rm
The rm command removes containers from the local machine.
Usage: turbo rm <options> <container>
<options> available:
-a, --all Remove all containers on the local machine
--format=VALUE Use json format for output
Use the -a flag to remove all containers at one time. Note that this operation cannot be undone.
# Remove a single container by specifying the ID
> turbo rm f1ea9fe
Container f1ea9fefjdkaslfh324fdadfshjkl3cndkj3 has been removed
# Remove all containers on the local machine with the -a flag
> turbo rm -a
All containers have been removed
JSON output
When --format=json option was passed this command will provide output in JSON format. It will contain either an containers array with information about removed containers or an error object if command failed.
rmi
The rmi command removes images from the local registry.
<options> available:
-a, --all Remove all images from the local machine or all matching images if argument is specified
--all-users Applies command to images stored in all users folder
-f, --force Attempts to stop running images
--format=VALUE Use the specified format for output. Supported values: json
Use the -a flag to remove all images at one time. Note that this operation cannot be undone.
# Remove an image by specifying it by name
> turbo rmi my-image
Image my-image was removed
# Remove all images with the -a flag
> turbo rmi -a
All images have been removed
If the same image is forked or tagged multiple times then the rmi command will only untag the specified name, not remove the image itself.
> turbo images
ID Name Tag Created Size
-- ---- --- ------- ----
7a85fe8f7ad1 chocolatey/chocolatey 8/22/2014 11:34:19 AM 3.6 MB
7a85fe8f7ad1 chocolatey-forked 1.0 8/22/2014 12:00:01 PM 3.6 MB
> turbo rmi chocolatey/chocolatey
Image chocolatey/chocolatey was untagged
> turbo images
ID Name Tag Created Size
-- ---- --- ------- ----
7a85fe8f7ad1 chocolatey-forked 1.0 8/22/2014 12:00:01 PM 3.6 MB
> turbo rmi chocolatey-forked:1.0
Image chocolatey-forked:1.0 was removed
JSON output
When --format=json option was passed this command will provide output in JSON format. It will contain either an images array with information about removed images or an error object if command failed.
run
The run command creates a new container from an image or starts the container with the same name and images.
Usage: turbo.exe run <options> [<image>][+skin(color)] [<parameters>...]
<options> available:
-- Parameters after -- are passed directly to the container process
-a, --attach Attach to stdin, stdout, and stderr of the container. This setting is not saved in the
container.
--ad-domain-allow=VALUE Allow execution from the Active Directory domain
--ad-domain-deny=VALUE Disallow execution from the Active Directory domain
--ad-group-allow=VALUE Allow execution for members of the Active Directory group
--ad-group-deny=VALUE Disallow execution for members of the Active Directory group
--admin Run the container with administrative permissions
--all-users Applies the configuration settings to all users
--api-key=VALUE Login with specified API key
-d, --detach Run the container in the background
--diagnostic Enable diagnostic logging
--disable=VALUE Disable the specified Turbo VM setting. This setting is not saved in the container.
-e, --env=VALUE Set an environment variable inside the container. This setting is not saved in the
container.
--enable=VALUE Enable the specified Turbo VM setting. This setting is not saved in the container.
--enable-sync Enable container synchronization. This setting is not saved in the container.
--env-file=VALUE Read in a line delimited file of environment variables. This setting is not saved in the
container.
--format=VALUE Use the specified format for output. Supported values: json
--hide-drive=VALUE Hide specified drives. This setting is not saved in the container. Format: <*|V:|-V:>[,..
.]
--hosts=VALUE Add an entry to the virtual /etc/hosts file (<redirect>:<name>). This setting is not
saved in the container.
-i, --isolate=VALUE Set isolation level: full, write-copy, merge or merge-user.
--link=VALUE Add link to another container (<container>:<alias>). This setting is not saved in the
container.
--mount=VALUE Mount a host folder into the container. This setting is not saved in the container.
Format: [other-container:]SourceFolder[=TargetFolder]
-n, --name=VALUE Name of created container
--network=VALUE Run container in specified named network. This setting is not saved in the container.
--no-pull Uses local images to run the container if possible. If not present, will pull from the
hub.
--proxy-password=VALUE Password used to connect to the proxy server. It is not required when using Tnlr. This
setting is not saved in the container.
--proxy-server=VALUE Proxy or Tnlr server (Tnlr requires TLS). This setting is not saved in the container.
Format: [socks5|http|https|tnlr]://proxy-address:port.
--proxy-targets=VALUE A list of addresses (separated by semicolons) which will be proxied. If not set, all
traffic will go through the proxy. The address could be either a DNS name or an IP
address.
--proxy-username=VALUE Username used to connect to the proxy server. It is not required when using Tnlr. This
setting is not saved in the container.
--pull Pulls base images from hub before running, if they exist
--route-add=VALUE Add route mapping. Supported protocols: ip, pipe, tcp, and udp. This setting is not
saved in the container.
--route-block=VALUE Block specified route or protocol. Supported protocols: ip, tcp, and udp. This setting
is not saved in the container.
--route-file=VALUE Read in a INI file of routing configuration. This setting is not saved in the container.
--set-startup-file=VALUE Override the default startup file permanantly
--set-startup-verb=VALUE Override the default startup verb permanantly
--show-window=VALUE Controls how window is shown. Supported values: max, default
--startup-file=VALUE Override the default startup file. This setting is not saved in the container.
--startup-verb=VALUE Override the default startup verb. This setting is not saved in the container.
--stream Enable streaming of the image if available
--temp Remove container when it exits
--trigger=VALUE Execute named group of startup files. This setting is not saved in the container.
--using=VALUE Use specified images as a temporary dependency
--vm=VALUE Use the specified Turbo VM version for execution
-w, --working-dir=VALUE Set the initial working directory inside the container. This setting is not saved in the
container.
--wait-after-error Leave process open after error
--wait-after-exit Leave process open after it exits
Turbo run can be used to specify multiple images by separating each image with a comma. If the same file, registry entry, or environment variable exists in multiple images, then the one from whichever image was specified last will win the conflict and be used in the virtual environment. Virtual machine settings are taken from the last specified image. Due to this "layering" approach, it is a good practice to specify images with newer versions of applications or libraries after images with older versions.
# Create a container with the apache/apache image
> turbo run apache/apache
# Create a container with apache and mysql
> turbo run apache/apache,mysql/mysql
# Create a container with .NET 3 and 4
> turbo run microsoft/dotnet:3.5.1,microsoft/dotnet:4.0.3
To use images temporarily, without committing them to the final image, use the --using switch. This is handy for a tool like 7zip and Git that may only needed during the build process. Using images will be used with the highest overriding priority of files and registry keys.
# Create a container using git temporarily to get a project
# Note that the using images are layered last, which will
# means its files and registries will override all others.
> turbo run --using git/git clean
Using VM 20.5.1515 from local
Using image clean:30 from local
Using image git:2.23.0.windows.1 from local
Running new container clean#0x3842xd
# Clone a git project
(0x3842xd) C:\> git clone https://github.com/JodaOrg/joda-time.git C:\root
# Build project...
# Exit and commit image
(0x3842xd) C:\> exit
# Git will not be part of the container after shutdown
Containers are started with the startup file specified in the first passed image that is not a modifier layer. A modifier layer is an image that has no startup file or auto-start services defined. Regardless of its position on the command line, it is never used as the entry point to the container.
# Chrome will be used as the startup file image and virtual machine settings.
# However, the files in Firefox will be layered on top (overriding) any files
# or registry keys in Chrome.
> turbo run google/chrome,mozilla/firefox
If a startup file is not set in the base image then cmd.exe /k is used.
# Default startup file is used to start container
> turbo run oracle/jdk
# Override the startup file to use the command prompt
> turbo run --startup-file=cmd.exe oracle/jdk
When passing arguments to a startup file or command, we recommend separating these arguments from the rest of the command with a --. Arguments specified after the -- mark are passed directly to the startup file/command.
If a -- mark is not used, any argument matching a run command flag will be interpreted by Turbo which may lead to unexpected behavior.
# Turbo will interpret the /d flag and execute a container in detached mode
> turbo run spoonbrew/clean /d
# /d flag is passed to cmd.exe, disabling execution of AutoRun commands from the registry
> turbo run spoonbrew/clean -- /d
A container's standard streams (stdin/out/err) can be redirected to either the current command prompt or the background using the --attach and --detach flags.
# Redict standard streams to current command prompt
> turbo run -a <image>
# Detach the container from the native prompt
> turbo run -d <image>
Detaching from a container will allow further work to be done in the native prompt while the container is running.
The initial working directory for the container can be set with the workdir instruction or the -w flag. The current directory will be used if workdir was not specified and no --startup-file parameter was provided when building the image.
# By default, a container's working directory matches the host's working directory
C:\Users> turbo run git/git
(0x3842xd) C:\Users>
# This sets the working directory to the root of the C drive
C:\Users> turbo run -w="C:\" git/git
(0x3842xd) C:\>
Containerized applications can be distinguished from normal apps with skin layering. Passing +skin(color) switch after image names pulls skin layer from hub. Skin layer paints colored border around all containerized application windows.
# Opens detached, containerized notepad with blue border around its window
turbo run --startup-file=notepad -d clean+skin(blue)
Turbo VM settings can be enabled or disabled with the --enable and --disable flags, respectively. For a list of Turbo VM settings, see VM Settings section of the documentation.
When the --diagnostic flag is used, the container will generate diagnostic logs that detail all of the operations that occur within the container. These diagnostic logs can later be viewed using the turbo logs command and be used to troubleshoot errors and configuration issues.
Please note that turbo.exe always runs outside of the container on the host even if executed from within the container.
Environment Variables
Environment variables from the host system will be seen inside the container, unless they were isolated or set image in which the image's value will be used over the host systems. Add or override them in the container with the -e or --env-file flags. Setting evironment variables in the container will persist them in the container but not on the host system regardless of the isolation mode.
# Add environment variable 'foo' with value 'bar'
> turbo run -e=foo=bar <image>
# Specify multiple env vars with multiple flags
> turbo run -e=foo=bar -e=x=2 <image>
If your container requires several environment variables then we recommend creating an env-file. An env-file is a line-delimited text file that lists all the environment variables to add to the container. The example file below lists 3 environment variables:
foo=bar
utensil=turbo
my-var=10
Environment variables are expanded on the host system before they are added to the container.
> echo %PATH%
C:\Windows\system32;C:\Windows;
> turbo run -e=%PATH%;C:\Users <image>
(2fedfja3) > echo %PATH%
C:\Windows\system32;C:\Windows;C:\Users
Virtual Networks
By default, containers run in the host network, meaning that any services exposed by a container can be accessible to the outside world just as if the application was running natively on the host. However, it is possible to run containers in virtualized network environments by specifying a network name other than "host" with the --network flag. Running a container in virtualized network environment prevents it from exposing services to the outside world (unless --route-add flag is used appropriately) while allowing for easy communication between containers running in the same virtualized network environment. In a virtual network, containers can connect to each other using their names as specified with the --name flag if there was any or auto-generated from the image name otherwise.
# Launch a new container in the host network context (the default)
> turbo run --network=host <image>
# Launch two containers in a "mynet" virtual network
> turbo run -d --network=mynet --name=web <image>
web#88e3bb0e
> turbo run -d --network=mynet myself/webbrowser http://web
webbrowser#dd73e48a
# The former will accessible by its name "web" within the network,
# and the latter by its auto-generated name: "webbrowser"
Note: When connecting, always use the container name and not the network name. After all, what should your application connect to if there were two separate containers exposing the same services on the same virtual network if you connected by network name instead of container name?
Proxy Settings
Proxy settings allows the virtual application to route network traffic to the specified proxy server --proxy-server with --proxy-password as the proxy password (if required). You may also specify addresses using the --proxy-targets to proxy only the specified addresses within the application.
If the user omits the --proxy-server flag when executing in a Turbo Server domain while specifying --proxy-targets, the application will proxy using the built in Portal proxy in the domain using a Turbo's custom tnrl proxy protocol.
For example, turbo run firefox --proxy-targets=https://internaladdress.com will attempt to proxy any connections to internaladdr.com to the Portal domain's network. The equivalent command is turbo run firefox --proxy-server=tnrl://<PortalDomain>/tnrl --proxy-targets=http://internaladdress.com
Port Mapping
All network operations (opening/closing ports, for example) are passed through to the local machine when running in the host network context. To remap container ports to other ports on the local machine, use the --route-add flag. This flag also works when running in a virtualized network environment (by specifying the --network flag).
# Map container tcp port 8080 to local port 80
> turbo run --route-add=tcp://8080:80 <image>
# Map udp traffic on container port 8080 to local port 80
> turbo run --route-add=udp://8080:80 <image>
# Map container tcp port 80 to random port on local machine
# The random port can be later queried using the netstat command
> turbo run --route-add=tcp://80:0 <image>
The default policy of allowing containers to bind to any port on the local machine can be changed with the --route-block flag. It isolates all services bound to container ports on specified protocols (tcp or udp). They can only be opened using the --route-add flag.
# Isolate all tcp services of a container
> turbo run --route-block=tcp <image>
# Isolate all tcp and udp services, but allow container tcp port 3486
# be bound to port 80 on local machine
> turbo run --route-block=tcp,udp --route-add=tcp://3486:80 <image>
Container-to-Container Links
If you decided to not expose any services running in a container to the public by specifying the --route-block flag and not --route-add, you may still want to be able to connect to the services in your container from another container on the same machine. Although this is best achieved by running the containers in the same virtual network using the --network flag, container linking can be used for this purpose as well.
When creating a container with the turbo new command, you can use the --link flag to link it to any existing containers and the new container will be able to connect to any services exposed by the linked containers. Such connection creates a parent-child relationship where the newly created container is the parent.
With each link, an alias name must be specified. Name resolution overrides are added to the parent container so it can refer to its children by these names. Note how with container links the name that a container will use to refer to another container is defined by the former (the parent) using a parameter, instead of by the name of the container as is the case with virtual networks (the --network flag).
Container links also work between containers running in different virtual networks.
Example
First create two containers, each exposing web sites on private port 80, but with no services exposed outside the containers. Run them in detached mode.
> turbo run --route-block=tcp,udp -d <image>
image#05bf1aa4
> turbo run --route-block=tcp,udp -d <image>
image#94a38820
Then create a web browser container linked to the previously created containers.
> turbo run --link=05bf:web1 --link=94a3:web2 myself/webbrowser http://web1 http://web2
You will be able to browse websites served by the linked containers even though they are not publically available.
Controlling Outbound Traffic
The --route-add and --route-block not only provide a way to create rules that apply to inbound network traffic with the tcp and udp protocols, but also rules that apply to outbound network traffic. For the outbound rules, the ip protocol is used. The rules can be implemented using a whitelist or a blacklist approach. It is also possible to reroute traffic from one IP address/host to another, effectively defining an IP address alias.
Routes can be defined using IPv4, IPv6 addresses, or based on hostnames. Note however that you cannot specify a host name on the right side of a --route-add mapping since the result would be ambiguous if the host name resolved to multiple IP addresses.
If your container requires several routing rules then we recommend creating a route-file. A route-file is an INI based, line-delimited text file that lists all the routing rules to add to the container. It can be added with --route-file flag.
Examples
Create a PuTTY container with all outbound access blocked except to IP address 10.0.0.34 (whitelist approach):
> turbo run --route-block=ip --route-add=ip://10.0.0.34 putty
In addition to the above, reroute all traffic to 1.1.1.1 to 10.0.0.34, making it possible to connect to host at 10.0.0.34 typing address 1.1.1.1 in PuTTY:
> turbo run --route-block=ip --route-add=ip://10.0.0.34 --route-add=ip://1.1.1.1:10.0.0.34 putty
It is also possible to use IP ranges using the CIDR notation. The following command allows PuTTY in the container to connect only to hosts in the 192.168.1.0/24 network:
> turbo run --route-block=ip --route-add=ip://192.168.1.0/24 putty
To disallow the app to connect to a set of specific IP addresses (blacklist approach), simply specify them in the --route-block flags:
> turbo run --route-block=ip://192.168.1.55 --route-block=ip://192.168.1.57 putty
When working with IPv6 addresses, it is necessary to enclose them in square brackets:
Block an IPv6 address:
> turbo run --route-block=ip://[2001:4860:4860::8888] putty
Block all IP traffic, except link local IPv6 space:
> turbo run --route-block=ip --route-add=ip://[fe80::c218:85ff:febd:5c01/64] putty
Reroute traffic to an IPv6 address to localhost:
> turbo run --route-block=ip --route-add=ip://[2001:cdba::3257:9652]:[::1] putty
To simplify working with mutliple IP addresses it is possible to use hostnames on the left side of all commands. When a hostname is specified with ip --route-add or --route-block, it is resolved to an IP address when the container starts, and the behavior is effectively the same as if the IP address was specified in place of the hostname. Additionally, all DNS resolves are intercepted and whenever a known hostname resolves to a previously unknown IP address, the IP address is added to the appropriate route table. This feature is what allows wildcard hostnames to work, since otherwise it would not be possible to infer the IP addresses of all possible subdomains.
For example, to run a Chrome container allowing only access to the turbo.net and blog.turbo.net domains, you can use the command:
> turbo run --route-block=ip --route-add=ip://turbo.net --route-add=ip://blog.turbo.net chrome https://turbo.net
Wildcards are supported in host name routing. So, for example, to unblock turbo.net and all of its subdomains, use the expression:
> turbo run --route-block=ip --route-add=ip://*.turbo.net chrome https://blog.turbo.net
Or, to run a Chrome container disallowing access to the facebook.com domain and all of its subdomains:
> turbo run --route-block=ip://*.facebook.com chrome
Another option is to use an INI based route-file which defines rules for blocking and allowing network traffic. The example below blocks all network traffic and then unblocks 192.168.198.0/24 and all turbo.net and spoon.net subdomains:
[ip-block]
*
[ip-add]
192.168.198.0/24
*.turbo.net
*.spoon.net
To create a firefox container with above route-file use this command:
turbo run --route-file=c:\turbo-rules.txt firefox https://turbo.net
If a large list of hostnames is used, such as in the turbobrowsers/block-ad-routes image, the default behavior as described above of resolving all of them to IP addresses at the start of the container would cause container startup to take too long. It can be overriden with the PreResolveHostNames=false setting in a route file, as shown below:
[settings]
PreResolveHostNames=false`
[ip-block]
adserver1.com
adserver2.com
...
Adding Custom Name Resolution Entries
All containers use name resolution provided by the host operating system. You can add specific name resolution overrides using the --hosts flag. The syntax is similar to that of the hosts file of the operating system.
# Make name my-test-service resolve to whatever the name
# test-service-43 resolves
> turbo run --hosts=my-test-service:test-service-43 <image>
# Make name mysite.net resolve to IPv4 address 127.0.0.1 and
# name ipv6.mysite.net resolve to IPv6 address ::1
> turbo run --hosts=127.0.0.1:mysite.net --hosts=::1:ipv6.mysite.net <image>
Using Startup Triggers
Images can be created with TurboScript that have multiple startup files. Collections of startup files can be linked together by a trigger name and executed together.
# in turbo.me file to create "test-trigger" image...
startup file ["c:\windows\system32\notepad.exe", "c:\windows\regedit.exe"]
startup file doc=[("c:\windows\system32\notepad.exe", "c:\doc\welcome.txt"), ("c:\windows\system32\notepad.exe", "c:\doc\howto.txt")]
# from command-prompt...
# launch both notepad and regedit are launched
> turbo run test-trigger
# launch welcome.txt and howto.txt in notepad
> turbo run test-trigger --trigger=doc
Using Mount
The mount option provides a way to mount folders from the host into the container, giving access to resources from the host system.
The mounted folder's content is not committed to the image nor synchronized to the Turbo Hub and therefore is not available when using the continue command.
If the source folder doesn't exist, the mount option is ignored. If the target folder doesn't exist, it is created.
Example for mounting a folder.
turbo run --mount "C:\FolderOnHostSystem=C:\FolderInContainer" clean
Mounts are useful to share a cache folder, like a local Maven repository:
turbo run --mount "%USERPROFILE%\.m2=%USERPROFILE%\.m2" jdk,maven
Mounting multiple folder is done by repeating the mount parameter:
turbo run --mount "C:\Mount1=C:\InContainer1" --mount "C:\Mount2=C:\InContainer2" clean
It is also possible to mount a folder from another container:
turbo run --mount <containerid>:"C:\FolderInSourceContainer=C:\FolderInTargetContainer" clean
Isolation Settings
The isolate parameter enables different levels of visibility and access from the vm to the host environment. The full isolation setting prevents read and write to the host system and registry. This is the preferred setting if you want the vm to run like a clean, completely isolated system.
The writecopy isolation setting allows the vm to read the host file system and registry but not write to the host. This is the preferred setting if you want the vm to be able to access host applications and settings, but not alter the host in any way.
The merge isolation setting allows read and write access to the host system.
Note that the vm isolation setting does not override more restrictive isolation settings that already exist in the image. For example, if you created an image in Turbo Studio and set specific folders and keys to full isolation, those settings would be preserved even if the vm isolation is set to merge.
For applications like Gimp or Notepad++ where you want to allow the vm to edit and save files you work with to the host file system, but otherwise do not want to let the application litter the host system for example with settings stored in the file system or the registry, there is the +merge-user isolation modifier. Used as full+merge-user or write-copy+merge-user, it uses merge isolation for user folders like Desktop or Documents, but keeps the base full or write-copy isolation for the rest of the system, making sure that the host system is kept clean. The preferred mode is full+merge-user.
The well-known root folders affected by the +merge-user modifier are: @DESKTOP@, @DESKTOPCOMMON@, @DOCUMENTS@, @PICTURES@, @DOWNLOADS@, @MUSIC@, @VIDEOS@, and @TEMPLATES.
As a separate convenience feature, if the startup verb is not empty, the startup file of the container is set to merge isolation, regardless of the isolation level that it would otherwise have. This way, when executing a shell operation like opening a file on the host system through a Turbo application that has host system file associations set, it is possible for the virtualized application to access and make changes to the file. The MergeStartupDir vm flag takes this feature one step further and sets the isolation level to merge for the whole parent folder of the startup file and all its subfolders except well-known root folders. For example, if the startup file was C:\myproject.proj and the flag was enabled, the folder C:\myproject-files would have merge isolation, but e.g., C:\Windows or C:\Program Files, being well-known root folders, would have isolation level unchanged.
Exit Code
When the container stops, the exit code of startup file is displayed as the process exit code. The error code will also be return as the Turbo Command's process exit code. If there was an internal Turbo error that was not the result of the virtual application, a negative error code (int32) will be returned. The following exit codes are reserved for Turbo:
public const int SuccessErrorCode = 0;
// Generic Turbo error. Missing startup files will return this code.
public const int GenericErrorCode = -1;
// Application license error
public const int DrmErrorCode = -2;
Selecting VM version
A specific VM version can be selected by using the --vm=version flag. If the selected version is lower than the minimum version that is required by turbo.exe, then the minimum version will be used instead.
JSON Output
When --format=json option was passed this command will provide output in JSON format. It will contain either a container array with information about created container or an error object if command failed.
Auto Update
The run command checks once a day for new image releases. Specify the --pull option to force checking for the latest release.
Updates are download within the specified release: turbo run firefox updates to the latest Firefox.
turbo run firefox:42 updates to the Firefox within release 42, like 42.0, 42.1 42.2 etc.
Remote vs. Local Image Usage
The behavior is to prioritize locally cached images over remote, unless the update check triggers an update of the repositories image.
# Start with an empty local image cache
> turbo run firefox
Downloading image firefox:3.5 from https://turbo.net/users/mozilla
Pull complete
# If the update check has not been done for firefox repository, run will update to the latest version
> turbo run firefox
Using VM 18.7.1306 from local
Using image clean:26 from local
Upgrading image firefox to version 61.0.2
Upgrading image firefox-base to version 61.0.2
Running new container firefox#165115f7
# Remove the created container and the latest image
> turbo rm firefox
Removing container firefox#165115f7
> turbo rmi firefox:61
Image mozilla/firefox:61.0.2 was removed
# Running firefox again will use the local image with the older version because the update check has already been done in the previous run
> turbo run firefox
Using VM 18.7.1306 from local
Using image clean:26 from local
Using image firefox:3.5 from local
Running new container firefox#9afe83e2
If the user does not want to trigger the update to the latest firefox, specify the release explicitly:
> turbo run firefox:3.5
Using VM 18.7.1306 from local
Using image clean:26 from local
Using image firefox:3.5 from local
Running new container firefox:3.5#a524349c
Run In Existing Session
If the user issues a run or start command targeting an already running virtual application session, then the process will start under the existing virtual session.
# Open a command prompt, detached
> turbo run clean -d
Running new container clean#a7b31817
# Open another command prompt, using the existing session
> turbo run clean
Running existing container clean#a7b31817
The application was started inside a running container
# Exit the second command prompt window, the turbo command unblocks
Running a process in an existing session will wait until the process exits before completing the turbo command. The wait for exit does not include child processes. Often an application's startup file such as firefox or notepad++ will immediately exit when another instance of the application is running. The turbo command will immediately exit. Persisted session data will be synchronized in the original turbo session.
save
The save command saves specified container to the hub.
Usage: turbo.exe save <options> <container>
<options> available:
--format=VALUE Use the specified format for output. Supported values: json
--wait-after-error Leave process open after error
--wait-after-exit Leave process open after it exits
Use the continue command to restore the saved container.
search
The search command is used to search the remote registry for images.
Usage: turbo search <query> [<query>...]
<options> available:
--format=VALUE Use json format for output
Only public repositories are listed in search results.
Multiple queries can be added to make searches more specific. The search command will return the set intersection of multiple queries (AND not OR). For example, the command below will only return images with Java and Maven.
> turbo search java maven
JSON output
When --format=json option was passed this command will provide output in JSON format. It will contain either an images array with information about found images or an error object if command failed.
start
The start command restarts a stopped container or starts an application inside an already running container.
Usage: turbo.exe start <options> <container>
<options> available:
-- Parameters after -- are passed directly to the container process
-a, --attach Attach to stdin, stdout, and stderr of the container. This setting is not saved in the
container.
--ad-domain-allow=VALUE Allow execution from the Active Directory domain
--ad-domain-deny=VALUE Disallow execution from the Active Directory domain
--ad-group-allow=VALUE Allow execution for members of the Active Directory group
--ad-group-deny=VALUE Disallow execution for members of the Active Directory group
--admin Run the container with administrative permissions
--all-users Applies the configuration settings to all users
--api-key=VALUE Login with specified API key
-d, --detach Run the container in the background
--diagnostic Enable diagnostic logging
--disable=VALUE Disable the specified Turbo VM setting. This setting is not saved in the container.
-e, --env=VALUE Set an environment variable inside the container. This setting is not saved in the
container.
--enable=VALUE Enable the specified Turbo VM setting. This setting is not saved in the container.
--enable-sync Enable container synchronization. This setting is not saved in the container.
--env-file=VALUE Read in a line delimited file of environment variables. This setting is not saved in the
container.
--format=VALUE Use the specified format for output. Supported values: json
--hide-drive=VALUE Hide specified drives. This setting is not saved in the container. Format: <*|V:|-V:>[,..
.]
--hosts=VALUE Add an entry to the virtual /etc/hosts file (<redirect>:<name>). This setting is not
saved in the container.
-i, --isolate=VALUE Set isolation level: full, write-copy, merge or merge-user.
--link=VALUE Add link to another container (<container>:<alias>). This setting is not saved in the
container.
--mount=VALUE Mount a host folder into the container. This setting is not saved in the container.
Format: [other-container:]SourceFolder[=TargetFolder]
--network=VALUE Run container in specified named network. This setting is not saved in the container.
--no-pull Uses local images to run the container if possible. If not present, will pull from the
hub.
--proxy-password=VALUE Password used to connect to the proxy server. It is not required when using Tnlr. This
setting is not saved in the container.
--proxy-server=VALUE Proxy or Tnlr server (Tnlr requires TLS). This setting is not saved in the container.
Format: [socks5|http|https|tnlr]://proxy-address:port.
--proxy-targets=VALUE A list of addresses (separated by semicolons) which will be proxied. If not set, all
traffic will go through the proxy. The address could be either a DNS name or an IP
address.
--proxy-username=VALUE Username used to connect to the proxy server. It is not required when using Tnlr. This
setting is not saved in the container.
--pull Pulls base images from hub before running, if they exist
--route-add=VALUE Add route mapping. Supported protocols: ip, pipe, tcp, and udp. This setting is not
saved in the container.
--route-block=VALUE Block specified route or protocol. Supported protocols: ip, tcp, and udp. This setting
is not saved in the container.
--route-file=VALUE Read in a INI file of routing configuration. This setting is not saved in the container.
--set-startup-file=VALUE Override the default startup file permanantly
--set-startup-verb=VALUE Override the default startup verb permanantly
--show-window=VALUE Controls how window is shown. Supported values: max, default
--startup-file=VALUE Override the default startup file. This setting is not saved in the container.
--startup-verb=VALUE Override the default startup verb. This setting is not saved in the container.
--stream Enable streaming of the image if available
--trigger=VALUE Execute named group of startup files. This setting is not saved in the container.
--using=VALUE Use specified images as a temporary dependency
--vm=VALUE Use the specified Turbo VM version for execution
-w, --working-dir=VALUE Set the initial working directory inside the container. This setting is not saved in the
container.
--wait-after-error Leave process open after error
--wait-after-exit Leave process open after it exits
If the start command is run against an already-running container then no action will be taken.
To enable diagnostic logging for the container, specify the --diagnostic flag.
To run the container in the background then specify the -d or --detach flag.
To temporarily alter the startup file, specify it with --startup-file parameter. The change overrides the original startup files and does not apply to a subsequent container starts or commits.
When the container stops, the exit code of startup file is displayed in decimal form.
JSON output
When --format=json option was passed this command will provide output in JSON format. It will contain container object with information about started container or an error object if command failed.
stop
The stop command stops containers which are currently running.
Usage: turbo stop <options> <container>
<options> available:
-a, --all Stop all running containers
--format=VALUE Use json format for output
--wait-after-error Leave program open after error
--wait-after-exit Leave program open after exit
start command accepts either a container to close or -a parameter to close all running containers.
If the stop command is run against a non-running container then no action will be taken.
JSON output
When --format=json option was passed this command will provide output in JSON format. It will contain container object with information about stopped container or an error object if command failed.
subscribe
The subscribe command is used to create a subscription to a workspace.
Usage: subscribe <options> <workspace>
<options> available:
--all-users Applies the configuration settings to all users
--format=VALUE Use the specified format for output. Supported values: json
--no-pull Subscribes without pulling images
--pull Pulls images for subscription
--register Registers applications after subscribing
--update-interval=VALUE The number of minutes between subscription update checks. Set to 0 to disable.
--wait-after-error Leave process open after error
--wait-after-exit Leave process open after it exits
Subscribing to a workspace automatically downloads and updates the workspace's applications. The end user can run the command turbo subscription register <subscription> to a subscription to add shell integrations to the desktop. The subscription register command is equivalant to the installi command for each application, and can be viewed via the installed command. This allows the installed application to run with the workspace application settings. The application images and configuration settings are updated by the update task.
A subscription will periodically update the install to the latest workspace application configuration, and the local image to the specified revision. The update is done by registering a Windows Task that runs the subscription update command once a day at 12:00 AM. change the frequency of the update task using the built in Windows Task Scheduler, or by using the --update-interval flag. The task will be under the turbo-net folder.
Use the subscription command to control the subscription. To view all subscriptions use the subscriptions command. To remove the subscription use the unsubscribe command.
Subscribe All Users
When --all-users is specified, the subscription will be installed for all users on the machine. This command requires Administrator privileges and that the Turbo client is installed for all users. See the install options for the Turbo installer for more information on how to install for all users.
Automatic Updates
Subscribing to a channel creates a Windows task that executes a daily update of the subscription. To avoid automatic updates, subscribe with the --update-interval set to 0. You may also use the subscription suspend command or the scheduled task can be disabled or modified to suit the desired update process.
subscription
The subscription command is used to update, register, suspend, resume and print the details of a subscription.
Usage: subscription <options> [action] <name>
sub <options> [action] <name>
<options> available:
--allow-offline Registers the subscription offline if the connection to the hub fails
--all-users Applies the configuration settings to all users
--format=VALUE Use the specified format for output. Supported values: json
--no-pull Registers or updates without pulling images
--offline Registers applications without a hub connection if all images are present locally
--pull Pulls images when registering or updating subscription
--wait-after-error Leave process open after error
--wait-after-exit Leave process open after it exits
The available actions are update, register, suspend, resume and print.
Update a Subscription
The update action updates all of the images in the subscription to the latest version.
Use the --no-pull option to update the subscription without pulling new image versions, instead the images will be streamed on demand.
Register a Subscription
The register action registers all applications in the subscription. The applications are registered via installi. Application AD group restrictions are applied to the end user's Windows identity. An all users context subscription may be registered from a user context, which will give the user read access to the registered applications.
The user's currently configured domain must the same as the subscription's domain otherwise the registration will fail.
Suspend and Resume a Subscription
The suspend action suspends updates for the specified subscription. The resume command will resume updates.
Listing Details
The print action shows details about the subscription.
> turbo subscription print example-channel
Subscription example-channel for the current user
Created 08.02.2016 17:20:23, last updated never (automatic)
Name Repo Release Layers
---- ---- ------- ------
Mozilla Firefox & Flash Latest mozilla/firefox 44.0 adobe/flash:20.0.0.267
Mozilla Firefox Latest mozilla/firefox 44.0
subscriptions
The subscriptions command lists the subscriptions that are currently registered on the device.
Usage: subscriptions <options>
subs <options>
<options> available:
--format=VALUE Use the specified format for output. Supported values: json
--no-trunc Don't truncate output
The subscriptions command provides some basic information about the subscriptions registered on the device including the name, last updated time and a list of applications.
For more detailed information about a specific subscription, use the subscription command.
suspend
The suspend command is used to suspend a running container.
Usage: turbo suspend <container>
<options> available:
--format=VALUE Use json format for output
This will suspend all processes and threads within the specified container.
JSON output
When --format=json option was passed this command will provide output in JSON format. It will contain container object with information about paused container or an error object if command failed.
try
The try command creates a new, temporary container which is removed once it is closed.
Usage: turbo.exe try <options> <image>[+skin(color)] [<parameters>...]
<options> available:
-- Parameters after -- are passed directly to the container process
-a, --attach Attach to stdin, stdout, and stderr of the container. This setting is not saved in the
container.
--ad-domain-allow=VALUE Allow execution from the Active Directory domain
--ad-domain-deny=VALUE Disallow execution from the Active Directory domain
--ad-group-allow=VALUE Allow execution for members of the Active Directory group
--ad-group-deny=VALUE Disallow execution for members of the Active Directory group
--admin Run the container with administrative permissions
--all-users Applies the configuration settings to all users
--api-key=VALUE Login with specified API key
-d, --detach Run the container in the background
--diagnostic Enable diagnostic logging
--disable=VALUE Disable the specified Turbo VM setting. This setting is not saved in the container.
-e, --env=VALUE Set an environment variable inside the container. This setting is not saved in the
container.
--enable=VALUE Enable the specified Turbo VM setting. This setting is not saved in the container.
--enable-sync Enable container synchronization. This setting is not saved in the container.
--env-file=VALUE Read in a line delimited file of environment variables. This setting is not saved in the
container.
--format=VALUE Use the specified format for output. Supported values: json
--hide-drive=VALUE Hide specified drives. This setting is not saved in the container. Format: <*|V:|-V:>[,..
.]
--hosts=VALUE Add an entry to the virtual /etc/hosts file (<redirect>:<name>). This setting is not
saved in the container.
-i, --isolate=VALUE Set isolation level: full, write-copy, merge or merge-user.
--link=VALUE Add link to another container (<container>:<alias>). This setting is not saved in the
container.
--mount=VALUE Mount a host folder into the container. This setting is not saved in the container.
Format: [other-container:]SourceFolder[=TargetFolder]
-n, --name=VALUE Name of created container
--network=VALUE Run container in specified named network. This setting is not saved in the container.
--no-pull Uses local images to run the container if possible. If not present, will pull from the
hub.
--proxy-password=VALUE Password used to connect to the proxy server. It is not required when using Tnlr. This
setting is not saved in the container.
--proxy-server=VALUE Proxy or Tnlr server (Tnlr requires TLS). This setting is not saved in the container.
Format: [socks5|http|https|tnlr]://proxy-address:port.
--proxy-targets=VALUE A list of addresses (separated by semicolons) which will be proxied. If not set, all
traffic will go through the proxy. The address could be either a DNS name or an IP
address.
--proxy-username=VALUE Username used to connect to the proxy server. It is not required when using Tnlr. This
setting is not saved in the container.
--pull Pulls base images from hub before running, if they exist
--route-add=VALUE Add route mapping. Supported protocols: ip, pipe, tcp, and udp. This setting is not
saved in the container.
--route-block=VALUE Block specified route or protocol. Supported protocols: ip, tcp, and udp. This setting
is not saved in the container.
--route-file=VALUE Read in a INI file of routing configuration. This setting is not saved in the container.
--set-startup-file=VALUE Override the default startup file permanantly
--set-startup-verb=VALUE Override the default startup verb permanantly
--show-window=VALUE Controls how window is shown. Supported values: max, default
--startup-file=VALUE Override the default startup file. This setting is not saved in the container.
--startup-verb=VALUE Override the default startup verb. This setting is not saved in the container.
--stream Enable streaming of the image if available
--temp Remove container when it exits
--trigger=VALUE Execute named group of startup files. This setting is not saved in the container.
--using=VALUE Use specified images as a temporary dependency
--vm=VALUE Use the specified Turbo VM version for execution
-w, --working-dir=VALUE Set the initial working directory inside the container. This setting is not saved in the
container.
--wait-after-error Leave process open after error
--wait-after-exit Leave process open after it exits
Turbo try can be used to specify multiple images by separating each image with a comma. If the same file, registry entry, or environment variable exists in multiple images, then the one from whichever image was specified last will win the conflict and be used in the virtual environment. Virtual machine settings are taken from the last specified image. Due to this "layering" approach, it is a good practice to specify images with newer versions of applications or libraries after images with older versions.
# Create a container with the apache/apache image
> turbo try apache/apache
# Create a container with apache and mysql
> turbo try apache/apache,mysql/mysql
# Create a container with .NET 3 and 4
> turbo try microsoft/dotnet:3.5.1,microsoft/dotnet:4.0.3
Containers are started with the startup file specified in the last passed image that is not a modifier layer. A modifier layer is an image that has no startup file or auto-start services defined. Regardless of its position on the command line, it is never used as the entry point to the container.
If a startup file is not set in the base image then cmd.exe /k is used.
# Default startup file is used to start container
> turbo try oracle/jdk
# Override the startup file to use the command prompt
> turbo try --startup-file=cmd.exe oracle/jdk
The initial working directory for the container can be set with the workdir instruction or the -w flag. The current directory will be used if workdir was not specified and no --startup-file parameter was provided when building the image.
# By default, a container's working directory matches the host's working directory
C:\Users> turbo try git/git
(0x3842xd) C:\Users>
# This sets the working directory to the root of the C drive
C:\Users> turbo try -w="C:\" git/git
(0x3842xd) C:\>
Turbo VM settings can be enabled or disabled with the --enable and --disable flags, respectively. For a list of Turbo VM settings, see VM Settings section of the documentation.
Please note that turbo.exe always runs outside of the container on the host even if executed from within the container.
Adding Environment Variables
Environment variables can be added to a container with the -e or --env-file flags.
# Add environment variable 'foo' with value 'bar'
> turbo try -e=foo=bar <image>
# Specify multiple env vars with multiple flags
> turbo try -e=foo=bar -e=x=2 <image>
If your container requires several environment variables then we recommend creating an env-file. An env-file is a line-delimited text file that lists all the environment variables to add to the container. The example file below lists 3 environment variables:
foo=bar
utensil=turbo
my-var=10
Environment variables are always expanded on the host system before they are added to the container.
> echo %PATH%
C:\Windows\system32;C:\Windows;
> turbo try -e=%PATH%;C:\Users <image>
(2fedfja3) > echo %PATH%
C:\Windows\system32;C:\Windows;C:\Users
Virtual Networks
By default, containers run in the host network, meaning that any services exposed by a container can be accessible to the outside world just as if the application was running natively on the host. However, it is possible to run containers in virtualized network environments by specifying a network name other than "host" with the --network flag. Running a container in virtualized network environment prevents it from exposing services to the outside world (unless --route-add flag is used appropriately) while allowing for easy communication between containers running in the same virtualized network environment. In a virtual network, containers can connect to each other using their names as specified with the --name flag if there was any or auto-generated from the image name otherwise.
# Launch a new container in the host network context (the default)
> turbo try --network=host <image>
# Launch two containers in a "mynet" virtual network
> turbo try -d --network=mynet --name=web <image>
web#88e3bb0e
> turbo try -d --network=mynet myself/webbrowser http://web
webbrowser#dd73e48a
# The former will accessible by its name "web" within the network,
# and the latter by its auto-generated name: "webbrowser"
Note: When connecting, always use the container name and not the network name. After all, what should your application connect to if there were two separate containers exposing the same services on the same virtual network if you connected by network name instead of container name?
Port Mapping
All network operations (opening/closing ports, for example) are passed through to the local machine when running in the host network context. To remap container ports to other ports on the local machine, use the --route-add flag. This flag also works when running in a virtualized network environment (by specifying the --network flag).
# Map container tcp port 8080 to local port 80
> turbo try --route-add=tcp://8080:80 <image>
# Map udp traffic on container port 8080 to local port 80
> turbo try --route-add=udp://8080:80 <image>
# Map container tcp port 80 to random port on local machine
# The random port can be later queried using the netstat command
> turbo try --route-add=tcp://80:0 <image>
The default policy of allowing containers to bind to any port on the local machine can be changed with the --route-block flag. It isolates all services bound to container ports on specified protocols (tcp or udp). They can only be opened using the --route-add flag.
# Isolate all tcp services of a container
> turbo try --route-block=tcp <image>
# Isolate all tcp and udp services, but allow container tcp port 3486
# be bound to port 80 on local machine
> turbo try --route-block=tcp,udp --route-add=tcp://3486:80 <image>
Container-to-Container Links
If you decided to not expose any services running in a container to the public by specifying the --route-block flag and not --route-add, you may still want to be able to connect to the services in your container from another container on the same machine. Although this is best achieved by running the containers in the same virtual network using the --network flag, container linking can be used for this purpose as well.
When creating a container with the turbo new command, you can use the --link flag to link it to any existing containers and the new container will be able to connect to any services exposed by the linked containers. Such connection creates a parent-child relationship where the newly created container is the parent.
With each link, an alias name must be specified. Name resolution overrides are added to the parent container so it can refer to its children by these names. Note how with container links the name that a container will use to refer to another container is defined by the former (the parent) using a parameter, instead of by the name of the container as is the case with virtual networks (the --network flag).
Container links also work between containers running in different virtual networks.
Example
First create two containers, each exposing web sites on private port 80, but with no services exposed outside the containers. Run them in detached mode.
> turbo try --route-block=tcp,udp -d <image>
image#05bf1aa4
> turbo try --route-block=tcp,udp -d <image>
image#94a38820
Then create a web browser container linked to the previously created containers.
> turbo try --link=05bf:web1 --link=94a3:web2 myself/webbrowser http://web1 http://web2
You will be able to browse websites served by the linked containers even though they are not publically available.
Controlling Outbound Traffic
The --route-add and --route-block not only provide a way to create rules that apply to inbound network traffic with the tcp and udp protocols, but also rules that apply to outbound network traffic. For the outbound rules, the ip protocol is used. The rules can be implemented using a whitelist or a blacklist approach. It is also possible to reroute traffic from one IP address/host to another, effectively defining an IP address alias.
Routes can be defined using IPv4, IPv6 addresses, or based on hostnames. Note however that you cannot specify a host name on the right side of a --route-add mapping since the result would be ambiguous if the host name resolved to multiple IP addresses.
If your container requires several routing rules then we recommend creating a route-file. A route-file is an INI based, line-delimited text file that lists all the routing rules to add to the container. It can be added with --route-file flag.
Examples
Create a PuTTY container with all outbound access blocked except to IP address 10.0.0.34 (whitelist approach):
> turbo try --route-block=ip --route-add=ip://10.0.0.34 putty
In addition to the above, reroute all traffic to 1.1.1.1 to 10.0.0.34, making it possible to connect to host at 10.0.0.34 typing address 1.1.1.1 in PuTTY:
> turbo try --route-block=ip --route-add=ip://10.0.0.34 --route-add=ip://1.1.1.1:10.0.0.34 putty
It is also possible to use IP ranges using the CIDR notation. The following command allows PuTTY in the container to connect only to hosts in the 192.168.1.0/24 network:
> turbo try --route-block=ip --route-add=ip://192.168.1.0/24 putty
To disallow the app to connect to a set of specific IP addresses (blacklist approach), simply specify them in the --route-block flags:
> turbo try --route-block=ip://192.168.1.55 --route-block=ip://192.168.1.57 putty
When working with IPv6 addresses, it is necessary to enclose them in square brackets:
Block an IPv6 address:
> turbo try --route-block=ip://[2001:4860:4860::8888] putty
Block all IP traffic, except link local IPv6 space:
> turbo try --route-block=ip --route-add=ip://[fe80::c218:85ff:febd:5c01/64] putty
Reroute traffic to an IPv6 address to localhost:
> turbo try --route-block=ip --route-add=ip://[2001:cdba::3257:9652]:[::1] putty
To simplify working with mutliple IP addresses it is possible to use hostnames on the left side of all commands. When a hostname is specified with ip --route-add or --route-block, it is resolved to an IP address when the container starts, and the behavior is effectively the same as if the IP address was specified in place of the hostname. Additionally, all DNS resolves are intercepted and whenever a known hostname resolves to a previously unknown IP address, the IP address is added to the appropriate route table. This feature is what allows wildcard hostnames to work, since otherwise it would not be possible to infer the IP addresses of all possible subdomains.
For example, to run a Chrome container allowing only access to the turbo.net and blog.turbo.net domains, you can use the command:
> turbo try --route-block=ip --route-add=ip://turbo.net --route-add=ip://blog.turbo.net chrome https://turbo.net
Wildcards are supported in host name routing. So, for example, to unblock turbo.net and all of its subdomains, use the expression:
> turbo try --route-block=ip --route-add=ip://*.turbo.net chrome https://blog.turbo.net
Or, to run a Chrome container disallowing access to the facebook.com domain and all of its subdomains:
> turbo try --route-block=ip://*.facebook.com chrome
Another option is to use an INI based route-file which defines rules for blocking and allowing network traffic. The example below blocks all network traffic and then unblocks 192.168.198.0/24 and all turbo.net and spoon.net subdomains:
[ip-block]
*
[ip-add]
192.168.198.0/24
*.turbo.net
*.spoon.net
To create a firefox container with above route-file use this command:
turbo try --route-file=c:\turbo-rules.txt firefox https://turbo.net
If a large list of hostnames is used, such as in the turbobrowsers/block-ad-routes image, the default behavior as described above of resolving all of them to IP addresses at the start of the container would cause container startup to take too long. It can be overriden with the PreResolveHostNames=false setting in a route file, as shown below:
[settings]
PreResolveHostNames=false`
[ip-block]
adserver1.com
adserver2.com
...
Adding Custom Name Resolution Entries
All containers use name resolution provided by the host operating system. You can add specific name resolution overrides using the --hosts flag. The syntax is similar to that of the hosts file of the operating system.
# Make name my-test-service resolve to whatever the name
# test-service-43 resolves
> turbo try --hosts=my-test-service:test-service-43 <image>
# Make name mysite.net resolve to IPv4 address 127.0.0.1 and
# name ipv6.mysite.net resolve to IPv6 address ::1
> turbo try --hosts=127.0.0.1:mysite.net --hosts=::1:ipv6.mysite.net <image>
Using Startup Triggers
Images can be created with TurboScript that have multiple startup files. Collections of startup files can be linked together by a trigger name and executed together.
# in turbo.me file to create "test-trigger" image...
startup file ["c:\windows\system32\notepad.exe", "c:\windows\regedit.exe"]
startup file doc=[("c:\windows\system32\notepad.exe", "c:\doc\welcome.txt"), ("c:\windows\system32\notepad.exe", "c:\doc\howto.txt")]
# from command-prompt...
# launch both notepad and regedit are launched
> turbo try test-trigger
# launch welcome.txt and howto.txt in notepad
> turbo try test-trigger --trigger=doc
Using Mount
The mount option provides a way to mount folders from the host into the container, giving access to resources from the host system.
If the source folder doesn't exist, the mount option is ignored. If the target folder doesn't exist, it is created.
Example for mounting a folder.
turbo try --mount "C:\FolderOnHostSystem=C:\FolderInContainer" clean
Mounts are useful to share a cache folder, like a local Maven repository:
turbo try --mount "%USERPROFILE%\.m2=%USERPROFILE%\.m2" jdk,maven
Mounting multiple folder is done by repeating the mount parameter:
turbo try --mount "C:\Mount1=C:\InContainer1" --mount "C:\Mount2=C:\InContainer2" clean
It is also possible to mount a folder from another container:
turbo try --mount <containerid>:"C:\FolderInSourceContainer=C:\FolderInTargetContainer" clean
Exit code
When the container stops, the exit code of startup file is displayed in decimal form.
Selecting VM version
A specific VM version can be selected by using the --vm=version flag. If the selected version is lower than the minimum version that is required by turbo.exe, then the minimum version will be used instead.
JSON output
When --format=json option was passed this command will provide output in JSON format. It will contain either a container array with information about created container or an error object if command failed.
Auto Update
The try command checks once a day for new image releases. Specify the --pull option to force checking for the latest release.
Updates are download within the specified release: turbo try firefox updates to the latest Firefox.
turbo try firefox:42 updates to the Firefox within release 42, like 42.0, 42.1 42.2 etc.
uninstall
The uninstall command will remove the Start Menu shortcut for the specified container
Usage: turbo.exe uninstall <options> <container>
<options> available:
--format=VALUE Use json format for output
If the specified container has not been previously registered to the host device using the turbo install command, then no action will be taken.
JSON output
When --format=json option was passed this command will provide output in JSON format. It will contain exit code and an error object if command failed.
uninstalli
The uninstalli removes the Start menu shortcuts for the image and disables the update process for the images registered with installi or subscribe commands.
Usage: uninstalli <options> <image>
<options> available:
-a, --all Uninstalls all images on the local machine
--all-users Subscriptions for all users on this machine. Requires admin privilege.
--format=VALUE Use the specified format for output. Supported values: json
--wait-after-error Leave process open after error
--wait-after-exit Leave process open after it exits
Uninstalling an Image that is Part of a Subscription
An image removed by uninstalli will not be updated or reinstalled during the subscription update process. However, it can be reinstalled by running the subscribe command again.
Manually Removing Installation
If an installi becomes corrupted and is unable to uninstall from Windows Settings or uninstalli command you may choose to manually remove the data and entries.
- Delete the corresponding data in %appdatalocal%\Turbo\Containers\shortcuts.
- Delete the corresponding registry key in
HKEY_LOCAL_MACHINE\SOFTWARE\Microsoft\Windows\CurrentVersion\UninstallorHKEY_CURRENT_USER\SOFTWARE\Microsoft\Windows\CurrentVersion\Uninstall
unsubscribe
The unsubscribe command unsubscribes a specified subscription or all subscriptions. It uninstalls shortcuts and removes the update task.
Usage: unsubscribe <options> <subscription>
<options> available:
-a, --all Unsubscribes all subscriptions on the local machine
--format=VALUE Use the specified format for output. Supported values: json
--wait-after-error Leave process open after error
--wait-after-exit Leave process open after it exits
If the --all-users option was used during, the unsubscribe command will unsubscribe all users. In this case, the command needs to be run as an Administrator.
To unsubscribe from all subscriptions, use the --all option.
version
The version command shows the current version of Turbo.
Usage: turbo version
<options> available:
--format=VALUE Use json format for output
JSON output
When --format=json option was passed this command will provide output in JSON format. It will contain version string with current version number.
vm
The vm command displays the most recent version of the Turbo VM which is available on the local machine.
Usage: turbo vm
<options> available:
--format=VALUE Use json format for output
If there is a user logged in to a remote registry then this command will also display the latest version of the Turbo VM available in that registry.
> turbo vm
The latest local version of the Turbo VM is 11.6.213
The latest version of the Turbo VM is 11.6.215
JSON output
When --format=json option was passed this command will provide output in JSON format. It will contain either vms array with one tag item for local VM and one for latest VM available on hub or an error object if command failed.
vms
The vms command lists all the available versions of the Turbo VM.
Usage: turbo vms
<options> available:
--format=VALUE Use json format for output
If a user is logged in to a remote registry then all versions which are available both locally and remotely will be displayed.
If no user is logged in then only local versions of the Turbo VM are displayed.
JSON output
When --format=json option was passed this command will provide output in JSON format. It will contain either vms array with list of available VM versions or an error object if command failed.
7.2 TurboScript
Turbo command processor can act as an automated builder by reading instructions from a .me file to create a new image. Turbo Shell can act as an interactive interpreter of TurboScript.
A .me script is a text file containing a set of instructions that the Turbo command processor or the Turbo Shell follows to create a container. In Turbo command processor, at the end of the script, a new image is created from the container and the container is deleted.
The syntax of a TurboScript generally follows the pattern:
instruction <arg 1> <arg 2> ...
instruction <arg 1> <arg 2> ...
instruction <arg 1> <arg 2> ...
The script is read and executed top-to-bottom and is not case-sensitive.
All scripts have an implicit commit at the end of the script. After the last instruction in the script, it executes turbo commit on the container. If a name was not provided to the build command (via the -n or --name flag) then the new image will be created with its ID as its name.
Syntax Rules
- TurboScript are line-delimited and must only contain 1 instruction per line. Line continuation is not supported.
- All lines must follow the general structure:
instruction <args> - Inline comments are not supported. Comments must be applied at the beginning of a line and are applied to the entire line.
Comments
Comments are denoted by the # character.
# This is a comment
Comments cannot be made inline with a command. Comments must be specified at the beginning of a line.
# This is a valid comment
layer nodejs/nodejs # This is not a valid comment
Conditions
Any TurboScript instruction can have an optional when clause at the end of the line to specify the conditions which must be met before the instruction will be executed. The general form is instruction when expression.
cmd "echo This is Windows7" when host has os:Windows7
These are the currently supported expressions:
- host has architecture:x86
- host has architecture:x64
- host has os:WindowsXP
- host has os:Windows2003
- host has os:WindowsVista
- host has os:Windows2008
- host has os:Windows7
- host has os:Windows2008r2
- host has os:Windows8
- host has os:Windows2012
- host has os:Windows8.1
- host has os:Windows2012r2
- host has os:Windows10
Note that client OSes are not differentiated from server OSes so "Windows7" is equivalent to "Windows2008r2", etc.
Expressions can be combined with AND, OR, NOT, and parenthesis.
layer clean when (not host has os:windows7 and not host has os:windows8.1)
layer spoonbrew/iis7-base when host has os:windows7
layer spoonbrew/iis8-base when host has os:windows8.1
batch
The batch instruction is used for joining multiple commands of the same type in TurboScript.
batch <command>
<line 1>
<line 2>
<...>
If <command> is cmd or empty then all following indented lines will be put into a single batch file. Otherwise, these lines will be turned into separate commands.
The first non-indented line terminates the batch section and resumes normal command processing.
Example
You can use the batch instruction to execute a series of commands that share their state.
# Create a new directory with a text file inside of it.
batch cmd
mkdir c:\new_folder
cd c:\new_folder
echo text content > text_file.txt
# Set several environment variables
batch env
var1="value 1"
var2="value 2"
var3="value 3"
cmd
The cmd instruction is used to run a command in the container.
The instruction has three forms:
# Execute the application directly
cmd ("executable", "param1", "param2")
# Interpret the command by cmd.exe, defaults to using cmd.exe /c
cmd <command> <param1> <param2>
# Pass parameters to the image's startup file
cmd <param1> <param2>
Please note that turbo.exe always runs outside of the container on the host even if passed as cmd parameter.
Form 1: As an Executable
If you wish to launch an executable and optionally supply parameters to that executable, you must express the desired executable as a tuple of strings and give the full path to the executable (unless it is on the local system or container's PATH). Using this syntax, parameters are passed directly to the executable.
# Open foo.txt in notepad
cmd ("c:\windows\system32\notepad.exe", "c:\users\user\desktop\foo.txt")
Form 2: As a Shell Command
Using this syntax, each command is executed in its own command prompt -- a new command prompt being spawned for each instruction. Any stateful commands (cd, for example), must be chained to other commands with an ampersand to have their desired effect.
For example, to read C:\turbo\text-file.txt:
# Does not work
cmd cd C:\turbo
cmd more text-file.txt
# Works!
cmd cd C:\turbo & more text-file.txt
Note: If you wish to use cd functionality in your script, consider using the WORKDIR instruction.
Form 3: As Parameters
Using this syntax, the parameters are sent to the default startup file in the base image. If multiple base images are specified, the startup file from last image listed will be used.
copy
The copy instruction is used to copy a file or directory from a TurboScript or an XAPPL configuration directory.
copy <source> <destination>
# There is also an alias:
cp <source> <destination>
The source path may point to an inner subdirectory of the one mentioned above, but must not point above it. This restriction does not apply to the Turbo Shell.
The destination may either be an absolute path, or a relative path. In the latter case, the file is copied into a location relative to the current working directory.
Examples:
copy turbo.me .
copy setup\installer.msi C:\setup\
cp app-1.2.3.4.msi setup\installer.msi
disable
The disable instruction disables the specified VM setting inside the container.
disable <vm setting>
Only one setting can be disabled per instruction. To disable multiple VM settings, use multiple disable instructions.
See VM Settings section for details on available options.
echo
The echo instruction simply echoes a string argument.
echo "Hello, world"
enable
The enable instruction enables the specified VM setting inside the container.
enable <vm setting>
Only one setting can be enabled per instruction. To enable multiple VM settings, use multiple enable instructions.
See VM Settings section for details on available options.
env
The env instruction creates a new environment variable inside the working container.
env <name>="<value>"
This environment variable will be persisted to the output image by the build command.
Only one environment variable can be added per env instruction. To add multiple environment variables to the working container, use multiple env instructions. Well known system paths like C:\Windows\System32 will be replaced by a variable that will be converted at runtime to the appropriate path for the execution environment.
When multiple environment variables with the same name are defined in set of images used to run a container, the value from last image is used. For two environment variables, PATH and PATHEXT, special behavior is defined. All values are concatenated together using the semicolon as the joining character. The value from the last image appears first and the host value is at the end.
env foo="bar"
env path="c:\path to executables\"
In the container these variables will have the following values:
foo="bar"
path="c:\path to executables;C:\WINDOWS\system32;C:\WINDOWS"
Variables can be reset within the same TurboScript by repeating the env command for the same variable name. The last value will be stored in the image. To remove the variable from the image, use the following command:
env foo=
Please note that if variable foo is also defined in one of layer images and final image is created with --no-base flag then it will be still loaded into containers created with it.
Environment variables can be overridden in a container by explicitly setting the variable to a new value or when an application or installer sets a new value.
hosts
The hosts instruction modifies host name resolution within a container.
hosts <ip address|local host name> <host name>
The syntax for this command matches that of the hosts file in Windows where the first parameter is a host name or IP address and the second parameter is the name to resolve the host name/IP address to.
This setting is persisted to the output image so that any containers created from that image will have these DNS settings applied.
# Make the loopback ip resolve to mydomain.net
hosts 127.0.0.1 mydomain.net
# Redirect requests to google.com to localhost
hosts localhost google.com
import
The import instruction imports content of specified file into current image.
import <import type> <path to file>
Supported import types:
- svm - turbo image file
- msi - msi file
- thinapp - thinapp configuration file
isolate
The isolate instruction sets the isolation setting of a named object.
isolate "<objectType>:<name or path>" <isolation>
Supported object types:
- kernel - kernel objects (full isolation only)
- file - file system (directory paths must end in a backslash)
- window - window objects
Supported isolation types:
- full - Enable read and write isolation.
- cow - Copy on write enables write isolation, allows read from host operating system.
- merge - Reads and writes using host operating system if available.
layer
The layer instruction creates a new container and sets the base image(s) for that container.
layer <image>
The layer instruction can be omitted if a clean base image is desired. Multiple layer instructions are additive.
Multiple images can be specified in a single layer instruction by separating each image with a comma or space. If the same file, registry entry, or environment variable exists in multiple images added via the layer instruction, then the one from whichever image was specified last will win the conflict and be used in the virtual environment. Virtual machine settings are taken from the last image specified in the layer instruction.
Due to this "layering" approach, it is a good practice to specify images with newer versions of applications or libraries after images with older versions.
layer <image 1> <image 2>
# Start container with git and node.js
layer git/git nodejs/nodejs
Note: To initialize an empty container, use the clean image
layer clean
meta
The meta instruction sets the metadata value for the output image.
meta <name>="<value>"
Standard metadata properties are listed below:
- Title
- Description
- Publisher
- Website
- Version
Additionally, metadata can be used to control namespace, name, and tag of the output image.
Custom metadata can be specified using other name-value pairs.
# Add a title
meta title="application name"
meta namespace="organization"
meta name="application"
meta tag="0.1"
# Add custom metadata
meta internal-name="new-name"
require
The require instruction defines a runtime requirement which should be checked and enforced before the output image is launched. If the requirement cannot be satisfied, the image will not be run.
require <requirement>
The following requirements are supported:
- privilege:admin
- architecture:x86
- architecture:x64
- minosver:6.1.7601
Example:
# Fail if image is not launched on 64-bit machine
require architecture:x64
requires
The requires instruction defines a build time requirement which should be enforced immediately. If the requirement cannot be satisfied, the build will fail.
requires <requirement>
See the require instruction for the list of supported requirements.
Example:
# Run TurboScript in elevated command prompt
requires privilege:admin
route
The route instruction adds a route mapping.
route add <route-specifiation>
route block <route-specifiation>
The route add and route block instructions are equivalent to --route-add and --route-block flags to the turbo new command, respectively. They use the same syntax for route-specifiation.
Examples:
# Block all tcp ports
route block tcp
# Map container port 80 to local port 8080
route add tcp://80:8080
# Block access to IP address 192.168.1.123
route block ip://192.168.1.123
setworkdir
The setworkdir instruction sets the working directory which is used by the output image at runtime.
setworkdir <path>
If a setworkdir command is not specified then all commands will be executed from the same working directory as the native command prompt. The <path> specified must exist on host or be created within the container.
shellextension
The shellextension instruction is used to enable a shell extension in the output image.
shellextension <context menu handler CLSID> <extension dll> <executable>
If an image contains shell extensions, the MergeStartupDir VM setting should be enabled to allow operations on file system items using the context menu in Windows Explorer.
Examples:
enable MergeStartupDir
# shellextension <context menu handler CLSID> <extension dll> <executable>
shellextension "{B41DB860-64E4-11D2-9906-E49FADC173CA}" "@PROGRAMFILES@\WinRAR\rarext.dll" "@PROGRAMFILESX86@\WinRAR\winrar.exe"
shellextension "{B41DB860-8EE4-11D2-9906-E49FADC173CA}" "@PROGRAMFILESX86@\WinRAR\rarext.dll" "@PROGRAMFILESX86@\WinRAR\winrar.exe"
Values required to enable the shell extension were copied from the following locations in the system registry:
| Parameter | Value | Registry path |
|---|---|---|
|
context menu handler CLSID |
{B41DB860-64E4-11D2-9906-E49FADC173CA} |
@HKCR@\WinRAR32\shellex\ContextMenuHandlers |
|
extension dll |
@HKCR@\CLSID\{B41DB860-64E4-11D2-9906-E49FADC173CA}\InProcServer32 |
@PROGRAMFILES@\WinRAR\rarext.dll @PROGRAMFILESX86@\WinRAR\rarext.dll |
|
executable |
@HKCR@\WinRAR\shell\open\command |
@PROGRAMFILES@\WinRAR\rarext.dll @PROGRAMFILESX86@\WinRAR\rarext.dll |
startup
The startup file instruction is used to specify the startup file or script to run when a new container is created from this image (using turbo run).
The instruction has multiple forms:
startup file <command> <param1> <param2>(executes the application directly)startup file ("executable", "param1", "param2")(executes the application directly)startup file [("executable1", "param1", "param2"), ("executable2", "param1", "param2"), ...](executes the list of applications directly)startup file trigger=("executable", "param1", "param2")(assigns a trigger name to a startup file)startup file trigger=[("executable1", "param1", "param2"), ("executable2", "param1", "param2"), ...](assigns a trigger name to a collection of startup files)
This instruction is only applied to the output image and does not affect the intermediate container.
If startup file is not specified then the startup file setting is inherited from last image listed in the layer command. Well known system paths like C:\Windows\System32 will be replaced by a variable that will be converted at runtime to the appropriate path for the execution environment.
As an Executable
If you wish to launch a process from an executable and optionally supply parameters to that executable, you must express the desired executable as a tuple of strings and give the full path to the executable (unless it is on the local system or container's PATH). Using this syntax, parameters are passed directly to the executable.
# "clone" and "https://github.com/turboapps/docs" are passed to git.exe
startup file ("git.exe", "clone", "https://github.com/turboapps/docs")
Using TurboScript Vars
When passing a TurboScript var to the startup file instruction, the variable must be appended to a string.
Example:
var startupfilepath = "C:\Program Files\App\app.exe"
startup file ("" + startupfilepath)
Passing Multiple Arguments to the Startup File
When passing multiple arguments to the startup file, the arguments should be separated with a comma to avoid issues with spaces in paths.
Example:
var startupfilepath = "C:\Program Files\App\app.exe"
var configfilepath = "C:\Program Files\App\config.cfg"
startup file ("" + startupfilepath, "-CONFIG","" + configfilepath)
The resulting config file argument is enclosed in quotes:
@PROGRAMFILES@\App\app.exe -CONFIG "@PROGRAMFILES@\App\config.cfg"
As a Shell Command
You may also launch a process using basic command prompt syntax. To open a Command Prompt window with a message:
# Hello world is passed to the 'echo' shell command
startup file cmd.exe /k echo hello world
Multiple Startup Files
It is possible to specify multiple startup files which will be launched simultaneously using the array syntax.
# set multiple default startup files for "test-shotgun" image
startup file [("c:\windows\system32\notepad.exe"), ("c:\windows\regedit.exe")]
# launch both notepad and regedit
turbo run test-shotgun
Startup File Triggers
A startup file, or collection of startup files, can be assigned a trigger name. When this is done, the startup file(s) specified will only launch when using turbo run with the --trigger flag. This can be useful when setting up shortcuts to multiple applications inside the same image.
# in turbo.me file to create "test-trigger" image...
startup file [("c:\windows\system32\notepad.exe"), ("c:\windows\regedit.exe")]
startup file doc=[("c:\windows\system32\notepad.exe", "c:\doc\welcome.txt"), ("c:\windows\system32\notepad.exe", "c:\doc\howto.txt")]
# from command-prompt...
# launch both notepad and regedit are launched
> turbo run test-trigger
# launch welcome.txt and howto.txt in notepad
> turbo run test-trigger --trigger=doc
sync
The sync instruction enables or disables synchronization for a specific path.
By default all directories except the @LOCALAPPDATA@ directories are synchronized.
The sync instruction is applied recursively to all sub directories.
sync enable|diable "<path>"
Example
# Disable synchronization for the app-settings directory
sync disable C:\apps-settings
# Enable synchronization for the sub directory
sync enable C:\app-settings\important-settings
using
The using instruction adds an additional, temporary image(s) for that container.
using <image>
Multiple images can be specified in a single using instruction by separating each image with a comma or space. If the same file, registry entry, or environment variable exists in multiple images added via the using instruction, then the one from whichever image was specified last will win the conflict and be used in the virtual environment. If the same file, registry entry, or environment variable exists in two images, one added via the using instruction and one added via the using instruction, then the one in the using image will win the conflict. Virtual machine settings are taken from the last image specified in the using instruction.
Due to this "layering" approach, it is a good practice to specify images with newer versions of applications or libraries after images with older versions.
If the next instruction after using is indented, a scope is defined and the images specified in the using instruction are available only in this scope.
using python
cmd python --version
cmd python --version || echo Python not available!
Note: Images added with using keyword are NOT included in final image
var
The var instruction sets value of a variable.
var <name>="<value>"
The value can be an expression involving strings and other variables.
var foo="bar"
var myvar=foo + "baz"
A few special variables are implicitly defined:
last- Output of last executed commandspoonversion- Version string of the binaryyear- Current yearmonth- Current month numberday- Curent day numberhour- Current hourminute- Current minutesecond- Current seconddateiso- Current date inyyyyMMddformatdate- Current datetime- Current time
For programs started in the build container, variables are available as environment variables.
var version = ""
using python
cmd python getLatestVersion.py
var version = last
using wget
cmd wget https://example.com/application-%version%.exe
meta name = "application"
meta tag = version
workdir
The workdir instruction sets the working directory inside the container.
workdir <path>
If a workdir command is not specified then all commands will be executed from the same working directory as the native command prompt. The <path> specified must exist on host or be created within the container before this instruction.
Unlike cmd cd <path>, the workdir instruction will persist the working directory to all subsequent instructions.
7.3 Turbo Shell
Turbo Shell, spsh, is a REPL-like interactive interface that understands TurboScript syntax.
When Turbo Shell starts, it creates a working container and starts an interactive prompt. Optionally, given a path to a TurboScript file as an argument, it can instead start by executing the TurboScript and only giving up execution control when the script issues a yield instruction. At the end of a Turbo Shell session, the working container is removed unless keep on instruction has been issued.
Turbo Shell scripting capabilities are superset of capabilities offered by turbo build. The differences:
- The working container is never implicitly committed to an image
- The
copyinstruction can be used to copy from anywhere on the host OS - There are a number of additional commands available
Additional Command Reference
commit
The commit command commits the working container to an image.
commit [no base] [overwrite]
If no base is specified, base image(s) are not merged into the new image.
If overwrite is specified, any existing images of this name are overwritten.
The name and tag of the image can be controlled by setting meta namespace, name, and tag.
push
The push command pushes last committed image to the hub.
push [<remote image>]
If the name of remote image is not specified, the image is pushed with the same name as committed locally.
7.4 Dependencies
Newly created images are usually based on a existing image. For example, a Wordpress image is based on a PHP, MySQL and Apache image. How are these dependencies handled?
Default
By default all base images are baked into the new image. The newly created image includes everything it needs.
For information purpose the used images will show up in the Hub under the Dependencies tab of the repository.
Runtime Dependency Inclusion
If a image is created with the --no-base option, the newly created image will not contain the base images.
Instead the images are downloaded and loaded when the image is used.
Example, a Wordpress image based on a PHP, MySQL and Apache. If this image was build with --no-base, and then launched,
the PHP, MySQL and Apache image are downloaded as well. Transitive dependencies are downloaded recursively.
A Image build with --no-base cannot be pushed, if the base images are not available on Hub.
An error will indicate which images have to be pushed first, before the main image can be pushed.
7.5 Turbo Client
Turbo Client Installation
The latest Turbo Client may be downloaded from https://turbo.net/download.
Installing Turbo Client for a Single User
To install the Turbo Client using default settings, double-click on the installer. This will configure the client for the current user and place the client components in the %LOCALAPPDATA%\Turbo user directory. Shortcuts will be added to the Start Menu in the Turbo.net folder for quick access to the Turbo.net Preferences. In addition, shortcuts will be added to the Startup folder to automatically start the Turbo Client.
The Turbo Client launches applications from the workspace portal using the turbo:// protocol, so a browser extension is not required for application launches.
The Turbo.net Extension is required when using the redirector feature with the Chrome browser. It may be found in the Chrome Web Store at https://chrome.google.com/webstore/detail/turbonet-extension/ldibmiofagdkgiphkcokpooepankmacl.
Installing Turbo Client for All Users
The Turbo Client can be installed for all users on the machine with the --all-users flag, which will place the client components in the %PROGRAMFILES(x86)%\turbo directory and register the shortcuts for all users on the system.
Note that if users on the machine already have the Turbo Client installed in their user directories, then their single user installs will be overriden by the all user install. Additional updates to the Turbo Client will occur for the all users installation even if the --all-users flag is omitted.
For all user installs in environments using the Chrome browser, the Turbo.net Extension may be enabled via group policy. See the [Enable the Turbo.net Extension for All Chrome Users] (https://blog.turbo.net/deploying-turbo-browser-url-redirection-via-group-policy/) section on the Turbo.net Blog.
Turbo Client Unattended Installation
Pass the --silent flag to the client installer to suppress the UI popups that may block unattended installs.
Passing Config Flags to Turbo Client Installer
Pass turbo config flags to the Turbo Client installer to configure the client at install time, such as setting the Turbo Server as the Domain URL and a trusted source.
# Install Turbo Client with a configured Domain URL and trusted source.
> Turbo-Plugin.exe --all-users --silent --domain=https://my.turboserver/ --add-trusted-source=https://my.turboserver/
If you are using the MSI installer, pass the config flags in CMDLINE:
# Install Turbo Client MSI with a configured Domain URL and trusted source.
> msiexec /i Turbo-Plugin.msi cmdline="--domain=https://my.turboserver/ --add-trusted-source=https://my.turboserver/" /qn
Turbo Client Installer Flags
Running the Turbo Client installer with these command line flags can change the install behavior.
|
Flag |
Behavior |
|---|---|
--app-server |
Installs client and provisions the server to be used as an Application Server in an onpremise streaming pool. |
--all-users |
Installs the Turbo Client to %PROGRAMFILES(x86)%\turbo so that it is accessible for all users on the machine. This is required for running certain Turbo command for all users (such as `subscribe` or `installi`) |
--hide-gui |
Disables the Turbo Launcher from being visible. |
--no-auto-start |
Stops the Turbo Launcher from starting when logging into your machine. |
--no-auto-update |
Disables the check to see if new versions of the client are available. |
--no-redirector |
Doesn't install the Turbo Redirector Internet Explorer plugin when installing for all users. |
--no-shell-ext |
Disables the Turbo Launcher from being visible. |
--shutdown-period |
Specifies the number of minutes that the Turbo Sandbox Manager is idle before shutting down. |
--silent |
Turbo Client installs without any UI popups. |
turbo config flags |
Turbo Client installs with the specified turbo config setting. See turbo config for available flags. |
Uninstalling the Turbo Client
Uninstalling Turbo Client via Control Panel
You can uninstall the Turbo Client or the TurboLauncher specifically from the Windows Uninstall or change a program screen (previously called Add/Remove Programs).
Uninstalling Turbo Client via the Command Line
To uninstall the Turbo.net Sandbox Manager, you may pass the /uninstall flag to the Turbo-Sandbox.exe in the %LOCALAPPDATA%\turbo[client-version] directory for single user installs or %PROGRAMFILES(x86)%\turbo[client-version] for all user installs.
# Uninstall for single user
C:\> "%LOCALAPPDATA%\Turbo\[client-version]\Turbo-Sandbox.exe" /uninstall /silent
# Uninstall for all users
C:\> "C:\Program Files (x86)\Turbo\[client-version]\Turbo-Sandbox.exe" /uninstall /silent
For unattended or scripted uninstalls, pass the /silent flag in addition.
Note that if the client is installed for all users, you would have to run from an elevated command prompt or the command will fail with insufficient privileges.
Turbo-Sandbox.exe Uninstall Flags
Pass the following flags to the Turbo-Sandbox.exe to uninstall specific components or the whole Turbo Client.
|
Parameter |
Behavior |
|---|---|
|
/uninstall |
Uninstalls the Turbo Client. Close all web browsers before uninstalling. |
|
/silent |
Used with /uninstall to perform a silent uninstall. |
|
/delete-user-data |
Used with /uninstall and /silent to remove user container data during uninstall. |
|
/uninstall-launcher |
Uninstalls the TurboLauncher but leaves the rest of the client. |
|
/uninstall-redirector |
Uninstalls the TurboRedirector but leaves the rest of the client. |
Turbo Client Security
There are several ways to control how containers can be run on your machine.
Trusted Sources
Trusted sources control which hub locations are allowed to have containers be started from web locations. By default, only https://turbo.net is trusted. A new hub can be added to the list with turbo config --add-trusted-source=[hub-authority].
Any untrusted hub will result in a warning dialog that will ask the user if the container execution is desired. The user will have the option to trust future containers from the location.
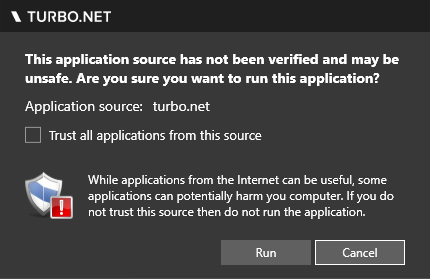
A hub location can also be blocked which will prevent users from executing containers from those locations. A hub source can be blocked with turbo config --block-trusted-source=[hub-authority].

The trusted sources can be set for all users on the machine with the --all-users flag. These will either set the defaults or the overrides depending on how the shared settings are configured.
# view current trusted sources
> turbo config
Hub server: https://turbo.net/
Turbo Drive is enabled (mounted as a T: drive)
Trusted Hub Sources:
turbo.net
# add a trusted hub
> turbo config --add-trusted-source=my-hub.com
Hub server: https://turbo.net/
Turbo Drive is enabled (mounted as a T: drive)
Trusted Hub Sources:
turbo.net
my-hub.com
# block a hub
> turbo config --block-trusted-source=dangerous-hub.net
Hub server: https://turbo.net/
Turbo Drive is enabled (mounted as a T: drive)
Trusted Hub Sources:
turbo.net
my-hub.com
Blocked Hub Sources:
dangerous-hub.net
Local Resource Requests
Containers which are executed remotely may require access to local resources (such as local network). If the container requires access but is not allowed globally then a security dialog will be shown to request permission.

To allow access to the local network automatically, use turbo config --enable=LocalNetworkAccess.
7.6 Turbo Play
Turbo Play is a command line based window wrapper application to Turbo applications.
Executing Turbo Commands
Users may execute turbo commands from turboplay which will provide windows graphical interface instead of the command prompt.
> turboplay turbo run --format=rpc my-image
User can also pass in a text file as the argument which contains a turbo command.
> turboplay turbo C:\Users\[user]\AppData\Local\Turbo\Containers\shortcuts\My App.txt
Additional flags:
--quiet Hide all graphical user interfaces until the application launches
--start-progress-ui-immediately Shows the status dialog immediately before any events are detected from the underlying Turbo.exe
--wait-for-window Status dialog remains until the application's main UI shows
--delete-cmd-file Deletes the cmd file if specified immediately after reading it. Todo: remove
--enable-full-removal Todo: remove
--app-title Sets the title of the status dialog
--debug-vm Overrides the path to the vm
--log Specifies location of log file
--startup-file Passes through startup file to turbo.exe
--startup-verb Passes through startup verb to turbo.exe
--isolate Passes through isolation setting to turbo.exe
--merge-file Passes through merge file setting to turbo.exe
Additional Notes:
- Turbo CLI flag
--wait-after-(error|exit)is ignored because it causes the process to hang waiting for input that will never come. - Turbo CLI flag
--format=rcpis automatically passed in in order to parse the output. --show-eula-for-rpcis automatically passed and displayed to the user in a window if a EULA exists for an application.
Turbo URI scheme
The Turbo protocol directs Turbo Play to execute a local execution of an application, or connects to a remote application server capable of launching a Turbo application.
turbo://{portalAuthority}/{configPath}?t={type}&h={hash}&v={version}
portalAuthority domain which must be trusted by the user from which the configuration comes from
path path of the service, typically 'config'
type config for launching a local application or remoteAppConfig for connecting to a remote application
hash hash of the configuration, to ensure its contents are not tampered with
version currently at 1
Configuration type example:
turbo://turbo.net/config?t=config&h=sha256:e28dd1863f82e6b2f46303311540ae194045a58756cd1c4fbbbc4c778021bc84&v=1
The json format of a config type is
{
"id":"2b68b3de-51e2-4a60-b822-bd810a55146f",
"repoId":"mozilla/firefox",
"appTitle":"Firefox",
"verb":"try",
"isolation":"full",
"isolateNetwork":false,
"routes":[],
"redirectedDomains":[],
"adGroupPermissions":[],
"startupFile":"",
"vm":"",
"layers":[],
"using":[],
"sync":false,
"tnlr":false,
"enableRemoteCommands":true,
"v":"1"
}
RemoteAppConfig type example:
turbo://turbo.net/config?t=remoteAppConfig&h=sha256:51d021ef9da4ee6c7910a4d5f19325fba77888ba94255ab67e0e4c0d8053fa6d&v=1
The json format of the remoteAppConfig type is
{
"v":1,
"sessionId":"e3e9df43-8f1e-4b0c-a371-8080b67cbc66",
"host":"192.0.2.1",
"auth":{
"user":"randomWindowsUser",
"password":"randomWindowsPassword"
},
"app":"turboplay",
"args":"turbourl turbo://config.to/run"
}
The legacy Turbo URI scheme is in the format of turbo://[Ip]?[query].
The query parameters are:
type rdp or local
rdpUsername the username on the remote system executing turbo
rdpPassword the password on the remote system executing turbo
remoteAppMode set value to 1 for RemoteApp rdp
remoteAppProgram set this to %7C%7Cturboplay
remoteAppCmdLine the arguments sent to the remote TurboPlay
tnlrUrl URL of the remote tnlr service which allows the remote application to connect to the local network
tnrlUsername tnlr username
tnlrPassword tnlr password
Turbo RDP
Turbo Play can connect and execute a Turbo Play command on the remote desktop without a Turbo URI scheme.
> turboplay rdp --rdp-host=<hostname> --rdp-program=<remoteAppProgram> --rdp-user=<rdpUsername> --rdp-password=<rdpPassword>
Required parameters:
--rdp-host=<hostname>
Optional parameters:
--rdp-domain=<logon user's domain>
--rdp-user=<logon user>
--rdp-password=<logon password>
--rdp-program=<program to run, defaults to cmd.exe>
--rdp-cmd=<remoteapp cmdline args>
--rdp-port=<rdp port, default 3389>
Turboplay Legacy Usage
Turbo Play can execute Legacy Turbo applications from a config or model URL
/config The URL to an application configuration to execute
/model The UNC path to a streaming model to execute
/xsandboxname
/xsandboxpath The path to the app sandbox (required with the /model flag)
/register
/cachemode The local path where the fully streamed application is to be cached (only valid with the /model flag and is required).
/clientconfig
/xvm
7.7 Turbo Desktop
Turbo Desktop
Turbo Desktop is a command line interface for registering Turbo Workspaces to a desktop.
A registered desktop will enable URL protocol handlers and file associations as specified in the workspace.
Turbo Desktop is currently available for Windows.
Command Line
Install Turbo for Windows and run the command turbodesktop.
Usage: register|unregister <workspace>
Options:
-a, --all-users=VALUE Register for all users
-d, --domain=VALUE Domain URL of the workspace. Current domain if none provided
-w, --workspace=VALUE Workspace to handle the url
-v, --verb=VALUE Verb for handle-file
-h, --help Show this message and exit
Ensure client is logged in and pointed to the correct domain:
turbo config --domain=<your domain>
turbo login <username>
Password: ******
Register a workspace in the domain:
>turbodesktop register default
Created device key for turboserver1@administrator
Fetching workspace default
Registering file / url associations
Created file association .torrent qBittorrent
Created ProgID Turbo.F4A20eBQ249d09wc8DxCGZl
Created url association: magnet qBittorrent
Created ProgID Turbo.U4A20eBQ249d09wc8DxCGZl
Created file association .pdf Firefox
Created ProgID Turbo.F6Uo0WpSOi0lr9Zl7E1wPez
Created url association: http Firefox
Created url association: https Firefox
Created url association: ipfs Firefox
Created ProgID Turbo.U6Uo0WpSOi0lr9Zl7E1wPez
Created file association .xlsx Excel
Created file association .xls Excel
Created ProgID Turbo.F528EJPsZXwPD4i1QblBcM7
Creating URL Protocol for ProgID zoom
Created url association: zoom Excel
Created ProgID Turbo.U528EJPsZXwPD4i1QblBcM7
Created remote icon from johnsu/qbittorrent for qBittorrent
Created remote icon from mozilla/firefox for Firefox
Created icon for Excel
Successfully registered Default (turboserver1)
URL and file assocations are now registered to the device. To unregister, use the unregister command.
>turbodesktop unregister default
Unregistering Default (turboserver1)
Deleting ProgIDs
Deleted ProgID Turbo.F4A20eBQ249d09wc8DxCGZl
Deleted file association .torrent
Deleted ProgID Turbo.U4A20eBQ249d09wc8DxCGZl
Deleted ProgID Turbo.F6Uo0WpSOi0lr9Zl7E1wPez
Deleted ProgID Turbo.U6Uo0WpSOi0lr9Zl7E1wPez
Deleted ProgID Turbo.F528EJPsZXwPD4i1QblBcM7
Deleted file association .xlsx
Deleted file association .xls
Deleted ProgID Turbo.U528EJPsZXwPD4i1QblBcM7
Deleted URL zoom
Deleting workspace files
Successfully unregistered Default (turboserver1)
8.0 About
8.1 What is Turbo?
Turbo allows you to package applications and their dependencies into a lightweight, isolated virtual environment called a "container." Containerized applications can then be run on any Windows machine that has Turbo installed, no matter the underlying infrastructure. This eliminates installs, conflicts, breaks, and missing dependencies.
Turbo containers are built on top of the Turbo Virtual Machine, an application virtualization engine that provides lightweight namespace isolation of core operating system objects such as the filesystem, registry, process, networking, and threading subsystems.
Why use Turbo?
Turbo dramatically simplifies and makes more reliable all phases of the software creation and deployment lifecycle:
For Developers
With Turbo, developers can:
- Develop and package applications in isolated containers that contain all dependencies, including runtimes such as .NET and Java, and databases such as SQL Server and MongoDB
- Automate testing and share test environments with QA, developers, and beta users with the Turbo Hub
- Simplify development and eliminate bugs by deploying applications in a "known good" configuration with a fixed set of components and dependencies
- Containers obviate the need for installers and prevent conflicts with natively installed software
For QA
With Turbo, testers can:
- Run development code in a pre-packaged, isolated environment with software-configurable networking
- Rapidly rollback changes and execute tests across a span of application versions and test environments
- Test in multiple client, server, and browser environments concurrently on a single physical device
- Accelerate test cycles by eliminating the need to install application dependencies and modify configuration
For IT Managers
With Turbo, system administrators can:
- Remove errors due to inconsistencies between staging, production, and end-user environments
- Allow users to test out new or beta versions of applications without interfering with existing versions
- Simplify deployment of desktop applications by eliminating dependencies (.NET, Java, Flash) and conflicts
- Improve security by locking down desktop and server environments while preserving application access
How does it work?
Turbo containers are built on top of the Turbo Virtual Machine Engine, an application virtualization engine which provides lightweight implementation of core operating system APIs, including the filesystem, registry, process, networking, and threading subsystems. Applications executing within the Turbo virtual machine interact with a virtualized filesystem, registry, network, and process environment supplied by the SVM, rather than directly with the host device operating system.
The image below illustrates how the SVM is isolated from the host environment.

The Turbo VM is required to implement containerization on the Windows platform since the underlying OS does not provide appropriate containerization primitives. Put another way, Turbo VM plays the same role for Turbo containers as LXC does for Docker containers.
Unlike hardware virtualization systems like Microsoft Virtual PC and VMWare, or hypervisor systems such as Hyper-V, Turbo VM operates on top of the base operating on the execution stack and virtualizes specific operating system features required for application execution. This enables virtualized applications to operate efficiently, with the same performance characteristics as native executables.
There are several advantages in choosing Turbo containers over hardware virtualization systems:
-
Optimal performance: Turbo containers run at the same speed as applications running natively against the host hardware, with a minimal memory footprint. In contrast, applications running within hardware-virtualized environments experience significant slow-downs and impose a large memory footprint due to the need to run multiple instances of a base operating system.
-
Dramatically reduced virtual environment size: Turbo containers require a footprint proportional to the size of the virtualized application, data, and included components. As a result, Turbo containers are small enough to be quickly downloaded by end-users. Hardware virtualization requires an entire host operating system image, including many basic subsystems that are already present on the end-user device. Each virtual machine may occupy several gigabytes of storage.
-
Application density: You can run multiple simultaneous Turbo environments per processor. Due to the high overhead of hardware virtualization, only a small number of hardware-virtualized environments per processor can run simultaneously.
-
Reduced licensing costs: Turbo does not require the purchase of separate operating system licenses to use a container. Hardware virtualization systems require a host operating system in order to function, which can impose additional licensing costs and restrictions.
-
User mode implementation: The Turbo application virtualization engine is implemented entirely in user mode and does not require administrative privileges. Note that applications requiring hardware device drivers or other non-user-mode software may require a hardware-virtualized environment to function properly.
FAQ
Do Turbo containers work by running a full OS virtual machine?
No. Turbo containers use a special, lightweight application-level VM called Turbo VM. Turbo VM runs in user mode on top of a single instance of the base operating system.
How long does it take to start Turbo containers?
Turbo container startup time is very fast -- on the order of seconds or less. (Startup time excludes any time required to download images.)
What is the performance overhead of running inside a Turbo container?
Containerized applications consume only a small percentage of additional CPU and memory consumption relative to native applications. In nearly all cases, Turbo overhead is negligible.
When I run a container with multiple base images, does it link multiple containers or make a single new container?
Running with multiple base images creates a single container with all of the base images combined. However, this is implemented in an optimized way that avoids explicit copying of the base image container contents into the new container.
Turbo then stores deltas on top of the base images as the container state evolves. The , operator works left-to-right, so files or settings in later arguments override files or settings in previous arguments.
Does Turbo support virtual networking?
Yes. Controlling both inbound and outbound traffic is supported. See the --route-add, --route-block, --link, --hosts, and --network commands. For details relating to binding and routing container ports or IPs see Networking.
Does Turbo support linking multiple containers?
Yes. See the --link and --network commands.
Is there a difference between server and desktop application containers?
No, there is no special distinction. And desktop containers can contain services/servers and vice versa.
How does Turbo handle licensing?
Turbo does not modify the licensing behavior of any applications running virtualized or within a container. Running on Turbo is identical to running on a regular PC, or running on virtual hardware such as Virtual PC or VMware. And Turbo runs on a single instance of a base operating system.
Does Turbo provide a mechanism to track licenses?
Turbo Server includes a licensing module which will actively track and/or enforce licensing. For example, you can grant/deny privileges based on Active Directory or LDAP membership and define licensing constraints on a total user, total device, concurrent user, or concurrent device basis. Turbo Server also provides an analytics module that allows administrators to track application consumption and validate compliance with licensing requirements.
Where is the Turbo container hub?
The public Turbo Hub is hosted at https://hub.turbo.net/hub.
What is the Turbo.net pricing model?
Turbo.net offers Turbo Server for free for up to 5 users. Additional user seats may be purchased on a subscription basis. See Pricing for more information on Turbo.net pricing options.
What if I don't want to host my repositories hosted on Turbo.net?
Turbo is also available as an on-premises enterprise server. Please see Turbo Server for more information or to request an evaluation license.
Does Turbo support file associations and shell extensions?
Yes. Turbo images and containers with shell extensions or file associations can be installed onto the host operation system. Use the installi or install command with the --register-extensions flag.
**How do I pass parameters/arguments to the underlying container's cli?
Pass the arguments directly after the image or containers name: turbo run clean ping google.com. If the command line interface uses dash flags which requires escaping use -- to pass parameters directly: turbo run chrome -- -incognito. This applies to the run, try, and start commands.
8.2 Turbo and App Virtualization
The Turbo platform includes both an application virtualization engine and a containerization engine. The Turbo container implementation is built on top of the Turbo application virtualization (usually called "app virtualization") engine, but includes many additional components.
Turbo's traditional app virtualization tool is called Turbo Studio. As with other app virtualization systems, Turbo Studio is based on a "static" model of virtual application configuration. Virtual machine state is created by capturing snapshots of a physical (or virtual physical) system. This is similar to the processes used by other products in this category such as Microsoft App-V and VMware ThinApp. A major disadvantage of this approach is the requirement to have a clean physical or virtual machine available to use as a target for "sequencing" (App-V) or "capture" (ThinApp).
Turbo containers offer a "dynamic" configuration model -- the user is presented with a clean base image (or a base image created by combining a set of pre-configured source images) and the user installs, configures, and runs applications within that container. The container model offers a significant advantage over the traditional app virtualization model in that a clean machine is not required to create virtual environments. Turbo containers are lightweight and can be quickly instantiated, committed, and shared to the hub over the web.
In addition, containers support concepts such as commit, push/pull, and rollback, allowing container state to be captured at specific points in time and shared with collaborators. Turbo also supports a powerful, unique primitive called continuation, which allows execution container state to be moved between devices. Continuation is linked to a state identifier which is a hash value computed from the dynamic state of a container.
The Turbo containerization system includes:
- Turbo Command Processor: The
turboconsole command provides a command-line interface for standard container operations such as creating, stopping, committing, and pushing containers. - TurboScript: TurboScript is a scripting language that supports automation of container creation and maintenance tasks. TurboScript supports all command-line options plus higher order primitives such as using, the ability to modify
- TurboDB: TurboDB is a deduplicated storage system optimized to support efficient storage, versioning, rollback, and delta-based transactioning of container and image state. Turbo uses a novel differential synchronization protocol that supports rapid synchronization over wide area networks such as the Internet.
- Turbo Hub: The Turbo Hub is an online container repository that allows containers to be easily shared with collaborators. The Turbo
Hub also provides container state synchronization, allowing continuation of container execution across different devices. (See the
continuecommand for more information on continuation.)
In addition, the Turbo VM has been substantially enhanced to support the additional primitives required by the containerization engine. Turbo's application compatibility footprint was expanded to provide support for additional server applications.
How is Turbo different from App-V or ThinApp?
Turbo provides an app virtualization engine and associated tooling, as do App-V and ThinApp. However, the underlying implementations between the three systems are very different. For example, App-V uses device drivers (and therefore requires administrative privileges on the desktop) and requires additional backend infrastructure such as Active Directory and SQL Server. ThinApp is a user mode implementation but differs in many details impacting compatibility coverage and available delivery modes. Both App-V and ThinApp require "sequencing" or "capture" of setups on a clean machine in order to create virtual environment packages.
Neither App-V nor ThinApp offer a containerization system supporting essential container primitives such as image storage, versioning, rollback, network virtualization, or container linking. While app virtualization engines share some characteristics in common with containers, such as the ability to run software in an isolated namespace from the host device, containerization requires additional components such as the container storage system, command processor, scripting engine, and hub, as well as additional core app virtualization engine capabilities to support dynamic configuration of application packages. Critically, neither App-V nor ThinApp support the ability to install software within a container without requiring a "sequencing" or "capture" process on an external operating system instance.
8.3 Turbo and Docker
Docker is a new containerization technology built on top of the LXC kernel container system, a component of the Linux OS. While there are some similarities between the Docker and Turbo platforms, there are also significant differences.
This section summarizes some of the substantial differences for those that are familiar with Docker.
Platform
Turbo was designed for the Windows platform and its containerization system is built on top of the Turbo application virtualization engine. Docker was designed for use on Linux environments and is built on top of the LXC application virtualization system. Put another way, the Turbo VM plays the same role for Turbo containers as LXC does for Docker. In fact, LXC can be viewed as a type of application virtualization implementation.
Turbo supports both desktop and server Windows applications, and works on all desktop and server editions of Windows from Windows Vista forward. Turbo does not require modifications to the base operating system kernel and Turbo does not execute a parallel copy of the base operating system.
For more information about the differences between application and OS virtualization, see the article How Turbo is different from hardware virtualization.
Via the Turbo VM, Turbo containers support many Windows-specific constructs, such as Windows Services, COM/DCOM components, named kernel object isolation, WinSxS side-by-side versioning, shell registration, clipboard data, and other mechanisms that do not directly apply to Linux operating systems.
Turbo also provides a desktop client with many features (GUI tool to launch applications, file extension associations, Start Menu integration) that allow containerized applications to interact with the user in the same way as traditionally installed desktop applications. Turbo also provides a small browser plugin that allows users to launch and stream containerized applications directly from any web browser.
Layering
Turbo containers are designed to operate in a layered virtual application engine architecture. Layers can be thought of as "transparent sheets" of virtual environment configuration that can be stacked on top of one another to build many distinct configurations out of discrete components.
For example, to build a container for a Java application that uses a MongoDB database, a Turbo user could combine a Java runtime layer with a MongoDB database layer, then stack the application code and content in an application layer on top of its dependency layers. Layers make it extremely easy to re-use shared components such as runtimes, databases, and plugins.
Layers can also be used to apply application configuration information. For example, one might have a layer that specifies the default homepage, favorites, and security settings for a browser. This can be applied on top of a base browser layer to impose those settings onto a non-customized browser environment.
Layers can be applied dynamically and programmatically, so you can present distinct application configurations to specific groups of users without rebuilding the base application container. Continuing the browser example, one might create a base browser layer with a particular configuration layer for the development team, then use the same base browser with a different configuration layer for the sales team.
Turbo layering also enables partial rollback during container builds via the using command. This is especially useful when an external tool is required during the build process, but is not desired in the ultimate container. For example:
using git
# pull in content using git
# (git content no longer present in the container)
# use the content to complete container setup
In this code, the contents of the git container will not be present in the output container. By contrast, Docker does not distinguish between content that is imported for use only during the build process and content required by the application container at runtime.
Multi-base image support
Layering can be used in the turbo.me automated build script to build containers on top of multiple base images. For example, in TurboScript the following is valid:
layer java, mongodb, redis
By contrast, Docker does not support creation of images from multiple base images. In other words, Turbo supports "multiple inheritance" through source layering, and "polymorphism" through post-layering.
Continuation
In addition to images and containers, Turbo supports an additional abstraction level called a state. Unlike image and container identifiers, which are arbitrary, a state is identified with a hash value that aggregates the state of all objects within the container at a specific point in time. States are volatile in that they vary continuously as execution occurs in the underlying container, and are indepenent of commit points. By default, the Turbo container engine captures state information at container startup and shutdown.
Turbo's unique continue command allows execution to be continued from a specified state identifier. Importantly, the state identifier encodes all
information about a container and, in particular, allows for continuation of container execution across different devices.
When a container is stopped or suspended, the Turbo container engine will report a state identifier for the container, such as 6aac21bf. You can
then continue execution of the container from that state with the command:
turbo continue 6aac21bf
and this command can be executed from any device, not necessarily the original device hosting the container. Continuation can be used with any state, not necessarily the latest state, creating the effect of an inter-commit rollback; and multiple continuations can be executed from a single state, allowing forking of execution, potentially across multiple devices.
Isolation Modes
Unlike Docker, Turbo containers are not required to be completely isolated from the host device resources. Turbo can fully or partially isolate objects as needed at a fine granularity.
The Turbo mount command allows a specific path in a container to be mapped to a (possibly different) path in another container or on the
host device. This is extremely useful, for example, to allow cached data to be persisted across resets of an application container image.
At an even finer granularity, a Turbo isolation mode may be specified on a per-object basis. For example, it is possible to specify that one directory subtree should be fully isolated while another one is visible from the host device. Supported isolation modes include Full, Merge, Hide, and Write Copy.
For more information on isolation modes, please see the Isolation Modes section of this documentation.
Networking
By default, all Turbo container ports are exposed on the host device network adapter, just as if the containerized application had been executed natively. If desired, all ports can be closed with a single command and then reopened or remapped on an individual basis. Like Docker, Turbo supports mapping of TCP, UDP, and DNS, as well as container-level remapping and IPC linking.
Importantly, this contrasts with Docker, which isolates all ports by default. With Turbo, a server container will work by default on the host device (ports open) and requires a separate command to close or relink the ports. Closing ports may be desired for various reasons, such as minimizing the network surface area in production environments.
Security Model
Docker relies on root access to the host device at two levels. First, the LXC/libcontainer containerization engine that Docker is built on is
implemented within the Linux kernel. Second, the Docker daemon itself runs with root privileges. Containers themselves are not run with root privileges
when used in accordance with recommended practices. The use of code with kernel or root privileges opens the possibility of "break out" into privileged
system resources.
By contrast, Turbo is designed to run entirely in user mode with no privileges. Turbo containerization inherits this ability from the user mode Turbo app virtualization engine, which operates on top of (rather than within) the OS kernel. This approach has two critical advantages: Turbo can be used by unprivileged users on locked down desktops without elevation, improving accessibility and reducing administrative complexity; and, in the event of malware execution or a vulnerability in the Turbo implementation, the affected process does not have access to root privileges on the device.
Toolchain
Like Docker, Turbo provides command-line interfaces (turbo) and a scripting language (TurboScript) for automating build processes. Turbo also provides a number of rich GUI- and web-based tools and services for building, configuring, and managing virtual environments.
Turbo Studio provides a visual design environment and easy-to-use wizards for creating images.
Turbo Server is an on-premises version of Turbo.net that provides the same functionality in a behind-firewall environment. In addition, Turbo Server provides enterprise-specific such as a web application portal, Active Directory and LDAP integration, centralized management, user data synchronization, license management, and usage analytics.
Turbo also maintains an online database of validated application templates and images for thousands of popular software applications.
Configuration
In addition to dynamic configuration via a console or script, Turbo also supports configuration via a static XML-based specification that declares the files, registry keys, environment variables, and other virtual machine states that will be presented to the container.
To assist in building static configurations, Turbo offers a graphical Turbo Studio interface, as well as both a graphical- and command line-based snapshot configuration.
For more information on Turbo Studio and snapshot tools, see the Studio section in this documentation.
Streaming
Turbo, like Docker, supports the use of local containers and the ability to push and pull containers from a central repository.
In addition, Turbo provides the ability to efficiently stream containers over the Internet. The Turbo system includes a predictive streaming engine to launch containers efficiently over wide area networks (WANs) without requiring the endpoint to download the entire VM image. Because many applications can be multiple gigabytes in size, this prevents a large startup latency for remote end users. Turbo predictive streaming uses statistical techniques to predict application resource access patterns based on profiles of previous user interactions. Turbo then adapts the stream data flow based on predictions of subsequent required resources.
Turbo provides a fully hosted application hosting service at Turbo.net, which hosts application streams, provides application and user portals, automatically synchronizes user settings and application state to the cloud, and provides file synchronization and shared folders.For more information, visit the Turbo.net homepage.
Support
Turbo provides commercial support for all official Turbo repositories. Professional services are also available for organizations needing assistance with virtualizing specific applications or building customized solutions on top of Turbo.
Turbo technology is integrated into select third-party enterprise application delivery platforms, including Novell ZENworks Suite, Novell ZENworks Application Virtualization, and LANDesk Management Suite. Novell and LANDesk provide commercial support for Turbo when purchased via these channels.
8.4 Contribute to Turbo
Welcome to the Turbo community!
All build scripts for Turbo images are open sourced, so please contribute!
You can contribute image build scripts here.
Things we love to see:
- Additions, fixes, or improvements to our tutorials and documentation.
- Build scripts, recipes, and walkthroughs for new images and containers.
- New projects built with Turbo's Windows containers in mind.
If you have an idea for an improvement but lack the time to make a pull request, tweet @turbohq, or email us at support@turbo.net.
If you want to join the Turbo team, check out our careers page! We're hiring ;)