1.5 Usage Scenarios
The functionalities available in the Identity Manager user application are numerous. A few examples will give some insight into the ways in which the user application can be used to solve real-world problems.
1.5.1 Scenario A: User searches for information about other persons in the organization
A common use case is that an employee wishes to find out information about another person in the organization. For example:
-
Obtain a coworker’s full name, contact information
-
Find all people with a certain skill set, within a geographic area
-
Determine who a particular person's manager is
These kinds of operations (including more advanced searches based on complex queries) can be done easily via the Directory Search interface. Typically, the end-user would log into the user application and bring the Identity Self-Service tab to the front (if it isn’t already on top), then click the Directory Search link in the column of navigation links on the left.
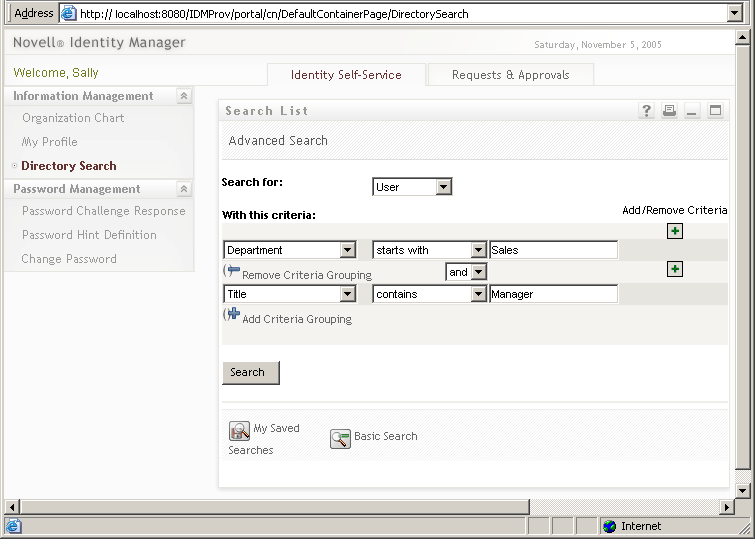
In the screen below, the logged-in user has set up an advanced search to find any User(s) whose department starts with Sales and whose Title contains Manager.
When this search completes, it provides a results-screen that looks like this:
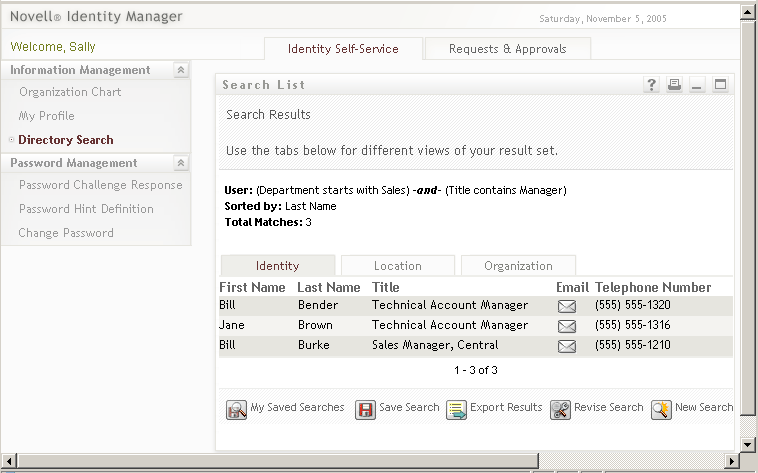
Notice the row of buttons on the bottom, allowing the user to Save this particular advanced query, Revise the query, start over with a new search, and so forth. Notice also the tabs above the list of located individuals. The individuals are currently listed by Identity, but can also be viewed by Location or Organization using the appropriate tab.
1.5.2 Scenario B: Manager creates a new User
Imagine that a department of a company has taken on a new intern, contractor, or other non-employee (who might only be with the company for a fixed amount of time). The new person needs to be in the system so that he or she can be provisioned with an appropriately limited set of resources (and also so that he or she can be located via User searches of the type described above). Since this person is not a regular employee, the person won’t be part of the company’s regular Human Resources system. Yet the person’s identity (and access to resources) needs to be managed in secure fashion.
As manager of the department in question, you are authorized to enter users into the system. To do this, you log in and find that there is a Create User or Group link in the column of navigation links on the left side of the page (see below):
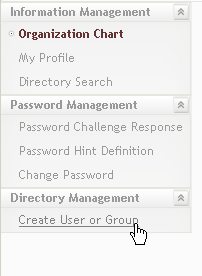
NOTE:This link will not appear unless the logged-in user has appropriate rights.
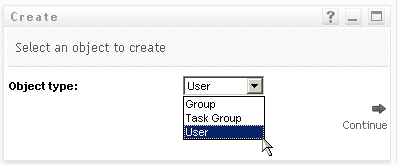
After clicking this link, you reach a screen that asks you whether you wish to create a new Group, Task Group, or User (as shown below).
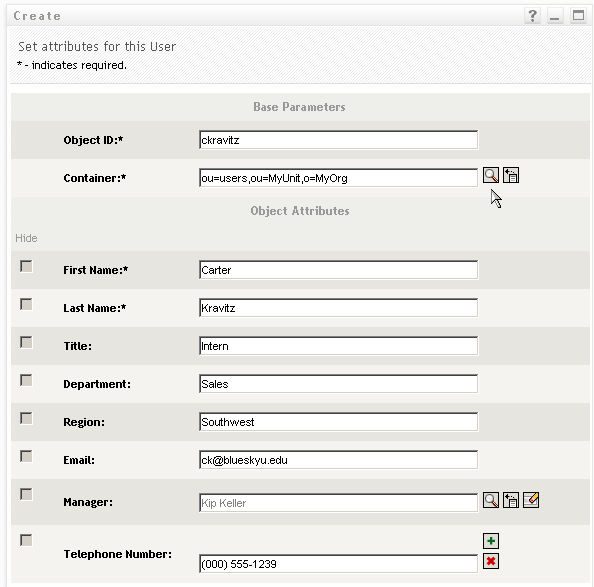
After selecting User and clicking Continue, the next wizard panel allows you to enter this User’s personal information:
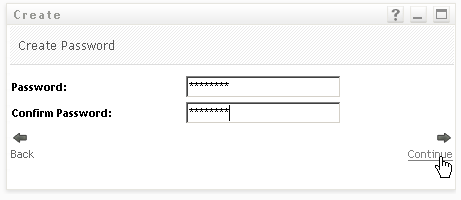
The next screen allows you to assign a password to the new User:
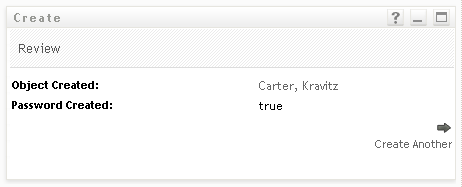
The final screen shows the net result of the process.
In this example, the newly entered person becomes a User with all of the rights of a normal User. But it is possible to define, say, an Intern object using the directory abstraction layer editor, with unique attributes and rights appropriate strictly to that kind of object. In that case, Intern would have shown up as one of the choices in the earlier picklist along with Group, Task Group, and User.
1.5.3 Scenario C: User provisioning
A common situation involves an employee needing to obtain a resource (whether it’s a piece of office equipment, a company credit card, or access to a database) that requires approval by another person. This is known as a provisioning request. In Identity Manager, if the Provisioning Module is installed and configured, such requests can be serviced via workflows.
NOTE:Unlike the preceding examples, this example requires that the Provisioning Module be installed and configured.
The user would first log in to the user application to arrive at his or her landing page. At the top of the page, the user would click the Requests & Approvals tab, then locate the Request Resource link on the left-hand navigation frame. When the Request Resource link is clicked, the user application displays the initial request form.
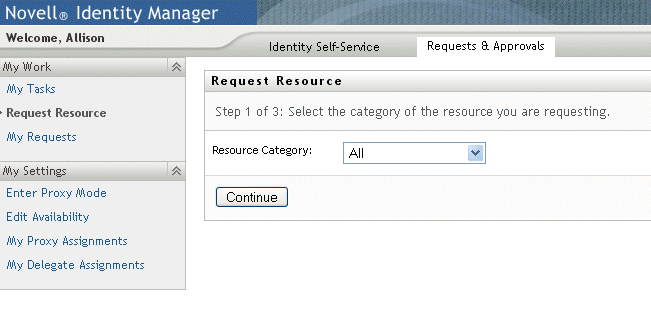
The Resource Category dropdown menu might contain any number of resource types, including entitlements with arbitrary names. (See the Identity Manager main Administration Guide for more information on entitlements and how they are created.) To view all available provisioned resources (in other words, anything that this particular user, with his or her present rights, can request), one need only select All, as shown.
If the user clicks Continue, the next screen will display all of the provisioning request types that this user is permitted to access.
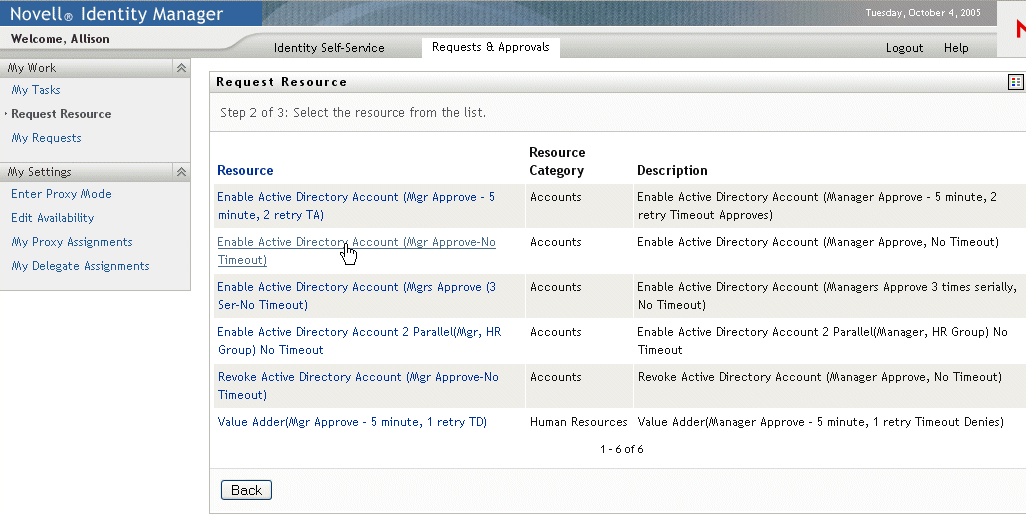
In this example, the user wishes to request an Active Directory account, something that requires manager approval. By merely clicking the appropriate link and filling in a simple form, the associated workflow is kicked off and the person’s manager receives an e-mail notification pertinent to the task that the manager needs to perform. The manager, in turn, can log in to his Requests and Approvals page and find the employee’s request waiting in his task list, ready to approve or deny. (If the manager is on vacation, his or her designated proxy will be notified and can log in and take the same actions the manager normally would.) Meanwhile, the browser screen changes to show a summary page that confirms that the workflow request was submitted successfully.
The granting of an account in a company’s directory (as shown here) is an example of an entitlement request. Many types of entitlement requests can be configured in the Identity Manager user application, and many kinds of workflows (single- or multi-manager approval, serial flow or parallel flow, with or without time-outs, and so forth) can be created. In all cases, fine-grained access control is available to manage the visibility of workflows and other information.
More information on these features can be found in the last chapters of this guide. (The information in those chapters is mainly of interest to administrators. The usage of the features is described more fully in the Identity Manager User Application User’s Guide.)