23.4 Working with the installed e-mail template
Identity Manager ships with an e-mail template that is designed specifically for workflow-based provisioning. This e-mail template is called New Provisioning Request. All provisioning request templates that ship with the product are associated with this e-mail template. Therefore, any new request definitions you create will use this e-mail template.
You can edit the New Provisioning Request template to change the content and format of e-mail messages, but you can not create new e-mail templates.
To edit the New Provisioning Request template, you need to use the Email Templates task within the Workflow Administration role in iManager.
NOTE:This task is a shortcut to the Edit Email Templates task under the Passwords role.
23.4.1 Default content and format
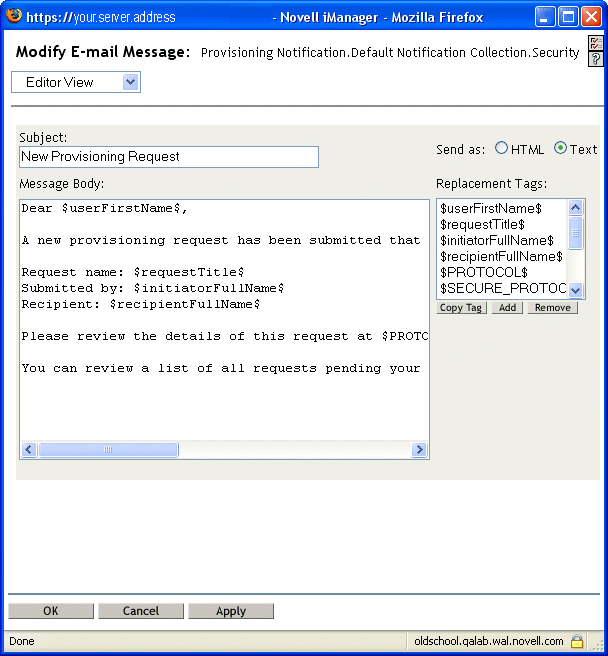
Here’s what the New Provisioning Request template looks like after you install the product:
Dear $userFirstName$,
A new provisioning request has been submitted that requires your approval.
Request name: $requestTitle$
Submitted by: $initiatorFullName$
Recipient: $recipientFullName$
Please review the details of this request at $PROTOCOL$://$HOST$:$PORT$/$TASK_DETAILS$ to take the appropriate action.
You can review a list of all requests pending your approval at $PROTOCOL$://$HOST$:$PORT$/$TASKLIST_CONTEXT$.
The template identifies the provisioning request definition that triggered the e-mail message. In addition, it includes a URL that redirects the addressee to the task that requires approval, as well as a URL that displays the complete list of tasks pending for that user.
23.4.2 Editing the template
You can change the content or format of the New Provisioning Request template. Note that the template applies to all provisioning requests in the Identity Manager user application, so be sure your edits are suitable for all users and workflow tasks.
To edit the template:
-
Select the Identity Manager category in iManager.
-
Open the Workflow Administration role.
-
Click on the Email Templates task.
iManager displays the Edit Email Templates screen.
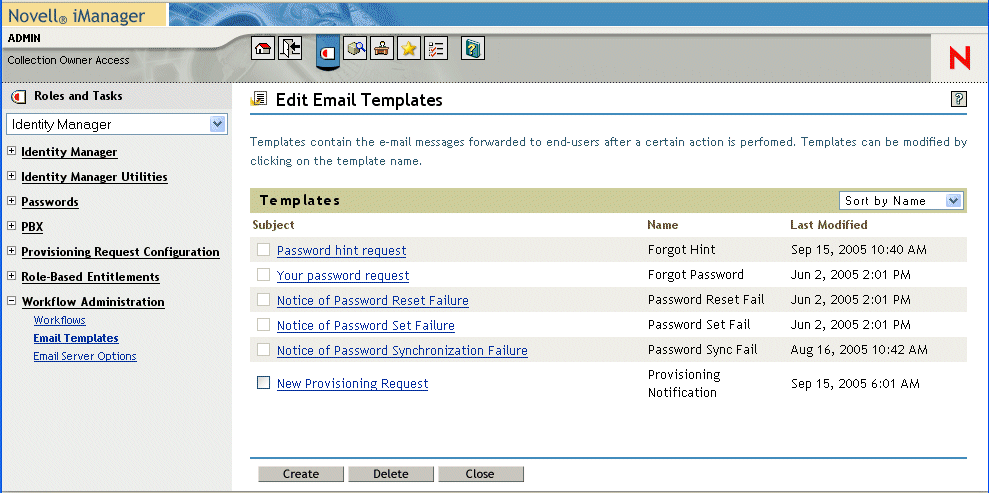
-
Click on New Provisioning Request in the list of templates.
iManager displays the Modify E-mail Message screen.
-
Make your changes in the Message Body box.
-
If necessary, copy one or more of the supplied tags in the Replacement Tags list box to include dynamic text in the message body.
The replacement tags are described briefly below:
-
When you’re done, click OK.
23.4.3 Modifying default values for the template
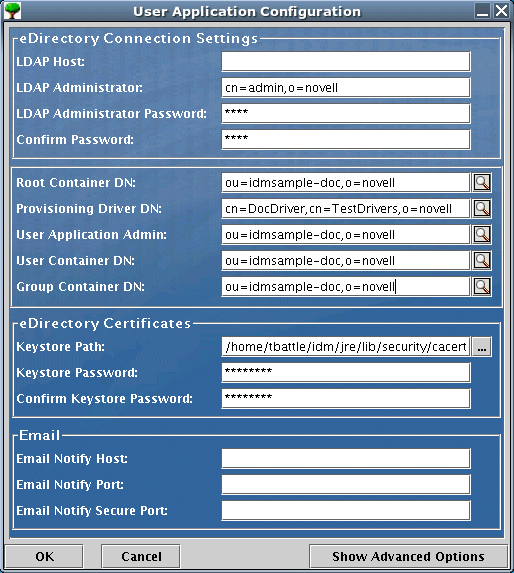
At installation time, you can set default values for several of the replacement tags used in e-mail templates. After you’ve completed the installation, you can also modify these values by using the User Application Configuration tool.
To modify the installation settings:
-
Run the ldapconfig.sh script in the idm folder.
./configupdate.sh
NOTE:On Windows, the file to run is configupdate.bat.
-
Make changes as necessary to any of the following fields:
-
Click OK to confirm your changes.