Integration Manager Enterprise Server User
CHAPTER 3
This chapter discusses subjects of importance to anyone who needs to administer deployed Integration Manager services. Those subjects include:
The various consoles available for managing deployed Integration Manager services, and how to use them
How to inspect and/or edit license-string info for Integration Manager server-side products
How to publish (and control the visibility of) JAR files and custom Java classes
You can manage various aspects of Integration Manager Enterprise Server's runtime operation through browser-based (JSP-powered) consoles. In addition to a General Properties console page where you can exercise control over settings of more-or-less global scope, there are individual consoles for the various Integration Manager Connects (such as JDBC, LDAP, Telnet, and so on), which expose Connect-specific settings. The GUI allows easy navigation back and forth between and among the various console.
NOTE: The consoles depend, in part, for their functionality on JavaScript, so be sure scripting is enabled in your browser. Your browser should also be HTML 4.0 compliant and CSS-aware. No Java applets are used, however, so there is no need to have a Java-plugin-enabled browser.
In addition to offering a GUI for adjusting important runtime settings, the General Properties panel of the main administrative console lets you inspect and/or update your product license(s). This is discussed below.

Any console settings you wish to change or experiment with will be updated on the server in real time, as you adjust them, so that you do not have to restart the server. Changes to cache settings, pool settings, etc., take effect immediately.
You can use the administrative console(s) at any time after the app server is running. The entry point is the General Properties page.
 To access the General Properties page:
Be sure the application server is running, with Integration Manager Enterprise Server installed and operational.
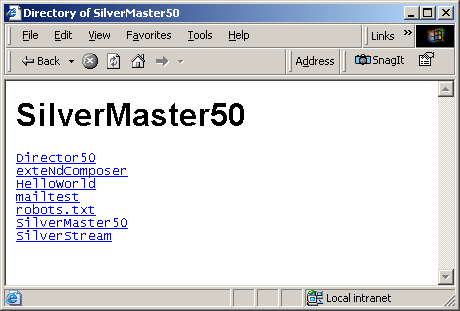
If the target server is Novell exteNd Application Server: Navigate to the default host address and port (for example, http:\\localhost:80.) A master console window similar to the following will appear, with a list of links. Click the exteNdComposer link.
Other app servers: Enter the default host IP address, port, and "exteNdComposer/Console" in your browser window and hit Go. (The URL should look something like http://localhost/exteNdComposer/Console.)
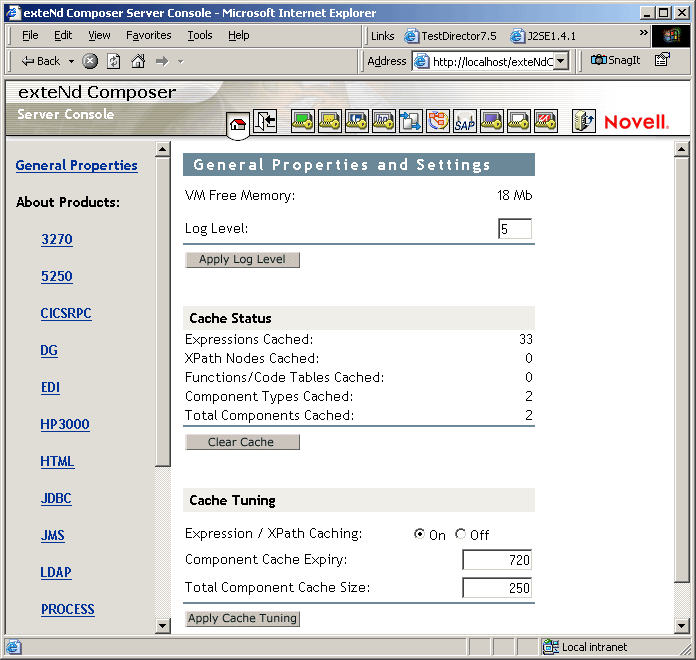
The General Properties page (shown above) has a toolbar at the top, a navigator frame on the left, and a content frame with various text fields and buttons.
The navigator frame contains links for each of the Integration Manager Enterprise Connect products that you have installed (including eval versions). Clicking any link will take you to a product-specific license-info page for the Connect in question. If the Connect in question is capable of using connection pooling, there will be a pushbutton on the license page labeled "Console."
NOTE: An exception to this rule is the JDBC Connect, whose pooling is handled by the app server rather than by Integration Manager Enterprise Server.
If you press the Console button, a new browser window will open, containing a console screen with information about connection pooling. (Consult the documentation for the individual Connects to learn more about the use of these connection-pooling consoles.) You can also open the connection-pooling console window(s) by use of the toolbar buttons, as described below.
At the top of the page, you'll find a row of buttons on a toolbar. The exact number and kind of buttons will depend on the number and type of Integration Manager Enterprise Connect products you currently have installed on the server. The toolbar configuration for Integration Manager is shown below:

Each button has a hover-tip associated with it. The tip appears above the button. In the illustration above, the cursor is hovering over the button corresponding to the 3270 Connect product. (The tooltip says "3270 Console.") Clicking the button will result in a new browser window opening, with the 3270 console showing in it.
The very first button on the far left of the toolbar is a link to the General Properties page. This button is present on all Integration Manager console pages.
The button next to the General Properties button is the Exit button. It closes the browser window.
The button at the far right of the toolbar is the Server-Based Deployment button. This button will take you to a series of deployment screens that you can use to locate and deploy a preexisting EAR, WAR, or JAR file that is ready to be retrieved from a staging area on a network drive. (In other words, this button will initiate a "pull-style" deployment.) To perform this kind of deployment requires that a deploy-ready archive (e.g., EAR) already exist somewhere on disk.
The main frame of the General Properties page contains controls for inspecting and adjusting various runtime parameters on the fly.
 ---
---
If you want to change the log-message threshold for your Integration Manager project(s), enter a number from 1 to 10 in the Log Level field and click the Apply Log Level button. (The lower the number, the more verbose the logging.) Changes take place immediately.
Click the Clear Cache button if you want to purge all objects from the in-memory cache immediately. (See additional discussion below.)
You can enter new cache settings as desired (again, see discussion below), then click the Apply Cache Settings button to make your new settings take effect immediately.
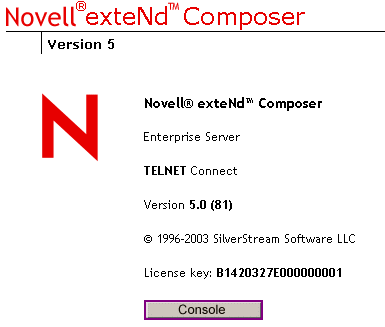
The Integration Manager logo in the top left corner of the General Properties page is itself a button. The cursor changes to a hand when you allow the mouse to linger over the words "Integration Manager."
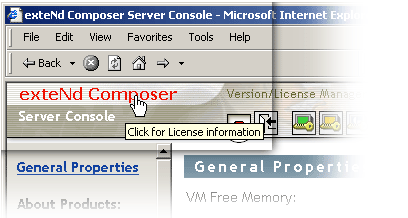
If you click the mouse when it is over the Integration Manager logo, you will see the content area of the browser window change appearance:
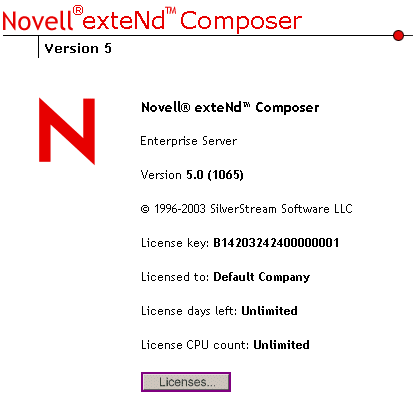
This screen displays the current license key, product version and build number, and other important information. You may be asked for this information when and if you need to contact Customer Support.
At the bottom of the license summary page, there is a Licenses . . . button. If you click this button, a new browser window will open:
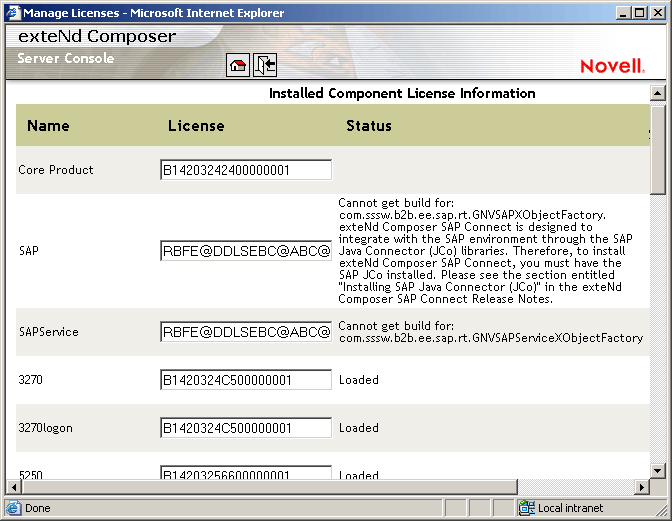
This page gives a detailed listing of license information, including Status info that may be useful for troubleshooting. In the above picture, for example, the entry for SAP Connect has a detailed status message explaining why the connector did not load. Likewise, the entry for SAP Service contains a message mentioning a specific class name. Again, you may be asked for this information when contacting Customer Support.
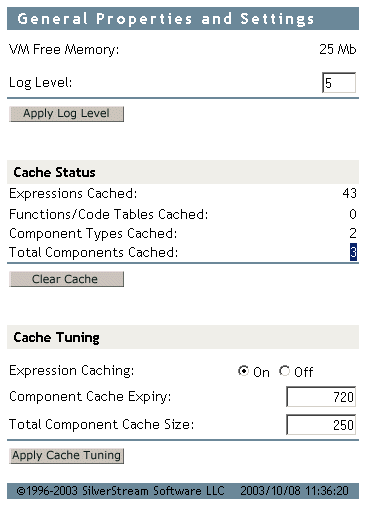
The General Properties page of the Integration Manager Enterprise Server console gives you the ability to inspect cache statistics as well as adjust caching parameters. This section, and the sections that follow, address the various issues you need to know about in order to use this portion of the console to best advantage.
Caching refers to temporary storage of in-memory objects that might be costly to create over and over again. It's a technique for achieving runtime-object reuse.
The goal of caching is to enable higher performance: more units of work per second. When objects are already available in memory and don't have to be created from scratch, applications take less time to run. The trick is knowing which objects to cache, and how to manage the cache so as to minimize RAM usage, data-copying, garbage collection overhead, etc. These are nontrivial issues, especially in a container process that manages a heterogeneous,complex, fast-changing execution environment. Fortunately, Integration Manager Enterprise Server does most of the hard work for you.
The down side to caching, in general, is the need for extra memory to store cached objects. Beyond this, there is the potential for performance degradation if cache-management overhead becomes great. The cost of managing a cache can become significant if the cache contains large numbers of objects, or if conditions are so dynamic that new objects are being "turned over" quickly.
Ideally, a cache should contain only frequently accessed items, and/or items that are costly to create. But it's not always obvious which items meet these criteria. The cache has to "know" how to identify (and retain) high-demand objects while removing infrequently accessed objects that are only taking up valuable memory.
Integration Manager Enterprise Server handles cache management automatically, via a least-recently-used (LRU) algorithm.
LRU means that cacheable objects, once they exist, are kept in memory until some predetermined number of cached objects has been reached or exceeded, at which point the least recently used objects will be removed if it is necessary to add new objects. The "predetermined number" is something you can set yourself, using the Total Component Cache Size control on the Integration Manager Enterprise Server main console. Entering a large number in this field tells Integration Manager Enterprise Server to maintain a large number of objects in memory, at the expense of available free Virtual Machine memory. Setting a low number means relatively few objects will be retained in memory, freeing up RAM. The default value is 250.
NOTE: A large value does not guarantee better performance: For example, routine JVM garbage collection (compaction and purging of memory) becomes more timeconsuming if the cache is large, and LRU analysis (and pruning) of the cache is more costly as well. You will have to experiment with different cache settings to find the "sweet spot" for your particular production environment.
Integration Manager can cache the following types of objects:
Integration Manager does not cache:
Resource XObjects other than Code Table: For example, there is no caching of WSDL Resources, Form Resources, Images, JARs, XSD, etc.
Of course, CPUs, operating systems, and JVMs all have their own caching mechanisms. It's possible (indeed likely) that objects not cached by Integration Manager will reside in a cache of one kind or another at runtime.
Integration Manager Enterprise Server provides runtime services for all Integration Manager-built executables deployed on the app server, regardless of which EAR, WAR, or JAR file(s) the executables come from. Accordingly, caching operates across a scope that encompasses any and all Integration Manager deployments on a given server. This means that any time you change cache parameters in the console, you are potentially affecting all deployed services.
For example, if you've deployed five projects, with three services each, and those 15 total services contain a grand total of 400 cacheable objects, Integration Manager Enterprise Server will cache the 250 most recently used objects (no matter what type they are or which project they came from), assuming you've kept the default Total Component Cache Size setting of 250. If you adjust the cache size up or down, Integration Manager Enterprise Server will add to or prune the cache as appropriate, again according to LRU only, with no regard for which object came from which deployed app.
The user-adjustable caching parameters available on the General Properties console screen include:
Expression Caching on/off—This radio button tells Integration Manager Enterprise Server whether to include Actions (such as Map, Decision, Function, etc.) in the cache. (Actions are considered "expressions" at runtime.) If you are using a generous Total Component Cache Size (see below) but are not seeing any performance improvement under load, try turning Expression Caching off.
Component Cache Expiry—This setting allows you to put a maximum limit (in minutes) on the lifetime of inactive (but still cached) objects. The default is 720 minutes (12 hours), which means no inactive item will stay in memory longer than 12 hours. (The key intuition here is that if an object has been in memory for 12 hours and hasn't been used, it probably doesn't need to be in memory any longer.)
Total Component Cache Size—This is the maximum number of objects (of all types) that will be stored in the cache at runtime. The default is 250.
The cache-expiry and total size limits are enforced via a daemon process—a cache pruner—that runs in its own thread. Every ten seconds, the pruner inspects the cache to see if any objects have "expired" (reached their inactivity time limit, or "Expiry,"as discussed above), in which case those objects are summarily purged from the cache, regardless of whether the cache is full.
IMPORTANT: The console contains a button called Apply Cache Tuning. This button applies the changes you've made (if any) to cache settings and refreshes the console. Don't forget to click this button after you've edited any cache settings.
The General Properties and Settings console contains a button called "Clear Cache." This button does just what it says: It immediately removes all stored objects from cache memory. The console's Cache Status numbers will update in real time to reflect this.
You will typically use the Clear Cache button when redeploying ("hot" deploying) a project after modifying it. If old, unmodified objects from the previous deployment are still in the cache, you may not see your new project's changes take effect until the cache is cleared.
NOTE: Undeploying a project (using the app-server's own utilities for removing deployed objects) does not obviate the need for clearing the cache. See "Removing (Undeploying) Existing Applications" in the previous chapter.
The Clear Cache button is often useful in testing. For example, if you are running in-house benchmark tests to determine which of various cache settings is optimal for a given set of conditions, you would probably want to zero out the cache between runs.
Performance optimization is a complex subject because of the many variables involved and the non-obvious interactions between them. There are few hard-and-fast rules. Some issues to be aware of include the following:
Larger cache sizes may improve application performance, but those gains can be offset by the larger amount of time spent in garbage collection (which is under control of the VM, not Integration Manager).
In an LRU-governed system, larger cache sizes may not have a dramatic effect if the VM is already using generational garbage collection (as is the case on the HotSpot server VM by default).
Incremental (as opposed to generational) garbage collection can be turned on via a VM param. You may want to test performance with and without incremental GC enabled.
Always be sure the same VM is used on production machines and performance-test machines. If you tune against a particular VM and then redeploy to a different VM, performance may not be what you expected.
Be sure the VM command-line params used in testing are exactly the same as those on the final target machine.
Garbage-collection algorithms generally change with each new release of a VM, so be sure to retest every time a new VM release comes out.
Tuning requirements will differ significantly depending on whether your applications are I/O bound, compute-intensive, or memory-intensive. Deploying a new project into a set of existing projects may alter the mix of dependencies and change the performance of other apps, because the newly deployed services may be I/O-bound, whereas the preexisting services might be compute-intensive.
The only way to know which cache and pool settings are best for a given set of apps is to test.
In a client/server system, one of the most resource consumptive operations is connection management. Allowing each transaction to open and close a connection for each request usually introduces significant overhead. To minimize this overhead, Integration Manager Enterprise Server allows you to exploit the connection pooling features of your application server.
It's important to make a distinction between database connection pooling and other types of connection pooling. In general, database connection pooling is under the control of the app server, whereas other types of pooled connections (such as 3270 connection pools) are under the direct control of Integration Manager. In the database case, you should consult the documentation for your app server for information of a more detailed nature than will be presented here. (The different application servers, such as Novell exteNd, WebLogic, and WebSphere, have different setup and administrative capabilities for managing and creating database connection pools.)
In the Novell exteNd Application Server, database connection pools are identified by database name. To take advantage of the server's connection pooling, the Connection Resource for the target database must have the pool name specified. You will want to coordinate with your app server administrator on this at design time, when setting up Connection Resources for your JDBC components.
For connections to non-database resources, Integration Manager Enterprise Server provides connection pooling capabilities that augment those of the application server. Integration Manager Enterprise Server's connector-specific connection pools are configurable and manageable through separate console pages.
Some of the Integration Manager connectors (chiefly those that emulate terminal sessions: 3270, 5250, Telnet, etc.) offer the ability not only to pool connections, per se, but to log in to a particular "start page"of an application or system (which sometimes involves navigating past several screens). The ability to pool properly pre-positioned (by "start page") connections is afforded by so-called Logon Components, which you build as part of your project in Integration Manager at design time.
In order for Logon components to work properly, their existence needs to be made known to the application server as well as to Integration Manager Enterprise Server. If your project uses Logon Components, you should do the following after deploying your project to the server:
To enable the use of Logon Components:
Locate the Integration Manager deployment JAR that contains your Logon Components. This will be a JAR file (bearing the name of your project) located in the \archives folder of your staging area's main output folder.
Follow the app-server vendor's recommendation for putting the JAR file in your server's classpath.
NOTE: If you're using Novell exteNd Application Server, you can add appropriate $SS_LIB entries in agjars.conf after copying the JAR files to the lib directory of the app server
If you want to go ahead and initialize the logon components (thus opening all pool connections and bringing them to the proper startup screen), continue to the next two steps. Otherwise, if you are okay with letting connections and logons happen in real time as they are needed (and taking the onetime performance hit associated with that), you can skip the next two steps.
Navigate to the Integration Manager runtime console (using your web browser) and click into the console for the particular Connect product in question.
Click the Initialize Connection Pool button. (This step needs to be done every time you start the server, if you want connections to be set up before going live. Otherwise, there will be a onetime speed hit as individual logon connections "start up" one by one, on demand.)
The architectural and other particulars of various types of pools differ somewhat depending on the type of back-end system involved. These issues are discussed in greater detail in the various individual User's Guides for the various Integration Manager Connect products (e.g., 3270, 5250, CICS RPC, JMS). See the appropriate guide for more information.
If your service will be running inside a proxy server, you will need to inspect (and possibly hand-edit) certain settings in your xconfig.xml file.
NOTE: There are two xconfig.xml files: One for design time, and another one on the server. The design-time file can be found under Composer\Designer\bin. The server-side file can be found under AppServer\Composer\lib. Be sure Integration Manager is not running when you make hand edits to the design-time file. (Integration Manager overwrites the file on shutdown.) Likewise, make edits to the server-side version of this file when the server is stopped. Then restart the server.
At design time, you can modify a project's proxy-server settings in Integration Manager via the Designer tab on the Tools > Preferences dialog. (See the Integration Manager User's Guide for details.) When you shut down Integration Manager, xconfig.xml is updated for you with respect to proxy-server settings that you made in Tools > Preferences.
On the server, you need to inspectand/or edit xconfig.xml manually in order to "sync up" the runtime proxy server parameters with those you used at design time. Simple go to your AppServer\Composer\lib folder and open xconfig.xml file with a text editor. Look for the PROXYSERVERINFO tag. The child elements under this tag allow you to fine-tune your proxy settings. Edit them as necessary (with the server shut down), then restart the server.
NOTE: Be sure the USEPROXYSERVER element is set to "ON" if your app will be running inside a proxy server at runtime.
Here is an example of what the relevant section of xconfig.xml looks like:
<PROXYSERVERINFO>
<USEPROXYSERVER Desc="If on, the additional PROXY options are enabled (valid values are on | off)">on</USEPROXYSERVER>
<HTTPPROXYHOST Desc=" For Doc I/O, HTTP Actions etc., if network uses a proxy enter name here."></HTTPPROXYHOST>
<HTTPPROXYPORT Desc="Port number HTTPPROXYHOST listens on.">80</HTTPPROXYPORT>
<HTTPNONPROXYHOSTS Desc="List of hosts that do not require a Proxy. Each hostname must be seperated by a pipe '|'.">localhost</HTTPNONPROXYHOSTS>
<FTPPROXYHOST Desc=" For Doc I/O, HTTP Actions etc., if network uses a proxy enter name here."></FTPPROXYHOST>
<FTPPROXYPORT Desc="Port number FTPPROXYHOST listens on.">80</FTPPROXYPORT>
<!-- Note: The following section applies only if you are
in a Windows NT Lan Manager (NTLM) security environment -->
<NTLMCREDENTIALS>
<NTLMUSER>MyUserName</NTLMUSER>
<NTLMPWD>aEPUqn2YTUV+s0y/AXHwBA==
</NTLMPWD>
<NTLMDOMAIN/>
<PROXYNTLMPROTECTED>on</PROXYNTLMPROTECTED>
</NTLMCREDENTIALS>
</PROXYSERVERINFO>
Note that if your proxy server requires the use of NTLM Authentication, you will need to copy the NTLMCREDENTIALS portion of the PROXYSERVERINFO block (see above) from your design-time xconfig.xml file to your server-side xconfig.xml file. This block will exist in your design-time xconfig.xml file if and only if you have set your NTLM credentials in the dialog at Tools > Preferences > Designer > Advanced > Setup. (You may have to exit Integration Manager in order to see the changes show up in xconfig.)
Security Roles (a J2EE feature supported by most app servers) provide a highly granular, inheritance-based mechanism by which you can set and enforce access privileges to deployed services that use connections and connection pools. With security roles, constraints can be placed on HTTP actions for particular URL patterns. Roles are also common in database connection pool scenarios.
Security Roles for container-scoped objects are created and administered at the application-server level (rather than in Integration Manager). You should consult your app server documentation for detailed information on how to set up and manage roles on your particular server. In Integration Manager, you use role names to identify a particular service with a role so that when the service acts as a client (to obtain connections, invoke beans, etc.) it can identify itself appropriately.
Most of the service-trigger property sheets in Integration Manager's design-time environment have a field in which you can specify the Role required in order to run the servlet/trigger in question.
When you specify a Role name in a trigger property sheet, you are essentially limiting access to the Integration Manager service. The role of the caller must match the Role required by the service, or it must inherit from a role with appropriate access rights, in order for the caller to invoke the target service. In this scenario, the Integration Manager service is the target of the request and uses the role mechanism to decide whether the caller is qualified to trigger the service.
You can also specify a "Run As" role for Integration Manager services that will execute other services. In this scenario, the Integration Manager service is the client, rather than the target. The "Run As" role gives the Integration Manager service a Role (an identity for security purposes) to be known by when it calls other services.
When establishing a business-to-business process, you may need to publish (or expose) certain files that are required by other services, or perhaps by your business partners. Examples of these files include XSL style sheets for rendering an invoice and DTD/schema files for validating documents sent by your site.
For management and maintenance purposes, it is usually more effective to prepare these files in their own dedicated JAR and deploy them to the application server. A URI can then be associated with the JAR and its contents published .
The use of special-purpose JARs can also be an effective strategy for resource files needed by your services, since they allow you to deploy and maintain ancillary files (and the services that use them) separately. In creating special-purpose JARS, you need to plan ahead and indirect all references to these resources through exteNd Project Variables.
You may find it convenient or necessary to use non-Integration Manager-built Java classes or JARs in your service. If you do require additional Java classes in your application, you must make them available (visible) to Integration Manager Enterprise Server and/or the application server.
If your JARs or classes need to be visible to Integration Manager Enterprise Server, you can edit or create <JAR> elements under the <RUNTIME> block of xconfig.xml. (You can locate the xconfig.xml file for the runtime environment in Integration Manager Enterprise Server's \lib directory. On the design-time side, look in Integration Manager's \bin directory.)
NOTE: You must do this when the server is not running, since Integration Manager overwrites xconfig.xml at shutdown.
If JARs need to be visible to the application server, and you're using Novell exteNd Application Server, you can add appropriate $SS_LIB entries in agjars.conf and copy the JAR files to the lib directory of the app server; or you can add classes directly to the server's application database.
Other application servers have their own classpath exposure points, generally involving .bat or .sh files and/or config files and/or custom environment variables. You can read about these in the appropriate vendor's documentation.
For development purposes, you can always set the system environment classpath variable to point to your classes or JARs, using operating-system utilities. This should be done only for development work, however. In a production environment, you should limit the scope of JAR/class access to just the applications that need access.
In J2EE, there are five ways in which JARs and/or classes can be installed such that they can be found by client processes within an app-server environment:
As individual classes within a web archive's WEB-INF/classes folder. These classes are visible only to processes that live within the same archive. If the classes are general-purpose utility classes, this may not be the best location because the classes might not be functionally related to the archive that contains them. A higher-level scope might be more appropriate so that the classes do not need to be put inside multiple WARs that need them.
As a JAR file within a web archive's WEB-INF/lib folder. Again, this is a good place to put utility classes functionally related to the applications in the WAR. But since these JAR files will be visible only from within the WAR, this is not a good place for utility JARs that might be needed by multiple modules. You could end up putting multiple copies of the JAR inside numerous WARs, creating a maintainability nightmare.
As individual classes within an EJB module. Although the classes are visible from other modules that use a manifest file, this is not something you should strive for, because the utility classes may not be functionally related to other code in the EJB module.
As a JAR stored within the enterprise application archive (the deployment EAR). The classes are then visible to any module within the application that has a valid manifest file. This is usually a good solution, as it keeps the classes neatly packaged in their own JAR file, which is usable by any services in the EAR. In Integration Manager, the easiest way to accomplish this kind of JAR-within-EAR packaging is to bring a JAR into your project at design time using the JAR Resource wizard. (See the chapter on Resources in the Integration Manager User's Guide.) From that point on, the JAR gets deployed with your project automatically.
As JARs or individual classes on the application server's global classpath. This is by far the easiest solution, since it makes classes visible to any applications running on the server. But from a design standpoint, it's a bad idea, for the following reasons.
Portability issues: Because the classes live outside of the EAR or WAR, they represent files that must be copied along with the project. (The project is no longer self-contained.) It also means changing the global classpath of each server to which the project or JAR is deployed.
Compatibility and Maintainability issues: It forces all client processes running on the server to use the same version of the classes. If the external classes are updated, all client applications must be upgraded and/or retested.
Visibility issues: The classes are visible to all applications running on the server. This is usually not what you want.
The classpath mechanism is a high-level, coarse-granularity mechanism for controlling class and package visibilities. If the goal is to restrict runtime access to code rather than design- and runtime visibility of code packages, it may be appropriate to consider using the programmatic and/or declarative role-based security models available for EJBs and WARs. (WAR security is a J2EE 1.3 concept.) If remote method invocation is an option, many access-control models are available.
The issue of how best to share "shared code" is a notoriously difficult one, regardless of the control mechanism(s) available. As with performance tuning, there are no hard and fast rules that apply for all situations.
Copyright © 2004 Novell, Inc. All rights reserved. Copyright © 1997, 1998, 1999, 2000, 2001, 2002, 2003 SilverStream Software, LLC. All rights reserved. more ...