5.4 Configuring the [Public] Trustee Access Rights on NSS Volumes for Daemons Running as the Nobody User
Access rights to files and folders on NSS volumes are controlled through the NSS file system trustees and rights set for eDirectory users, not with Linux POSIX rights. The only exception to this is the root user, which never has an eDirectory counterpart in order to allow the server to be administered even if eDirectory is not available.
NSS maps the Linux nobody user ID to the eDirectory [Public] trustee. When you use daemons that run as the nobody user to access Linux file system volumes, you typically set the Linux POSIX rights to 777 (rwx rwx rwx) in order to grant access to the nobody user. However, this does not work on the NSS file system. NSS expects the trustee rights for the [Public] trustee to be set up on the target directory and be granted at least the Read and File Scan access rights. This allows NSS to set up the proper NSS and eDirectory authorizations for the nobody user, and to provide the nobody user ID when interacting with native Linux daemons. Otherwise, the daemon cannot store files on the NSS volume.
The [Public] trustee is not an eDirectory object. It is a special trustee that represents any network user, logged in or not, for rights assignment purposes. By making [Public] a trustee of a directory or file, you effectively grant all objects in eDirectory the same trustee rights.
IMPORTANT:For security reasons, you should not provide the file system Supervisor right to the [Public] trustee.
You can use the Files and Folders plug-in in iManager, or the NSS rights utility to configure trustees and trustee rights for volumes, directories, or files. For information about setting trustees in iManager, see Section 6.5, Using the Files and Folders Plug-In for iManager to Manage Trustees, Trustee Rights, and Inherited Rights. For information about the rights utility, see Section 6.9, Using the Rights Utility to Set Trustee Rights for the NSS File System. An example of using each method is provided below.
Example: [Public] Trustee Setup for the RSync Daemon
The rsync daemon runs as the nobody user. In the following example, you want the daemon to access files in the /media/nss/VOL1/rsync directory on an NSS volume named VOL1. You must assign the eDirectory [Public] trustee as a file system trustee of the directory, and give it the Read and File Scan access rights on that directory.
To use the Files and Folders Plug-In to iManager to set up the [Public] trustee as a file system trustee:
-
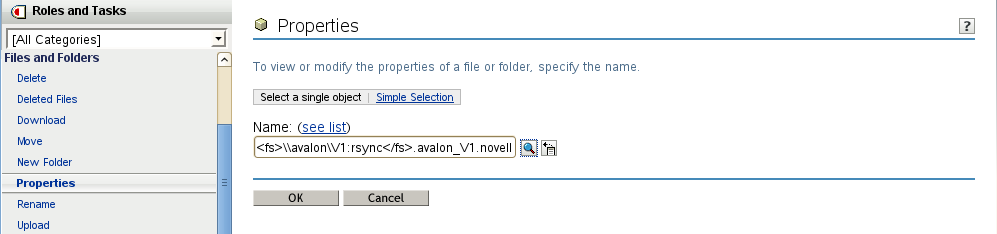
In iManager, click , then click to open the Properties page.
-
On the Properties page, browse and select the VOL1/rsync directory, then click .
-
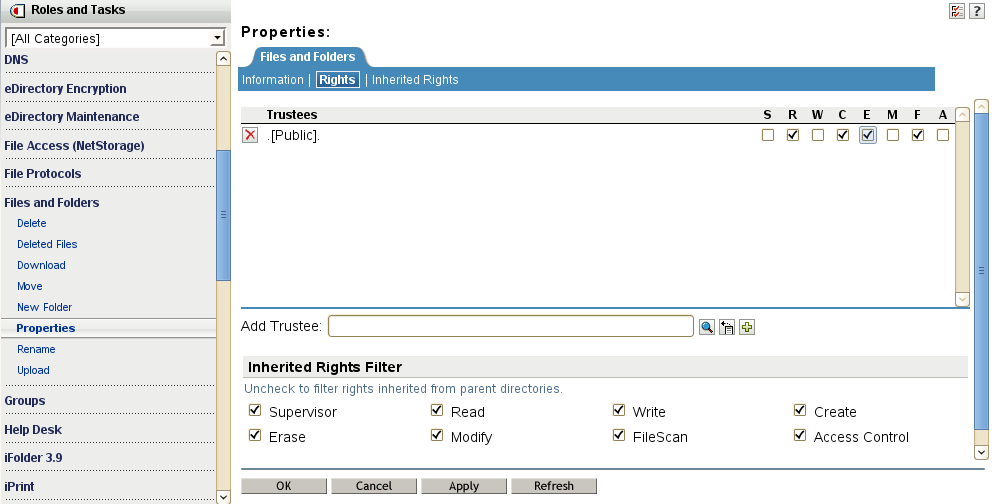
On the folder’s Properties page, click the tab to view the trustees, trustee rights, and inherited rights filter for the selected directory.
-
Add the eDirectory [Public] trustee as a file system trustee of the directory.
-
Scroll down to the field.
-
Type [Public] enclosed in square brackets with a dot before and after, then click the (+) icon.
For example:
.[Public].
The name appears in the list, but it is not actually added until you click or . The Read and File Scan trustee rights are assigned by default.
-
On the Properties page, click to save the changes.
-
-
(Optional) Add other trustee rights for the .[Public]. trustee by clicking the check box below the right, then click .
To use the Rights Utility to set up the [Public] trustee as a file system trustee:
-
Log in to the server as the root user, then open a terminal console.
-
At the console prompt, enter the following commands
cd /media/nss/VOL1/rsync

rights trustee "[Public]" -r rf
Modify the list of rights in this command to add other rights for the daemon if they are needed. For information about the options, see Section 6.9, Using the Rights Utility to Set Trustee Rights for the NSS File System.
-
View the rights to verify that the settings are as expected by entering
rights show
The displayed response should be similar to the following:
Trustees and Inherited Rights Filter
------------------------------------
File: /media/nss/VOL1/rsync
------------------------------------
Trustees:
  (1) [Public]
    [read, scan]

Inherited Rights Filter:
    [supervisor, read, write, create, erase, access control, scan, modify]