C.7 Removing a Shadow Relationship with a Remote NSS Volume
You can use the remote secondary volume as an independent volume again by removing the relationship with the remote secondary volume and disconnecting the Novell Client connection to the remote server. Because none of the file access rights that were set on the merged view of the shadow volume were pushed to the secondary NSS volume, you must set the trustees and file system rights again for the data on the remote volume.
-
Remove the shadow volume relationship between the two volumes.
-
In Novell Remote Manager for Linux, log in as the root user.
-
Select to go to the NCP Shares page.
-
Locate the primary NSS volume in the list, then click the button next to the share name.

-
On the Manage Shares page, click the (i) icon next to the volume name of the NSS volume to access the .

-
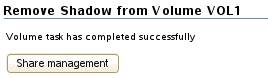
On the volume’s Share Information page under > , click .
After the shadow volume is removed, the page refreshes to report a successful removal.
-
Select to go to the NCP Shares page, locate the volume that was the primary volume in the list, then click the button next to it.
-
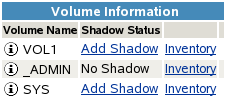
Verify that the shadow volume was removed by using one of the following methods:
-
Select to go to the Dynamic Storage Options page. The former primary volume now has an link next to it instead of a link.
-
Select , then click the icon next to the former primary volume’s name. The field displays n/a (not applicable).

-
-
-
Use one of the following methods to remove file access to the secondary volume:
-
All NSS volumes on all of the remote servers: On the DST server, log out of the Novell Client sessions for all remote servers.
-
Log in to the DST server as the root user, then open a terminal console.
-
At the console prompt, enter
nwlogout --tree <tree_name>
-
-
All NSS volumes on the remote server: On the DST server, log out of the Novell Client session for a specified remote server.
-
Log in to the DST server as the root user, then open a terminal console.
-
At the console prompt, enter
nwlogout --server <remote_servername_or_ip_address>
-
-
Individual NSS volume on the remote server: Remove the file system access rights on the remote volume for the user name you used to log in to the remote server.
-
-
For the remote NSS volume, remove any special file system access rights that you gave the user name that you used for the remote login.
-
Set up file access for users on the independent remote NSS volume.