D.5 Removing the Shadow Volume Relationship in a Cluster Resource with a Remote Secondary
-
Log in to the master node of the cluster as the root user, then open a terminal console.
-
If the cluster pool resource for the shadow volume is not running on the master node, cluster migrate it to the master node. At the console prompt, enter
cluster migrate resource_name masternode_name
-
Offline the cluster pool resource that is managing the shadow volume.
cluster offline resource_nameThis unloads the cluster resource and deactivates the cluster pool and the shadow volume so that the cluster is not controlling them.
-
Manually activate the shared pool and mount the primary volume.
-
At the console prompt of the master node, enter
nssmu
-
In the NSSMU menu, select , then press Enter.
-
Select the primary pool, then press F7 to activate it.
-
Press Esc to return to the NSSMU menu, select , then press Enter.
-
Select the primary volume, then press F7 to mount it.
-
Press Esc twice to exit NSSMU.
-
-
Remove the shadow volume relationship between the two volumes:
-
In Novell Remote Manager for Linux, log in as the root user. to the master node.
-
Select to go to the NCP Shares page.
-
On the NCP Shares page, locate the primary NSS volume in the list, then click the button next to the share name.

-
On the Manage Shares page, click the (i) icon next to the volume name of the NSS volume to access the .

-
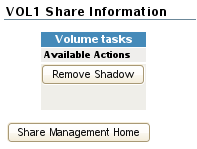
On the volume’s Share Information page under > , click .
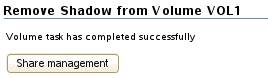
After the shadow volume is removed, the page refreshes to report a successful removal.
-
Select to go to the NCP Shares page, locate the volume that was the primary volume in the list, then click the button next to it.
-
Verify that the shadow volume was removed by using one of the following methods:
-
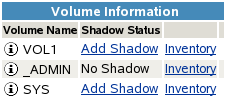
Select to go to the Dynamic Storage Options page. The former primary volume now has an link next to it instead of a link.
-
Select , then click the icon next to the former primary volume name.
The field displays that it is not applicable (n/a).

-
-
-
In NSSMU, manually deactivate the primary pool and its volume.
This automatically dismounts the shared volume, which allows the cluster resource to be managed by the cluster resource again.
-
At the console prompt of the master node, enter
nssmu
-
In the NSSMU menu, select , then press Enter.
-
Select the primary pool, then press F7 to deactivate it.
-
Press Esc twice to exit NSSMU.
-
-
Modify the load script of the cluster pool resource that was managing the clustered shadow volume pair:
-
In iManager, select , then select .
-
Click the browser, then locate and select the cluster server node to view a list of cluster resources.
-
On the Cluster Manager page, click the name link of the primary cluster resource to view its Cluster Pool Properties page, then click the tab.
-
On the > page, comment out or remove the following commands:
#Log in to the remote server
exit_on_error /opt/novell/ncl/bin/nwlogin --server 10.10.10.41 --tree MYCOMPANY_TREE --user dstuser --context users.context --password novell

ncpcon mount volumename=volID,SHADOWPATH=shadowpath
-
On the > page, uncomment the mount command for the primary pool’s volume that you commented out when you set up the clustered shadow volume. For example:
exit_on_error ncpcon mount VOL1=254
-
Click to save your changes.
The changes do not take effect until the cluster resource is taken offline and brought online.
-
-
Modify the unload script of the cluster pool resource that was managing the clustered shadow volume pair:
-
On the > page, click the link.
-
On the > page, comment out or remove the nwlogout command for the remote secondary server:
#ignore error nwlogout --server remote_servername_or_IP_address -
Click to save your changes.
The changes do not take effect until the cluster resource is taken offline and brought online.
-
-
Online the cluster pool resource for the primary pool:
-
Select , then select to view the list of cluster resources.
-
Select the check box next to the primary cluster pool resource, then click .
-
Select the cluster node where you want the resource to load (such as server38), then click .
-
-
Verify that the cluster resource is running by going to the > page.
-
Use one of the following methods to remove file access to the secondary volume:
-
All NSS volumes on all of the remote servers: On the DST server, log out of the Novell Client sessions for all remote servers.
-
Log in to the DST server as the root user, then open a terminal console.
-
At the console prompt, enter
nwlogout --tree <tree_name>
-
-
All NSS volumes on the remote server: On the DST server, log out of the Novell Client session for a specified remote server.
-
Log in to the DST server as the root user, then open a terminal console.
-
At the console prompt, enter
nwlogout --server <remote_servername_or_ip_address>
-
-
Individual NSS volume on the remote server: Remove the file system access rights on the remote volume for the user name you used to log in to the remote server.
-
-
For the remote NSS volume, remove any special file system access rights that you gave the user name that you used for the remote login.
-
For the remote NSS volume, set up file access for users.