22.4 Managing User Space Quotas
User space quotas are the space restrictions you optionally set for users of an NSS volume where the User Space Quotas attribute is enabled. The Users with Quotas page of the Storage plug-in reports the quota setting and space usage for each user who has space restrictions in place for a specified volume, whether the user has data stored on the volume or not.
NOTE:If the user gets deleted, it's corresponding associated files does not get deleted and the ownership does not change which may cause quota inconsistency.
This section describes the following:
22.4.1 Setting the User Space Quotas Attribute for an NSS Volume
The administrator user can view and modify the User Space Quotas attribute at any time.
-
In iManager, click .
For instructions, see Section 9.1.5, Accessing Roles and Tasks in iManager.
-
Select a server to manage to view a list of its volumes.
For instructions, see Section 9.1.6, Selecting a Server to Manage.
-
In the list, select a volume that you want manage, then wait for the page to refresh to view its details.
-
Click .
The page has three tabs: , , and . It opens to the tab.
-
On the tab, select (enable) or deselect (disable) the check box, then click .
22.4.2 Viewing User Space Quotas
As the Administrator user or a user with the Supervisor right for the volume can view and configure user space quotas with the Storage plug-in for iManager. Users can view their own user quotas and space usage statistics, but they cannot modify the quota settings.
The page reports the quota setting and space usage for each user who has space restrictions in place for a specified volume, whether the user has data stored on the volume or not. The page reports the current usage of all users on the volume who have data stored on the volume, whether the users have a quota on the volume or not.
The tracking of user space usage and quotas is an expensive operation in terms of performance. For this reason, NSS does not begin tracking user space usage until you create the first user quota on the volume. If you have never assigned a user quota to a volume, the All Users page has no information to report. After you create the first user quota on the volume, NSS begins tracking all of the user space used on the volume. From then on, the All Users page reports usage for all users with data on the volume.
The report and report include the following information:
Table 22-1 Report of User Space Quotas
|
Parameter |
Description |
|---|---|
|
User Name |
The distinguished user name. For example: userid.context, jsmith.geo.example, asantiago.example |
|
Quota |
Indicates the amount of space in MB that the user can use on the selected volume. The user’s data can grow only to the size of the quota or to the amount of available physical space on the volume, whichever is less. NSS allocates space only as needed. You can set user quotas that total more than the total available space on the volume. This is called overbooking. However, you cannot set any single quota to be greater than the volume size. |
|
Used |
Reports the current amount of space used by the user's data in all directories combined on the specified volume. Reports the current amount of space used by the user's data in all directories combined on the specified volume. |
|
Available |
Reports the free, unused space within the user’s quota for the specified volume. Because of overbooking, other users might be competing for a portion of this space. |
Viewing User Quotas as the Administrator User
-
Log in to iManager as the Administrator user or equivalent user.
-
In iManager, click .
-
Click the browser, then select the volume that you want to manage.
Wait for the page to refresh to see the user space restrictions for all users with quotas for the selected volume.

-
To view all users (with or without quotas) who have data stored on that volume, click .
Viewing User Quotas as an Individual User
-
Log in to iManager as an individual user with your eDirectory username and password.
-
In iManager, click .
-
Click the Volume browser, then select the volume that you want to manage.
Wait for the page to refresh to see the individual user’s space restrictions for the selected volume on the page.

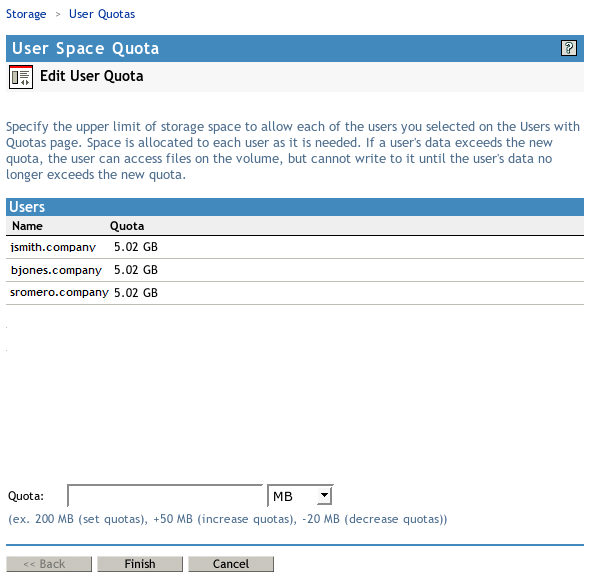
22.4.3 Configuring a User Space Quota
The Administrator user or equivalent user can configure the user space quota for one user or multiple users at a time.
-
In iManager, click , then select the volume you want to manage.
-
Click to open the dialog box.

-
Click the icon to open the User object list, then browse to select one or more users who you want to share the same quota.
-
In , specify the upper limit of storage space that you want to assign to each of the selected users.
-
Use the drop-down list to select the units to use for the quota you specified in Step 4. Options are bytes, kilobytes, megabytes, and gigabytes.
-
Click to apply the quota, or click to back out of the transaction.
Each of the usernames you selected now has user space quotas assigned to it.
22.4.4 Modifying a User Space Quota
The Administrator user or equivalent user can modify the quota for one user or multiple users at a time. Modify the current quotas for the selected users by setting a new quota for all users, increasing each quota by the same amount, or decreasing each quota by the same amount.
-
In iManager, click , select a server, then select the volume you want to manage.
-
Click .
-
Open the dialog box by doing one of the following:
-
Single User: Select the name link for the user.
-
Multiple Users: Select the check box next to one or more user names whose user space quota you want to delete, then click .
-
-
Specify the change that you want to apply to each of the selected users by doing one of the following:
-
Modify Quota: Specify a value to set each selected user's quota to the specified value, such as 200 MB.
-
Increase Quota: Use a plus (+) with the value to increase each selected user's quota by that amount, such as +50 MB.
If any individual quota or the total of all quotas exceeds the volume size, the increase is processed, because space is allocated to the users as needed, on a first-come-first-served basis.
If you attempt to increase the quota for a user with an Unlimited quota, no changes are made for that user's quota. The setting remains Unlimited.
-
Decrease Quota: Use a minus (-) with the value to decrease each selected user's quota by that amount, such as -20 MB.
If a reduction takes a user's quota to 0 MB, then the user is fully restricted. The user cannot add any new files no matter how many existing files are deleted. To remove the restriction, set a non-zero quota or delete the quota for the user.
If a reduction takes a user's quota to a negative value, then an error message reports the quota as an Invalid Quota. You must repeat the process to set a valid quota for the user.
-
-
Use the drop-down list to select the units to use for the quota you specified in Step 4. Options are bytes, kilobytes, megabytes, and gigabytes.
-
Click .
Each of the users you selected now has the new user quota assigned to his or her individual account on this volume.
22.4.5 Deleting a User Space Quota
The Administrator user or equivalent user can delete the user space quota for one or more users. Deleting the user space quota for a user removes the space restriction for the user on the selected volume. Of course, any directory quotas or volume quotas still apply.
-
In iManager, click , then select the volume you want to manage.
-
Select the check box next to one or more user names whose user space quota you want to delete, then click .
-
Do one of following:
-
To confirm, click to remove the quotas. The user accounts no longer have quotas assigned to them for the selected volume.
-
To back out of the process, click .
-
To remove all user space quotas on the volume at the same time, you can simply disable the User Space Quota attribute for the volume. For information about disabling the attribute, see Section 22.4.1, Setting the User Space Quotas Attribute for an NSS Volume.
22.4.6 Configuring User Space Quotas on Volumes After Upgrading or Migrating from OES 1 Linux
Beginning with OES 2 Linux, file ownership is properly assigned for access via the NCP protocol whether the user is Linux-enabled or not. User quotas for NCP users no longer require that a user be Linux-enabled.
For OES 1 Linux, using user space quotas required usernames to be Linux-enabled with Linux User Management (LUM). If an NCP user was not Linux-enabled on OES 1 Linux, any files the user created were assigned as the root user identity (after verifying the username's trustee rights to do so, of course) instead of the actual username.
If you migrate an NSS volume where NCP users were not Linux-enabled from OES 1 Linux to OES 2 Linux, you will observe that the file ownership is now recorded as the actual user. However, existing files might still belong to the root user and are not counted against user space quotas.
IMPORTANT:Directories and files that were created while users were not Linux-enabled on the OES 1 Linux server are owned by the root user and are not counted against the user space quotas you set unless you reassign file ownership to the individual users.
-
Use one of the following tools to change ownership of any files that the user normally uses that were previously assigned to the root user as owner:
-
Novell Client
-
Files and Folders plug-in to iManager
-
You cannot use the Linux chown command to change the creator field for the NSS file system. It changes the root user’s view of who is reported as the owner user in the Linux path, but the change has no effect on the NSS metadata. The Linux chown command also does not modify the owner group.