13.14 Renaming the Mount Point Path for a Shared NSS Volume (Using a Custom Mount Point for a Shared NSS Volume)
This section describes how to modify the load and unload scripts to specify a custom mount point for a clustered NSS volume. The NSS volume attribute must be enabled.
For local NSS volumes, the Linux mount point for the device that contains the volume is stored in the /etc/fstab file, and the NCP mount point for the volume is stored in the /etc/opt/novell/ncpserv.conf file. By design, clustered NSS volumes do not have entries in these files. The mounting and dismounting of clustered volumes is controlled by the load and unload scripts. The mount location is assumed to be the default /media/nss/<volume_name>.
In an NSS pool cluster resource’s load script, the pool activation command automatically mounts the NSS volume in Linux at the default mount point /media/nss/<volume_name>. The ncpcon mount command creates an NCP volume instance for the NSS volume and also assumes the default mount point.
If you enable the NSS volume attribute , you can modify the load and unload scripts to mount and dismount the NSS volume and NCP instance of the volume in a custom location. However, you must use a Linux command to dismount the volume from the default location, then mount it in the new location. Use the path option in the ncpcon mount command to specify the preferred mount point path. Before you bring the resource online by using the modified load script, the custom mount point path must be created manually on all nodes where the resource is allowed to load. You can alternatively add the Linux mkdir -p command before the Linux mount command to create the path.
After you modify the load and unload scripts to use a custom mount location, you should use the cluster online command to mount the volume, and use the cluster offline command to dismount the volume. If you need to mount the volume locally, do not use NSSMU or the Storage plug-in in iManager to mount or dismount the volume. These tools rely on information in /etc/fstab file to provide the preferred mount point location, but the clustered volume has no entry there.
-
To mount the volume locally, take the resource offline, activate the pool, then use the Linux mount command to mount it in Linux and the ncpcon mount command to mount it for NCP. Ensure that you specify the custom mount point location in the commands as you do in the load script.
-
To dismount the volume locally, use the ncpcon dismount command to dismount the volume from NCP, then use the Linux umount command to dismount the volume from Linux, then deactivate the pool. Bring the resource online to mount the volume for the cluster.
The following sample values are used in the NSS pool cluster resource scripts in the following procedure. Replace the values with the actual values for your own clustered pool and volume.
|
Variable |
Sample Value |
|---|---|
|
Cluster resource’s virtual server name |
CLUS1-POOL-D-SERVER |
|
Resource IP address |
10.10.10.44 |
|
Device |
/dev/sdd |
|
Pool name |
POOL_D |
|
Volume name |
VOL_D |
|
Volume ID |
252 (valid values are 0 to 254) |
|
Advertising protocols enabled for the resource |
NCP (You can add others.) |
|
Default mount point location |
/media/nss/VOL_D |
|
New mount point location |
/usr/novell/nss/VOL_D |
To rename the mount point path for a clustered NSS volume to use a custom mount point location:
-
Verify that the NSS volume attribute is enabled to allow the mount point to be renamed. The attribute is enabled by default.
-
Log in as the root user to the server where the NSS pool cluster resource is online.
-
Open a terminal console, then launch NSSMU:
nssmu
-
In the NSSMU , select , then press Enter.
-
Select the volume in the Volumes list, then press Enter to open its Volume Properties page.
-
Use the Down arrow to navigate to and select the value for the attribute.
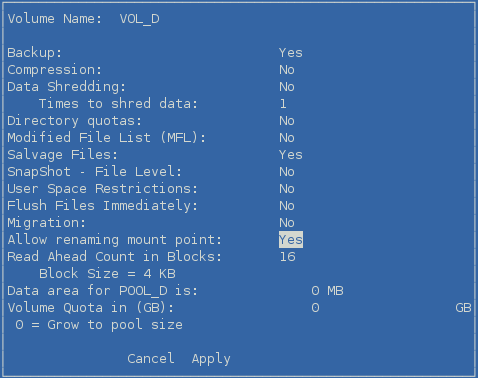
-
If the value is set to no, press y (Yes) to enable it.
-
Use the arrow keys to navigate to and select , then press Enter.
-
Press Esc twice to exit NSSMU.
-
-
Open Novell iManager in a web browser, then log in as a cluster administrator user.
-
In , select > , select the cluster, then click the tab.
-
On the Cluster Manager page, select the resource’s name link to open its Cluster Properties page, then click the tab.
The Scripts tab automatically displays the load script.
-
On the Load Scripts page, view the default load script for the NSS pool cluster resource.
The following sample load script is enabled for NCP as an advertising protocol. The pool name is POOL_D and the volume name is VOL_D.
#!/bin/bash

. /opt/novell/ncs/lib/ncsfuncs

exit_on_error nss /poolact=POOL_D

exit_on_error ncpcon mount VOL_D=252

exit_on_error add_secondary_ipaddress 10.10.10.44

exit_on_error ncpcon bind --ncpservername=CLUS1-POOL-D-SERVER --ipaddress=10.10.10.44

exit 0
-
Modify the load script to specify the new mount point path:
-
After the pool activation command, add a Linux umount command to dismount the NSS volume from Linux.
# unmount the NSS volume from Linux (currently mounted at /media/nss/volname)
ignore_error umount -t nssvol VOL_D
The pool activation automatically mounts the volume on Linux at /media/nss/<volume_name>. You must dismount the volume from Linux before you can remount it for Linux at the new location.
-
After the umount command, add a Linux mkdir command to create the new mount point path on nodes if it does not exist.
# create the custom mount point path if it does not exist on the node
ignore_error mkdir -p /usr/novell/nss/VOL_D
You can alternatively create the new path by using the mkdir command in a terminal console on each node where the resource is allowed to load. If the master node is not the most preferred node, ensure that you make the path before you bring the resource online.
-
After the mkdir command, add a Linux mount command to mount the NSS volume at the new mount point path.
# mount the NSS volume using the Linux mount command
exit_on_error mount -t nssvol VOL_D /usr/novell/nss/VOL_D -o name=VOL_D
-
Add the path option to the ncpcon mount command in order to specify the custom mount point path.
# add the path command to create the NCP instance at the new location
exit_on_error ncpcon mount VOL_D=252,path=/usr/novell/nss/VOL_D
-
Review the modified load script to ensure the correct order of commands:
#!/bin/bash

. /opt/novell/ncs/lib/ncsfuncs

exit_on_error nss /poolact=POOL_D

# unmount the NSS volume from Linux (currently mounted at /media/nss/volname)
ignore_error umount -t nssvol VOL_D

# create the custom mount point path if it does not exist on the node
ignore_error mkdir -p /usr/novell/nss/VOL_D

# mount the NSS volume using the Linux mount command
exit_on_error mount -t nssvol VOL_D /usr/novell/nss/VOL_D -o name=VOL_D

# add the path to create the NCP instance at the new location
exit_on_error ncpcon mount VOL_D=252,path=/usr/novell/nss/VOL_D

exit_on_error add_secondary_ipaddress 10.10.10.44

exit_on_error ncpcon bind --ncpservername=CLUS1-POOL-D-SERVER --ipaddress=10.10.10.44

exit 0
IMPORTANT:If you have multiple volumes with a non-default mount point, every mount -t nssvol command should be followed by the ncpcon mount command.
-
Click .
Wait for the page to refresh before you continue.
-
-
On the Scripts tab, click .
-
On the Unload Script page, view the default unload script for the NSS pool cluster resource.
The following sample unload script is enabled for NCP as an advertising protocol. The pool name is POOL_D and the volume name is VOL_D.
#!/bin/bash
. /opt/novell/ncs/lib/ncsfuncs

ignore_error ncpcon unbind --ncpservername=CLUS1-POOL-D-SERVER --ipaddress=10.10.10.44

ignore_error del_secondary_ipaddress 10.10.10.44

ignore_error nss /pooldeact=POOL_D

exit 0
-
Modify the unload script to explicitly dismount the volume and NCP instance from the custom mount point location:
-
After the del_secondary_ipaddress command, add an ncpcon dismount command to dismount the NCP instance from the new mount point location.
# dismount the NSS volume from NCP
ignore_error ncpcon dismount VOL_D
-
After the ncpcon dismount command, add a Linux umount command to unmount the NSS volume from Linux.
# unmount the NSS volume from Linux
ignore_error umount -t nssvol VOL_D
-
Review the modified unload script to ensure the correct order of commands:
#!/bin/bash
. /opt/novell/ncs/lib/ncsfuncs

ignore_error ncpcon unbind --ncpservername=CLUS1-POOL-D-SERVER --ipaddress=10.10.10.44

ignore_error del_secondary_ipaddress 10.10.10.44

# dismount the NSS volume from NCP
ignore_error ncpcon dismount VOL_D

# unmount the NSS volume from Linux
ignore_error umount -t nssvol VOL_D

ignore_error nss /pooldeact=POOL_D

exit 0
-
Click .
Wait for the page to refresh before you continue.
-
-
(Optional) On the Scripts page, click , then view the monitor script.
No changes are required for the monitor script.
-
At the bottom of the page, click to save your changes and close the Properties page.
The changes do not take effect until the resource is taken offline and brought online.
-
Take the resource offline, then bring the resource online in order for the script changes to take effect.
-
On the Cluster Manager page, select the check box next to the resource, then click . Wait for the status to report that it is offline, then continue.
-
Select the check box next to the resource, then click .
-
Verify that the resource comes online and reports a state.
If the resource goes into a Comatose state, there might be a mistake in the lines you added or modified in the script. Take the resource offline, then go back to correct the scripts, and try to bring it online again.
-
-
In NSSMU, verify that the new mount point is used when the pool cluster resource is brought online:
-
Log in as the root user to the node that is hosting the resource, then start NSSMU by entering:
nssmu
-
From the NSSMU , select, then press Enter.
-
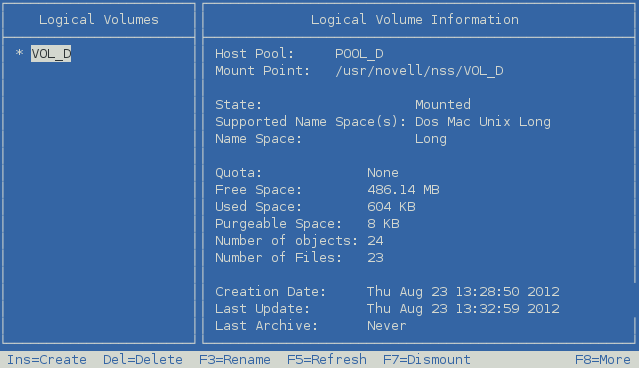
In the list, select the clustered NSS volume.
-
View the volume details to verify that the mount point has changed.
For example, the mount point in this example should display /usr/novell/nss/VOL_D.
-
Press Escape twice to exit NSSMU.
-
-
In Novell Remote Manager, verify that the new mount point is used for the NSS volume and its NCP instance when the pool cluster resource is brought online:
-
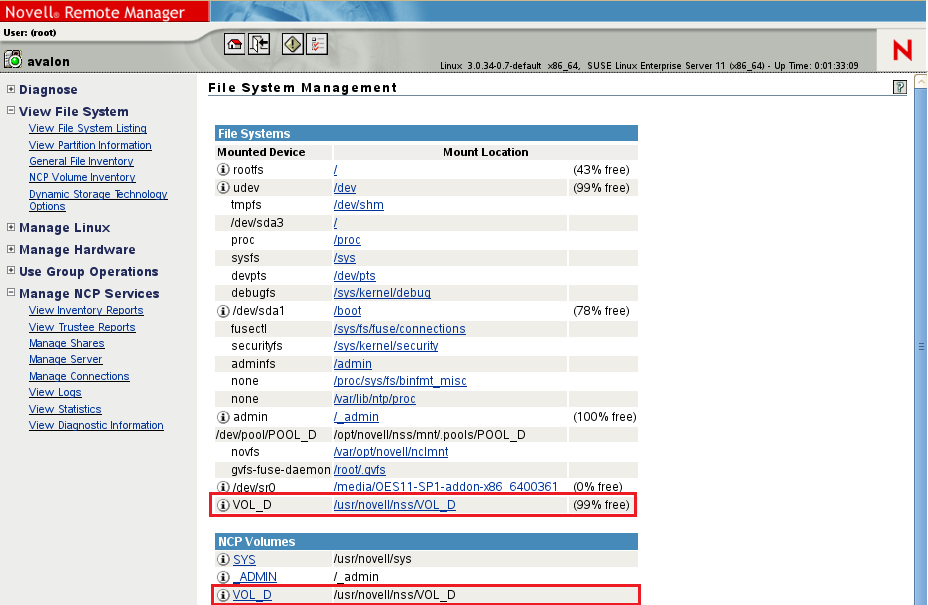
In a web browser, launch Novell Remote Manager for the node that is hosting the resource, then log in as the root user.
-
On the File System Management page, view the mount information for the NSS volume under , and view its NCP instance under . Note that both volumes are mounted at the new mount point location /usr/novell/nss/VOL_D.
-
Exit Novell Remote Manager.
-
-
Open a Linux terminal console as the root user, then list the files in the new mount point location.
ll /usr/novell/nss/VOL_D
For example, the following is the list for a new NSS volume. You should see the default ~DFSINFO.8-P file and the hidden ._NETWARE directory. If AFP is enabled as an advertising protocol, the DESKTOP.AFP directory is also present. For an existing volume that contained user data, you should also see additional directories listed.
