9.3 Selecting a Cluster to Manage

  1. Log in to iManager as a cluster administrator.

  2. In Roles and Tasks, select Clusters > My Clusters.

    The My Clusters page displays your personalized list of clusters in the tree that you want to manage. To add or remove clusters from your list, see Section 9.2, Setting Up a Personalized List of Clusters to Manage.

    The Clusters plug-in sends a status query to the master IP address of each cluster in the list.

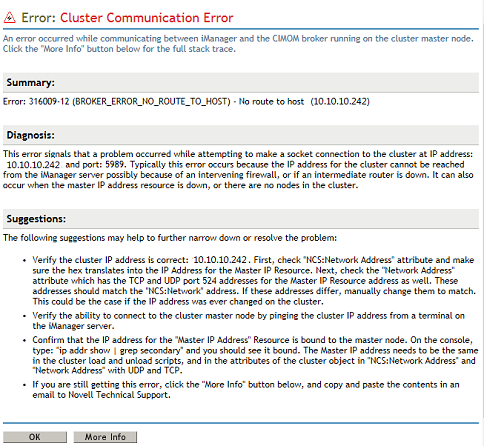
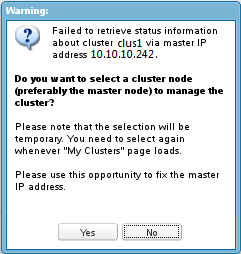
  3. If the master IP address of a cluster has connection problems, the Clusters plug-in allows you to use the server IP address of a node (preferably the master node) to manage the cluster and fix the problem.

    On the My Clusters page, if the cluster status query fails:

    1. Read the message about the problem connecting to the master IP address.

      The message appears each time that you revisit the My Clusters page until you resolve the IP address conflict on the network or by modifying the cluster’s master IP address.

    2. Do one of the following:

      • Use a server node (preferably the master): Click Yes to agree to use the server IP address of a node to temporarily manage the cluster.

      • View error details: Click No to view the Cluster Communication Error details. It provides some tips for diagnosing the root cause of the IP address conflict. Click OK to dismiss the message. Try to resolve the conflict on the network, then select Clusters > My Clusters to see if the connection issue is resolved.

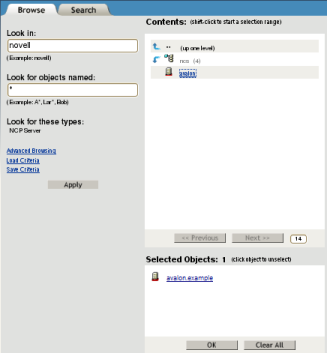
    3. Browse to choose the node (preferably the master node) to use to temporarily manage the cluster, then click OK.

    4. If you need to modify the master IP address to fix the connection problem, see Section 9.12, Viewing or Modifying the Cluster Master IP Address or Port.

  4. After a successful connection to the cluster master IP address, do any of the following:

    • Cluster Properties: To view or manage the cluster policies, protocols, or properties, select the check box next to the cluster, then select Action > Edit Properties.

      The Cluster Properties dialog box opens. The browser’s pop-up blocker must be disabled. See the following:

    • Resources: To manage cluster resources, click the cluster name link.

      The browser opens on the Cluster Manager page in the same browser window. See Section 11.0, Configuring and Managing Cluster Resources.

    • Cluster Report: To generate a report for the cluster, select the check box next to the cluster, then select Action > Run Report.

      The Cluster Report dialog box opens. The browser’s pop-up blocker must be disabled. See Section 10.9, Generating a Cluster Configuration Report.

    • Repair a NetWare Cluster: To repair a NetWare cluster, select the check box next to the cluster, then select Action > Repair.

      This option is useful if you are replacing an existing NetWare server. Install the NetWare operating system and Novell Cluster services on the new server, and name server with the same name as the old server. Choose the Repair option to automatically configure Novell Cluster Services on the replacement server. You must manually copy the ldncs.ncf and uldncs.ncf files from the sys:\system directory to this node from another node in the cluster.

    • Repair an OES Linux Cluster: To repair an OES cluster, select the check box next to the cluster, then click Action > Repair.

      The Repair option is useful when you see a mismatch in the cluster resource list or the resource priority list. The cluster repair will make the resource list consistent with the resource objects.

      For example, if the cluster status command output is blank or the deleted resources are still listed, the repair option will make the resource list match the resource objects. Resources will then be displayed properly in CLI and iManager.

      NCS logs the corresponding repair option messages in the /var/opt/novell/log/ncs/repair.log file.