8.2 Planning for OES Cluster Services

8.2.1 Cluster Administration Requirements

You use different credentials to install and set up the cluster and to manage the cluster. This section describes the tasks performed and rights needed for those roles.

Cluster Installation Administrator

Typically, a tree administrator user installs and sets up the first cluster in a tree, which allows the schema to be extended. However, the tree administrator can extend the schema separately, and then set up the necessary permissions for a container administrator to install and configure the cluster.

NOTE:If the eDirectory administrator user name or password contains special characters (such as $, #, and so on), some interfaces in iManager and YaST might not handle the special characters. If you encounter problems, try escaping each special character by preceding it with a backslash (\) when you enter credentials.

eDirectory Schema Administrator

A tree administrator user with credentials to do so can extend the eDirectory schema before a cluster is installed anywhere in a tree. Extending the schema separately allows a container administrator to install a cluster in a container in that same tree without needing full administrator rights for the tree.

IMPORTANT:It is not necessary to extend the schema separately if the installer of the first cluster server in the tree has the eDirectory rights necessary to extend the schema.

Container Administrator

After the schema has been extended, the container administrator (or non-administrator user) needs the following eDirectory rights to install OES Cluster Services:

  • Attribute Modify rights on the NCP Server object of each node in the cluster.

  • Object Create rights on the container where the NCP Server objects are.

  • Object Create rights where the cluster container will be.

For instructions, see Assigning Install Rights for Container Administrators or Non-Administrator Users.

NCS Proxy User

During the cluster configuration, you must specify an NCS Proxy User. This is the user name and password that Cluster Services uses when the cluster management tools exchange information with eDirectory.

Cluster Services supports the OES Common Proxy User enablement feature of eDirectory. The proxy user is represented in eDirectory as a User object named OESCommonProxy_<server_name>.<context>. If the OES Common Proxy user is enabled in eDirectory when you configure a node for the cluster, the default NCS Proxy User is set to use the server’s OES Common Proxy User. You can alternatively specify the LDAP Admin user or another administrator user.

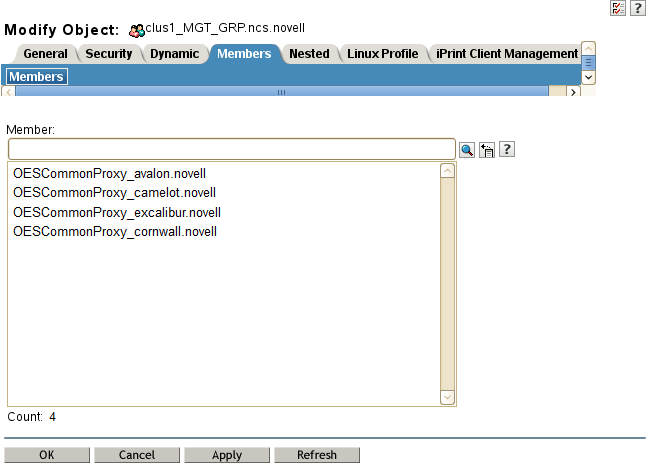
The specified NCS Proxy User for the node is automatically assigned as a member in the <cluster_name>_MGT_GRP.<context> group that resides in the Cluster object container, such as clus1_MGT_GRP.ncs.novell. The group accommodates the server-specific NCS Proxy Users that you assign when you configure each node for the cluster. Members are added to the group as you configure each node for a cluster. Each member of the group has the necessary rights for configuring the cluster and cluster resources and for exchanging information with eDirectory.

For example, Figure 8-2 shows that an OES Common Proxy User has been assigned as the NCS Proxy User for each node in a four-node cluster. The nodes are named avalon, camelot, excalibur, and cornwall. The context is novell.

Figure 8-2 Members of the NCS Management Group for a Cluster

IMPORTANT:You can modify this default administrator user name or password for the user name assigned as the NCS Proxy User after the install by following the procedure in Moving a Cluster, or Changing the Node IP Addresses, LDAP Servers, or Administrator Credentials for a Cluster.

Consider the following caveats for the three proxy user options:

OES Common Proxy User

If you specify the OES Common Proxy user for a cluster and later disable the Common Proxy user feature in eDirectory, the LDAP Admin user is automatically assigned to the <cluster_name>_MGT_GRP.<context> group, and the OES Common Proxy user is automatically removed from the group.

If an OES Common Proxy User is renamed, moved, or deleted in eDirectory, eDirectory takes care of the changes needed to modify the user information in the <cluster_name>_MGT_GRP.<context> group.

If a cluster node is removed from the tree, the OES Common Proxy User for that server is one of the cluster objects that needs to be deleted from eDirectory.

For information about enabling or disabling the OES Common Proxy User, see the OES 2018 SP2: Installation Guide. For caveats and troubleshooting information for the OES Common Proxy user, see the OES 2018 SP2: Planning and Implementation Guide.

LDAP Admin User

If you specify the LDAP Admin user as the NCS Proxy User, you typically continue using this identity while you set up the cluster and cluster resources. After the cluster configuration is completed, you create another user identity to use for NCS Proxy User, and grant that user sufficient administrator rights as specified in Cluster Administrator or Administrator-Equivalent User.

Another Administrator User

You can specify an existing user name and password to use for the NCS Proxy User. Cluster Services adds this user name to the <cluster_name>_MGT_GRP.<context> group.

Cluster Administrator or Administrator-Equivalent User

After the install, you can add other users (such as the tree administrator) as administrator equivalent accounts for the cluster by configuring the following for the user account:

  • Give the user the Supervisor right to the Server object of each of the servers in the cluster.

  • Linux-enable the user account with Linux User Management (LUM).

  • Make the user a member of a LUM-enabled administrator group that is associated with the servers in the cluster.

8.2.2 IP Address Requirements

  • Each server in the cluster must be configured with a unique static IP address.

  • You need additional unique static IP addresses for the cluster and for each cluster resource and cluster-enabled pool.

  • All IP addresses used by the master cluster IP address, its cluster servers, and its cluster resources must be on the same IP subnet. They do not need to be contiguous addresses.

8.2.3 Volume ID Requirements

A volume ID is a value assigned to represent the volume when it is mounted by NCP Server on an OES server. The Client for Open Enterprise Server accesses a volume by using its volume ID. Volume ID values range from 0 to 254. On a single server, volume IDs must be unique for each volume. In a cluster, volume IDs must be unique across all nodes in the cluster.

Unshared volumes are typically assigned low numbers, starting from 2 in ascending order. Volume IDs 0 and 1 are reserved. Volume ID 0 is assigned by default to volume SYS. Volume ID 1 is assigned by default to volume _ADMIN.

Cluster-enabled volumes use high volume IDs, starting from 254 in descending order. When you cluster-enable a volume, Cluster Services assigns a volume ID in the resource’s load script that is unique across all nodes in a cluster. You can modify the resource’s load script to change the assigned volume ID, but you must manually ensure that the new value is unique.

In a Business Continuity Clustering (BCC) cluster, the volume IDs of BCC-enabled clustered volumes must be unique across all nodes in every peer cluster. However, clustered volumes in different clusters might have the same volume IDs. Duplicate volume IDs can prevent resources from going online if the resource is BCC-migrated to a different cluster. When you BCC-enable a volume, you must manually edit its load script to ensure that its volume ID is unique across all nodes in every peer cluster. You can use the ncpcon volumes command on each node in every peer cluster to identify the volume IDs in use by all mounted volumes. Compare the results for each server to identify the clustered volumes that have duplicate volume IDs assigned. Modify the load scripts to manually assign unique volume IDs.

8.2.4 Hardware Requirements

The following hardware requirements for installing Cluster Services represent the minimum hardware configuration. Additional hardware might be necessary depending on how you intend to use Cluster Services.

  • A minimum of two Linux servers, and not more than 32 servers in a cluster

  • At least 512 MB of additional memory on each server in the cluster

  • One non-shared device on each server to be used for the operating system

  • At least one network card per server in the same IP subnet.

    In addition to Ethernet NICs, Cluster Services supports VLAN on NIC bonding in OES 11 SP1 (with the latest patches applied) or later. No modifications to scripts are required. You can use ethx or vlanx interfaces in any combination for nodes in a cluster.

In addition, each server must meet the requirements for Open Enterprise Server 2018 SP2. See Meeting All Server Software and Hardware Requirements in the OES 2018 SP2: Installation Guide.

NOTE:Although identical hardware for each cluster server is not required, having servers with the same or similar processors and memory can reduce differences in performance between cluster nodes and make it easier to manage your cluster. There are fewer variables to consider when designing your cluster and failover rules if each cluster node has the same processor and amount of memory.

If you have a Fibre Channel SAN, the host bus adapters (HBAs) for each cluster node should be identical and be configured the same way on each node.

8.2.5 Virtualization Environments

Xen and KVM virtualization software is included with SUSE Linux Enterprise Server. Cluster Services supports using Xen or KVN virtual machine (VM) guest servers as nodes in a cluster. You can install Cluster Services on the guest server just as you would a physical server. All templates except the Xen and XenLive templates can be used on a VM guest server. For examples, see Configuring OES Cluster Services in a Virtualization Environment.

Cluster Services is supported to run on a host server where it can be used to cluster the virtual machine configuration files on Linux POSIX file systems. Only the Xen and XenLive templates are supported for use in the XEN host environment. These virtualization templates are general, and can be adapted to work for other virtualization environments, such as KVM and VMware. For information about setting up Xen and XenLive cluster resources for a virtualization host server, see Virtual Machines as Cluster Resources.

8.2.6 Software Requirements for Cluster Services

Ensure that your system meets the following software requirements for installing and managing Cluster Services:

Open Enterprise Server 2018 SP2

Cluster Services for Linux supports Open Enterprise Server 2018 SP2. OES Cluster Services is one of the OES Services patterns.

We recommend having uniform nodes in the cluster. The same release version of OES must be installed and running on each node in the cluster.

Mixed-mode clusters with different operating system platforms are supported during rolling cluster upgrades or conversions for the following scenarios:

Cluster Services

Cluster Services is required for creating and managing clusters and shared resources on your OES servers. OES Cluster Services is one of the OES Services patterns on OES 2018 SP2.

NetIQ eDirectory 9.2.1

NetIQ eDirectory is required for managing the Cluster object and Cluster Node objects for Cluster Services. eDirectory must be installed and running in the same tree where you create the cluster. eDirectory can be installed on any node in the cluster, on a separate server, or in a separate cluster. You can install an eDirectory master replica or replica in the cluster, but it is not required to do so for Cluster Services.

For information about using eDirectory, see NetIQ eDirectory Administration Guide.

IMPORTANT:Because the cluster objects and their settings are stored in eDirectory, eDirectory must be running and working properly whenever you modify the settings for the cluster or the cluster resources.

In addition, ensure that your eDirectory configuration meets the following requirements:

eDirectory Tree

All servers in the cluster must be in the same eDirectory tree.

eDirectory Context

If you are creating a new cluster, the eDirectory context where the new Cluster object will reside must be an existing context. Specifying a new context during the Cluster Services configuration does not create a new context.

Cluster Object Container

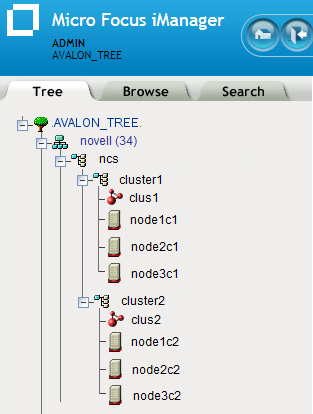
We recommend that the Cluster object and all of its member Server objects and Storage objects be located in the same OU context. Multiple Cluster objects can co-exist in the same eDirectory container. In iManager, use Directory Administration > Create Object to create a container for the cluster before you configure the cluster.

For example, Figure 8-3 shows an example where all clusters are configured in the ncs organizational unit. Within the container, each cluster is in its own organizational unit, and the Server objects for the nodes are in the same container as the Cluster object:

Figure 8-3 Same Container for Cluster Object and Server Objects

If the servers in the cluster are in separate eDirectory containers, the user that administers the cluster must have rights to the cluster server containers and to the containers where any cluster-enabled pool objects are stored. You can do this by adding trustee assignments for the cluster administrator to a parent container of the containers where the cluster server objects reside. For more information, see eDirectory Rights in the NetIQ eDirectory Administration Guide.

Renaming a pool involves changing information in the Pool object in eDirectory. If Server objects for the cluster nodes are in different containers, you must ensure that the shared pool is active on a cluster node that has its NCP server object in the same context as the Pool object of the pool you are going to rename. For information about renaming a shared pool, see Renaming a Clustered NSS Pool .

Cluster Objects Stored in eDirectory

Table 8-1 shows the cluster objects that are automatically created and stored in eDirectory under the Cluster object () after you create a cluster:

Table 8-1 Cluster Objects

Icon

eDirectory Object

Master_IP_Address_Resource

Cluster Node object (servername)

Resource Template objects. There are 11 default templates:

  • AV_Template
  • DHCP_Template
  • DNS_Template
  • Generic_FS_Template
  • Generic_IP_Service
  • iPrint_Template
  • MySQL_Template
  • Samba_Template
  • Xen_Template
  • XenLive_Template

For example, Figure 8-4 shows the 13 default eDirectory objects that are created in the Cluster container as viewed from the Tree view in iManager:

Figure 8-4 Tree View of the Default eDirectory Objects in the Cluster

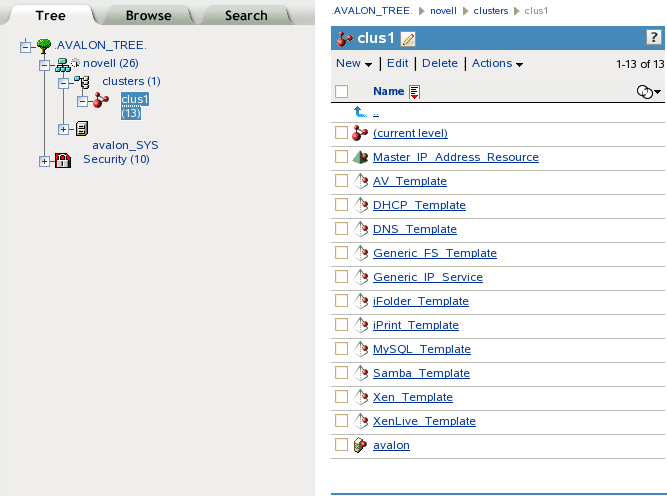
Table 8-2 shows the cluster objects that are added to eDirectory when you add nodes or create cluster resources:

Table 8-2 Cluster Resource Objects

Icon

eDirectory Object

Cluster Node object (servername)

NSS Pool Resource object (poolname_SERVER)

Resource object

Table 8-3 shows the cluster objects that are added to eDirectory when you add nodes or create cluster resources in a Business Continuity Cluster, which is made up of OES Cluster Services clusters:

Table 8-3 BCC Cluster Resource Objects

Icon

eDirectory Object

BCC NSS Pool Resource object

BCC Resource Template object

BCC Resource object

LDAP Server List

If eDirectory is not installed on a node, it looks to the LDAP server list for information about which LDAP server to use. As a best practice, you should list the LDAP servers in the following order:

  • Local to the cluster

  • Closest physical read/write replica

For information about configuring a list of LDAP servers for the cluster, see Changing the Administrator Credentials or LDAP Server IP Addresses for a Cluster.

SLP

SLP (Service Location Protocol) is a required component for Cluster Services on Linux when you are using NCP to access file systems on cluster resources. NCP requires SLP for the ncpcon bind and ncpcon unbind commands in the cluster load and unload scripts. For example, NCP is needed for NSS volumes and for NCP volumes on Linux POSIX file systems.

SLP is not automatically installed when you select Cluster Services. SLP is installed as part of the eDirectory configuration during the OES installation. You can enable and configure SLP on the eDirectory Configuration - NTP & SLP page. For information, see Specifying SLP Configuration Options in the OES 2018 SP2: Installation Guide.

When the SLP daemon (slpd) is not installed and running on a cluster node, any cluster resource that contains the ncpcon bind command goes comatose when it is migrated or failed over to the node because the bind cannot be executed without SLP.

The SLP daemon (slpd) must also be installed and running on all nodes in the cluster when you manage the cluster or cluster resources.

NCP Server re-registers cluster resource virtual NCP servers with SLP based on the setting for the eDirectory advertise-life-time (n4u.nds.advertise-life-time) parameter. The parameter is set by default to 3600 seconds (1 hour) and has a valid range of 1 to 65535 seconds.

You can use the ndsconfig set command to set the n4u.nds.advertise-life-time parameter. To reset the parameter in a cluster, perform the following tasks on each node of the cluster:

  1. Log in to the node as the root user, then open a terminal console.

  2. Take offline all of the cluster resources on the node, or cluster migrate them to a different server. At a command prompt, enter

    cluster offline <resource_name>
    
    or
    
    cluster migrate <resource_name> <target_node_name>
  3. Modify the eDirectory SLP advertising timer parameter (n4u.nds.advertise-life-time), then restart ndsd and slpd. At a command prompt, enter

    ndsconfig set n4u.nds.advertise-life-time=<value_in_seconds>
    
    rcndsd restart
    
    rcslpd restart
  4. Bring online all of the cluster resources on the node, or cluster migrate the previously migrated resources back to this node.

    cluster online <resource_name>
    
    or
    
    cluster migrate <resource_name> <node_name>
  5. Repeat the previous steps on the other nodes in the cluster.

OpenSLP stores the registration information in cache. You can configure the SLP Directory Agents to preserve a copy of the database when the SLP daemon (slpd) is stopped or restarted. This allows SLP to know about registrations immediately when it starts.

For more information about configuring and managing SLP, see Configuring OpenSLP for eDirectory in the NetIQ eDirectory Administration Guide.

iManager 3.2.1

iManager is required for configuring and managing clusters on OES.

iManager must be installed on at least one computer in the same tree as the cluster. It can be installed in the cluster or not in the cluster. For information about using iManager, see the iManager documentation website.

For SFCB (Small Footprint CIM Broker) and CIMOM requirements, see SFCB and CIMOM.

For browser configuration requirements, see Web Browser.

Clusters Plug-in for iManager

The Clusters plug-in for iManager provides the Clusters role where you can manage clusters and cluster resources with OES Cluster Services. The plug-in can be used on all operating systems supported by iManager and iManager Workstation.

The following components must be installed in iManager:

If iManager is also installed on the server, these files are automatically installed in iManager when you install OES Cluster Services.

The Clusters plug-in also provides an integrated management interface for OES Business Continuity Clustering (BCC). The additional interface is present only if BCC is installed on the server. See the following table for information about the versions of BCC that are supported. BCC is sold separately from OES. For purchasing information, see the BCC product page.

BCC Release

OES Support

iManager and Clusters Plug-In

BCC 2.6

OES 2018 SP1 and later

NetIQ iManager 3.1 or later

Requires the Clusters plug-in for OES 2018 SP2 with the latest patches applied.

See the BCC 2.6 Administration Guide.

BCC 2.0

OES 11 SP1

Novell iManager 2.7.6 or later

Requires the Clusters plug-in for OES 11 SP1 with the latest patches applied.

See the BCC 2.0 Administration Guide for OES 11 SP1.

BCC 1.2.2

OES 2 SP3

Novell iManager 2.7.4 or later

Requires the Clusters plug-in for OES 2 SP3 and the OES 2 SP3 April 2011 Scheduled Maintenance patch.

See the BCC 1.2.2: Administration Guide for OES 2 SP3.

BCC 1.2.1

OES 2 SP2

Novell iManager 2.7.3 or later

Requires the Clusters plug-in in the OES 2 SP2 January 2010 Maintenance patch.

See the BCC 1.2.1: Administration Guide for OES 2 SP2.

BCC 1.1 SP2

NetWare 6.5 SP8

Novell iManager 2.7.2 or later

Requires the Clusters plug-in released in OES 2 SP1 Linux or NetWare 6.5 SP8, or a later version.

See the BCC 1.1 SP2 Administration Guide for NetWare 6.5 SP8.

Storage-Related Plug-Ins for iManager

In OES 11 and later, the following storage-related plug-ins for iManager share code in common in the storagemgmt.rpm file:

Product

Plug-In

NPM File

Novell Apple Filing Protocol (AFP)

File Protocols > AFP

afpmgmt.rpm

Novell CIFS

File Protocols > CIFS

cifsmgmt.rpm

Novell Cluster Services

Clusters

ncsmgmt.rpm

Novell Distributed File Services

Distributed File Services

dfsmgmt.rpm

Novell Storage Services

Storage

nssmgmt.rpm

These additional plug-ins are needed when working with the NSS file system. Ensure that you include the common storagemgmt.rpm plug-in module when installing any of these storage-related plug-ins.

IMPORTANT:If you use more than one of these plug-ins, you should install, update, or remove them all at the same time to ensure that the common code works for all plug-ins.

Ensure that you uninstall the old version of the plug-ins before you attempt to install the new versions of the plug-in files.

The plug-in files are included on the installation disk. The latest storage-related plug-ins can be downloaded as a single zipped download file from the Micro Focus Downloads website. For information about installing plug-ins in iManager, see Downloading and Installing Plug-in Modules in the NetIQ iManager Administration Guide.

For information about working with storage-related plug-ins for iManager, see Understanding Storage-Related Plug-Ins in the OES 2018 SP2: NSS File System Administration Guide for Linux.

SFCB and CIMOM

The Small Footprint CIM Broker (SFCB) replaces OpenWBEM for CIMOM activities in OES 11 and later. SFCB provides the default CIMOM and CIM clients. When you install any OES components that depend on WBEM, SFCB and all of its corresponding packages are installed with the components. For more information, see Section L.0, Small Footprint CIM Broker (SFCB).

IMPORTANT:SFCB must be running and working properly whenever you modify the settings for the cluster or the cluster resources.

Port 5989 is the default setting for Secure HTTP (HTTPS) communications. If you are using a firewall, the port must be opened for CIMOM communications. Ensure that the CIMOM broker daemon is listening on port 5989. Log in as the root user on the cluster master node, open a terminal console, then enter the following at the command prompt:

netstat -an |grep -i5989

The Clusters plug-in (and all other storage-related plug-ins) for iManager require CIMOM connections for tasks that transmit sensitive information (such as a user name and password) between iManager and the _admin volume on the OES server that you are managing. Typically, CIMOM is running, so this should be the normal condition when using the server. CIMOM connections use Secure HTTP (HTTPS) for transferring data, and this ensures that sensitive data is not exposed.

IMPORTANT:SFCB is automatically PAM-enabled for Linux User Management (LUM) as part of the OES installation. Users not enabled for LUM cannot use the CIM providers to manage OES. The user name that you use to log in to iManager when you manage a cluster and the BCC cluster must be an eDirectory user name that has been LUM-enabled.

For more information about the permissions and rights needed by the administrator user, see Section 8.2.1, Cluster Administration Requirements.

IMPORTANT:If you receive file protocol errors, it might be because SFCB is not running.

You can use the following commands to start, stop, or restart SFCB:

To perform this task

At a command prompt, enter as the root user

To start SFCB

rcsfcb start or systemctl start sblim-sfcb.service

To stop SFCB

rcsfcb stop or systemctl stop sblim-sfcb.service

To check SFCB status

rcsfcb status or systemctl status sblim-sfcb.service

To restart SFCB

rcsfcb restart or systemctl restart sblim-sfcb.service

For more information, see Web Based Enterprise Management using SFCB in the SUSE Linux Enterprise Server 12 Administration Guide.

OES Credential Store (OCS)

Cluster Services requires OES Credential Store to be installed and running on each node in the cluster.

To check whether the OCS is running properly, do the following:

  1. At the command prompt, enter as the root user.

  2. Run the following command:

    oescredstore -l

Web Browser

For information about supported web browsers for iManager, see System Requirements for iManager Server in the NetIQ iManager Installation Guide.

The Clusters plug-in for iManager might not operate properly if the highest priority Language setting for your web browser is set to a language other than one of the supported languages in iManager. To view a list of supported languages and codes in iManager, select the Preferences tab, click Language. The language codes are Unicode (UTF-8) compliant.

To avoid display problems, in your web browser, select Tools > Options > Languages, and then set the first language preference in the list to a supported language. You must also ensure the Character Encoding setting for the browser is set to Unicode (UTF-8) or ISO 8859-1 (Western, Western European, West European).

  • In a Mozilla browser, select View > Character Encoding, then select the supported character encoding setting.

  • In an Internet Explorer browser, select View > Encoding, then select the supported character encoding setting.

8.2.7 Software Requirements for Cluster Resources

Ensure that your system meets the following software requirements for creating and managing storage cluster resources:

NCP Server for Linux

NCP Server for Linux is required in order to create virtual server names (NCS:NCP Server objects) for cluster resources. This includes storage and service cluster resources. To install NCP Server, select the NCP Server and Dynamic Storage Technology option during the install.

NCP Server for Linux also allows you to provide authenticated access to data by using the OES Trustee model. The NCP Server component must be installed and running before you can cluster-enable the following storage resources:

  • NSS pools and volumes

  • NCP volumes on Linux POSIX file systems

  • Dynamic Storage Technology shadow volume composed of a pair of NSS volumes

  • Linux Logical Volume Manager volume groups that use an NCS:NCP Server object, such as those created by using the Logical Volume Manger (NLVM) commands or the NSS Management Utility (NSSMU)

WARNING:Cross-protocol file locking is required when using multiple protocols for data access on the same volume. This helps prevent possible data corruption that might occur from cross-protocol access to files. The NCP Cross-Protocol File Lock parameter is enabled by default when you install NCP Server. If you modify the Cross-Protocol File Lock parameter, you must modify the setting on all nodes in the cluster.

NCP Server does not support cross-protocol locks across a cluster migration or failover of the resource. If a file is opened with multiple protocols when the migration or failover begins, the file should be closed and reopened after the migration or failover to acquire cross-protocol locks on the new node.

See Configuring Cross-Protocol File Locks for NCP Server in the OES 2018 SP2: NCP Server for Linux Administration Guide.

NCP Server for Linux is not required when running Cluster Services on a Xen-based virtual machine (VM) host server (Dom0) for the purpose of cluster-enabling an LVM volume group that holds the configuration files for Xen-based VMs. Users do not directly access these VM files.

For information about configuring and managing NCP Server for Linux, see the OES 2018 SP2: NCP Server for Linux Administration Guide.

For information about creating and cluster-enabling NCP volumes on Linux POSIX file systems, see Configuring NCP Volumes with OES Cluster Services in the OES 2018 SP2: NCP Server for Linux Administration Guide.

Storage Services File System for Linux

Storage Services (NSS) file system on Linux provides the following capabilities used by OES Cluster Services:

The NSS pool configuration and NCS pool cluster resource configuration provide integrated configuration options for the following advertising protocols:

  • NetWare Core Protocol (NCP), which is selected by default and is mandatory for NSS. See NCP Server for Linux.

  • OES Apple Filing Protocol (AFP). See AFP.

  • OES CIFS. See CIFS.

LVM Volume Groups and Linux POSIX File Systems

Cluster Services supports creating shared cluster resources on Linux Logical Volume Manager (LVM) volume groups. You can configure Linux POSIX file systems on the LVM volume group, such as Ext3, XFS, and ReiserFS. LVM and Linux POSIX file systems are automatically installed as part of the OES installation.

After the cluster is configured, you can create LVM volume group cluster resources as described in Configuring and Managing Cluster Resources for Shared LVM Volume Groups.

NCP Server is required if you want to create a virtual server name (NCS:NCP Server object) for the cluster resource. You can add an NCP volume (an NCP share) on the Linux POSIX file system to give users NCP access to the data. See NCP Server for Linux.

NCP Volumes on Linux POSIX File Systems

After you cluster-enable an LVM volume group, Cluster Services supports creating NCP volumes on the volume group’s Linux POSIX file systems. NCP Server is required. See NCP Server for Linux.

For information about creating and cluster-enabling NCP volumes, see Configuring NCP Volumes with OES Cluster Services in the OES 2018 SP2: NCP Server for Linux Administration Guide.

Dynamic Storage Technology Shadow Volume Pairs

Cluster Services supports clustering for Dynamic Storage Technology (DST) shadow volume pairs on OES 11 and later. DST is installed automatically when you install NCP Server for Linux. To use cluster-enabled DST volume pairs, select the NCP Server and Dynamic Storage Technology option during the install.

For information about creating and cluster-enabling Dynamic Storage Technology volumes on Linux, see Configuring DST Shadow Volume Pairs with OES Cluster Services in the OES 2018 SP2: Dynamic Storage Technology Administration Guide.

NCP File Access

Cluster Services requires NCP file access to be enabled for cluster-enabled NSS volumes, NCP volumes, and DST volumes, even if users do not access files via NCP. This is required to support access control via the OES Trustee model. See NCP Server for Linux.

AFP

Cluster Services supports using AFP as an advertising protocol for cluster-enabled NSS pools and volumes.

AFP is not required to be installed when you install OES Cluster Services, but it must be installed and running before you enable AFP as an advertising protocol for an NSS pool cluster resource. Otherwise, the resource will be in a comatose state, and cannot be brought online. The AFP daemon should also be running before you bring resources online that have AFP enabled.

To install AFP, select the OES AFP option from the OES Services list during the install. For information about configuring and managing the AFP service, see the OES 2018 SP2: OES AFP for Linux Administration Guide.

CIFS

Cluster Services supports using CIFS as an advertising protocol for cluster-enabled NSS pools and volumes.

CIFS is not required to be installed when you install OES Cluster Services, but it must be installed and running in order for the CIFS Virtual Server Name field and the CIFS check box to be available. Select the check box to enable CIFS as an advertising protocol for the NSS pool cluster resource. A default CIFS Virtual Server Name is suggested, but you can modify it. The CIFS daemon should also be running before you bring resources online that have CIFS enabled.

To install CIFS, select the OES CIFS option from the OES Services list during the install. For information about configuring and managing the CIFS service, see the OES 2018 SP2: OES CIFS for Linux Administration Guide.

Domain Services for Windows

Cluster Services supports using clusters in Domain Services for Windows (DSfW) contexts. If Domain Services for Windows is installed in the eDirectory tree, the nodes in a given cluster can be in the same or different DSfW subdomains. Port 1636 is used for DSfW communications. This port must be opened in the firewall.

For information using Domain Services for Windows, see the ---OES 2018 SP2: Domain Services for Windows Administration Guide.

8.2.8 Shared Disk Configuration Requirements

A shared disk subsystem is required for a cluster in order to make data highly available. The Cluster Services software must be installed in order to be able to mark devices as shareable, such as the devices you use for clustered pools and the device you use for the SBD (split-brain detector) during the cluster configuration.

Ensure that your shared storage devices meet the following requirements:

Shared Devices

Cluster Services supports the following shared disks:

  • Fibre Channel LUN (logical unit number) devices in a storage array

  • iSCSI LUN devices

  • SCSI disks (shared external drive arrays)

Before configuring Cluster Services, the shared disk system must be properly set up and functional according to the manufacturer's instructions.

Prior to installation, verify that all the drives in your shared disk system are recognized by Linux by viewing a list of the devices on each server that you intend to add to your cluster. If any of the drives in the shared disk system do not show up in the list, consult the OES documentation or the shared disk system documentation for troubleshooting information.

Prepare the device for use in a cluster resource:

  • NSS Pool: For new devices, you must initialize and share the device before creating the pool. For an existing pool that you want to cluster-enable, use NSSMU or iManager to share the device.

    All devices that contribute space to a clustered pool must be able to fail over with the pool cluster resource. You must use the device exclusively for the clustered pool; do not use space on it for other pools or for Linux volumes. A device must be marked as Shareable for Clustering before you can use it to create or expand a clustered pool.

  • Linux LVM volume group: For new devices, use an unpartitioned device that has been initialized. Do not mark the device as shared because doing so creates a small partition on it. LVM uses the entire device for the volume group. For an existing volume group, no not mark the device as shared.

If this is a new cluster, connect the shared disk system to the first server so that the SBD cluster partition can be created during the Cluster Services install. See SBD Partitions.

SBD Partitions

If your cluster uses physically shared storage resources, you must create an SBD (split-brain detector) partition for the cluster. You can create an SBD partition in YaST as part of the first node setup, or by using the SBD Utility (sbdutil) before you add a second node to the cluster. Both the YaST new cluster setup and the SBD Utility (sbdutil) support mirroring the SBD partition.

An SBD must be created before you attempt to create storage objects like pools or volumes for file system cluster resources, and before you configure a second node in the cluster. NLVM and other NSS management tools need the SBD to detect if a node is a member of the cluster and to get exclusive locks on physically shared storage.

For information about how SBD partitions work and how to create an SBD partition for an existing cluster, see Creating or Deleting Cluster SBD Partitions.

Preparing the SAN Devices for the SBD

Use the SAN storage array software to carve a LUN to use exclusively for the SBD partition. The device should have at least 20 MB of free available space. The minimum size is 8 MB. Connect the LUN device to all nodes in the cluster.

For device fault tolerance, you can mirror the SBD partition by specifying two devices when you create the SBD. Use the SAN storage array software to carve a second LUN of the same size to use as the mirror. Connect the LUN device to all nodes in the cluster.

The device you use to create the SBD partition must not be a software RAID device. You can use a hardware RAID configured in a SAN array since it is seen as a regular device by the server.

Initializing and Sharing a Device for the SBD

Before you use YaST to set up the a cluster, you must initialize each SAN device that you created for the SBD, and mark each as Shareable for Clustering.

IMPORTANT:The Cluster Services software must already be installed in order to be able to mark the devices as shareable.

After you install Cluster Services, but before you configure the cluster, you can initialize a device and set it to a shared state by using NSSMU, the Storage plug-in for iManager, Linux Volume Manager (NLVM) commands, or an NSS utility called ncsinit.

If you configure a cluster before you create an SBD, NSS tools cannot detect if the node is a member of the cluster and cannot get exclusive locks to the physically shared storage. In this state, you must use the -s NLVM option with the nlvm init command to override the shared locking requirement and force NLVM to execute the command. To minimize the risk of possible corruption, you are responsible for ensuring that you have exclusive access to the shared storage at this time.

When you mark the device as Shareable for Clustering, share information is added to the disk in a free-space partition that is about 4 MB in size. This space becomes part of the SBD partition.

Determining the SBD Partition Size

When you configure a new cluster, you can specify how much free space to use for the SBD, or you can specify the Use Maximum Size option to use the entire device. If you specify a second device to use as a mirror for the SBD, the same amount of space is used. If you specify to use the maximum size and the mirror device is bigger than the SBD device, you will not be able to use the excess free space on the mirror for other purposes.

Because an SBD partition ends on a cylinder boundary, the partition size might be slightly smaller than the size you specify. When you use an entire device for the SBD partition, you can use the Use Maximum Size option, and let the software determine the size of the partition.

Shared iSCSI Devices

If you are using iSCSI for shared disk system access, ensure that you have installed and configured the iSCSI initiators and targets (LUNs) and that they are working properly. The iSCSI target devices must be mounted on the server before the cluster resources are brought online.

Shared RAID Devices

We recommend that you use hardware RAID in the shared disk subsystem to add fault tolerance to the shared disk system.

Consider the following when using software RAIDs:

  • NSS software RAID is supported for shared disks for NSS pools. Any RAID0/5 device that is used for a clustered pool must contribute space exclusively to that pool; it cannot be used for other pools. This allows the device to fail over between nodes with the pool cluster resource. Ensure that its component devices are marked as Shareable for Clustering before you use a RAID0/5 device to create or expand a clustered pool

  • Linux software RAID can be used in shared disk configurations that do not require the RAID to be concurrently active on multiple nodes. Linux software RAID cannot be used underneath clustered file systems (such as OCFS2, GFS, and CXFS) because Cluster Services does not support concurrent activation.

    WARNING:Activating Linux software RAID devices concurrently on multiple nodes can result in data corruption or inconsistencies.

8.2.9 SAN Rules for LUN Masking

When you create a Cluster Services system that uses shared storage space, it is important to remember that all of the servers that you grant access to the shared device, whether in the cluster or not, have access to all of the volumes on the shared storage space unless you specifically prevent such access. Cluster Services arbitrates access to shared volumes for all cluster nodes, but cannot protect shared volumes from being corrupted by non-cluster servers.

LUN masking is the ability to exclusively assign each LUN to one or more host connections. With it you can assign appropriately sized pieces of storage from a common storage pool to various servers. See your storage system vendor documentation for more information on configuring LUN masking.

Software included with your storage system can be used to mask LUNs or to provide zoning configuration of the SAN fabric to prevent shared volumes from being corrupted by non-cluster servers.

IMPORTANT:We recommend that you implement LUN masking in your cluster for data protection. LUN masking is provided by your storage system vendor.

8.2.10 Multipath I/O Configuration Requirements

If you use shared devices with multipath I/O capability, ensure that your setup meets the requirements in this section.

Path Failover Settings for Device Mapper Multipath

When you use Device Mapper Multipath (DM-MP) with Cluster Services, ensure that you set the path failover settings so that the paths fail when path I/O errors occur.

The default setting in DM-MP is to queue I/O if one or more HBA paths is lost. Cluster Services does not migrate resources from a node set to the Queue mode because of data corruption issues that can be caused by double mounts if the HBA path is recovered before a reboot.

IMPORTANT:The HBAs must be set to Failed mode so that Cluster Services can automatically fail over storage resources if a disk paths go down.

Change the Retry setting in the /etc/modprobe.d/99-local.conf and /etc/multipath.conf files so that DM-MP works correctly with Cluster Services. See Modifying the Port Down Retry Setting in the modprobe.conf.local File and Modifying the Polling Interval, No Path Retry, and Failback Settings in the multipath.conf File.

Also consider changes as needed for the retry settings in the HBA BIOS. See Modifying the Port Down Retry and Link Down Retry Settings for an HBA BIOS.

Modifying the Port Down Retry Setting in the modprobe.conf.local File

The port_down_retry setting specifies the number of times to attempt to reconnect to a port if it is down when using multipath I/O in a cluster. Ensure that you have installed the latest HBA drivers from your HBA vendor. Refer to the HBA vendor’s documentation to understand the preferred settings for the device, then make any changes in the /etc/modprobe.conf.local file.

For example, for QLogic HBAs, ensure that you have installed the latest qla-driver. Ensure that you verify the vendor’s preferred settings before making the changes.

Modifying the Polling Interval, No Path Retry, and Failback Settings in the multipath.conf File

The goal of multipath I/O is to provide connectivity fault tolerance between the storage system and the server. When you configure multipath I/O for a stand-alone server, the retry setting protects the server operating system from receiving I/O errors as long as possible. It queues messages until a multipath failover occurs and provides a healthy connection. However, when connectivity errors occur for a cluster node, you want to report the I/O failure in order to trigger the resource failover instead of waiting for a multipath failover to be resolved. In cluster environments, you must modify the retry setting so that the cluster node receives an I/O error in relation to the cluster SBD verification process (recommended to be 50% of the heartbeat tolerance) if the connection is lost to the storage system. In addition, you want the multipath I/O fail back to be set to manual in order to avoid a ping-pong of resources because of path failures.

Use the guidance in the following sections to configure the polling interval, no path retry and failback settings in the /etc/multipath.conf file:

Polling Interval

The polling interval for multipath I/O defines the interval of time in seconds between the end of one path checking cycle and the beginning of the next path checking cycle. The default interval is 5 seconds. An SBD partition has I/O every 4 seconds by default. A multipath check for the SBD partition is more useful if the multipath polling interval value is 4 seconds or less.

IMPORTANT:Ensure that you verify the polling_interval setting with your storage system vendor. Different storage systems can require different settings.

No Path Retry

We recommend a retry setting of “fail” or “0” in the /etc/multipath.conf file when working in a cluster. This causes the resources to fail over when the connection is lost to storage. Otherwise, the messages queue and the resource failover cannot occur.

IMPORTANT:Ensure that you verify the retry settings with your storage system vendor. Different storage systems can require different settings.

features "0"
no_path_retry fail 

The value fail is the same as a setting value of 0.

Failback

We recommend a failback setting of "manual" for multipath I/O in cluster environments in order to prevent multipath failover ping-pong.

failback "manual"

IMPORTANT:Ensure that you verify the failback setting with your storage system vendor. Different storage systems can require different settings.

Example of Multipath I/O Settings

For example, the following code shows the default polling_interval, no_path_retry, and failback commands as they appear in the /etc/multipath.conf file for EMC storage:

defaults
{
    polling_interval 5
#    no_path_retry 0
    user_friendly_names     yes
    features 0
}

devices {
  device {
        vendor "DGC"
        product ".*"
        product_blacklist "LUNZ"
        path_grouping_policy "group_by_prio"
        path_checker "emc_clariion"
        features "0"
        hardware_handler "1 emc"
        prio "emc"
        failback "manual"
        no_path_retry fail    #Set MP for failed I/O mode, any other non-zero values sets the HBAs for Blocked I/O mode
  }
} 

For information about configuring the multipath.conf file, see Managing Multipath I/O for Devices in the SLES 12 Storage Administration Guide.

Modifying the Port Down Retry and Link Down Retry Settings for an HBA BIOS

In the HBA BIOS, the default settings for the Port Down Retry and Link Down Retry values are typically set too high for a cluster environment. For example, there might be a delay of more than 30 seconds after a fault occurs before I/O resumes on the remaining HBAs. Reduce the delay time for the HBA retry so that its timing is compatible with the other timeout settings in your cluster.

For example, you can change the Port Down Retry and Link Down Retry settings to 5 seconds in the QLogic HBA BIOS:

Port Down Retry=5
Link Down Retry=5