3.4 Install Retain

This is a full Linux install of Retain on the Reload, that includes: The web server, SQL database management software, and Retain.

WARNING:ONCE YOU HAVE INSTALLED THE RETAIN SERVER, DO NOT RUN THE WEB-BASED CONFIGURATION WIZARD FOR RETAIN. IT WILL DELETE THE CONTENTS OF YOUR PRODUCTION RETAIN DATABASE.

Install the exact version of Retain on the Reload server as is running on the Production Retain Server. Most customers using Retain on Linux have the version of Retain installed on their Production Retain Server sitting somewhere in an installation directory on the Retain Server. Locate the software there.

3.4.1 Install Apache web server

Open YaST and set the HTTP Server to start on boot.

3.4.2 Install SQL database management software

The SQL start guides are included here as a courtesy. It is your responsibility to find the proper installa­tion procedures and documentation from your chosen database vendor. The entire responsibility for installation, care, and maintenance of the database server lies with the customer. We do not provide any kind of support for the database server.

In some cases, the SQL database management software will have to be installed on a separate server that supports it and only client software is installed on the Reload server. The Agent will need to be configured depending on the SQL database management software installed.

WARNING:NFS shares should not be utilized in any database system. NFS locking is insufficient for data­base requirements and will result in corruption.

Create a new database for Retain

MySQL

If using MySQL with Retain you will also need to download and install the Connector/J software, which is detailed below.

Reload for Retain Agent MySQL Setup Script

NOTE:If the Reload for Retain Agent is running on the Retain Server, then the MySQL Client and Server are already installed. So there is nothing that needs to be done.

If the Reload for Retain Agent is running remotely from the Retain Server, then you must install the MySQL Client that matches the version of MySQL Server.

GWAVA has created a script to assist with the MySQL Client install. If it does not work for you, go ahead and download the MySQL software from https://www.mysql.com

Here are the instructions for using the script created by GWAVA:

  1. Download the script installmysql.zip to the server that is running the Reload for Retain Agent

  2. Unzip the script: 

    unzip installmysql.zip

  3. Run the script:  

    bash mysqlinstall.sh

Client Install to the Reload Server

  1. Download and install the latest 5.6x MySQL server and client and configure according to local system needs.

  2. Install the client:

    rpm -ivh MySQL-client-5.6.3.5-1.sles11.x86_64.rpm

Full Install to the Reload Server

  1. Download and install the latest 5.6x MySQL server and client and configure according to local system needs.

    Install the server:

    rpm -ivh MySQL-server-5.6.3.5-1.sles11.x86_64.rpm

    Install the client:

    rpm -ivh MySQL-client-5.6.3.5-1.sles11.x86_64.rpm

    If using a separate data volume: Modify /usr/my.cnf, to move the database to a data volume, by adding the line

    datadir=/path/to/where/you/want/the/MySQL/data

    Find the root password in /root/.mysql_secret

    cat /root/.mysql_secret

    Start MySQL:

    rcmysql start

    Change the root password:

    /usr/bin/mysql_secure_installation

  2. Log in to MySQL using the client:

    mysql -u root -p

  3. Create the database: * This is critical. Not storing the database in UTF-8 format guarantees irreparable corruption for non-US-ASCII characters. *

    CREATE DATABASE retain DEFAULT CHARACTER SET 'utf8' DEFAULT COLLATE 'utf8_bin';

    If you make a mistake, enter this command:

    DROP DATABASE retain;

    …and repeat step 3 to create the database.

  4. Retain needs a user account created that has full rights to the Retain database. It is strongly recom­mended that the ‘root’ account is not used. While logged in to MySQL, enter the following commands. Replace (UserName) and (Password) with the desired user name and password (Both commands are needed. The ‘%’ is a wildcard. If you want to restrict the connection to a specific IP address, put that address instead of the ‘%’ sign.):

    GRANT ALL PRIVILEGES ON retain.* TO '(UserName)'@'%' IDENTIFIED BY '(Pass­word)';

    GRANT ALL PRIVILEGES ON retain.* TO '(Username)'@'localhost' IDENTIFIED BY '(Password)';

    For example, if the database user's name is "retain" and the password is "Password1":

    GRANT ALL PRIVILEGES ON retain.* TO 'retain'@'%' IDENTIFIED BY 'Password1';

    GRANT ALL PRIVILEGES ON retain.* TO 'retain'@'localhost' IDENTIFIED BY 'Password1';

MS SQL Server 2008 R2, 2012, 2014

Client Install

Install UNIXODBC Driver on a SUSE Linux Enterprise Server

YAST Console Instructions

    Run the YAST Utility:   

yast

Select Software | Software Management

In the Search Phrase field enter the following:   unixodbc

Select the package that reads: unixODBC

Do not worry about the other packages

Use the Spacebar to select the package

Select the Accept button to proceed with the installation

Install FreeTDS UNIXODBC Driver Software Packages

    Obtain Supporting Driver for FreeTDS  ( libsybdb5-0.95.80-51.1.x86_64.rpm )

    Copy the .rpm file to the server that is running the Reload for Retain Agent

    In a terminal session, install the Supporting Database Driver for the FreeTDS package, see next step

    Install in this manner:    

rpm -ivh libsybdb5-0.95.80-51.1.x86_64.rpm

Install the FreeTDS Package

        SLES11: ( freetds-tools-0.95.80-51.1.x86_64.rpm )

        SLES12: ( freetds-tools-0.95.95-60.1.x86_64.rpm )

    In a terminal session, install the FreeTDS UNIXODBC Driver package, see next step

    Install in this manner:    

rpm -ivh freetds-tools-0.95.80-51.1.x86_64.rpm

Full Install

1. Install as default instance, with Latin 1_ General_C1_AS as standard encoding.

2. Enable SQL Server Authentication in addition to Windows Authentication

3. Once installed, verify the server is listening on port 1433 (on the command line run: telnet <IP address> 1433)

4. Ensure TCP/IP is enabled - Run SQL Server Configuration Manager

5. Expand SQL Server Network Configuration

6. Protocols for MSSQLSERVER

7. Enable TCP/IP

8. Run SQL Server Management Studio, connect to Server

9. Under Security/Logins, right click and select "create Login, (for example Retainuser) that uses SQL Server authentication. Assign a password.

10. Right click on Databases, and create a new database named Retain and assign Retainuser as the owner. (There are other ways to grant the permissions but this is easiest)

ORACLE 10/11g/12c

Client Install

Install Oracle Instant Client Software Packages

Obtain the Oracle Basic Client ( oracle-instantclient12.1-basic-12.1.0.2.0-1.x86_64.rpm )

Copy the .rpm file to the server that will run the Reload for Retain Agent

In a terminal session, install the Oracle Instant Basic Client, see next step:

rpm -ivh oracle-instantclient12.1-basic-12.1.0.2.0-1.x86_64.rpm

Obtain the Oracle Instant SQLPlus Client ( oracle-instantclient12.1-sqlplus-12.1.0.2.0-1.x86_64.rpm)

Copy the .rpm file to the server that will run the Reload for Retain Agent

In a terminal session, install the Oracle Instant SQL Plus Client, see next step:

rpm -ivh oracle-instantclient12.1-sqlplus-12.1.0.2.0-1.x86_64.rpm

Full Install

Retain supports the usage of Oracle 10, 11g, and 12c on all platforms. However, it is the customer’s responsibil­ity to employ an experienced Oracle DBA to install, maintain, and tune Oracle.

The instructions below serve as a guideline, but may result in poorly performing, insecure environments.

Oracle Installation instructions vary wildly depending the version, OS, storage, clustering, etc. so consult your DBA. There is no one-size-fits-all. This is also true of other SQL Server products, but Oracle even more so.

Using Oracle with Retain consists of:

Installation of the Oracle Server

Setting up a TCP IP listener

Setting up a new database named Retain

Creating a user to access the database, and granting sufficient rights.

Installation

Install your Oracle Server normally, according to your standards and practices. One option is to use the Universal Installer, specifying a custom installation, choose the type of Oracle Server to install, and to Install Files Only

TCPIP Listener

Next use the Net Configuration Assistant (or manually edit the Oracle Listener configuration) to create a TCP based listener on port 1521. This allows TCPIP clients to connect to Oracle and is required for Retain.

Database Creation

Next, either use the Database Configuration Assistant or manually create the database with your favorite tool. Regardless, you want to create a database and sid, named Retain, and create your SYSTEM account

An example of a create statement (which should not be used as is):

connect "SYS"/"&&sysPassword" as SYSDBA
set echo on
spool C:\oracle\product\10.2.0\admin\Retain\scripts\CreateDB.log
startup nomount pfile="C:\oracle\product\10.2.0\admin\Retain\scripts\init.ora";
CREATE DATABASE "Retain"
MAXINSTANCES 8
MAXLOGHISTORY 1
MAXLOGFILES 16
MAXLOGMEMBERS 3
MAXDATAFILES 100
DATAFILE 'C:\oracle\product\10.2.0\oradata\Retain\system01.dbf' SIZE 300M REUSE AUTOEXTEND ON NEXT  10240K MAXSIZE UNLIMITED
EXTENT MANAGEMENT LOCAL
SYSAUX DATAFILE 'C:\oracle\product\10.2.0\oradata\Retain\sysaux01.dbf' SIZE 120M REUSE AUTOEX­TEND ON NEXT  10240K MAXSIZE UNLIMITED
SMALLFILE DEFAULT TEMPORARY TABLESPACE TEMP TEMPFILE 'C:\oracle\product\10.2.0\ora­data\Retain\temp01.dbf' SIZE 20M REUSE AUTOEXTEND ON NEXT 640K MAXSIZE UNLIMITED
SMALLFILE UNDO TABLESPACE "UNDOTBS1" DATAFILE 'C:\oracle\product\10.2.0\ora­data\Retain\undotbs01.dbf' SIZE 200M REUSE AUTOEXTEND ON NEXT 5120K MAXSIZE UNLIMITED
CHARACTER SET AL32UTF8
NATIONAL CHARACTER SET AL16UTF16
LOGFILE GROUP 1 ('C:\oracle\product\10.2.0\oradata\Retain\redo01.log') SIZE 51200K,
GROUP 2 ('C:\oracle\product\10.2.0\oradata\Retain\redo02.log') SIZE 51200K,
GROUP 3 ('C:\oracle\product\10.2.0\oradata\Retain\redo03.log') SIZE 51200K
USER SYS IDENTIFIED BY "&&sysPassword" USER SYSTEM IDENTIFIED BY "&&systemPassword";
spool off

The most critical items to note are the CHARACTER SET (AL32UTF8 aka UTF8), and the NATIONAL CHAR­ACTER SET (AL16UTF16). If using a GUI based installed, be careful to set these - they are easily missed. (They are located on the Encoding tab of the 10th step or so of the wizard).

User Account Creation

Finally, using the SYSTEM account, connect to the database, create a user, and grant full system privileges to the account. An example is shown below:

CREATE USER user-name IDENTIFIED BY password;

grant dba to user-name;

Restart everything, and verify you can telnet on the TCP LISTENER's PORT (1521 if as above).

If a restricted user is desired, Retain requires a user with the following roles:

RESOURCE CONNECT

And the following database privileges to the Retain database:

CREATE PROCEDURE
CREATE SESSION
CREATE SYNONYM
CREATE TABLE
CREATE TYPE
CREATE VIEW

Tuning

Tuning Oracle is quite far beyond the scope of this manual. The manuals on Oracle's site, as well as an experienced DBA or extensive training is strongly recommended.

Postgres 9

Client Install

Full Install

When creating a PostgreSQL database for use by Retain, specify UTF8 encoding. If the Retain Server is on a different machine, you will need to configure PostgreSQL to accept connections from that machine's IP address.

1. Connect to PostgreSQL using its psql utility.

2. Create a new user for use by Retain. In the example below, we are creating a user named "Retainuser" with a password of "Retainpassword":

CREATE ROLE Retainuser LOGIN ENCRYPTED PASSWORD 'Retainpassword';  

The psql utility should respond with "CREATE ROLE." 

3. Create a new database for use by Retain. Assign the user created in the previous step as the owner:

CREATE DATABASE Retain WITH ENCODING='UTF8' OWNER=Retainuser; 

The psql utility should respond with >"CREATE DATABASE." 

4. If Retain Server is running on a different machine, you'll need to configure PostgreSQL to permit access:

 By default, PostgreSQL only permits local "loopback" connections. To allow connections from other machines, add the following to the postgresql.con configuration file: 

listen_addresses='*' 

 Specify the user and IP address that is permitted to connect to PostgreSQL by editing the pg_hba.conf configuration file. The following example grants the user "Retainuser" access to the database "Retain" from IP address "192.168.2.2": 

# TYPE   DATABASE   USER        CIDR-ADDRESS    METHOD 

# IPv4 local connections: 

host   Retain     Retainuser  192.168.2.2/32  md5 

 Restart PostgreSQL to activate these changes.

3.4.3 Retain Install

Extract the Retain software

Open a terminal window in the Retain install folder and make the installer script executable by running the command:

chmod +x *.sh

(The installer installs Retain-Tomcat and initialize the Retain installation which will install the embedded Tomcat as well. Consider removing any existing Tomcat installation.)

1. Install Retain. Enter the following command:

./RetainInstall.sh   

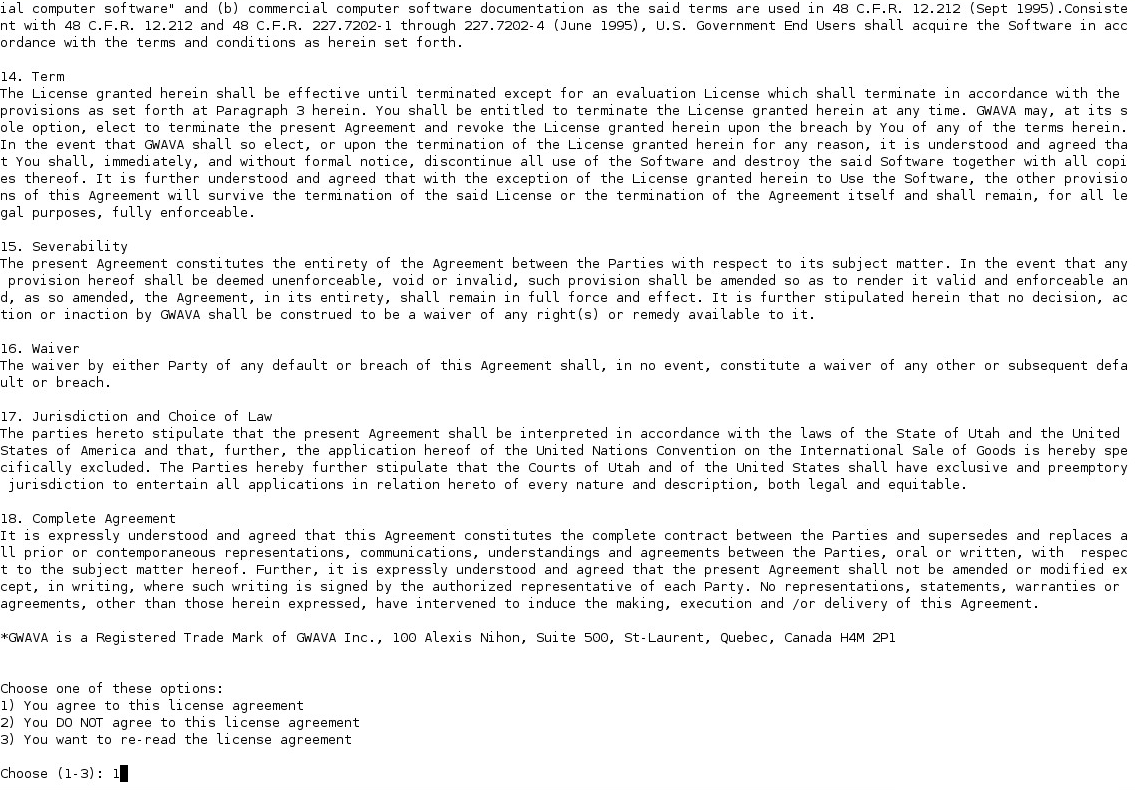
2. Read and accept the license agreement.

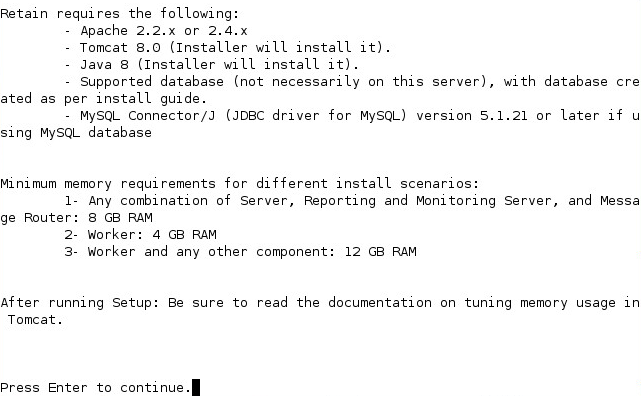
3. Read the software requirements and press Enter.

4. You will be asked what components to install. Each of these components can be installed on a separate server or on the same server. However, the Message Router needs to be in the network DMZ and is usually installed separately. Options include:

Retain Server

Stubbing Server (GroupWise only)

Reporting and Monitoring Server

Retain Worker

Retain Message Router (needs to be installed in the network DMZ)

Generally, we recommend installing the Server, Reporting and Monitoring, and Worker on the Retain server.

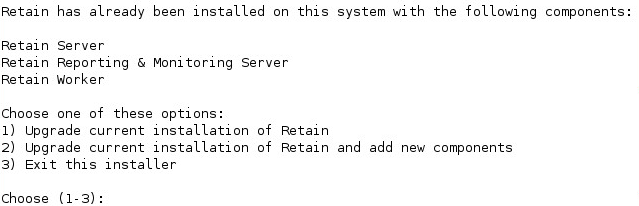
4a. If you are upgrading Retain, you are given a list of currently installed options and the ability to select upgrade options, if you wish to add components you can choose which ones to add here. Otherwise during a new installation, Java will be installed.

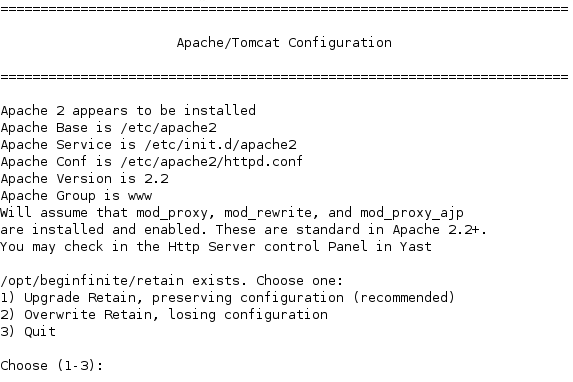
4b. During an upgrade the installer will check the Apache/Tomcat configuration.

NOTE:If components already exist on the system, but new features are being added, all new and existing features must be selected for install, AND the upgrade must be selected with the first option: “Upgrade Retain, Preserving configuration” must be selected.

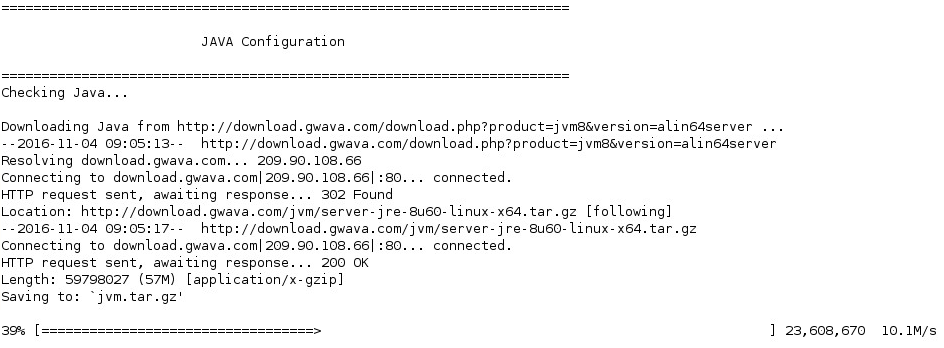
5. Java is checked, and automatically installed or upgraded, if necessary.

6. Installation completes, shows the URL to the RetainServer web console and returns to the prompt.

7. Check the status of Apache 2 and Retain Tomcat. (They should both be 'running'.)

Starting and Stopping Tomcat

Controlling Tomcat

SLES12

To check the status, start or stop apache or retain-tomcat, use the following runtime commands:

service apache2 status|start|stop|restart

service retain-tomcat8 status|start|stop|restart

SLES11

To check the status, start or stop apache or retain-tomcat, use the following runtime commands:

rcapache2 status|start|stop|restart

rcretain-tomcat8 status|start|stop|restart

8. If using MySQL, install the MySQL Connector/J (JDBC driver for MySQL) before configuring Retain.

MySQL Connector/J (JDBC driver for MySQL) Installation

The MySQL Connector/J driver must be provided to the Retain Server and, or the Reporting and Monitoring Server. This must be installed after Retain has been installed but before Retain is configured.

1. Download the MySQL Connector/J (JDBC driver for MySQL) version 5.1.21 or later ZIP file.

2. Extract the mysql-connector-java-5.1.X-bin.jar file (X being the current version number) from the ZIP. For example, on Linux use the command:

unzip mysql-connector-java-5.1.41.zip

2. Stop Tomcat service

SLES12

service retain-tomcat7 stop

SLES11

rcretain-tomcat7 stop

Windows

Start | Services | Retain Tomcat | Stop the service

3. Copy the mysql-connector-java-5.1.X-bin.jar file (X being the current version number) to the following Retain directories or where Retain was installed:

/opt/beginfinite/retain/RetainServer/WEB-INF/lib (for Retain Server)

/opt/beginfinite/retain/RetainStatsServer/WEB-INF/lib (for the Reporting and Monitoring Server)

/opt/beginfinite/retain/RetainStubbingServer/WEB-INF/lib (for the Stubbing Server)

For example:

cp mysql-connector-java-5.1.41-bin.jar /opt/beginfinite/retain/RetainServer/WEB-INF/lib/

3a. If on Linux, change ownership of the file to match the other files with the terminal command:

chown tomcat:www mysql-connector-java-5.1.41-bin.jar

3b. If on Linux, change rights of the file to match the other files with the terminal command:

chmod 774 mysql-connector-java-5.1.41-bin.jar

4. Start Tomcat service

SLES12

service retain-tomcat7 start

SLES11

rcretain-tomcat7 start

Windows

Start | Services | Retain Tomcat | Start the service

Schema update note: On Linux, some systems have encountered an error after a schema update caused when MySQL cannot create a temporary file for the result of a Retain query.

The following appears in the Retain Server log:

2008-10-27 00:00:59,786 [TP-Processor2] ERROR com.maintainet.dao.HibernateUtil - SCHEMA UPDATE FAILURE: Something went wrong during Schema Update - contact tech support immediately 2008-10-27 00:00:59,786 [TP-Processor2] ERROR com.GWAVA.utils.ErrorHandle - reportError: SchemaUpdate :: EXCEPTION : org.hibernate.exception.GenericJDBC­Exception: could not get table metadata: Audit org.hibernate.exception.Gener­icJDBCException: could not get table metadata: Audit

This is usually caused when MySQL cannot create or has lost rights to the tmp working directory. Try the following from a system terminal:

1. Add rights to the tmp working directory:

mkdir /var/lib/mysql/tmp

chown mysql:mysql /var/lib/mysql/tmp

2. Add the following line into the [mysqld] section of /etc/my.cnf:

tmpdir = /var/lib/mysql/tmp

3. Restart the Server

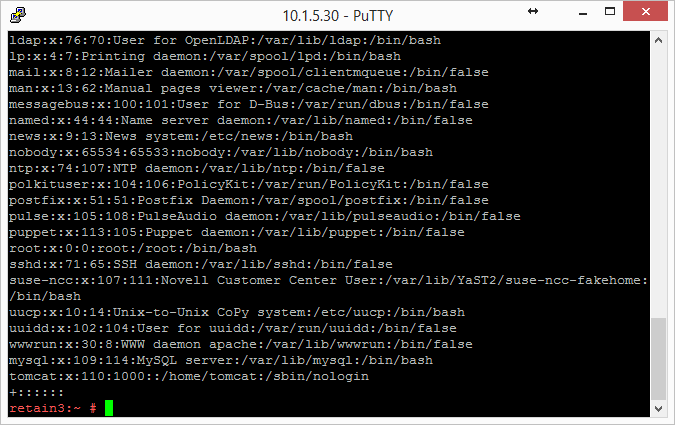
9. Match the tomcat identity on the Reload server to the tomcat identity on the Retain server

On the Retain server type the following command on the Linux command line.

cat /etc/passwrd

This will list out all the user accounts on the server, showing their userids and group IDs.  In the list in the screenshot, tomcat is listed last and its userid is 110 and its group ID is 1000.

On the Retain server type the following command on the Linux command line.

cat /etc/passwrd

If the userids match, skip to step 10.

If the userids do not match, you will need to change the tomcat userid. Also changing the userid of the process currently using the userid.

On the Reload server:

edit /etc/passwrd with vi or other text editor

or use the usermod command

usermod -u [new userid assignment] [username getting the new userid]

For example,

usermod -u 103 tomcat

Restart the server

  1. Copy the ASConfig.cfg file from the Retain server to the Retain installation on the Reload server found in /opt/beginfinite/retain/RetainServer/WEB-INF/cfg

No more configuration of Retain needs to be done as Reload for Retain will copy the configuration files from the production Retain Server.

WARNING:ONCE YOU HAVE INSTALLED THE RETAIN SERVER, DO NOT RUN THE WEB-BASED CONFIGURATION WIZARD FOR RETAIN. IT WILL DELETE THE CONTENTS OF YOUR PRODUCTION RETAIN DATABASE.