9.9 Quick Start Guide
9.9.2 Configure Migrator
Start the tool by running the executable file from the shortcut.
-
File | New Configuration Select

-
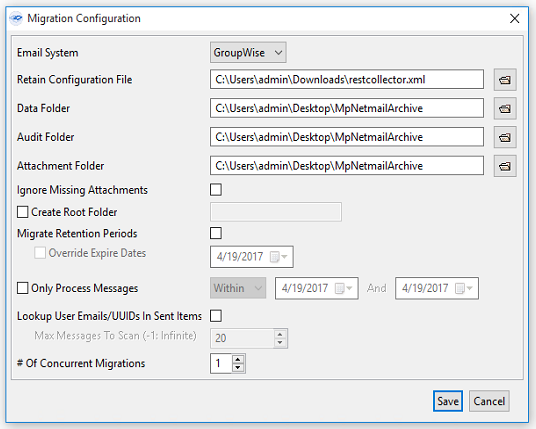
Select the Email System: Exchange or GroupWise
Exchange

GroupWise
-
Browse to the REST Configuration XML or Worker Bootstrap CFG file exported from Retain.
-
Point the migrator to the parent folder of the Data, Audit and Attachments folders.
-
Ignore Missing Attachments: Attachments that are not present will be skipped and the remaining messages will be processed, instead of erroring out.
-
Create Root Folder: Enabling this option will allow you to specify the name of the root folder for the destination of the migrated messages and folder structure in each user's Retain mailbox. If this option is not enabled, the messages and folder structure will be placed directly under the user's Retain mailbox.
-
Migrate Retention Periods: This option will migrate the expiration date of the migrated messages into Retain.
-
Override Expiry Dates: This option is dependant on "Migrate Retention Periods" and will override the existing expiration date with one of your choosing.
-
Only Process Messages: Enabling this option allows you to limit the migration by date in one of three ways:
-
Falling between 2 dates (inclusive).
-
Before a certain date (exclusive).
-
After a certain date (exclusive).
Inclusive means that messages on the dates will be included.
Exclusive means that messages on that date will be excluded. For example, if you want all messages before 21 Oct 2015 (exclusive) it will only migrate message until midnight 20 Oct 2015.
-
-
Lookup User Emails/UUID in Sent Items: Enabling this option will cause the migration tool to lookup the user email or UUID that may exist in the user's M+ or Netmail Sent Items.
-
Select the # of Concurrent Migration threads to run:
NOTE:The number of concurrent migrations may be as high as 10, or as low as 1. Performance will be determined by the processor of the local machine; a multi-core or multi-threaded processor will perform fine with multiple concurrent migrations, while machines with lower resources will be taxed by higher numbers of concurrent migrations.
-
Click Save to File and select a name and location for your configuration file. The next time you run the migrator you can load the configuration from file to save time.
-
Click Save to exit the Migration Context