5.4 Exchange Module On-Premise Exchange
5.4.6 Basic Authentication
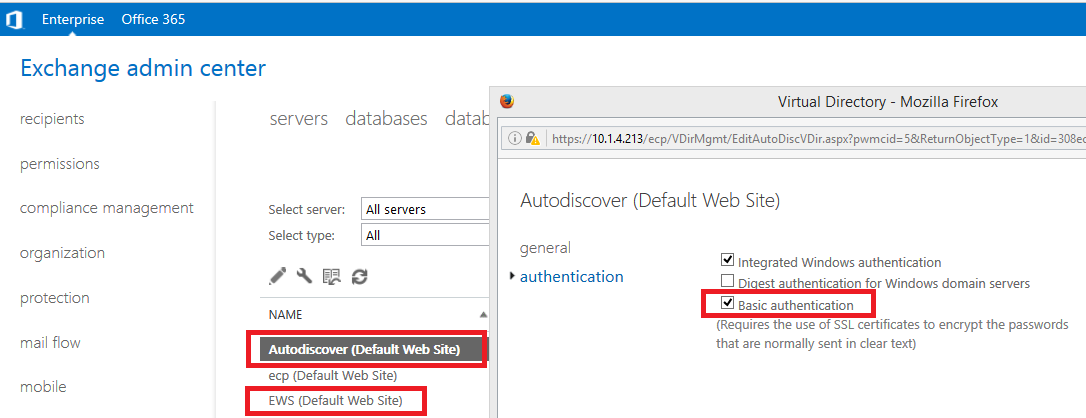
Retain requires Basic Authentication to be enabled on each CAS Exchange server in the system for Autodiscover and EWS.
In Exchange Admin Center, go to Servers, then go to the Virtual Directories tab.
-
Edit Autodiscover and under Authentication enable Basic authentication if it is not enabled.
-
Edit EWS and under Authentication enable Basic authentication if it is not enabled.
-
Do this for each server in the list.
To check if this worked, run the following PowerShell cmdlets:
For EWS:
Get-WebServicesVirtualDirectory | ft server,basicauthentication
For Autodiscover:
Get-AutoDiscoverVirtualDirectory | ft server,basicauthentication
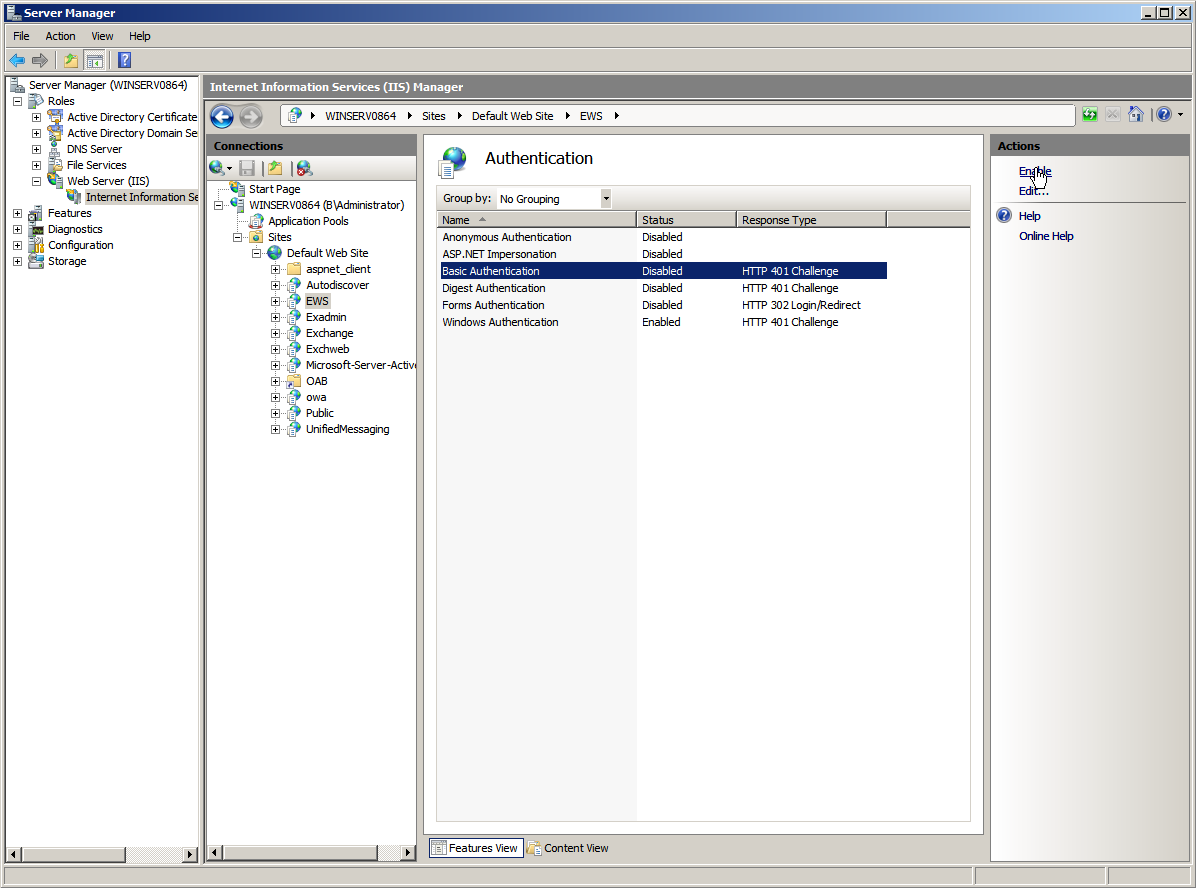
On Exchange systems prior to 2013 you may need to set basic authentication manually.
Open “Server Manager” on Exchange server.
-
In left pane, expand “Roles”, expand “Web Server (IIS)”, select “Internet Information Services (IIS) Manager”.
-
A new “Connections” pane opens, expand your Exchange server object, expand “Sites”, expand “Default Web Site (Multiple Protocols)”, select “EWS”.

-
Under heading “IIS”, open “Authentication” icon
-
Select “Basic Authentication”, click “Enable” in right pane.
You can now close “Server Manager”.
DNS SRV Record
Microsoft has an article describing how to set up a DNS SRV record titled "A new feature is available that enables Outlook 2007 to use DNS Service Location (SRV) records to locate the Exchange Autodiscover service".
In general, you will need to:
-
Go to the DNS Manager
-
Expand Forward Lookup Zones
-
Locate and right-click on the external DNS zone and choose Other New Records
-
Click Service Location (SRV) and enter:
Service: _autodiscover
Protocol: _tcp
Port Number: 443
Host: [your mail host, e.g. mail.gwava.net, usually the AD domain forest found in AD Domains and Trusts on the MS AD server]
-
Click OK
The Microsoft autodiscover library in Retain expects a URL along the lines of https://autodiscover.[your domain]/Autodiscover/Autodiscover.xml (e.g., https://autodiscover.xyzcompany.com/Autodiscover/Autodiscover.xml), which can be found in the worker log as it attempts to login by searching for "Discovered endpoint:" or "AutoDiscover".
Server DNS Setting
Retain has best performance when the server's network setting is using the same DNS as the Exchange servers.
If Retain and Exchange must use different DNS, on the DNS that Retain uses, create a Conditional Forwarder that resolves to the Exchange server.
Set Rolling In-Place Hold
To prevent data loss, it is highly recommended that a rolling In-Place or Litigation Hold be set so users are unable to remove items from disk before Retain has a chance to archive them.
In Exchange by default, when a user deletes a message out of Outlook, it is moved to the trash. When they empty the trash, the item is moved to the mostly hidden Recoverable Items folder, where it is kept for 14 day before being removed from disk. The user can then right-click the Trash to recover items, and in that dialog box they can purge the item which will delete it immediately. With a hold in place that item will be moved to a Purged folder that is not user accessible, where it will be kept until the hold is lifted.
In Retain, set Profile/Miscellaneous to Include user's recoverable items.
In Exchange Admin Console, set up a distribution list, for example All_Mailboxes, that contains all mailboxes. It will be best to create a policy to add new users to this distribution list by default.
Place the distribution list under a 90-day hold.
In the Exchange Management Shell:
An In-Place Hold can be set up for all mailboxes for 90 days:
New-MailboxSearch "Retain90DayHold" -ItemHoldPeriod 90 -InPlaceHoldEnabled $true -SourceMailboxes All_Mailboxes
It will take time for the hold to take effect. You can determine how many mailboxes were placed under hold with the script:
((Get-Mailbox).InPlaceHolds).Count
5.4.7 Configure Exchange Module for On-Premise Exchange
The Exchange module must be configured in the Retain Server before any communication between Retain and an existing Exchange message system can occur. Open the Retain management page on the Retain Server, and select Module Configuration.
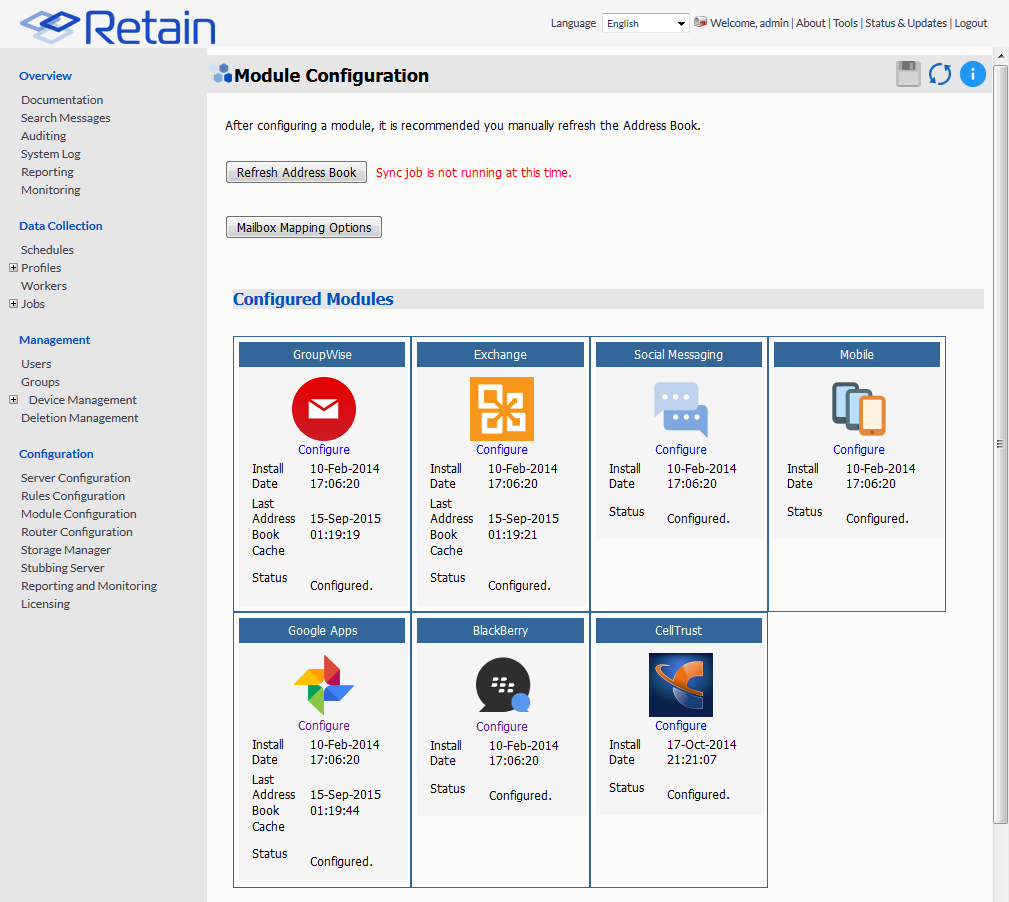
Select the ‘Configure’ option in the Exchange module. A new window or tab will open with the module configuration.
NOTE:Ensure that your Retain Server DNS is set to the same DNS server that your Exchange server uses. The Exchange module uses these DNS setting to auto discover critical information about Exchange stored in Active Directory and will not function correctly unless both systems are pointed to the same DNS server.
5.4.8 Core Settings
The module needs to be enabled on this page to make it active in the Retain system.
The module can be given a name.
The Send Method option enables either the SMTP Forwarding or FTP features. For either feature to appear and function, the Module Forwarding tab must be configured on the Server Configuration page. See that section for more information.
Normally all the checkboxes on this tab are always left selected. It is rare that you would ever deselect any of them. Two cases where you might, would be: troubleshooting (as instructed by Technical Support), or retrieving an old email system.
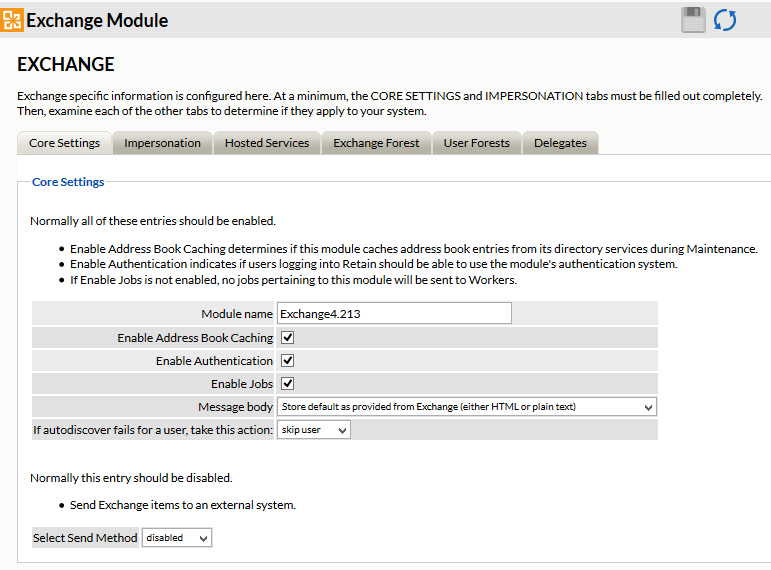
The Enable Address Book Caching function allows Retain to regularly cache the online email systems address book and synchronize it with Retain. This is critical for administration, authentication, and archiving purposes. It is recommended to cache the Address Book once every 24 hours to keep the Retain storage system up to date. By default, maintenance is set to cache the Address Book once every 24 hours.
The Enable Authentication checkbox determines if end-user authentication is performed when the user logs into Retain. If it is deselected, the Retain system will NOT authenticate the user against the email system and the user will not be able to log in unless another authentication method is enabled.
The Enable Jobs checkbox determines if configured data retrieval jobs are ever passed to the Worker. Even if the individual job is fully configured and enabled, if this checkbox is switched off, no jobs configured for this module will be processed.
The Message body allows the administrator to decide whether to store either the HTML or plain text message body, or both.
Send Method
The Send Method option enables either the SMTP Forwarding or FTP features. For either feature to appear and function, the Module Forwarding tab must be configured on the Server Configuration page. See that section for more information.
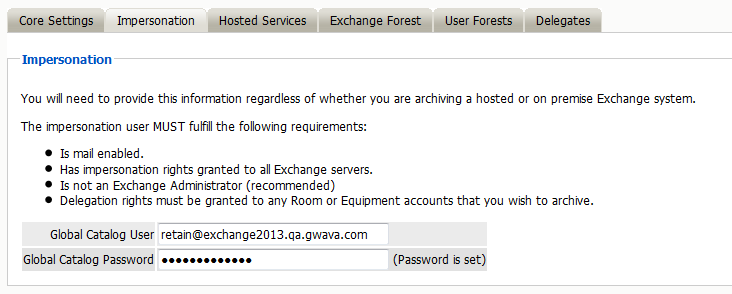
5.4.9 Impersonation
If the Impersonation and Core Settings tabs are not completely configured with the correct information, the hosted system will not be archived correctly.
5.4.11 Exchange Forest
Retain needs to know where to access the Global Catalog Host and existing domains before any archiving can be accomplished.
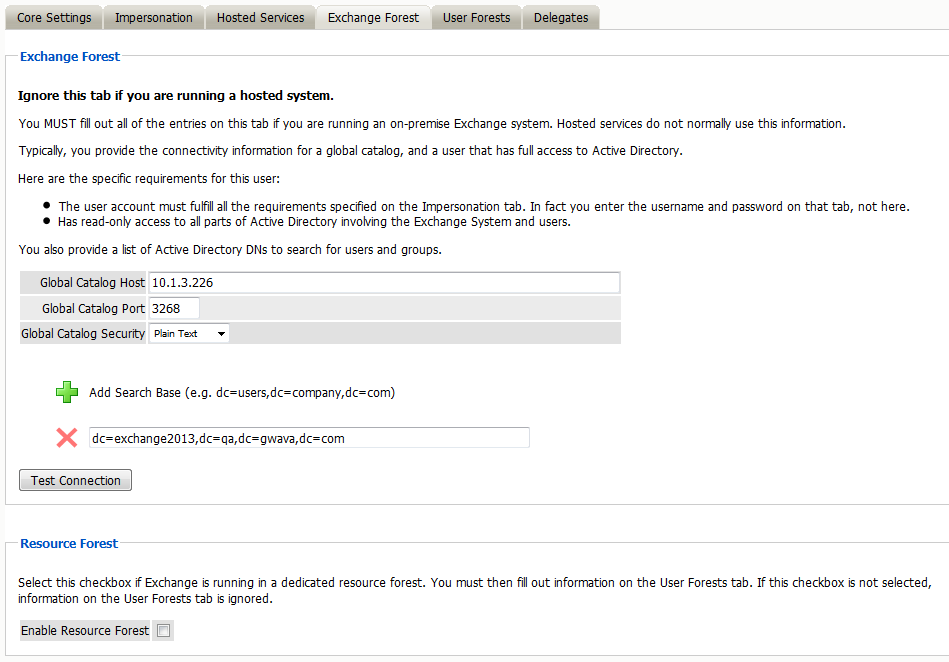
Open the “Exchange Forest” tab and enter the IP address or hostname of the Global Catalog Host.
Click on the Green Plus sign to add a search base. This should be set to the highest level of the LDAP domain so the entire address book can be found. For example: DC=exchange2013,DC=qa,DC=gwava,DC=com
Retain uses Active Directory extensively when integrating with Exchange. Its uses include: populating the address book, authentication, and access to the Exchange System.
There are settings required for Exchange, see the Exchange Permissions required for Retain section.
On the Exchange Forest tab, you configure all the Active Directory information you need for an Exchange forest. There is no need to fill out any information on the User Forest tab unless the users exist in a separate forest from the Exchange Forest.
On the Exchange Forest tab, specify whether to use SSL or not for the Global Catalog Security and the search base, (use of SSL with the Global Catalog Security and search base is highly recommended). The search base is the LDAP path to the base of where Retain will start searching for valid Exchange users.
The Global Catalog Port defaults depend on whether SSL is used for security or not. (SSL is strongly recommended. Default ports are 3268 for plain text, and 3269 for SSL.) Adjust as appropriate for your system.
You also must provide the credentials of an Active Directory user. This user is special It must have full read rights to Active Directory, be a mailbox-enabled, user, and be granted various Impersonation and Delegation rights. More on this is discussed in the Exchange Permissions required for Retain section. The username must be in UPN format, (user principal name).
This search base, in LDAP form, must be high enough in the tree to include ALL users, groups, and servers. Multiple search bases can be specified, though it often results in a less efficient interface. These are LDAP search bases which allow Retain to resolve all users, groups, and servers of interest in the forest.
After the Search Base has been added, test the connection to ensure information and connection works. The test performs a simple login to confirm that the user exists, the Exchange Server is reachable, and that the credentials are accepted. The test does not confirm impersonation or delegation rights necessary for the Service Account.
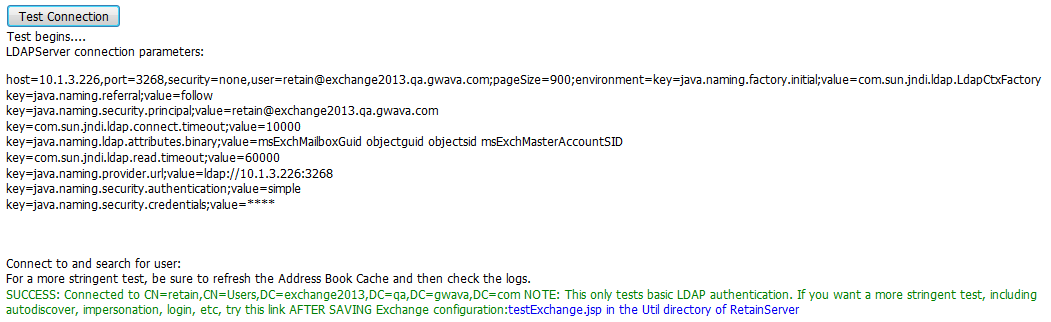
If the test results in an error stating: “FAILURE: User doesn't exist or is not mail enabled,” It indicates that the user’s mailbox is unavailable. A mailbox is not required for Retain to utilize the specified user. If the user Retain utilizes does not have a mailbox, this error may be ignored. However, if the user specified does have a mailbox, this may indicate connection issues.
If the test results in an error with an LDAP error code 49 it is an authentication error. The important bit of information is what comes after the data field. That is the LDAP connection error code that applies to this case.
-
525 user not found
-
52e invalid credentials
-
530 not permitted to logon at this time
-
531 not permitted to logon at this workstation
-
532 password expired
-
533 account disabled
-
701 account expired
-
773 user must reset password
-
775 user account locked
The Exchange Forest tab is the only tab required by the Server and the Worker to archive mail from the Exchange system. The User Forest tab, however, is required for Exchange systems utilizing a resource forest, to allow the end user to log into Retain.

If the system contains a Resource Forest, enable the checkbox on the Exchange Forest tab and save changes. If the Resource Forest checkbox is not enabled, the User Forests tab will be non-functional and all settings contained on that tab will be ignored. The checkbox must be unchecked in a single forest Active Directory deployment, but must be checked in a multiple forest Active Directory deployment.
Check all information to ensure that it is correct and save changes, and then configure the User Forest if required.
User Forest
The User Forest must have an entry for each user forest attached to the system.
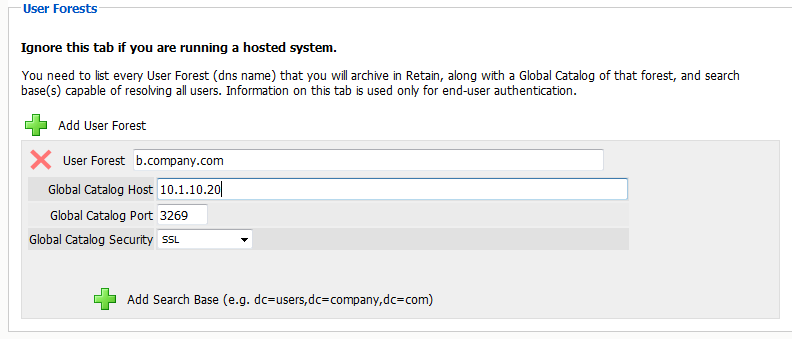
Select the green ‘+’ button and input the LDAP information required by the Forests’ Global Catalog server: IP address or hostname, port, security, (SSL is strongly recommended), and all search bases to include all the users. No administrative credentials are required. Each end user’s provided credentials will be used on login.
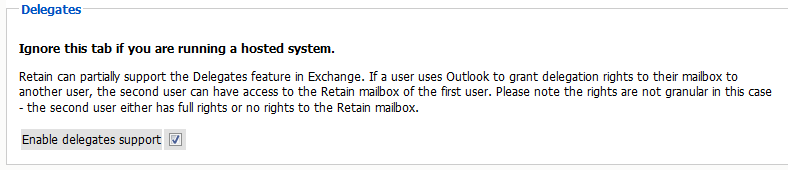
Delegates
You can set Retain to use delegate rights with On-Premise Exchange.
5.4.13 Refresh Address Book
After saving changes, return to the Retain Server's Module Configuration page, and trigger a refresh of the Address Book.
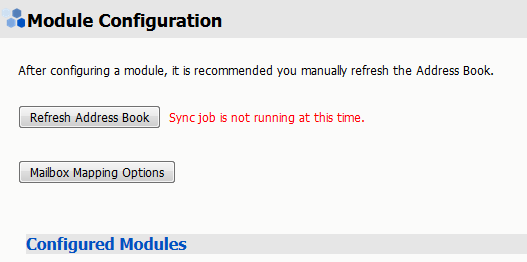
Depending on the size of the address book, it may take several minutes to return with information, but a successful configuration will return a correct address book cache date and no errors. The date should reflect the date of when the address book refresh was triggered.
The Status may show “Address Book Cache Never Run” or may list commonly misconfigured or missed items if the Refresh job fails.
Once the status is configured and the Address Book has been cached, Retain can connect to and archive messages from the Exchange server. The system is ready to have workers, schedules, profiles, and jobs configured, and those options will now appear on the main administrative interface.
The Address Book is refreshed whenever the button is pressed, during the nightly maintenance cycle, and before each job.
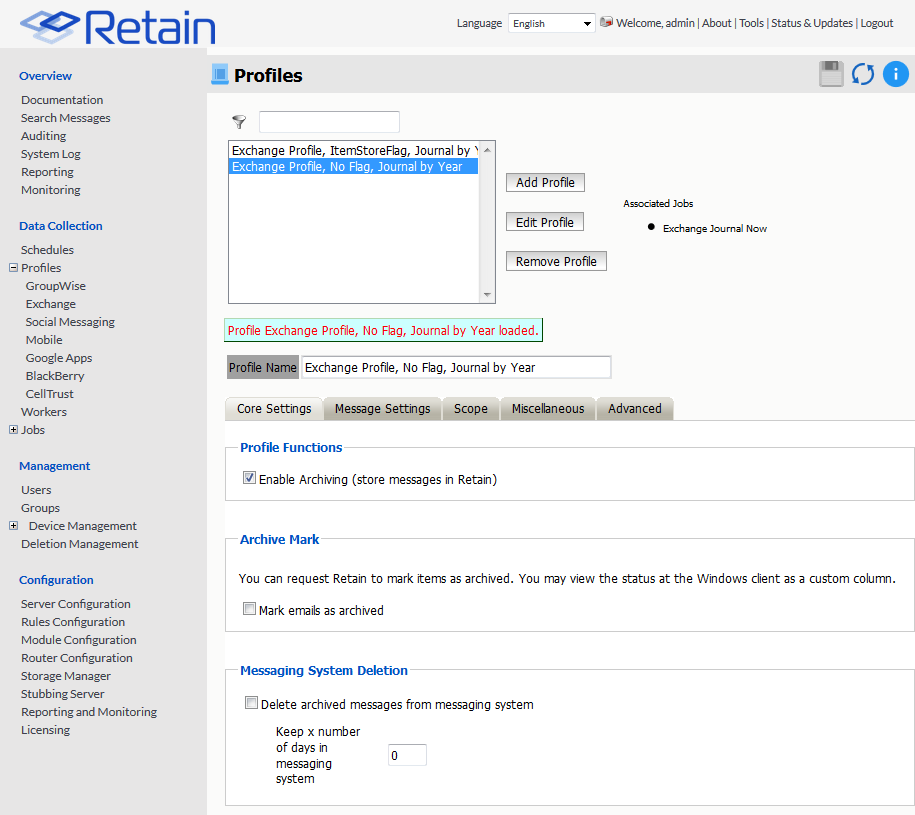
5.4.15 Core Settings
The core settings consist of an enabled/disabled option which must be enabled for any jobs based on this profile to archive anything.
5.4.17 Message Settings
Retain can archive and select specific types of mail and Exchange system items to be archived. The Manage Settings tab provides access to manage those settings.
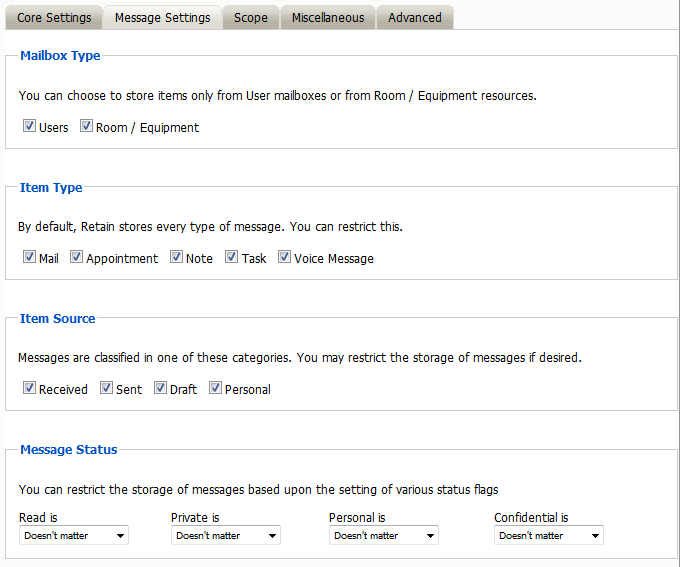
The Mailbox type specifies whether to include or exclude the available types of mailboxes. Because there can be multiple profiles and jobs, it may be advantageous to archive the Users and Room / Equipment mailboxes separately as needed and appropriate for the system.
The Item Type option specifies the different types of messages found in Exchange that can be archived, and allows the exclusion of or inclusion of the different individual types.
The Item Source option allows administrators to exclude or include messages that have not yet been sent or received, or posted.
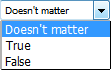
The Message Status allows messages which have or have not been read or opened, or marked private or confidential to be archived. The different options in the drop-down menu are as shown.
5.4.18 Scope
The Scope tab dictates the date range Retain will scan in the attached archiving jobs.
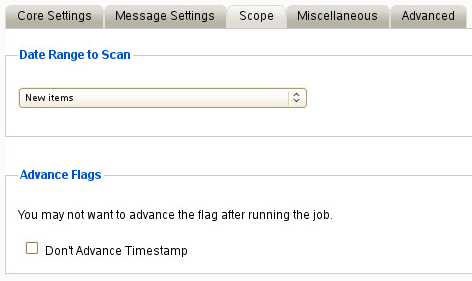
Date Range to Scan
The Date Range to Scan instructs Retain to scan for, and archive, messages after, or before, a certain date. This is useful if only specific chunks or areas of mail are to be archived.
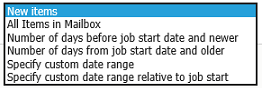
New Items: All items that have not been archived by Retain since the last time the job ran.
All Items in Mailbox: All items in the mailbox starting from 1/1/1970, duplicates will be processed but not stored if they already exist in Retain's archive.
Number of days before job start date and newer: Only items from the relative number of days from the time the job began will be archived. E.g. messages that came into the email system less than 7 days ago.
Number of days from job start date and older: Only items before the relative number of days from the time the job began will be archived. E.g. messages that came into the email system more than 7 days ago.
Specify custom date range: Only items between two absolute dates will be dredged.
Specify custom date range relative to job start: Only items between two relative dates will be dredged. E.g. messages that came into the email system between 7 and 5 days ago.
It is recommended to archive all New items.
Advance Flags
Enabling "Don't Advance Timestamp" will not update the timestamp flag. Items that are dredged will still be considered new by Retain the next time the job runs.
This is useful when troubleshooting, but is generally not used for normal jobs.
NOTE:Unlike GroupWise, Exchange does not ensure any compliance when scanning end user mailboxes; users may freely delete their email. The Item store flag does not prevent mail deletion. Only setting a rolling hold on all mailboxes, or journaling and archiving a journaling mailbox guarantees all items have been archived.
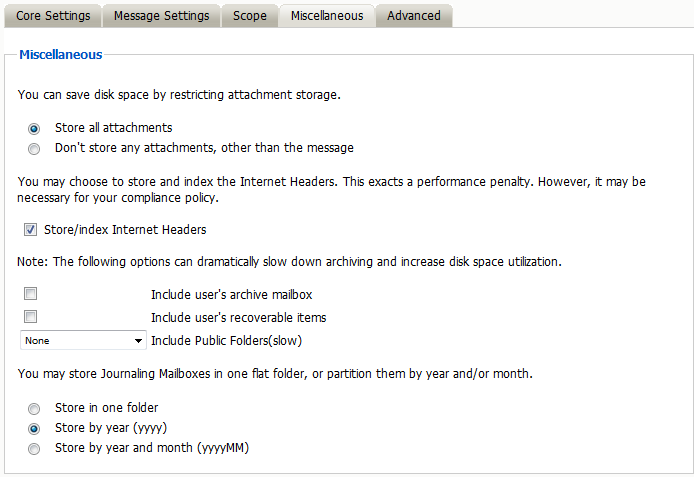
5.4.19 Miscellaneous
The Miscellaneous tab allows access to settings detailing how messages are stored and what is archived. Attachments, message information such as the Internet headers, and how the data is stored and named, (by folders, year, or year and month), dictate not only the message store structure, but affect the storage size.
Miscellaneous options also allow for the archiving of the ‘recoverable items’. To enable checking and archiving of the ‘Recoverable Items’ for compliance reasons, select the checkbox next to the option.
5.4.20 Advanced
The Advanced tab allows you to limit what is stored by Retain. This must be used with caution as this opens holes for data to be lost through. It is recommended to store everything since storage space is inexpensive.
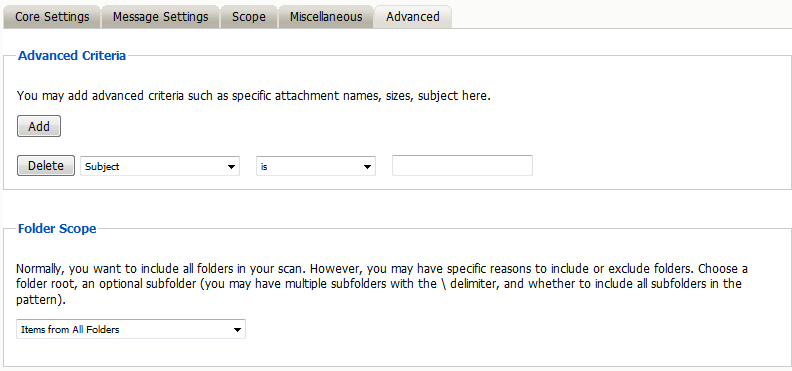
Advanced Criteria
If you want to be more specific as to what to dredge or not to dredge, add the criteria here. Each line will be logically AND-ed together. Think “Dredge all items where the following is true:” Criteria A AND Criteria B AND Criteria C AND etc.
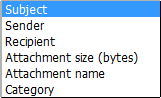
You may select based on:
-
Subject
-
Sender
-
Recipient
-
Attachment Size (in bytes)
-
Attachment Name
-
Category
And whether they are equal to, not equal to, contain or do not contain the item you specify.
This gives you great flexibility and granularity. It allows you to customize dredges and retention for many different groups, or even individuals.
5.4.21 Folder Scope
By default, we dredge items from all folders. You can specify one or more inclusions or exclusions.
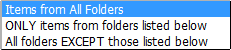
Your choices are:
-
Dredge everything
-
Dredge only these listed folders
-
Dredge everything except these listed folders
How to specify the list of folders to dredge/exclude:
-
Specify a System Folder (mandatory). Example: Calendar.
-
You specify a subfolder of that folder (optional).
Example: entering “old” would mean the folder “old” under “Calendar”.
-
You can have multiple hierarchies under that with the / delimiter.
Example: “old/mail” would mean the subfolder “mail” under “old” under “Calendar”.
-
You specify if the option includes subfolder.
Example: If you select “old” and “includes subfolder” is unchecked, “Calendar/mail” is selected. If “includes subfolder” is CHECKED, “Calendar/old/mail” would also be selected.
You may now configure Schedules, Workers and Jobs.
5.4.23 Exchange Message Dredging Process Overview
How does Retain get messages from Exchange?
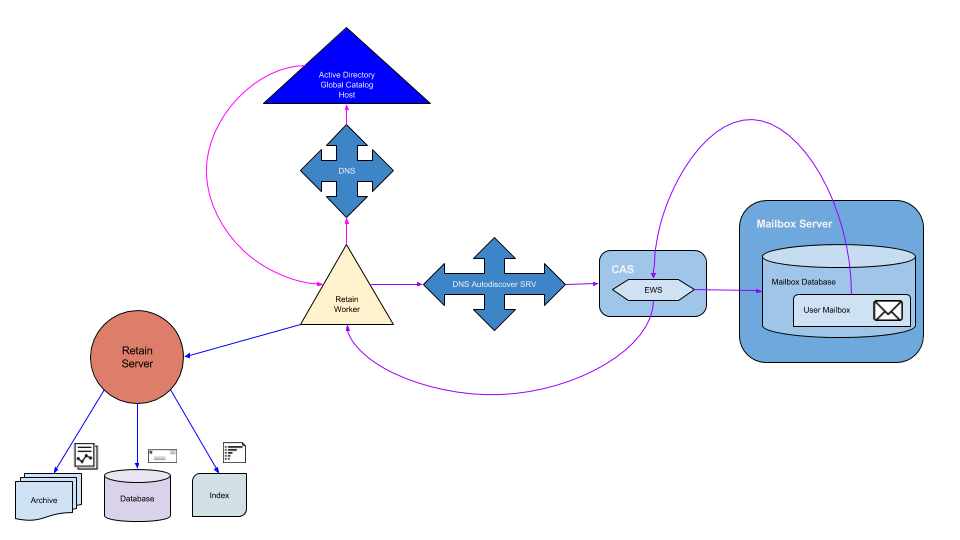
-
When a job starts, the Retain Worker will query the DNS for the SCP record to the URL of the Active Directory Global Catalog Host.
-
Then the worker queries Active Directory for the Autodiscover SCP Records and Active Directory returns the Autodiscover URLs. The URLs tell Retain where to connect to autodiscover. There are also some default autodiscover URLs that Retain uses to connect to autodiscover.
-
Retain then uses autodiscover to connect to the Client Access Server. It is helpful to have an autodiscover SRV record on the DNS to speed up this process.
-
Once Retain has connected to the Client Access Server (CAS), the CAS uses EWS to connect Retain to the correct Mailbox Server.
-
Retain uses the impersonation user credentials to enter the mailbox of the user we are attempting to dredge messages from. Retain queries Exchange for messages that meet the criteria set in the job.
-
Exchange then serves the oldest message that meets the criteria back to the Retain Worker through EWS on the CAS.
-
The Retain Worker receives the message and opens it to query the Retain Server if the message body or attachments already exists.
-
If the Retain Server determines that the message is new, then the body and attachments are stored in the archive, the header information and hash is saved in the database with links to the archive and the contents of the message are indexed.
-
If the message already exists, the database is updated with the header data and linked to the existing data, and the existing message body or attachment is dropped by the worker and the next message is retrieved from the email system.
-
Troubleshooting Exchange Performance
In general, we have found that acceptable throughput is in the 3-5 messages per second range. In well designed systems with sufficient hardware resources we have seen throughput above 10 m/s. There is definitely an issue if the throughput is less than 3, and we have seen instances of less than 0.1. The first place to look is the worker log.
Shared Mailboxes, Rooms and Equipment
Impersonation rights allow the Retain user to enter other mailboxes but those rights do not extend to shared mailboxes. To access a shared mailbox the Retain user would need delegate rights to each shared mailbox that is to be archived. These rights can be granted through the Exchange Management Shell.
If the shared mailbox is owned by “John Doe” and your Retain impersonation account is "Retain", you would issue the following command in an Exchange Management Shell (EMC):
Add-MailboxPermission -Identity "John Doe" -User Retain -AccessRights FullAccess -InheritanceType All -AutoMapping $false
Mailbox Delays
We are looking for how long it takes Retain to log into each mailbox and when it finds the endpoint which tells us it entered the mailbox.
Search the log for lines containing:
enterMailbox
Discovered endpoint
Now you want to compare the difference in times between these two lines. It should be less than 2 seconds. If it is significantly longer than 2 seconds it is most likely an issue with the DNS not properly serving autodiscover.
2015-09-25 12:00:07,256 TRACE [RTWQuartzScheduler_Archive_Worker-1] com.gwava.caapi.MailboxArchivingStats: enterMailbox: JDoe@RETAIN.GWAVAUTAH
2015-09-25 12:02:14,177 DEBUG [RTWQuartzScheduler_Archive_Worker-1] com.gwava.ews.archiveimpl.process.ExchangeUser: Discovered endpoint: https://ad.test.sys/ews/exchange.asmxscreen
This indicates that there is an issue with how autodiscover is configured in the DNS. It may need an SCP or SRV record.
Message Delays
Another thing to search for are connection failures and retries, which increase each time it fails which can add up to 4 minutes:
search for items
Software caused connection abort: recv failed
EWS request failed: null. Will retry after
2015-07-22 00:25:25,056 TRACE [Thread-1341102] com.gwava.ews.RetainExchangeWebserviceFactory: retry, exception :
javax.xml.ws.WebServiceException: java.net.SocketException: Software caused connection abort: recv failed
at com.sun.xml.ws.transport.http.client.HttpClientTransport.readResponseCodeAndMessage(Unknown Source)
...
at com.gwava.ews.archiveimpl.process.CursorFetchThread.run(CursorFetchThread.java:1334)
Caused by: java.net.SocketException: Software caused connection abort: recv failed
at java.net.SocketInputStream.socketRead0(Native Method)
...
at sun.net.www.protocol.https.HttpsURLConnectionImpl.getResponseCode(HttpsURLConnectionImpl.java:318)
... 27 more
2015-07-22 00:25:25,056 DEBUG [Thread-1341102] com.gwava.ews.RetainExchangeWebserviceFactory: EWS request failed: null. Will retry after 2 seconds
This will retry a few times with longer delays untl it aborts. Here we are losing connection to the Exchange server while already in a mailbox. This can indicate that there are issues with either a message attachment or the webserver on the Exchange or CAS servers is unable to serve the item at this time. Go to the message in Outlook or OWA and see if it can be accessed.
If the message can be accessed successfully export it as a .pst and use the PST Importer to bring it into Retain.
If the message cannot be accessed successfully then it will have to be deleted.
Exchange Health
You may also want to check the health of the Exchange server itself.
Performance Monitor
The first thing to check is the performance of the server by going into Performance Monitor to see it is above 80% utilization of CPU, Memory, Disk and/or Network. If they are consistently high you will want to use the various Server health, monitoring, and performance cmdlets to pinpoint the issue
Queues
Another thing to check are the Queues. The mail queues are how Exchange handles mail. You can see they by going into Exchange Tookbox/Queue Viewer. The number of messages in the queues should be low, if there is a queue with hundred or thousands of messages and they are not being cleared then that queue may have a stuck message, which would need to be cleared.
You can also use the Exchange Managment Shell (EMS) to check the status of the queues.
Get-Queues
Mailboxes
Another thing to check are the mailboxes. Performance can degrade if a mailbox has too many messages (~100k). The number of messages is more important then the size of the messages. For large systems you should pipe to a file since this command can exceed the EMS buffer.
Get-Mailbox | Get-MailboxStatistics > c:\mailboxstat.txt
If there is a specific mailbox with issues you may need to repair the mailbox.
Server Health
You can get a quick overview of an Exchange server's health by running this EMS cmdlet:
Get-ServerHealth -Identity server1 | Sort-Object AlertValue | ft Name, AlertValue
Exchange Throttling Policy and Bandwidth/Performance (2013)
Microsoft Exchange 2013 uses client throttling policies by default to track bandwidth for each Microsoft Exchange user and enforce bandwidth limits as necessary. Throttling policies should be turned off for the Retain Service Account, because they can affect the performance of Retain for Exchange when accessing mailboxes with a large number of folders and mail items.
-
On a computer that hosts the Microsoft Exchange Management Shell, open the Microsoft Exchange Management Shell.
-
Type these commands:
-
New-ThrottlingPolicy [give it a policy name of your choosing]
-
Set-ThrottlingPolicy [policy name from step "a"] -RCAMaxConcurrency Unlimited -EWSMaxConcurrency Unlimited -EWSMaxSubscriptions Unlimited -CPAMaxConcurrency Unlimited -EwsCutoffBalance Unlimited -EwsMaxBurst Unlimited -EwsRechargeRate Unlimited
-
Set-Mailbox [Retain impersonation user account] -ThrottlingPolicy [policy name from step "a"]
-
-
To check the policy run the command: Get-ThrottlingPolicy -Identity [policy name from step "a"] | Format-List
5.4.26 Large Attachments and/or Messages Cannot Be Archived
Symptoms you may notice when experiencing problems with default IIS limitations:
-
Retention is turned on in GroupWise and messages up to a certain date can't be deleted.
-
Errors on retrieving attachments show in the Worker log.
-
Can see messages that don't have all the attachments in Retain.
-
You may also have difficulty getting larger exports through the web interface (exports larger than 28.6 MB).
-
When logging is set to diagnostic for the Worker you can see errors like this:
15:15:15,668 RetainServerCommunication - Attempt to connect, but Server returned HTTP status (404): Not found (this line is typically repeated several times over the course of 5 minutes) 15:15:15,668 RetainServerCommunication - Giving up...too many retries! 15:15:15,668 ArchiveAttachment - Send a nice healthy blob:Archive: ERROR: Fatal Error Result=AddedEMails: 0, emailID=null, parentID=null 15:15:15,691 JobUtilities - HandleArchivingException
*Note: IIS is not supported by GWAVA. These are suggested methods for allowing Retain to archive large emails through IIS. For further information visit the MicroSoft support pages: http://www.iis.net/configreference/system.webserver/security/requestfiltering/requestlimits Some other useful information can also be found on the IIS forums: http://forums.iis.net/t/1066272.aspx
This may not be as much of an issue in Retain installations that were created with 3.x and newer. The RetainWorker will now communicate, by default, directly to the RetainServer on port 48080 thereby bypassing IIS. If you'd like to change this for an older installation, change the connection address of the worker. See the manual (look up "Worker Configuration") for your particular installation for more information. You may still have this be an issue on your Exchange server when Retain tries to collect from it if there are message attachments or messages that are larger than whatever ISS is set to allow through. This would be a setting on the Exchange side that would need to be changed. Default is 30000000 bytes.
For getting exports out of Retain you can also choose to bypass IIS and use http://(RetainIP):48080/RetainServer. IIS integration is more of a convenience to point users at Retain so that you don't have to deal with port information in a URL and other advantages that this can provide.
IIS, by default, limits the amount of data that can be imported by Retain. You can remove, or at least mitigate, this limitation by changing 4 settings. This example will be assuming you'd like to archive files up to 931 MB.
-
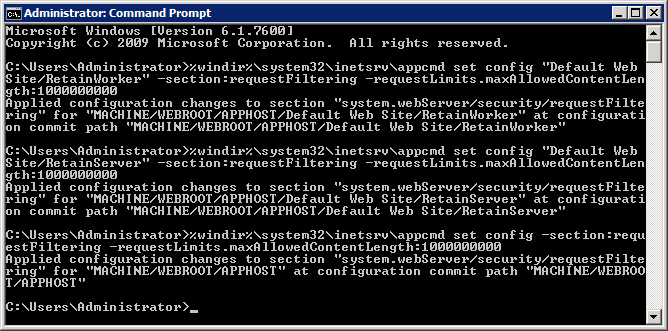
1. You'll need to increase the limit on how much data the RetainWorker and RetainServer can push/pull through IIS. You can do that using the following command*:
-
** %windir%\system32\inetsrv\appcmd set config "Default Web Site/RetainWorker" -section:requestFiltering -requestLimits.maxAllowedContentLength:1000000000
-
%windir%\system32\inetsrv\appcmd set config "Default Web Site/RetainServer" -section:requestFiltering -requestLimits.maxAllowedContentLength:1000000000
-
Current testing indicates that you'll also have to do a blanket statement: %windir%\system32\inetsrv\appcmd set config -section:requestFiltering -requestLimits.maxAllowedContentLength:1000000000
*Note: the number at the end of the command is the size you'd like to have as the max in bites.
**Note: the "Default Web Site/RetainWorker" piece may vary depending on your server setup. See the picture in the next section.
-
-
2. If you don't like command line you can also change it through the IIS manager.
-
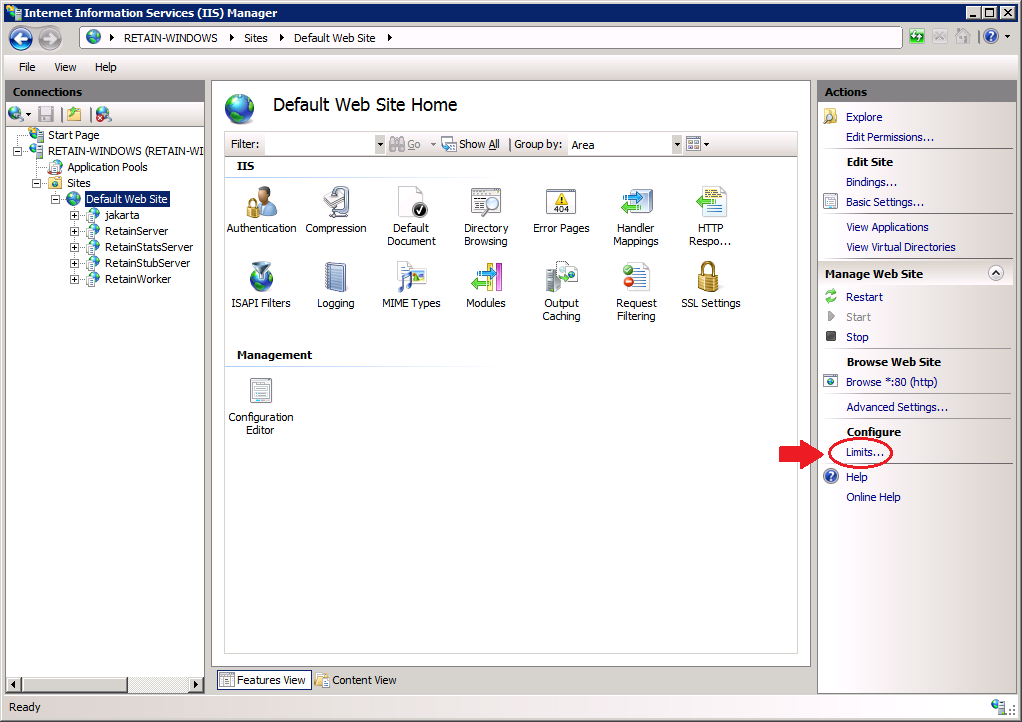
Bring up the IIS manager and highlight "Default Web Site"
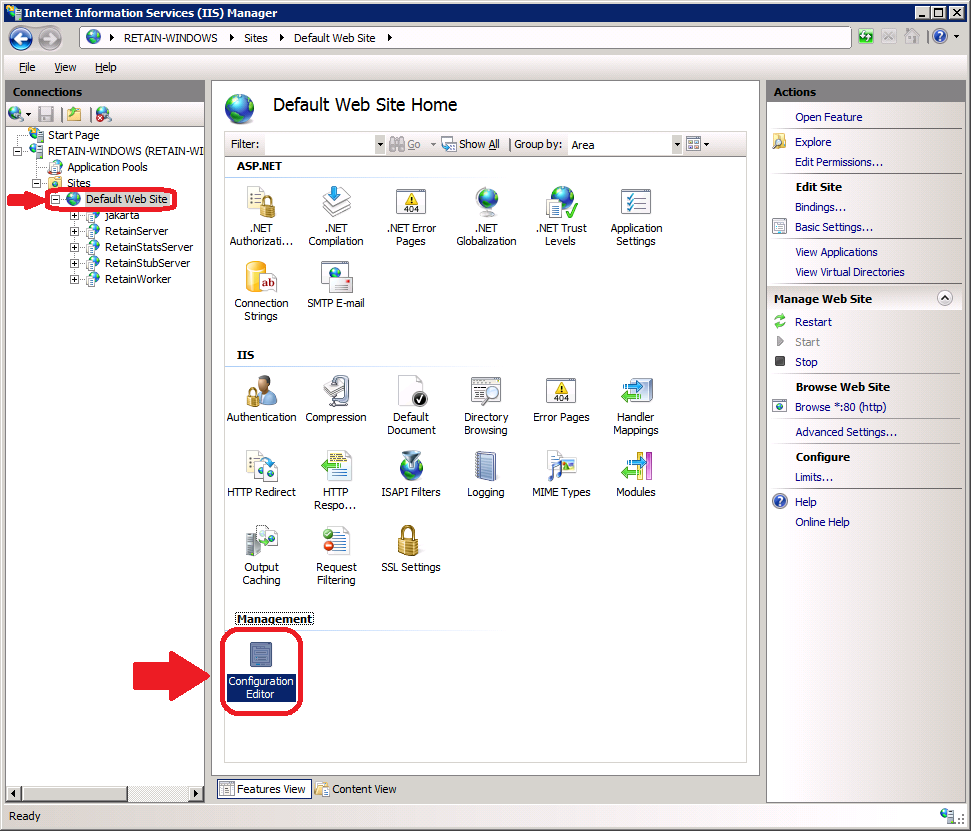
-
Double click on "Configuration Editor" as shown in the figure above.
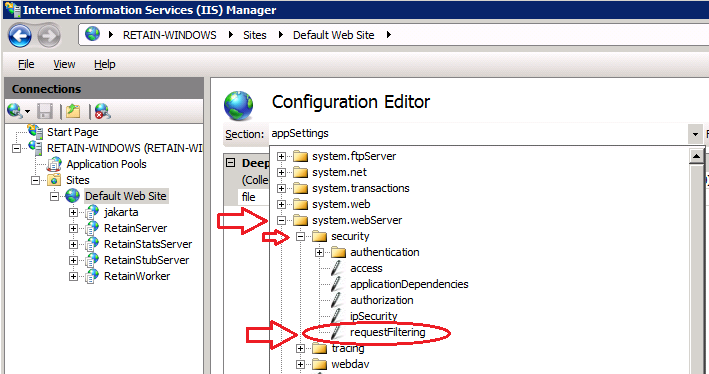
-
Use the "Section" area drop down box to go to "requestFilterg" as shown in the following figure.
-
Expand the "requestLimits" section. Change the "maxAllowedContentLength" shown in the next figure to the size (in bytes) you would like to be able to pass though.
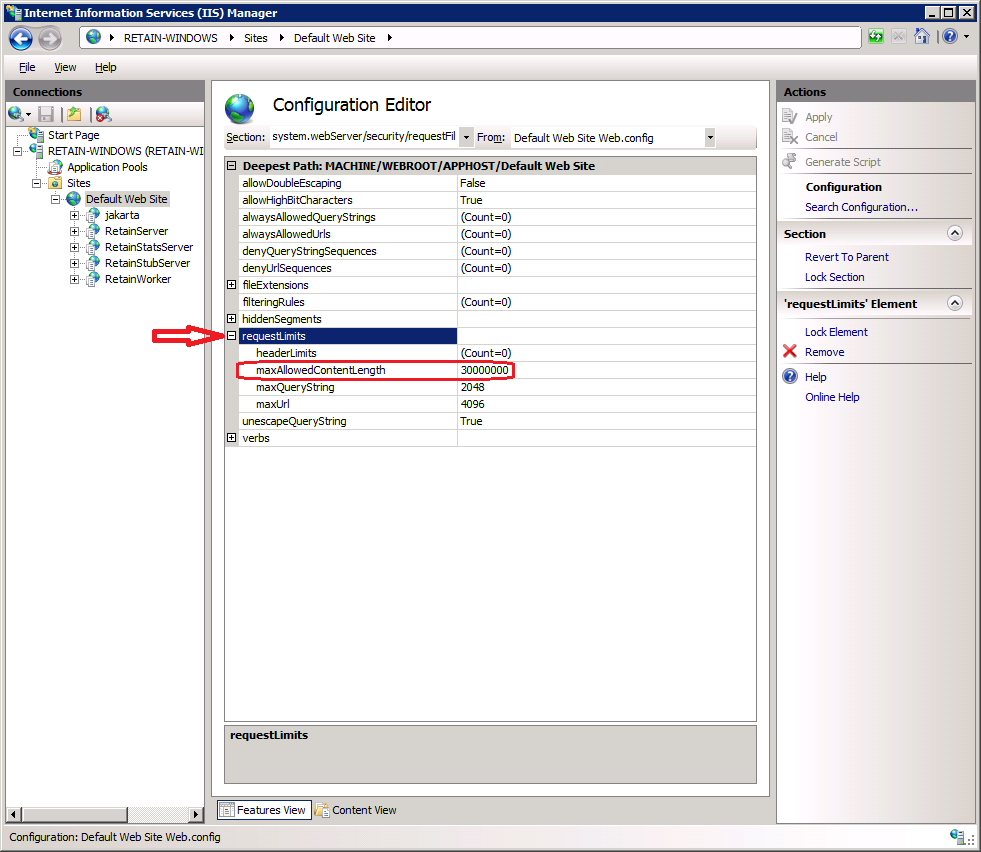
-
Repeat for both RetainServer and RetainWorker.
-
-
3. You may also need to change the timeouts in IIS. To do this:
-
Open the IIS manager.
-
Highlight "Default Web Site".
-
Click on "Limits"
-
Change "Connection time-out (in seconds):" to the desired time.
.png)
-