10.7 Reports
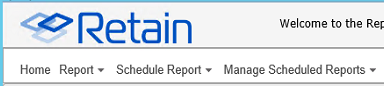
10.7.1 Report and Schedule Report
Report and Schedule Report functions are accessed through drop-down menus in the interface. To access the different reports, select the ‘Report’ or ‘Schedule Report’ menus from the top menu and then click on the desired report. Most reports which are accessible through the ‘Report’ menu are also available as a ‘Scheduled Report’, except for ‘Job Run Mailbox Summary’.
All reports under the ‘Report’ menu except ‘Job Run Mailbox Summary’, can be scheduled and have a ‘Schedule’ button at the bottom of the delivered HTML report. Selecting this button copies the settings used to generate the visible report to the Schedule Report interface. This convenience is designed to allow rapid fine-tuning of reports to deliver the desired information. First select the report you wish to run, and then fine-tune the report until it reaches the desired effect. Once the desired settings have been achieved, select the ‘Schedule’ button from the bottom of the report to carry all settings into the corresponding ‘Schedule Report’ interface, and schedule the report.
Reports differ from Scheduled reports in more than immediate delivery, reports support HTML in addition to PDF and XLS delivery formats. However, both report structures may be emailed to a desired recipient. When a report is created and emailed it is formatted as selected and then attached to a message which is sent to the desired recipient.
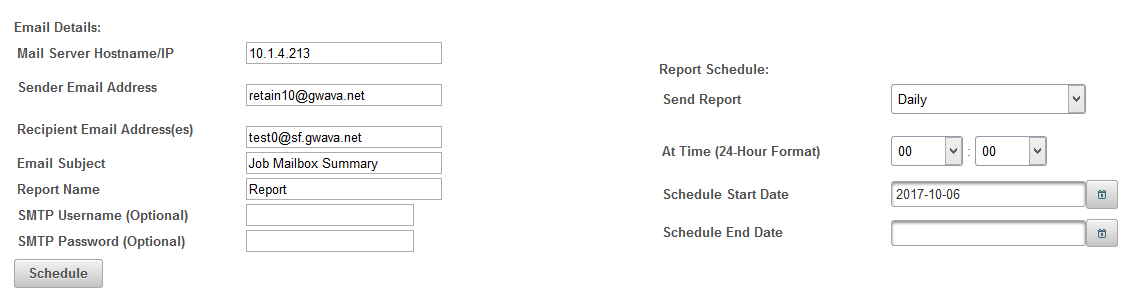
When the Email delivery option is selected, additional configuration is required. The R&M module needs to know not only what address to send the report to and what mail server to use, but also allows the configuration of the email subject and sender address. If an SMTP username and password are required for the desired host system, they should be provided.
The Reporting and Monitoring module will automatically copy the SMTP configuration from the Retain Server. If this information is not correct, it should be configured here before selecting the ‘Generate’ button.
Scheduled reports have an additional section for the email details needed for sending the scheduled reports automatically via email.
10.7.2 Reports
Reports may be created in HTML, PDF, or XLS, and may be delivered straight to the Browser or in a specified email. Different reports have different settings, however the basics are the same; select or specify the desired criteria, specify the format and delivery method, then click on the “Generate” button to create the report.
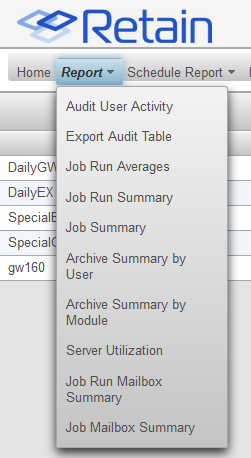
Audit user activity
Export audit table
Job run averages
Job run summary
Job summary
Archive summary by user
Archive summary by module
Server utilization
Job run mailbox summary
Job mailbox summary
Device management
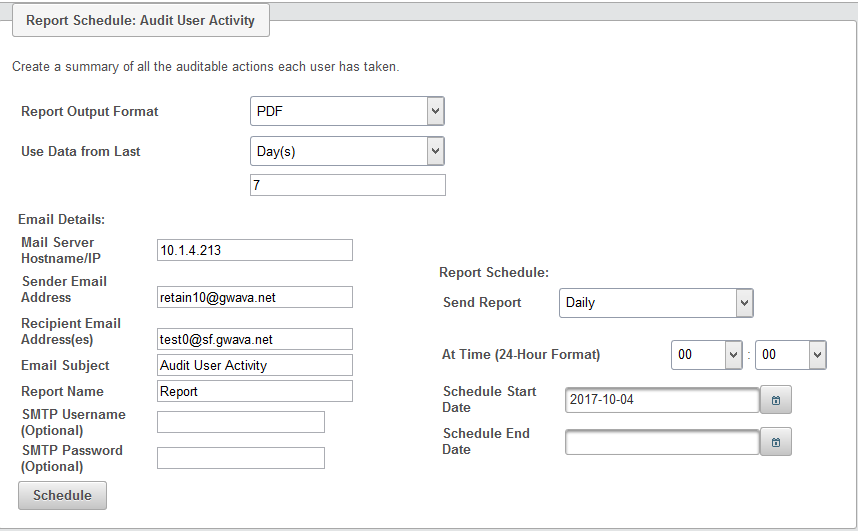
10.7.3 Audit User Activity
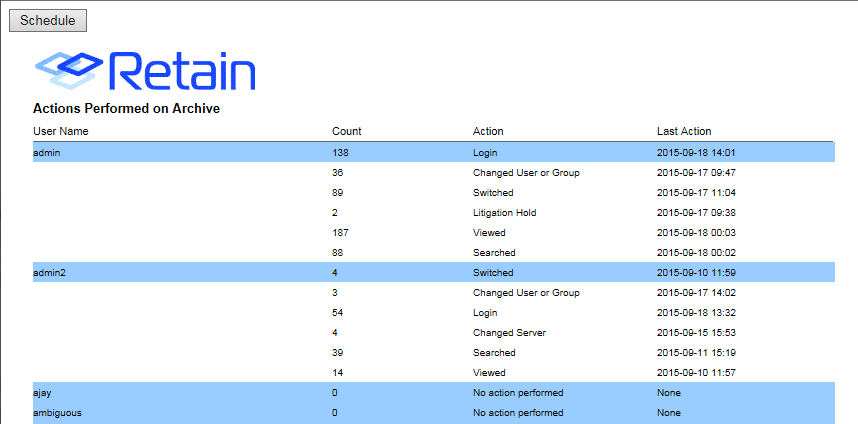
The Audit User Activity report details the different actions performed in the Retain system by different users. This report is a detailed list of all auditable actions taken and which users took them in the Retain system.
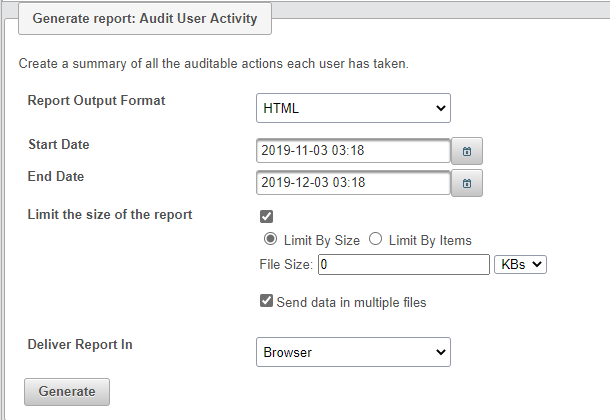
Output formats for this report include: HTML, PDF, XLS, and CSV.
You can limit the report by size or by items. Enabling the option generates a complete report broken down into multiple files, each conforming to the limits set above the option.
While this report lists all actions by all users, it may still be restricted by a date range. The date ranges are specified through a calendar interface.
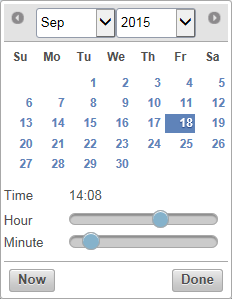
The date and year are selected through the top bar, while the hour and minute, if desired, are selected through sliders. The date can be immediately set to the current moment by selecting the ‘Now’ button. When configuration has been completed, select the ‘Done’ button to set the date. Both the Start and End Date have identical date tools.
When the settings are as desired select the ‘Generate’ button to create the report.
The report lists all users, a quick description of the action taken and how many times it was performed, and the date of the last time it was performed. Actions such as viewing an item, searching the archive, changing settings on either the server or in the interface, forwarding items, applying litigation holds, publishing items, etc. To take the same settings used when creating this report, select the ‘Schedule’ button to enter the Schedule Report interface with the same settings.
10.7.4 Export Audit Table
The Export Audit Table sorts the entire Audit log with the settings desired and creates a report for specific users or all users, with specific events or all events. This report can be limited in size and date.
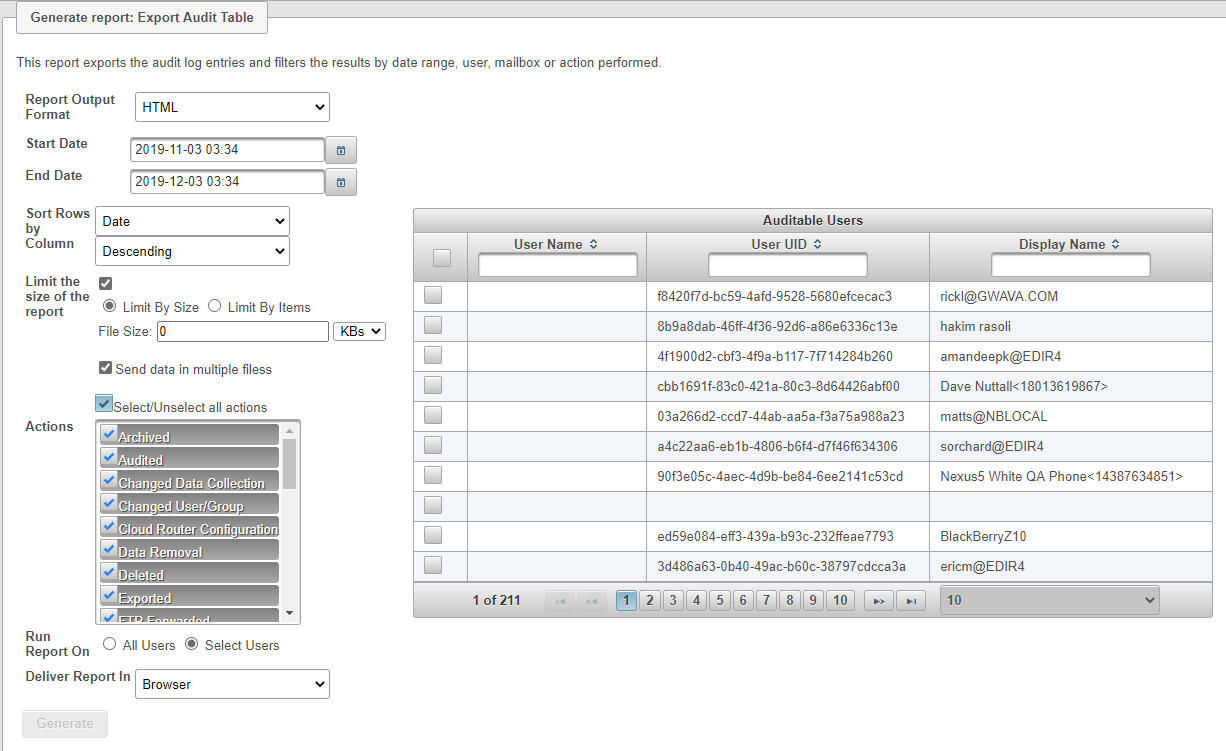
Output formats for this report include: HTML, PDF, XLS, and CSV.
You can limit the report by size or by items. Enabling the option generates a complete report broken down into multiple files, each conforming to the limits set above the option.
If restricting the report to a specific user or users, a menu displaying ‘auditable users’ is displayed. The different fields are searchable. The option to select all, or none, is also present. Users may be searched for via User Name or email address, User UID, or the user Display Name.
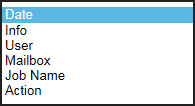
The rows and columns are not sortable in the generated report, but they can be sorted or organized from the report generation interface. The rows may be organized by the columns listed.
Date
Info
User
Mailbox
Job name
Action
This has the exact same effect as organizing columns for the jobs on the reporting and monitoring home page. Configure as desired and then select ‘Generate’ to create the report.
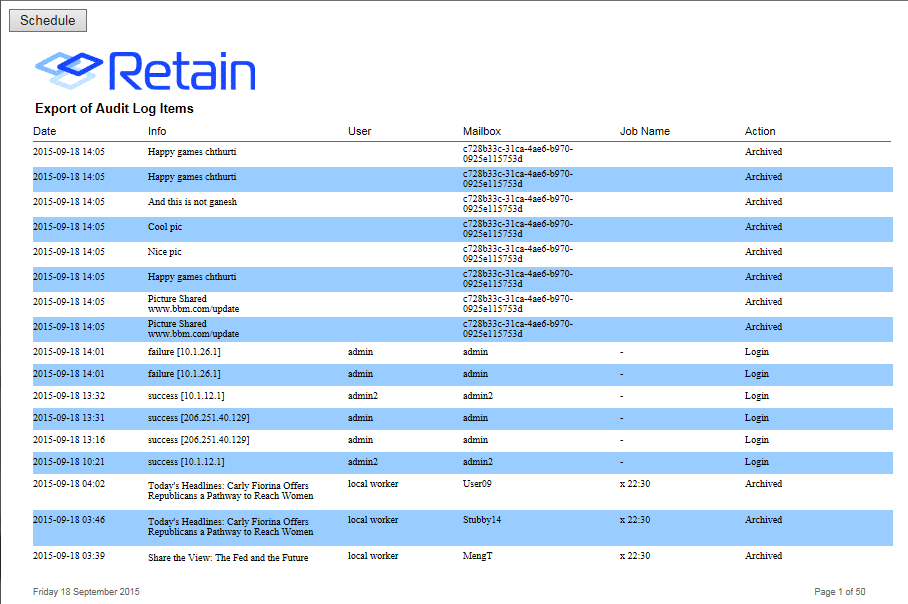
To Schedule the report, select the ‘Schedule’ button from the top of the report to keep the settings.
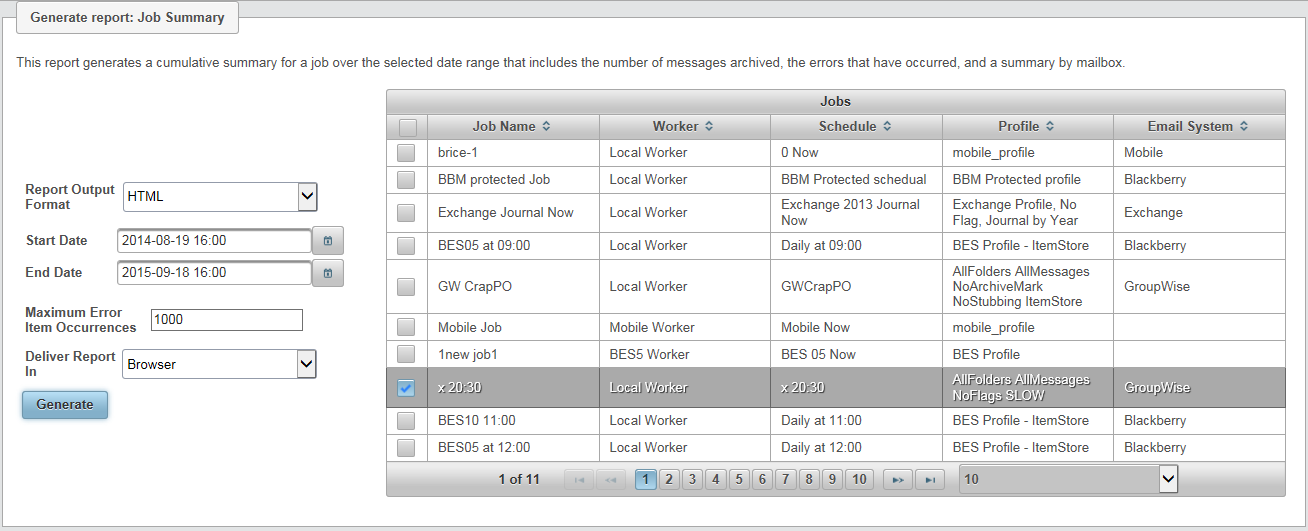
10.7.5 Job Run Averages
The job run averages report takes the performance of any selected particular job and creates a chart to display the trends. The effectiveness, overall load, and performance can be rapidly displayed. The Job Run Averages report requires a single job to be selected. The ‘Jobs’ selection window has columns which are sortable for convenience.
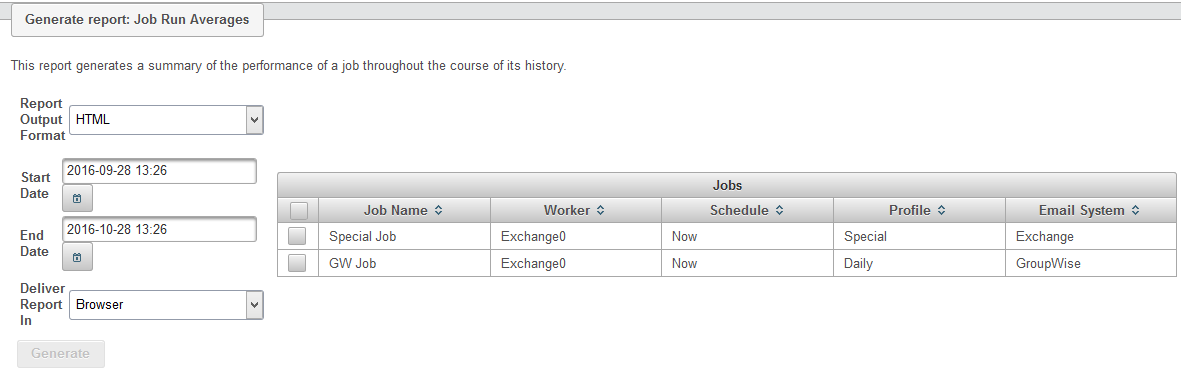
Once the date period has been configured, select ‘Generate’ to create the report.
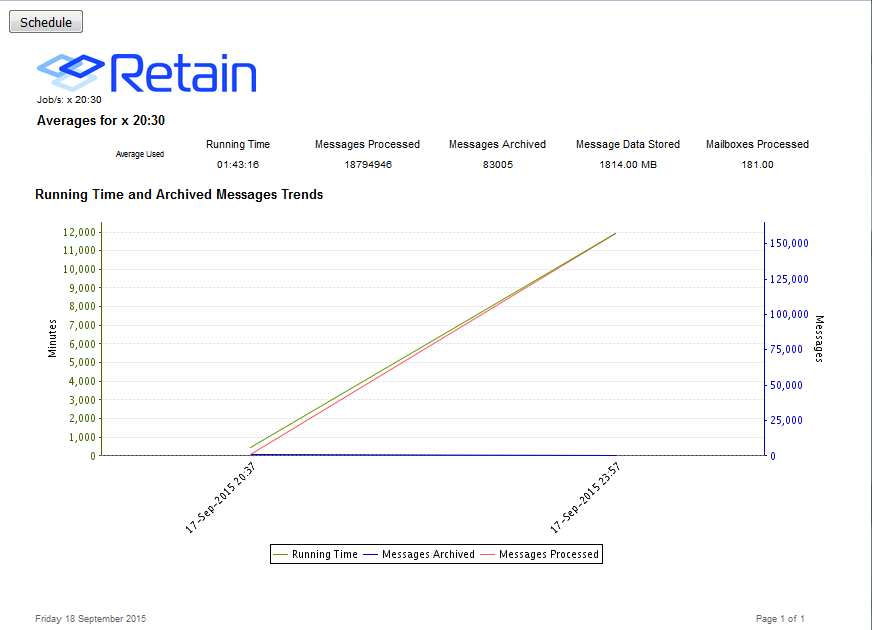
Performance trends are immediately apparent as run time is compared with message counts over a time period. The averages used to create the graph are listed above the graph, as well as a legend below.
As with the rest of the reports which exist in the ‘Schedule Report’ interface, to schedule this report with the settings which created it, select the ‘Schedule’ button from the top of the report to use the same settings and be linked directly to the ‘Schedule Reports’ interface.
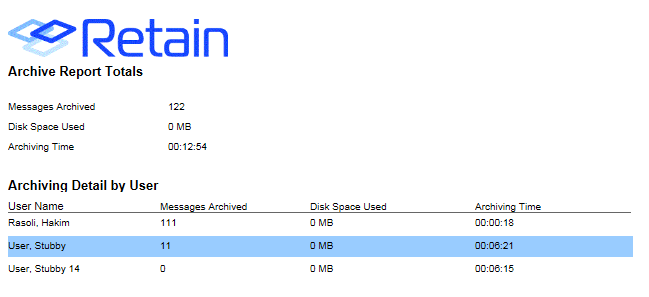
10.7.6 Job Run Summary
The Job Run Summary report gives a complete report of the performance of a single job. Whereas the Job Run Averages report charts raw performance averages, the Job Run Summary report goes into greater detail on the total number of archived messages, the errors, and mailbox summary for a single instance of a job.
Job Run Summary and Job Summary reports have the option to limit the number of reported errors displayed.
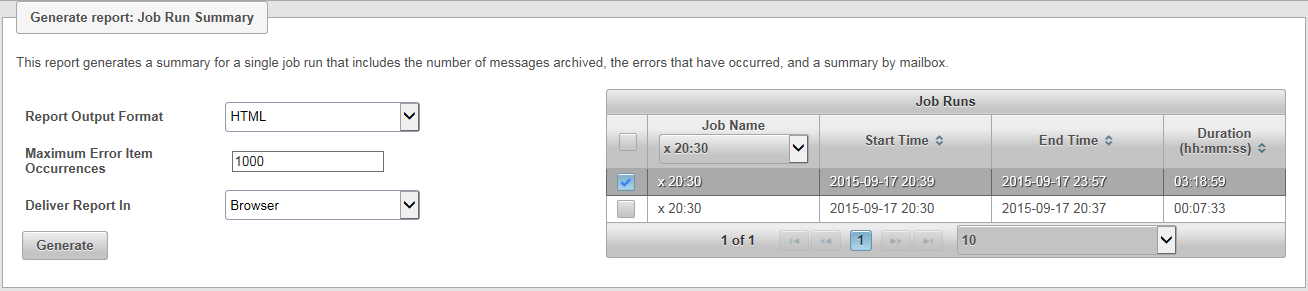
Select the desired single instance of a job and then select ‘Generate’.
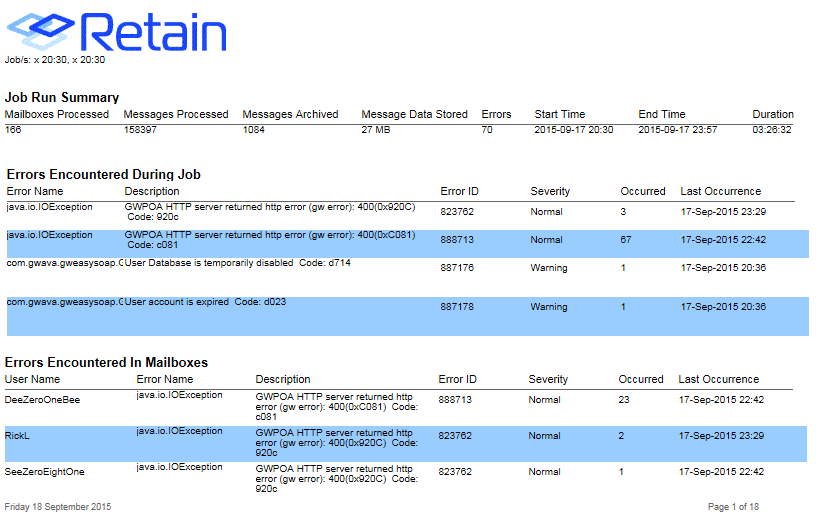
The summary displays the total mailboxes, messages, data store, errors, and running time of the job. Afterwards, this information is broken down by each mailbox the job covers.
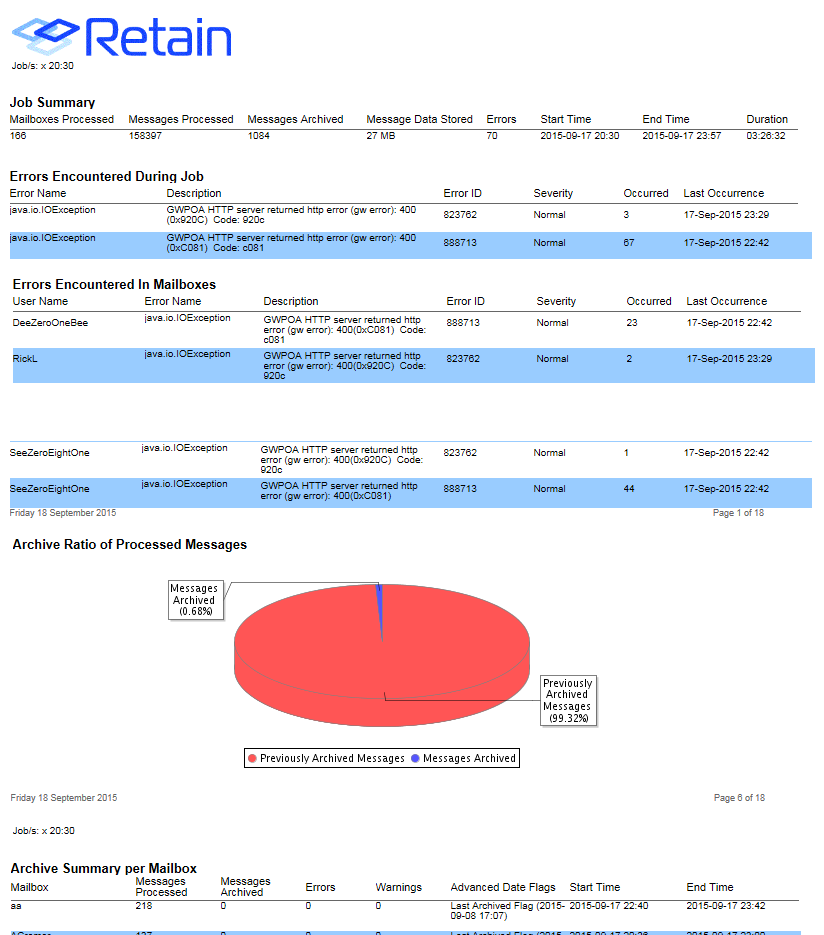
10.7.7 Job Summary
The Job Summary report is much the same to the Job Run Summary report, except that this report covers the entire history of a job and not just a single run. To run the report, select the desired job and any time period, if desired, the desired output and delivery method, and click ‘Generate’.
Job Summary contains the option to limit the number of reported errors displayed.
The report generated displays the number of mailboxes that the job processes, the total messages the job has processed, how many messages are actually archived, the message data stored, the total errors encountered, when the job first started, and the total time the job has been active.
Immediately below the initial information, a pie chart displays the amount of messages actually archived in comparison to the number of messages the job processed.
Finally, below the pie chart is a summary, by individual mailbox, of job actions. Each mailbox is displayed with the pertinent information, including the messages archived, messages processed, critical errors, a record of the advancement of message store flags, and the duration of the job in that mailbox.
To schedule this job with the settings desired, select the ‘Schedule’ button from the top of the report. All settings used to create the report will automatically be copied into the ‘Schedule Report’ interface.
10.7.8 Archive Summary by User
The Archive Summary by User report creates a summary of all users’, or a specific user’s, archive history. The summary includes all pertinent information for each mailbox’s archive over the last 3 months of jobs. To run the report, either all or one mailbox must be selected. If all mailboxes are selected, the maximum returned rows may be a very important setting to keep the report from becoming immense.
While the report cannot be sorted after it is generated, it may be sorted at generation through the ‘Sort Rows by Column’ feature. The columns may be sorted by either descending or ascending order. Select ‘Generate’ to create the report.
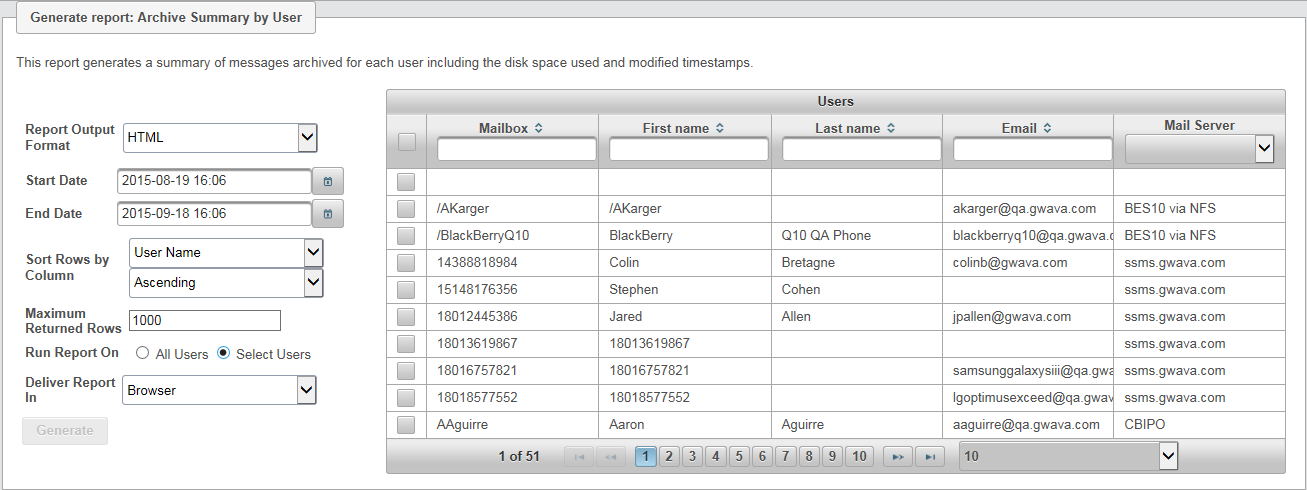
The report displays the total information for every mailbox selected; User name, the time stamps and their advanced dates, and the message store for the associated user.
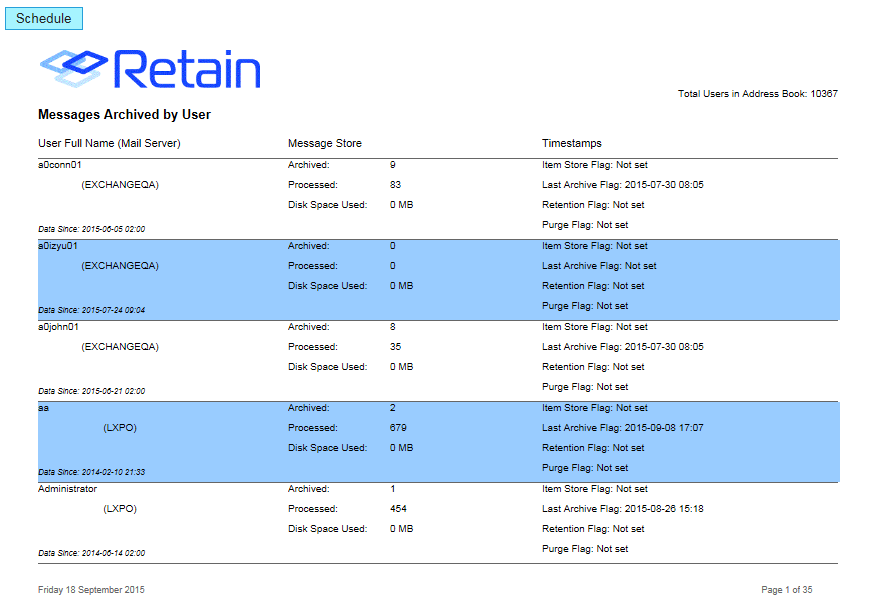
The most valuable part of this report, and what will make this report a staple for administrators, is the ability to monitor and get a concise report for the disk space used for each individual user along with the messages processed and stored.
If the report is to be scheduled, select the ‘schedule’ button from the top of the report to use the same settings which created the report.
10.7.9 Archive Summary by Module
Not all modules gather data with a Job, REST based modules have data enter at any time. To monitor those data streams use this report.
REST modules include:
-
Mobile
-
AT&T
-
Celltrust
-
GBS Notes
-
BBM
-
Social Messages
-
Tele Messages
-
UM Labs

Report Output Format: HTML, PDF or XLS.
Start Date: Default, one month ago.
End Date: Default, today.
Maximum Error Item Occurrences: How many times to repeat an error report. Default, 1000.
Deliver Report In: Browser or Email
Module: Select the module for the source.
10.7.10 Server Utilization
The Server Utilization report is a direct report on the load that the Retain Server is under. The only option is to limit the date range for which the report is active. Select the report period and then select ‘Generate’ to produce the report.
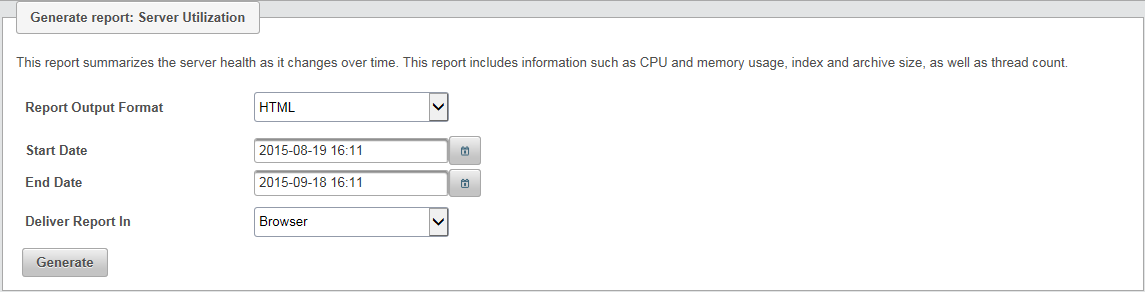
The Server utilization report details the memory, CPU utilization, Archive size, Thread usage, Index size, heap memory, and non-heap memory usage all in quick to digest charts.
To schedule the report, select the ‘Schedule’ button from the top of the report to utilize the same settings.

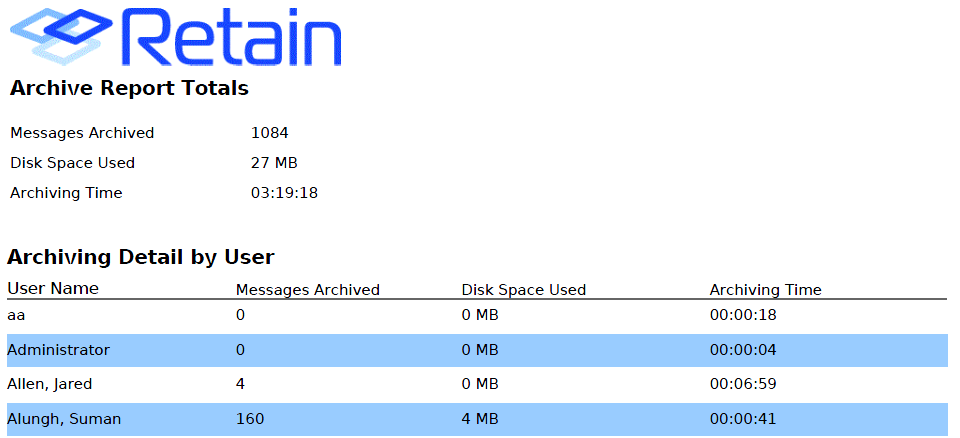
10.7.11 Job Run Mailbox Summary
The Job Run Mailbox Summary report is much like the Job run Summary except it is dedicated to specific mailboxes and specific jobs. This job requires both a job, and a user or users to be selected.
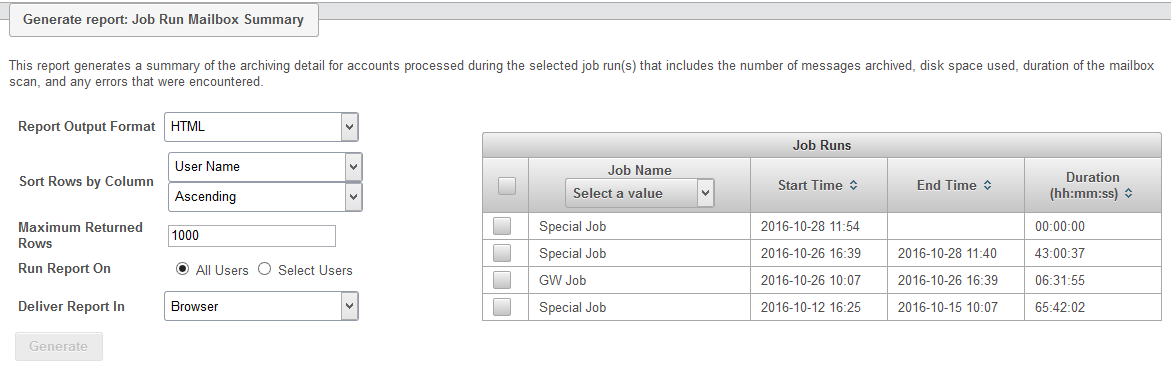
Select the desired job and either all users, or only select users. If desired, the columns may be sorted by a selected value through the ‘Sort Rows by Column’ drop-down menu. Once set as desired, select the ‘Generate’ button.
The report shows the details for the selected job and mailboxes. The user name, messages archived, disk space used, and archiving time is all displayed for each mailbox as well as for the total job.
This report cannot be scheduled.
10.7.12 Job Mailbox Summary
The Job Mailbox Summary report is a scheduled report only, that displays the number of messages archived, the disk space used, and the time the job took, separated by separate mailboxes. This report may be restricted to a date range, a limited amount of rows, and may be performed on all, or only select users. This report may also sort the data according to a selected column, in either ascending or descending value.
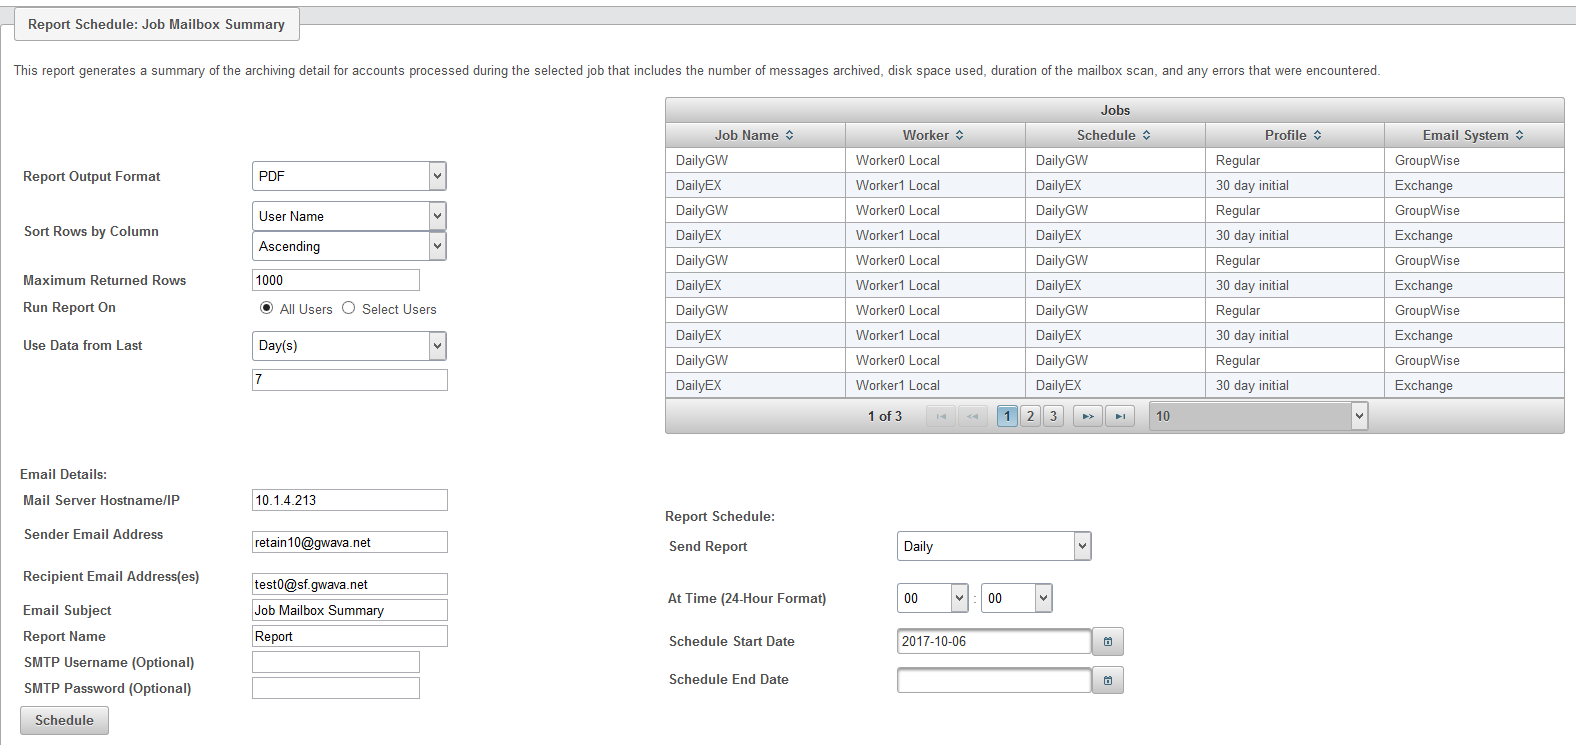
Select the ‘Schedule’ button to create the report.
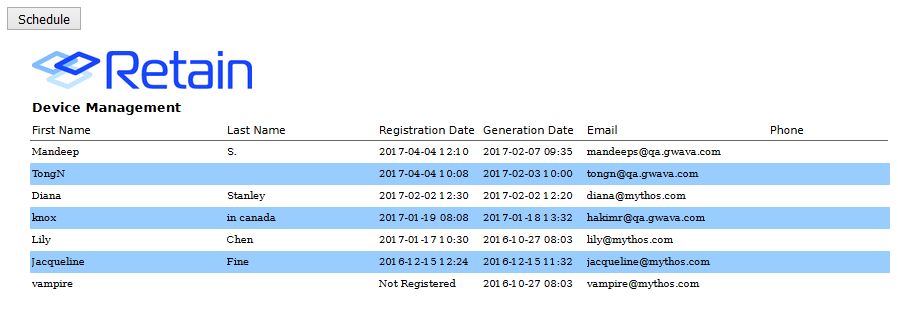
10.7.13 Device Management
The device management report generates the device registration details by user, generation time, registration time.
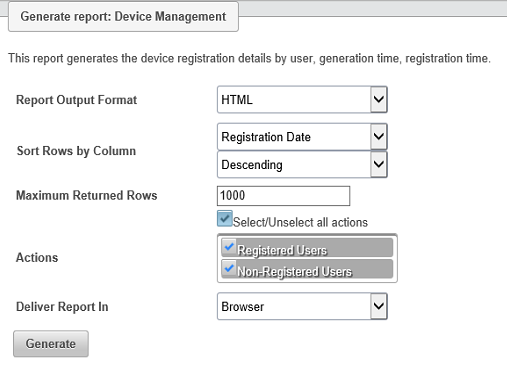
Available output formats include: HTML, PDF, XLS, and CSV.
The resulting report will show Non-registered Users with a Registration date of Not Registered until the registration process is complete on their device. The Generation Date shows when the registration process was begun.
10.7.14 Schedule Report
Scheduling reports is accomplished through the Schedule Report interface. Every report which can be scheduled is also available as an instant report with a ‘schedule report’ button located at the top of the HTML report. Because these instant reports are easier to fine-tune, it is recommended to first configure a scheduled report through the ‘Report’ interface first, to allow immediate fine tuning and viewing of the results. Once achieved, selecting the ‘Schedule’ button on the report will take all settings used to generate that report and input them into the schedule Report interface. To schedule any report, a destination email address, SMTP information, and a set schedule are required.
Scheduled reports differ from normal reports in that, due to the scheduled nature, they must be given a time to generate the report and be given an email address to deliver the report to. Reports are delivered as an attachment in an email sent to a specified user. As such, scheduled reports are only offered in PDF and XLS formats.
Reports which have a time frame attached to them as part of the criteria will have a floating time window which they may take information from.
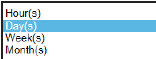
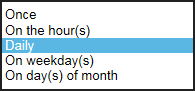
Also, the frequency of the report may be configured to be either a single instance or a reoccurring report. The frequency allows for hourly, multiple times on specified hours every day, daily, weekly or on any specified number of days in the week, or at any specified day or days in the month.
Configure Reports
The configuration allows reports to the use data created in the past number of hours, days, weeks, or months. The number of time periods may be set by the user.
In addition, a scheduled start and end date allow the administrator to control exactly when the start and stop dates for any specific report can be. The end date is optional.
Specify the Mail server, sender email address, recipient email addresses (comma separate additional addresses), and the SMTP username and password, if required.
You can set the Email Subject of the report email, and the Report Name of the attached file which will have a timestamp added to it so as to not overwrite any other reports.
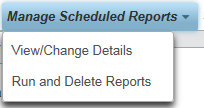
Manage Scheduled Reports
Once reports have been scheduled, it may be necessary to either cancel or modify the frequency or settings of the report. The Manage Scheduled Reports interface allows jobs to be immediately run, modified, or removed.
As with all other columns in the R&M interface, the columns are sortable and even searchable to allow quick access to any desired Report through any of the scheduled criteria. For instance, a user which doesn’t want to receive a report anymore, but doesn’t know what report is being delivered to their email, only needs to know the email subject, or the next delivery time, to immediately identify the report. Unique sender addresses or subjects will readily allow any report to be identified.
To modify or view a report’s settings select the ‘View/Change details’ window.

Once the desired report has been located, select the report and then select the ‘View/Change details’ button at the bottom to be taken to the Report’s configuration. Make any desired changes and select the ‘Update’ button at the bottom to save the changes.
To remove or immediately run a scheduled report, select the ‘Run and Delete reports’ window.

Any report or reports may be immediately run or removed from the system through this window. All scheduled reports will be displayed. A select all/none box is at the top left of the table, and allows for a quick selection or clearing of all previous selections which have been made.
To run a report or reports, select the desired report by clicking on the associated checkbox and then select the ‘Run report now’ button at the bottom. The report will be immediately triggered, and emailed to the specified recipient.
To remove a report or reports, select the desired reports by placing a check in the associated checkbox. Once the reports are selected, click the ‘Remove selected’ button at the bottom of the table.
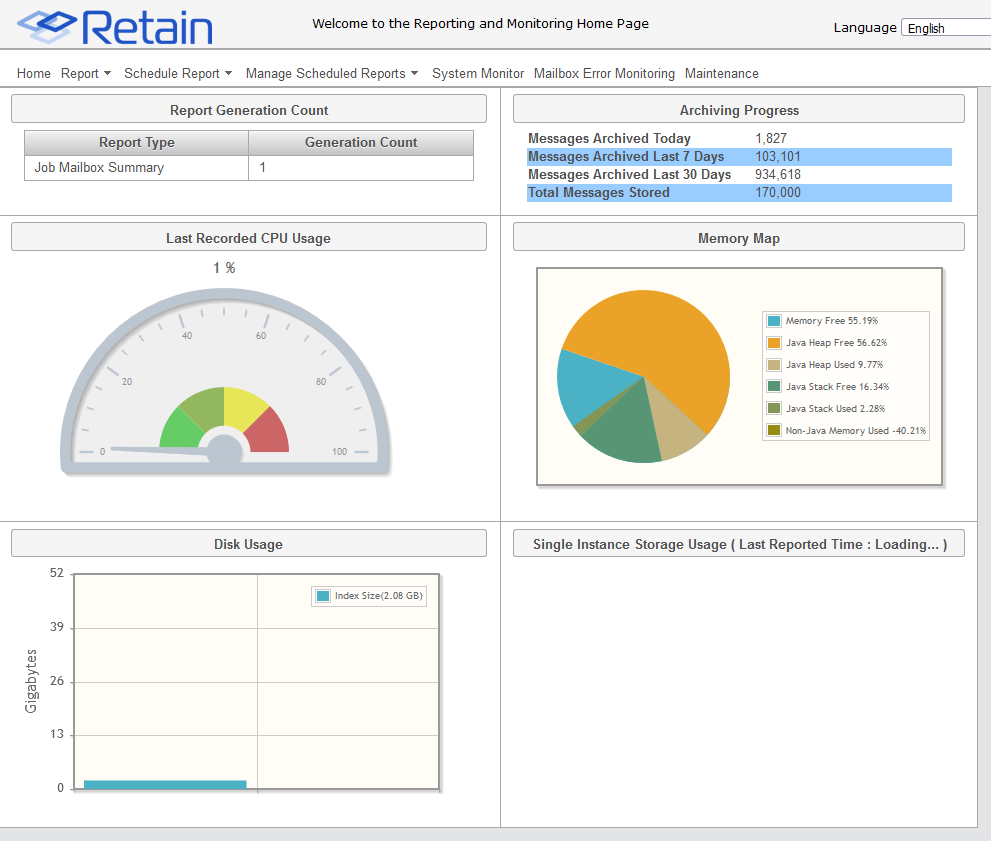
10.7.15 System Monitor
The System Monitor page is a quick, graphed page which displays the essential stats of the Retain Server system. The R&M module statistics are displayed, with how many reports have been created and of what type. The basic archive progress is also displayed showing the daily, weekly, monthly, and total amount of messages which have been archived in the system.
The system CPU load, memory usage map, and Disk Usage are displayed. The dashboard also contains statistics for disk space saved through single storage instances. These numbers are for the actual host server, and not just the Retain system, with exception of the memory map, which has both. The Memory map is broken out to total system memory free and used, but also includes Java memory statistics – which will be Retain specific unless additional Java applications are running on the Retain Server. This page will not time-out or expire, to allow quick monitoring of the system.
NOTE:A problem has recently been identified with gathering some system-level variables for the System Monitor page. Affected variables include CPU, RAM, and system memory usage. To avoid additional problems these variables have been set to ‘0’ until the issue is resolved.
10.7.16 Mailbox Error Monitoring
Mailbox Error Monitoring is a function that allows the Administrator to deal with message errors. The email system reports errors to Retain when there is an issue accessing a message. Sometimes these errors are transient and other times they are permanent. This function will help the Administrator determine the next action.
This function requires the Reporting and Monitoring server to be installed.
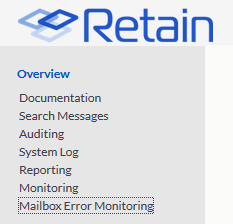
Find "Mailbox Error Monitoring" under the Overview section of the left navigation bar.
Clicking on "Mailbox Error Monitoring" will open a new window or tab. This will show the Mailbox Error Monitoring page of the Reporting and Monitoring server.
"Error Summary for all the Mailboxes with Errors" shows a list of mailboxes with errors.
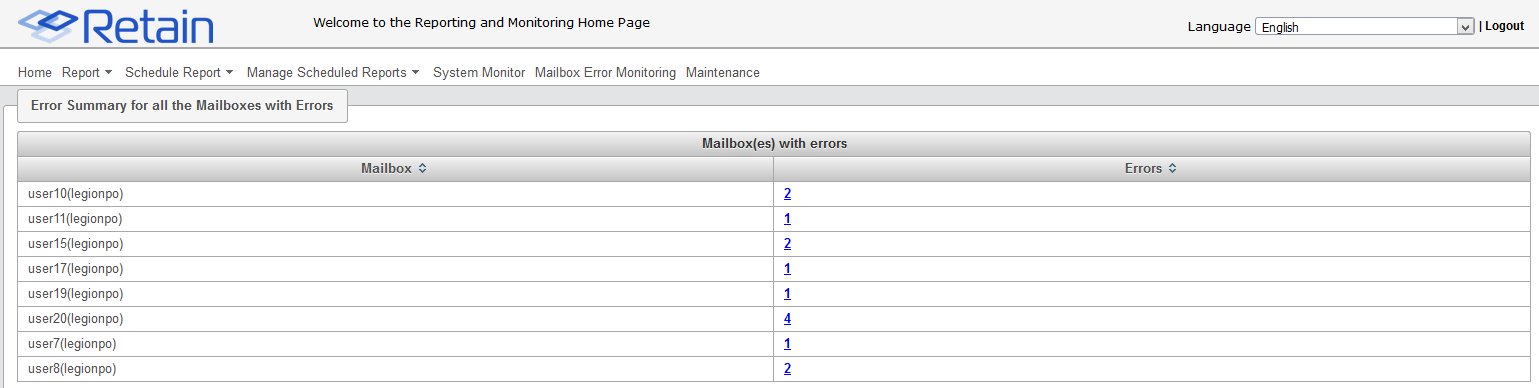
To access the errors click on the error number, which is a link that opens a new window or tab. This window will show the "Error Summary for Mailbox [mailboxName]" list.
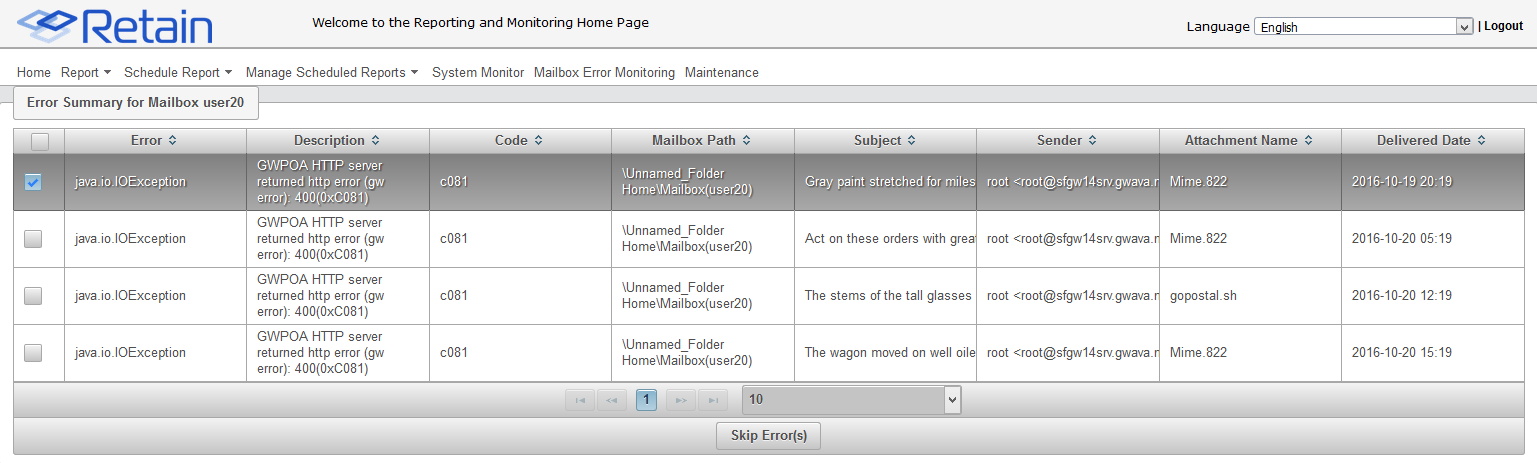
Each line will include: the error, a description of the error, the error code, the mailbox path to the folder the message was found in, the subject, the sender, the attachment that the error occurred on, and the delivered date.
If the message is accessible from the user's client, save the message from the client. Import the message into Retain using the PST Importer or GroupWise Personal Archive Migrator.
To skip a message, select a message by clicking the checkbox by a message, or use the title bar checkbox to select all. Click on the "Skip Errors" button to have Retain skip those errors the next time the job runs. This will remove the message from the list.
10.7.17 Maintenance
The Maintenance page contains the basic maintenance for the R&M module. This is not maintenance for the entire Retain Server. Because the R&M module maintains individual statistics, it needs to be refreshed and purged at regular intervals. The defaults are shown.
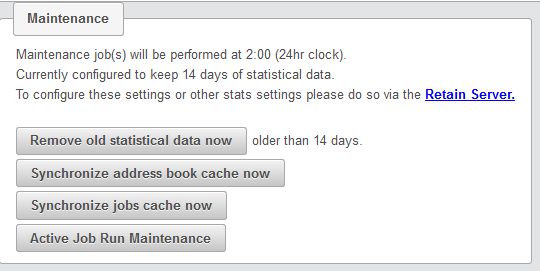
Remove old statistical data now: By default, the statistics server only maintains a record of statistics for 14 days, and all data older than 14 days will be automatically expired and the data deleted. If the statistic data is required for longer or shorter, configure and save the setting. It is not recommended to maintain statistical data older than 30 days.
Synchronize address book cache now
Synchronize jobs cache now: The R&M Module maintains a separate record of the address book and the job cache. The system automatically synchronizes this information with the Retain Server every 24 hours. Still, the different records may become out of sync. If a synchronize job is required before regular maintenance, a manual sync may be individually triggered.
Active job run maintenance: If a job has completed but R&M thinks it is still running, press this button to clear.