5.7 Domain Management
Micro Focus Secure Messaging Gateway may manage messages coming from multiple domains. Each domain to be managed by Micro Focus Secure Messaging Gateway must be added to the Domain Management for it to function and have message data scanned by Micro Focus Secure Messaging Gateway.

Adding domains to the Micro Focus Secure Messaging Gateway server is simple: Select the 'Add new' button and input the new domain and select the 'save' disk button at the top right of the Manage Domains page.
Once added, domain options may be configured and managed. The SMTP hosts and any LDAP hosts must be specified for logins and scanning to be completed properly.
5.7.1 Add New
The button allows you to create a new domain. You need at least one domain. This should be named after the fully qualified domain name of your email server.
You also need to set up what users can connect and what SMTP server the domain should connect to. You may also enter details for connecting to LDAP for user authentication and DKIM signing.

-
Enable user auto-provisioning: This is disabled by default.
-
Auto-provision roles: If auto-provisioning is enabled on the domain, you can specify which roles are given to auto-provision users: System Administrator, OU Supervisor, Policy Administrator, Policy User, QMS Administrator, QMS User, Message Tracker. For more information about roles, see Manage System roles.
-
Require inbound SMTP domain authentication: Requires inbound SMTP authentication to the domain. Only users with SMTP AUTH enabled can authenticate.
-
Require SMTP sending domain authentication: Requires outbound SMTP authentication from the domain. Only users with SMTP AUTH enabled can authenticate.
-
SMTP authentication exception mode: Specify whether listed SMTP AUTH exceptions are allowed or denied.
-
SMTP authentication exceptions: Specify the IP addresses for client that are exempted from any enforcement settings for SMTP AUTH and can send messages without being authenticated. IP addresses can be entered as string/regex patters or in CIDR format.
NOTE:A client whose IP address is in the list is not considered authenticated unless they choose to authenticate. This is important to consider when using the SMTP Envelope filter in a scan policy (which has the option to test whether the client is authenticated).
-
Additional Host Pattern Matches: Enter the IP address range or host names with wildcards of appropriate hosts.
SMTP Hosts
Enter the SMTP host messages will be directed to on each line.
-
Target type
-
SMPT server
-
Discard
-
Target host
-
Priority
-
Security
-
Authentication
-
Username
-
Password
-
Mail (Enable if the SMTP server handles mail)
-
Auth (Enable if the SMTP server handles authentication)
-
Line limit
A test button allows you to determine if the connection will function.
-
Enter a valid user email address.
-
Click “Start Test”

-
The dialog box will show the connection process to the SMTP server and whether it passed

or failed.

LDAP Hosts
Enter the LDAP to authenticate against.
-
Target host: The IP Address of the LDAP server used for user authentication.
-
Priority
-
Security
-
Username: The username is the Distinguished Name of the user used to allow LDAP access. For example: CN=dapple ldap,CN=Users,DC=sf,DC=gwava,DC=net
-
Password
-
Auth
-
Validate
-
Scope
-
DN template / DN search base: The search base is the distinguished name of the domain.For example: DC=sf,DC=gwava,DC=net
-
Search pattern: If using proxy addresses or if the users are in a different location than the default,in the Search pattern enter: (|(mail=%email%)(proxyAddresses=smtp:%email%))
Enabling LDAP for Users Logging into QMS
Using an LDAP browser to confirm that the LDAP server can be successfully accessed is highly recommended. For example, Softerra LDAP Browser.
-
Enter the LDAP server address as the Target Host.
-
Provide the Distinguished Name and password of the user that has access to authenticate the other users.
-
Enable Auth.
-
Enter the DN Search base for the domain.
-
If using proxy addresses or if the users are in a different location than the default, in the Search pattern enter: (|(mail=%email%)(proxyAddresses=smtp:%email%))

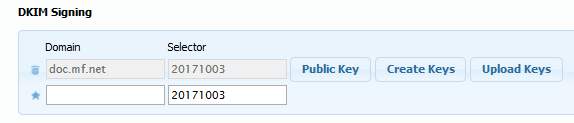
DKIM Signing
-
Domain: Enter the domain that emails will be signed from. Once a domain is entered, additional functionality is revealed.
-
Selector: An identifier that will be used in your DNS for the signing. This can be anything, by default it is today’s date.
-
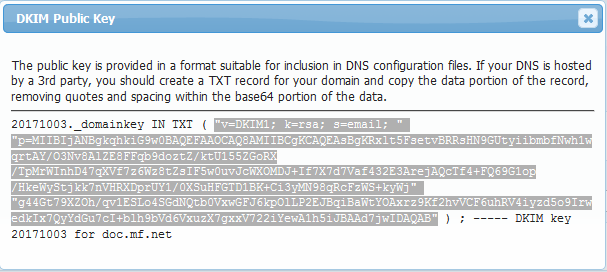
Public Key button: This button will reveal your public key, once it has been created or uploaded. The public key is provided in a format suitable for inclusion in DNS configuration files. If your DNS is hosted by a 3rd party, you should create a TXT record for your domain and copy the data portion of the record, removing quotes and spacing within the base64 portion of the data.
-
Create Keys button: This button will create a set of private and public keys for DKIM signing.
-
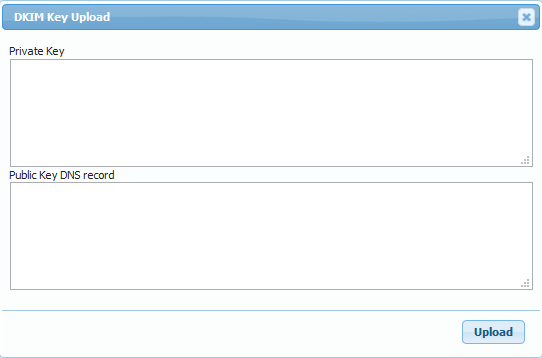
Upload Keys button: If you already have keys you wish to use, they can be uploaded here. A dialog box will appear.
Setting up DKIM Signing
DKIM signing is a DNS function.
-
After setting up the public key, you will have to create a new TXT record in your DNS that Secure Messaging Gateway will use to sign each message. The DNS TXT record is required to be of the form <selector>._domainkey.<domain>. For example, the TXT record for the above screenshot would be 20171003._domainkey.doc.mf.net.
-
The content of the TXT record is the key within the parentheses {()}. For example, using the example above, you would copy into the TXT record: "v=DKIM1; k=rsa; s=email; " "p=MIIBIjANBgkqhkiG9w0BAQEFAAOCAQ8AMIIBCgKCAQEAsBgKRxlt5FsetvBRRsHN9GUtyiibmbfNwh1wqrtAY/O3Nv8AlZE8FFqb9doztZ/ktU155ZGoRX/TpMrWInhD47qXVf7z6Wz8tZsIF5w0uvJcWXOMDJ+If7X7d7Vaf432E3ArejAQcTf4+FQ69G1op/HkeWyStjkk7nVHRXDprUY1/0XSuHFGTD1BK+Ci3yMN98qRcFzWS+kyWj" "g44Gt79XZOh/qv1ESLo4SGdNQtb0VxwGFJ6kpOlLP2EJBqiBaWtYOAxrz9Kf2hvVCF6uhRV4iyzd5o9IrwedkIx7QyYdGu7cI+blh9bVd6VxuzX7gxxV722iYewA1h5iJBAAd7jwIDAQAB"
-
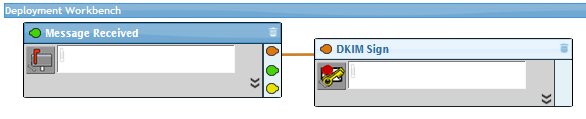
Finally, you need to create a DKIM signing service in Secure Messaging Gateway, either in an existing policy or in its own policy.
-
To verify that this worked send a message from the domain that is DKIM signing to an external domain. The DKIM signature should be added to the message.
Notes
Enter any notes about the domain.