Setting Up Terminal Emulation
To set up terminal emulation, create a script for the emulator, specifying Terminal Launcher as the script type. Then configure the emulator and create a login.
Creating a SecureLogin Script
The following example sets up SecureLogin Terminal Launcher to single sign-on to a session using Jolly Giant QWS3270 Plus.
-
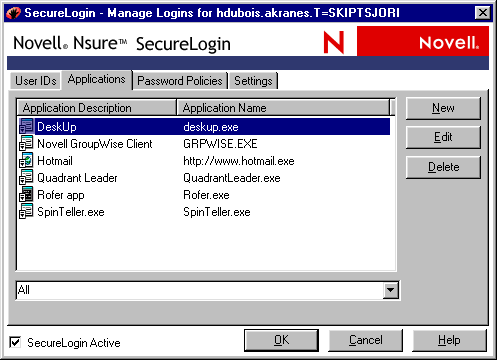
Double-click the SecureLogin icon on the system tray, click Applications, then click New.
-
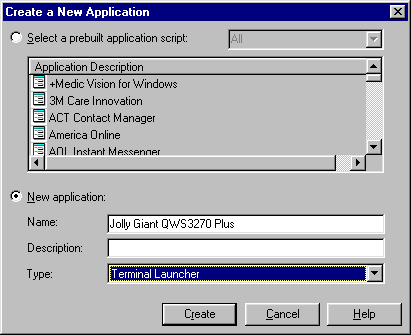
Select New Application, type a name in the Name text box, select Terminal Launcher as the type, then click Create.
-
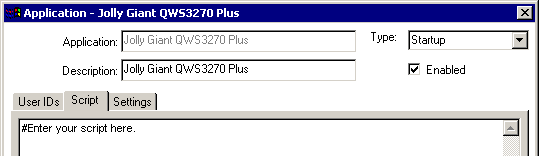
Click Script.
-
Type a single command, then click OK.
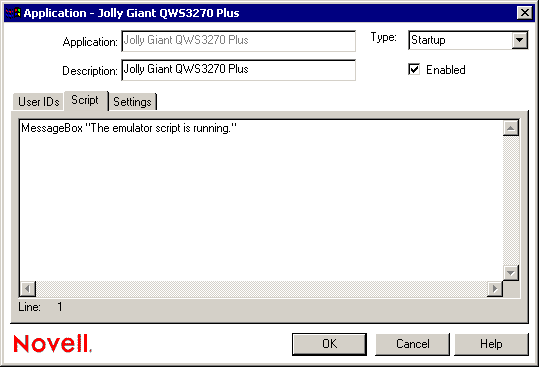
For example, type a MessageBox command. By entering one command, you can find out the following:
- Terminal Launcher is working as expected.
- The script is ready for you to enter the appropriate commands.
-
Save the data and close open windows by clicking OK.
Configuring Terminal Launcher
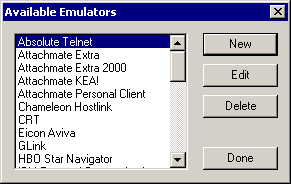
SecureLogin Terminal Launcher includes configurations for the following emulators:
Attachmate* Extra* |
NetTerm v4.2 |
Attachmate Extra 2000 |
NS/Elite |
Attachmate KEA! |
PASSPORT* TN 3270E |
Chameleon* Hostlink |
QVT |
Eicon* Aviva* |
QWS3270 Plus |
GLink |
SDI* TN3270 |
HBO Star Navigator |
TeraTermPro |
IBM* Personal Communications |
TLaunch Options |
IDXTerm Healthcare |
ViewNow |
Info Connect |
Wall Data RUMBA* |
Microsoft* Telnet 2000 |
Wall Data RUMBA 2000 |
Microsoft Telnet NT |
Wall Data RUMBA Web To Host |
Microsoft Telnet Win 9x |
Windows Telnet VT |
Mocha W32 Telnet |
WRQ* Reflection* |
If an emulator doesn't have a predefined script, you can configure Terminal Launcher to do the following:
To configure Terminal Launcher you must specify any required mainframe session file and the path to the emulator executable.
Configuring WinHLLAPI, HLLAPI, or 16-Bit HLLAPI Emulators
This section can help you configure WinHLLAPI, HLLAPI, or 16-bit HLLAPI emulators. If you select the wrong HLLAPI type, however, Terminal Launcher will fail. To find out the HLLAPI type, do one of the following:
HINT: Most HLLAPI-based emulators require you to configure HLLAPI short session names (normally A-Z) and link them with the session files or the main application. Otherwise, SecureLogin won' t be able to determine which HLLAPI session to send responses to, and it will appear that SecureLogin isn't working. This will be the case even though everything within the SecureLogin configuration is correct.
-
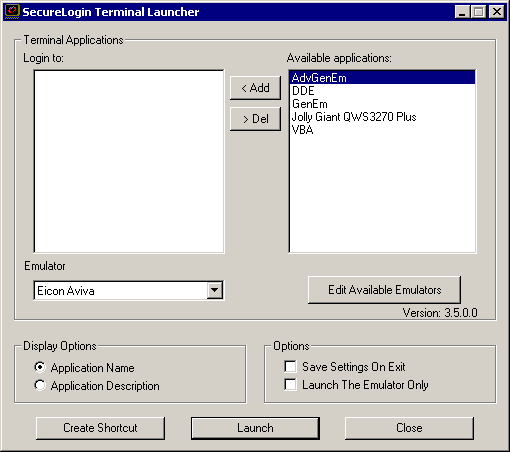
Click Start > Programs > Novell SecureLogin > Terminal Launcher.
As the following figure illustrates, Terminal Launcher displays the application that you created the script for:

-
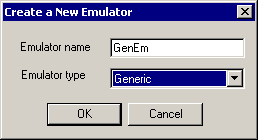
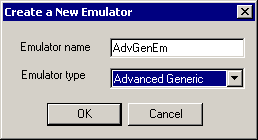
Click Edit Available Emulators > New.
-
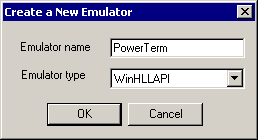
Type a name for the emulator, select WinHLLAPI, HLLAPI, or HLLAPI16 as the emulator type, then click OK.
-
Type values, then click OK.
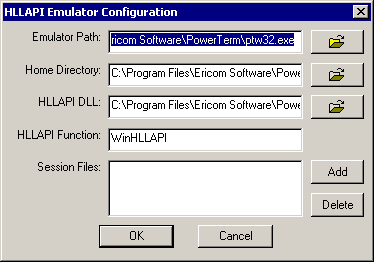
Emulator Path |
The directory path and executable filename of the emulator. Either type the path or use the Browse button located to the right of the text box. You can type short (8.3 format) or long filenames. Enclose long filenames in quotes (for example, "c:\Program Files\emulator"). |
Home Directory |
The directory path to files for this emulator. |
HLLAPI.DLL |
The directory path to the .dll file for this emulator, along with the .dll filename. This file is in the Home directory. Typically, the filename contains "hllapi" in the name, but on occasion you need to refer to the documentation on the emulator. Validate the .dll file by using Dependency Walker (depends.exe), which is available from the Dependency Walker Web site. |
HLAPPI Function |
The name of the HLLAPI function contained within the hllapi.dll file. Find or validate this information by using Dependency Walker. The function is case sensitive. Enter the function name exactly as you find it in Dependency Walker. |
Session Files |
The session files for the emulator. Type the path and session file name. Enclose long names within quotes (for example, "C:\Program Files\Sessions\Session1.xxx"). |
-
In the Available Emulators dialog box, click Done.
Configuring a DDE Emulator
-
Click Start > Programs > Novell SecureLogin > Terminal Launcher.
As the following figure illustrates, Terminal Launcher displays the application that you created the script for:
-
Click Edit Available Emulators > New.
-
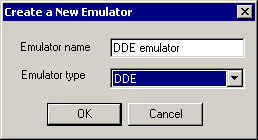
Type a name for the emulator, select DDE as the emulator type, then click OK.
-
Type values, then click OK.
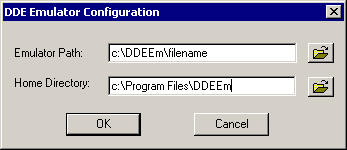
Emulator Path |
The directory path and executable filename of the emulator. Either type the path or use the Browse button located to the right of the text box. You can type short (8.3 format) or long filenames. Enclose long filenames in quotes (for example, "c:\Program Files\emulator"). |
Home Directory |
The directory path to where the executable is located. |
-
In the Available Emulators dialog box, click Done.
Configuring a VBA Emulator
VBA emulators support the Visual Basic* scripting language. In most cases, it is possible to write a macro for the emulator. The macro prompts SecureLogin to enter credentials.
Configuring VBA emulators to work with Terminal Launcher is a specialized field and is specific to each emulator.
VBA emulators can often be configured as Generic emulators. However, generic configuration offers limited functionality.
-
Click Start > Programs > Novell SecureLogin > Terminal Launcher.
As the following figure illustrates, Terminal Launcher displays the application that you created the script for:
-
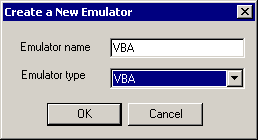
Click Edit Available Emulators > New.
-
Type a name for the emulator, select VBA as the emulator type, then click OK
-
Type values, then click OK.
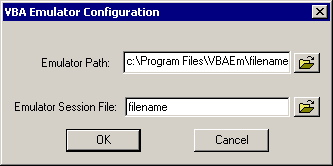
Emulator Path |
The directory path and executable filename of the emulator. Either type the path or use the Browse button located to the right of the text box. You can type short (8.3 format) or long filenames. Enclose long filenames in quotes (for example, "c:\Program Files\emulator"). |
Emulator Session |
The session file for the emulator. Type the path and session file name. Enclose the path and filename within quotes (for example, "C:\Program Files\Sessions\Session1.xxx"). |
-
In the Available Emulators dialog box, click Done.
Configuring a Generic Emulator
The Generic Emulator option enables you to configure SecureLogin's Terminal Launcher to interface with emulators that do not provide HLLAPI, VBA, or DDE support. Terminal Launcher interfaces with generic emulators though the Windows Clipboard by copying and pasting.
Because an emulator doesn't have to be programmed to allow external programs to interface with it, almost any emulator can be configured as a generic emulator.
Normal generic emulators have Select All, Copy, and Paste functions. These functions are most often found in the Edit menu, which is at the top of the emulator screen. However, buttons or keyboard shortcuts might be available.
Terminal Launcher uses these functions to interface with the emulator. Upon running a WaitForText command in a script, Terminal Launcher repeatedly simulates the selection of Select All, then Copy, which places the content of the emulator's screen on the Windows Clipboard. Terminal Launcher then searches the content of the Clipboard for the text it is waiting for.
If the text is not found, Terminal Launcher repeats the procedure, which usually takes about half a second.
Also, the emulator screen flickers while the WaitForText command is being executed. This is normal. See "BeginSplashScreen / EndSplashScreen" in the Nsure SecureLogin 3.51 Scripting Guide.
If Terminal Launcher finds the text it is looking for, Terminal Launcher goes to the next line of the script, which is most often a Type command. The Type command enters a username or password. To enter the text into the emulator, you can configure Terminal Launcher to type the text in, or to use the Clipboard.
When using the Clipboard, Terminal Launcher copies the text (for example, a username) to the Clipboard and then simulates the selection of the Paste function of the emulator. This procedure copies the text to the screen of the emulator. When using the direct typing method, Terminal Launcher simulates pressing the applicable keys on the keyboard.
The process is then repeated for the password, and the user's login to the mainframe session is complete.
-
Click Start > Programs > Novell SecureLogin > Terminal Launcher.
As the following figure illustrates, Terminal Launcher displays the application that you created the script for:
-
Click Edit Available Emulators > New.
-
Type a name for the emulator, select Generic as the emulator type, then click OK.
-
Type values, then click OK.
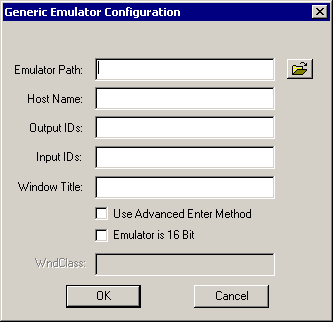
Emulator Path |
The directory path and executable filename of the emulator. Either type the path or use the Browse button located to the right of the text box. You can type short (8.3 format) or long filenames. Enclose long filenames in quotes (for example, "c:\Program Files\emulator"). |
Host Name |
The IP address, host name, or emulator session file you want Terminal Launcher to connect to or load. Occasionally, emulators require command line switches before they accept connection commands at startup. If so, include the switches in the Host Name text box. Scenario for Including a Command Line Switch: Henri is configuring a generic emulator. The emulator requires the /h switch so that the emulator can accept an IP address at startup. Henri types /h 192.168.130.222 in the Host Name text box. |
Output IDs |
The Control ID for the Copy function of the emulator. For information on finding Output IDs, see Finding Control IDs and Offsets of an Emulator. Some emulators allow a keyboard simulation alternative (for example, CTRL+C) instead. |
Input IDs |
The Control ID for the Paste function of the emulator. For information on finding Input IDs, see Finding Control IDs and Offsets of an Emulator. Some emulators allow a keyboard simulation alternative (for example, CTRL+C) instead. |
Window Title |
Assists Terminal Launcher in detecting the emulator window. If no Window Title is specified, Terminal Launcher might not detect the emulator opening. To find the Window Title, use Window Finder. Run Window Finder, then right-click and drag the SecureLogin icon to the title bar of the emulator. The required value will be shown as the second-from-last entry (Window Text) in Window Finder. Some emulators hide the real Window Title. There is no rule to describe which text you should enter into the Terminal Launcher configuration. (It depends on how the emulator hides it.) First, try the configuration without a Window Title specified. Next, try the text that is actually displayed in the title bar of the emulator. Finally, try the real Window Title. |
Use Advanced Enter Method |
Enables you to use the Advanced Enter method. This method is necessary for Lawson and StarNavigator emulators. Advanced Enter sends the \n character sequence to the emulator for the Type @E command. |
-
In the Available Emulators dialog box, click Done.
Configuring an Advanced Generic Emulator
Advanced generic emulators have Copy and Paste functions, but do not have a Select All function.
For advanced generic emulators, Terminal Launcher follows the same process as for generic emulators, except for one difference. Instead of simulating the selection of Select All, Terminal Launcher clicks and drags the mouse cursor over the emulator screen. This procedure selects all the text that the emulator is displaying.
-
Click Start > Programs > Novell SecureLogin > Terminal Launcher.
As the following figure illustrates, Terminal Launcher displays the application that you created the script for:
-
Click Edit Available Emulators > New.
-
Type a name for the emulator, select Advanced Generic as the emulator type, then click OK.
-
Type values, then click OK.
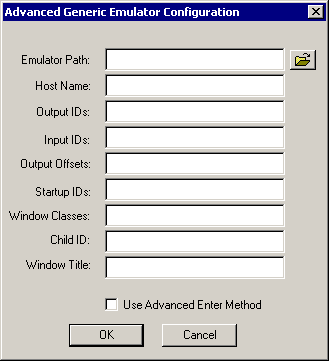
Emulator Path |
The directory path and executable filename of the emulator. Either type the path or use the Browse button located to the right of the text box. You can type short (8.3 format) or long filenames. Enclose long filenames in quotes (for example, "c:\Program Files\emulator"). |
Host Name |
The IP address, host name, or emulator session file you want Terminal Launcher to connect to or load. Occasionally, emulators require command line switches before they accept connection commands at startup. If so, include the switches in the Host Name text box. Scenario for Including a Command Line Switch: An emulator requires the /h switch so that the emulator can accept an IP address at startup. Henri types /h 192.168.130.222 in the Host Name text box. |
Output IDs |
The Control ID for the Copy function of the emulator. Some emulators allow a keyboard simulation alternative (for example, CTRL+C) instead. For information on finding Output IDs, see Finding Control IDs and Offsets of an Emulator. |
Input IDs |
The Control ID for the Paste function of the emulator. Some emulators allow a keyboard simulation alternative (for example, CTRL+C) instead. For information on finding Input IDs, see Finding Control IDs and Offsets of an Emulator. |
Output Offsets |
For Terminal Launcher to select the text on the screen without a Select All function, Terminal Launcher needs to use the mouse to copy from the screen. Select all the text by clicking and dragging the cursor over the entire emulator screen. For Terminal Launcher to do this correctly, you need to specify how much space to allow for the toolbar and other bars when Terminal Launcher starts to drag. The Output Offset is the specified number, which tells Terminal Launcher where to start the click-and-drag process. The Output Offset is a set of two numbers, separated with a comma and no space. The numbers can be anything from zero up to tens of thousands. However, 10,000 is generally the highest number that is needed. To find the Output Offsets, you can use nslfindera.exe or trial and error. To use nslfindera.exe, download the utility from Novell's Support Web site. A text file that explains how to use nslfinder is downloaded along with the utility. TID 2965468 provides the download. Also see Finding Offsets. To use the trial-and-error method, start with high numbers (for example: 10000,10000) and work your way down. The first number is the horizontal offset, and the second number is the vertical offset. Watch where the mouse starts to click and drag. Then lower the numbers until the mouse clicks in the top lefthand corner of the emulator screen. Normally, the Output Offset number is around 500,7000 or lower. Trial and error becomes easier with experience. IMPORTANT: The offsets for an Advanced Generic emulator depend on screen resolutions. Therefore, an offset for a workstation set to 800 x 600 pixels will differ from a workstation set to 1074 x 768 pixels. We recommend that you create multiple emulator definitions for each screen resolution. The actual SecureLogin script remains the same, but you deliver a unique Terminal Launcher configuration for each different screen resolution. WARNING: If you enter the wrong offsets, SecureLogin might select undesired locations on the workstation's desktop. These locations might close, maximize, or minimize other applications, resize the Windows task bar, or perform some other unwanted task. |
Startup IDs |
The Control ID numbers of any functions or buttons that you want Terminal Launcher to select before attempting to log in. An example of this is a Connect button if the emulator does not automatically connect If several functions or buttons are needed, separate them with a comma. |
Windows Classes |
Assist Terminal Launcher in detecting the emulator window. If no Window Class is specified, Terminal Launcher might not detect the emulator opening. To find the Window Class, use Window Finder. Run Window Finder, then right-click and drag the SecureLogin icon to the title bar of the emulator. The required value is shown as the third-from-last entry (Class Name) in Window Finder. |
Child ID |
A Child ID is given to each child window that the main application launches. Only enter a Child ID into the TLaunch configuration if it is necessary to interact with a child window. |
Window Title |
Assists Terminal Launcher in detecting the emulator window. If no Window Title is specified, Terminal Launcher might not detect the emulator opening. To find the Window Title, use Window Finder. Run Window Finder, then right-click and drag the SecureLogin icon to the title bar of the emulator. The required value will be shown as the second-from-last entry (Window Text) in Window Finder. Some emulators hide the real Window Title. There is no rule to describe which text you should enter into the Terminal Launcher configuration. (It depends on how the emulator hides it.) First, try the configuration without a Window Title specified. Next, try the text that is actually displayed in the title bar of the emulator. Finally, try the real Window Title. |
Use Advanced Enter Method |
Enables you to use the Advanced Enter method. This method is necessary for Lawson and StarNavigator emulators. Advanced Enter sends the \n character sequence to the emulator for the Type @E command. |
-
In the Available Emulators dialog box, click Done.
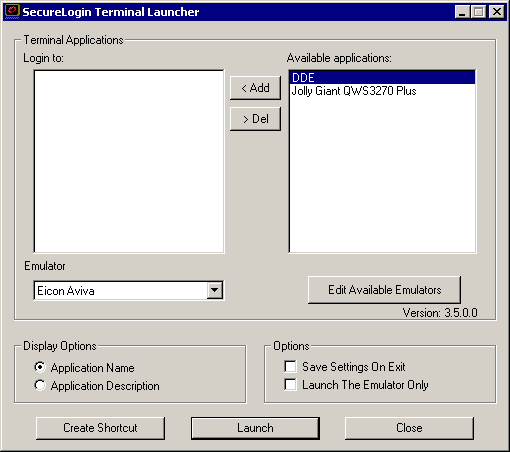
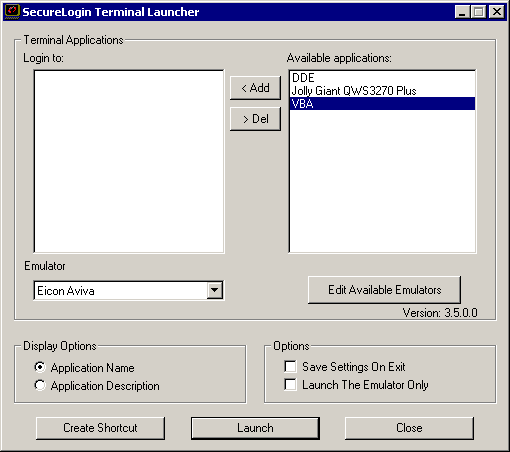
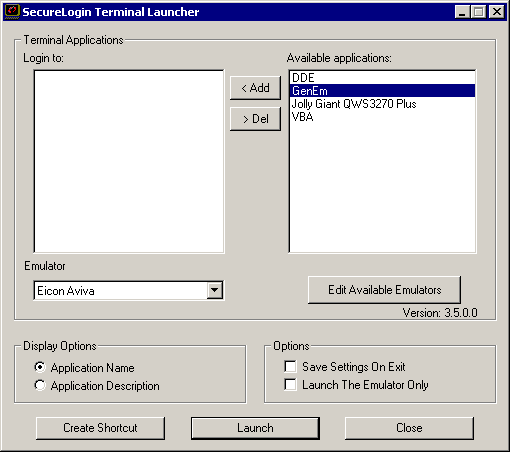
Creating a Login for an Emulator
-
From the list in the Available Applications pane, click the application that you want to log in to, then click Add.
To move an entry from one side to the other, you can double-click it.
-
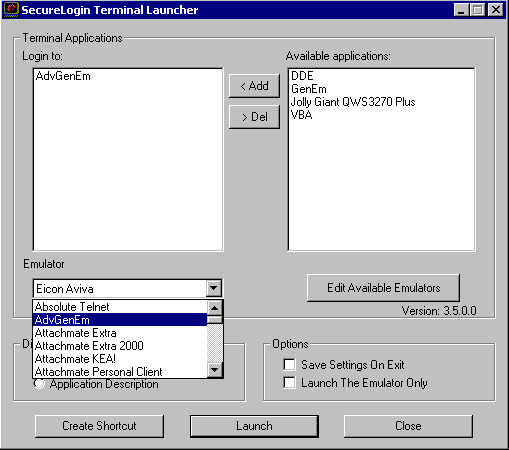
Select the emulator from the Emulator drop-down list, then click Launch.
The selected application script runs, using the selected emulator.
The first time the script is run, you encounter a prompt to enter your username and password. Enter the required values, then click OK. Terminal Launcher launches the emulator, enters your username and password, and logs you in to a session.