3.6 Custom Installation
The Custom Installation option allows for a fully distributed installation, with more control over memory and other installation settings. The Custom Installation option can install one or more Sentinel components, including:
-
Sentinel Database Components
-
Sentinel Services
-
Communication Server
-
Correlation Engine
-
Data Access Server (DAS)
-
Sentinel Collector Service (Collector Manager)
-
-
Applications
-
Sentinel Control Center
-
Sentinel Data Manager
-
Sentinel Solution Designer
-
Ensure that the prerequisites mentioned in Section 3.4, General Installation Prerequisites are met before you proceed with installing Sentinel.
The Sentinel Database components should always be installed first. Other components can be installed at the same time if the system architecture includes multiple components on the database machine. The procedure below shows the steps for installing all the components on the same machine; a distributed installation includes a subset of the steps below.
3.6.1 Starting the Installation
-
Log in as the root user on Solaris/Linux or the administrator user on Windows.
To install the Sentinel Database components on Windows when the target SQL Server instance is in Windows Authentication only mode, you must log in to Windows as a System Administrator database user.
-
Extract the <SENTINEL_6.1.2.zip> file to a location of your choice.
The files are extracted to disk1 folder.
-
From the disk1 folder, run the following script:
-
Windows: setup.bat
-
Solaris/Linux:
GUI mode:
./setup.sh
Textual (headless) mode:
./setup.sh –console
You cannot run the installer on UNIX from a directory path that has special characters such as a space or non-ASCII characters.
-
-
Click the down-arrow and select one of the following language choices:
-
Read the Welcome screen, then click .
-
Read and accept End User License Agreement. Click .
-
Accept the default install directory or click to specify your installation location. Click .
You cannot install Sentinel in a directory with special characters or non-ASCII characters.
-
Select , then click .
-
Select the components of Sentinel to install.
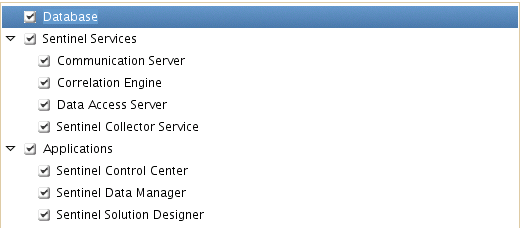
The following options are available:
There is a time delay in the interface when you select or deselect a component.
If none of the child features of Sentinel Services are selected, make sure that you also deselect the Sentinel Services feature. This option looks like it is disabled (with a white check mark) even if all of its child features are deselected.
As part of the installation of the Sentinel Database component, the installer stores the files in the %ESEC_HOME%\unist\db folder.
If you are using the console mode, the component selection page only displays a few components. Follow the on-screen instructions to view and edit the selected child components. For more information, see Section 3.6.5, Console Installation on Linux or Solaris.
NOTE:For SQL (SQL 2005 and 2008) databases, the maximum number of online partitions allowed is 255. You must schedule the offline delete/archive operations so that the online partitions do not exceed 255.
-
If you select to install DAS, supply the serial number and license key when you are prompted.
-
On Linux/Solaris, specify the Sentinel Administrator username and the location of its home directory. This is the username that owns the installed Sentinel product. If the user does not already exist, the user role is created along with a home directory in the specified directory.
-
OS Sentinel Administrator username: The default username is esecadm
-
OS Sentinel Administrator user home directory: The default location is /export/home. If esecadm is the username, the home directory of the user is /export/home/esecadm.
To meet stringent security configurations required by the Common Criteria Certification, the esecadm user is created without a password. To log in as the esecadm user, you must first set a password.
-
-
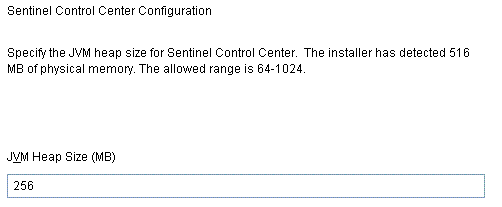
If you chose to install the Sentinel Control Center, the installer prompts for the maximum memory space to be allocated to the Sentinel Control Center. Specify the maximum JVM heap size (MB) that you want to allocate only for the Sentinel Control Center.
By default, this is 256 MB. The maximum is1024 MB.
-
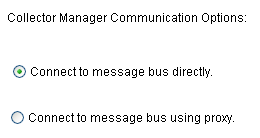
If you select only Collector Manager and do not select Data Access Server (DAS), select the option for establishing communication between the Sentinel Collector Managers and the Sentinel Server. You can select or .
For more information on these two options, see Section 6.0, Communication Layer (iSCALE).
If you select , immediately after the installation is complete you are prompted for the information that is required to register this Collector Manager as a trusted client. Before you select this option, ensure that the Communication Server is running.
If the Communication Server is not available, first select and later manually configure the Proxy type communication by performing Step 5.
-
Specify the Communication Server port or host server name information.
The port numbers must be identical on every machine in the Sentinel system to enable communications. For more information on the port numbers used for Sentinel 6.1, see Section 3.3, Port Numbers Used for Sentinel 6.1. Make a note of these ports for future installations on other systems.
-
Click .
-
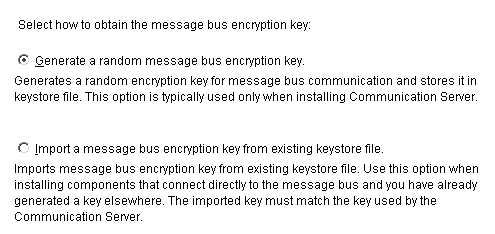
If you are installing a component that makes a direct connection to the message bus or if you are installing the Communication Server, specify how to obtain the shared message bus encryption key:
All components connecting directly to the message bus must share the same encryption key. Novell recommends that you generate a random encryption key when you install the Communication Server and import this key when you install components on other machines. Components that connect through the proxy do not require the shared message bus encryption key.
The .keystore file is stored at $ESEC_HOME/config on Linux/Solaris or %ESEC_HOME%\config on Windows.
-
Select the target Database Server platform based on the target database version that you have installed, then click .
If you chose to install DAS and the Sentinel Database components are already installed on a different system, you are prompted for the following Sentinel Database information. This information is used to configure DAS to point to the Sentinel Database.
-
Database hostname or IP address: The name or IP address of the existing Sentinel Database where events and configuration information are stored.
-
Database name: The name of the Sentinel Database instance that you want to configure for the DAS component (the default name is ESEC).
-
Database port: The default port number. For SQL Server, the port number is 1433 and for Oracle it is1521.
-
Sentinel Application Database User: Specify the login for the Sentinel Application User (esecapp by default) and the password given for this user during Sentinel Database installation.
-
-
Click .
-
If you chose to install the database component, configure the database for installation:
-
To configure the database on Windows, continue with Section 3.6.2, Configuring the Database on Windows.
-
To configure the database on Linux or Solaris, continue with Section 3.6.3, Configuring the Database on Linux or Solaris
-
-
Continue with Section 3.6.4, Completing the Installation.
3.6.2 Configuring the Database on Windows
-
Complete Step 1 through Step 18 in Section 3.6.1, Starting the Installation.
-
Select Microsoft SQL Server 2005 or Microsoft SQL Server 2008 as the target database server platform, then select one of the following options:
-
Create a new database with database objects: Creates a new Microsoft SQL database and populates the new database with database objects.
-
Add database objects to an existing empty database: Adds the database objects to an existing Microsoft SQL Server 2005 database. The existing database must be empty.
-
-
Specify the Database Install log directory.
-
Click .
-
If you are creating a new database, specify the existing directories to use as storage for:
-
Data Directory
-
Index Directory
-
Summary Data Directory
-
Summary Index Directory
-
Log Directory
Continue with Step 7.
-
-
If you chose to add database objects to an existing empty database, continue with Section 3.6.4, Completing the Installation.
-
Click .
-
Select the database character set support option and click .
If the installer is running in an Asian language, the Unicode database option is set by default. If the installer is running in a non-Asian language, the system prompts you to select from either ASCII only or Unicode.
The Unicode database installation requires more hard disk space than the ASCII only database installation.
-
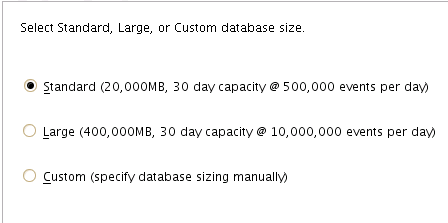
Select a database size option. If you selected a Custom database size, specify custom database size settings:
-
Maximum Database Size: The maximum amount of disk space the database occupies. The database automatically increases up to this size as it accumulates data. Regardless of the value specified here, the initial size of the database is 1000 MB.
-
Log File Size: The size of the transaction log file.
-
Maximum Database File Size: No single database file grows beyond this size.
-
-
Click .
-
Continue with Section 3.6.4, Completing the Installation.
3.6.3 Configuring the Database on Linux or Solaris
-
Configure the system for Oracle database installation. For more information, see Section B.4, Configuring the System for Oracle Database Installation.
-
Complete Step 1 through Step 18 in Section 3.6.1, Starting the Installation.
-
Select the target Oracle database server version, then select whether to use a new database or an existing database.
-
Create a new database with database objects: Creates a new Oracle database instance and populates the new database with database objects.
-
Add database objects to an existing empty database: Adds database objects to an existing Oracle database instance. The existing database must be empty except for the esecdba user.
-
-
Specify the Database Install log directory.
-
Click .
-
Specify the Oracle user name or accept the default user name, then click .
-
If you chose to create a new database, specify the following:
-
The path for Oracle JDBC driver file: Specify the path to the jar file (do not use environment variables in this field.)
-
Hostname: The hostname of the local machine, where the Oracle database is installed. The installer only supports creating a new database instance on the local host.
-
Database Name: The name of the database instance to create.
Continue with Step 9.
-
-
If you chose to add database objects to an existing empty Oracle database or perform a remote installation, specify the following information:
-
The path for Oracle JDBC driver file: Specify the path to the jar file (do not use environment variables in this field.)
-
Database hostname or IP address: The hostname or IP address of the machine where the Oracle database is installed. This can be the local hostname or a remote hostname.
-
Database name: The name of the existing empty Oracle database instance (the default name is ESEC). This database name must display as a service name in the tnsnames.ora file (in the directory $ORACLE_HOME/network/admin/) on the system from which you are running the installation.
-
Database port: The default database port is 1521.
-
Password: For Sentinel Database Administrator User (DBA), specify the password for the esecdba user. The Username field in this prompt is not editable.
IMPORTANT:If the database name is not in the tnsnames.ora file, the installer does not give an error at this point in the installation (because it verifies the connection using a direct JDBC connection), but the database installation fails when the database installer tries to connect to the database through SQL Plus. If the Database installation fails at that point, do not exit the installer. Modify the Service Name for this database in the tnsnames.ora file on that machine, then go back in the installer one screen and then forward again. This retries the Database installation with the new values in the tnsnames.ora file.
The installer takes a back up of the existing tnsnames.ora and listener.ora files in the $ORACLE_HOME/network/admin directory. It overwrites the listener.ora file with Sentinel database connection information, and appends Sentinel database connection information to the tnsnames.ora file. If you have other databases on the same server as the Sentinel database, the administrator must manually merge information from the backed-up listener.ora files into the new file and restart the Oracle listener in order for other applications to continue to connect to the database.
Continue with Section 3.6.4, Completing the Installation.
-
-
Specify the Oracle memory (RAM) allocation and listener port or accept the default values.
-
Specify the passwords to set for the default SYS and SYSTEM database users, then click .
-
Select a database size option. If you selected to use a custom database size, specify the custom database size settings:
-
Maximum Database Size: The maximum amount of disk space the database occupies. The database automatically increases to this size as it accumulates data. Regardless of the value specified here, the initial size of the database is 5000 MB.
-
Log File Size: The size of each redo log file
-
Maximum Database File Size: No single database file grows beyond this size.
-
-
Click .
-
Specify the existing directories to use for database storage:
-
Data Directory
-
Index Directory
-
Summary Data Directory
-
Summary Index Directory
-
Temp and Undo Directory
-
Redo Log Member A Directory
-
Redo Log Member B Directory
-
-
Click .
IMPORTANT:For recovery and performance purposes, Novell recommends that these locations be on different I/O devices.
For performance reasons, the Redo Log should point to the fastest write disk you have available.
The installer does not create these directories, so they must be created externally before continuing beyond this step, and they must be writable by the oracle user. For more information, see Section 3.4.2, Sentinel Database Installation Prerequisites.
-
Continue with Completing the Installation.
3.6.4 Completing the Installation
After you have configured the database, perform the following steps to complete the installation.
-
If you chose to install the database component, configure the database partitions:
-
Select to allow Sentinel Data Manager to handle database partitioning and archiving.
-
For data partitions, specify an existing directory for archive files.
-
Specify start time for adding partitions and archiving data. These operations should not overlap because they use shared resources.
-
Click .
-
Provide authentication information for the following:
-
Sentinel Database Administrator User
-
Sentinel Application Database User
-
Sentinel Administrator User
-
Sentinel Report User (only on Windows)
NOTE:If the DAS component is also being installed, the Sentinel Application Database User password is required even if Windows authentication is selected. This is required to install the Sentinel Service to log in as the Sentinel Application Database User. No other users require a password to be specified if you are using Windows authentication.
On a Windows Server 2008 platform with MS SQL Server 2008 database, the Sentinel installation fails if you enter a weak password that does not meet Windows policy requirements.
-
-
Click .
-
-
A summary of the specified Database parameters displays. Click .
-
If you chose to install any of the Sentinel Server components, specify the amount of memory (RAM) to allocate to these components.
The installer factors in operating system and database overhead when determining what allocation options to display. There are two ways to specify memory allocation:
-
Automatic Memory Configuration: Select the total amount of memory to allocate to Sentinel Server. The installer automatically determines the optimal distribution of memory across components taking into account the estimated operating system and database overhead.
IMPORTANT:You can modify the-Xmx value in configuration.xml file to change the RAM allocated to Sentinel Server processes. The configuration.xml file is placed at $ESEC_HOME/config on Linux/Solaris or %ESEC_HOME%\config on Windows.
-
Custom Memory Configuration: Click the button to allocate memory for specific components. This option is only available if there is sufficient memory on the machine.
-
-
Click , verify the selected features for installation, then click .
-
If Collector Manager was selected to be installed and it was configured to use Proxy type communication, you are prompted for username and password of a Sentinel user that has the permission to register to a trusted client (For example, esecadm).
To complete this step, the Communication Server must be running and a valid username and password must be specified.
-
Accept the Communication Server SSL certificate and upload the Collector Manager SSL certificate to the Communication Server.
When the connection with the Communication Server is initiated, you are prompted to accept the server certificate.
-
Review the certificate attributes, then select .
The installer automatically uploads the Collector Manager certificate to the Communication Server.
-
-
After installation, you are prompted to reboot or to log in again and start Sentinel services manually. Click to reboot the system.
NOTE:The Sentinel installer, by default, turns off archive logging. For database recovery purposes, it is highly recommended that you enable archive logging after you install and before you begin to receive your production event data. You should also schedule backups for your archive logs to free up space in your archive log destination, or your database might stop accepting events.
3.6.5 Console Installation on Linux or Solaris
If you are using console mode, the installer’s component selection page does not display all of the components together. Follow the on-screen instructions to view and edit the selected child components.
The following is an example of how to navigate the console mode component selection page:
Sentinel 6.1 - InstallShield Wizard

Select the features for "Sentinel 6.1" you would like to install:

   Sentinel 6.1

   To select/deselect a feature or to view its children, type its number:

     1.  [ ] Database
     2. +[x] Sentinel Services
     3. +[x] Applications

   Other options:

     0. Continue installing

   Enter command [0] 1

Select the features for "Sentinel 6.1" you would like to install:

   Sentinel 6.1

   To select/deselect a feature or to view its children, type its number:

     1.  [x] Database
     2. +[x] Sentinel Services
     3. +[x] Applications

   Other options:

     0. Continue installing

   Enter command [0] 2

    1. Deselect 'Sentinel Services'
    2. View 'Sentinel Services' subfeatures

    Enter command [1] 2

Select the features for "Sentinel 6.1" you would like to install:

   Sentinel 6.1
    - Sentinel Services

      To select/deselect a feature or to view its children, type its number:

        1.  [ ] Communication Server
        2.  [x] Correlation Engine
        3.  [x] Data Access Server
        4.  [x] Sentinel Collector Service

      Other options:

       -1. View this feature's parent
        0. Continue installing

      Enter command [0] 1

Select the features for "Sentinel 6.1" you would like to install:

   Sentinel 6.1
    - Sentinel Services

      To select/deselect a feature or to view its children, type its number:

        1.  [x] Communication Server
        2.  [x] Correlation Engine
        3.  [x] Data Access Server
        4.  [x] Sentinel Collector Service

      Other options:

       -1. View this feature's parent
        0. Continue installing

      Enter command [0] 2

Select the features for "Sentinel 6.1" you would like to install:

   Sentinel 6.1
    - Sentinel Services

      To select/deselect a feature or to view its children, type its number:

        1.  [x] Communication Server
        2.  [x] Correlation Engine
        3.  [x] Data Access Server
        4.  [x] Sentinel Collector Service

       Other options:

        -1. View this feature's parent
        0. Continue installing