Analysis
Within the Service Request Analysis tab other requests can be created,
similar Service Requests can be viewed and the current Service Request
can be related to other requests. It also allows the User to convert a
Service Request to an Incident.
To assign a Solution to a Service Request, the User can apply Proposed
Solutions presented by the application or use the Search Solution facility.
If a Solution Article does not exist, a Service Request solution can be
created within this screen. Once a Solution is applied to the Service
Request, the application automatically closes the Request.
The options with the Service Request Analysis tab include:
Analysis Tab Drop-down
Options |
Proposed Solution |
Displays a list of all solutions
with a search based on Request Description, Item Type and Classification.
To assign a Solution, select the Solution ID number to display
the solution in full. Click Resolve if the Solution is relevant.
This will close the Request and update the Customer. |
Search Solution |
Allows User to enter full
text or ID number to search for possible Solution Articles. To
assign a Solution, select the Solution ID number to display the
Solution in full. Click Resolve if the Solution is relevant. This
will close the Request and update the Customer. |
New Solution |
Displays Knowledge Base editor
to allow the User to enter a new Solution. Solution Articles are
used as Proposed Solutions for future Requests. See: Solution Article. |
New Incident
|
Creates a new Incident and
automatically links the Request to the Incident. The Request status
will move to ‘On Hold - Process Escalated’. |
Convert to Incident |
Allows the User to make the
current Request an Incident and maintain the current identification
number for Customer correspondence purpose, while recording the
action in the Audit Trail. |
Link Incident
|
Allows the User to enter
full text or ID number to search on Incidents. Select a No. link
to immediately link the current Request to Incidents. |
Similar Service Requests |
Displays similar Requests
based on Item Category, Classification and Description. |
New Problem |
Creates a new Problem and
automatically links the Request to the Problem. |
Link Problem |
Allows the User to enter
full text or ID number to search on Problems. Select a Problem
ID number to immediately link the current Request to other Problems.
The Request status will move to ‘On Hold - Process Escalated’. |
New Change Request |
Creates a new RFC and automatically
links the Request to the RFC. The Request status will move to
‘On Hold - Process Escalated’. |
Link Change Request |
Allows the User to enter
full text or ID number to search on Change Requests. Select a
Change Request ID number to immediately link the current Request
with other Change Requests. |
Alerts |
Allows the User to create
an Alert directly related to the Request. Displays any reminder
alerts that have been created in the Summary tab of the Request.
Select the Alerts option to view Alerts list, and click on an
Alert Publish Date to view Alert Content. |
Searching for a Solution
To Search for a Solution:
Click on the number
of the required Request
The Request Information screen appears.
Select the Analysis
tab
Click Edit
The drop-down list will become active.
Select from the available
options, as follows:
Analysis
Tab Drop-down Options |
Proposed Solution |
Displays a list of all
solutions with a search based on Request Description, Item
Type and Classification. To assign a Solution, select the
Solution ID number to display the solution in full. Click
Resolve if the Solution is relevant. This will close the Request
and update the Customer. |
Search Solution |
Allows User to enter
full text or ID number to search for possible Solution Articles.
To assign a Solution, select the Solution ID number to display
the Solution in full. Click Resolve if the Solution is relevant.
This will close the Request and update the Customer. |
New Solution |
Displays Knowledge Base
editor to allow the User to enter a new Solution. Solution
Articles are used as Proposed Solutions for future Requests.
See: [Comment: External link: Workspace/Manual/LiveTime Service Manager Guide/Workspace/Manual/LiveTime Service Manager Guide/solution_articles.htm]Solution Article. |
Alerts |
Shows details of the
Alerts that have been created within the Incident. |
Click Save.
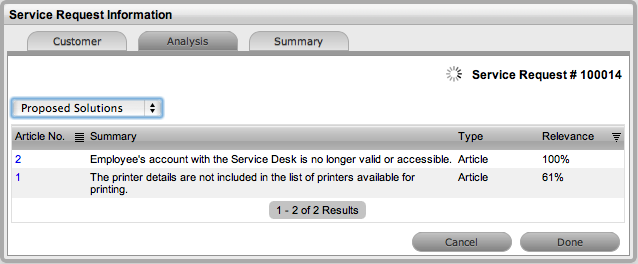
Proactive Analysis during Request
Creation
During Request creation after the Request
Description is completed, the system automatically searches the Knowledge
Base for possible Solutions that may be related to the Request. This search
is based on the Item Type, Classification and text matching of existing
Articles with the Request Description content. Proposed Solutions are
visible when the Proposed Solutions filter is selected within the Analysis
tab.
To assign a proposed Solution to a Request:
Select the Article ID
number
The system will display the Solution details screen.
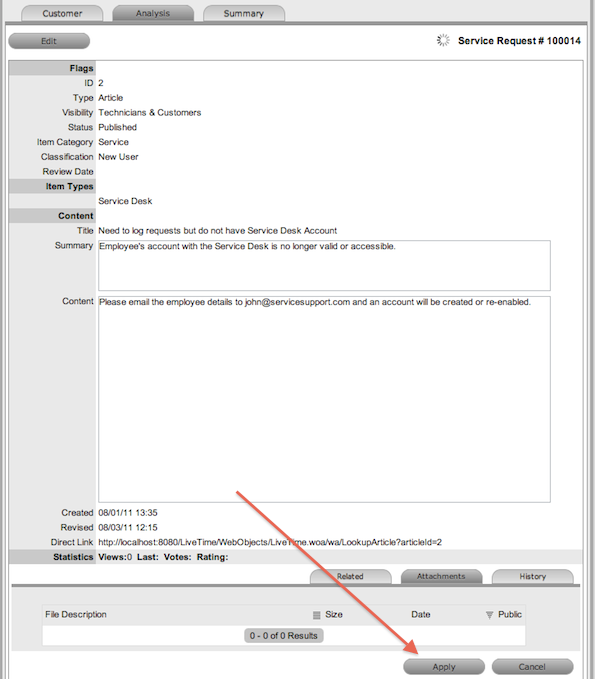
Select the Apply button.
The Service Request is automatically closed when a Proposed Solution
is applied.
Converting a Service Request to an Incident
Service Requests are logged against Service Items and can be converted
to Incidents within the Analysis tab. This action results in the Incident
maintaining the same request identification number and audit trail that
records the conversion.
To convert a Service Request to an Incident:
Select Edit within the
Analysis tab
Select the Convert to
Incident option.
The Service Request ID # is associated with a new Incident and the
Incident is assigned the Entry State of a relevant Incident Workflow.
The audit trail of the Incident records the conversion time and date.
The customer is not notified about the Process amendment.
Linking Service Requests
Within the Analysis tab, Service Requests can be linked to other Service
Requests, Incidents, Problems and RFCs.
To link a Service Request to a Group:
Select Edit within the
Analysis tab
Search for a Request
Group using the full text or ID option
Select the relevant
search result ID number.
This automatically adds the current Request with the existing group.
Creating an Incident, Problem or Change Request
within a Service Request
A Service Request can prompt the creation of an Incident, Problem or
RFC and this can be achieved within the Analysis tab. This will
move the Service Request status to On Hold - Process Escalated, and link
it to the new Incident, Problem or Change Request group.
To escalate a Service Request to another Process:
Select Edit within the
Analysis tab
Select the New Incident,
New Problem or New Change Request option.
The Service Request is automatically escalated and its status changed
to On Hold - Process Escalated.
When the related Incident,
Problem or Change is moved to an Exit State, the Service Request is
automatically moved to the default Exit State, if not already closed.
Creating an Alert
Within the Analysis tab, an Alert that is associated
with the Request can be created by:
Select Edit within the Analysis tab
Select the Alerts option in the drop-down
list
The New button is made accessible.
Click New
Refine the content for each required field:
Alert
Details |
Description |
Created |
The
current date and time. |
Publish |
The
date the Alert is published. Use the calendar icon to the
right of the field, to select a Publish date.
Set to a date in the future, or use the
default to publish the Alert immediately. |
Dismiss |
The
date the Alert ceases to be available. Use the calendar icon
to the right of the field, to select a Publish date. On this
date, the Alert will disappear from a User's Alert list. |
Severity
|
The
type of Alert to be published. The choices are:
Information
–
for general Alerts Warning – to warn Users of
potential issues Urgent – to publish an urgent
actionable message.
The icon appearing with the message will
depend on the type of Alert. |
User |
The
type of Users to receive the Alert, which include:
In the Find User or Customer list, click
search to select the recipient from the drop-down list.
An Alert
sent to a User Role will go to all Users with that Role.
A personal
Alert appears on the User's own screen at the Publish date.
A Public
Alert appears when the Public Alert link is selected on the
Login Page. |
Title |
Enter
the title of the Alert. |
Message |
Enter
the main content of the Alert. |
Click Save.
Article Button

When a Solution has been applied or proposed for a request with the
Create Knowledge option set to No, the Solution is visible within the
Analysis tab and not available within the Knowledge Base. To manually
escalate a request Solution to a Knowledge Base Solution Article, with
the Analysis tab in Edit mode, select the Article tab.

Remove Button

When a Solution has been applied or proposed for a request, the Solution
or Knowledge Base Solution Article is visible within the Analysis tab.
To disassociate a Solution from a request, with the Analysis tab in Edit
mode, click the Remove button. The Analysis tab will now only display
the default drop-down list options.