
Category Classifications that are used to define and group issues are created within this tab. These are applied to requests that are logged against Items based on the Item Type Category template. The Classifications are also used by the system for proactive Incident analysis when automatically identifying Problems.
Category Classifications are used for generic grouping of issues relevant across all Item Types that use a Category. Supervisor Users can define additional Classifications for specific Item Types, within the Configuration>Categories>Item Categories>Classification tab.
The system is installed with several default Classification Type Categories, which can be edited as required.
The General Classification is owned and used by the system and cannot be deleted. It is also advised that this Classification not be renamed, as this is the Classification assigned to requests when they are created via email.
Additional Classifications can be created for each Item Category, while the system provided Classifications can be renamed or deleted. The Custom facility, when enabled, allows Users to add Classifications during the request creation process.
To add a new Classification:
Select the Classification tab of an Item Category
Right-click on the Classifications header
Select Create

Enter the details in
the newly created node

Click outside the text
box to commit the entry listing

Repeat the above process to create all required list entries
Move an existing Classification
to a new position, if required
Select the entry, then drag and drop the entry into its new location.

Click Save.
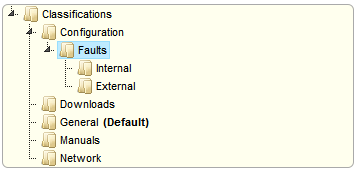
Classifications can be expanded to include nested Classifications.
To create Sub-Classifications:
Right-click the relevant
Classification header
The Create, Rename, Delete and Make Default options are displayed.
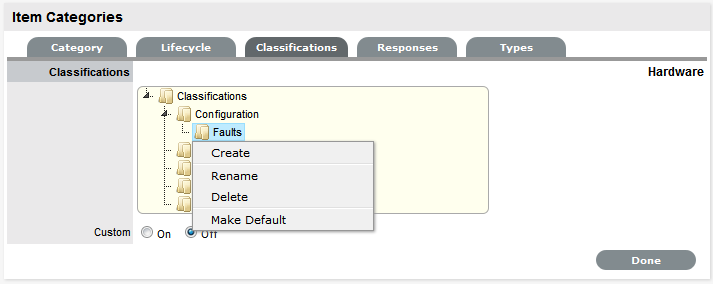
Select Create
A text box will appear under the Classification.
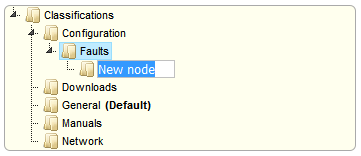
Enter the name for the list entry
Click away from the text box to commit and save the change
Move an existing Classification
to a new position, if required
Select the entry, then drag and drop the entry into its new location
The above steps can
be repeated until the sub-category list is completed.
Any Item Category Classification can be renamed.
To rename a Classification:
Right-click the Classification
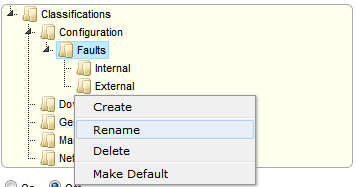
Click Rename
Edit the field content
Click away from the text field to save the change.
To delete a Classification:
Right-click the relevant list entry
Click Delete
Click Done when the Classification Categories are complete.
To make a Classification default:
Right-click the required classification and then click Make Default.