
Users who are assigned the Change Process of Release are provided access to the Releases, Deployments and Deployment Tasks sub-menu options within Change. These Users can oversee the Release process and also action Deployment Tasks, as required.
Within the Release tab, Users can create Releases, with the associated Deployments and Deployment Tasks. The Releases can also be exported using the Project button, to allow the User to manage the Release in a project management tool.
The Releases tab defaults to show active Releases logged in the system. This view can be filtered to show:
Filter |
Description |
My Releases (Active) |
Displays all Releases in an active Workflow State that are assigned to the logged-in User. |
My Releases (All) |
Displays all Releases, in active and inactive Workflow States, that are assigned to the logged-in User. |
Releases (Active) |
Displays all Releases logged in the system that are in an active Workflow State. |
Releases (All) |
Displays all the Releases logged in the system regardless of their Status or Assignment. |
The list can be re-sorted by clicking on a column header and the number of Releases displayed per batch can be altered using the Display pop-up option.
Before creating Releases, the Workflow and Team need to be configured. Also, Release Managers need to decide if Deployments are to be controlled by Change Management. Doing so means that when the Release moves into a Deployment State of the Release Workflow, RFCs are automatically generated and must follow the Change Workflow to the assigned Deployment State, before the Deployment Tasks can be acted upon. To manage Deployments with Change Management, the Administrator must enable Control Deployments via RFC in Admin>Setup>Privileges>Requests.
Releases within the system include the following five areas of information:
Details: Provide a Release overview describing the Release, its Priority, assigned Workflow and Workflow State, and Release Manager
Types: Details the Item Types that are to be affected by the Release and if the Release involves installing new, updating or replacing Items
Analysis: Allows the User to associate existing Change Requests to the Release
Related: Lists the Change Requests assigned to the Release
Deploy: Defines where the Release is to be pushed out to, this covers specific Customers, Organizational Units and Global Releases.
The Release Manager defines all elements related to the Release within the Details Tab.
After entering the initial information about the Release, the Manager also uses the Details Tab to move the Release through the Workflow States. Each stage of the Workflow can be assigned to different Managers, so by moving the Release through the Workflow States, the User is also potentially reassigning control of the Release.
Also, within the Workflow, States may be defined as Approval or Deployment States. When the Workflow moves into an Approval State, the accept and reject options are visible. The Manager selects the appropriate option and the system automatically moves the Release to the pre-configured State of the Workflow relative to the option selected.
If the Workflow is configured as a Deployment State, when the Release is moved into this State, the Deployment Tasks created within the Release can be actioned by the assigned Technicians. However, if the "Control Deployment via RFC" is enabled, when the Release moves into a Deployment State, RFCs are automatically created for the Deployment, and when the RFCs hit the Deploy State configured within the Details tab of the Release, the Deployment Tasks become active and allow Technicians to action the Tasks. The Change Manager can view all Deployment Tasks related to the RFC within the RFC Summary screen and when all Tasks are moved to Closed-Resolved the Change Manager can close the related RFC.
When all Deployment Tasks are completed, the Deployment is automatically closed by the system and the Release Manager can close the Release within the Details Tab, by moving the Release Workflow to the Exit State.
To create a Release:
Go to Change>Releases
Click New
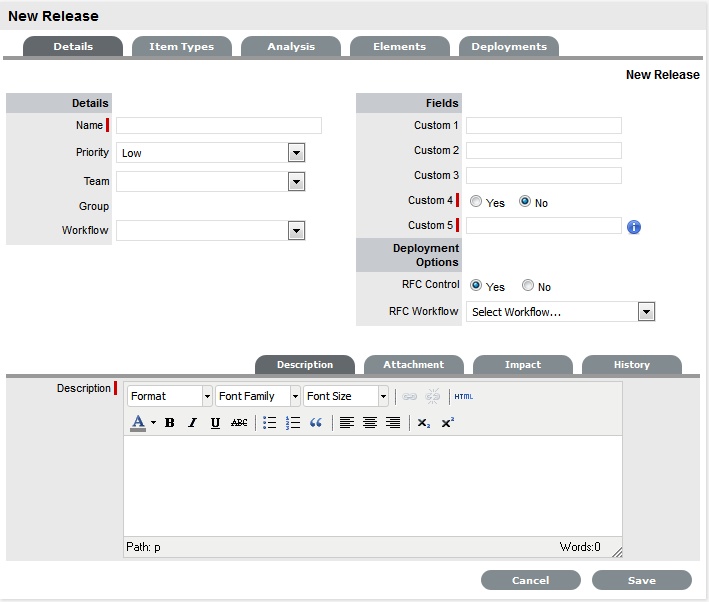
Complete the following information:
Release Fields |
Description |
Name |
Enter a Name that reflects the objective of the Release. |
Priority |
Set the Priority, which will correspond to the target timeframes for the SLAs associated with the Release via the RFCs. |
Team |
Select the Release Team who will oversee all part of the Release. |
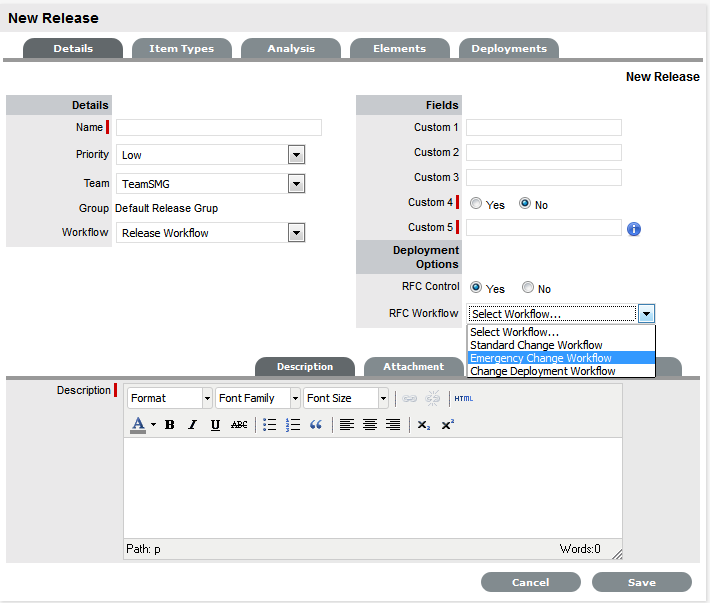
Workflow |
Set the Workflow that includes the relevant stages to manage the Release. The Release Manager moves the Release through the stages of the Workflow, relevant to the events being undertaken and completed. |
Status |
This is set to the Default Entry State of the selected Workflow. |
Next Action |
Based on the assigned Workflow, select the next Workflow State for the Release, as required by the next Release activity.
Some States are Approval States, when
the Release moves to an Approval State the Approve |
Manager |
From the drop-down list of Managers assigned to the default Entry Point of the assigned Release Workflow, select the Release Manager to manage the project when it is initially created. The User defined here, is the Manager who can edit the Release after it is saved and then move it to the next State. |
RFC Control |
If the Control Deployments via RFC option is enabled in Admin>Setp>Privileges>Requests, this field will be displayed.
Select Yes if the Deployment is to be
routed through Change Management, to enable the scheduling
of Deployment Tasks. |
Description |
Enter information that describes the goal of the Release. |
Click Save.
Move to the Types tab to associate the Item Types with the Release,
for Items being upgraded, replaced and installed from new.
The Attachments tab allows the Manager to upload any relevant files, but also provides access to any Media Files that are associated with Deployments during the Release and Deployment creation process.
To add Attachments to a Release, within the Release's Details tab:
Click Edit to display the Attachment tab New button
Click
New

Browse and select a file
Enter a Description, if required
Click
 .
.
To delete an attachment, tick the field next to the File Description name link and select the Delete button.
The Deployment Tasks filter view of the Impact Tab displays the number of Deployment Tasks per Status associated with the Release. While the Change Requests view shows all RFCs, and their current Workflow State, associated with the Release using the Analysis Tab and also listed in the Related tab.

The History tab records all changes and updates for the Release, relative to the assigned Workflow State. To view a historical entry within the Release Details tab:
Select
the History tab

Click on the identification number hyperlink to display the entry details
Click
Cancel.
The expanded window is closed.
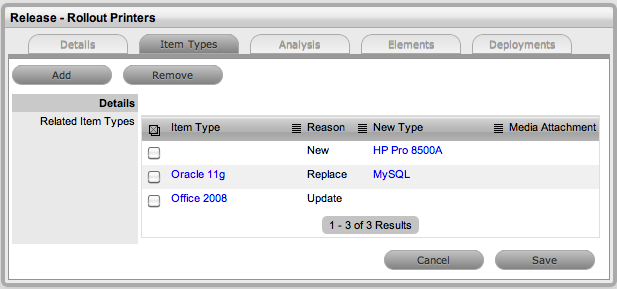
Within the Types Tab the Release Manager can define one or multiple Item Types for the Items that will be affected by the Release and why the Types will be affected. The reasons the Types are affected include creating new Items, updating existing Items in the CMDB, or replacing existing Items with other newly created Items.
If the Release involves creating a new Item, it is assumed the Item Type does not exist in the CMDB, therefore setting the Reason to New allows the User to create a new Item Type and set the default service Teams, SLAs and criticality level of the Item Type. If the Release is to update an existing Item, the User only needs to search for an existing Item Type in the CMDB and assign it within the Release Types tab. Releases that cover an Item replacement require the User to associate the existing Item Type with the Release and create a new Item Type. A Release can include a mix of reasons, if relevant.
As part of defining all Releases, media attachments required for the process, such as an installer or executable file, can be associated with the Release in the Types tab.
New Items can be created from existing Item Types by using the Find Item Type field in the Item Types tab, but to define new Item Types for Items that are to be created as part of the Release, with the Item Types tab in Edit mode:
Click
![]()
The New Type field is displayed.
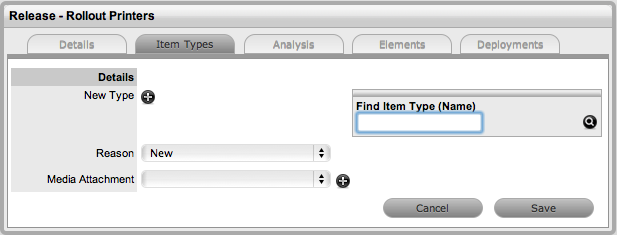
Select

The Item Types field is expanded to allow the User to create a new
Item Type.
Enter
the Name for the Item Type and set all other Item Type template information
(See: Create
Item Type.)
Click
Save
The screen displays Item Details Fields for the Item being created.
Enter
any known details in the Item Details Fields
This information will automatically be populated to the newly created
Item's Details tab, when the Deployment Task is completed and the
Item entered into the CMDB.
Upload
a media file for the new Item, if relevant
The media file may be an installer or executable file and will be made
available within the Deployment Task.
Click
Save.
Additional Item Types can be added to the Release by repeating the
above process.
To upgrade Items as part of the Release, define the Item Type within the Types tab in Edit mode by:
Click
![]()
Set
the Reason to Update
The Find Item Type option is displayed.
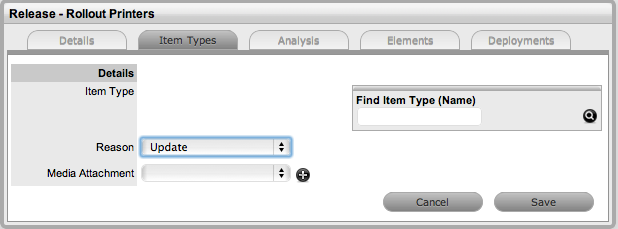
Search
and select an Item Type
The Item Details Fields are displayed.
Complete
any information that is to be updated in existing Items associated
with the Item Type
For example, if the Release involves upgrading software it would be
relevant to include the new version number in the Item Details. All
Items that use this Item Type would have their Item Details automatically
updated, based on the information entered here, when the Deployment
Tasks are completed.
Upload
a media file for the new Item, if relevant
The media file may be an installer or executable file and will be made
available within the Deployment Task.
Click
Save.
Additional Item Types can be added to the Release by repeating the
above process.
To replace Items as part of the Release, define the Item Type within the Types tab in Edit mode by:
Click
![]()
Set
the Reason to Replace
The Find Item Type search field is available for the Item Type that
is to be replaced. The New Type field displays the options to create
a new Item Type by selecting
or searching on an existing Item Type using the Find Item Type field.
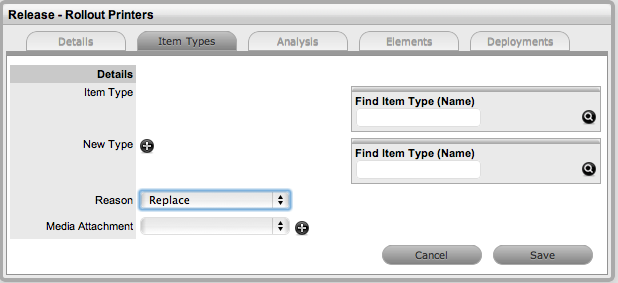
Search and select the Item Type to be replaced
Use
the Find Item Type field within the New Type field to replace the
Item Type with a Type that exists in the CMDB
Or, create a new Item Type by clicking . The Item
Types field is expanded to allow the Manager to create a new Item
Type.
Enter
the Name for the Item Type and set all other Item Type template information
(See: Create Item Type.)
Click
Save
For the new or existing Item Type associated within the New Type field
the screen displays Item Details Fields for the Item being created.
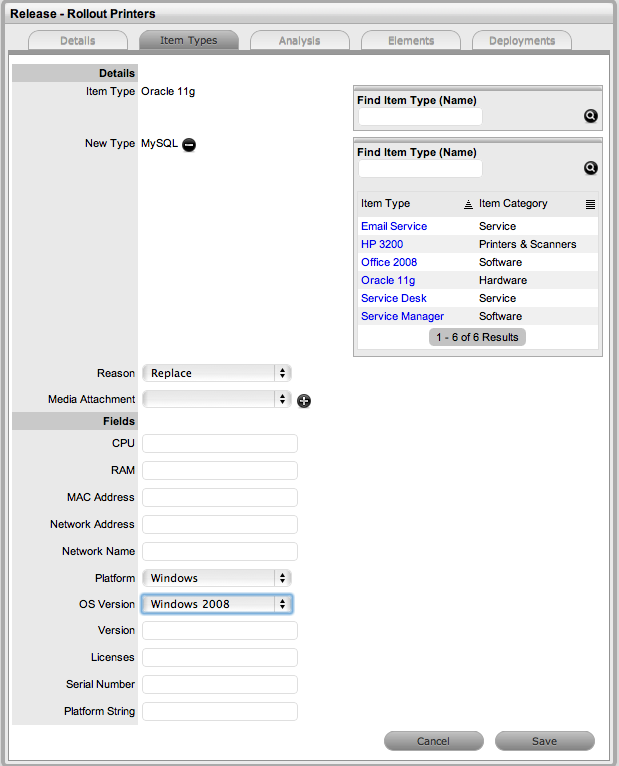
Enter
any known details in the Item Details Fields
This information will automatically be populated to the newly created
Item's Details tab, when the Deployment Task is completed and the
Item entered into the CMDB.
Upload
a media file for the new Item, if relevant
The media file may be an installer or executable file and will be made
available within the Deployment Task.
Click
Save.
Additional Item Types can be added to the Release by repeating the
above process.
After all the Item Types have been added to the Release click Save, and
move to the Analysis tab to associate any pre-existing Change Requests
to the Release package.
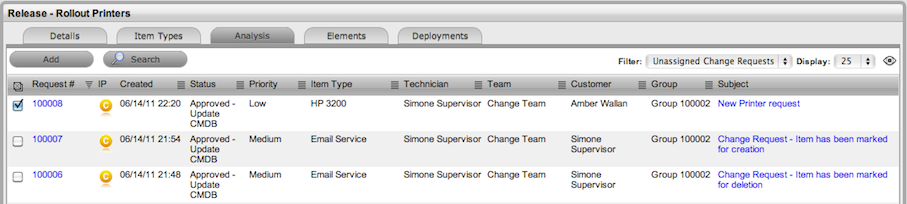
As a Release Manager, the Analysis tab allows
you to associate any pre-existing Change Requests to a Release. To add
RFCs to a Release within the Analysis tab, check boxes next to relevant
Request # links and click ![]() .
.
The Elements tab allows the Release Manager to view all Change Requests associated with the Release and output this information to PDF. This list can be managed by allowing the Manager to remove any irrelevant RFCs from the Release package.
To remove any RFCs from the Release, check
boxes next to relevant Request # links and click ![]() .
.
The Deploy tab allows the Manager to define where the Deployment is to be pushed and who will be working on the Release by creating Deployment Tasks. Deployments can be created on a Per Customer, Per Organizational Unit or Global Deployment basis.
To define the Deployments for the Release, with the Deployments tab in Edit mode:
Click New
Set the Deployment Type option:
Options |
Description |
Deployment per Customer |
Allows specific Customers and Items to be assigned to the Deployment. By selecting this option Customer Names are displayed for Customers that own Items derived from Item Types associated with the Release. Use the Search Options field to find a specific Customer.
Use this option if an Item being created, updated or replaced is to be owned by the Customer directly. |
Deployment per Org. Unit |
Allows Organizational Units to be assigned to the Deployment for the Release. Selecting this option displays Org Units configured in the system.
Use this option for Items that are created, updated or replaced as part of the Deployment, which are shared by all Org. Units included in the Deployment or are assigned ownership on a per Org. Unit basis.
|
Global Deployment |
Sets the Workflow that includes the relevant stages to manage the Release. Selecting this option creates the Deployment for the entire customer base and displays the Next button. |
Tick
the relevant Deployment targets in the list, for Customer or Org.
Unit Deployments
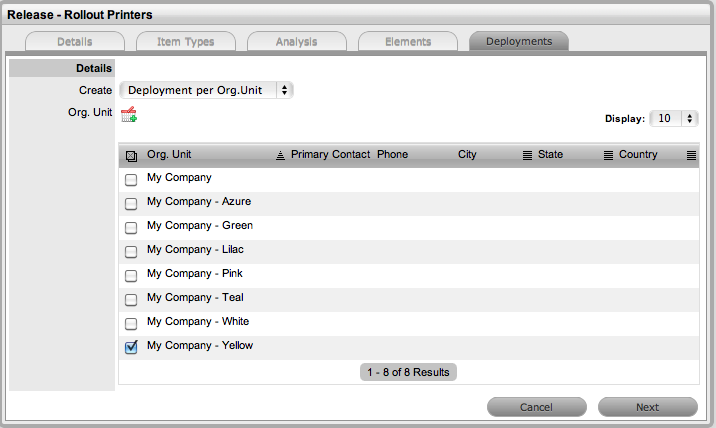
Click

The selections are added to the Deployment and displayed in the Selected
Org. Units side-bar.
Click
Next
The screen allows the Manager to define the Deployment Work Group who
will action the Deployment Tasks of the Release, and the State
of the Deployment Workflow in which the tasks are to be actioned.
The Items Field will also display any Items associated with the Customer
or Org Unit for Update or Replace Item Type Releases.
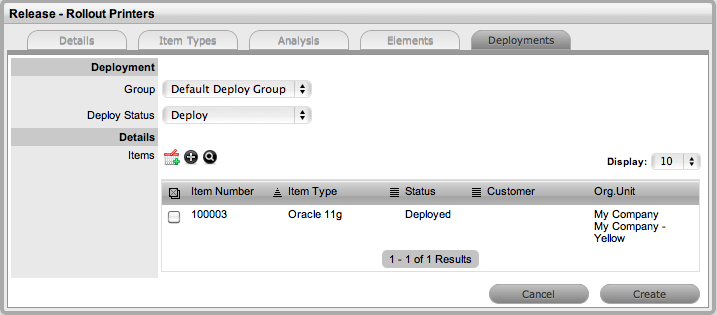
Set
the Work Group who will complete the Deployment Tasks
The list is derived from the Groups tab of a Release Team.
Set
the Workflow State that the Deployment Tasks move to Open
This is when the tasks are to be worked on by Technicians in the Work
Group. The Deploy Status list is derived from Release Workflow States
that have Deployment State option set to Yes.
For
Update & Replace Item
Releases, select one, multiple or all Items displayed in the Items
List or use  to search
for Items
to search
for Items
Click
once the Items have been identified
The Items will be listed in a Selected Items sidebar.
For
New Item Releases, click
The screen defaults to the New Types list.
Select the Item Type for the Deployment
Set
the Item Ownership Status
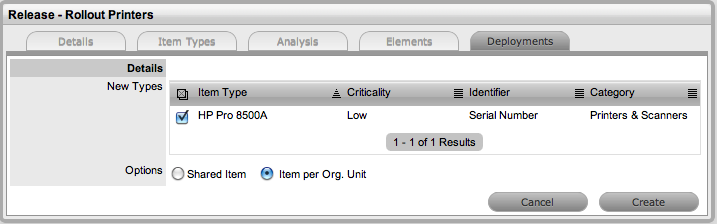
Click
Create
The Selected Item box displays the New Item to be created. Continue
to create Deployment Tasks, if relevant or click Create to lodge the
Deployment in the system.
Click
Done when all Deployment Tasks have been created.
The Deployments will be listed within the Change>Deployments tab.
When all Deployment Tasks are created they are included in the Deployments listed in the Change>Deployments screen. The individual Deployment Tasks will be visible within the All Deployment Tasks filter of the Change>Deployment Tasks tab.
Releases can have multiple Deployments that are to be completed at different stages of a Release lifecyle, and to allow for this, multiple stages of the Release Workflow can be defined as Deployment States when creating a Release Workflow. The different Deployment States can be selected as the Deploy Status for a Deployment when a Release is created in the system. Then, as the Release Manager moves through the Release Workflow, by adjusting the Next Action State in the Details tab of the Release, and when a State that is assigned as the Deploy Status for the Deployment is assigned to the Release, the Deployment Tasks move into an active Open State.
When a State that is assigned as a Deploy Status is selected for the Release, the Deployment Tasks for that Deployment created within the Release move to Open and can be actioned by the assigned Technicians. However, if Control Deployment via RFC is enabled, when the Release moves into the Deployment State, RFCs are automatically created for the Deployment, and only when the RFCs hit the Deploy State configured for the RFC Control option within the Details tab of the Release do the Deployment Tasks become active. The Change Manager can view all Deployment Tasks related to the RFC within the RFC Summary screen, and when all Tasks are moved to Closed-Resolved the Change Manager can close the related RFC.
When all Deployment Tasks are completed, the Deployment is automatically closed by the system. When all Deployments are closed for a Release, the Release Manager can close the Release within the Details Tab, by moving the Release Workflow Status to the Exit State.
 and Reject
  options
are visible. The Release Manager selects the appropriate option
and the system automatically moves the Release to the pre-configured
next State, relative to the option applied.
options
are visible. The Release Manager selects the appropriate option
and the system automatically moves the Release to the pre-configured
next State, relative to the option applied.