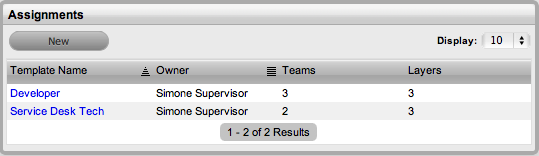
Assignments
The Assignments tab allows job function templates to be created for
new and existing Technician Users. Users can be assigned to multiple Teams,
Escalation Layers and, for new Users, Processes by applying the templates.
Administrator and Supervisor Users can apply these templates within the
User Information screen for new Users, and the Team tab of the User Information
screen for existing Users who are assigned the relevant Processes.
For example, a Frontline Support template may be created, where a User
is assigned to Layer 1 of an Incident Team and a Work Group of a Service
Request Team. They may also be assigned to an Update Customer Group within
a Change Management Team. This template could then be easily applied to
all Users created directly in the system, within the User Information
screen. Or, if the User was created using an authentication server, the
template could be applied within the Team tab of the User Information
screen.
Creating an Assignment Template
Before creating an Assignment template, be sure all the relevant Teams
and Escalation Layers or Groups exist in the system. However, should you
create additional Teams, Escalation Layers or Groups at a later date,
the Assignment template can easily be updated.
To create an Assignment Template:
Select User>Assignments
Click New
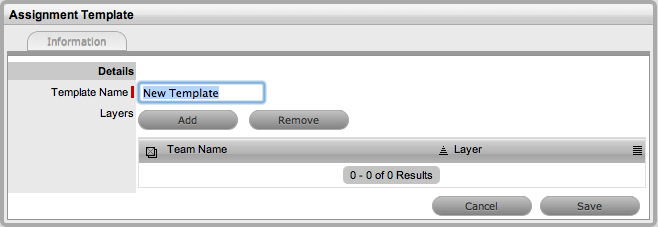
Enter the Template Name
Click Add
The Find Team editor is displayed.
Enter a Name to find a specific Team, or
leave the field blank to return a list of all Teams and click 
Select the Team name link
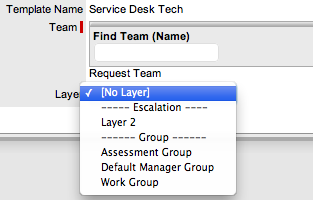
The Layer or Groups drop down list is displayed.
Select an option from the available list
Click Save
Repeat steps 4 to 8, until all relevant assignments
have been created for the template

Click Save.
The template is now available within the User Information screen for
new User creation, or the Teams tab for existing Users.
Editing an Assignment Template
To make changes to an existing User Assignment template, such as adding
or removing Teams and the related Layer or Group assignment:
Select User>Assignments
Click on the relevant Template Name hyperlink
Click Edit
To remove a Team/Layer association, check
the box next to the Team Name
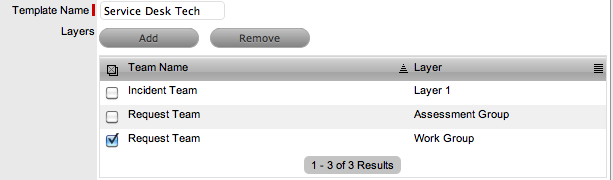
Click Remove
To add a Team/Layer association, click Add
Enter a Name to find a specific Team, or
leave the field blank to return a list of all Teams and click
Select the Team name link
The Layer or Groups drop down list is displayed.
Select an option from the available list
Click Save
To save all changes, click Save.
The screen defaults to the Assignments list view.
Deleting an Assignment Template
To delete an Assignment template from the system:
Select User>Assignments
Click on the relevant Template Name hyperlink
Click Edit
Select Delete
A warning message is displayed.
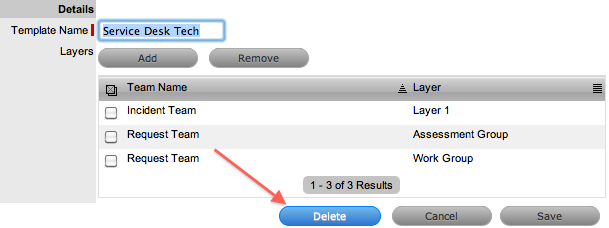
Click OK.
The screen defaults to the Assignments list view.
Applying Assignment Templates to New Users
For new Users created directly in the system, the Assignment template
is available within the User Information screen. By selecting a template,
the newly created User is automatically associated with all relevant Processes,
Teams, Escalation Layers and Groups. To remove a Team assignment after
a template has been applied during the new User creation, deselect the
Process and the Team Name will be removed from the assigned list.
To use an Assignment template for a new User:
Select the User>Users tab
Click New
Enter the User details
Within the Assignment Template field, select
the relevant option
All Processes are automatically ticked for the User.

Uncheck any Processes that are to be removed
for the User
The Team association will automatically be removed from the Team Name
list.
Complete remaining User details, including
assigning a Supervisor and Email address
Click Save.
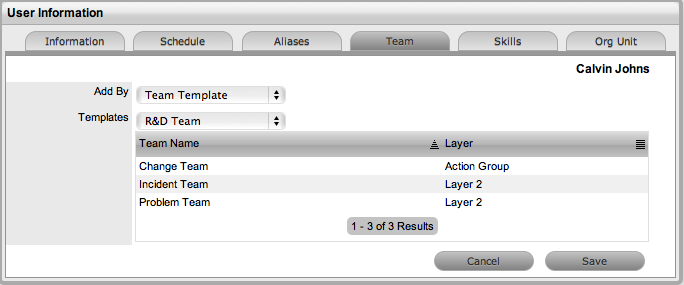
Applying Assignment Templates to Existing Users
For Users who have active accounts in the system and are assigned the
relevant Processes, the Assignment template is available within the Team
tab of the User Information screen.
To apply a template to an existing User:
Go to User>Users
Select the Technician Name hyperlink
Click Edit
Verify the User has all the relevant Processes
with the User Information screen
Select the Team tab
Within the Add By field, select the Team
Template option
The drop down list of Templates is made available.
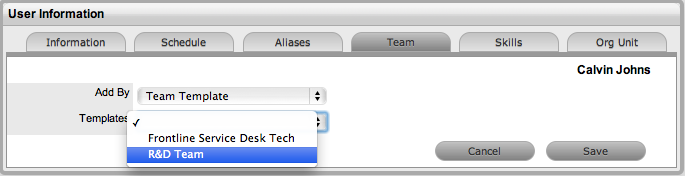
Select the relevant Template from the list
Click Save.