The flexibility of the service management system’s fully configurable Workflows can at times provide a challenge for new installations and evolving support environments.
For new installations the default Workflows are generally quite suitable, but as Users become more familiar with the application and look to adapt the Workflow Lifecycle to better reflect the organizational requirements, an understanding of the elements included in the Workflow and how they impact other parts of the system is needed.
When building a new Workflow or adjusting a Default Workflow, it is advised that the Supervisor User map the Workflow Lifecycle outside of the application and define all possible pathways through the different stages of the Lifecycle, before commencing the configuration process in the service management system.
After each stage of the Lifecycle is identified, then consideration needs to be given to the specific requirements of each Workflow State. These include:
If the request assigned this stage of the Workflow is to appear in the My Tasks filter for Technicians, (i.e., on their Home tab), then it should be marked as Active State: Yes.
The Active State flag implies an Open State, so anything in an Active stage of the Workflow will be included in the report results for Open requests. For example, Open Incidents by Priority or Open Problems by Age.
Requests in a Workflow stage assigned an Active State : No are, by default, not visible on the Home tab of Technicians and considered to be Closed from the perspective of the customer. This allows for follow up work to be performed that doesn’t concern the customer.
If the stage of the Workflow is to be where the request commences its journey through the Workflow Lifecycle, it is an Entry Point and no Previous stages exist before this State. Once a new Entry Point is saved within the Lifecycle tab, it can be set to the Default Open Status within the Workflows tab.
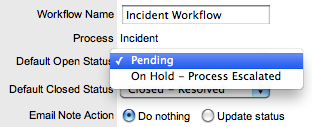
If the stage of the Workflow is to be where the request ends it journey, it is an Exit Point and no Next stages can be assigned to it. This stage can also be defined as the Default Closed Status within the Workflows tab, after it has been created and saved within the Lifecycle tab.
If the stage is a transitionary stage of the Workflow, it is neither marked as an Entry Point nor Exit Point of the Workflow.
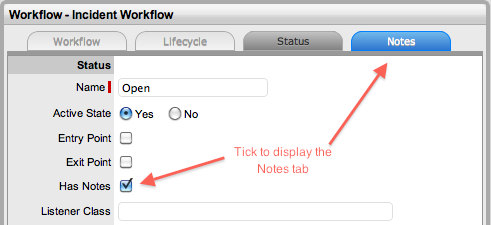
If the answer to this question is yes, then it is advisable to check the Has Notes option. By doing so, a Notes tab appears, which allows the Supervisor User to enter instructions that will become available to the Technician User when a request moves into this stage of the Lifecycle.
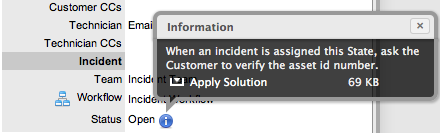
When a request moves into a Workflow stage with a Status Note, ![]() is displayed next to the Status field in the request
Information screen. Technicians can then view the notes by scrolling over
the icon.
is displayed next to the Status field in the request
Information screen. Technicians can then view the notes by scrolling over
the icon.
The next series of questions that need to be considered relate to Service Level Management.
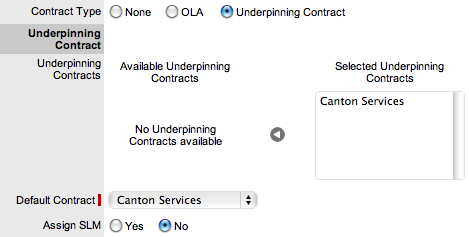
The Contract Type option within the Workflow State allows the Supervisor User to manage each Workflow State with an agreement that specifies the response, restoration and resolution time for an internal or external service provider.
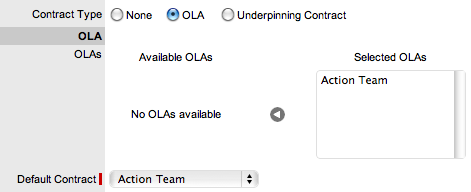
Using this information to configure the Workflow State, you need to consider when the request moves into this stage of the Workflow, will a specific Team of Technicians working within a specified timeframe be responsible for the request. If so, then select the OLA Contract Type.
Based on the understanding that Operational Level Agreements (OLAs) have been created in the application, select the OLA option from the list of configured OLAs that becomes available when the OLA Contract Type option is marked.
The Default Team option is displayed at this point, allowing the Supervisor to select from the Teams that have been assigned within the Teams tab of the OLA Editor screen. This Team is then assigned to the request upon entering this State.
If the request is to be handled by an external service provider at this stage of the Workflow, then select the Underpinning Contract option. Choosing this option will display a list of pre-configured Underpinning Contracts, which are created within the Underpinning Contracts option of the Service tab.
It should also be noted that when the request moves into this stage of the Workflow, internally the request moves to the responsibility of the Service Level Manager, who is to ensure the external contractors meet their service obligations.
You will notice that when an OLA or UPC is assigned to a Workflow State, the State image included in the Lifecycle includes a clock icon. This indicates that it has drawn the resolution time from the OLA or UPC and assigned it to the Contract Time displayed within the Workflows tab. If one or multiple OLAs or UPCs are assigned to the Workflow, the system checks that the SLA resolution time is greater than the sum of all resolution times for the OLAs and UPCs assigned to the Workflow.
The application will not allow a Supervisor to save a Workflow stage, where the OLA or UPC resolution targets cause an SLA breach.
Tip: Before building a Workflow, configure OLAs and Underpinning Contracts within the relevant option of the Service Tab.
If Yes, set the SLA Active option to Yes, and when a request is in this stage of the Workflow, time will be recorded and measured against the response, restoration and resolution targets for the Service Level Agreement applied to the request.
Warnings and escalations configured for the SLA will be activated when target triggers are reached by the time accumulated in a service timer Active State.
If the SLA Restoration time for the Priority of the SLA applied to the request has been met when the request enters this stage of the Workflow, this option should be set to Yes. This ensures that automated warnings and escalations are deactivated in relation to the customer’s service being restored.
If the SLA Resolution target for the Priority of the SLA applied to the request has been met when the request enters this stage of the Workflow, this option should be set to Yes. The SLA Resolution option within the Workflow State will ensure automated warnings and escalations will be deactivated in relation to the customer’s issue being resolved.
Once the specific elements of the Workflow State have been configured, you are ready to build the Workflow Lifecycle - that is, map where a request can come from, and where it can go to.
As mentioned at the top of this document, when configuring a new Workflow or adding new Workflow States, the system advises that all stages be created in the system before mapping the Workflow Lifecycle. This will make mapping Previous and Next States a much simpler task.

Using the Workflow that has been drafted outside of the system, the Previous States are easily configured by selecting the State(s) where the request can reside immediately before moving into the Workflow State being edited from the Available State list, and moved to the Selected States field.
Using the Workflow that has been drafted outside of the system, the Next States are easily configured by selecting the State(s) where the request can move to immediately after the Workflow State being edited from the Available State list, and moved to the Selected States field.

The ability to move a request between two States can easily be achieved by assigning the two relevant States to the Available States list, within the Next States field for each State.
When building a Request Fulfilment or Change Management Workflow there are a couple of additional options that need to be considered, these include:
The Item Editable option within a Request Workflow takes into consideration that activities undertaken within this stage of the Workflow may result in the need to amend information recorded against the Item associated with the request. By not allowing items to be edited at every stage of the Request Workflow, greater control is maintained over changes made to the CMDB.
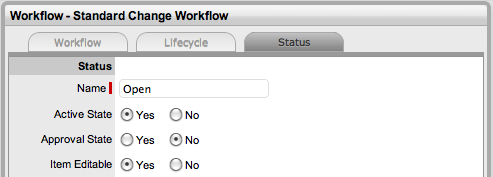
If a Manager User, who typically does not have the ability to edit requests needs to approve or reject activity recorded against a request, the Workflow needs to include an Approval State. Alternatively, if work on a Request needs to be approved by a Customer or Line Manager, then an Approval State is also required.
An Approval State must be neither an Entry nor Exit Point, and when the Approval State option is set to Yes, the Supervisor User must configure the Next States that a request can move to, when accepted or rejected by the Manager, Customer or Line Manager.
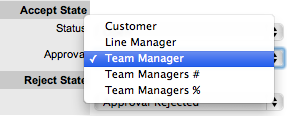
After the Accept State is selected, the system provides the option to define the type of Approval State, which includes the option for Customers, Line Managers and one or more Managers to be canvassed for Approval:
Approval |
|
Customer |
Select if the request is to be assigned to the Customer associated with the request to accept/reject request activity. The Customer will be able to access the accept/reject icons in the Customer Portal to process the request. |
Line Manager
|
Select if the request is to be forwarded to a system user with the Customer Role, who will process the approval in relation to the Customer associated with the request. The Customer/Line Manager will be able to access the accept/reject icons in the Customer Portal to process the request. |
Team Manager |
Select if a single Manager User assigned to the Team is to process the Request. |
Team Managers# |
Select if a set the number of Managers are required to Approve the Request before the system automatically applies the defined Accept or Reject State. |
Team Managers% |
Select if a set percentage weighting must be achieved by multiple Managers voting, before the system automatically applies the defined Accept or Reject State. When selected, define the percentage weighting. |
Select Team Manager for States that only require one Manager to approve the Request. If multiple Managers or a percentage of Managers in a group need to approve a Request, the number of Approvals or percentage weighting needs to be configured for the Request to be moved to the defined Accept State.
This configuration allows the Customer or Manager to simply reply yes or no to email they receive for approving a request. Alternatively, they can log into the system, add a Note and mark the request as approved or rejected and upon doing so, the system will automatically assign the next relevant state, as dictated by the Workflow.
It should be noted, for Line Manager Approval States to be displayed as a Workflow State Next Action option in the Request Summary screen, the system will automatically check that the Customer associated with the Request has a Line Manager defined in their Customer Information screen.
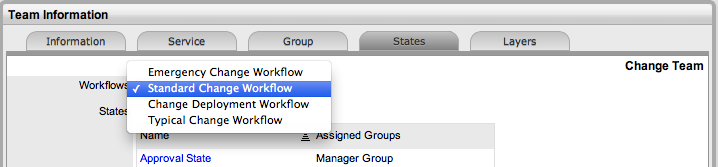
Tip: After building a Service Request or Change Workflow with a Team Manager Approval State, ensure the appropriate Managers are assigned to a Manager Group within the Team>Groups tab, and this Manager Group is assigned to the relevant State within the Change Workflow of the User>Teams>Team Name>States tab.
The final piece of the Workflow puzzle is to ensure that the correct Workflow is available when a request is created. To achieve this, in addition to assigning the request to the appropriate Team, the following configuration needs to be completed:
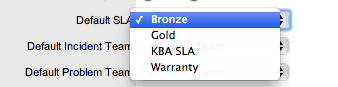
Assign the relevant SLA to the required Workflow, within the Workflows tab of the SLA Editor information screen
Assign the required Workflow to the relevant Team, within the User>Teams>Team Name>States tab
Ensure the relevant SLA is applied to either the Item, Customer or Organizational Unit assigned to the request.
Note:
Failure to assign an SLA results in the system default settings being
applied, which are configured in the administration console within
the Setup>Privileges>Requests tab.