
Within the CMDB Import screen multiple asset management datasources can be synchronized with the service management system. When one or more applications are configured within AMIE, a list is displayed within the AMIE Setup tab.
To import Items using Database Mapping, the following configuration
steps need to be completed:
Select Setup>AMIE
Click New
The Server, Database, Ownership and Synchronization fields appear.
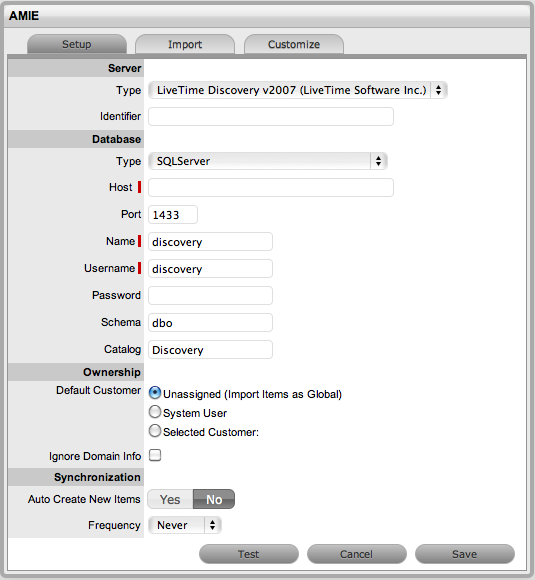
Configuration |
|
System Type |
Define the system type as Database Mapping. |
Identifier |
An identifying label that is used in List Views to inform Users regarding the Source of an Item. |
Server |
|
Type |
Select the Type of inventory management product. |
Database |
|
Type |
Select the Database Type. |
Host |
Enter the Host name or IP Address. |
Port |
Enter the Port Number for the database server. |
Name |
Enter the Database name. |
Username |
Complete User name details. |
Password |
Complete Password details. |
Schema |
Enter the Schema type. |
Catalog |
Enter the Catalog name. Typically this would be the name of the Database. |
Notification (Only If 'Control CMS via RFC' is enabled) |
|
Email RFC's to Tech?
|
Select this option if technicians are to be notified of generated change requests.
|
Ownership |
|
Unassigned (Import Items as Global) |
Select this option if Items are to be globally owned. |
System User |
Select this option to assign imported Items to the System User. |
Selected Customer |
Select this option to assign imported Items to a specific Customer. |
Ignore Domain Info |
Tick this field if the system is to disregard domain details attached to the User Name inside the AMIE source when assigning an owner. |
Synchronization |
|
Auto Create New Items |
This option is only visible when a single AMIE source is defined within AMIE. When enabled, Items are automatically created upon synchronization, relative to the Control CMS via RFC setting within the Setup>Privileges>Requests tab . If disabled, a snapshot of imported asset information is listed within the Super>Configuration>AMIE Snapshots tab. |
Frequency |
Choose a synchronization interval. This can be left as Never if the database will be synchronized manually.
|
Click Test, to initiate
a connection and test the setup
If a connection is not made, a system message will advise which part
of the configuration was not successful.
Click Save
To execute the import, click the Import button
After the import is
complete, an Alert appears providing results of the import.
Click on the Publish link to read the Alert details.

Alerts are generated for the Admin User after the AMIE synch is completed. The import alert summary displays:
the details of the system that the synchronization was run against, as it is possible to import from multiple sources.
the number of assets found in the datasource.
the number of assets automatically created if a single datasource is configured in AMIE and the auto-create option is enabled; or if the Auto-Create option is disabled and Items already exists in the system, the number of Items that were updated.
the number of AMIE Snapshots successfully imported, with a breakdown of new Items added and number of Items updated.
The options to delete AMIE configurations can be achieved through the List View on the AMIE Setup tab, or by clicking on the a hyperlink within the Server column within the List View, which displays the expanded Setup view for the specific asset management tool.
The Delete button clicked in the AMIE>Setup tab>List View results
in Global level "delete" flags being applied to all AMIE-managed
Items stored in the system, however it retains the server details configured
in AMIE and their associated snapshots.
The imported Items that are deleted are not completely removed from the database but are flagged as not available . By not erasing the Items completely, the historical data is maintained and allows these Items to be re-enabled in the future. It should be noted that the Item Types associated with the deleted imported Items are not disabled in the application.
The Delete button selected within the expanded Setup tab view for the specific
asset management datasource, results in Configuration level deletion of
the configured server and any related AMIE snapshots.
The application must be restarted
after the performance of either deletion operation, to allow the changes
to take effect and prevent unpredictable behavior of the system.

To delete the server configuration within AMIE and related snapshots:
Select Setup>AMIE>Setup
Select the Server link
option within the AMIE list view
The expanded Setup screen is displayed with the Delete button.
Select the Delete button
A pop-up message is displayed asking your to confirm the deletion action.
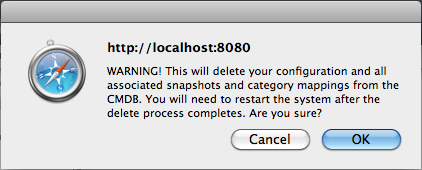
Click OK.
A warning message is displayed informing you to restart the application
server to complete the deletion process.

To re-enable Deleted Items, initiate an Item search on deleted Items within the Configuration>Items screen of the Supervisor view.
Within the Supervisor view to search for a deleted Item:
Select Configuration>Items
Click the Search button
A simple search page will be displayed

Enter a search term
Select the Deleted Item Only option
Click Search
A list of Items is displayed.
For the Item to be re-enabled, select the Item ID#
Click ![]() .
.