The Incident Queue allows for Incidents allows for newly created requests to be assigned to an Incident Team's holding bay. Users within the Team then have the option to select Incidents they decide to work on, or manually assign the Incidents to the appropriate User.
Incidents that are assigned to the Queue are allocated to the System User, until they are manually reassigned to a specific User. The unassigned requests are located within the Home tab My Teams Queued Tasks and the Operations>Incidents tab Filter option called Incident Queue.
When the Incident Queue feature
is enabled for the application, it can be applied on a Team by Team basis.
This means some Teams can be configured to use the business logic of the
application for assigning Incidents to specific Users, while other Teams
can use the Incident Queue to select the Incidents they want to work on,
or it allows other Users to manually assign the Incident to a User.|
When the Self Assign and Queue options are enabled for a Team and a request
is created by a Technician User, the Self Assign option will override
the Queue assignment and allocate the request to the User creating the
request, if they are in the first layer of escalation. The User can assign
the request to the Queue by selecting the System User in the Technician
list.
By default, the Incident Queue functionality is disabled in the application Setup.
To enable the Incident Queue:
Log in as an Administrator
Select Setup>Privileges
Select
the Request tab

Enable the Queues option
Click Save.
To enable the Queue for a Team:
Log in as a Supervisor
Select the User>Teams option
Select
the relevant Team link
Click Edit
Enable
the Queue option
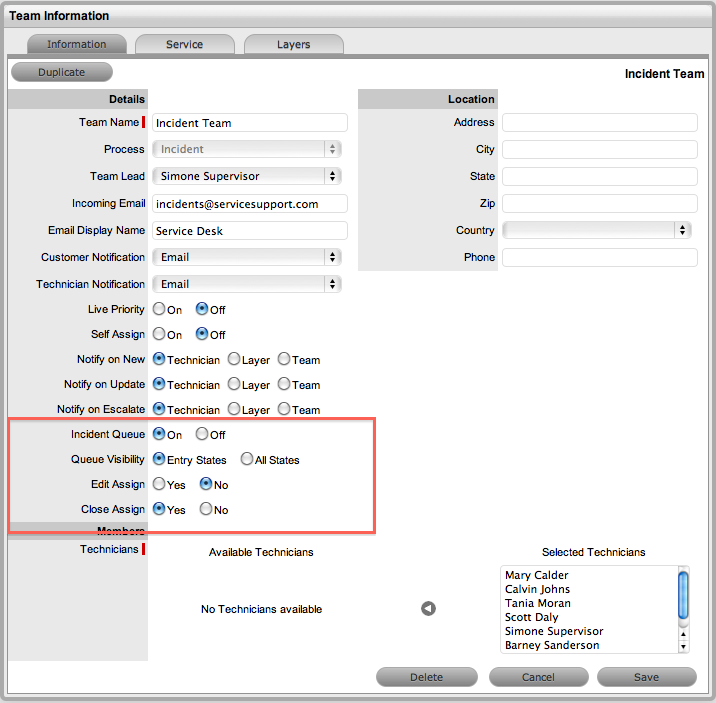
The following options can then be applied to the Queue:
Options |
Description |
Service Request /Incident/Problem Queue |
Allows the Team to use a holding bay for Incidents that are received via email or the Customer Portal. (This option is visible if it has been enabled by the Administrator.) If the Team has only one Technician assigned to Layer One of Escalation, new Incidents are automatically assigned to that Technician and that Technician is notified of the new Incident assignment. If the Team has multiple Technicians
assigned to Layer One of Escalation, the new Incident is placed
in the Queue (i.e., it is assigned to the System User) and
all members of the Team are notified that a new Incident has
been assigned to the Incident Queue. See: Queues. |
Queue Visibility |
When the Incident Queue is enabled, the option can be refined to allow the Queue to be available for assigned Workflow entry points, or all stages of the assigned Workflow. If All States is enabled, Users can move requests back to the Queue throughout the request lifecycle. See: Queues. |
Edit Assign |
When set to Yes and a request assigned to the System User (i.e., Queue) is opened in Edit Mode, the system will automatically assign the request to the User editing the request if they are in the Escalation Layer associated with the request. |
Close Assign |
When set to Yes and a request assigned to the System User (i.e., Queue) is moved to an Exit State of the Workflow, the system will automatically assign the request to the User who prompted the close action. |
Set
the Queue Visibility
Select All States if Team members are to be allowed to return a request
to the Queue regardless of the assigned Workflow State.
Set
the Edit Assign option
Select Yes, if a request that is assigned to the System User/Queue
is to be automatically assigned to a User in the first layer of escalation
who opens the request in Edit mode.
Set
the Close Assign option
Select Yes, if a request that is assigned to the System User/Queue
is to be automatically assigned to the User who initiates an action
that results in the request being moved to an Exit State.
Select Save.
Assigning Incidents from a Queue
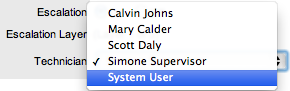
All Incidents displayed within the Incident Queue list are assigned to
the System User. To reassign the Incident to an appropriate User:
Select the Incident Reference # hyperlink
Click Edit
Select
an appropriate User from the Technician list
The Incident will now be assigned to the new User and removed from
the Incident Queue

Click Save.
When the All States option has been enabled for the Queue within the Team Information screen, the System User will be retained in the Technician drop-down list for the first layer of escalation after it has been assigned to a User. This allows the assigned User to re-assign the request back to the Queue.
To reassign the request to the Queue/System User:
Select
the Request # hyperlink
The request should be at layer one of escalation within the assigned
Team
Click Edit
Select
System User within the Technician drop-down list
The request will now be assigned to the System User and returned to
the Queue.
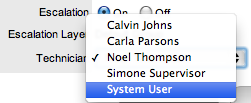
Click Save
Click Done.
The system returns to the request list view.
Teams that use the Queue method for request assignment can view and allocate requests using the My Teams Queued Tasks within the Home Tab List Filter, or Incidents tab Queue List filter.
To view Incidents assigned to the Queue within the Home tab:
Select the Home tab
Go to the Filter List
Select
the My Teams Queued Tasks option from the drop down list.
The screen will list all Incidents that are currently assigned to the
System User.
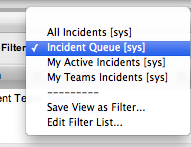
To view the Incident Queue:
Select the Incidents tab
Go to the filter list
Select
the Incident Queue option from the drop down list.
The screen will list all of the Incidents that are currently assigned
to the System User.