Surveys
The Service Desk can obtain feedback regarding the quality of support
provided to Customers and any other issues by distributing Surveys to
Service Desk staff and Customers. Surveys within Help Desk can be created
for specific Users or User Role groups, Customers who have logged requests
and anyone who accesses the Help Desk.
Refer to Surveying Customer
Sentiment for indepth information about surveys and customer satisfaction.
Creating a Survey
To create a new Survey:
Select Knowledge >
Surveys
Click New
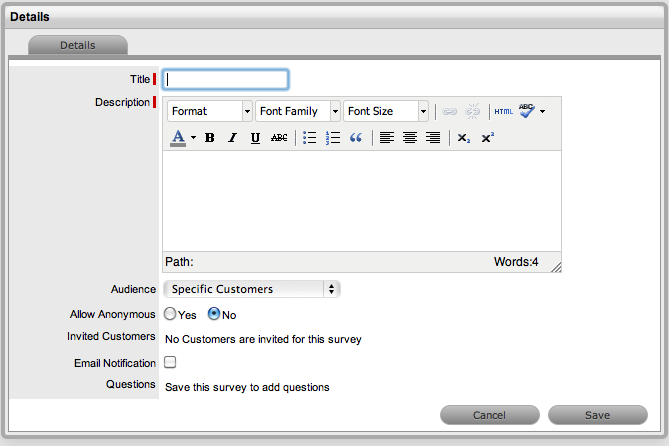
Enter a Survey Title
Enter a Survey Description
Select an Audience:
Audience Type |
Description |
Serviced
Customer
Send on Resolution
Send Once Only |
A Survey is issued
to Customers who have had a request resolved by service desk
staff. This Survey type is available to Customers within the
Customer Portal.
If Serviced Customer is selected
as the audience, an option called Send on Resolution becomes
visible. When this option is enabled and a request is resolved,
an email is automatically dispatched to the Customer asking
them to complete a Survey.
If the Send on Resolution option
is left disabled, the email must be sent manually. To send
the email, select a closed request and click  within the Summary Information screen. An email is sent
to the Customer with a Survey.
within the Summary Information screen. An email is sent
to the Customer with a Survey.
Select this option if you want Customers
to receive the Serviced Customer Survey once and not on multiple
occasions. |
Serviced Customers
(1 in 5) |
Sends the survey
to one in five Customers who log a request with the service
desk. |
Everyone |
A Survey that is
published for all Users groups, including the Public Portal,
Technicians and Customers. |
Allow
Anonymous |
Allows Customers
to complete the Survey without their identity being recorded. |
Roles
Raise Alert |
A Survey generated
for a specific User Role/s.
If Roles is selected, a list of
User Roles is displayed. Select the User Roles to receive
the Survey.
To generate an Alert when the survey
is published, select the Raise Alert option. |
Specific Customer
Email Notification |
A Survey generated
for a specific Customer/s.
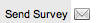
If a specific Customer is selected:
Click
the add button to invite Customers to the Survey Search
and select Customers Select Save, to assign the Customer/s.
To notify the Customer via email,
select the Email Notification option. When the Survey is published,
an email is sent to the Customer/s. |
Customers
By Org Unit
Selected
Org. Units |
A Survey generated
for Customers within one or more Organizational Units. When
selected and saved, the option to assign Organizational Units
is displayed.
Click the  to search and assign Org Units.
 |
Customers
By Item Type
Select
Item Types |
A
Survey generated for Customers using one or more Item
Types. When selected and saved, the option to assign Item
Types is displayed.
Click the
to search and assign one or more Item Types. |
Click Save to add questions
to the Survey
Click
to create a new Survey question
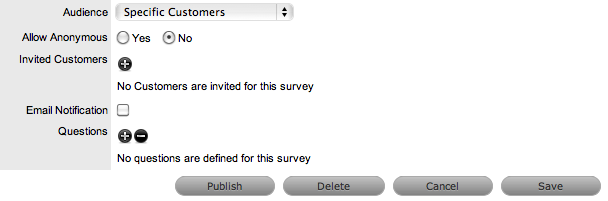
Enter the Question text
Select the Required
option if an answer is mandatory
Tick Shared, if this
question is to be included in surveys created by duplicating this
survey in the future
If selected, these questions cannot be edited in the newly created
duplicated survey.
Select an Answer Type:
Answer Type |
Description |
Agree
or Disagree |
Displays the options
to Agree or Disagree. |
Agree or Disagree
(1-5) |
Displays the options
to Agree or Disagree on a scale of 1 to 5. |
Scale
(1-x) |
Provides the option
to define the rating scale from 1 to 10. When selected, the
Scale field is displayed allowing the User to define the range. |
Text Response |
Provides a text
box for text based responses. |
True,
False or Undecided |
Displays the options
of True, False and Undecided. |
True
or False |
Displays the options
of True or False. |
Yes, No or Undecided |
Displays the options
of Yes, No and Undecided. |
Yes
or No |
Displays the options
of Yes or No. |
Yes/No - branch |
Allows a further
question to be asked based on a Yes or No answer given for
the current question.
When using this option, it may be necessary to return
to the question configured with this selection after
all the questions have been created for the survey, so the
Branch Question can be configured appropriately.
If End is selected, the User screen will automatically
close when the configured selection is made. |
Menu
Selection |
Provides a list
of possible responses.
To create a list of responses:
Click
New Enter
a response name Click
Save Repeat
to add multiple options |
Click Save
Click
to enter additional questions
(Refer to Steps 8 to 11 above)
To re-order the questions,
check the box next to the relevant question and use  or
or  to move it in the appropriate
direction
to move it in the appropriate
direction
When all questions are
entered in the correct order, select Save.
The Survey is now ready for publication.
Publishing a Survey
After a Survey has been created, it must be published in order for it
to be available to Customers and Users. Published Surveys are accessible
through the Feedback tab.
To publish a Survey:
Select Knowledge >
Surveys
Select the hyperlink
of an unpublished Survey
Click Edit
Select 
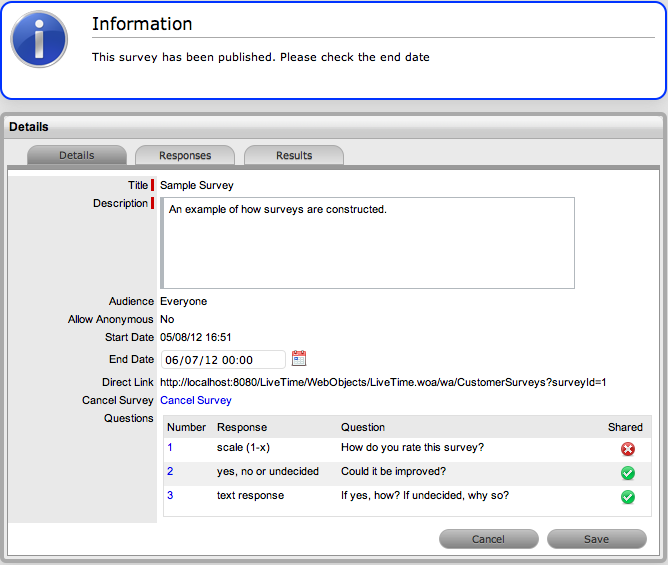
Enter an End Date for
the Survey
By default the end date is set to one month after the start date. To
modify the default end date, select a date within the calender icon.
The start date is set to the date the survey is published.
Click Save.
A direct hyperlink is also created and saved with the survey. This
can be sent to audience members for direct access to the survey.
When a Survey is published it can
no longer be edited.
To deactivate a Survey, adjust the
end date or click the Cancel link within the Details tab of the Survey.
Duplicating a Survey
Surveys can be duplicated both before or after publication.
To duplicate a Survey:
Select Knowledge >
Surveys
Select the hyperlink
of a survey
Click the Duplicate
button
The duplicate Survey is displayed.
Update the duplicate
Survey, as required
Click Save.
The Survey is saved and ready to publish.
Completing a Survey
When a Survey is published, it can be completed by Users and Customers.
To complete
a Survey as a Supervisor or Technician User, the survey can be accessed
within the Home>Feedback screen:
Select
Home > Feedback
Select
the Fill Survey hyperlink
Complete
the Survey
Click
Done.
To complete a Survey within the Home Page of the Customer Portal:
Select the Survey option
within the Menu sidebar
Select the Take Survey
hyperlink
Complete the Survey
Click Done.
To complete a Survey as a Public User:
At the login page select
Public Access Surveys
Select the Fill Survey
hyperlink
Complete the Survey
Click Done.
Viewing the results of a Survey
As a Survey is completed the results are collated on a per User basis
and summarized into a chart.
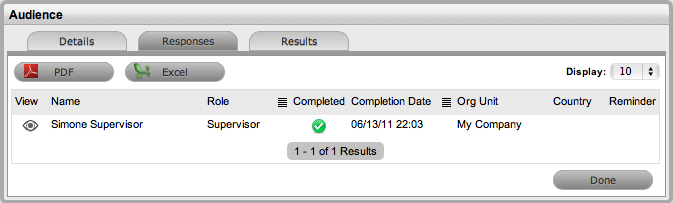
To view the results per User:
Select Knowledge >
Survey
Select a completed Survey's
hyperlink
Select the Users tab
A list of Survey participants is displayed.
Select View to display
the full response for each User
To view a summary of results:
Select Knowledge >
Survey
Select a completed survey's
hyperlink
Select the Summary tab
Each Survey question will be summarized and charted.
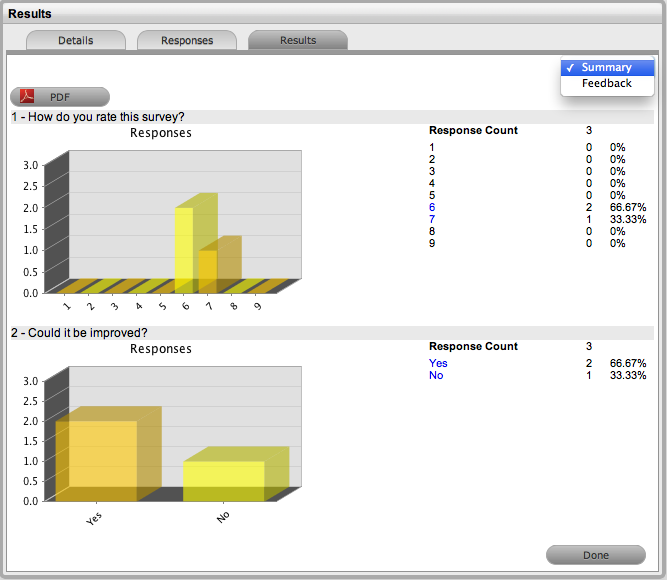
For text based questions,
select Feedback from the drop-down list provided
A list of text responses is displayed.
The completed Surveys sent to Serviced Customers upon resolution of
an Incident, are also accessible within the Analysis tab of the Incident.
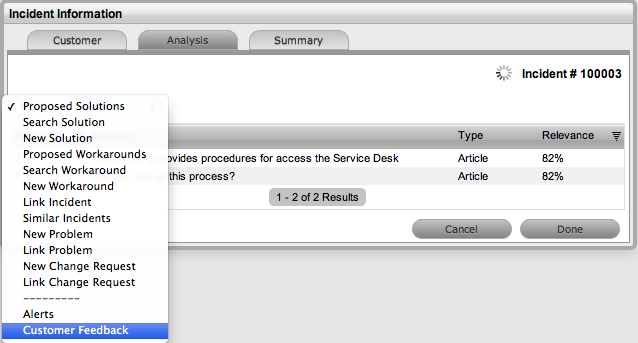
Refer to Surveying
Customer Sentiment for indepth information about surveys and customer
satisfaction.