Click Edit
Amend
details, as required
The default Incident Workflow defines the sequence of States to be followed by requests logged with the application.
When deployed, the system includes one fully customizable Incident Workflow
for the Incident Management processes. This can be used immediately, or
it can be edited to reflect more comprehensively your organization's support
service requirements.
The Incident Workflow can be configured to
reflect the organizational Service Desk requirements for the Incident
Management Process. The default Workflow includes States that are used
by the business logic of the system to maintain control of the Incident
Lifecycle.
It is recommended that the Selected States used by the application, as
indicated by an asterisk, not be removed from the Workflow Lifecycle.
However, other Available States can be added to the Selected States list.
The following table contains the default Incident Workflow States.
Default State |
Description |
|---|---|
Cancelled |
Used to cancel a request when it is no longer to be worked on. |
Cancelled Unpaid* |
Used by the system from the Pending - No Contract State when Contracts and Invoices are enabled. See Billing. |
Closed Resolved |
Used when the request has been resolved. This is the Default Closed State for the Incident Workflow. This start marks the end of SLA timing and is used when measuring SLA times for Reports. |
Closed Restored |
Used when the request has been closed and the service restored for the Customer. This start marks the end of SLA timing and is used when measuring SLA times for Reports. |
On Hold |
Used when the request is on hold. By default this State stops SLA timing. |
On Hold - Client Action |
Awaiting a response from the Customer. When a Note is added to the request by the Customer, the system will change the status to Open. |
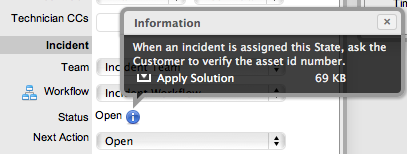
On Hold - Pending Approval* |
An Incident automatically moves to this State when the "Propose" button is used for sending an Incident Note. This means the CloseRequest email is sent to the Customer asking them to verify the proposed Solution. If the Customer does not respond to the email, the request is automatically closed by the number of days set within the Handshaking Privilege. (The email handshaking option is set by the Administrator in Setup>Privileges> Requests.)
By clicking on the URL provided in the email, the Customer ensures the request retains an open and active state. |
Open |
Used to indicate that the request is currently open. |
Open Restored |
Used to identify that initial service to the Customer has been restored, or a Workaround is in place but the request is not resolved. This State stops the initial Response Timer if a Note has not been added to the request by a Technician. |
Pending |
The default first State for new Incidents. |
Pending - No Contract* |
Used when a request is created but there is no active Contract. A Contract needs to be created for either the Customer, Incident/Problem, Item or Organizational Unit.
|
Prior to editing the existing Workflow, it is suggested that a preferred Workflow Lifecycle be mapped externally to the application.
If States are to be added or removed from the Workflow, it is advised
that all changes be made to the Current States list within a Workflow's
Lifecycle tab, prior to mapping the Lifecycle. This ensures that all relevant
status options exist in the Available States field, for allocation to
the Previous and Next Workflow States.
Once the Workflow Lifecycle has been defined, edit the Incident Workflow by:
Select
Service>Workflows
The Workflows screen appears.
Click
the Incident Workflow hyperlink
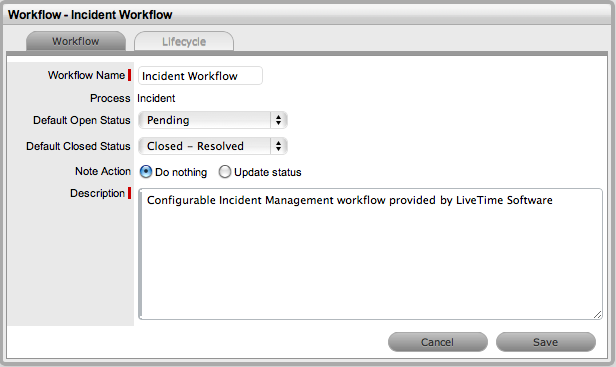
The Workflows tab appears. This tab is used to set the default Open
and Closed States for the Workflow. The States available within these
lists are all those marked as an Entry or Exit Point in the Lifecycle
tab.
Field Name |
Description |
|---|---|
Workflow Name |
Incident Workflow. |
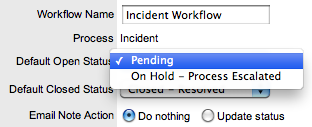
Default Open Status |
The Open State that a request adopts when it is assigned the Workflow. |
Default Closed Status |
The Closed State that indicates the request has reached the end of the Workflow Lifecycle. |
Email Note Action |
This applies to requests that are in an non-active State (i.e., where the Active State option set to No). The option selected here determines the system behavior, regarding an inactive request, when an email is received from a Customer.
|
Update Status to |
This field is displayed when the Update Status option is selected for the Email Note Action field. It allows the User to select the default Open State a request will move to after an email has been received from a Customer regarding a request in an inactive State. |
Description |
Defines the purpose of the Workflow |
Click Edit
Amend
details, as required
Click Save.
Select Service > Workflows
Select the Incident
Workflow hyperlink
The Workflow > Categories screen appears.
Select the Lifecycle tab
Click New
Enter the Status details
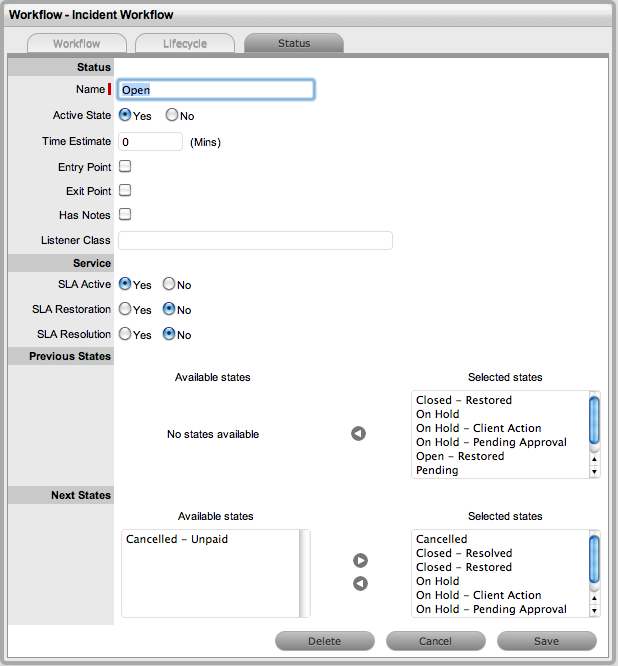
Status |
|
Name |
System Defined States cannot have the name altered. For other statuses, enter a name. |
Active State
|
Assign Yes for requests
to be available in the Home tab by default, when assigned
to this stage of the Workflow. |
Time Estimate |
Estimates the amount of time the request will be in the State. |
Entry Point |
An Entry Point is used to indicate the start of a Lifecycle. To make the State a workflow Entry Point, select the Entry Point checkbox. As the Entry Point is the first State, the Previous States field will be removed. |
Exit Point |
Select whether the State will be an Exit Point. An Exit Point is used to indicate the end of a Lifecycle.
|
Has Notes |
Allows the Supervisor to include instructions or add relevant details for requests that move into this State. The information is configured within the Articles tab that is displayed when this option is enabled. |
Listener Class |
This field is visible if the Outbound Webservices option is enabled in the Admin>Setup>Privileges>System tab. Complete this field, if assigning this State to a request is to trigger an event in an external system. This field should contain the name of a Java class that implements the interface com.livetime.ws.listenWorkflowListener that has been compiled into a jar file and added to the LiveTime classpath. Please contact support for further details. |
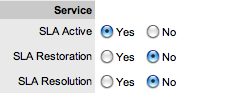
SLA Active |
Links the status with timing set within SLAs. When the option is set to No, the SLA timing is stopped while the Incident is in this State. |
SLA Restoration |
When timing is set using SLAs, the SLA Restoration Time trigger is disabled when the request is moved to this State. Restoration Time indicates a Customer has access restored or a temporary workaround. Reports on Restoration Time are measured from when the Restoration Time trigger is disabled. |
SLA Resolution |
Allows the State selected to be used to mark the SLA Resolution Time. This will be used in SLA reporting. |
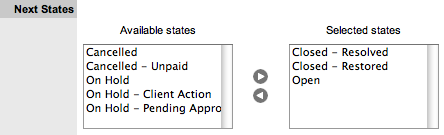
Previous States |
If the State is not an
Entry Point, use the arrow button to select Previous States
from the Available States and choose when this State will
appear as a drop-down menu item in the Next Action field. |
Next States |
If the State is not an
Exit Point, use the arrow button to select the Next States
a request can move to in the Next Action field of a service
request. |
If editing a State, click Delete to remove the State entirely from the Workflow, or Name/Rename the State
Enter all State information up to the SLA Resolution field
Save the updated State details
It
is recommended all States to be included in the Workflow be added
or re-named now
After all States have been entered in the system, the mapping of the
Workflow can be more easily achieved.
Continue to edit, add or delete States until all relevant lifecycle States exist for the Workflow
Create
the Workflow Lifecycle
To assign Available States
to the Previous State or Next State field, open the Status Details
screen by clicking the State object in the Workflow map or select
the State hyperlink in the table beneath the Workflow map.
Assign
a States to be a Next and/or Previous State
For the Current Status highlight an option in the Available State list
and click the right-pointing arrow to move it to the Selected States
field.
When
a State is used as a Previous and a Next State, it allows a request
to move forward and backward in a Lifecycle
An Open State cannot have
any previous States and a Closed State cannot have any Next States.
Click Save to return to the Workflow map and to access other States to build on the Workflow Lifecycle
Repeat Steps 9 to 11 until all transitional stages of the Workflow have been mapped
Click
Save.
The visual representation of the Workflow is displayed.
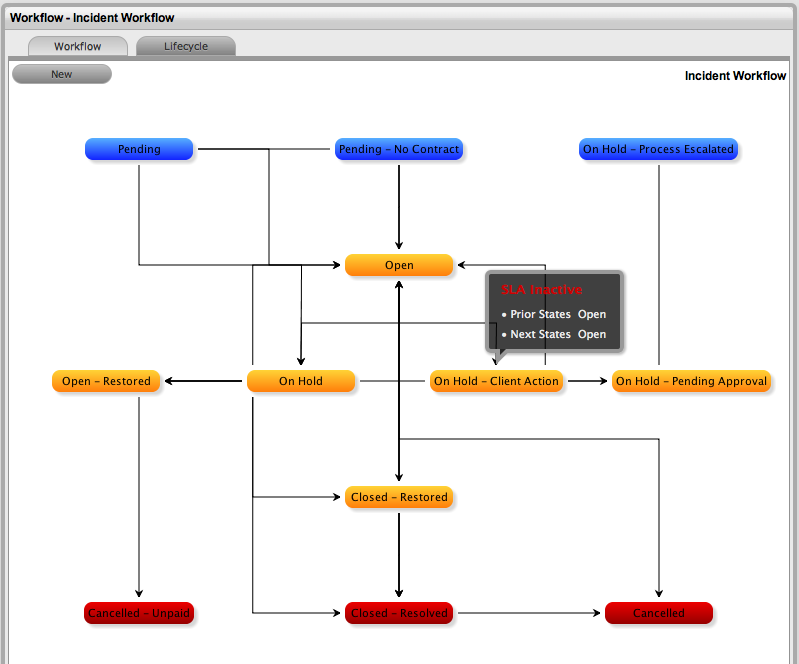
The Workflow Map is a visual representation of the Workflow Lifecycle. The map displays the relationship between each Lifecycle State by using different colors to represent the type of Lifecycle State.
Color |
|
Blue |
Indicates the Entry point of the Lifecycle. |
Orange |
Is a Transitional stage of the Lifecycle. |
Red |
Indicates the Exit point of the Lifecycle. |
Detailed information about a Lifecycle State can be accessed by clicking on the State field within the Map.
It may be necessary to delete a system default State or a State that is no longer in use. Note that a State cannot be deleted if it has been assigned to a request.
To delete an unused State:
Select Service>Workflows
Click on the Workflow Name hyperlink
Click on the State Name hyperlink in the States Table beneath the Workflow Map
Click Delete
Select
Save.
The State will be erased from the States list.
The flexibility of the fully configurable Incident Workflow can at times provide a challenge for new installations and evolving support environments.
For new installations the default Incident Workflow is generally quite suitable, but as Users become more familiar with the application and look to adapt the Workflow Lifecycle to better reflect the organizational requirements, an understanding of the elements included in the Workflow and how they impact other parts of the system is needed.
When adjusting the Default Workflow, it is advised that the Supervisor User map the Workflow Lifecycle outside of the application and define all possible pathways through the different stages of the Lifecycle, before commencing the configuration process in the system.
After each stage of the Lifecycle is identified, then consideration needs to be given to the specific requirements of each Workflow State. These include:

If the request assigned this stage of the Workflow is to appear in the My Tasks filter for Technicians, (i.e., on their Home tab), then it should be marked as Active State: Yes.
The Active State flag implies an Open State, so anything in an Active stage of the Workflow will be included in the report results for Open requests. For example, Open Incidents by Priority or Open Problems by Age.
Requests in a Workflow stage assigned an Active State : No are, by default, not visible on the Home tab of Technicians and considered to be Closed from the perspective of the customer. This allows for follow up work to be performed that doesn’t concern the customer.
If the stage of the Workflow is to be where the request commences its journey through the Workflow Lifecycle, it is an Entry Point and no Previous stages exist before this State. Once a new Entry Point is saved within the Lifecycle tab, it can be set to the Default Open Status within the Workflows tab.
If the stage of the Workflow is to be where the request ends it journey, it is an Exit Point and no Next stages can be assigned to it. This stage can also be defined as the Default Closed Status within the Workflows tab, after it has been created and saved within the Lifecycle tab.
If the stage is a transitionary stage of the Workflow, it is neither marked as an Entry Point nor Exit Point of the Workflow.
If the answer to this question is yes, then it is advisable to check the Has Notes option. By doing so, a Notes tab appears, which allows the Supervisor User to enter instructions that will become available to the Technician User when a request moves into this stage of the Lifecycle.
When a request moves into a Workflow stage with a Status Note, an icon is displayed next to the Status field in the request Information screen. Technicians can then view the notes by scrolling over the icon.
The next series of questions that need to be considered relate to Service Level Management.
If Yes, set the SLA Active option to Yes, and when a request is in this stage of the Workflow, time will be recorded and measured against the response, restoration and resolution targets for the Service Level Agreement applied to the request.
Warnings and escalations configured for the SLA will be activated when target triggers are reached by the time accumulated in a service timer Active State.
If the SLA Restoration time for the Priority of the SLA applied to the request has been met when the request enters this stage of the Workflow, this option should be set to Yes. This ensures that automated warnings and escalations are deactivated in relation to the customer’s service being restored.
If the SLA Resolution target for the Priority of the SLA applied to the request has been met when the request enters this stage of the Workflow, this option should be set to “Yes”. The SLA Resolution option within the Workflow State will ensure automated warnings and escalations will be deactivated in relation to the customer’s issue being resolved.
Once the specific elements of the Workflow State have been configured, you are ready to build the Workflow Lifecycle - that is, map where a request can come from, and where it can go to.
As mentioned at the top of this document, when configuring a new Workflow or adding new Workflow States, it is advised that all stages be created in the system before mapping the Workflow Lifecycle. This will make mapping Previous and Next States a much simpler task.

Using the Workflow that has been drafted outside of the system, the Previous States are easily configured by selecting the State(s) where the request can reside immediately before moving into the Workflow State being edited from the Available State list, and moved to the Selected States field.
Using the Workflow that has been drafted outside of the system, the Next States are easily configured by selecting the State(s) where the request can move to immediately after the Workflow State being edited from the Available State list, and moved to the Selected States field.
The ability to move a request between two States can easily be achieved by assigning the two relevant States to the Available States list, within the Next States field for each State.