Select Setup>Privileges>Requests
The Requests Screen appears.
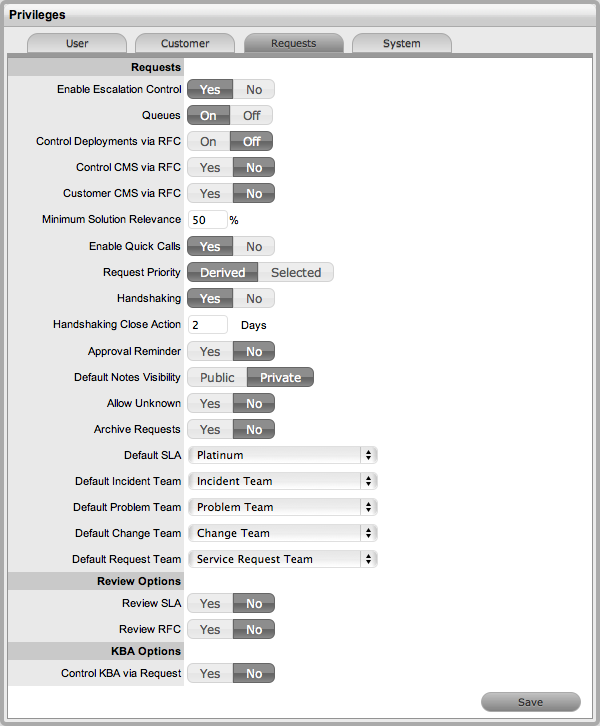
Request Options |
|
Enable Escalation Control |
Enables escalation to be enabled or disabled on a per request basis. This option is only available to Supervisor Users. |
Queues |
Allows Teams to use a holding bay for requests that are received via email or the Customer Portal. The Queues can be enabled within the Team Information screen, on a per Team basis. |
Control Deployments via RFC |
When enabled, Change Requests are automatically created from newly entered Deployments, and will require approval before work commences on the Deployment. |
Control CMS via RFC
|
When enabled, changes made within the CMDB by a Technician will generate a Change Request requiring approval before the change is implemented. |
Customer CMS via RFC |
When enabled, Customers creating Items via the Customer Portal generate a Change Request that requires approval before the change is implemented in the CMDB. |
Minimum Solution Relevance |
Define the minimum degree of relevancy for content included in the Description field of a request, when the system automatically searches the Knowledge Base to propose solutions. |
Enable Quick Calls |
Enables the functionality that allows the Supervisor to profile Requests using Quick Call Templates. These can be used by other system Users when creating new requests. |
Request Priority (Derived/Selected) |
Enable Derived to allow the system to derive the Priority based on Urgency and Impact of the request . Enable 'Selected' to manually apply the Priority from a list of options. |
Default Priority |
**This option is displayed when the Incident Priority is set to Selected. The selection made from the drop-down menu, is automatically applied as the default Priority for newly created requests. |
Handshaking |
Enables notifications to be sent to a Customer using the Propose button within an Incident or Request, stating the Incident/Request will be closed if no reply is received from them within a set number of days.
|
Handshaking Close Action |
Sets the system default number of days to lapse before an Incident or Request will close if the Customer does not respond to the handshake email notification. This can be adjusted on a per Org Unit basis.
|
Approval Reminder |
To automatically send Managers reminder emails regarding Requests requiring their approval, set this option to Yes. When Yes is selected, define the number of days to lapse before a reminder will be sent. The content of the reminder email is drawn from the ApproveChange or ApproveServiceRequest template. These are configured within Setup>Email>Templates tab. |
Default Notes Visibility |
Sets the system default visibility of Notes, when added to requests. If it is expected that the majority of Notes are to be emailed to Customers, select Public. |
Allow Unknown |
When set to No and a User opens a request that is assigned the Unknown Service Item, the User will be prompted to update the Item before saving the request. |
Archive Requests |
When enabled, the number of days a request is closed before being removed from the List View and archived is to be set.
Requests that are archived have attachments removed and they are no longer included in the full text index for searching. They are still accessible for reporting purposes and attribute based searches. |
Default SLA |
Is used as the Default SLA when a new request is created without an SLA defined for the Item, Customer or Org Unit. |
Default Incident* Team (required if using AMIE) |
Set the Default Incident Team, which is used for AMIE integration and also set as a default Support Team for Item Types. |
Default Problem* Team (required if using AMIE) |
Set the Default Problem Team, which is used for AMIE integration and also set as a default Support Team for Item Types. |
Default Change* Team (required if using AMIE) |
Set the Default Change Team, which is used for AMIE integration and also set as a default Support Team for Item Types. |
Default Request Team* (required if using AMIE) |
Set the Default Request Team, which is used for AMIE integration and also set as a default Support Team for Item Types. |
Review Options |
|
Review SLA |
When enabled will display the Review date field in the Service Level Information screen. The default number of days between reviewing SLAs should be set and the number of days before the review date for an Alert Reminder, should also be entered. |
Review RFC |
When enabled the system will display a Review date in the RFC Information tab. The default number of days between reviewing RFCs should be set and the number of days before the review date for an Alert Reminder, should also be entered. |
KBA Options |
|
Control KBA via Request |
When enabled, a Request is generated when the KBA is created, deleted or amended and can only be published to the KB by a User with publishing privileges. |
Request Type |
Specify the type of request to be generated when new or amended KB content is moved to a "Pending Publication" state. (The options are based on the ownership of Change and Service Request licenses.) |
Default SLA |
Set the default SLA to be used for when requests are logged regarding updates in the knowledge base. Applying an SLA here, determines which workflow and team will receive the requests for approval, as with any other request logged in the system. |