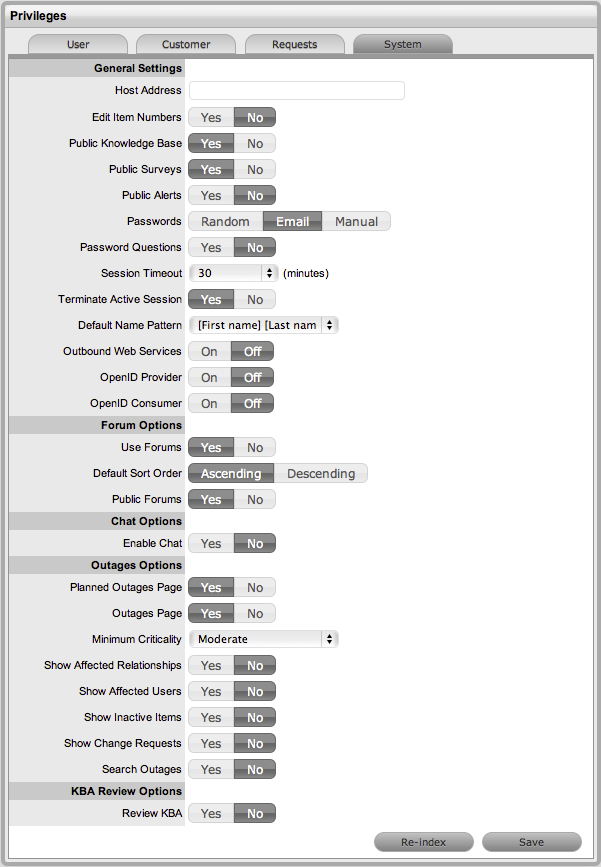
Select Setup>Privileges>System
The System Privileges tab is displayed.
Customer Privileges |
Description |
|---|---|
Host Address |
To be completed with details of the machine hosting the application, if required. |
Edit Item Numbers |
Allows users to edit the identification number of an Item. |
Public Knowledge Base |
Allows access to the Public Knowledge Base on the Login Page. |
Public Surveys |
Provides access to Public Surveys on the Login Page. |
Public Alerts |
Alerts with the visibility defined as "Everyone" will be made available on the Login Page. |
Passwords |
When
LDAP or Active Directory Authorization is not used internal
authentication is used. To define the password type to be
used by the system select: Email: The Users Email Address will be used as the password. Manual: Allows the User to manually create a password. |
Password Questions |
Enables the ability to set security questions within the My Account screen for Customers and Users, which are referenced when resetting or re-sending login credentials. |
Session Timeout |
The number of minutes the system waits before terminating idle sessions.
|
Terminate Active Session |
When enabled, if a User attempts to log into the system when they already have an active session, they will be prompted to end the active session to allow for the new login. |
Default Name Pattern |
Select the order for names being displayed in the system, when the First and Last Name are shown together on a screen. |
Outbound Web Services |
When enabled, request Workflow States and Item Lifecycle States can be assigned a 'listener', which allows these details to be updated in external systems. (Refer to the Extend section of the LiveTime website for details on how to develop a listener.) |
OpenID Provider |
Enables the system to function as an OpenID Provider for User authentication across network resources, as the user authentication source. The OpenIDProvider URL should be: <PROTOCOL>://<SERVER>/LiveTime/WebObjects/LiveTime.woa/ wa/providerLookup The Protocol should be set to http or https and the server details should include where the system is hosted. |
OpenID Consumer |
Enables the system to delegate authentication of Users and/or Customers to one or more OpenID Providers (i.e., Google, Yahoo). OpenID Providers that are to be used as delegates are configured in the Setup>Authentication>Social tab. |
Forum Options |
|
Use Forums |
This option enables and disables all Forums within the system. |
Default Sort Order |
Sets the default Forum Topic sort order to either ascending or descending. |
Public Forums |
This option enables Public Forums to be viewed from the login page and does not require an account to view. |
Chat Options |
|
Enable Chat |
Select 'Yes' to activate Chat facility within the application. |
Chat Request Assignment |
Set to Technician if Customers are to be restricted to chatting only with the Technician assigned to their Request. Set to 'Team' to allow Customers to chat with any member of the Team assigned to their request. |
Default Technician Availability |
Sets the default availability for chat status in newly created Technician Account information screens. |
Outages Options |
|
Planned Outages Page |
A link to the Planned Outages page is displayed on the Login Screen. Outages can be set within Configuration Item properties to schedule when the item will be off-line. |
Outages Page |
A link to the Outages Page is displayed on the Login Screen. |
Minimum Criticality |
Defines the Minimum Criticality required for Items to be displayed on the Outages pages. |
Show Affected Relationships |
Enables Item from the Outages page to show the Item's Relationships. |
Show Affected Users |
Allows Item owner's details to be displayed on the Outages page. |
Show Inactive Items |
Displays inactive Items on the Outages page. An inactive Item is an Item that is currently not in use by the organization. |
Show Change Requests |
Allows Customers to view Change Requests related to Outages displayed in the Customer Portal. |
Search Outages |
Enables Outages to be searched using the Customer email addresses or Item number. |
KBA Review Options |
|
Review KBA |
When enabled a Review date field is displayed in the KBA Information screen. The default number of days between reviewing KBAs should be set and the number of days before the review date for an Alert Reminder, should also be entered. |
Click Yes to enable, or No to disable a Privilege option
Click Save.