The Service Portfolio Team is responsible for overseeing the creation and publication of all service offerings in the Service Portfolio, which include:
Services under development
Services in production and operation, stored in the Service Catalog
Retired and discontinued services.
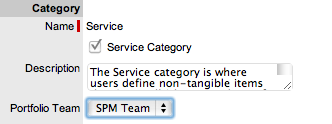
To maintain control of the creation, editing and deletion of Service Items within the CMDB, Service Portfolio Teams can be assigned to Service Category templates. Included within these Teams are Groups of Users who are responsible for managing Item information at the various stages of the Service Lifecycle.
When Service Portfolio Teams are configured
within the application, the option to assign a Service Portfolio Team
is displayed within Service Category templates in the Configuration>Categories
tab. This allows for the Groups that are created within the Team,
to be assigned to the different Category Lifecycle States included in
the Lifecycle Map displayed in the Item Categories>Life Cycle tab.
![]()
Assigning Groups to Category Lifecycle States allows the Users within the Group to edit the details of an Item when it is assigned that stage of the Category Lifecycle.
When creating the Teams, it is suggested that the Group names reflect the stage of the Service Lifecycle, for instance Service Design, Service Implementation, Service Operation, Service Quality Control and Catalog Management.
To create a Service Portfolio Team:
Select User>Teams
Click New
Enter the Team Name
Select
the Service Portfolio Process
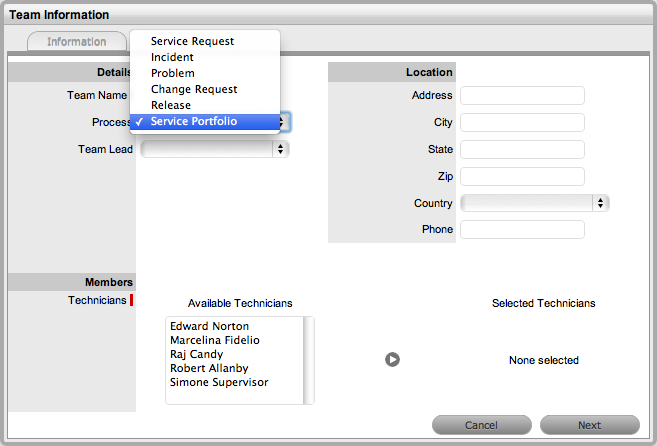
Complete the Team Location details, if required
Select
Technicians from the Available Technicians list
Highlight Technician names within the Available Technicians list and
click the arrow icon to move the Users to the Selected Technicians
list.
Set the Team Lead
Click
Next
The Service Screen moves to the Group tab where the Users are assigned
the various Groups that are provided the privilege of managing Item
information and lifecyle status as part of managing the Service Portfolio.
Some suggested Groups include Service Design, Service Implementation,
Service Operation, Service Quality Control and Catalog Management.
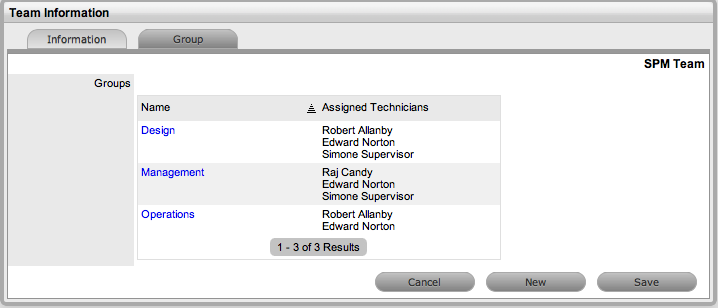
For each Group link, click to assign Users to the Team
Move
Technicians between the Available and Selected boxes
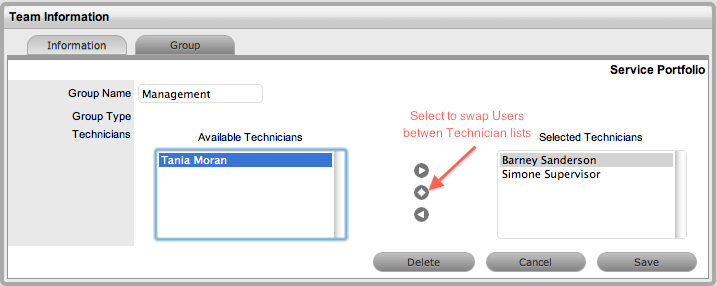
Select Save
Click
New, to add other Groups to the Team
Assign Users as required and Save.
Click
Done.
To remove a User from a Group, with the Team Information screen in Edit mode:
Click
on the Group Name hyperlink
The lists of Available and Selected Technicians are displayed.
Remove and add Technicians, as required
Select Save.
To remove a User from a Team:
In
the User tab, click Users
The User Information screen appears.
Click on the name of the User
Select the Team tab
Click
on Edit
The Remove button is displayed.
Select the checkbox to the left of the Team
Click
Remove.
If the User is not the only person assigned to an escalation layer
of the selected Team, the User will be successfully removed from the
Team.