5.3 Service
5.3.1 Service
Service Level Agreements (SLAs)

Service Level Agreements (SLAs) are used by organizations to manage the level of service expected of IT and to ensure optimal maintenance of critical business systems. SLAs are documents that are negotiated between IT and Customer departments, to identify expectations and clarify responsibilities.
This tab is used to create and modify Service Level Agreements that provide service request management capabilities.
SLAs include the following elements:
-
Notifications
-
Targets
-
Pricing (if enabled in Admin>Setup>Billing)
-
Blackout Periods
-
Workflows.
Details
Creating a Service Level Agreement
To create a new Service Level Agreement:
-
Select Service >SLAs
-
Click New
The screen defaults to the Details tab of the SLA Editor screen.
-
Complete the fields, including any custom fields, as required:
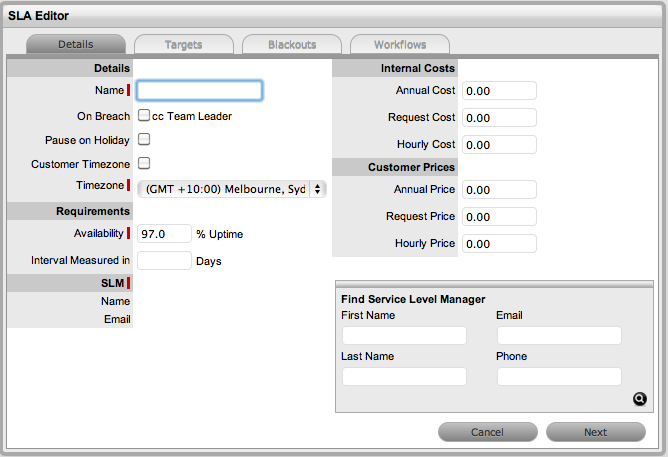
SLA Editor
Details
Name*
The name to identify the SLA.
Review Date
Details are completed based on the Admin default settings but can be edited by the User. An Alert is sent based on the default days set in the Review RFC Alert field in Admin>Setup>Privileges>Requests.
Pricing ^
Annual Price ^
Indicates the cost applied on an Annual basis. This price is used within Items to calculate the cost of supplying services.
Incident Price ^
Indicates the cost applied on a Per Incident basis.
Hourly Price ^
Indicates the cost applied on an Hourly basis.
On Warning
Notification can be set to Carbon Copy (CC) an email to the Team Leader when the Warning time is breached.
On Breach
An email can also be sent to the Team Leader when an Escalation Time period is Breached.
Pause on Holiday
**This option is only displayed if the Observe Public Holidays option has been enabled within the Administrator>Setup>Privileges>User tab.
Enable this option, if the SLA is to be adjusted on designated Public Holidays. The Public Holidays are defined within the Administrator>Setup>Public Holidays screen.
Customer Timezone
When enabled, SLA times displayed within the Technician request view uses the customer timezone.
Requirements
Availability*
Used to state the time an Item under the SLA is required to be online. The default value is set to 97%.
Interval Measured in __ Days
Defines the number of days over which the Availability requirement is calculated.
SLM (Service Level Manager)
Name
Email
Use the Find Service Level Manager search option, to enter the contact details of the Manager who will monitor the performance of the SLA.
This is also the Service Desk User who is assigned responsibility for managing the performance of external support providers who are forwarded Service Requests assigned with this SLA .
Priority
Process Name
The field is displayed when Workflows have been assigned to the SLA.
If multiple Workflows have been assigned for each Process, this field allows the User to assign a default Workflow for the SLA. When a Request is created using the SLA, the default Workflow is assigned to the Request.
* Denotes a mandatory field
^ Only applicable when billing is enabled
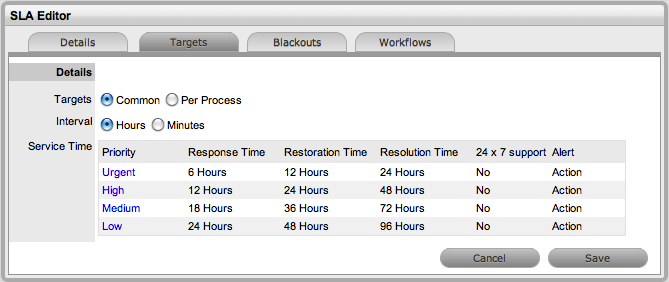
Targets
The Targets tab is used to configure the SLA's priority Response, Restoration and Resolution Times.
To modify a Priority:
-
Select Service > SLAs
-
Select an SLA
-
Select the Targets tab to display the following fields:
SLA Editor
Targets
Targets
Select Common if the SLA is to apply across Incidents, Requests, Problems and Change Management. If the SLA is specific to a Process, select Per Process and choose a Process displayed in the drop-down list.
Interval
Define if the time is to be calculated in Hours or Minutes.
Service Time
Priority
Urgent, High, Medium and Low.
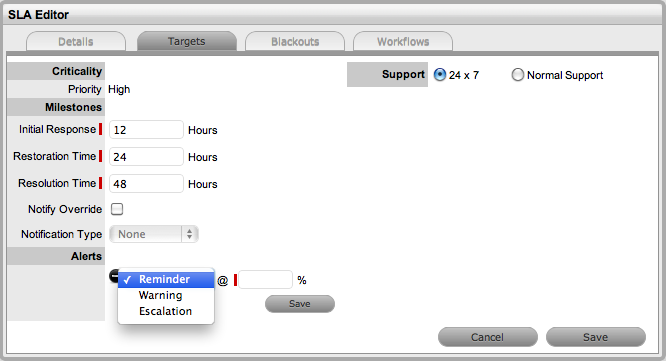
Milestones
Initial Response
The maximum time the Customer would wait from the point of request creation before receiving a Note update for a Technician. The Response trigger is stopped when a Note has been added to the request by the assigned Technician and an email is sent to the Customer. If the Response Time is reached, without a Note being added, the request will be escalated.
Restoration Time
The maximum time the Customer would wait from the time the request was created until a workaround or temporary fix has been implemented. The Restoration trigger stops by assigning the request a Workflow State that has to the SLA Restoration option set to Yes. By default, this Workflow State is Open - Restored.
Resolution Time
The taken time from the point of request creation until it the request is moved to a Workflow State with the SLA Resolution option set to Yes. Any of the default Workflow Exit States stop the Resolution Timer.
Notify Override
If the system is to override the default notification method set for a request when the Priority being edited is assigned to a request, check this option.
Notification Type
Set Email or SMS as the type of notification when the override action is applied to a Priority.
Alerts
Reminder
Sends a reminder email to the Technician when the defined percentage of time elapses for a Response, Restoration or Resolution target that has not been met on a request. Can be set up to 200% of the SLA. Note, Alert intervals are not cumulative.
Warning
Sends a warning email to the Technician when the defined percentage of time elapses for a Response, Restoration or Resolution target that has not been met on a request. Can be set up to 200% of the SLA.
Escalation
Escalates the request to a higher escalation layer when the defined percentage of time elapses for a Response, Restoration or Resolution target that has not been met on a request. Can be set up to 200% of the SLA. It should be noted that the Service Level Manager is also notified when an SLA is breached.
Support
24 x 7
Do not amend if the SLA is to apply 24 hours a day, 7 days a week.
Normal Support
Select if service hours are to be defined for the SLA. When checked, define the service hours by either selecting a template (Templates are configured by the Administrator in the Setup>Localization>Hours tab) or manually define the days and time by making selections within the drop-down lists.
-
Click Edit, if not already in Edit mode
-
Define if the SLA applies across all Processes or to a specific Process
-
Define if the SLA is to be calculated in minutes or hours
-
Select the Priority link to customize the following:
-
Modify the Milestone intervals for the Response Time, Restoration Time and Resolution Time, as required
The time will be set in minutes or hours, as defined for the SLA.
NOTE:Milestone intervals are not cumulative
For example, for the default Warranty SLA, the Priority of Urgent has the default Milestone times of 6, 12 and 24 hours. This means a User has 6 hours to send a response to a Customer before the Response time is breached, 12 hours from the point of request creation to meet the Restoration time, and 24 hours from the point of request creation to meet the Resolution time. It should be noted that requests may be moved to non-SLA timed States during these Milestone periods, so the 12 or 24 hours may not be consecutive hours.
-
Check the Notify Override option, if relevant
Set the type of notification, email or SMS, that is to be used to contact the User assigned to the request with this Priority.
-
Create one or multiple Reminder, Warning or Escalation Alerts, if relevant
Enter the percentage of time to elapse for an Alert to be triggered for a Milestone. Selecting Warning as the Alert will cause a warning e-mail to be sent to the request's Technician when the specified percentage of a milestone has been reached.
Selecting Escalation will trigger a request escalation to the next support layer of the Team. The escalation system will also fire if the SLA threshold is breached.
NOTE:It is recommended that reminders be sent at 50% of elapsed time and escalations at 75-80%
These figures are advisory only. The internal processes of your organization will dictate the appropriate values. The Reminder percentage must be less than the Warning or Escalation percentages.
Alerts can be set to 200% of the SLA time, which ensures notifications can be still be received against breached requests
If Alerts are not customized, the application will automatically escalate the request when the Priority milestone is breached
-
Click Save
-
Modify other Priorities as necessary.
Configuring Support Hours
After the Priority times and Alerts of an SLA have been configured, Support Hours can be defined. These can be set to 24 hours by 7 days a week (24 X 7), or manually adjusted to reflect the support operation open hours.
Under 24 X 7 mode, if the SLA's urgent Initial Response field is set to six hours, and an urgent request that uses the SLA is created at midnight in the assigned Technician's time zone, those six hours will expire by 6:00 AM. This is the option to use if a support operation is staffed 24 hours a day.
If a support operation is not open 24 hours a day, the request timers are not required to run when Technicians are not available. For instance, if the support hours are 9:00 AM to 5:00 PM and the SLA hours reflect this, the SLA timers of the urgent request created at midnight would not start ticking until 9:00 AM the following business day and would expire at 3:00 PM.
To define the OLA support hours:
-
Select Service > SLAs
-
Select an SLA
-
Select a Priority link
This will display the Detail tab with Support Hours options of 24x7 and Normal.
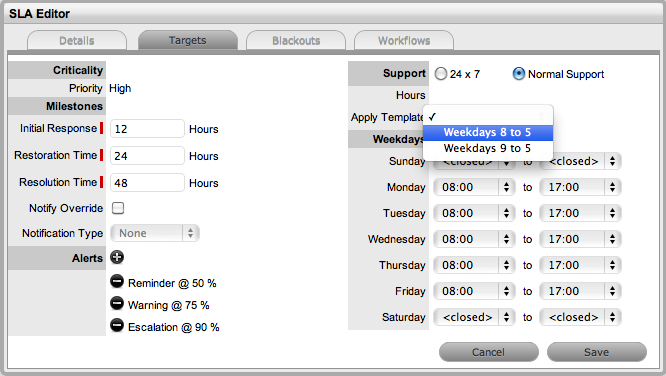
-
The default setting is 24 X 7, to amend the support hours select the Normal Support option
-
Use the drop-down lists to customize the available support hours for each day
Note that the SLA timers become inactive when the support desk is closed.
-
Click Save.
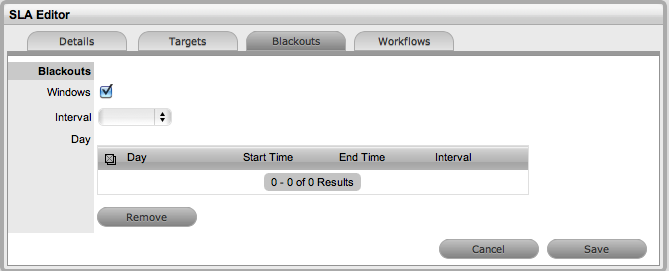
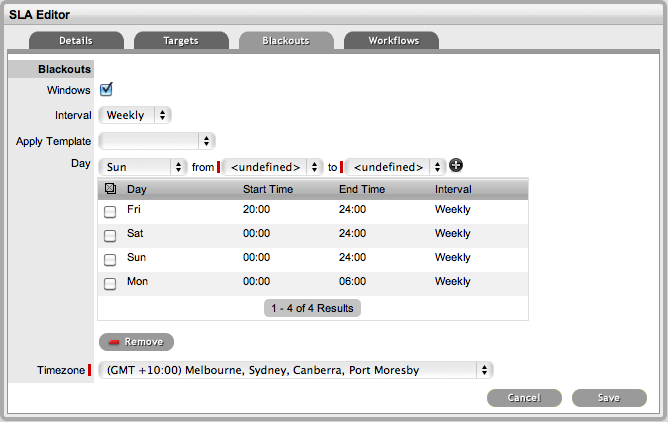
Blackouts
Blackouts are used as part of Change Management to advise Users about the time periods an Item using the SLA should be scheduled to be taken off-line if an Outage is necessary. When scheduling an Outage (Item>Details>Outages) the Blackout times are displayed advising the User of the best Planned Outage times.
After the option has been checked, use the dropdown lists to specify change windows.
A Blackout Period is an agreement between the Customer and the Service Desk regarding a period of time when the Customer has no service expectations. This can also be the preferred time for Item upgrades and maintenance without affecting service availability.
A Blackout Period is specified within an SLA. During this period, the SLA is seen to be inactive and its timers have stopped. OLAs that underpin a Workflow State that uses an SLA with a Blackout Period, will also adopt the Blackout Period.
Specifying a SLA Blackout
To specify a SLA Blackout:
-
Select Service >SLAs
-
Click a SLA hyperlink
-
Click Edit
-
Move to the Blackouts tab
-
Tick the Windows option
-
Set the Interval of weekly or monthly
-
Apply a Template or define the day and time period for the approved Blackout manually, then click

-
Define the preferred Timezone
This is required information to save the Blackout information.
-
Click Save.
See: Item Planned Outages using Blackout Periods
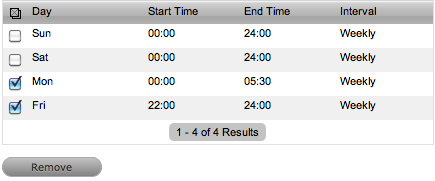
To remove time-frames from the Blackout Period:
-
Select Service >SLAs
-
Click a SLA hyperlink
-
Click Edit
-
Move to the Blackouts tab
-
Check the box next to the Day to be deleted from the Blackout
-
Click Remove.
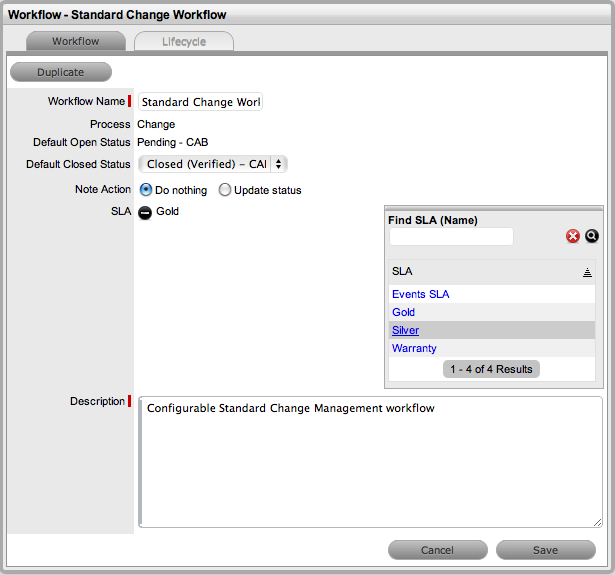
Assigning a Workflow
To assign a Workflow:
-
Select Service>SLAs
-
Click the relevant SLA link
-
Move to the Workflows tab
-
Select Add
The Available Workflow drop-down list will be displayed.
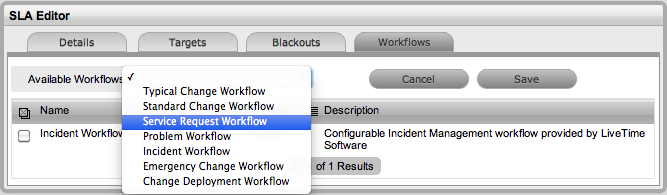
-
Select a Workflow
-
Click Save.
To remove a Workflow assignment, use the checkbox next to the relevant Workflow and click the Remove button.
Default Warranty SLA
The system includes a default SLA that does not include costs, called Warranty. The Warranty SLA can be used or edited as required.
Integration with Request Creation and the Billing System
The prices specified in the SLA provide the basis for fees charged for support on both a per Incident basis and on a subscription basis. The hourly rate is included for reporting purposes. Rather than an Item using an SLA, Items can be covered by maintenance contracts. A contract can cover a particular request, or exist as a subscription.
Maintenance Contracts form part of the Incident creation process. Incidents can be entered into the system without a valid contract, but are flagged as unpaid, and are unable to be worked on until the invoice is processed. There is also a control (configured in the Billing Preferences) for the length of time an unpaid Incident can exist in the system.
See: Assigning an SLA to a Customer
See: Assigning an SLA to an Organizational Unit when Contracts are Disabled