1.26 Configuration Categories
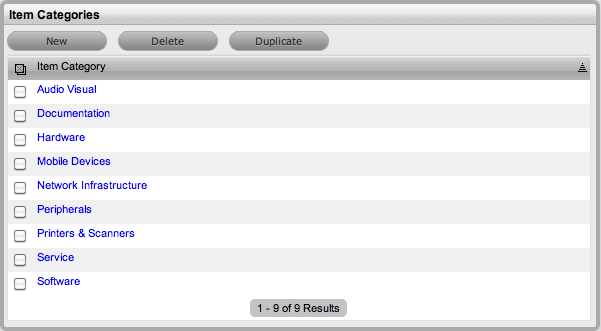
Within the application the number of Item Categories that can be defined is unlimited. By default the following Categories are included:
-
Audio Visual
-
Documentation
-
Hardware
-
Mobile Devices
-
Network Infrastructure
-
Peripherals
-
Printers & Scanners
-
Software
-
Service.
Within each Category the Lifecycle and Classifications associated with the Category can be defined.
1.26.1 Categories Tab
The default templates set at the Category level are used to cover a broad range of Item Types. Within each default Category the following have been configured, but can be customized as required:
-
The Field Labels that will be available on the Details tab of Items using the Category
-
The broadest level of Classifications that are assigned as part of the request creation process.
-
The Lifecycle stages an Item will move through from being proposed or ordered to decommissioned
-
Template responses that Technicians can use when entering a Note for a request that is assigned an Item that uses a Category.
The following table illustrates how Categories can be represented as Manufacturer Models within the Configuration>Types tab:
|
Category |
Proposed Item Type |
|---|---|
|
Hardware |
PCs, Servers, Notebooks |
|
Networking Infrastructure |
Routers/Switches, UPS, Cabinets, Racks |
|
Mobile Devices |
iPhones, PDAs, Windows MDs |
|
Peripherals |
Monitors, External Storage Devices, Docking Stations, Barcode Scanners |
|
Audio Visual |
Projectors, Electronic Whiteboards |
|
Printers/Scanners |
Printer, Scanner |
|
Digital Cameras |
Digital Still, Digital Video, Thermal Image |
|
Software |
Operating Systems, Databases, Applications |
|
Service |
Email, Website. |
The easiest way to create additional Categories, is to duplicate a default Category and tailor it to the organizational requirements.
A Service Portfolio Team can be assigned to the default Service Category by creating the Team within the User>Teams screen, then selecting Edit within the Categories tab of the Service Item Category.
Creating a Category
-
Select Configuration>Categories
The Item Categories screen appears.
-
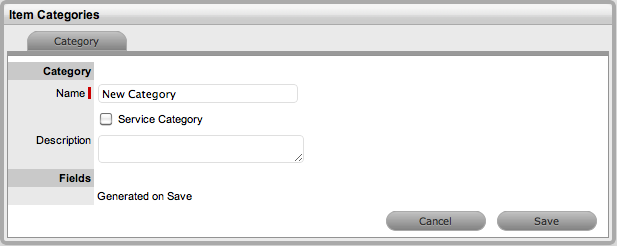
Click New
-
Enter the name of the new Category
-
Complete the Description
Content entered in this field is visible when the User scrolls over the Category Name in the Item Category list.
-
Click Save
The Item Categories screen expands to display the options to upload an Item Category icon and customize Field labels.
NOTE:The Item No. Validation option is displayed, if the Admin>Setup>Privileges>System> Edit Item Numbers is set to Yes
This displays the Input Mask and User Mask fields, which are explained in the Categories Fields table below.
-
Check the Service Category field if the template is to be used for a Service Item
Ticking this option displays the Portfolio Team drop-down list, ifService Portfolio Teams have been created within the application. This allows Groups within the Service Portfolio Teams to be assigned to the different stages of the Item Lifecycle, and activates Service Catalog Management functionality within the Cost Tabs of Types and Items that use the template.
NOTE:Customers cannot create Items using Item Categories that have the Service Category option enabled
-
Select the icon to be replaced, to change the Icon image for the Item Category
This icon is used as the generic visual representation of the Item Category in the Relationship Map. This can also be refined at the Item Type level.

Use the
 to upload a new image or
  to cancel the upload.
NOTE:The dimensions of the uploaded icon must be exactly 128 x 128 pixels
-
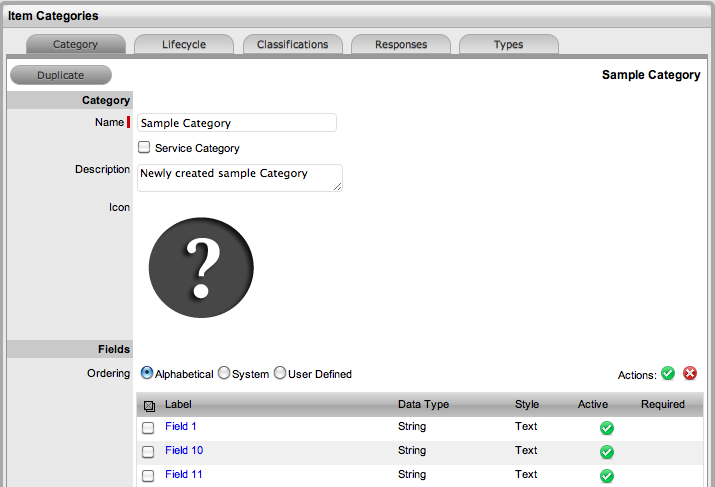
Customize the Field Labels
Custom fields are visible in the Details tab of Items that use the Category.
Click the Field Label link to open it in Edit mode and display the following options:
-
Categories Fields
Description
Category
Field Label
The name defines what attribute information is to be recorded in the field.
Active
Indicates if the field will be visible in the Details tab of an Item.
Required
Indicates if the field is required or mandatory field.
Customer Visible
Defines if the Customer can see the field within the
Customer Portal.
If Yes is selected, define if the Customer can edit the field information on the Customer Portal.
Data Type
Dictates the field's Data Type. The options available include :
-
String - List or Free Text
-
Number
-
Boolean - radio buttons for Yes/No and True/False
-
Date - creates a date field
-
Currency- creates a currency field
-
Hyperlink.
Style
States the style of the field.
eg. String- List or Free Text field. SeeLists for more information on creating a list field type.
Unique Value
When active, the system prevents the duplication of data within the customized field.
Default Value
Value entered is the default system entry for the field, when the field is not completed manually.
Input Validation
When enabled the Input Mask and User Mask can be defined.
Input Mask : A regular expression to use for data validation of values entered by a User (i.e., Zip/Post Code, telephone no.)
User Mask: A "User Friendly" representation of the Input Mask that Customers can understand should it appear in a validation error message.
Enable Description
When enabled a Description field appears, allowing the User to enter details of what information is the field is expected to capture. These details are accessible next to the custom field on the relevant screen.
-
-
Click Save to complete the field label configuration
Continue to customize all fields as required.
-
Define the ordering preference
The option defined here dictates how the fields appear on the Item Details tab.
To move a field, select the checkbox beside the field label followed by the

 to move the label up and down the list. To multi-select fields, tick the checkboxes beside the label name and click
  to activate or
  to deactivate the fields.
The field order can be set to:
-
Alphabetical - the fields will be presented according to the alphabet order of the first letter.
-
System - the fields will appear in the order they are entered into the system.
-
User Defined - the fields can be manually adjusted by the User using the system buttons.
-
-
Click Save.
Modify the Category Lifecycle,Classifications, Responses and, if the system is synched with more than one asset management discovery tool the Federated templates, if necessary.
Duplicating a Category
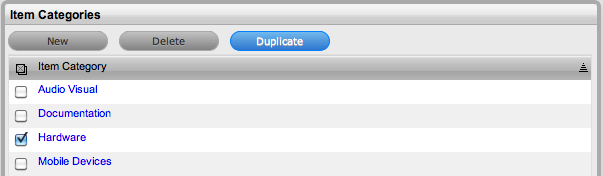
To fast track the creation of an Item Category, each can be duplicated.
To duplicate an existing Category:
-
Select Configuration>Categories
-
Tick the box to the left of the Category name
-
Click Duplicate
A new Category hyperlink is added to the Category list. The new Category will contain the same custom fields, lifecycle and classifications of the original Item Category.

-
Modify the new Category as required.
Editing and Configuring an Item Category Template
After an Item Category has been duplicated it can be modified to represent the new Item Category.
To edit a Category:
-
Select Configuration>Categories
-
Click on the appropriate hyperlink
The screen defaults to the Categories>Categories tab.
-
Click Edit
-
Enter the name of the new Category
-
Complete the Description
Content entered in this field is visible when the User scrolls over the Category Name in the Item Category list.
-
Click Save
The Item Categories screen expands to display the options to upload an Item Category icon and customize Field labels.
NOTE:The Item No. Validation option is displayed, if the Admin>Setup>Privileges>System> Edit Item Numbers is set to Yes. This displays the Input Mask and User Mask fields, which are explained in the Categories Fields table at Point 9.
-
Check the Service Category field if the template is to be used for a Service Item
Ticking this option, displays the Portfolio Team drop-down list, ifService Portfolio Teams have been created within the application. This allows Groups within the Service Portfolio Team to be assigned to the different stages of the Item Lifecycle, and activates Service Catalog Management functionality within the Cost Tabs of Types and Items that use the template.
NOTE:Customers cannot create Items using Item Categories that have the Service Category option enabled
-
Select the icon to be replaced, to change the icon image for the Item Category
This icon is used as the generic visual representation of the Item Category in the Relationship Map. This can be refined at the Item Type level.
Use the
to upload a new image or to cancel the upload.
NOTE:The dimensions of the uploaded icon must be exactly 128x128 pixels
Version 7.0 will not apply these icons in the Relationship Map, but they will be used in a future release
-
Customize the Field Labels
Custom fields are visible in the Details tab of Items that use the Category.
Click the Field Label link to open it in Edit mode and display the following options:
-
Categories Fields
Description
Category
Field Label
The name of the field.
Active
Indicates if the field is active.
Required
Indicates if the field is required or mandatory field.
Customer Visible
Defines if the Customer can see the field within the
Customer Portal.
For a Service Category, if it is relevant to display costs or other specific details regarding a Service on offer in the Services Tab of the Customer Portal, then set relevant attribute fields to being Customer Visible.
Data Type
Dictates the field's Data Type. The options available include :
-
String - List or Free Text
-
Number
-
Boolean - radio buttons for Yes/No and True/False
-
Date - creates a date field
-
Currency- creates a currency field
-
Hyperlink.
Style
States the style of the field.
eg. String- List or Free Text field. SeeLists for more information on creating a list field type.
Unique Value
When active, the system prevents the duplication of data within the customized field.
Default Value
Value entered is the default system entry for the field, when the field is not completed manually.
Input Validation
When enabled the Input Mask and User Mask can be defined.
Input Mask : A regular expression to use for data validation of values entered by a User (i.e., Zip/Post Code, telephone no.)
User Mask: A "User Friendly" representation of the Input Mask that Customers can understand should it appear in a validation error message.
Enable Description
When enabled a Description field appears, allowing the User to enter details of what information is the field is expected to capture. These details are accessible next to the custom field on the relevant screen.
-
-
Click Save to complete the field label configuration
Continue to customize all fields as required.
-
Define the ordering preference
The option defined here dictates how the fields appear on the Item Details tab.
To move a field, select the checkbox beside the field label followed by the
to move the label up and down the list. To multi-select fields, tick the checkboxes beside the label name and click to activate or to deactivate the fields.
The field order can be set to:
-
Alphabetical - the fields will be presented according to the alphabet order of the first letter.
-
System - the fields will appear in the order they are entered into the system.
-
User Defined - the fields can be manually adjusted by the User using the system buttons.
-
-
Click Save.
Modify the Category Lifecycle,Classifications, Responses and, if the system is synched with more than one asset management discovery tool, the Federated templates, if necessary.