1.41 Create an Item
When an Item is created within the system it takes the generic settings of an Item Type and binds them to a Customer or Customers and/or Organizational Unit. The Item information uses the details defined in the Item Type template, however these can be adjusted to suit the requirements of the specific Item.
To create an Item:
-
Select Configuration > Items
-
Click New
The Item Information screen appears
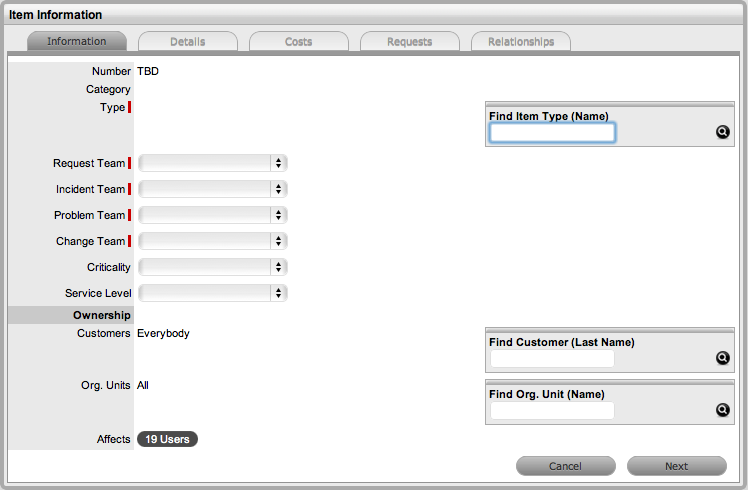
*Denotes mandatory fields.
-
Item
Description
Item Number*
If the Administrator has set the Item Numbers Editable option in Setup> Privileges> System to Yes, the User will have the option of entering a customized Item number. It may contain numbers and/or letters, and be between 1 and 64 characters in length.
As no two Item Numbers can be the same, the User will be prompted to change the value they have entered if it is already in use. If the Item Number field is left blank, the system will automatically create an Item Number.
If the Administrator has set the Item Numbers Editable option to No, an Item Number will be generated automatically and cannot be edited.
Category*
This is auto-filled, based on the assigned Item Type.
Type*
This is the Item Type that the Item represents. Click the Search button to view the list of available Item Types.
Team*
This is the Technician Team that will be assigned to support the Item.
Status*
Select the status from the drop-down options displayed after the Item Type has been assigned.
Criticality*
Rates the degree of importance of an Item Type within an organization. The 'Impact' of a request is initially pulled from the Criticality of the Item, but can be adjusted within the request Information screen if required. Requests logged through the Customer Portal, use the Criticality of the Item to determine the Priority of the request. (See additional information below.)
Service Level
Select the Service Level Agreement from the drop-down list, if required.
Ownership
Customers
These are the Customers who own the Item. A single Customer, a group of Customers or all Customers in the application can be assigned to an Item.
-
Enter a Customer last name, or leave blank then click the Search button to view a list of all available Customers.
-
Click on the hyperlink for the relevant Customer name or names to assign them to the Item.
If no specific Customer is allocated to the Item, it becomes a Global Item and is assigned to Everyone.
Org Units
These are the Org Units who own the Item. The Item can be assigned to one or multiple Organizational Units.
To assign an Org Unit:
-
Enter an Org Unit name, or leave blank then click the Search button to view a list of available Org Units.
-
Click on the hyperlink for the relevant Org Unit name or names to assign them to the Item.
-
NOTE:If Billing is enabled an owner must be assigned to the Item. The owner can be either a Customer or an Org Unit, but only Org Units that have a Primary Contact, will be displayed in the Org Unit Search list. (See: Primary Contact.)
Notification
Method
This field is visible when an active Item moves into an offline State and allows the User to define who (Primary Contact or All Owners of the Item) and how (Email or SMS), Customers will be notified that the Item is not available.
-
-
Search and select an Item Type
-
Define a support Team for each process
-
Select the Item's Status and Criticality
(Refer below for further details about Item Criticality.)
-
Assign a Service Level
If Contracts are enabled for the system, the assignment of an SLA will result in an annual service contract automatically being applied to the Item. If an SLA is not assigned, a Contract can be created for the Item within the Costs tab.
-
Search and select a Customer and/or an Organizational Unit owner
-
Click Next to view the Details tab
1.41.1 Item Criticality
The Item Criticality is used to identify the degree of importance of an Item to an Organization.
When the Incident Priority is set to Derived in the Administrator Setup, the Impact of a request is mapped from the Criticality of the Item associated with the request and then combined with the selected Urgency, which derives the Priority of the request. If required, the Impact can be manually adjusted within the request Information screen. Requests logged through the Customer Portal, use the Criticality of the Item to determine the Priority of the request, which can be manually adjusted by the Technician User.
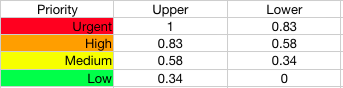
The following table displays the calculations applied by the system to the Item Criticality, which is mapped to a request's Impact to determine a request's Priority:

The above calculations result in the following Priorities:
The Incident Analyzer, if enabled by the Administrator in Setup>CMS>Incident Analyzer, can apply the Criticality to automatically detect Problems. The minimum Criticality level can also be used to determine which off-line Items are displayed on the Outages pages, when the Outages pages are enabled by the Administrator in Setup>Privileges>System.