The Lifecycle details the stages of life for a Configuration Item. This allows Items to be tracked from the conceptualization/purchase stage through to being decommissioned/discarded, and can be used to indicate availability levels throughout the Lifecycle.
The States configured here are used within the Item information screen and allow the User to easily see if an Item is at a start or end point of its life, whilst also indicating if the Item is available or not. If an Item is moved to an Offline state, this information is also used on the Outage pages, for easy reference.
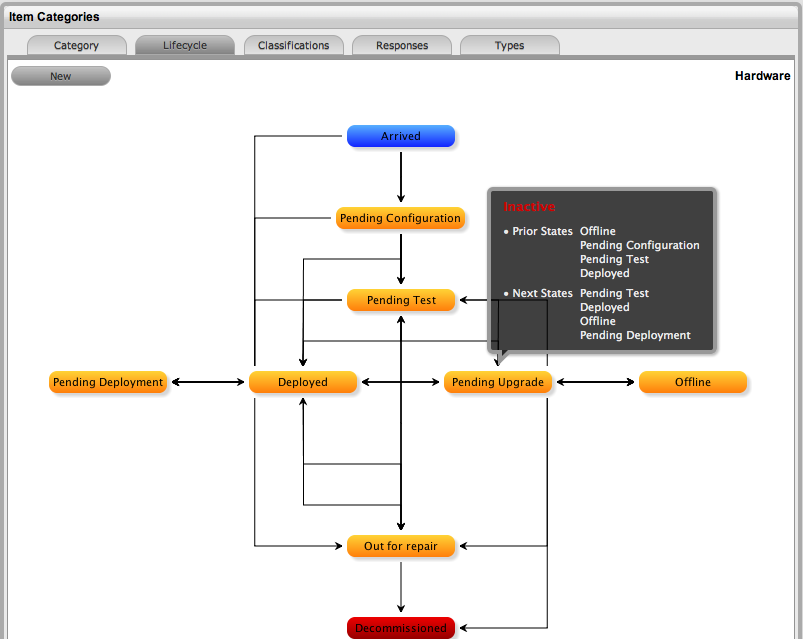
By default, the system is installed with some pre-defined Lifecycles, which are displayed with the three types of States:- Previous, Current and Next. Based on the configuration of the Current State, the listings displayed in the Previous or Next column show where an Item can move to from the Current State.
If the default Lifecycles do not match the requirements of the service and support organization, they can be customized. To avoid confusion, it is suggested that the default Lifecycle States be erased completely if they are not relevant to your organization.
It is recommended that all Lifecycle States be written down and mapped before this process is started.
Select Configuration>Categories
Click on the Item Category hyperlink
Move to the Lifecycle tab
Click
the Current State hyperlink to edit the State, or, click New to create
a new transitional State
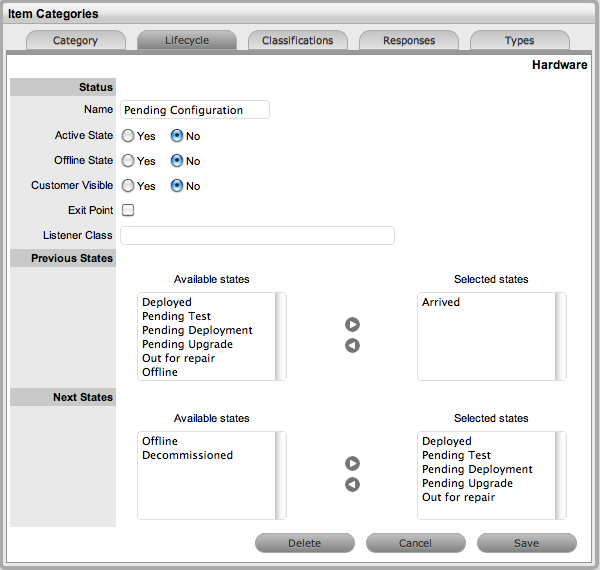
The States/Status screen appears.
Rename the State as required
Complete the State configuration:
|
Description |
|---|---|
Status |
|
Name |
Enter the name of the Lifecycle State. |
Active State |
Stipulates if the Item is Active, when assigned this State. |
Offline State |
Only visible when Active is set to No. Indicates if the Item is offline and inactive. Items moved into states where this is enabled, have availability metrics calculated. |
Customer Visible |
When selected, Items in this State are visible in the Customer Portal |
Pre-production State |
Only visible for Service Category lifecycle states. Items that use this state are available within the Service Pipeline filter view of the Configuration>Items tab. |
Entry Point |
An Entry Point is used to indicate the start of a Lifecycle. To make the state a Workflow Entry Point, select the Entry Point checkbox. As the Entry Point is the first state, the Previous States field will be removed. |
Exit Point |
Select whether the state will be an Exit Point. An Exit Point is used to indicate the end of a Lifecycle. |
Listener Class |
This field is visible if the Outbound Webservices option is enabled in the Admin>Setup>Privileges>System tab.
Complete this field, if assigning an Item to this State is to trigger an event in an external system.
This field should contain the name of a Java class that implements the interface com.livetime.ws.listen.LifecycleListener that has been compiled into a jar file and added to the LiveTime classpath. Please contact support for further details. |
It is advised Users enter the list of all States, before defining any relationships to Previous or Next States
To return to the Lifecycle Current State list, save the updated State information
Continue editing, adding
or deleting States until all relevant transitional States exist within
the Lifecycle
After each Lifecycle State has been configured, the Lifecycle itself
should be mapped.
Select a Current State
hyperlink to configure the Previous State or Next State options,
Using all Available States entered in the Lifecycle, define the status
direction options of an Item that uses this Item Category template.
|
Description |
|---|---|
Status |
|
Previous States |
If the State is not an Entry Point, use the arrow button to select Previous States from the Available States. |
Next States |
If the State is not an Exit Point, use the arrow button to select the Next States. |
Available States |
Lists all the possible States that can be included in the Lifecycle. |
Selected States |
Lists the states that have been included as a Next or Previous State of the Lifecycle. |
When a State is used as a Previous
or Next State, it allows an Item to move forward and backward in a
Lifecycle
An Entry Point State cannot have any previous States and an Exit Point
State cannot have any Next States.
Highlight the relevant States in the Available States box
Click the arrow pointing
towards the Selected States box

When all States have been allocated, click Save
Save the assignment, and complete the process for all stages of the Item Lifecycle
Customise settings if
editing a Service Category
Assign a Group within the associated Service Portfolio Team, this will
allow these Users to edit the Item details when assigned this stage
of the Category Lifecycl
![]()
Click Save.
Move to the Classifications tab, to define request Classifications
for the Item.
It may be necessary to delete a system default State or a State that is no longer in use. Note that a State cannot be deleted if it has been assigned to an Item.
To delete an unused State:
Select Configuration>Categories
Click on the Item Category hyperlink
Move to the Lifecycle tab
Select the Current State link
Click Delete.
Item Lifecycle Example
In this example the Item Category Hardware has a Lifecycle State of Arrived. This State is inactive and an entry point. Items assigned this State would not be visible on the Customer Portal.
After this State is assigned to an Item, the next State that the Item can move to is any of the States listed within the Selected States list (i.e., Deployed, Pending Configuration, Pending Test, Pending Deployment or Out for Repair).
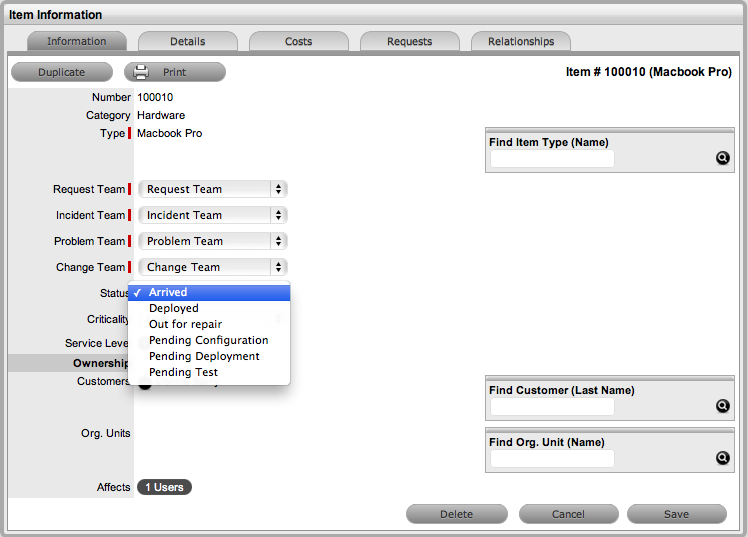
Setting up the Lifecycle Status "Arrived"

The Item Status list contains all the States defined as Next States for the Arrived Status.