E.15 Action - Install MSI
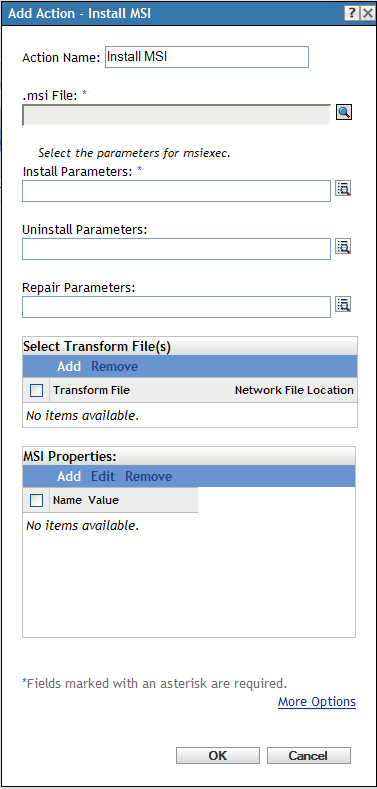
The Action - Install MSI dialog box lets you specify the location of the MSI file; its Install, Uninstall, and Repair parameters; the transform file; and the executable security level.
Figure E-16 Action - Install MSI Dialog Box
You access this dialog box by using the following methods:
-
As part of the process of creating a Windows bundle by using the bundle category. For more information, see Section 2.4, Creating Windows Bundles.
-
In ZENworks Control Center, click the tab, click the underlined link of a bundle in the column of the list, click the tab, click one of the action set tabs (Install, Launch, Verify, Uninstall, Terminate, or Preboot), click the drop-down list, then select an available action.
.msi File:
Click  to display the Select .msi File dialog box. Browse to and select the .msi file to install.
Select the option to include all the supporting files that are within the directory containing the .msi file and the subdirectories within it.
If you have not installed the Novell File Upload extension on this device, you must do so before you can browse to and upload files. For more information, see Novell File Upload Extension.
Install Parameters:
Click  to display the Install Parameters dialog box, then specify the desired parameters. Click the button for additional information.
Uninstall Parameters:
Click to display the Uninstall Parameters dialog box, then specify the desired parameters. Click the button for additional information.
Repair Parameters:
Click to display the Repair Parameters dialog box, then specify the desired parameters. Click the button for additional information.
Transform File: Click to browse to and select the desired transform file. You can upload the transform file or you can specify its location.
If you have not installed the Novell File Upload extension on this device, you must do so before you can browse for a file path. For more information, see Novell File Upload Extension.
Different groups within an organization often use the same application, but they might not require the same feature set. One of the benefits of Windows Installer is that if you have 10 groups needing 10 different feature sets or other alterations for the same application, you can deploy the same MSI package to all 10 user groups, but with a different transform file (MST) applied for each group.
A transform file is a collection of changes applied to an MSI installation. It contains all modification information, such as whether features are installed; how they are installed; which files, shortcuts, and registry entries are included; and Add/Remove Programs applet information.
If you have vendor-supplied MSI packages, you can use AdminStudio ZENworks Edition to create and manage transforms.
MSI Properties: The MSI package contains the property values that were defined during the administrative installation of the application. These property values determine the way the Microsoft Windows Installer installs the application to the workstation. In some cases, you might want to change one or more of the property values. For example, a property value might define the default location for a user’s work files. By adding the property to the list and changing the property’s value, you can override the default location defined in the MSI package.
If necessary, you can add public properties that were not included in the MSI package. When doing so, you should be careful to add only those properties that are valid for the package. The following options are available:
-
Add: To override a property value, you change the property value and add the property to the Properties list so that Application Launcher knows to use that property value rather than the one defined in the MSI package. To do so, click to display the dialog box. In the field, select the property whose value you want to override, specify the new value in the field, then click to add the property to the list.
-
Edit: To modify a property that is in the list, select the property, click , modify the value data, then click OK.
-
Remove: To remove a property from the list, select the property, then click . Deleting the property causes future installations of the application to use the property value defined in the MSI package.
Executable Security Level: Click to specify the executable security level options.
On Windows 2000/XP/Vista, the application executable can run in either the “user” space or the “system” space. By default, the option is selected, which causes the application to run in the “user” space and inherit the same workstation security level as the logged-in user.
If the logged-in user's security level does not provide sufficient rights and file access to run the application, you can configure the application to run in the “system” space or as a dynamic administrator, as described below:
-
Run as logged in user: The MSI application inherits the logged-in user’s credentials. For example, the application has the same rights to the registry and the file system as the logged-in user.
Select the application’s display mode: , , , or . In Hidden mode, the application runs normally without a user interface available. This is useful if you want the application to process something, then go away without user intervention.
Select to provide administrator privileges to the logged-in user. However, providing administrator privileges to a user might pose security risks. If this option is selected, the user on the managed device is prompted to enter the password when the MSI is installed on the device. To install the MSI, the user must log in to the device with a user account that has a password configured.
NOTE:On a Vista device, if the administrator is logged in to the device and the is selected, the action is performed in the quiet mode.
-
Run as secure system user (Don't allow system to interact with desktop): The application is run under the Local System user and inherits Administrator-level credentials. For example, the application has full rights to the registry and the file system. Because the security level is set to , the application's interface is not displayed to the user and the application is only visible in the Task Manager. This option is useful when running applications that require full access to the workstation but require no user intervention.
-
Run as dynamic administrator: A dynamic administrator is an administrator account that is created on the fly to perform certain procedures, such as installing applications. Using a dynamic administrator is helpful when installing applications (some MSI applications, for example) that cannot be installed in the system space. When you select this action, the dynamic administrator is created, it performs the required tasks, and then the account is deleted.
You cannot use mapped network drives to specify files and directories because dynamic administrators do not have access to mapped drives.
NOTE:Performing this action as dynamic administrator on a Windows domain controller fails because Microsoft does not allow the use of local administrator accounts on domain controllers.