3.3 Assigning Existing Bundles to Users
When you create bundles, the object is created without assigning devices or users to it, or specifying distribution, launch, or availability schedules. Before the bundle can be used on assigned devices, you must complete the steps in this procedure.
You can use ZENworks Control Center or the zman command line utility to assign bundles. The following procedure explains how to assign a bundle using ZENworks Control Center. If you prefer the zman command line utility, see the Bundle Commands
in ZENworks Command Line Utilities
.
-
In ZENworks Control Center, click the tab.
-
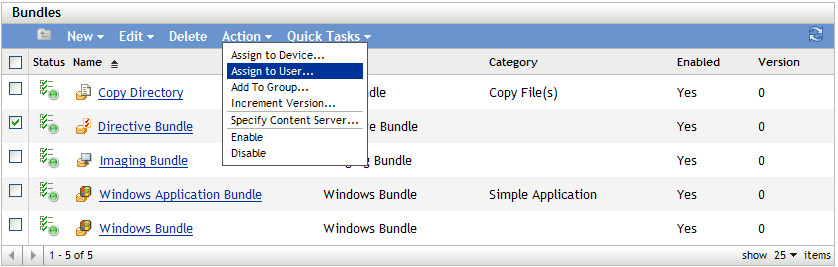
Select the desired bundle in the list by clicking the box next to its name, click , then click .
or
Click the desired bundle, click . In the Device Assignments panel, click Add.
A bundle must be assigned to devices and users before it can be distributed to them.
You can assign the bundle to individual devices, users, folders, or groups. Assigning a bundle to a folder or group is the preferred method of assigning bundles. This allows for easier management of the bundle assignments and can decrease the possibility of high server utilization caused by assigning the bundle to a large number of items (for example, more than 250).
-
In the Select Objects dialog box, browse to and select the objects to which you want to assign the bundle.
The Select Objects dialog box opens with the Users folder as the root folder. By default, the user sources that have been defined are displayed, as well as the ZENworks User Groups folder.
Browse for and select the users, groups, and folders to which you want to assign the bundle. To do so:
-
Click
 next to a folder to navigate through the folders until you find the user, group, or folder you want to select.
If you are looking for a specific item, such as a User or a User Group, you can use the list to limit the types of items that are displayed. If you know the name of the item you are looking for, you can also use the box to search for the item.
-
Click the underlined link in the column to select the user, group, or folder and display its name in the list box.
-
Click to add the selected users, folders, and groups to the list.
-
-
Specify the bundle’s shortcut location.
You can use the Shortcut Location assignments to specify the locations on the managed device where ZENworks Adaptive Agent displays the bundle’s icon. The possible locations include the following:
Application Window: Places the icon in the Application window. This location is selected by default.
Quick Launch: Places the icon on the Quick Launch toolbar area of the Windows taskbar.
Desktop: Places the icon on the device’s desktop.
System Tray: Places the icon in the system tray (notification area) of the Windows taskbar.
Start Menu: Places the icon on the menu on all Windows devices except for Windows Vista. On Windows Vista, it places the icon in > .
On Windows Vista device, if you want to change the look and feel of the menu or pin applications to the menu, see Section G.0, Best Practices.
-
Click to display the Schedules page, then select the schedules you want to define:
Distribution Schedule: Defines the dates and times when the content of the bundle is distributed from the ZENworks Server to the managed device or user. If you do not establish a schedule, the bundle’s content is distributed to the device or user when it is first launched. However, the schedule does not define the date and time when the action in the bundle runs.
Launch Schedule: Defines the dates and times when the ZENworks Adaptive Agent automatically launches the bundle. If you do not establish a schedule, the bundle is launched only when the user launches it. Before launching the bundle, the ZENworks Adaptive Agent checks if the bundle is distributed and installed. If the bundle is not yet distributed, the agent first distributes the bundle, performs the bundle’s install actions to install the bundle, then performs the bundle’s launch actions to launch it.
Availability Schedule: Defines the dates and times when the bundle is available to the device or user. The ZENworks Adaptive Agent displays the bundle icon only during the times defined by the schedule. If you do not establish a schedule, the bundle is available at all times.
NOTE:If a bundle with an assignment schedule fails to execute on a device, an attempt to execute the bundle on the device is made five times, by default.
To change the default value:
-
Open the Registry Editor.
-
Go to HKLM\Software\Novell\ZCM\.
-
Create a STRING called ScheduleRetries, and set its value as desired.
For example, if you do not want the failed bundle to be executed again on the device, set the value of ScheduleRetries to 0.
-
-
(Conditional) If you selected in Step 5, click to display the Bundle Distribution Schedule page.
The distribution schedule defines the dates and times when the bundle is distributed from the ZENworks Server to the managed device. The default schedule (no schedule) causes the bundle to be distributed to the device when it is first launched.
-
In the field, select one of the following schedules, then fill in the fields. For detailed information, click the button on the wizard page or see the following sections:
-
Select the following options as desired:
Wake on LAN: If the device is not on at the scheduled time, ZENworks attempts to use Wake on LAN (WoL) technology to power on the device. The device must support Wake on LAN.
Install Immediately After Distribution: Performs any installation actions immediately after the bundle is distributed to the device.
Launch Immediately After Installation: Performs any launch actions immediately after the bundle is installed. This option is available only if the option is enabled.
-
(Conditional) If you selected in Step 5, click to display the Bundle Launch Schedule page.
The launch schedule determines the dates and times when ZENworks Adaptive Agent automatically launches the bundle. The default schedule (no schedule) results in the bundle only being launched if the user launches it.
-
In the field, select one of the following schedules, then fill in the fields. For detailed information, click the button on the wizard page or see the following sections:
-
(Conditional) If you selected in Step 5, click to display the Bundle Availability Schedule page.
The availability schedule defines the dates and times when the bundle is available on the managed device. ZENworks Adaptive Agent displays the bundle icon only during the times defined by the schedule. The default schedule (no schedule) makes the bundle available at all times.
The schedule applies regardless of whether or not the bundle is installed. For example, if a user has not yet installed the bundle, it is only available for installation at the times specified by the schedule. If a user has already installed the bundle, it is only available for running during the scheduled times.
-
In the field, select one of the following schedules, then fill in the fields. For detailed information, click the button on the wizard page or see the following sections:
-
Click to display the Finish page, review the information and, if necessary, use the button to make changes to the information.
-
Click .
If you assign bundles to Active Directory users, the assignments are available to the users only if the ZENworks server is able to resolve the DNS name of the Active Directory.