5.5 Walkthrough: Deploy a Sample Job
One of the main functions of the ZENworks Orchestrator is to run application requests, called jobs, on grid resources. Because the Orchestrator Server is capable of handling multiple application requests, it uses a policy-based broker and scheduler to decide when and how a job should run on the resources. These decisions are based on many controlled factors, including the number of resource nodes, their cost, and a variety of other factors as requested by the application, but managed under policy constraints set up by the administrator or the job developer.
Developing a job involves the creation of an application executable and a job file. See the Novell ZENworks Orchestrator 1.2 Developer Guide and Reference for more information on creating and building jobs using the ZENworks Orchestrator Job Description Language (JDL) and the job policies.
Before a job can run, the ZENworks Orchestrator administrator must deploy it, which involves moving it from a development state to a state where it is ready and available for users. Only the administrator has the necessary rights to deploy a job.
There are three methods you can use to deploy a job:
-
Deploy from the ZENworks Orchestrator Console by right-clicking the container in the Explorer panel.
-
Deploy from the ZENworks Orchestrator Console by selecting the menu in the console.
-
Deploy from the zosadmin command line (zosadmin deploy path_to_job).
For this walkthrough, we will deploy a simple job developed for ZENworks Orchestrator customers to demonstrate how jobs are deployed and run. Although the walkthrough shows only the first method for deploying, the other methods are relatively simple, so no further explanation is provided.
-
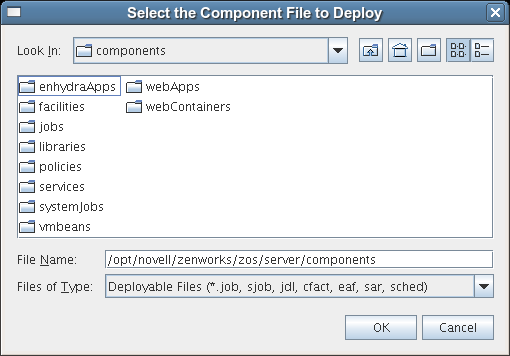
In the Explorer panel of the ZENworks Orchestrator Console, right-click the container, then click to open the Select the Component File to Deploy dialog box.
-
Open the drop-down list, then navigate to the location of the job you want to deploy.
Although a job developer can store Orchestrator jobs at any location on the network, the sample jobs shipped with ZENworks Orchestrator are limited to the directories where the product is installed. For this walkthrough, navigate to the /opt/novell/zenworks/zos/clients/examples directory.
-
Select whoami.job, then click to deploy the job to the container.
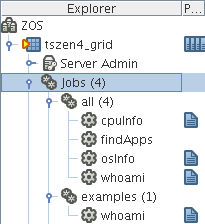
The job appears in the container and in the container in the tree.
When deployed, the job is sent over the wire to the Orchestrator Server with which it is associated. It is persisted there until undeployed.
When the job is available, you need to create a user who can run that job. For more information, see Section 5.6, Walkthrough: Create a User Account