Getting Started with Advance Authentication

1.0 Overview

Advanced Authentication provides multi-factor authentication to protect sensitive data by using a series of authentication methods.

From ZENworks 2020 Update 3 onwards, NetIQ Advanced Authentication can be integrated with ZENworks to provide a more secure way to access ZENworks Control Center. The multi-factor authentication can be configured and enabled for all the administrators in the zone. The settings can be configured for an individual administrator or all the administrators in a group.

By default, ZENworks provides free limited entitlement to Advanced Authentication that supports One Time Password (OTP via Hard or Soft Token), SMS OTP, Email OTP, RADIUS Client, Emergency Password, and LDAP Password methods. However, if required, you can purchase the Full Advanced Authentication from Micro Focus and use all the supported methods.

This document provides a detailed step-by-step procedure to deploy, configure, and use multi-factor authentication.

2.0 Deploying Advanced Authentication Server

The NetIQ Advanced Authentication enables you to go beyond usernames and passwords to authenticate and protect your sensitive data. For more information and key features of Advanced Authentication, see Introduction to Advanced Authentication.

IMPORTANT:ZENworks supports Advanced Authentication 6.3.3 and above versions. Hence, ensure that you deploy Advanced Authentication 6.3.3 and above version to integrate with ZENworks.

3.0 Installing Advanced Authentication

Depending on your requirements, Advanced Authentication can be deployed as a trial or full version. For more information on obtaining the Advanced Authentication, see Obtaining Advanced Authentication.

After obtaining the required version of Advanced Authentication, see the Installing Advanced Authentication for the installing instructions.

NOTE:

  1. Install the latest updates. For more information, see Getting the Latest Online and Offline Updates.

    ZENworks supports Advanced Authentication 6.3.3 and later versions.

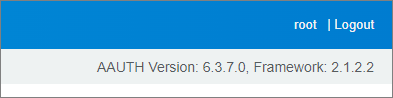
    After upgrading, the Advanced Authentication Appliance Console displays the version number.

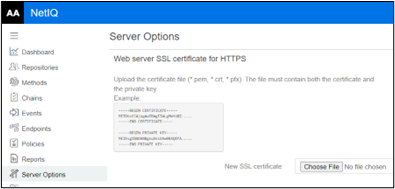
  2. Create and upload the web server certificate. For more information, see Uploading the SSL Certificate.

    Ensure that the web server certificate name that you upload should match the name of the AA server.

4.0 Configuring Advanced Authentication Server

After deploying, ensure that you perform the following steps in the Advanced Authentication Server:

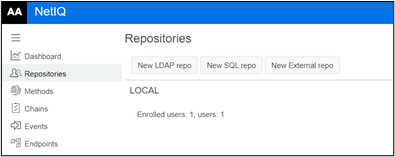
  1. Configure Repository: To configure a repository in Advanced Authentication Server, see Adding Repositories. Configure the LDAP source in which users are located. The LDAP source should be the same user source used in ZENworks.

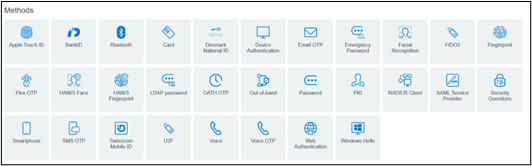
  2. Configure Methods: 2-factor authentication methods should be configured which can be used along with the default password authentication. For more information, see Configuring Methods.

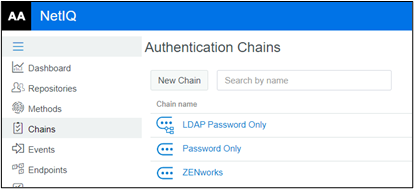
  3. Creating an Authentication Chain: A chain is a series of configured authentication methods, which the user should authenticate. To authenticate successfully, users should pass all the methods configured in the chain. For more information, see Creating a Chain.

  4. Configuring Events: The Advance Authentication capabilities can be enhanced by configuring events. Depending on the application or device, AA triggers authentication events when a user tries to access it. For more information, see Configuring Events.

    For ZENworks, ensure that you select the Event Type as Ouath 2/ Open ID Connect.

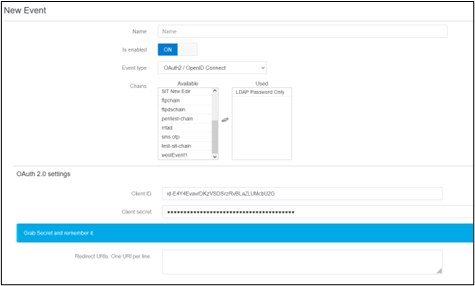
    NOTE:Ensure that you copy Client ID and Client Secret, as it will be used later while Configuring Advanced Authentication in ZENworks.

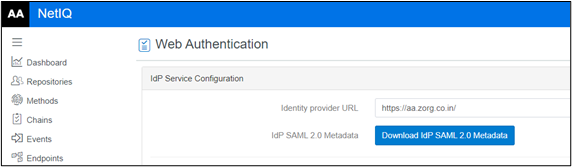
  5. Verify URL in Policies: Ensure that you verify the Identity Provide URL, which is your Advanced Authentication server nameURL in the Web Authentication page. Ensure that Identity Provide URL is your AA server name. Example: https://aa.zorg.co.in/

    For more information, see Web Authentication.

5.0 Configuring Advanced Authentication in ZENworks

After deploying and configuring the Advanced Authentication server, you can proceed to configure or integrate with ZENworks.

5.1 Prerequisites

To configure or integrate Advanced Authentication in ZENworks, ensure that you collect Event Name, Client ID, and Secret while configuring an event in the Advanced Authentication server.

NOTE:Only Super Administrators can configure Advanced Authentication in ZENworks.

5.2 Configuring Advanced Authentication in ZENworks

To configure the AA server, perform the following steps:

  1. In ZCC, click Configuration.

  2. In the Advanced Authentication Server Configuration panel, click New and specify the following:

    • Name: Specify a unique name to identify the Advanced Authentication server.

    • Ensure that the name follows the standard naming conventions.

      For more information, see Naming Conventions.

    • Description: Specify a description for the Advanced Authentication server.

    • Host Name or IP Address: Specify the hostname or IP address of the Advanced Authentication server.

    • Tenant Name: Specify the tenant’s name obtained while configuring the Advanced Authentication server. This is an optional field if the tenant’s name is not specified in the Advanced Authentication server.

      NOTE:In ZCC, only one AA server hostname and event can be added for an Advanced Authentication Server. If required, you can configure different authentication methods such as SMP OTP or Fingerprint, and so on for a set of users, this can be achieved by configuring different chains with different authentication methods for user sources with-in AA server.

  3. In the Certificate page, the certificate of the Advanced Authentication Server that was specified in the Configuration Details page is displayed. Ensure that you verify the certificate, and then click Next.

    NOTE:If the Advanced Authentication Server is using an intermediate CA, then manually import the chain of untrusted certificate to the ZENworks trust store.

    To import the intermediate CA along with the CA into ZENworks:

    1. Export the intermediate CAs and CA certificate from the certificate chain.

    2. Run microfocus-zenworks-configure -c AddExternalCAToTrustStore.

  4. In the Method and Event Settings page, specify the following details of the event that was created in the Advanced Authentication server:

    • Event Name: Specify the event name.

    • Ensure that the name follows the standard naming conventions.

      For more information, see Naming Conventions.

      Currently, ZENworks supports only OAuth2/OpenID connect event type.

    • Client ID: Specify the client ID of the event.

    • Client Secret: Specify the client's secret.

    • Redirect URIs: Displays the list of possible redirect URIs, you can either copy anyone or the complete URIs, and update the Redirect URIs field in the Advanced Authentication portal.These are the URIs through which ZCC can be accessed.

      The list of URIs should be updated at the NetIQ Advanced Authentication Server to complete the configuration.

  5. In the Link User Source page, you can assign the user sources that should be linked with the Advanced Authentication server.

    You can move the user sources available in the List of Available User Sources to the List of Selected User Sources by using >>. You can use << to unlink the user sources from the List of Selected User Sources.

    NOTE:

    • At least one user source should be linked with the Advanced Authentication server and ensure that you link only the user source for which the multi-factor authentication should be enabled.

    • Selecting Local ZENworks Administrator enables ZENworks to look up multi-factor authentication for local administrators. For more information, see Enabling Multi-Factor Authentication for Administrators.

    • Local ZENworks Administrator should be added to the Advanced Authentication local repositories.

  6. Click Finish to complete the configuration.

5.3 Disable or Enabling the Advanced Authentication Server Configuration

To Disable or Enable the Advanced Authentication Server Configuration, select the required items, click Action, and then click Disable or Enable.

Enabling or Disabling the Advanced Authentication Server Configuration for all administrators will enable or disable the multi-factor authentication for all administrators.

5.4 Delete the Advanced Authentication Server Configuration

To delete the Advanced Authentication Server Configuration, select the required items, and then click Delete.
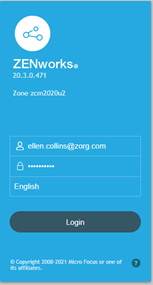
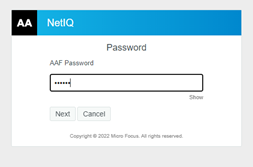
6.0 Enabling Multi-Factor Authentication for Administrators

Multi-factor authentication for ZENworks administrators can be enabled at two levels, one at the administrator group level and another at the individual administrator level.

Ensure that you have the following Administrator rights to modify the Multi-Factor Authentication settings:

  • Modify MFA Setting

  • Modify MFA Setting for Groups

For more information on how to assign the administrator rights, see Assigning Rights in the ZENworks Administrator Accounts and Rights Reference.

By default, the Multi-Factor Authentication will be disabled for all Administrators and the Administrator Group.

For individual administrators, the multi-factor authentication can be inherited, enabled, or disabled.

  • If the setting is inherited, the value of Parent administrator group. If the administrator is not part of any administrator group, then by default the multi-factor authentication is disabled.

  • If the setting is enabled, multi-factor authentication will be enabled irrespective of value of parent administrator group setting. If the administrator is not part of any administrator group, then multi-factor authentication will be enabled.

  • If the setting is disabled, multi-factor authentication will be disabled irrespective of value of the parent administrator group. If the administrator is not part of any administrator group, then multi-factor authentication will be disabled.

NOTE:

  • By default, multi-factor authentication will be disabled for the built-in (default) administrator.

  • Enabling or disabling multi-factor authentication using ZMAN command is not supported.

6.1 Enabling the Multi-Factor Authentication for an Administrator Group

To enable Multi-Factor Authentication by creating an administrator group, perform the following steps:

  1. In ZCC, go to Configuration > Administrators

  2. Click New > Administrator Group.

    Create an Administrator Group by providing the required details.

  3. In the Multi-Factor Authentication field, you can either enable or disable the multi-factor authentication.

  4. Select the required option, and then click OK.

To enable Multi-Factor Authentication for an existing administrator group, perform the following steps:

  1. In ZCC, go to Configuration > Administrators.

  2. Click an existing administrator group.

  3. In General > Multi-Factor Authentication Status, click Edit.

  4. In Edit Multi-Factor Authentication > Change Status, you can either enable or disable the multi-factor authentication.

6.2 Enabling the Multi-Factor Authentication for an Individual Administrator

To enable Multi-Factor Authentication by creating an administrator, perform the following steps:

  1. In ZCC, go to Configuration > Administrators

  2. Click New > Administrator.

    Create an Administrator by providing the required details.

  3. In the Multi-Factor Authentication field, you can either enable, disable, or inherit the multi-factor authentication settings from Zone or Administrator Group.

  4. Select the required option, and then click OK.

To enable Multi-Factor Authentication for an existing administrator, perform the following steps:

  1. In ZCC, go to Configuration > Administrators

  2. Click an existing administrator.

  3. In General > Multi-Factor Authentication Status, click Edit.

  4. In Edit Multi-Factor Authentication > Change Status, you can either enable, disable, or inherit the multi-factor authentication settings from Zone or Administrator Group.

  5. Select the required option, and then click OK.

7.0 Login Flow

After setting up the multi-factor authentication, if multi-factor authentication is enabled, then you will have to go through the following authentication screens to log into ZENworks Control Center:

  1. 1. Log in using your LDAP credentials or local ZENworks credentials.

  2. Depending on the configured authentication method, you will be prompted with the Advanced Authentication login screen.

After successful authentication, ZENworks Control Center will be displayed.

8.0 Troubleshooting

8.1 Internal Server Error is displayed while logging into ZENworks

After configuring Advanced Authentication with ZENworks, Internal Server Error (500 error) might be displayed while logging into ZENworks.

Workaround: After resolving the issue mentioned in the Advanced Authentication Issues section, then ensure that you close the browser or clear cookies and then reopen the login page.

9.0 Advanced Authentication Issues

This section lists all the issues that you might face while configuring or using Advanced Authentication with ZENworks:

9.1 Tenant ID

If you have specified the wrong Tenant ID, then the following errors might be displayed:

  1. 500 Error An unexpected error occurred is displayed while logging into ZENworks.

  2. Unable to complete request at this time error is displayed while logging out of ZENworks.

9.2 Event Name

If you have specified the wrong Event Name, then “500 Error: The AA Server responded with Client Authentication error” might be displayed while logging into ZENworks.

9.3 Client ID

If you have specified the wrong Client ID, then The requested service may have been disabled or not configured properly error might be displayed while logging into ZENworks.

9.4 Client Secret

If you have specified the wrong Client Secret, then “500 Error: The AA Server responded with Client Authentication error” might be displayed while logging into ZENworks.

9.5 Response Code

If you have not specified the response code in the AA Server URL while configuring the AA server, then the following error might be displayed:

  1. Invalid_request

  2. Missing response_type parameter

9.6 Invalid Redirect URL

If you have specified an invalid redirect URL while configuring the AA server, then The service may be disabled if an invalid request was made to an active service error might be displayed.

9.7 The server is Not Accessible

When the AA server is not accessible, then Unable to contact the AA server is displayed.

10.0 Legal Notice

For information about legal notices, trademarks, disclaimers, warranties, export and other use restrictions, U.S. Government rights, patent policy, and FIPS compliance, see https://www.microfocus.com/about/legal/.

© Copyright 2008 - 2023 Open Text

The only warranties for products and services of Open Text and its affiliates and licensors (“Open Text”) are as may be set forth in the express warranty statements accompanying such products and services. Nothing herein should be construed as constituting an additional warranty. Open Text shall not be liable for technical or editorial errors or omissions contained herein. The information contained herein is subject to change without notice.