ZENworks Patch Management Airgap Solution
The Airgap solution for ZENworks Patch Management enables you to deliver patches to networks that are disconnected and isolated from the Internet. These networks are referred to as “airgapped” or “closed” networks.
NOTE:Airgap supports Microsoft Windows patches, not including Microsoft Office 365. Airgap does not currently support patches for Linux distributions or Mac operating systems.
1.0 About the Airgap Solution
The Airgap solution requires two ZENworks Management Zones, one zone in the open (Internet-connected) network and one in the closed network. A Primary Server (OCM) (referred to as the Airgap Collector) in the open zone receives patches by running the Maintenance Schedule (Configuration > Management Zone Settings > Security > Patch Server Configuration). You then transfer the patches via portable media from the Airgap Collector to a Primary Server (referred to as the Airgap Server) in the closed zone. The patch agent installed on device analyzes the device to determine what patches it needs, downloads the patches on-demand through ZENworks content system and then applies the patch based on the established patching schedule. For more information, see Patch Management Overview in the ZENworks Patch Management Reference.

The ZENworks Management Zone in your open network should include managed devices that you want to patch. The patches downloaded by the Airgap Collector are retained in the zone (in addition to being copied to a transfer directory) and can be deployed to managed devices within the open zone.
IMPORTANT:The CVE data cannot be imported from an Open Zone to an Airgapped Zone. Hence, the security dashboard will not be populated with any CVE information.
4.0 Setting Up the Open Zone
The tasks required to configure the ZENworks Management Zone in your open network are described in the following sections.
4.1 Mirroring the Closed Zone’s Managed Devices
When a ZENworks Primary Server downloads patches ondemand, it downloads the patch fingerprints, not the entire patch. A patch fingerprint contains metadata about which operating systems the patch applies to. The Primary Server compares the downloaded patch fingerprints against the operating systems of the zone’s managed devices and displays the applicable patches in the Patches list. You can then select the patches you want to cache to the Primary Server for distribution to your managed devices.
If possible, we recommend that you register devices in your open zone that mirror the operating systems of the closed zone’s managed devices. This limits the Patches list to only those patches that are applicable for your closed zone’s devices.
If you choose to mirror your closed zone’s devices in your open zone, consider the following guidelines:
-
In your closed zone, log in to ZENworks Control Center and review the Devices list. The list displays the operating system for each registered device.
-
In your open zone, register devices that have the same operating systems as the ones displayed in your closed zone’s Devices list.
-
Registering a device in your open zone adds the device object to the zone. The device object is what is needed to automatically filter the Patches list to show applicable patches only.
4.2 Enabling the Airgap Collector
You can enable the Airgap Collector zone by adding a AIRGAP_COLLECTOR=true system variable to your ZENworks zone.
NOTE:Add the system variable only if you configuring the Airgap zone for the first time.
-
Log in to ZENworks Control Center for the zone in your open network.
-
Click > (in the panel) > to display the System Variables list.

-
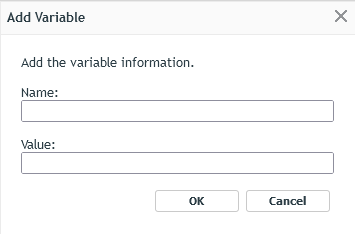
Click to display the Add Variable dialog box.
-
Fill in the following fields:
Name: AIRGAP_COLLECTOR
Value: true
-
Click to add the variable to the list.

-
Click to save the list.
-
Go to > .
-
In the Server Hierarchy panel, select an Ondemand Content Master (indicated by
 ), click , and then select the option.
NOTE:The will be disabled if you select a Primary Server with an older ZENworks version (ZENworks 2020 Update 3 or earlier).
The Airgap Collector Ondemand Content Master is indicated by
 .
. -
Optionally, you can set a schedule when the Airgap Ondemand Content Master should export patch data to the Airgap folder.
For more information, see Export Schedule for Patch Content.
5.0 Setting Up the Closed Zone
In your closed network, you need to configure the ZENworks Management Zone to enable the Primary Server to act as an Airgap Server. When you transfer downloaded patches from your open network to the closed network, the Airgap Server pulls them into the ZENworks Management Zone as if it had downloaded ondemand. You then deliver the patches using the standard ZENworks Patch Management methods.
-
Log in to ZENworks Control Center for the zone in your closed network.
-
Enable the Airgap Server by adding several system variables:
-
Click > (in the panel) > to display the System Variables list.
-
Click to display the Add Variable dialog box.
-
Fill in the following fields:
Name: AIRGAP_SERVER
Value: true
-
Click to save the list.
NOTE:Add the system variable only if you are configuring the zone for the first time.
-
-
In ZCC, go to Configuration > Server Hierarchy.
-
In the Server Hierarchy panel, select an Ondemand Content Master (indicated by
), click , and then select the option.
NOTE:The will be disabled if you select a Primary Server with older an ZENworks version (ZENworks 2020 Update 3 or earlier).
The Airgap Ondemand Content Master is indicated by
. -
Optionally, you can set a schedule when the Airgap Ondemand Content Master should import patch data from the Airgap folder.
For more information, see Import Schedule for Patch Content.
5.1 Important Point to Remember
-
In a zone, both AIRGAP_SERVER and AIRGAP_COLLECTOR system variables should not be set to true. In such conditions, you might not get the expected results.
7.0 Airgap Content Schedule
In the Airgap Content Schedule page, you can set a schedule for when the Airgap Ondemand Content Master should import/export patch data from the Airgap folder.
Based on the System Variable (AIRGAP_COLLECTOR or AIRGAP_SERVER) that you have set in your zone, Export Schedule for Patch Content or Import Schedule for Patch Content is displayed.
7.1 Export Schedule for Patch Content
In the Export Schedule for Patch Content panel, you can set a schedule for when the Airgap Ondemand Content Master should export patch data to the Airgap folder.

-
In ZCC, click Configuration > Security (Management Zone Settings) > Airgap Content Schedule.
-
The export interval can be set to Hourly or Daily.
-
If the export interval is set Hourly, then you need to select an interval (H) after which the export should be initiated.
-
If the export interval is set Daily (24 Hour Time Format - Hours: Minutes), then select the time at which the export will be initiated. By default, the export schedule is set at 2:00 A.M.
If required, you can click Run Export Now to initiate the export immediately.
-
In this page, you can also view the last export status.
-
Last Export Successfully Run at: Displays the date and time when the last export was successful.
-
Export Status: Displays the status of the export.
7.2 Import Schedule for Patch Content
In the Import Schedule for Patch Content panel, you can set a schedule for when the Airgap Ondemand Content Master should import patch data from the Airgap folder.

-
In ZCC, click Configuration > Security (Management Zone Settings) > Airgap Content Schedule.
-
The import interval can be set to Hourly or Daily.
-
If the import interval is set Hourly, then by default the import will be initiated every 2 hours. If required, the import schedule (H) can be modified.
-
If the import interval is set Daily, then you need to select a time (24 Hour Time Format - Hours: Minutes) when the import should be initiated.
If required, you can click Run Import Now to initiate the export immediately.
-
In this page, you can also view the last export status.
-
Last Import Successfully Run at: Displays the date and time when the last import was successful.
-
Import Status: Displays the status of the import.
NOTE:If the Airgap status (import/export) is partial success or failure, then a link is displayed. Click the link to view the reason.
Partial Success: The status is partial only if a few files are copied.
Failure: The status is failure when none of the files are copied.