2.1 Adding User Sources
After you define a user source, the ZENworks Agent automatically prompts device users to log in to the ZENworks Management Zone. If you do not want users to receive this prompt, you can uninstall or disable the User Management module at the ZENworks Agent level. For more information, see Configuring ZENworks Agent Settings after Deployment
in the ZENworks Agent Reference.
-
In ZENworks Control Center, click the tab.

-
In the User Sources panel, click to launch the Create New User Source Wizard.

-
In the Create New User Source page, select the required user source type.
Following are the available options:
-
LDAP Directory (Active Directory or eDirectory): If you have selected this option, then refer to the following table:
Wizard Page
Details
Connection Information page
Specify the information required to create a connection to the LDAP directory:
-
Connection Name: Specify a descriptive name for the connection to the LDAP directory.
-
Address: Specify the IP address or DNS hostname of the server where the LDAP directory resides.
-
Use SSL: This option is applicable for a user source and is displayed only if you are creating a new user source. However, this option is not displayed if you are adding a new connection for an existing user source. By default, this option is enabled. Disable the option if the LDAP server is not using the SSL (Secure Socket Layer) protocol.
NOTE:If the Active Directory servers have the LDAP channel bind fixes from Microsoft, then ZENworks user authentication will break for all the LDAP Servers for which SSL is not enabled. For more information, see User Authentication fails when LDAP is not configured with SSL
-
Port: This field defaults to the standard SSL port (636) or non-SSL port (389) depending on whether the option is enabled or disabled. If your LDAP server is listening on a different port, select that port number.
-
Root LDAP Context: Displays the root context for the LDAP directory. This option is available only when you are creating a new user source. The root context establishes the point in the directory where you can begin to browse for user containers. Specifying a root context can enable you to browse less of the directory, but it is optional. If you don’t specify a root context, the directory’s root container becomes the entry point.
-
Ignore Dynamic Groups in eDirectory: This option allows you to select whether or not to display the dynamic groups in a Users page. If you choose to select , then users cannot assign a policy or a bundle to a dynamic user group and the dynamic group membership will not be computed while calculating the effective assignments for any user.
Certificate Page
(Conditional) If you selected Use SSL on the previous Wizard page (Connection Information), the Certificate page displays as the next. step in the Wizard. Ensure that the Certificate is correct.
Credentials page
Specify a username and password for accessing the directory:
-
Username: Specify the username for a user that has read-only access to the directory. The user can have more than read-only access, but read-only access is all that is required and recommended.
For eDirectory access, use standard LDAP notation. For example:
cn=admin_read_only,ou=users,o=mycompany
For Microsoft Active Directory, use standard domain notation. For example:
AdminReadOnly@mycompany.com
For DSfW, use standard LDAP notation. For example:
cn=admin_read_only,ou=users,dc=mycompany, dc=com
-
Password: Specify the password for the user you specified in the field.
NOTE:Ensure that the password does not contain the special characters ~ and \.
Authentication Mechanisms page
Select the mechanism used to authenticate users to the ZENworks Management Zone. The available mechanisms depend on whether you are configuring a Novell eDirectory or a Microsoft Active Directory user source.
-
Kerberos: Active Directory or Domain Services for Windows (DSfW). Enables Kerberos authentication in which the Active Directory server generates a Kerberos ticket that Novell Common Authentication Services Adapter (CASA) uses to authenticate the user, instead of using a username and password. Kerberos authentication is often used with smart cards.
-
Username/Password: eDirectory, Active Directory, or Domain Services for Windows (DSfW). Enables simple authentication using a username and password.
-
Shared Secret: eDirectory only. Enables a user to automatically log in to ZENworks when a smart card is used to log in to eDirectory. This option is enabled only if the schema of the eDirectory specified in the is extended using the microfocus-zenworks-configure tool.If is not selected as an authentication mechanism, a ZENworks login dialog box is displayed when the user on the managed device attempts to log in to eDirectory using a smart card. After the user specifies the eDirectory username and password, that password is stored in Novell SecretStore. The next time the user uses a smart card to log in to eDirectory, the password is retrieved from SecretStore and the user is logged in to the ZENworks without having to specify the password.
If you select both available mechanisms ( and for Active Directory or and for eDirectory), ZENworks Configuration Management attempts to use the first mechanism for authentication. If authentication fails, the next mechanism is used. For example, if you select and for Active Directory, ZENworks Configuration Management first attempts to use Kerberos authentication. If Kerberos authentication fails, simple Username/Password authentication is used.
User Containers page
After you connect to an LDAP directory as a user source, you can define the containers within the directory that you want exposed. The number of user containers you define is determined by how much of the directory you want to expose. Consider the following example:
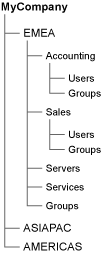
Assume that you want to enable all users in the Accounting and Sales containers to receive ZENworks content. In addition, you want to be able to access the user groups located in the Accounting, Sales, and Groups containers in order to distribute content based on those groups. To gain access to the users and groups, you have two options:
-
You can add MyCompany/EMEA as a user container, so all containers located below EMEA are visible in ZENworks Control Center, including the Servers and Services containers. Only users and user groups located in the EMEA containers are visible (servers and services are not), but the structure is still exposed.
-
You can add MyCompany/EMEA/Accounting as one user container, MyCompany/EMEA/Sales as a second container, and MyCompany/EMEA/Groups as a third container. Only these containers become visible as folders beneath the MyCompany directory reference in ZENworks Control Center.
To add the containers where users reside:
-
Click to display the Add User Container dialog box.
-
In the field, click
 to browse for and select the desired container.
 -
In the field, specify the name you want used for the user container when it is displayed in ZENworks Control Center.
-
Click to add the container to the list.
-
-
Azure Active Directory: If you have selected this option, then perform the following steps:
-
In the Select Azure Application page, select the Azure application that was created earlier. Ensure that the application you are selecting is not used by another user source.
After selecting the Azure application, Tenant ID and Tenant Name fields will be displayed.
By default, tenant name will be populated as the User Source Name. If required, you can edit the user source name.
NOTE:The drop-down displays only the applications for which User Source Application was selected while configuring the application.
-
In the Summary page, following details are displayed. Review the details. To make any modifications, click Back. Click Finish to add the new user source.
-
Azure AD Application
-
Tenant Name
-
Tenant ID
-
-
-