1.16 Underpinning Contracts
Underpinning Contracts (UCs) are used to manage support services provided to the Service Desk by external service providers. These Contracts ensure the external parties maintain their service obligations to the Service Desk, which ensures the Service Desk meets the SLA expectations of its Customers.
To successfully meet SLA expectations, the system allows the Service Desk to associate each Workflow State of a request with an Operational Level Agreement (OLA) or Underpinning Contract. It should be noted that SLA targets for Response, Restoration and Resolution time must be greater than or equal to the combined OLA and UC times for each of these targets, to ensure that service level breaches do not occur.
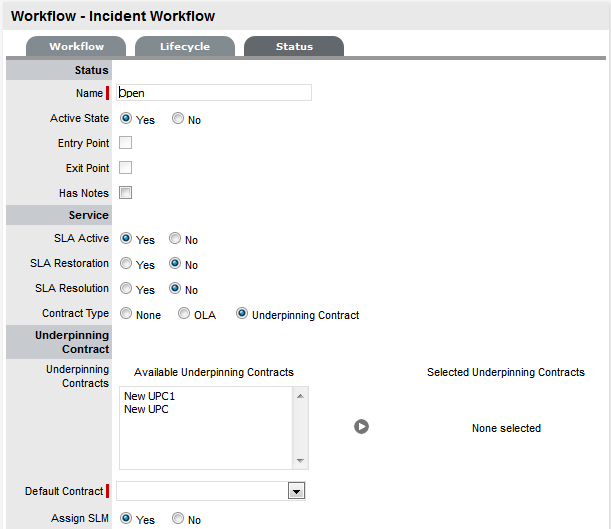
When a request moves into a State that is governed by an Underpinning Contract, for internal contract monitoring, the request can be assigned to a Service Level Manager. This allows the Manager to maintain control of the request and to easily follow up with the external service provider, if required.
1.16.1 Details Tab
Creating an Underpinning Contract:
To create an Underpinning Contract for use within a Workflow State:
-
Select Service>Underpinning Contracts
-
Click New
-
Enter the Contract Name
-
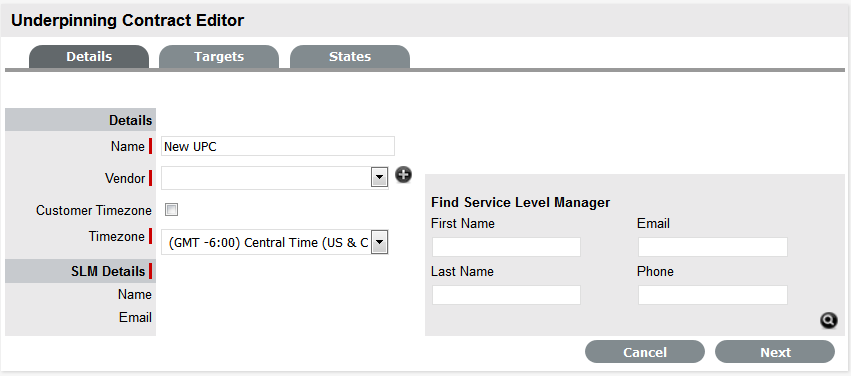
UPC Editor
Details
Name*
The name to identify the UC.
Vendor
The name of the service provider supporting the contract. Select from the list or create a new Vendor.
Review Date
Details are completed based on the Admin default settings but can be edited by the User. An Alert is sent based on the default days set in the Review SLA Alert field in Admin>Setup>Privileges>Requests.
Customer Timezone
When enabled, UPC times displayed within the Technician request view using the Customer timezone.
Timezone
This is visible when Customer Timezone is not set and all UPC dates are calculated based on the Timezone set within this field. This is especially applicable for User Work Hours, Blackouts, which also impacts the UPC Reports.
SLM (Service Level Manager)
Name
Email
Use the Find Service Level Manager search option, to enter the contact details of the Manager who will monitor the service provider's ability to meet their contractual obligations .
-
Select a Vendor from the drop-down list or click
 to enter new vendor details
 -
Adjust the Review Date, if necessary
(A reminder Alert will be sent to the SLM based on the default days set in Admin>Setup>Privileges>Requests.)
-
Tick the Customer Timezone option, if relevant
Apply this option if the User is to view UC due dates using the Customer Timezone or define the UC Timezone.
-
Search and Select a Service Level Manager using the Find Service Level Manager field
-
Move to the Targets tab
-
Complete the following information:
-
SLA Editor
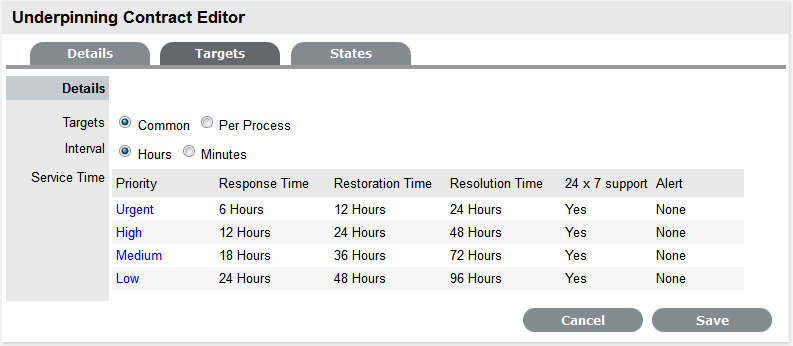
Targets
Targets
Common: Select Common if the UC is to apply across Incidents, Requests, Problems and Change Management.
Per Process: If the UC is specific to a Process, select Per Process and choose a Process displayed in the drop-down list.
Interval
Define if the time is to be calculated in Hours or Minutes.
Service Time
Priority
Urgent, High, Medium and Low
Milestones
Initial Response
The maximum time the Customer would wait from the point of request creation before receiving a Note update for a Technician. The Response trigger is stopped when a Note has been added to the request by the assigned Technician and an email is sent to the Customer. If the Response Time is reached, without a Note being added, the request will be escalated.
Restoration Time
The maximum time the Customer would wait from the time the request was created until a workaround or temporary fix has been implemented. The Restoration trigger stops by assigning the request a Workflow State that has to the UC Restoration option set to Yes. By default, this Workflow State is Open - Restored.
Resolution Time
The taken time from the point of request creation until it the request is moved to a Workflow State with the UC Resolution option set to Yes. Any of the default Workflow Exit States stop the Resolution Timer.
Notify Override
If the system is to override the default notification method set for a request when the Priority being edited is assigned to a request, check this option.
Notification Type
Set Email or SMS as the type of notification when the override action is applied to a Priority.
Alerts
Reminder
Sends a reminder email to the Technician when the defined percentage of time elapses for a Response, Restoration or Resolution target that has not been met on a request. Can be set up to 200% of the UC. Note, Alert intervals are not cumulative.
Warning
Sends a warning email to the Technician when the defined percentage of time elapses for a Response, Restoration or Resolution target that has not been met on a request. Can be set up to 200% of the UC.
Escalation
Escalates the request to a higher escalation layer when the defined percentage of time elapses for a Response, Restoration or Resolution target that has not been met on a request. Can be set up to 200% of the UC. It should be noted that the Service Level Manager is also notified when an OLA is breached.
Support
24 x 7
Do not amend if the UC is to apply 24 hours a day, 7 days a week.
Normal Support
Select if service hours are to be defined for the UC. When checked, define the service hours by either selecting a template (Templates are configured by the Administrator in the Setup>Localization>Hours tab) or manually define the days and time by making selections within the drop-down lists.
-
Add one or multiple Warning Alerts, if required.
Enter the percentage of time to elapse for each interval, which will trigger a Warning to be sent via email to the Service Level Manager when the specified percentage is reached.
NOTE:Trigger intervals are not cumulative
For example, the Urgent default times of 6, 12 and 24, mean 6 hours for the Response stage, 12 hours for Restoration from initial creation, and 24 hours to reach the Resolution from initial service request creation.
-
Define the support hours
Within the Targets tab of the Underpinning Contracts Editor screen the default support hours are set to 24x7.
For 24 X 7, if the UC's urgent Initial Response field is set to six hours, and an urgent request that uses the UC is created at midnight in the assigned Technician's time zone, those six hours will expire by 6:00 AM. This is the option to use if your support is staffed 24 hours a day. Normal support ensures request timers do not run when Technicians are not available. For instance, if the support hours are 9:00 AM to 5:00 PM and the SLAs are as such, the urgent requests' timer would not start ticking until 9:00 AM the following business day and would expire at 3:00 PM.
-
Click Save
-
Click Done.