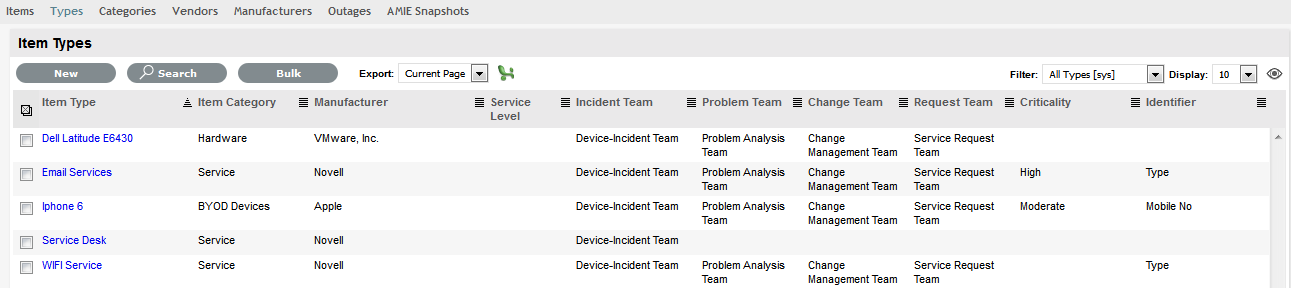
1.37 Item Types
Item Types are templates used to create Items. Items are specific instances of Item Types with individual asset detail information.
In this section, Item Types and their manufacturers can be created and edited. The Item Types default support Team is assigned here, as well as Criticality, service level and other default information.
For Item Types that use a Category with the Service Category functionality enabled, a Costs tab is also displayed that allows a User with the Finance Role to forecast the costs for offering the Service Item that applies the Item Type.
1.37.1 Create a New Item Type
To enter a new Item Type:
-
Select Configuration>Types
-
Click New
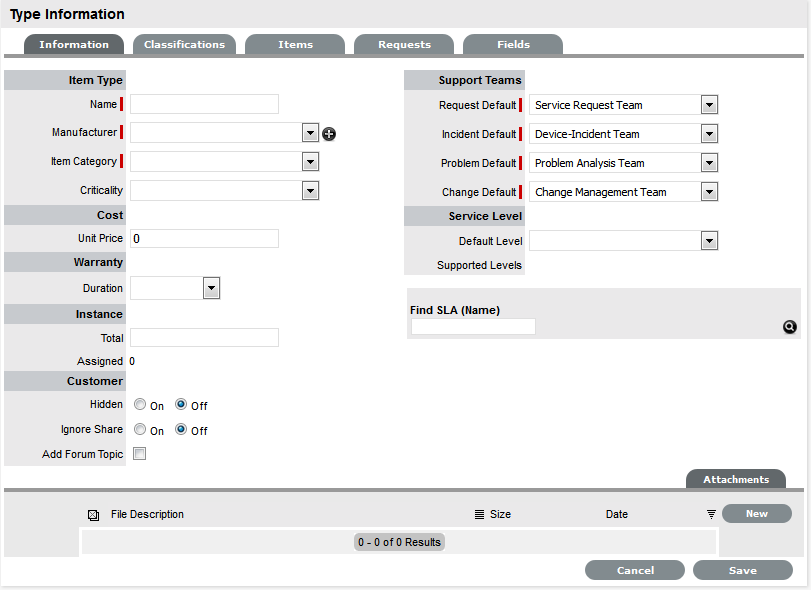
The Type Information screen appears.
-
Enter the Name of the Item Type
-
Enter a Manufacturer using the drop-down list
Or, select
 to add a Manufacturer. The Manufacturer screen appears. See: Create a Manufacturer
 -
Type Information
Name
Name of the Item Type.
Manufacturer
The manufacturer of the Item Type. New manufacturers can be created and existing manufacturers can be edited and deleted by using the Edit and New buttons that appear beside the drop-down menu of manufacturers.
-
Using the drop-down list, select the relevant Item Category
-
Select the Criticality for the Item Type
-
Item Type
Item Category
This signifies the type of Item. (Hardware, Software or Service are the default Types, but Users with the Supervisor Role can create more if required).
Identifier
The drop-down list that appears is drawn from the fields defined for the Item Category selected. Although this information is not required, the Identifier is used to differentiate similar Items that may be in use throughout an organization. For example, if an organization uses the same printers for all departments, an Item Category field of "Location" could be configured for the Item Details and this could also be used as a secondary Identifier for Printer Item.
Criticality
Rates the degree of importance of an Item Type within an organization, which can be adjusted on a per Item basis. The 'Impact' of a Request is initially pulled from the Criticality of the Item, but can be adjusted within the request Information screen if required. Requests logged through the Customer Portal, use the Criticality of the Item to set the Priority of the request.
The Incident Analyzer, if enabled by the Administrator in Setup>CMS>Incident Analyzer, can apply the Criticality to automatically detect Problems.
The minimum Criticality level can also be used to determine the off-line Items that appear on Outages pages, if the Outages pages are enabled by the Administrator in Setup>Privileges>System.
Icon
When the Type details are saved, the Icon selected for the Item Category will be displayed. To customize the icon for the specific Item Type, select the Icon to access the Upload
 or Cancel
  options. The icon must be 128 x 128 pixels.
Unit Price
The per-unit price of the Item Type.
Instance Total
Number of instances owned by the organization.
Assigned
Number of instances assigned to Customers as Items.
Hidden
Select 'On' to ensure Customers cannot view this Item Type within the list in the Customer Portal. If all Item Types use this selection, the Item Type list will be completely removed from the Portal.
Items created using Item Types with Hidden enabled, will not allow Customers to generate requests against them in the Customer Portal, nor will they be able to view or receive updates about requests logged by the User against Items with this functionality enabled.
Creation
Enabling this option gives Customers using the portal the ability to create new Items using this Item Type (if they have been granted the ability to create Items by the Administrator in Setup>Privileges>Customer>Create Item. (This option is not displayed when the Hidden option is enabled.)
Ignore Share
Enabling this option overrides the system level option for sharing requests raised against Items of this Type. Requests raised against Items of this Type will not appear in the customer portal when viewing shared requests is enabled.
Add Forum Topic
Create a forum topic using the Item Type Name. This option is only displayed when a new Type is being created.
Incident Default
The Team of Technicians assigned to support Incidents received related to the Item Type. See: Teams
Problem Default
The Team of Technicians assigned to support Problems received related to the Item Type. See: Teams
Change Default
The Team of Technicians assigned to support Change Requests received related to the Item Type. See: Teams
Request Default
The Team of Technicians assigned to support Service Requests received related to the Item Type. See: Teams
Service Level Default
The default service level for the Item Type. When Billing is enabled, service levels without a cost are listed as an option. The service level with an associated cost can be applied when the Item created, this ensures Item contract payment is processed.
Support Levels
All Service Level Agreements assigned to the Item Type, which will be displayed as options when a request is created applying Item that uses this Type template. SLAs listed here, are used within the Costs tab of Service Types to forecast break even points on the Service relative to the number of Users.
Find SLA (Name)
To assign multiple SLAs use this option. Click
 to view all SLAs or refine the search by entering a specific name. Select the SLA hyperlink to assign the SLA to the Type Information. Click to clear the search field.
 -
Enter the Unit Price for the Item Type. This is an optional field that is used for asset management
See Finance Role.
-
Set the Customer options
-
Assign the default support Teams
-
Assign one or multiple SLAs, as required
-
Click Save
The Type Screen moves out of Edit mode.
-
Click the icon if the generic Item Category icon image is to be changed for the Item Type
This icon is used as the visual representation of the Item Type in the Relationship Map.

-
NOTE:The dimensions of the uploaded icon must be exactly 128 x 128 pixels
-
Move to the Classification tab to create classifications for issues related to Item of this Item Type.
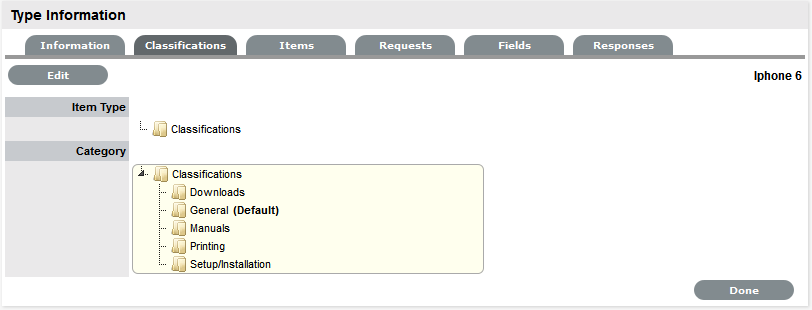
1.37.3 Classification
Category Classifications are used as generic problem classification for sorting requests. These are refined within the Item Type Classification to make them more relevant to the actual Item Type. For example, the Item Type category Hardware needs the Category Classification to be refined differently for hardware Item Types such as desktops and servers. To refine the problem types, Item Type Classifications are used.
Editing an Item Type Classification listing
To edit the Item Type Classification entry:
-
Within the Item Type>Classification tab
-
Select Edit
A New button is displayed within the Item Type Classification section.
-
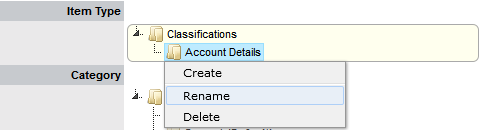
Right-click on the Classifications link
The Create option is displayed.
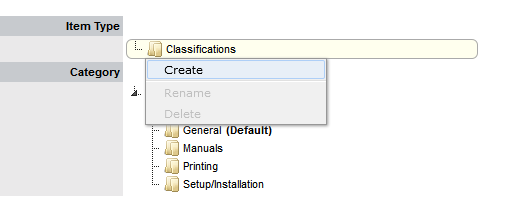
-
Select Create
A New node field is displayed in Edit mode.
-
Complete the details of the new list entry

-
Click outside the text field to save the entry
-
To re-name an entry, highlight the field
-
Select the Rename option
The field opens in edit mode
-
Change the details
-
Click outside the text field to save the changes
-
Repeat the above process to create all required list entries
-
Move existing Classifications to a new position, if required
Highlight the entry, then drag and drop the entry into its new location.
-
Click Save.
Creating Sub-Classifications
Classifications can be expanded to include sub-categories.
To create sub-classifications:
-
Select the relevant Classification header
The Classification header is highlighted.

-
Right-click the Classification Entry
The Create, Rename and Delete options are displayed
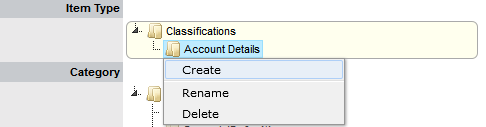
-
Click Create
-
Complete the details of the new node

-
Click away from the text field to save the change
-
The above steps can be repeated until the Sub-Classification list is completed.
To move an existing entry to a new position, select the entry, then drag and drop the entry into its new location
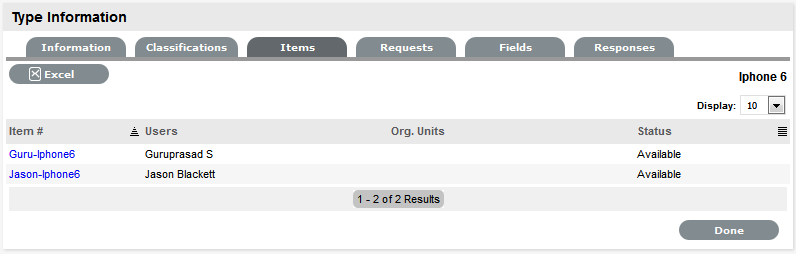
1.37.4 Items
The Items tab lists the Items created using this Item Type. Individual Item details can be viewed by clicking on an Item Number. The list of Items can be exported using the Excel button.
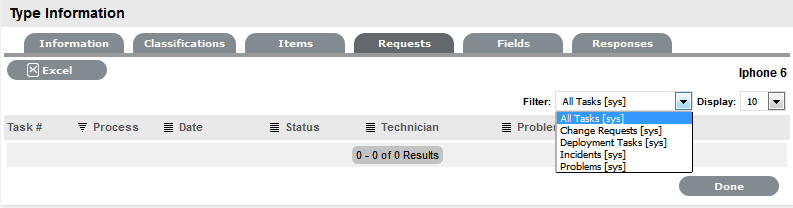
1.37.5 Requests
The Requests tab lists all requests that have been created for this Item Type.
Use the Filter to switch between Incident, Problem, Change and Service Requests views. Requests can be viewed from this screen by clicking on the Task# or Problem Report hyperlink. The list of Requests can be exported using the Excel button.
1.37.6 Costs
NOTE:This is only visible to Users with the Finance Role.
The Costs tab is only available within the Service Type Information screens and allows organizations to calculate the Break-Even Point (BEP) of a service based on forecasting the number of Customers of that Service. This allows the service organization to account for the per calendar month price of the Service, which is used to calculate the ongoing revenue figures within the Item Costs tab that uses the Service Type template.

|
Forecast Costs |
|
|---|---|
|
Capital |
Enter the sum total to be invested in hardware and software infrastructure that will underpin the Service. |
|
Recovery |
Complete the field with the expected number of years designated to recover the costs of implementing the Service. |
|
Recurring |
Enter the proposed ongoing cost, on a per calendar month basis, for offering the Service. |
|
Services |
Using the details entered in the Costs fields and the cost per annum of the SLA, enter the forecast number of Customers/Users to calculate the break even point (B.E.P) of the Service. Using the auto-calculated B.E.P., enter a per calendar month Price for the Service to recover costs. This figure is used in the Service Item Costs tab to calculate the ongoing Revenue figures. NOTE:If an SLA with an Internal Cost is assigned to the Type, the B.E.P will be the SLA cost divided by 12 plus the cost of recovering the Capital expenditure over the number of years defined for the Capital to be recovered. For example, where the SLA cost is $240 for the year, the B.E.P will never be less than $20 per month. |
|
Actual Costs |
|
|
Capital |
Content for this field is derived from the Cost field within then Costs tab of the Item created using this Type. |
|
Recurring |
Content for this field is derived from the Monthly Cost field within the Costs tab of the Item created using this Type. |
1.37.7 Fields
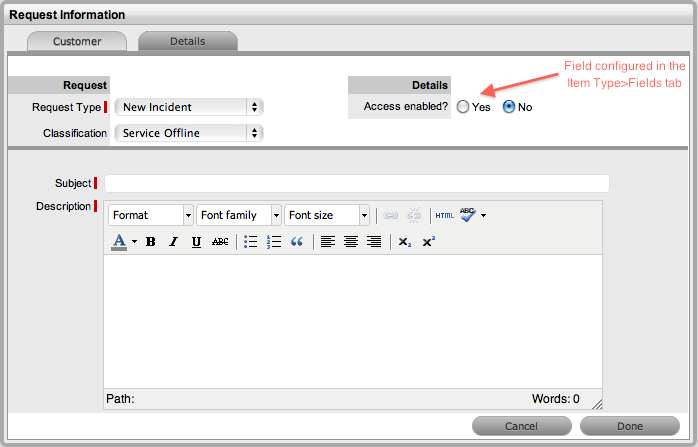
Within the system, service organizations can refine custom fields made available during the request creation process based on the Item assigned to the request. In the Fields tab a User can create custom fields that apply to the Item Type. Therefore, when a request is logged against an Item that uses an Item Type with custom fields configured within the Fields tab, the Fields are made available within the Details tab of the request creation process.
These fields are in addition to the fields created by the Administrator within the Admin>Setup>Custom Fields, which are created for the specific Process, such as Incident, Problem, Change and Service Requests.
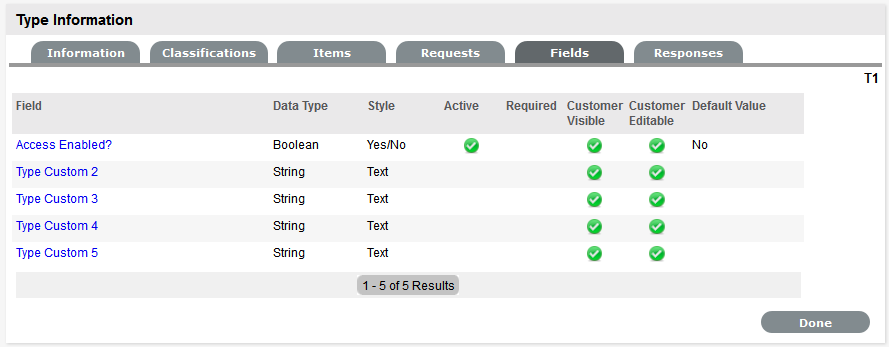
To create Field labels within the Type Information screen:
-
Click the Fields tab
-
Click Edit
-
Select a Field hyperlink
The Custom Field screen is displayed
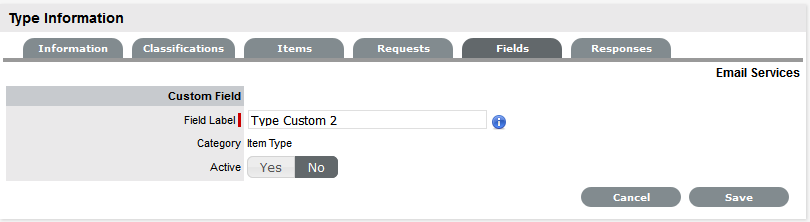
-
Click Yes to activate the Field
-
Complete the following details:
-
Categories Fields
Description
Category
Field Label
The name of the field.
Active
Indicates if the field is active.
Required
Indicates if the field is required or mandatory field.
Customer Visible
Defines if the Customer can see the field within the
Customer Portal.
If Yes is selected, define if the Customer can edit the field information on the Customer Portal.
Data Type
Dictates the field's Data Type. The options available include :
-
String - List or Free Text
-
Number
-
Boolean - radio buttons for Yes/No and True/False
-
Date - creates a date field
-
Currency- creates a currency field
-
Hyperlink.
Style
States the style of the field.
eg. String- List or Free Text field. SeeLists for more information on creating a list field type.
Unique Value
When active, the system prevents the duplication of data within the customized field.
Default Value
Value entered is the default system entry for the field, when the field is not completed manually.
Input Validation
When enabled the Input Mask and User Mask can be defined.
Input Mask : A regular expression to use for data validation of values entered by a User (i.e., Zip/Post Code, telephone no.)
User Mask: A User Friendly representation of the Input Mask that Customers can understand should it appear in a validation error message.
Enable Description
When enabled a Description field appears, allowing the User to enter details of what information is the field is expected to capture. These details are accessible next to the custom field on the relevant screen.
-
-
Click Save.
The active Field will now be available during the request creation process, for all Items that use the Item Type.
1.37.8 Responses
The Responses tab within an Item Type displays the templates configured within the Item Category>Response tab, which can be used as content for Notes sent for requests received against the Item Category. In addition to saving time for customer responses that are sent on a regular basis, these ensure the service desk responds to issues in a consistent manner, in line with the support organization's policies and protocol. Within the Types>Responses tab, additional Note templates can be configured, that will only be available for requests logged against that Item Type.
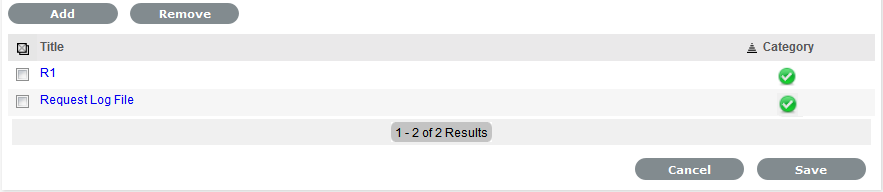
The following screen displays a list of default template options available within the Notes tab of a request:

Adding a Template for Item Types
To add a Note template:
-
Go to the Responses tab
-
Click Edit
-
Click Add
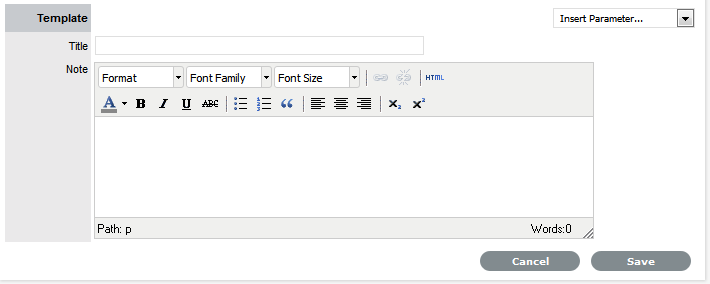
-
Enter the Template Title
-
Complete the content for the Note, inserting any relevant parameters
-
Click Save.
Removing a Template
Within the Types>Response tab, only templates created for the Item Type can be deleted. Templates created at the Category level must be deleted within the Category>Responses tab.
To delete a template within an Item Type:
-
Go to the Responses tab
-
Click Edit
-
Check the box in the column next to the template Title
-
Click

-
Click Save.