Actions
The following are the actions that can be performed in the Knowledge Base list page:

|
Actions |
Description |
|---|---|
|
Managing Columns |
The columns displayed in the Knowledge Base page can be rearranged, reordered and resized.
|
|
Row Actions |
Each row in the Knowledge Base has its own set of actions. To view the actions, Click the kebab menu icon (vertical three dots). Following are some of the actions displayed:
|
|
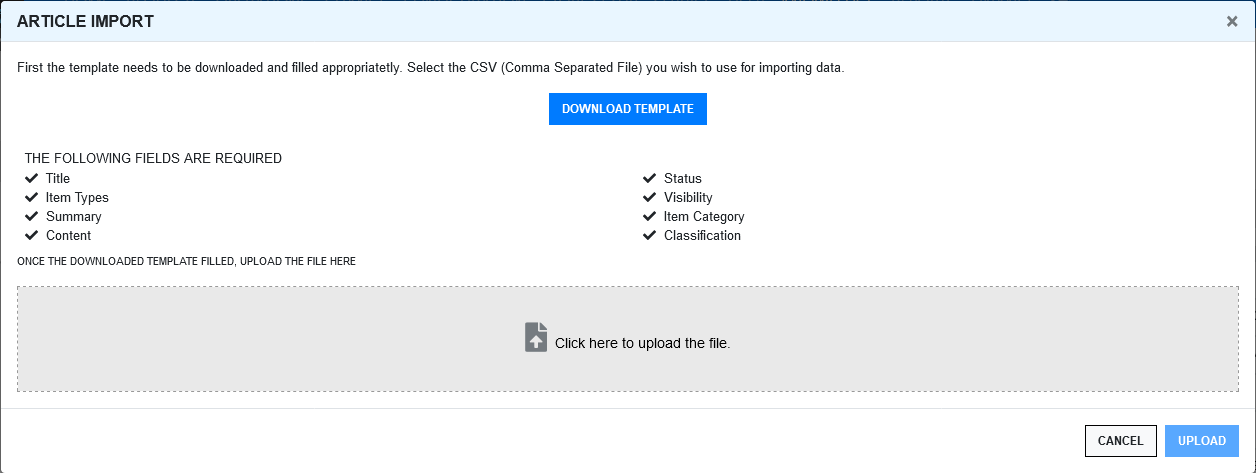
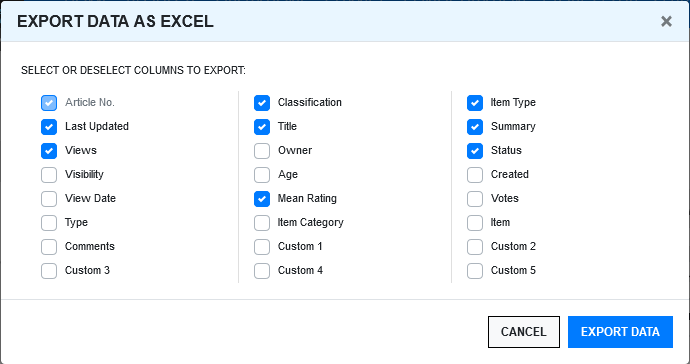
Import or Export Data |
Import or Export actions have different set of actions.
|
|
Bulk Operations |
Following are some of the bulk operations that can be performed on Knowledge Base. Select one or more than one Knowledge Base, and then perform any of the following action:
|
 icon, and then select the required field that should be displayed.
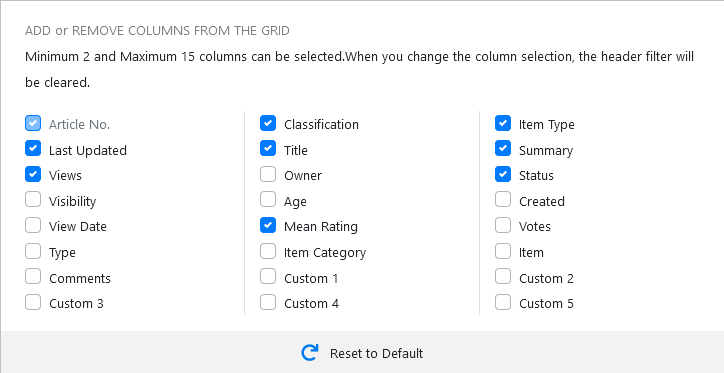
Knowledge Base Search and Filter
To search and filter the Knowledge Base, refer to the following sections:
Full Text Search
To search the Knowledge Base, specify the required keyword and hit enter. If you had applied any filter or performed any header level search, then the results will be cleared. If you want to retain the existing applied filter criteria and want to search withing the filtered results then ensure that you select the Search within Filtered Results check-box.
For more information, see Full Text Search.
Column Header Level Search
Use the column header level search to search the data within the column to narrow down the result. This option is available for many columns.

Knowledge Base Filter
On the left-hand side of the Request page, the Filters panel is displayed. Using the options available in this panel, you can filter the unrelated data so that only the required data is displayed in the grid.

General Filters
This section of the filter includes the following options:
My Content: Select this check-box if you want to filter only the content that you (logged-in user) had created
Article Number: In this field, specify the KBA number.
Article Type: In this field, select the type of the KBA. The available options are Article, FAQs, Solution and Workaround.
Owner:In this field, specify the name of the KBA owner.
Status: In this field, select the status of the KBA.
Visibility: In this field, select the visibility of the KBA.
ITEM Filter
Item Category: In this field, select the category to which the KBA belongs.
Item Type/Item Number: In this field, specify the item number.
Date
Created Date: In this field, select a date range when the KBA was created.
Last Updated: In this field, select a date range when the KBA was last updated.
Last Review: In this field, select a date range when the KBA was last reviewed.
View Date: In this field, select a date range when the KBA was last viewed.
Following are some of the actions that can be performed in this Filters panel:
Apply Filters: After making the required modifications to the filter panel, click Apply to view the results.
Reset Filter: To reset the data displayed in the grid and clear the filter fields, click the
 icon.
icon.Save Filter: After modifying the filters, if required, you can save the filter for future use. To save the filter, click the Save Filter button.
Load Saved Filters: To load or apply the saved filters, click the filter list panel, and then select the required filter.
Share Filter: To share the filter, click the share icon, and then select the required option in the displayed pop-up.

The available options are:
No: Select this option to stop sharing the filters that was shared earlier.
With Role: Select this option to share the filter with those who have same roles.
With Team: Select this option to share the filter with your team.
Delete Filter: Click the Delete button to delete the filter.
Note: Only the custom filters can be shared and deleted.
